| Bookshelf Home | Contents | Index | Search | PDF | |
Siebel Assignment Manager Administration Guide > Assignment Manager Configuration > Creating Workflow Policy Components >
Example of Creating a Workflow Policy Component
This section explains how to create a workflow policy component based on a specific scenario of creating an assignment rule that assigns candidates to two objects (Account and Opportunity) using only one of the object's criteria (Opportunity Lead Quality). The example for accomplishing this is divided into four phases; perform each phase and the steps within each phase in the order provided.
Phase 1: Creating a Workflow Policy Component for Both Objects
In this first phase, you create a workflow policy component for both objects.
To create a workflow policy component
- Start Siebel Tools.
- Lock the project.
- In the Object Explorer, click the Types tab, and then select Project.
- In the Projects window, select the appropriate project.
For this example, select Assignment (SSE).
- Check the Locked field.
- Select the workflow policy object for which you want to create a workflow policy component.
- In the Object Explorer, select Workflow Policy Object.
- In the Workflow Policy Objects window, select the object.
For this example, select Account.
- Add a new workflow policy component record.
- In the Object Explorer, expand Workflow Policy Component.
- In the Workflow Policy Component window, choose Edit > New Record.
- Enter information in the fields for the new record using the following steps:
- In the Name field, type the name of the workflow policy component.
For this example, type Account/Opportunity.
- In the Source Table Name field, select the source table for the workflow policy component.
For this example, select S_OPTY.
- In the Source Column Name field, select the source column for the workflow policy component.
For this example, select PR_DEPT_OU_ID.
- In the Target Component Name field, select the target component for the workflow policy component.
For this example, select Account.
- In the Target Column Name field, select the target column for the workflow policy component.
For this example, select ROW_ID.
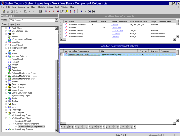
Figure 23 shows an example of creating the Opportunity workflow policy component that maps to the Opportunity source table and the Account target table.
Phase 2: Mapping a Column to the Workflow Policy Component
After you create the workflow policy components for both objects, you need to map the workflow policy component to the assignment criteria. You do this by mapping a column to one of the workflow policy components. In this example, you map the Opportunity workflow policy component to the Opportunity Lead Contact assignment criteria.
To map a column to the workflow policy component
- With the Account/Opportunity record still selected, expand the Workflow Policy Component object in the Object Explorer, and then select the Workflow Policy Component Col object.
- In the Workflow Policy Component Columns window, choose Edit > New Record.
- In the Workflow Column Name field, select the workflow column for the workflow policy component.
For this example, select Opportunity Lead Quality.
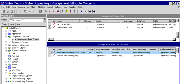
Figure 23 shows an example of mapping the Account/Opportunity workflow policy component to the Opportunity Lead Quality assignment criteria.
Phase 3: Mapping the Workflow Policy Component to the Assignment Attribute
After you map a column to the workflow policy component, you map the workflow policy component to the assignment attribute. In this example, you map the Account/Opportunity policy component to the Lead Quality Code assignment attribute.
To map the workflow policy component to the assignment attribute
- In the Object Explorer, select the Assignment Attribute object.
- In the Assignment Attributes window, select Lead Quality Code.
- In the Object Explorer, expand the Assignment Attribute object and select the Assignment Attribute Column object.
- In the Assignment Attribute Columns window, choose Edit > New Record.
- Enter information in the fields for the new record using the following steps:
- In the Name field, type the name of the assignment attribute column.
For this example, type
Account: Lead Quality.- In the Assignment Object field, select the assignment object to which candidates are assigned for the assignment rule.
For this example, select Account.
- In the Workflow Policy Component field, select the workflow policy component to map to this assignment attribute.
For this example, select Account/Opportunity.
- In the Workflow Policy Component Column field, select the workflow policy component column to map to this assignment attribute.
For this example, select Opportunity Lead Quality.
- In the Sequence field, specify the sequence of this assignment attribute.
For this example, type
2.- Update the siebel.srf file and run various server administration tasks.
For instructions on updating your deployment with the new configurations, see Server Administration After Configuration.
NOTE: You must recompile the siebel.srf file whenever you add, inactivate, or delete any assignment object types, assignment criteria, and assignment attributes. Make sure all projects are recompiled—not only the locked projects—if you inactivate or delete a top-level object type or assignment criteria. For more information on when to recompile the siebel.srf file, see Table 16.
Figure 24 shows an example of mapping the Account/Opportunity workflow policy component to the Opportunity: Lead Quality assignment attribute.
Phase 4: Administration Tasks After Configuration
After the workflow policy component is mapped to the assignment attribute, the siebel.srf file must be updated and various server administration tasks run. To make sure your configurations are recognized, complete steps in To update your deployment with new configurations.
| Bookshelf Home | Contents | Index | Search | PDF | |
Siebel Assignment Manager Administration Guide Published: 18 June 2003 |