| Oracle® Distributed Document Capture User's Guide Release 10gR3 E13867-01 |
|
 Previous |
 Next |
Home > User's Guide > User Interface > Client Screen
| Oracle® Distributed Document Capture User's Guide Release 10gR3 E13867-01 |
|
 Previous |
 Next |
Home > User's Guide > User Interface > Client Screen
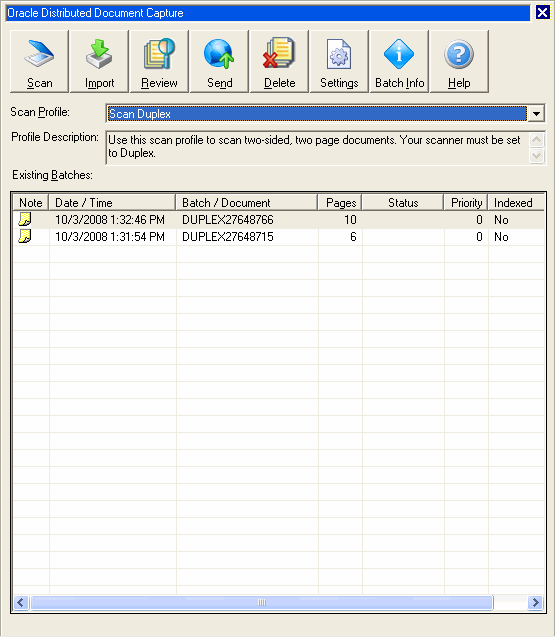
Use the Client screen to perform batch actions such as scanning or sending batches.
Display this screen by starting the Oracle Distributed Document Capture application.

| Element | Description |
|---|---|
| Scan | Begin scanning papers using the profile selected in the Scan Profile field. |
| Import | Begin importing image files using the profile selected in the Scan Profile field. |
| Review | Display and edit the selected batch in the Review/Index screen. |
| Send | Send the selected batches to the server for processing. Hold down the Ctrl or Shift key to select multiple batches. |
| Delete | Delete the selected batches. Hold down the Ctrl or Shift key to select multiple batches. |
| Settings | Change application settings, including scanner and image processing settings. |
| Batch Info | Display information about the selected batch and to add batch notes, or change the status or priority of the batch. |
| Scan Profile | Select a profile whose settings you want to use when scanning or importing batches of documents. A profile is a set of scanning options configured by the administrator.
An administrator can make a profile inactive, in which case (Inactive) is displayed after the profile name. You can review, index, and send batches whose profile is inactive, but you cannot create new batches using an inactive profile. |
| Profile Description | If shown, displays instructions for using the selected scan profile. |
| Existing Batches | This table lists batches scanned or imported using the selected profile, including:
Sort the batch list by clicking a column heading. For example, click the Priority heading to display batches in ascending order by their priority. Click the heading again to sort the list in the opposite direction. |