| Oracle® Business Intelligence New Features Guide Release 10.1.3.3.3 Part No. E10416-04 |
|
 Previous |
 Next |
| Oracle® Business Intelligence New Features Guide Release 10.1.3.3.3 Part No. E10416-04 |
|
 Previous |
 Next |
This chapter describes Oracle BI Publisher support for Digital Signature in PDF Documents.
Oracle BI Publisher now enables you to add a digital signature to PDF output documents. Digital signatures enable you to verify the authenticity of the documents you send and receive. Oracle BI Publisher can access your digital ID file from a central, secure location and at runtime sign the PDF output with the digital ID. The digital signature verifies the signer's identity and ensures that the document has not been altered after it was signed.
For additional information on digital signatures, see the following sources:
Digital ID Introduction by Verisign
Digital Signature by Adobe
Digital Signatures in PDF and Acrobat
Before you can implement digital signatures with Oracle BI Publisher output documents, you need the following:
A digital ID obtained from a public certificate authority or from a private/internal certificate authority (if for internal use only). You must copy the digital ID file to a secure location of the file system on the server that is accessible by the BI Publisher server.
Use of digital signatures with Oracle BI Publisher output documents has the following limitations:
Only a single digital ID can be registered with BI Publisher in this release. Future releases will support multiple digital IDs.
Only reports submitted through BI Publisher's Schedule Report interface can include the digital signature.
The digital signature is enabled at the report level; therefore, multiple templates assigned to the same report share the digital signature properties.
The following steps summarize the tasks required to set up and use digital signature with Oracle BI Publisher:
Register the digital ID in the BI Publisher Admin interface.
Specify the Roles that are authorized to sign documents.
(Optional for PDF templates) Add a signature field to the PDF template in which to place the digital signature at runtime.
Enable Digital Signature for the report in the Runtime Configuration properties and specify the position to place the digital signature on the completed document. This can be a signature field (for PDF templates), general location (top left, top center, or top right), or you can specify x and y coordinates.
Log in to BI Publisher as a user with an authorized role and submit the report through the BI Publisher scheduler, choosing PDF output. When the report completes it will be signed with your digital ID in the specified location of the document.
In this release, BI Publisher supports the identification of a single digital ID file only. Register the digital ID in the BI Publisher Admin page as follows:
Log in to BI Publisher with Administrator credentials.
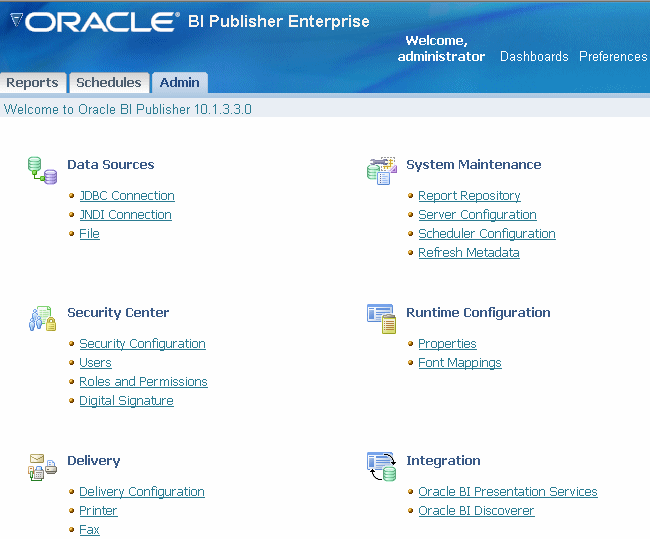
Select the Admin tab, and then from the Security Center menu select Digital Signature.
The following screenshot shows the new Digital Signature entry available from the Admin tab.
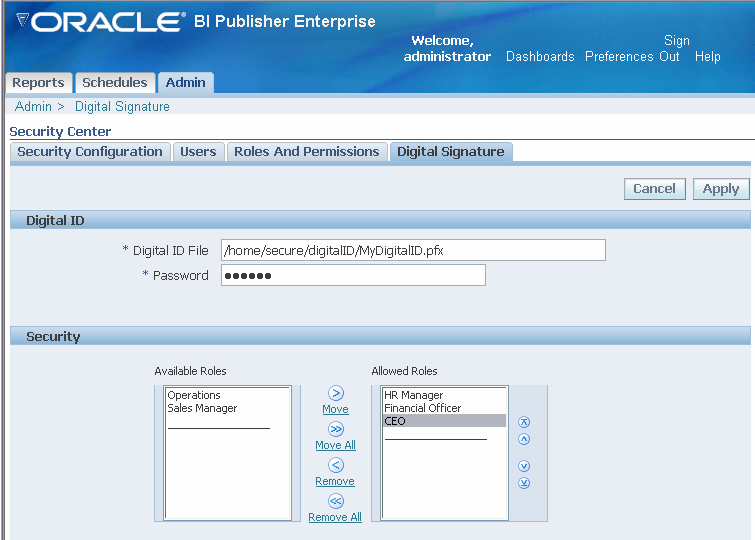
On the Digital Signature sub-tab, enter the file path to the digital ID file and enter the password for the digital ID.
Enable the Roles that will have the authority to sign documents with this digital ID. Use the shuttle buttons to move Available Roles to the Allowed Roles list.
Click Apply.
The following screenshot shows the Digital Signature sub-tab:
You must specify the location for the digital signature to appear in the completed document. If your template is PDF, you can either specify a template field in which to put the digital signature or you can just specify a location on the document using Runtime Configuration properties. If your template is RTF, you can only specify a location; you cannot specify a field.
If your template is a PDF, you can designate an existing field in which to place the digital signature or insert a new signature field on the form.
Add a signature field:
Open the template in Adobe Acrobat Professional.
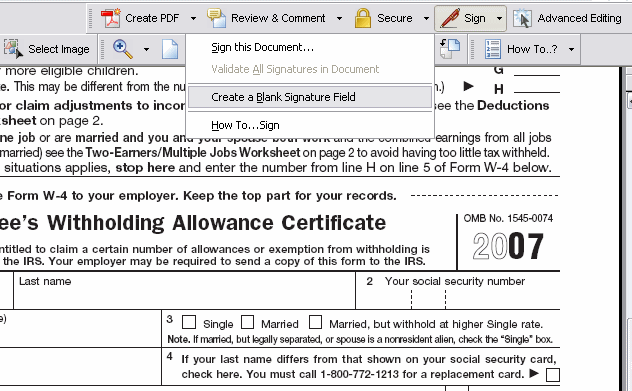
Select Sign from the toolbar and then select Create a Blank Signature Field. The following figure displays this selection from the Adobe Acrobat Professional toolbar.
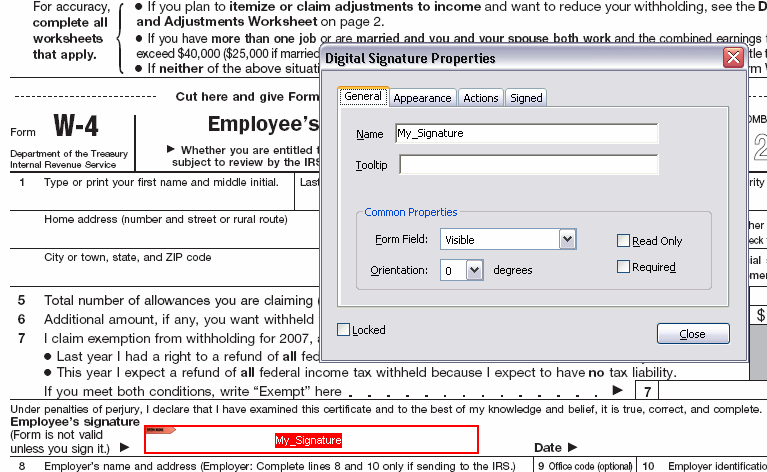
Draw the signature field in the desired location on the template. When you are finished drawing (that is, when you release the mouse button), the Digital Signature Properties dialog will display.
Assign a name to your signature field. The following figure shows an inserted digital signature field called "My_Signature."
Save your template.
Now perform the following task to configure BI Publisher to insert the digital signature to this field.
Upload the template and configure the report:
Log in to BI Publisher with Developer or Administrator credentials.
Upload the template to the appropriate report definition.
Navigate to the report.
Select the Edit link.
From the Report definition pane select Layouts.
Select Browse to locate your template, then select Upload.
After the template uploads successfully, with Layouts still selected on the Report definition pane, select New to add a layout.
In the General Settings of the Layout definition, enter a Name for your layout, then select the uploaded template from the list. Select the appropriate Template Type and Output Formats.
Click Save.
Select the Configure link for the report.
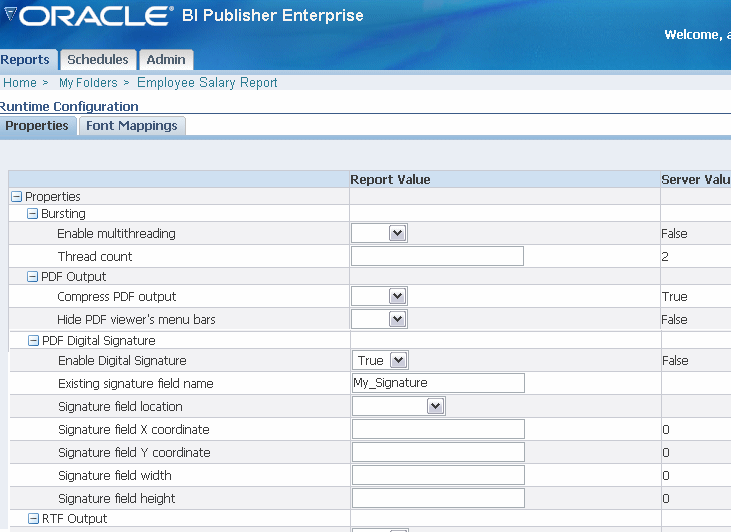
Scroll down to the PDF Digital Signature group of properties.
Set Enable Digital Signature to True.
Enter the field name from the PDF template for the property Existing signature field name.
The following screenshot shows the "My_Signature" field name entered into the properties field.
Select Apply.
Note that the runtime properties that you have just set are at the report level and not the template level. Therefore any templates associated with the report will now include the digital signature as specified in the Runtime Configuration properties for the report. When an Existing signature field name is specified, the template must contain the field for the signature to be applied.
When you specify a location in the document to place the digital signature, you can either specify a general location (Top Left, Top Center, or Top Right) or you can specify x and y coordinates in the document. You can also specify the field height and width. This is done through properties on the Runtime Configuration page. Therefore you do not need to alter the template to include a digital signature.
Log in to BI Publisher with Developer or Administrator credentials.
Navigate to the report you wish to allow authorized users to sign with the digital ID.
Select the Configure link for the report.
Scroll to the PDF Digital Signature group of properties.
Set Enable Digital Signature to True.
Specify the location in the document where you want the digital signature to appear by setting the appropriate properties as follows (note that the signature is inserted on the first page of the document only):
Existing signature field name – does not apply to this method.
Signature field location – provides a list containing the following values: Top Left, Top Center, Top Right. Choose one of these general locations and BI Publisher will insert the digital signature to the output document sized and positioned appropriately. If you set this property, do not enter X and Y coordinates or width and height properties.
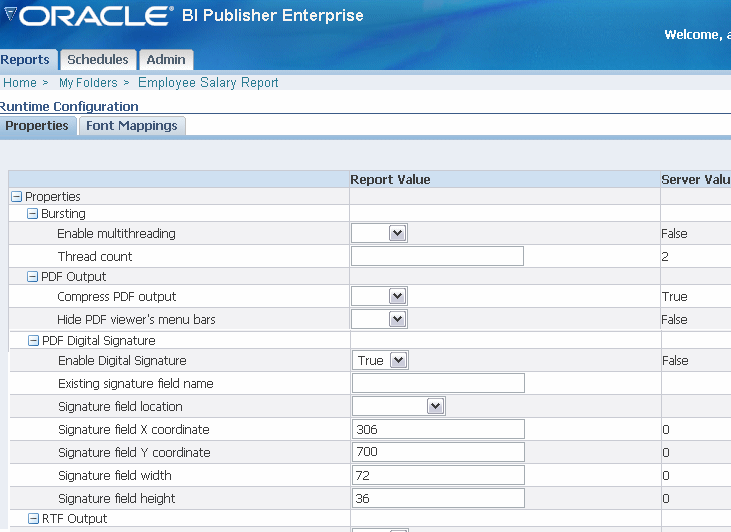
Signature field X coordinate – using the left edge of the document as the zero point of the X axis, enter the position in points that you want the digital signature to be placed from the left. For example, if you want the digital signature to be placed horizontally in the middle of an 8.5 inch by 11 inch document (that is, 612 points in width and 792 points in height), enter 306.
Signature field Y coordinate – using the bottom edge of the document as the zero point of the Y axis, enter the position in points that you want the digital signature to be placed from the bottom. For example, if you want the digital signature to be placed vertically in the middle of an 8.5 inch by 11 inch document (that is, 612 points in width and 792 points in height), enter 396.
Signature field width – enter in points the desired width of the inserted digital signature field. This applies only if you are setting the X and Y coordinates.
Signature field height – enter in points the desired height of the inserted digital signature field. This applies only if you are setting the X and Y coordinates.
The following screenshot shows a report configured to place the digital signature at specific x and y coordinates in the document.
Users assigned a role with the digital signature privilege can attach the digital signature to their generated reports. The digital signature can only be inserted on scheduled reports.
Log in to BI Publisher as a user with a role granted digital signature privileges.
Navigate to the report that has been enabled for digital signature and select Schedule.
Complete the scheduler fields, selecting PDF output, and then submit the job.
The completed PDF will display the digital signature.
BI Publisher also supports secured PDF to prevent unauthorized users from opening, printing, updating or cutting and pasting the PDF document contents. Digital signature is also supported for PDF reports configured with these security features enabled.
Users with the Developer or Administrator role can change PDF security settings for a report. To set PDF security properties, select the Configure link for the report. For more information about the PDF security properties, see the topic: Setting Runtime Properties in the Oracle Business Intelligence Publisher User's Guide.