4 Extending the Functionality of the Connector
After you deploy the connector, you can configure it to meet your requirements. This chapter discusses the following optional configuration procedures:
-
Section 4.1, "Adding New Attributes for Target Resource Reconciliation"
-
Section 4.2, "Adding New Multivalued Attributes for Target Resource Reconciliation"
-
Section 4.3, "Adding New Attributes for Reconciliation of Groups or Roles"
-
Section 4.4, "Adding New Attributes for Trusted Source Reconciliation"
-
Section 4.6, "Adding New Attributes for Provisioning Groups or Roles"
-
Section 4.7, "Adding New Multivalued Attributes for Provisioning"
-
Section 4.8, "Adding Custom Object Classes for Provisioning"
-
Section 4.9, "Adding New Object Classes for Provisioning and Reconciliation"
-
Section 4.10, "Configuring the Mapping of the User ID Field"
4.1 Adding New Attributes for Target Resource Reconciliation
Note:
This section describes an optional procedure. Perform this procedure only if you want to add new attributes for target resource reconciliation.
You must ensure the new attributes that you add for reconciliation contain data in string-format only. Binary attributes must not be introduced into Oracle Identity Manager natively.
By default, the attributes listed in Section 1.6, "Connector Objects Used During Target Resource Reconciliation" are mapped for reconciliation between Oracle Identity Manager and the target system. If required, you can add new attributes for target resource reconciliation.
To add a new attribute for target resource reconciliation, perform the following procedure:
-
Log in to the Oracle Identity Manager Design Console.
-
Add the new attribute on the OIM User process form as follows:
-
Expand Development Tools.
-
Double-click Form Designer.
-
Search for and open the OID User.
-
Click Create New Version.
-
In the Label field, enter the version name. For example,
version#1. -
Click the Save icon.
-
Select the current version created in Step e from the Current Version list.
-
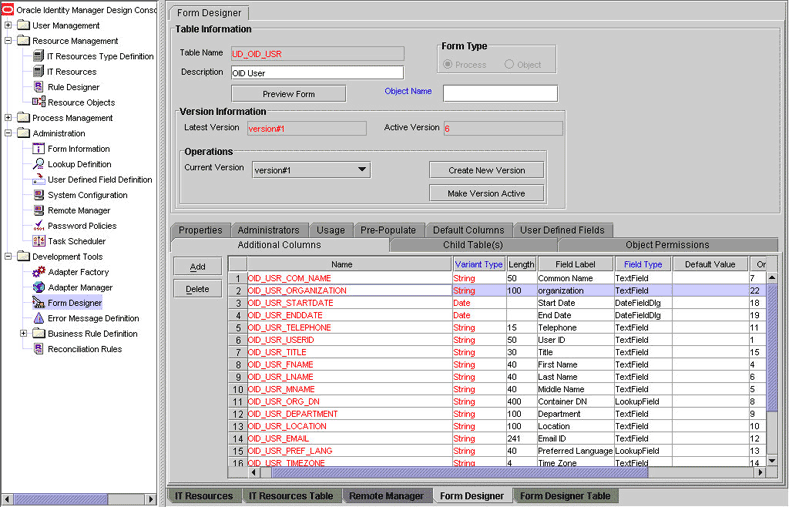
Click Add to create a new attribute, and provide the values for that attribute.
For example, if you are adding the organization attribute, then enter the following values in the Additional Columns tab:
Field Value Name
organization
Variant Type
String
Length
100
Field Label
organization
Order
20
The following screenshot shows this form:
-
Click the Save icon.
-
Click Make Version Active.
-
-
Add the new attribute to the list of reconciliation fields in the resource object as follows:
-
Expand Resource Management.
-
Double-click Resource Objects.
-
Search for and open the OID User resource object.
-
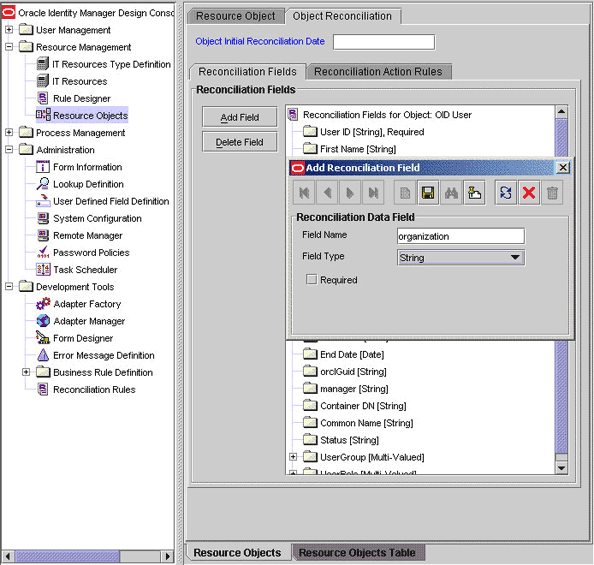
On the Object Reconciliation tab, click Add Field, and then enter the following values:
Field Name:
OrganizationField Type:
StringThe following screenshot shows this form:
-
If you are using Oracle Identity Manager release 11.1.1, then click Create Reconciliation Profile. This copies changes made to the resource object into the MDS.
-
Click the Save icon.
-
-
Create a reconciliation field mapping for the new attribute in the process definition form as follows:
-
Expand Process Management.
-
Double-click Process Definition.
-
Search for and open the OID User process definition.
-
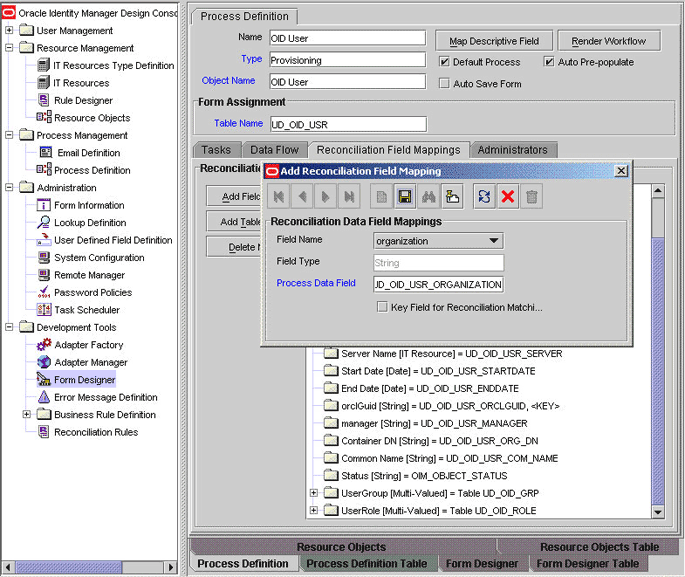
On the Reconciliation Field Mappings tab, click Add Field Map, and then select the following values:
Field Name:
OrganizationField Type:
StringProcess Data Field:
OrganizationThe following screenshot shows this form:
-
Click the Save icon.
-
-
Create an entry for the attribute in the lookup definition for reconciliation as follows:
-
Expand Administration.
-
Double-click Lookup Definition.
-
Search for and open the AttrName.Recon.Map.OID lookup definition.
-
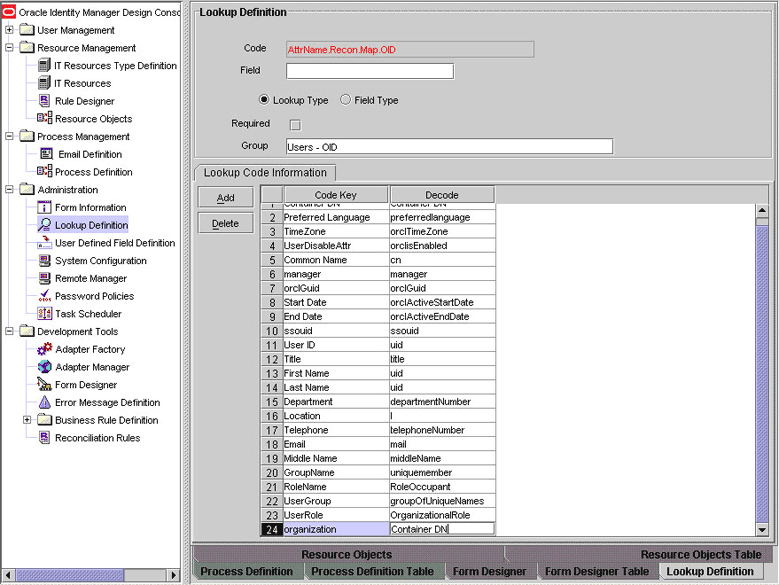
Click Add and enter the Code Key and Decode values for the attribute. The Code Key value must be the name of the attribute given in the resource object. The Decode value is the name of the attribute in the target system.
For example, enter
organizationin the Code Key field and then enteroin the Decode field.The following screenshot shows this form:
-
Click the Save icon.
-
4.2 Adding New Multivalued Attributes for Target Resource Reconciliation
Note:
This section describes an optional procedure. Perform this procedure only if you want to add new multivalued fields for reconciliation. This procedure can be applied to add either user, group, or role attributes.
You must ensure that new attributes you add for reconciliation contain only string-format data. Binary attributes must not be brought into Oracle Identity Manager natively.
By default, only the UserGroup and UserRole multivalued attributes (listed in Section 1.6.1, "User Attributes for Target Resource Reconciliation") are mapped for user reconciliation between Oracle Identity Manager and the target system. If required, you can add new multivalued attributes for target system reconciliation.
By default, no multivalued attributes are mapped for reconciliation between Oracle Identity Manager and the target system for groups and roles. If required, you can add new multivalued attributes for reconciliation of groups or roles.
To add a new multivalued attribute for target resource reconciliation:
-
Log in to the Oracle Identity Manager Design Console.
-
Create a form for the multivalued attribute as follows:
-
Expand Development Tools.
-
Double-click Form Designer.
-
Create a form by specifying a table name and description, and then click Save.
-
Click Add and enter the details of the attribute.
-
Click Save and then click Make Version Active.
-
-
Add the form created for the multivalued attribute as a child form of the process form as follows:
-
Perform one of the following steps:
-
For users, search for and open the UD_OID_USR process form.
-
For groups, Search for and open the UD_OID_GR process form.
-
For roles, search for and open the UD_OID_RL process form.
-
-
Click Create New Version.
-
Click the Child Table(s) tab.
-
Click Assign.
-
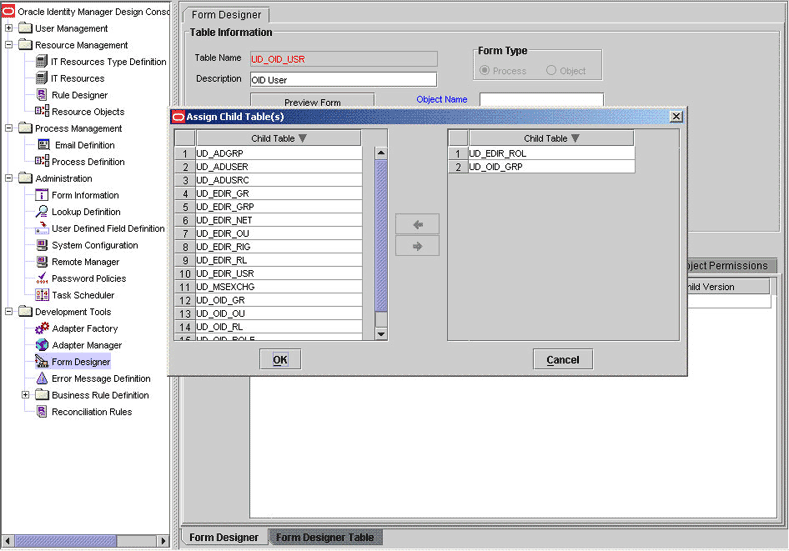
In the Assign Child Tables dialog box, select the newly created child form, click the right arrow, and then click OK.
The following screenshot shows this form:
-
Click Save and then click Make Version Active.
-
-
Add the new attribute to the list of reconciliation fields in the resource object as follows:
-
Expand Resource Management.
-
Double-click Resource Objects.
-
Perform one of the following steps:
-
For users, search for and open the OID User resource object.
-
For groups, search for and open the OID Group resource object.
-
For roles, search for and open the OID Role resource object.
-
-
On the Object Reconciliation tab, click Add Field.
-
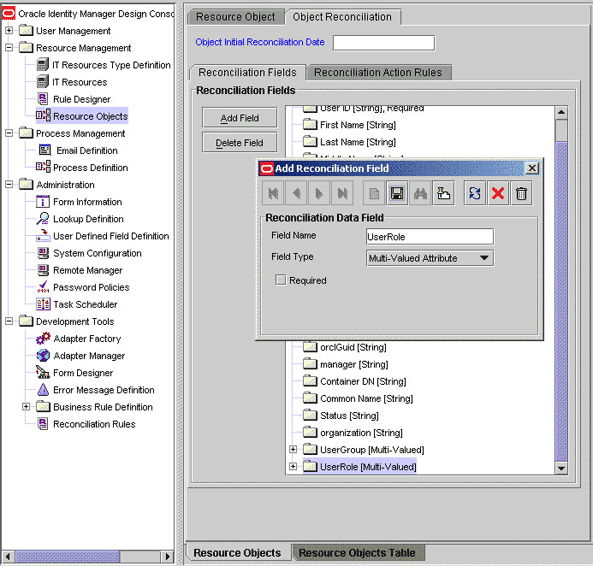
In the Add Reconciliation Fields dialog box, enter the details of the attribute.
For example, enter
Addressin the Field Name field and select Multi Valued Attribute from the Field Type list.The following screenshot shows this form:
-
Click Save and then close the dialog box.
-
Right-click the newly created attribute.
-
Select Define Property Fields.
-
In the Add Reconciliation Fields dialog box, enter the details of the newly created field.
For example, enter
Mailing Addressin the Field Name field and select String from the Field Type list. -
Click Save, and then close the dialog box.
-
If you are using Oracle Identity Manager release 11.1.1, then click Create Reconciliation Profile. This copies changes made to the resource object into the MDS.
-
-
Create a reconciliation field mapping for the new attribute as follows:
-
Expand Process Management.
-
Double-click Process Definition.
-
Perform one of the following steps:
-
For users, search for and open the OID User process form.
-
For groups, search for and open the OID Group process form.
-
For roles, search for and open the OID Role process form.
-
-
On the Reconciliation Field Mappings tab of the process definition, click Add Table Map.
-
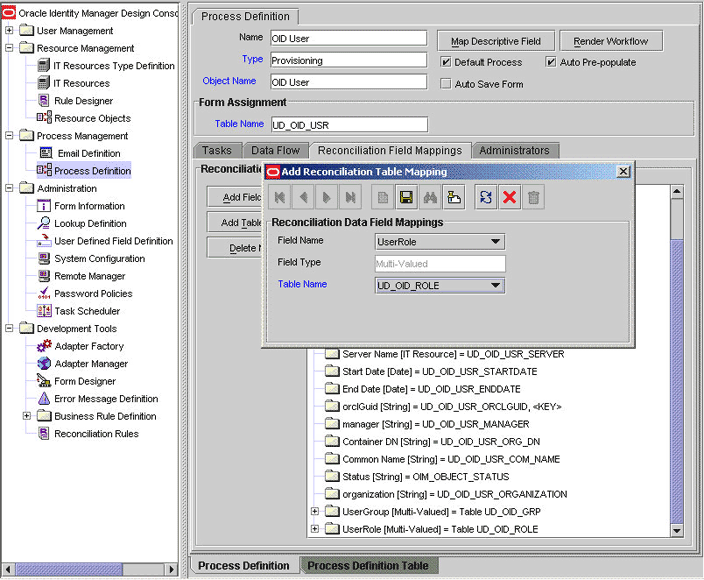
In the Add Reconciliation Table Mapping dialog box, select the field name and table name from the list, click Save, and then close the dialog box.
The following screenshot shows this form:
-
Right-click the newly created field, and select Define Property Field Map.
-
In the Field Name field, select the value for the field that you want to add.
-
Double-click the Process Data Field field, and then select the required data field.
-
Select the Key Field for Reconciliation Mapping check box, and then click Save.
-
-
Create an entry for the attribute in the lookup definition for reconciliation as follows:
-
Expand Administration.
-
Double-click Lookup Definition.
-
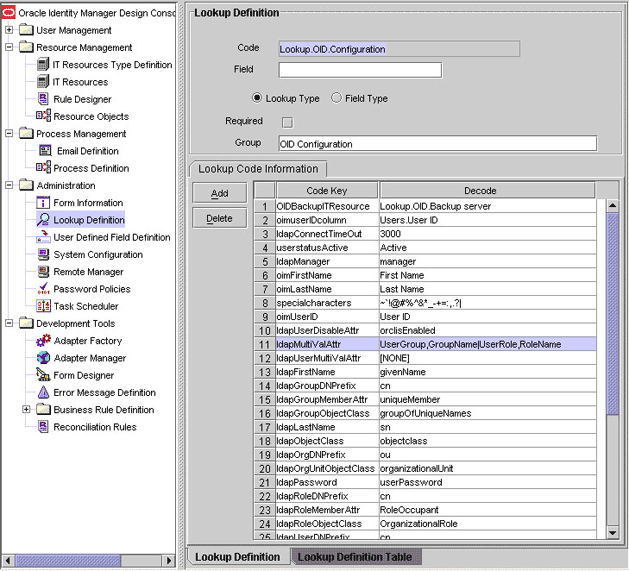
For a user attribute, search for and open the Lookup.OID.Configuration lookup definition. Then, search for the
ldapUserMultiValAttrCode Key value.If you do not want to reconcile multivalued attributes, then accept the default Decode value
[NONE].If you want to reconcile a multivalued attribute, then enter a value in the following format:
RECONCILIATION FIELD NAME OF ATTRIBUTE,PROPERTY NAME OF THE RECONCILIATION FIELD
For example:
Address,MailingAddressIf you want to reconcile more than one multivalued attribute, then enter values in the following format:
RECONCILIATION FIELD NAME OF ATTRIBUTE 1,PROPERTY NAME OF THE RECONCILIATION FIELD 1| RECONCILIATION FIELD NAME OF ATTRIBUTE 2,PROPERTY NAME OF THE RECONCILIATION FIELD 2| . . .
For example:
Address,MailingAddress|group,groupnameThe following screenshot shows this form:
-
Perform one of the following steps:
-
For groups, search for and open the Lookup.OIDGroupReconciliation.FieldMap lookup definition.
-
For roles, search for and open the Lookup.OIDRoleReconciliation.FieldMap lookup definition.
-
-
In the lookup definition, add an entry for the attribute that you want to add:
-
Code Key: Enter the name of the attribute that you add on the process form.
-
Decode Key: Enter the name of the attribute displayed on the target system, which you recorded earlier in this procedure.
-
-
Perform one of the following steps:
-
For users, search for and open the Attrname.Prov.Map.OID lookup definition.
-
For groups, search for and open the AttrName.Group.Prov.Map.OID lookup definition.
-
For roles, search for and open the AttrName.Role.Prov.Map.OID lookup definition.
-
-
In the lookup definition, add an entry for the attribute that you want to add:
-
Code Key: Enter the name of the attribute that you add on the process form. The value that you enter must be in the same case (uppercase and lowercase) as the attribute name on the process form.
-
Decode Key: Enter the name of the attribute displayed on the target system, which you recorded earlier in this procedure.
-
-
If you have added new multivalued for groups or roles, then you must specify the decode key values of the newly added attributes as a value of the Multivalue Attribute attribute that is discussed in Section 3.3.4.2, "Scheduled Tasks for Group and Role Reconciliation."
4.3 Adding New Attributes for Reconciliation of Groups or Roles
Note:
This section describes an optional procedure. Perform this procedure only if you want to add new attributes for group or role reconciliation.
By default, the attributes listed in Section 1.6.2, "Group Attributes for Target Resource Reconciliation" are mapped for group reconciliation between Oracle Identity Manager and the target system. Similarly, the attributes listed in the Section 1.6.3, "Role Attributes for Target Resource Reconciliation" are mapped for role reconciliation between Oracle Identity Manager and the target system. If required, you can add new attributes for group or role reconciliation.
See Also:
Oracle Fusion Middleware User's Guide for Oracle Identity Manager for detailed instructions on performing the following procedure
To add a new attribute for group or role reconciliation:
-
Log in to the Oracle Identity Manager Design Console.
-
Add the new attribute on the process form as follows:
-
Expand Development Tools.
-
Double-click Form Designer.
-
Perform one of the following steps:
-
If you want to add new attributes for group reconciliation, then search for and open the UD_OID_GR form.
-
If you want to add new attributes for role reconciliation, then search for and open the UD_OID_RL form.
-
-
Click Create New Version.
-
In the Label field, enter the version name. For example,
version#1. -
Click the Save icon.
-
Select the current version created in Step e from the Current Version list.
-
Click Add to create a new attribute, and provide the values for that attribute.
-
Click the Save icon.
-
Click Make Version Active.
-
-
Create an entry for the new attribute in the lookup definition for reconciliation as follows:
-
Expand Administration.
-
Double-click Lookup Definition.
-
If you are adding new attributes for group reconciliation, then search for and open the Lookup.OIDGroupReconciliation.FieldMap lookup definition.
-
If you are adding new attributes for role reconciliation, then search for and open the Lookup.OIDRoleReconciliation.FieldMap lookup definition.
-
In the lookup definition, create an entry for the attribute that you want to add by clicking Add, and then enter the Code Key and Decode values for the attribute.
The Code Key value must be the name of the attribute given in the resource object. The Decode value is the name of the attribute in the target system.
For example, enter
organizationin the Code Key field and then enteroin the Decode field. -
Click the Save icon.
-
-
Add the new attribute to the list of reconciliation fields in the resource object as follows:
-
Expand Resource Management.
-
Double-click Resource Objects.
-
If you are adding a new attribute for group reconciliation, then search for and open the OID Group resource object.
-
If you are adding a new attribute for role reconciliation, then search for and open the OID Role resource object
-
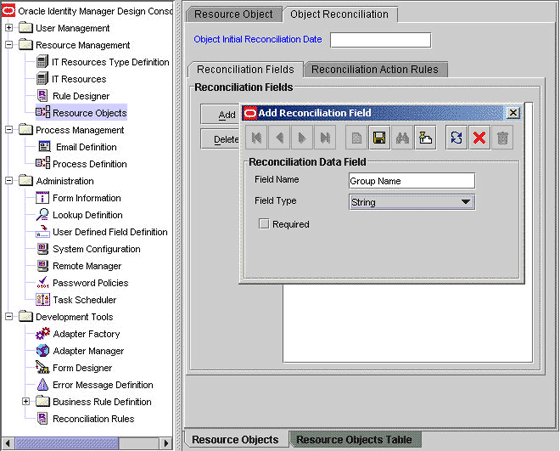
On the Object Reconciliation tab, click Add Field, and then enter the appropriate values for the Field Name and Field Type fields.
The following screenshot shows this dialog box:
-
If you are using Oracle Identity Manager release 11.1.1, then click Create Reconciliation Profile. This copies changes made to the resource object into the MDS.
-
Click the Save icon.
-
-
Create a reconciliation field mapping for the new attribute in the process definition form as follows:
-
Expand Process Management.
-
Double-click Process Definition.
-
If you are adding a new attribute for group reconciliation, then search for and open the OID Group process definition.
-
If you are adding a new attribute for group reconciliation, then search for and open the OID Role process definition.
-
On the Reconciliation Field Mappings tab, click Add Field Map, and then specify the appropriate values for the Field Name, Field Type, and Process Data Field fields.
The following screenshot shows this dialog box:
-
Click the Save icon.
-
4.4 Adding New Attributes for Trusted Source Reconciliation
Note:
This section describes an optional procedure. Perform the procedure described in this section only if both the following conditions are true
You must ensure that the new attributes you add for reconciliation contain only string-format data. Binary attributes must not be brought into Oracle Identity Manager natively.
By default, the attributes listed in Section 1.7.1, "User Attributes for Trusted Source Reconciliation" are mapped for reconciliation between Oracle Identity Manager and the target system. If required, you can add new attributes for trusted resource reconciliation.
To add a new attribute for trusted source reconciliation:
See Also:
One of the following guides for detailed information about these steps:
-
For Oracle Identity Manager release 9.1.0.x: Oracle Identity Manager Design Console Guide
-
For Oracle Identity Manager release 11.1.1: Oracle Fusion Middleware Developer's Guide for Oracle Identity Manager
-
Log in to the Oracle Identity Manager Design Console.
-
Add the new attribute on the Users process form as follows:
-
For Oracle Identity Manager releases prior to 11.1.1.5.4 (including release 9.1.0.x):
-
Expand Administration.
-
Double-click User Defined Field Definition.
-
Search for and open the Users process form.
-
Click Add.
-
In the User Defined Fields dialog box, enter the details of the attribute.
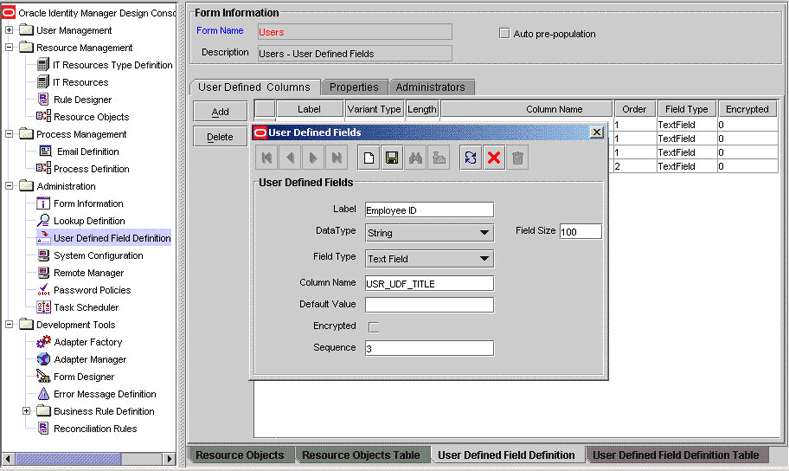
For example, if you are adding the Title attribute, then enter the following details in the User Defined Fields dialog box:
- In the Label field, enter
Employee ID.- From the Data Type list, select String.
- From the Field Type list, select TextField.
- In the Column Name field, enter
USR_UDF_TITLE.- In the Field Size field, enter
100(for example).The following screenshot shows this form:
-
Click Save.
-
-
For Oracle Identity Manager release 11.1.1.5.4 or later:
See the "Configuring User Attributes" chapter in Oracle Fusion Middleware Administrator's Guide for Oracle Identity Manager.
-
-
Add the new attribute to the list of reconciliation fields in the resource object as follows:
-
Expand Resource Management.
-
Double-click Resource Objects.
-
Search for and open the Xellerate User resource object.
-
On the Object Reconciliation tab, click Add Field.
-
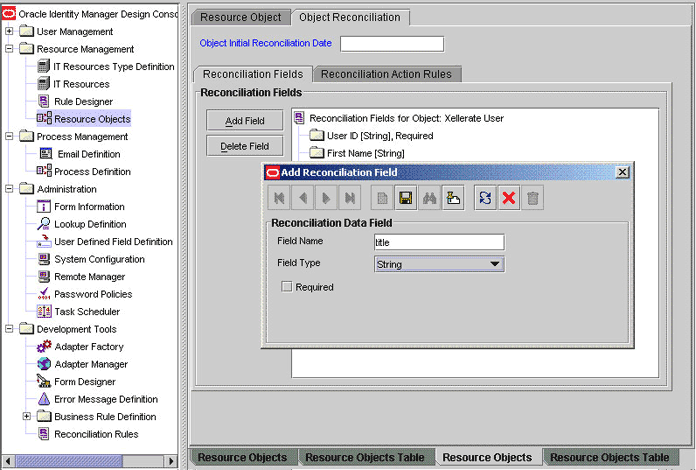
Enter the details of the attribute.
For example, enter
Titlein the Field Name field and select String from the Field Type list.Later in this procedure, you will enter the attribute name as the Decode value of the entry that you create in the lookup definition for reconciliation.
The following screenshot shows the Add Reconciliation dialog box in which sample values have been entered:
-
If you are using Oracle Identity Manager release 11.1.1, then click Create Reconciliation Profile. This copies changes made to the resource object into the MDS.
-
Click Save.
-
-
Create a reconciliation field mapping for the new attribute in the process definition as follows:
-
Expand Process Management.
-
Double-click Process Definition.
-
Search for and open the Xellerate User process definition.
-
On the Reconciliation Field Mappings tab, click Add Field Map.
-
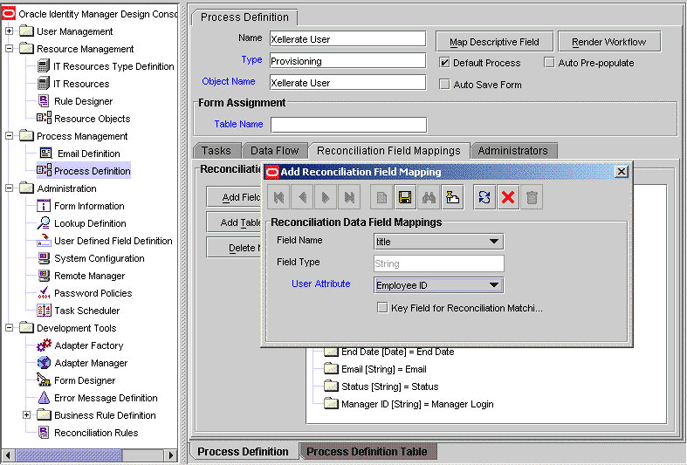
In the Field Name field, select the value for the attribute that you want to add.
For example, select
Title = Title.The following screenshot shows this form:
-
Click Save.
-
-
Create an entry for the attribute in the lookup definition for reconciliation as follows:
-
Expand Administration.
-
Double-click Lookup Definition.
-
Search for and open the AttrName.Recon.Map.OID lookup definition.
-
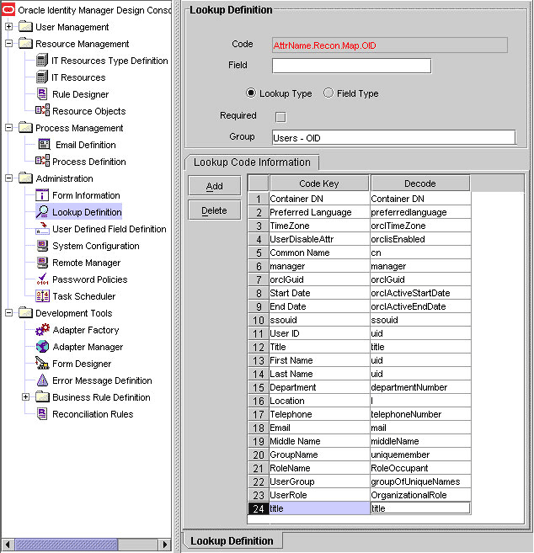
Click Add and enter the Code Key and Decode values for the attribute. The Code Key value must be the name of the attribute on the target system, which you determined at the start of this procedure. The Decode value is the name that you provide for the reconciliation field in Step 3.e.
For example, enter
Titlein the Code Key field and then entertitlein the Decode field.The following screenshot shows this form:
-
Click Save.
-
Select Field Type, and then click Save.
-
4.5 Adding New Attributes for Provisioning Users
Note:
-
This section describes an optional procedure. You need not perform this procedure if you do not want to add new user attributes for provisioning.
-
Before starting the following procedure, perform Steps 1 and 2 as described in Section 4.1, "Adding New Attributes for Target Resource Reconciliation." If these steps have been performed while adding new attributes for target resource reconciliation, then you need not repeat the steps.
By default, the attributes listed in Section 1.8.2, "User Attributes for Provisioning" are mapped for provisioning between Oracle Identity Manager and the target system. If required, you can map additional attributes for provisioning.
To add a new attribute for provisioning users, create an entry for the attribute in the lookup definition for provisioning as follows:
-
Expand Administration.
-
Double-click Lookup Definition.
-
Search for and open the AttrName.Prov.Map.OID lookup definition.
-
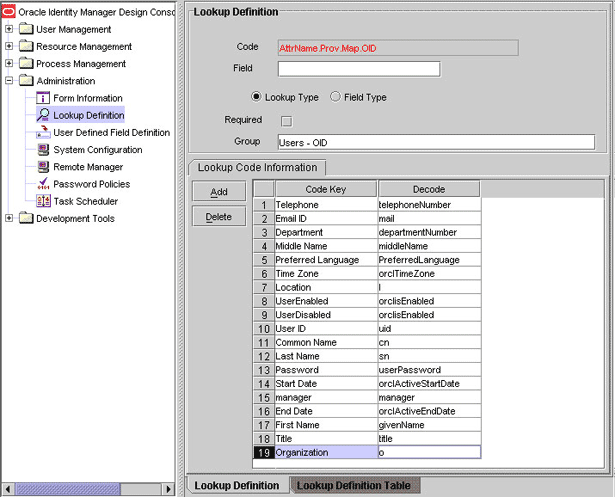
Click Add and enter the Code Key and Decode values for the attribute. The Code Key value must be the name of the attribute given in the resource object. The Decode value is the name of the attribute in the target system. The value that you enter in the Code Key column must be in the same case (uppercase and lowercase) as the attribute name in the resource object.
For example, enter
organizationin the Code Key field and then enteroin the Decode field.The following screenshot shows this form:
-
Click the Save icon.
Note:
Perform steps 6 through 8 only if you want to perform request-based provisioning.
-
Update the request dataset.
When you add an attribute on the process form, you also update the XML file containing the request dataset definitions. To update a request dataset:
-
In a text editor, open the XML file located in the OIM_HOME/DataSet/file directory for editing.
-
Add the AttributeReference element and specify values for the mandatory attributes of this element.
See Also:
The "Configuring Requests" chapter of the Oracle Fusion Middleware Developer's Guide for Oracle Identity Manager guide for more information about creating and updating request datasets
For example, if you add organization as an attribute on the process form, then enter the following line:
<AttributeReference
name = "organization"
attr-ref = "organization"
type = "String"
widget = "text"
length = "100"
available-in-bulk = "false"/>
In this AttributeReference element:
-
For the name attribute, enter the value in the Name column of the process form without the tablename prefix.
For example, if OID_USR_ORGANIZATION is the value in the Name column of the process form, then you must specify
organizationas the value of the name attribute in the AttributeReference element. -
For the attr-ref attribute, enter the value that you entered in the Field Label column of the process form.
-
For the type attribute, enter the value that you entered in the Variant Type column of the process form.
-
For the widget attribute, enter the value that you entered in the Field Type column of the process form.
-
For the length attribute, enter the value that you entered in the Length column of the process form.
-
For the available-in-bulk attribute, specify
trueif the attribute must be available during bulk request creation or modification. Otherwise, specifyfalse.
If you add more than one attribute on the process form, then repeat this step for each attribute that you add.
-
-
Save and close the XML file.
-
-
Run the PurgeCache utility to clear content related to request datasets from the server cache.
See Oracle Fusion Middleware Administrator's Guide for Oracle Identity Manager for more information about the PurgeCache utility.
-
Import into MDS, the request dataset definitions in XML format.
See Section 2.3.1.8.2, "Importing Request Datasets into MDS" for detailed information about the procedure.
4.5.1 Enabling Update of New Attributes for Provisioning Users
After you add an attribute for provisioning users, you must enable update operations on the attribute. If you do not perform this procedure, then you will not be able to modify the value of the attribute after you set a value for it during the Create User provisioning operation.
To enable the update of a new attribute for provisioning a user:
-
Expand Process Management.
-
Double-click Process Definition and open the OID User process definition.
-
In the process definition, add a new task for updating the field as follows:
-
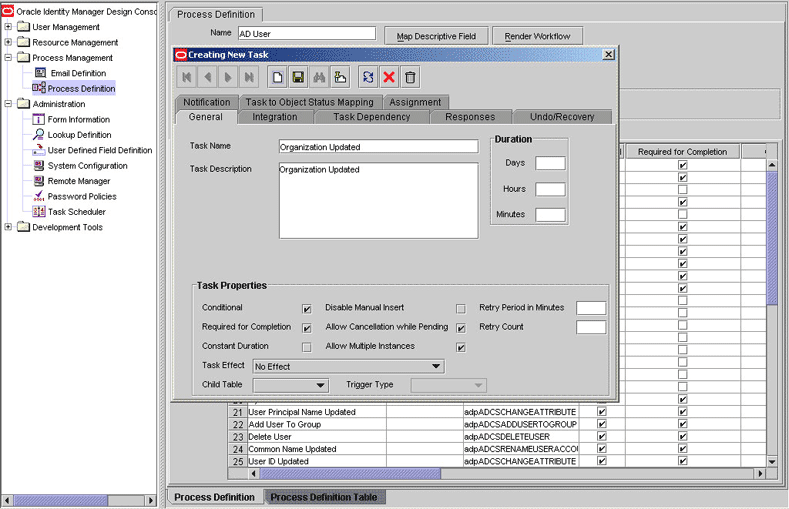
Click Add and enter the task name, for example,
organization Updatedand the task description. -
In the Task Properties section, select the following fields:
-
Conditional
-
Required for Completion
-
Allow Cancellation while Pending
-
Allow Multiple Instances
The following screenshot shows this form:
-
-
Click on the Save icon.
-
-
On the Integration tab, click Add, and then click Adapter.
-
Select the adpOIDMODIFYUSER adapter, click Save, and then click OK in the message that is displayed.
-
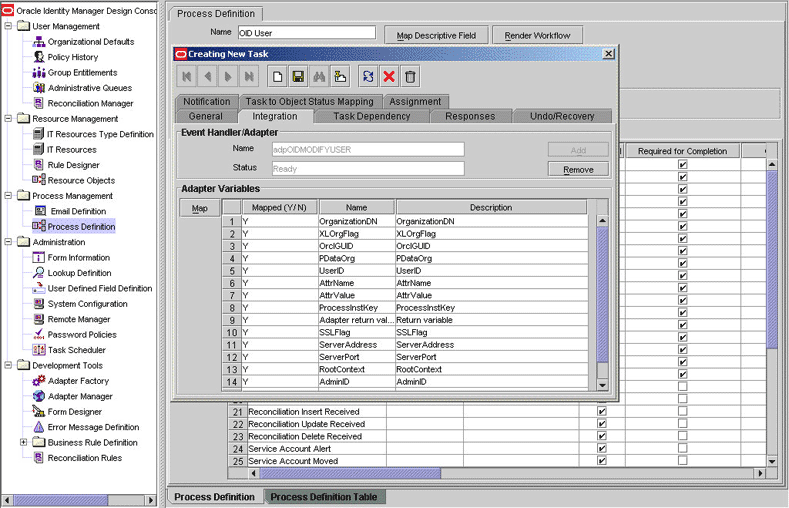
To map the adapter variables listed in this table, select the adapter, click Map, and then specify the data given in the following table:
Note:
Some of the values in this table are specific to Organization (o value in OID target). These values must be replaced with values relevant to the attributes that you require.
Variable Name Data Type Map To Qualifier IT Asset Type IT Asset Property PDataOrg
String
Process Data
Organization DN
NA
NA
User ID
String
Process Data
User ID
NA
NA
AttrName
String
Literal
String
Literal value :Organization
NA
AttrValue
String
Process Data
Organization Note: The name of the attribute in process form
NA
NA
ProcessInstKey
String
Process Data
Process Instance
NA
NA
Adapter return value
Object
Response Code
NA
NA
NA
SSL FLag
String
IT Resources
Server
OID Server
SSL
Server Address
String
IT Resources
Server
OID Server
Server Address
Server Port
String
IT Resources
Server
OID Server
Port
RootContext
String
IT Resources
Server
OID Server
Root DN
AdminID
String
IT Resources
Server
OID Server
Admin ID
AdminPwd
String
IT Resources
Server
OID Server
Admin Password
AttrLookupCode
String
IT Resources
Server
OID Server
Prov Attribute Lookup Code
OrganizationDN
String
Literal
String
Literal Value:Note: don't specify any value here
NA
XLOrgFlag
String
IT Resources
Server
OID Server
Use XL Org Structure
The following screenshot shows this form:
-
Click the Save icon and then close the dialog box.
4.6 Adding New Attributes for Provisioning Groups or Roles
Note:
This section describes an optional procedure. You need not perform this procedure if you do not want to add new attributes for provisioning groups or roles.
By default, the attributes listed in Section 1.8.3, "Group Attributes for Provisioning" are mapped for provisioning of groups between Oracle Identity Manager and the target system. Similarly, by default, the attributes listed in Section 1.8.4, "Role Attributes for Provisioning" are mapped for provisioning of roles between Oracle Identity Manager and the target system. If required, you can map additional attributes for provisioning groups or roles.
To add a new attribute for provisioning a group or role:
-
Log in to the Oracle Identity Manager Design Console.
-
Add the new attribute on the process form as follows:
-
Open the Form Designer form.
-
Perform one of the following steps:
Search for and open the UD_OID_GR form.
Search for and open the UD_OID_RL form.
-
Create a new version of the form.
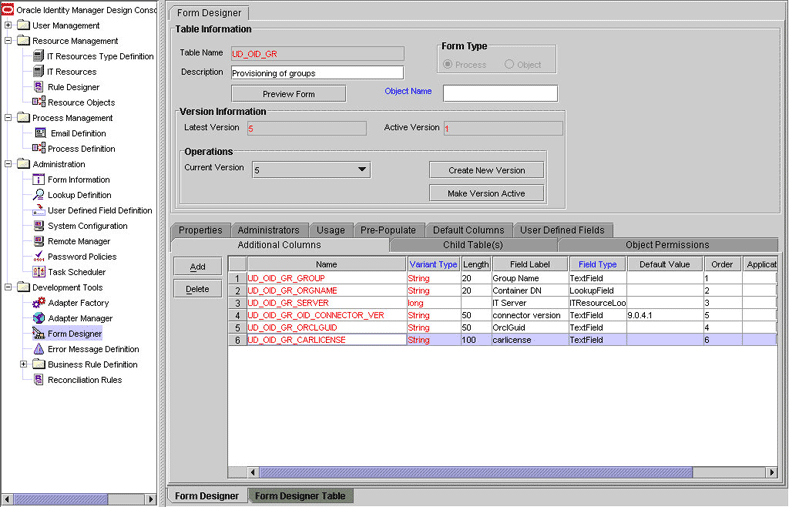
-
Add the new attribute on the form.
The following screenshot shows this form:
-
Save the form.
-
Make the version active, and close the form.
-
-
In the lookup definition for provisioning, create an entry for the new attribute as follows:
-
Open the Lookup Definition form.
-
Do one of the following:
-
Search for and open the AttrName.Group.Prov.Map.OID lookup definition.
-
Search for and open the AttrName.Role.Prov.Map.OID lookup definition.
-
-
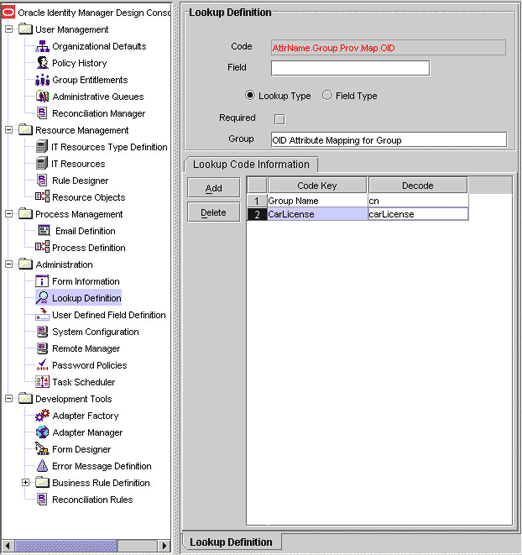
In the lookup definition, add an entry for the attribute that you want to add:
-
Code Key: Enter the name of the attribute that you add on the process form.
-
Decode Key: Enter the name of the attribute displayed on the target system, which you recorded earlier in this procedure.
The following screenshot shows this form:
Note:
Perform steps 4 through 6 only if you want to perform request-based provisioning.
-
-
-
Update the request dataset.
When you add an attribute on the process form, you also update the XML file containing the request dataset definitions. To update a request dataset:
-
In a text editor, open the XML file located in the OIM_HOME/DataSet/file directory for editing.
-
Add the AttributeReference element and specify values for the mandatory attributes of this element.
See Also:
The "Configuring Requests" chapter of the Oracle Fusion Middleware Developer's Guide for Oracle Identity Manager guide for more information about creating and updating request datasets
For example, while performing Step 2 of this procedure, if you added GroupDesc as an attribute on the process form, then enter the following line:
<AttributeReference
name = "GroupDesc"
attr-ref = "GroupDesc"
type = "String"
widget = "text"
length = "100"
available-in-bulk = "false"/>
In this AttributeReference element:
-
For the name attribute, enter the value in the Name column of the process form without the tablename prefix.
For example, if UD_OID_GR_GRPDESC is the value in the Name column of the process form, then you must specify
GroupDescas the value of the name attribute in the AttributeReference element. -
For the attr-ref attribute, enter the value that you entered in the Field Label column of the process form while performing Step 2.
-
For the type attribute, enter the value that you entered in the Variant Type column of the process form while performing Step 2.
-
For the widget attribute, enter the value that you entered in the Field Type column of the process form, while performing Step 2.
-
For the length attribute, enter the value that you entered in the Length column of the process form while performing Step 2.
-
For the available-in-bulk attribute, specify
trueif the attribute must be available during bulk request creation or modification. Otherwise, specifyfalse.
While performing Step 2, if you added more than one attribute on the process form, then repeat this step for each attribute added.
-
-
Save and close the XML file.
-
-
Run the PurgeCache utility to clear content related to request datasets from the server cache.
See Oracle Fusion Middleware Administrator's Guide for Oracle Identity Manager for more information about the PurgeCache utility.
-
Import into MDS, the request dataset definitions in XML format.
See Section 2.3.1.8.2, "Importing Request Datasets into MDS" for detailed information about the procedure.
-
To test whether or not you can use the newly added attribute for provisioning, log in to the Oracle Identity Manager Administrative and User Console and perform a provisioning operation in which you specify a value for the newly added attribute.
4.6.1 Enabling Update of New Attributes for Provisioning Groups or Roles
After you add an attribute for provisioning a Group or Role, you must enable update operations on the attribute. If you do not perform this procedure, then you will not be able to modify the value of the attribute after you set a value for it during the Create User provisioning operation.
To enable the update of a new multivalued attribute for provisioning a group or role:
-
Log in to the Oracle Identity Manager Design Console.
-
Expand Process Management.
-
Do one of the following:
-
Double-click Process Definition and open the OID Group process definition.
-
Double-click Process Definition and open the OID Role process definition.
-
-
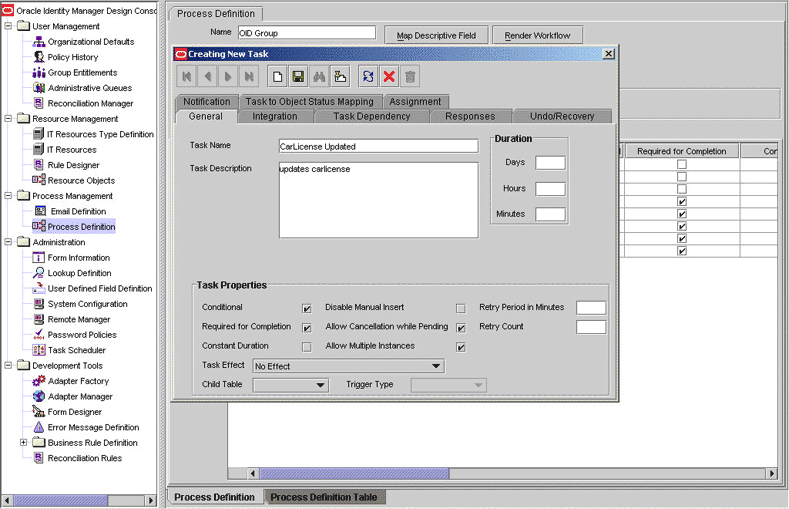
In the process definition, add a task for setting a value for the attribute:
-
Click Add, enter the name of the task for adding multivalued attributes, and enter the task description.
-
In the Task Properties section, select the following fields:
-
Conditional
-
Required for Completion
-
Allow Cancellation while Pending
-
Allow Multiple Instances
-
Select the child table from the list.
For the example described earlier, select Mailing Address from the list.
The following screenshot shows this form:
-
-
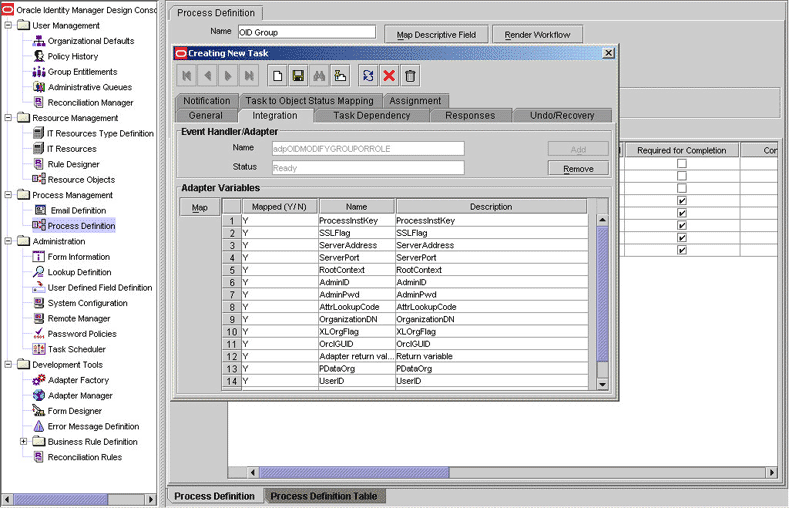
On the Integration tab, click Add, and then click Adapter.
-
Select the adpOIDMODIFYGROUPORROLE adapter, click Save, and then click OK in the message.
-
To map the adapter variables listed in this table, select the adapter, click Map, and then specify the data given in the following table:
Variable Name Data Type Map To Qualifier IT Asset Type IT Asset Property SSLFlag
String
IT Resource
Server
OID Server
SSL
Adapter return value
Object
Response Code
NA
NA
NA
UserID
String
Process Data
User ID
NA
NA
userPassword
String
Process Data
Password
NA
NA
rootContext
String
IT Resources
Server
OID Server
Root DN
port
String
IT Resources
Server
OID Server
Port
LDAPServer
String
IT Resources
Server
OID Server
Server Address
AttrLookupCode
String
IT Resources
Server
OID Server
The value can be any one of the following:
-
For group:
AttrName.Group.Prov.Map.OID -
For Role:
AttrName.Role.Prov.Map.OID
PropertyName
String
Literal
String
homePostalAddress
Note: This is a sample (literal) value.
NA
PropertyValue
String
Select Process Data and then select (for example) OID User Role.
Address
Note: This is a sample value.
NA
NA
Admin ID
String
IT Resources
Server
OID Server
Admin Id
AdminPwd
String
IT Resources
Server
OID Server
Admin Password
organizationDN
String
Literal
String
Note: Do not enter a value in the Literal field.
NA
ProcessInstKey
String
Process data
Process Instance
NA
NA
PDataOrg
String
Process data
Organization DN
NA
NA
The following screenshot shows this form:
-
-
Click the Save icon and then close the dialog box.
-
4.7 Adding New Multivalued Attributes for Provisioning
Note:
This section describes an optional procedure. Perform this procedure only if you want to add new multivalued fields for provisioning. This procedure can be applied to add either user, group, or role attributes.
By default, the user attributes Group and Role (listed in Section 1.8.2, "User Attributes for Provisioning") are the only multivalued attributes mapped for provisioning between Oracle Identity Manager and the target system. If required, you can add new multivalued attributes for provisioning users.
By default, no multivalued attributes are mapped for provisioning between Oracle Identity Manager and the target system for groups and roles. If required, you can add new multivalued attributes for reconciliation and provisioning of groups or roles.
To add a new multivalued attribute for provisioning:
Note:
If you have already performed Steps 1 through 3 of the Section 4.2, "Adding New Multivalued Attributes for Target Resource Reconciliation," then you need not repeat the steps in the following procedure, and directly proceed to the Section 4.7.1, "Enabling Update of New Multivalued Attributes for Provisioning."
-
Log in to the Oracle Identity Manager Design Console.
-
Create a form for the multivalued attribute as follows:
-
Expand Development Tools.
-
Double-click Form Designer.
-
Create a form by specifying a table name and description, and then click Save.
-
Click Add and enter the details of the attribute.
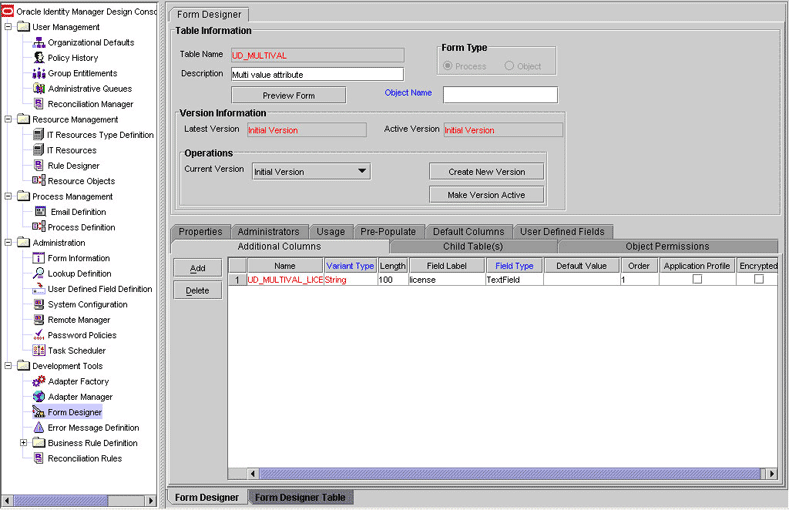
-
Click Save and then click Make Version Active.
-
-
Add the form created for the multivalued attribute as a child form of the process form as follows:
-
Perform one of the following steps:
-
For users, search for and open the UD_OID_USR process form.
-
For groups, search for and open the UD_OID_GR process form.
-
For roles, search for and open the UD_OID_RL process form.
-
-
Click Create New Version.
-
Click the Child Table(s) tab.
-
Click Assign.
-
In the Assign Child Tables dialog box, select the newly created child form, click the right arrow, and then click OK.
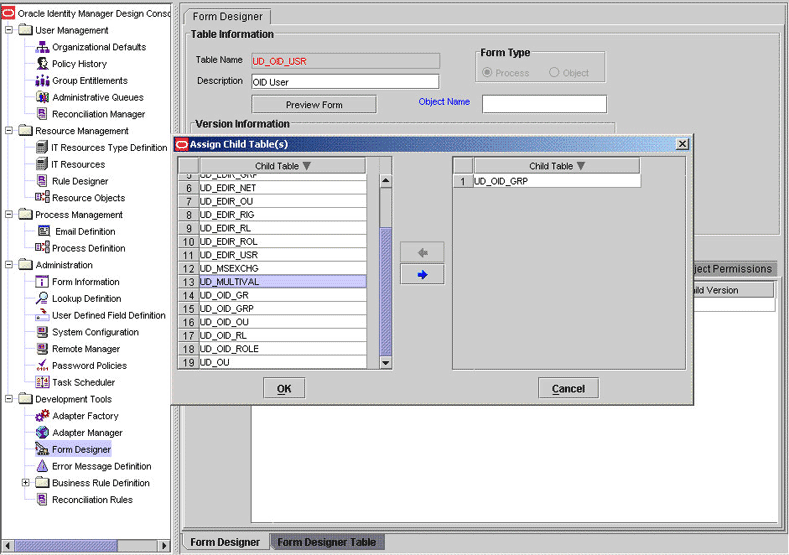
-
Click Save and then click Make Version Active.
Note:
Perform steps 4 and 5 only if you want to perform request-based provisioning.
-
-
Update the request dataset.
When you add an attribute on the process form, you also update the XML file containing the request dataset definitions. To update a request dataset:
-
In a text editor, open the XML file located in the OIM_HOME/DataSet/file directory for editing.
-
Add the AttributeReference element and specify values for the mandatory attributes of this element.
See Also:
The "Configuring Requests" chapter of the Oracle Fusion Middleware Developer's Guide for Oracle Identity Manager guide for more information about creating and updating request datasets
For example, if you added Address as an attribute on the process form, then enter the following line:
<AttributeReference
name = "Address"
attr-ref = "Address"
type = "String"
widget = "text"
length = "100"
available-in-bulk = "false"/>
In this AttributeReference element:
-
For the name attribute, enter the value in the Name column of the process form without the tablename prefix.
For example, if UD_MULTIVAL_ADDRESS is the value in the Name column of the process form, then you must specify
Addressas the value of the name attribute in the AttributeReference element. -
For the attr-ref attribute, enter the value that you entered in the Field Label column of the process form.
-
For the type attribute, enter the value that you entered in the Variant Type column of the process form.
-
For the widget attribute, enter the value that you entered in the Field Type column of the process form.
-
For the length attribute, enter the value that you entered in the Length column of the process form.
-
For the available-in-bulk attribute, specify
trueif the attribute must be available during bulk request creation or modification. Otherwise, specifyfalse.
If you add more than one attribute on the process form, then repeat this step for each attribute that you add.
-
-
Save and close the XML file.
-
-
Import into MDS, the request dataset definitions in XML format.
See Section 2.3.1.8.2, "Importing Request Datasets into MDS" for detailed information about the procedure.
4.7.1 Enabling Update of New Multivalued Attributes for Provisioning
After you add a multivalued attribute for provisioning, you must enable update operations on the attribute. If you do not perform this procedure, then you will not be able to modify the value of the attribute after you set a value for it during the Create provisioning operations.
To enable the update of a new multivalued attribute for provisioning:
See Also:
Oracle Fusion Middleware User's Guide for Oracle Identity Manager for detailed information about these steps
-
Log in to the Oracle Identity Manager Design Console.
-
Expand Process Management.
-
Double-click Process Definition, and then perform one of the following steps:
-
For users, open the OID User process definition.
-
For groups, open the OID Group process definition.
-
For roles, open the OID Role process definition.
-
-
In the process definition, add a task for setting a value for the attribute:
-
Click Add, enter the name of the task for adding multivalued attributes, and enter the task description.
-
In the Task Properties section, select the following fields:
-
Conditional
-
Required for Completion
-
Allow Cancellation while Pending
-
Allow Multiple Instances
-
Select the child table from the list.
For the example described earlier, select Mailing Address from the list.
-
Select Insert as the trigger type for adding multivalued data. Alternatively, select Delete as the trigger type for removing multivalued data.
-
-
On the Integration tab, click Add, and then click Adapter.
-
Select the adpOIDADDMULTIVALUEATTRIBUTE adapter, click Save, and then click OK in the message.
-
To map the adapter variables listed in this table, select the adapter, click Map, and then specify the data given in the following table:
Note:
Some of the values in this table are specific to the Mailing Address/Postal Address example. These values must be replaced with values relevant to the multivalued attributes that you require.
Variable Name Data Type Map To Qualifier IT Asset Type IT Asset Property SSLFlag
String
IT Resource
Server
OID Server
SSL
Adapter return value
Object
Response Code
NA
NA
NA
UserID
String
Process Data
User ID
NA
NA
userPassword
String
Process Data
Password
NA
NA
rootContext
String
IT Resources
Server
OID Server
Root DN
port
String
IT Resources
Server
OID Server
Port
LDAPServer
String
IT Resources
Server
OID Server
Server Address
AttrLookupCode
String
IT Resources
Server
OID Server
Prov Attribute Lookup Code
Note: While mapping for either group or role process definition, select the corresponding lookup definitions:
-
For group:
AttrName.Group.Prov.Map.OID -
For Role:
AttrName.Role.Prov.Map.OID
PropertyName
String
Literal
String
homePostalAddress
Note: This is a sample (literal) value.
NA
PropertyValue
String
Select Process Data and then select (for example) OID User Role.
Address
Note: This is a sample value.
NA
NA
Admin ID
String
IT Resources
Server
OID Server
Admin Id
AdminPwd
String
IT Resources
Server
OID Server
Admin Password
organizationDN
String
Literal
String
Note: Do not enter a value in the Literal field.
NA
ProcessInstKey
String
Process data
Process Instance
NA
NA
PDataOrg
String
Process data
Organization DN
NA
NA
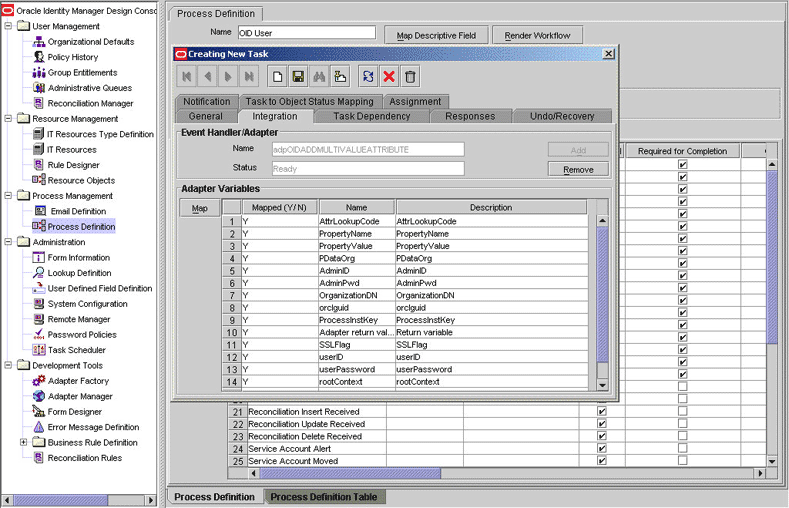
-
-
Click the Save icon and then close the dialog box.
-
-
In the process definition, add a task for removing the value of the attribute by performing Step 4. While performing Step 4.d, select the adpOIDREMOVEMULTIVALUEATTRIBUTE adapter.
-
In the process definition, add a task for updating the value of the attribute by performing Step 4.
While performing Step 4.d select the adpOIDUPDATEMULTIVALUEATTRIBUTE adapter. Map the Adapter return Value attribute for this update task by providing the values described in the preceding table.
4.8 Adding Custom Object Classes for Provisioning
Note:
Perform the procedure described in this section only if you want to add custom object classes for provisioning organizational units, groups, or roles.
The ldapUserObjectClassSecondary field is one of the fields defined in the Lookup.OID.Configuration lookup definition.
By default, this field contains a value that you can change to the name of your object class. If required, you can modify the ldapUserObjectClassSecondary field and add more object classes. Use a vertical bar (|) to separate object classes whose names you enter. The following is a sample value that can be assigned to the ldapUserObjectClassSecondary field:
objclass1|objClass2
You must ensure that the attributes in the new object class are optional, and not mandatory attributes.
4.9 Adding New Object Classes for Provisioning and Reconciliation
To add a new object class for provisioning and reconciliation:
-
Section 4.9.1, "Adding the Attributes of the Object Class to the Process Form"
-
Section 4.9.3, "Adding the Attributes of the Object Class to the Resource Object"
-
Section 4.9.4, "Adding Attributes of the Object Class to the Provisioning Process".
4.9.1 Adding the Attributes of the Object Class to the Process Form
To add the attributes of the object class to the process form:
-
Open the Oracle Identity Manager Design Console.
-
Expand the Development Tools folder.
-
Double-click Form Designer.
-
Search for and open the UD_OID_USR process form.
-
Click Create New Version, and then click Add.
-
Enter the details of the attribute.
For example, if you are adding the Associated Domain attribute, enter
UD_OID_USR_ASSOCIATEDDOMAINin the Name field and then enter the other details of this attribute.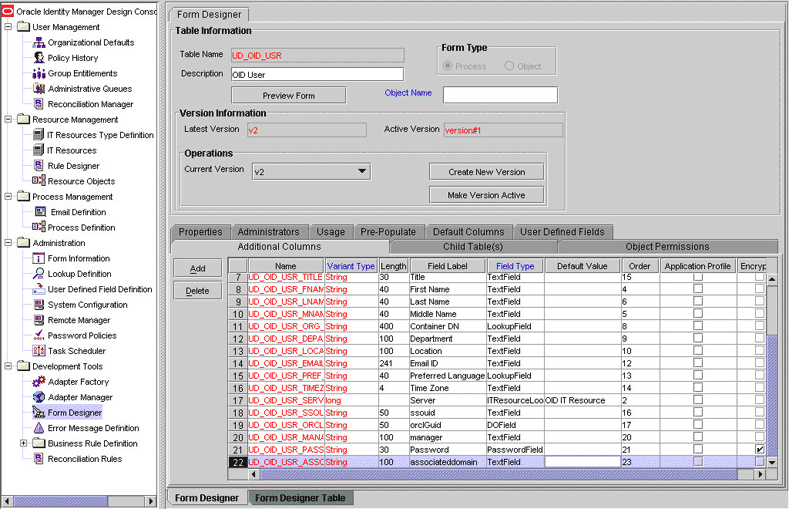
-
Click Save, and then click Make Version Active.
4.9.2 Adding the Object Class and its Attributes to the Lookup Definition for Provisioning
To add the object class and its attributes to the lookup definition for provisioning:
-
Expand the Administration folder.
-
Double-click Lookup Definition.
-
Search for and open the Lookup.OID.Configuration lookup definition.
-
Add the object class name to the Decode value of the
ldapUserObjectClassCode Key.Note:
In the Decode column, use the vertical bar (|) as a delimiter when you add the object class name to the existing list of object class names.
For example, if you want to add
domainRelatedObjectin the Decode column then enter the value as follows:top|person|organizationalPerson|inetOrgPerson|orclUser|orclUserV2|domainRelatedObject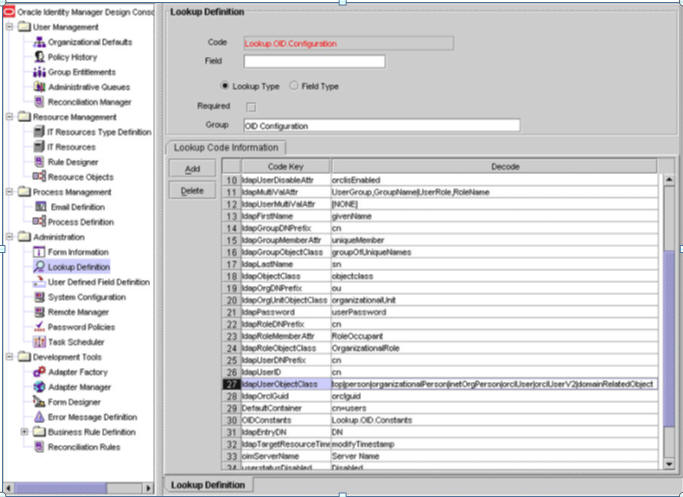
-
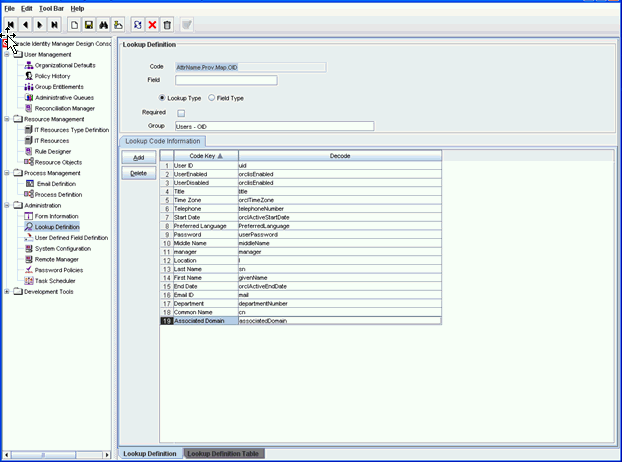
Search for and open the AttrName.Prov.Map.OID lookup definition.
-
Click Add and then enter the Code Key and Decode values for an attribute of the object class. The Code Key value must be the name of the field on the process form and Decode value must be the name of the field on the target system.
For example, enter
Associated Domainin the Code Key field and then enterassociatedDomainin the Decode field.Note:
You must perform this step for all the mandatory attributes of the object class. You can also perform this step for the optional attributes.
-
Click Save.
4.9.3 Adding the Attributes of the Object Class to the Resource Object
To add the attributes of the object class to the resource object:
Note:
You must perform this step for all the mandatory attributes of the object class. You can also perform this step for the optional attributes.
-
Expand the Resource Management folder.
-
Double-click Resource Objects.
-
Search for and open the OID User resource object.
-
For each attribute of the object class:
-
On the Object Reconciliation tab, click Add Field.
-
Enter the details of the field.
For example, enter
Associated Domainin the Field Name field and select String from the Field Type list.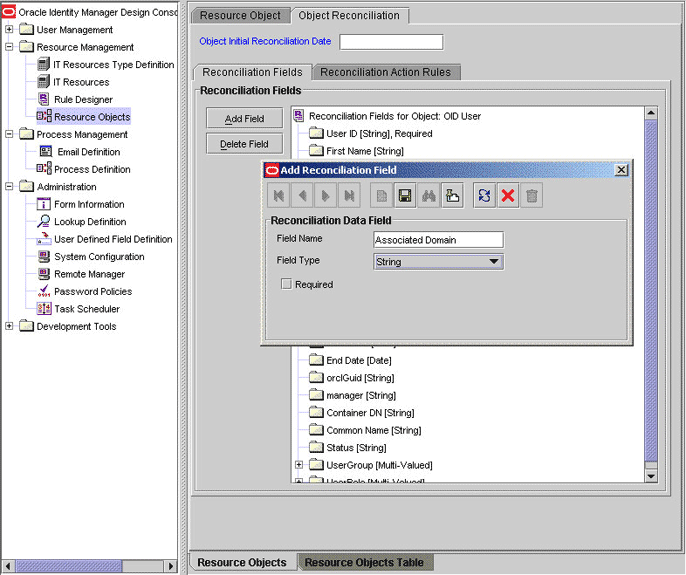
-
-
If you are using Oracle Identity Manager release 11.1.1, then click Create Reconciliation Profile. This copies changes made to the resource object into the MDS.
-
Click the save icon.
4.9.4 Adding Attributes of the Object Class to the Provisioning Process
To add the attributes of the object class to the provisioning process:
Note:
You must perform this step for all the mandatory attributes of the object class. You can also perform this step for the optional attributes.
-
Expand the Process Management folder.
-
Double-click Process Definition.
-
Search for and open the OID User provisioning process.
-
On the Reconciliation Field Mappings tab, click Add Field Map.
-
In the Field Name field, select the value for the field that you want to add.
For example, select
Associated Domain = UD_OID_USR_ASSOCIATEDDOMAIN -
In the Field Type field, select the field type.
-
Click the save icon.
4.10 Configuring the Mapping of the User ID Field
Note:
Perform this procedure only if you want to customize the mapping between the user ID fields of Oracle Internet Directory and Oracle Identity Manager.
While creating a user account on Oracle Internet Directory through Oracle Identity Manager, the user ID that you specify is assigned to the uid field of Oracle Internet Directory. If required, you can customize the mapping so that the user ID is assigned to the cn field of Oracle Internet Directory.
See Also:
Oracle Fusion Middleware User's Guide for Oracle Identity Manager for information about modifying lookup definitions
-
In the Design Console, open the AttrName.Prov.Map.OID lookup definition.
-
Change the decode value of the User ID code key to
cn. -
Save the changes.
-
In the Design Console, open the Lookup.OID.Configuration lookup definition.
-
Change the decode value of the ldapUserDNPrefix code key to
cn. Do not change the case ofcnto, for example,CN. -
Save the changes.
Now, when you create a user account on Oracle Internet Directory through Oracle Identity Manager, the user ID assigned in Oracle Identity Manager will be assigned to the cn field of Oracle Internet Directory.
After you map for provisioning, the User ID field of Oracle Identity Manager to the cn field of the target system, you must customize the mapping for reconciliation. By default, during reconciliation, the uid field of Oracle Internet Directory is mapped to the User ID field of Oracle Identity Manager. To customize mapping so that the value in the cn field in Oracle Internet Directory is assigned to the User ID field in Oracle Identity Manager:
-
In the Design Console, open the AttrName.Recon.Map.OID lookup definition.
-
Change the decode value of the User ID code key to
cn. -
Save the changes.