5 Extending the Functionality of the Connector
This chapter discusses the following optional procedures that you can perform to extend the functionality of the connector for addressing your business requirements:
-
Section 5.1, "Adding Custom Fields for Target Resource Reconciliation"
-
Section 5.2, "Adding Custom Multivalued Fields for Reconciliation"
-
Section 5.4, "Removing Attributes Mapped for Target Resource Reconciliation"
-
Section 5.5, "Using the Provisioning Agent to Run IBM z/OS Batch Jobs"
-
Section 5.7, "Initial LDAP Gateway Population and Full Reconciliation"
-
Section 5.11, "Handling PIONEER Error Messaging Exceptions in the Gateway"
5.1 Adding Custom Fields for Target Resource Reconciliation
Note:
You must ensure that new attributes you add for reconciliation contain only string-format data. Binary attributes must not be brought into Oracle Identity Manager natively.By default, the attributes listed in Table 1-3 are mapped for reconciliation between Oracle Identity Manager and the target system. If required, you can add new attributes for target resource reconciliation.
To add a custom field for reconciliation, you must first update the connector reconciliation component you are using, and then update Oracle Identity Manager.
This section discusses the following topics:
5.1.1 Adding Custom Fields for Reconciliation
You can add custom fields for reconciliation by specifying a value for the SingleValueAttributes attribute of the RACF Reconcile All Users and RACF Reconcile All LDAP Users scheduled tasks. See Section 4.4.3.4, "RACF Reconcile All LDAP Users" and Section 4.4.3.1, "RACF Reconcile All Users" for more information about the attributes of these scheduled tasks.
To add a custom field for scheduled task reconciliation:
-
Log in to Identity System Administration.
-
In the left pane, under System Management, click Scheduler.
-
Search for and open the RACF Reconcile All Users and RACF Reconcile All LDAP Users scheduled tasks as follows:
-
On the left pane, in the Search field, enter
RACF Reconcile All UsersorRACF Reconcile All LDAP Usersas the search criterion. Alternatively, you can click Advanced Search and specify the search criterion. -
In the search results table on the left pane, click the scheduled job in the Job Name column.
-
-
Add the custom field to the list of attributes in the SingleValueAttributes scheduled task attribute.
-
Click Apply.
5.1.2 Adding Custom Fields to Oracle Identity Manager
After adding the custom field to the RACF Reconcile All Users scheduled task (if using scheduled task reconciliation), you must add the custom field to the Oracle Identity Manager components.
To update Oracle Identity Manager with the custom field:
-
Log in to the Design Console.
-
Add the custom field to the list of reconciliation fields in the resource object as follows:
-
Expand Resource Management and then double-click Resource Objects.
-
Search for and open the OIMRacfResourceObject resource object.
-
On the Object Reconciliation tab, click Add Field.
-
In the Add Reconciliation Field dialog box, enter the details of the field.
For example, enter
Descriptionin the Field Name field and select String from the Field Type list. -
Click Save and close the dialog box.
-
Click Create Reconciliation Profile. This copies changes made to the resource object into MDS.
-
Click Save.
-
-
Add the custom field on the process form as follows:
-
Expand Development Tools and then double-click Form Designer.
-
Search for and open the UD_RACF_ADV process form.
-
Click Create New Version, and then click Add.
-
Enter the details of the field.
For example, if you are adding the Description field, then enter UD_RACF_ADV_DESCRIPTION in the Name field, and then enter the rest of the details of this field.
-
Click Save and then click Make Version Active.
-
-
Create a reconciliation field mapping for the custom field in the provisioning process as follows:
-
Expand Process Management and then double-click Process Definition.
-
Search for and open the OIMRacfProvisioningProcess process definition.
-
On the Reconciliation Field Mappings tab of the provisioning process, click Add Field Map.
-
In the Add Reconciliation Field Mapping dialog box, from the Field Name field, select the value for the field that you want to add.For example, from the Field Name field, select Description.
-
Double-click the Process Data field, and then select UD_RACF_ADV_DESCRIPTION.
-
Click Save and close the dialog box.
-
Click Save.
-
-
Create a new UI form and attach it to the application instance to make this new attribute visible. See Section 3.4.1.2, "Creating a New UI Form" and Section 3.4.1.6, "Updating an Existing Application Instance with a New Form" for the procedures.
-
If you are adding a custom attribute or custom dataset, then set values for the
_configAttrs_, _configDNamesand_configDatasets_properties in the tops.properties file. See Step 3 of Section 3.5, "Installing and Configuring the LDAP Gateway" for information about these properties.
5.2 Adding Custom Multivalued Fields for Reconciliation
To add a custom multivalued field for reconciliation, you must first update the IDF reconciliation component you are using, and then update Oracle Identity Manager.
-
Section 5.2.1, "Adding Custom Multivalued Fields to the Reconciliation Component"
-
Section 5.2.2, "Adding Custom Multivalued Fields to Oracle Identity Manager"
5.2.1 Adding Custom Multivalued Fields to the Reconciliation Component
You can add custom multivalued fields for reconciliation by specifying a value for the MultiValuedAttributes property of the RACF Reconcile All Users and RACF Reconcile All LDAP Users scheduled tasks. See Section 4.4.3.4, "RACF Reconcile All LDAP Users" and Section 4.4.3.1, "RACF Reconcile All Users" for more information about the attributes of these scheduled tasks.
To add a custom field for scheduled task reconciliation:
-
Log in to Identity System Administration.
-
In the left pane, under System Management, click Scheduler.
-
Search for and open the RACF Reconcile All Users and RACF Reconcile All LDAP Users scheduled tasks as follows:
-
On the left pane, in the Search field, enter
RACF Reconcile All UsersorRACF Reconcile All LDAP Usersas the search criterion. Alternatively, you can click Advanced Search and specify the search criterion. -
In the search results table on the left pane, click the scheduled job in the Job Name column.
-
-
Add the custom field to the list of attributes in the
MultiValuedAttributes property. -
Click Apply.
5.2.2 Adding Custom Multivalued Fields to Oracle Identity Manager
After adding the custom multivalued field to the RACF Reconcile All Users and RACF Reconcile All LDAP Users scheduled task (if using scheduled task reconciliation), you must add the custom multivalued field to the Oracle Identity Manager components.
To update Oracle Identity Manager with the multivalued field:
-
Log in to the Design Console.
-
Create a form for the multivalued field as follows:
-
Expand Development Tools and double-click Form Designer.
-
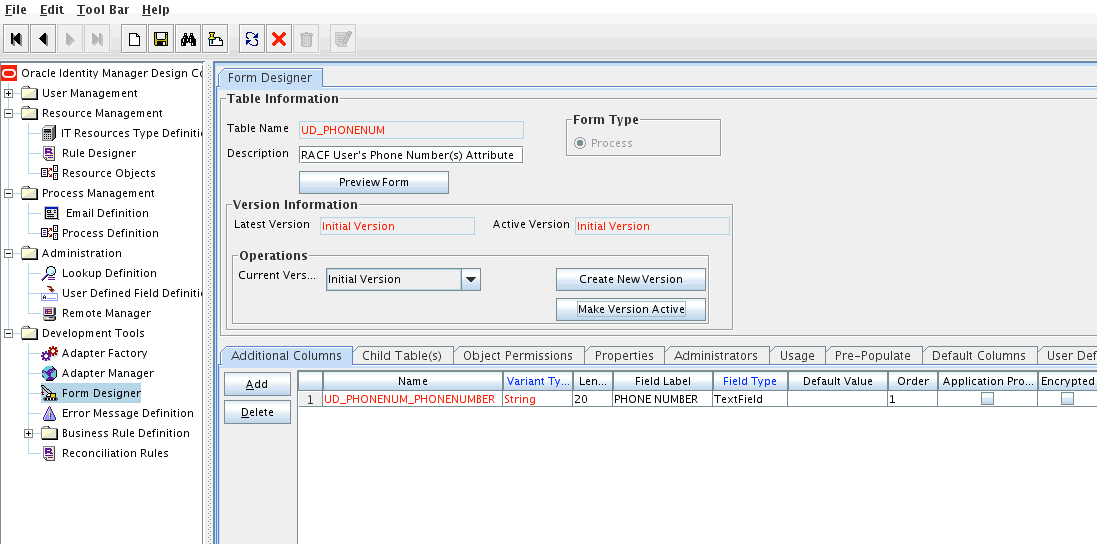
Create a form by specifying a table name and description, and then click Save.
-
Click Add and enter the details of the field.
-
Click Save and then click Make Version Active. Figure 5-1 shows the multivalued field added on a new form.
-
-
Add the form created for the multi-valued field as a child form of the process form as follows:
-
Search for and open the UD_RACF_ADV process form.
-
Click Create New Version.
-
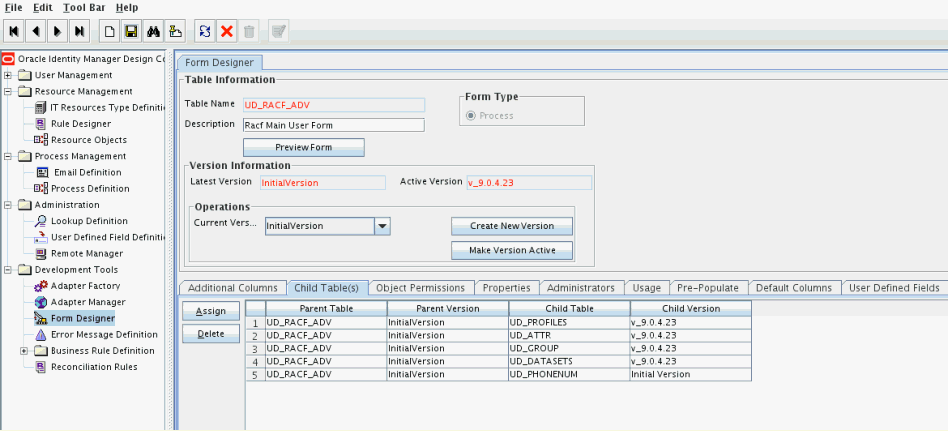
Click the Child Table(s) tab.
-
Click Assign.
-
In the Assign Child Tables dialog box, select the newly created child form, click the right arrow, and then click OK.
-
Click Save and then click Make Version Active. Figure 5-2 shows the child form added to the process form.
-
-
Add the new multivalued field to the list of reconciliation fields in the resource object as follows:
-
Expand Resource Management and then double-click Resource Objects.
-
Search for and open the OIMRacfResourceObject resource object.
-
On the Object Reconciliation tab, click Add Field.
-
In the Add Reconciliation Field dialog box, enter the details of the field.
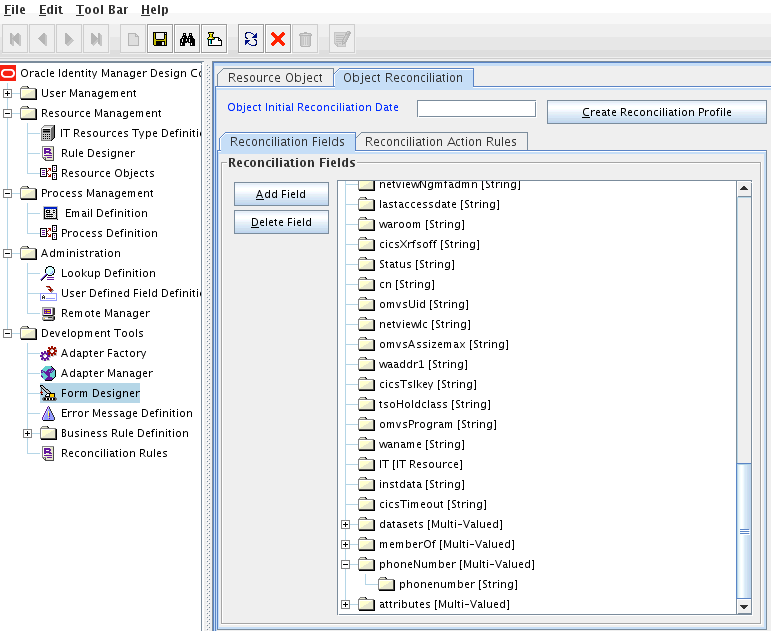
For example, enter phoneNumber in the Field Name field and select Multivalued Attribute from the Field Type list.
-
Click Save and close the dialog box.
-
Right click the newly created field and select Define Property Fields.
-
In the Add Reconciliation Field dialog box, enter the details of the newly created field. For example, enter phonenumber in the Field Name field and select String from the Field Type list.
-
Click Save, and then close the dialog box. Figure 5-3 shows the new reconciliation field added in the resource object.
-
Click Create Reconciliation Profile. This copies changes made to the resource object into MDS.
-
-
Create an entry for the field in the AtMap.RACF lookup definition, as follows:
-
Expand Administration and then double-click Lookup Definition.
-
Search for the AtMap.RACF lookup definition.
-
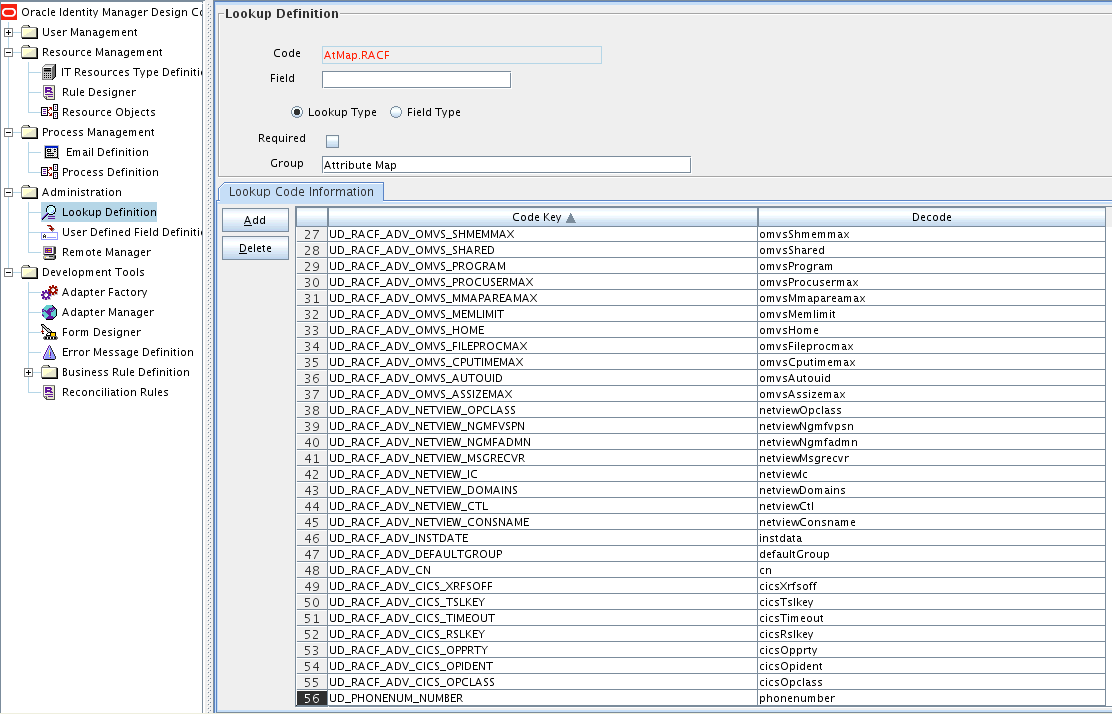
Click Add and enter the Code Key and decode values for the field. The Code Key value is the name of the process form field that you created for the multivalued custom field in Step 3.d. The Decode value is the name of the target system field.
For example, enter
UD_PHONENUM_PHONENUMBERin the Code Key field and then enter phonenumber in the Decode field. Figure 5-4 shows the lookup code added to the lookup definition. -
Click Save.
-
-
Create a reconciliation field mapping for the new multivalued field as follows:
-
Expand Process Management and then double-click Process Definition.
-
Search for and open the OIMRacfProvisioningProcess process definition.
-
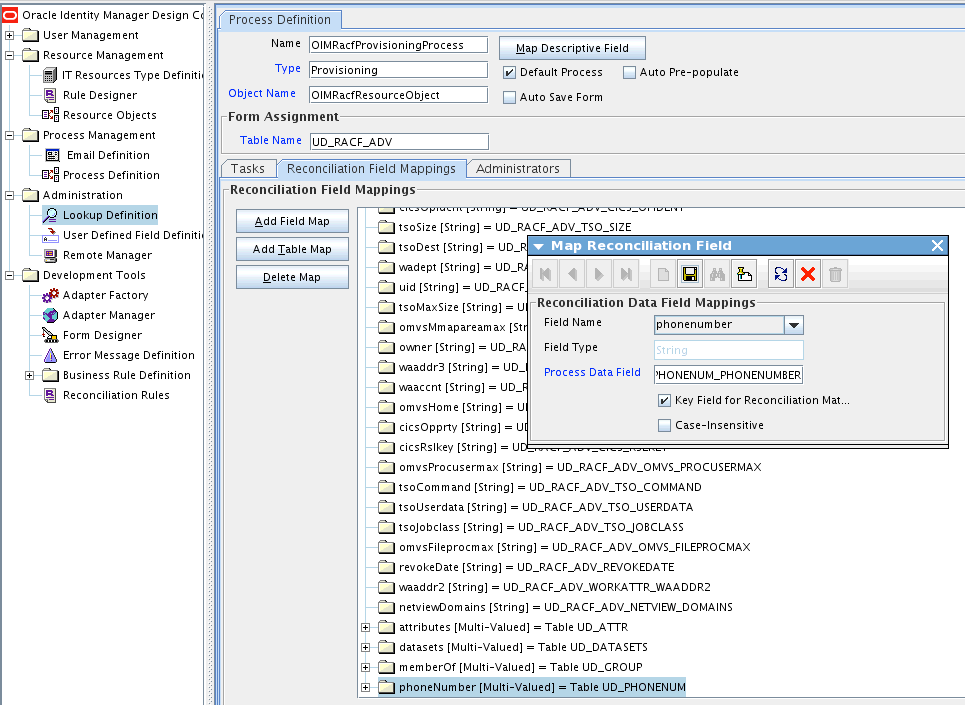
On the Reconciliation Field Mappings tab of the provisioning process, click Add Table Map.
-
In the Add Reconciliation Table Mapping dialog box, select the field name and table name from the list, click Save, and then close the dialog box.
-
Right-click the newly created field and select Define Property Field Map.
-
In the Field Name field, select the value for the field that you want to add.
-
Double-click the Process Data field, and then select UD_PHONENUM_PHONENUMBER.
-
Select Key Field for Reconciliation Field Matching and click Save. Figure 5-5 shows the new reconciliation field mapped to a process data field in the process definition.
-
5.3 Adding Custom Fields for Provisioning
By default, the attributes listed in Table 1-3 are mapped for provisioning between Oracle Identity Manager and the target system. If required, you can map additional attributes for provisioning.
To add a new attribute for provisioning:
-
Log in to the Design Console.
-
Add the new field on the process form as follows:
If you have added the field on the process form by performing Step 4 of Section 5.1.2, "Adding Custom Fields to Oracle Identity Manager," then you need not add the field again. If you have not added the field, then:
-
Expand Development Tools.
-
Double-click Form Designer.
-
Search for and open the UD_RACF_ADV process form.
-
Click Create New Version, and then click Add.
-
Enter the details of the attribute.
For example, if you are adding the
Description field, enter UD_RACF_ADV_DESCRIPTION in the Name field, and then enter the rest of the details of this field. -
Click Save and then click Make Version Active.
-
-
Enable update provisioning operation on the custom fields by creating a process task as follows:
-
Expand Process Management, and double-click Process Definition.
-
Search for and open the OIMRacfProvisioningProcess process definition.
-
Click Add.
-
On the General tab of the Creating New Task dialog box, enter a name and description for the task and then select the following:
Conditional
Required for Completion
Disable Manual Insert
Allow Cancellation while Pending
Allow Multiple Instances
-
Click Save.
-
Go to the Integration tab and click Add.
-
In the Handler Selection dialog box, select Adapter.
-
Click adpMODIFYUSER. and then click the save icon. The list of adapter variables is displayed on the Integration tab.
-
To create the mapping for the first adapter variable:
Double-click the number of the first row.In the Edit Data Mapping for Variable dialog box, enter the following values: Variable Name:
Adapter return valueData Type:
ObjectMap To:
Response code -
Click the Save icon.
-
To create mappings for the remaining adapter variables, use the data given in the table Table 5-1:
Table 5-1 Values for the Variables, Map To, Qualifier, and Literal Value lists for each variable
Variable Number Variable Name Map To Qualifier Second
idfResource
Process Data
LDAP_SERVER
Third
uid
Process Data
LoginId
Fourth
attrName
String Literal
Enter the LDAP attribute name in the Literal Value field.Example: description
Fifth
attrValue
Process Data
Select the process form field from the drop-down list.Example: DESCRIPTION
-
On the Responses tab, click Add to add at least the SUCCESS response code, with Status C. This ensures that if the custom task is successfully run, then the status of the task is displayed as Completed.
-
Click the Save icon and close the dialog box.
-
Save the process definition.
Note:
To enable Password Interval provisioning,-
use literal attrName "pwdInterval" for the modifyUser task. Value=0 (Note a value of 0 will set the command to NOINTERVAL).
-
use literal attrName "pwdInterval" for the modifyUser task. Value=1 through nnn, where nnn is system accepted value range for INTERVAL (1) through INTERVAL (nnn).
-
-
Create a new UI form and attach it to the application instance to make this new attribute visible. See Section 3.4.1.2, "Creating a New UI Form," and Section 3.4.1.6, "Updating an Existing Application Instance with a New Form" for the procedures.
5.4 Removing Attributes Mapped for Target Resource Reconciliation
The SingleValueAttributes and MultiValuedAttributes attributes contain the list of target system attributes that are mapped for scheduled task reconciliation. These attributes are found in the RACF Reconcile All Users and RACF Reconcile All LDAP Users scheduled tasks. If you want to remove an attribute mapped for scheduled task reconciliation, then remove it from the SingleValueAttributes or MultiValuedAttributes attributes.
5.5 Using the Provisioning Agent to Run IBM z/OS Batch Jobs
You can use the Provisioning Agent to run IBM z/OS batch jobs after provisioning operations. This feature provides an interface to the batch environment of IBM z/OS. For example, a CLIST script written in IBM REXX can be called through the standard TSO JCL. When it is called, the CLIST can perform user functions such as calling IBM DB2 UDB for database table updates, calling user programs to handle file updates, and generating reports.
To configure the Provisioning Agent to run IBM z/OS batch jobs:
-
Open the Provisioning Agent control file in a text editor.
See Chapter 2, "Deploying the IDF Advanced Adapter for IBM RACF" for information about this file.
-
In this file, create entries in the following format:
C=RACF_COMMAND,M=MEMBER_NAME,L=LIBRARY_NAMEP=USERID(Y),NAME(Y),CSDATA(003)If the user wants to perform special post-processing, a new feature has been added to only one parameter of the control file. The following is the definition for the new feature:
C=DELUSER,M=member-name,L=library_name,DEL=Y  or  DEL=N
DEL=Y  --  execute Rexx clist or z/OS job stream in library L=, M= and Perform the actual deluser via RACF
DEL=N  --  execute Rexx clist or z/OS job stream in library L=,M= and DO NOT issue the deluser to RACF
In the first line:
-
RACF_COMMAND can be ADDUSER, ALTUSER, DELUSER, CONNECT, or REMOVE.
-
MEMBER_NAME is the name of the IBM z/OS PDS that is submitted for execution in the IBM z/OS batch environment.
-
LIBRARY_NAME is the name of the IBM z/OS PDS library name that contains the member specified by
MEMBER_NAME.The output of the submitted job is not sent back to the Provisioning Agent of the LDAP Gateway. You must take steps to ensure that the required action is taken based on the status of the operation.
For example:
C=ADDUSER,M=ABCD,L=PDS.LIBRARY.ONE
P=USERID(Y),NAME(N)
The Provisioning Agent fetches the RACF user ID and passes it as a parameter to a REXX clist. The REXX clist must be set up to support parameters or arguments as shown in this example:
/* rexx */
Arg p1
Here, p1 is the RACF user ID and it can be used in the REXX clist.
The same applies for NAME. If NAME(Y) and USERID(Y) are used, then the REXX clist can be similar to the following:
/*    rexx      */
Arg p1 p2
Here, p1 is the RACF user ID and p2 is the name.
If USERID(Y),NAME(N) is used, then only the user ID is passed.
The csdata field can also be passed. The following example shows how to create and pass this field:
See Also:
Target system documentation for more information-
Define a csdata segment. See the IBM RACF System Administrator's Guide for information about the procedure.
-
To populate a CSDATA segment with one field:
Altuser IDF004 CSDATA(EMPSER(100100))
lu idf004 csdata noracf
USER=IDF004
CSDATA INFORMATION
 ------------------
EMPLOYEE SERIAL= 0000100100
-
To populate a CSDATA segment with multiple fields:
Altuser idf004 csdata(address('99 Main St, Anywhere, NJ, 08022') Phone(555-555-5555))
lu idf004 csdata noracf
USER=IDF004
CSDATA INFORMATION
------------------
EMPLOYEE SERIAL= 0000100100
HOME ADDRESS = 99 Main St, Anywhere, NJ, 08022
HOME PHONE = 555-555-5555
For example:
C=ADDUSER,M=ABCD,L=PDS.LIBRARY.ONE
P=USERID(Y),NAME(N),CSDATA(001)
The Provisioning Agent fetches the RACF user ID and passes it and the EMPLOYEE SERIAL csdata field to a REXX clist. This format has been changed and on CSDATA, the number of CSDATA fields need to be passed. The passed fields including userID, name and CSDATA cannot exceed 80 bytes. A CSDATA(001) will pass the first CSDATA field defined.
Note:
A hyphen must be added between the two names in this example and the length must be provided.The REXX clist must be set up to support parameters or arguments as shown in the following example:
/* rexx */
Arg p1 p2
Here, p1 is the RACF user ID and p2 is Employee-Serial.
Note:
In this release of the Provisioning Agent, there is an 80-byte limit on the size of the field value that is passed. For example, if the user ID, name, and Employee-Serial are together over 80 bytes, one or two of these values must be removed so that the 80-byte limit is not exceeded. -
Save and close the file.
-
The following sequence of steps takes place after a provisioning operation:
-
The Provisioning Agent opens the control file and reads the association between provisioning functions and the members specified in the file.
-
If there is an entry for the provisioning operation that was performed, then the corresponding member is submitted to the IBM z/OS batch environment.
For example, suppose you had added the following entry in the control file:
C=ALTUSER,M=MY_MEMBER,L=MY_LIBRARY
At the end of a Modify User provisioning operation on the target system, the Provisioning Agent runs the MY_MEMBER member. This member performs the required operation on IBM z/OS.
5.6 Configuring the Connector for Provisioning to Multiple Installations of the Target System
You can configure the connector for multiple installations of the target system. You can also configure the connector for a scenario in which multiple logical partitions (LPARs), which are not associated with the first LPAR, are configured in the target system.
For each installation of the target system, you create an IT resource and configure an additional instance of the LDAP Gateway.
To configure the connector for the second installation of the target system:
Note:
Perform the same procedure for all installations of the target system.-
Create an IT resource based on the OIMLDAPGatewayResourceType IT resource type.
See Creating IT Resources in Oracle Fusion Middleware Developing and Customizing Applications for Oracle Identity Manager for information about creating IT resources.
See Section 3.3, "Configuring the IT Resource" for information about the parameters of the IT resource.
-
Copy the current LDAP_INSTALL_DIR directory, including all the subdirectories, to a new location on the Oracle Identity Manager computer.
Note:
In the remaining steps of this procedure, LDAP_INSTALL_DIR refers to the newly copied directory. -
Extract the contents of the LDAP_INSTALL_DIR/dist/idfserver.jar file.
-
In the beans.xml file, change the value of the port in the <property name="port" value="xxxx"/> line to specify a port that is different from the port used for the first instance of the LDAP Gateway. The default port number is shown in the following example:
<bean id="listener" class="com.identityforge.idfserver.nio.Listener">
<constructor-arg><ref bean="bus"/></constructor-arg>
<property name="admin"><value>false</value></property>
<property name="config"><value>../conf/listener.xml</value></property>
<property name="port" value="5389"/>
</bean>
When you change the port number, you must make the same change in the value of the idfServerPort parameter of the IT resource that you create by performing Step 1.
-
Save and close the beans.xml file.
-
Open the LDAP_INSTALL_DIR/conf/racf.properties file and edit the following parameters:
-
_host_= Enter the IP address or host name of the mainframe.
-
_port_= Enter the port number for the second instance of the Provisioning agent.
-
_agentPort_= Enter the port number for the second instance of the Reconciliation agent.
Note:
The value of the _agentPort_ parameter must not be the same as that of the first instance if a second LPAR, which is not associated with the first LPAR, is configured in the target system. This value can be the same as the value of the idfServerPort parameter if you have two mainframe servers with IBM RACF running on each server.
-
-
Save and close the racf.properties file.
-
In a Linux or Solaris environment, if there are not enough socket file descriptors to open up all the ports needed for the server, then:
-
In a text editor, open the run script from the LDAP_INSTALL_DIR/bin directory.
-
Add the following line in the file:
-Djava.nio.channels.spi.SelectorProvider=sun.nio.ch.PollSelectorProvider
-
Save and close the file.
-
When you perform provisioning operations:
When you use Identity Self Service to perform provisioning, you can specify the IT resource corresponding to the IBM RACF installation to which you want to provision the user.
5.7 Initial LDAP Gateway Population and Full Reconciliation
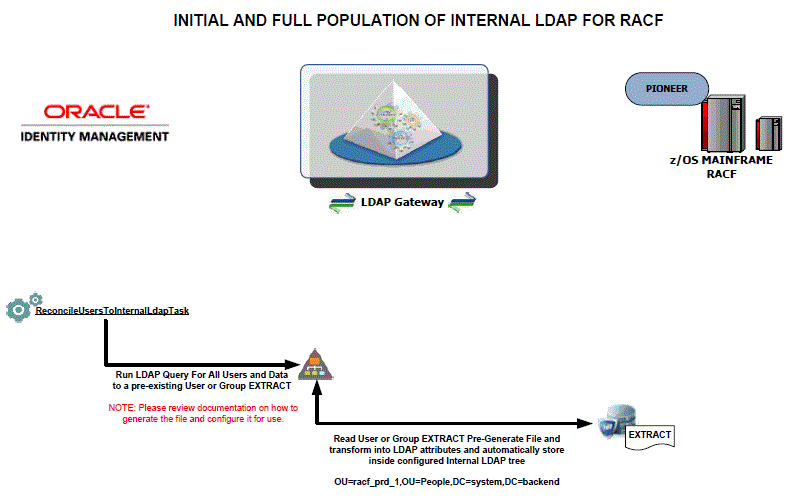
Instead of reconciling directly from the target system to OIM (which can be slow on large systems), the LDAP gateway offers an internal LDAP store that can be populated with target system users by using a single transaction to the mainframe. Oracle Identity Manager then reconciles user data from the LDAP store instead of the target system.
Reconciling user or group extract file requires the following procedure:
-
Download the RACSEQ Assembler program from the IBM website below:
http://www-03.ibm.com/systems/z/os/zos/features/racf/downloads/racseq.html -
Assemble RACSEQ must be AC(1).
Note that RACSEQ is called by the supplied GENUFILE and GENGFILE CLISTs and the output is stored in SYSTSPRT DDs.
-
Load the PIONEER.IMPORTU.FILE and PIONEER.IMPORTG.FILE.
Note:
The output of the PIONEER.IMPORTU.FILE and PIONEER.IMPORTG.FILE files must be the same as the DSNs used by the PIONEER started task. -
Build a JCL stream to create the PIONEER.IMPORTU.FILE: (USERS) file.
The SYSTSPRT (DD) points to the full import group IMPORTU file as shown below:
DISP=SHR,DSN=PIONEER.IMPORTU.FILE
SYSTIN DD INPUT % GENUFILE

//SRCHLST  JOB SYSTEMS,MSGLEVEL=(1,1),MSGCLASS=X,CLASS=A,PRTY=8,
//             NOTIFY=&SYSUID,REGION=0K
//STEP1    EXEC PGM=IKJEFT01,DYNAMNBR=20
//STEPLIB  DD  DISP=SHR,DSN=<YOURHLQ>.LINKLIB
//SYSPRINT DD  SYSOUT=*
//SYSTSPRT DD  DISP=SHR,DSN=<YOURHLQ>.IMPORTU.FILE
//MSGOUT   DD  SYSOUT=*
//SYSPROC  DD  DISP=SHR,DSN=<YOURHLQ>.REXX.CLISTS
//SYSTERM  DD  DUMMY
//SYSTSIN  DD  *
  %GENUFILE
/*
-
Build a JCL stream to create the PIONEER.IMPORTG.FILE: (GROUPS).
The SYSTSPRT (DD) points to the full import group IMPORTG file as shown below:
DISP=SHR,DSN=PIONEER.IMPORTG.FILE
SYSTIN DD INPUT % GENGFILE

//SRCHLST  JOB SYSTEMS,MSGLEVEL=(1,1),MSGCLASS=X,CLASS=A,PRTY=8,
//             NOTIFY=&SYSUID,REGION=0K
//STEP1    EXEC PGM=IKJEFT01,DYNAMNBR=20
//STEPLIB  DD  DISP=SHR,DSN=<YOURHLQ>.LINKLIB
//SYSPRINT DD  SYSOUT=*
//SYSTSPRT DD  DISP=SHR,DSN=<YOURHLQ>.IMPORTG.FILE
//MSGOUT   DD  SYSOUT=*
//SYSPROC  DD  DISP=SHR,DSN=<YOURHLQ>.REXX.CLISTS
//SYSTERM  DD  DUMMY
//SYSTSIN  DD  *
  %GENGFILE
/*
Note:
During the IMPORTG process, there is no direct support for a filter such as "alldata=true" to be passed on to the LDAP gateway. This filter enables to populate IMPORTG into the backend of the LDAP Gateway. If you require this special customization, you must create a custom scheduled task as described in Appendix F, "Code for Searching All Groups and All Group Data". -
Create a CLIST library or add the two attached CLISTs as listed below to the Pioneer clist library:
-
GENUFILE – for Users
-
GENGFILE – for Groups
-
-
To perform the full import for users, perform the following steps:
-
Execute the Step 4 job stream building the IMPORTU file.
-
After completion, run the RACF Reconcile Users to Internal LDAP scheduled task (invokes SRCHLU).
-
-
To perform the full import for groups perform the following steps:
-
Execute the Step 5 job stream building the IMPORTG file.
-
After completion, execute the RACF Find All Groups scheduled task (invokes SEARCH CLASS (GROUP)).
Once the processing is complete, run the following steps:
-
Ensure the racf.properties file contains the following values.
Note:
If they are not in the file, this is a good indication that the upgrade or installation was not completed in full.-
USED FOR IMPORTING ALL USERS INTO INTERNAL META isStreamingUsers=true
-
USED FOR IMPORTING ALL GROUPS INTO INTERNAL META isStreamingGroups=true
Note:
if you want to add or modify these values, the gateway must be stopped and re-started before performing the next step. -
-
Run the RACF Reconcile Users to Internal LDAP scheduled task. This invokes SRCHLU. See Section 5.7.1, "Reconcile User Extract File" for details.
-
Run the RACF Find All Groups scheduled task. This invokes SEARCH CLASS (GROUP).
-
5.7.1 Reconcile User Extract File
This feature will perform full reconciliation 30% - 50% faster than the normal out-of-the-box scheduled task that reconciles all users. This requires coordination with configuration changes for the Pioneer Mainframe Agent.
-
Have the Mainframe Team configure the Pioneer agent to use a generated file. (See Chapter 2, "Deploying the IDF Advanced Adapter for IBM RACF"). Run the IRRXUTIL to use the EXTRACT USER or GROUP command that will generate the file of all users and data.
-
Open the LDAP_INSTALL_DIR/conf/racf.properties file for editing.
-
Set the value of the _internalEnt_ property to
true. -
Save and close the property file.
-
Log in to Identity System Administration, search for and run the RACF Reconcile Users to Internal LDAP scheduled task. This scheduled task will initially populate the internal LDAP store with all user profiles. See Table 4-6 for information about the attributes of the RACF Reconcile Users to Internal LDAP scheduled task.
-
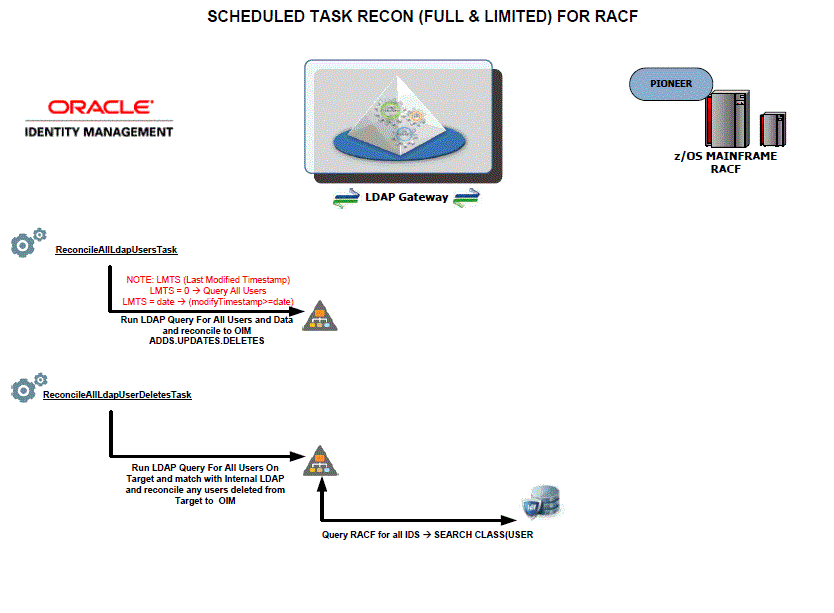
Search for and open the RACF Reconcile All LDAP Users scheduled task.
-
Enter values for the attributes of the RACF Reconcile All LDAP Users scheduled task. See Table 4-7 for information about the attributes of the RACF Reconcile All LDAP Users scheduled task.
-
Run the RACF Reconcile All LDAP Users scheduled task. This task reconciles each user from the internal LDAP store to Oracle Identity Manager.
RACF Advanced Connector – Design/Deployment Review
5.8 Configuring Windows Service
In a Windows environment, the LDAP gateway server can also be installed as a Windows Service. This section describes the installation and configuration procedure of the Windows Service for the LDAP Gateway.
Overview of the Installation Process
The Windows Service for the LDAP Gateway is installed with a supplied IdentityForge batch file. The batch file for the Windows service installer should be updated with your system's JAVA_HOME, JVM, HOME, and APPLICATION_SERVICE_HOME variables. The Windows service installer uses the Apache Procrun utility prunsrv.exe to create a fully managed Windows Service for the LDAP Gateway.
To install and configure the Windows Service for the LDAP Gateway, you must perform the following steps:
-
In a text editor, open the IDF-Win-Service.bat file in the <LDAP_INSTALL_DIR>/win_service directory.
Modify the JAVA_HOME, JVM, HOME, and APPLICATION_SERVICE_HOME variables to match your environment settings. In the following example, the JAVA_HOME, JVM, HOME, and APPLICATION_SERVICE_HOME environment variables are set:
set JAVA_HOME=C:\software\Java\jdk1.7.0_55
set JVM=C:\software\Java\jdk1.7.0_55\jre\bin\server\jvm.dll
set HOME=D:\software\ldapgateway5.0
set APPLICATION_SERVICE_HOME=D:\software\ldapgateway5.0\win_service
-
By default, the Windows service is called LDAPGatewayService. This name can be customized. To modify the service name, perform the following steps:
-
Update the SERVICE_NAME variable with the chosen custom service name.
-
In the /win_service directory, rename the LDAPGatewayService application to match the chosen custom service name.
-
-
To customize the log file locations, you must edit the CG_IDFLOG and CG_XMLERRLOG variables as follows:
-
Locate the following section of the IDF-Win-Service.bat file:
rem set CG_IDFLOG="-Didf.logpath="%CG_LOGPATH%\idfserver_custom.log"
rem set CG_XMLERRLOG="-Didf.xmllogpath="%CG_LOGPATH%\idf.xml.error_custom.log"
-
Uncomment the CG_IDFLOG and CG_XMLERRLOG variables and modify the variable paths to match your custom locations.
-
Locate the following section of the IDF-Win-Service.bat file and uncomment the following lines:
rem set EXECUTE_STRING= "%EXECUTABLE%" //US//%SERVICE_NAME% ++JvmOptions %CG_IDFLOG%
rem call:executeAndPrint %EXECUTE_STRING%
rem echo .........
rem set EXECUTE_STRING= "%EXECUTABLE%" //US//%SERVICE_NAME% ++JvmOptions %CG_XMLERRLOG%
rem call:executeAndPrint %EXECUTE_STRING%
rem echo .........
-
Save and close the file.
-
-
After saving the file, execute the following command from a console from the <LDAP_INSTALL_DIR>/win_service directory to install the service:
> IDF_Win_Service install -
If there are any problems with the installation of the service from the batch file, you may need to check the JAVA_HOME and JVM variables to make sure they are accurate.
-
Once the service is installed, you can start, stop, and restart it from the standard Windows Services manager.
Modifying or Removing the Windows Service
If you need to modify the windows service settings, it is recommended to first uninstall the service, make the modifications, and then re-install the service.
To uninstall the service, execute the following command from the <LDAP_INSTALL_DIR>/win_service directory:
> IDF_Win_Service remove
5.9 Customizing Log File Locations
The name and log location of the main LDAP gateway log file (idfserver.log) and the EXTRACT XML error log file (idf.xml.error.log) can be modified by adding additional arguments to the LDAP gateway server STARTUP command. These arguments are optional, and you can include one, both, or neither in the STARTUP command:
-
In a text editor, open the run script from the LDAP_INSTALL_DIR/bin directory. This run script is used to start and stop the LDAP gateway.
-
If using a Windows system, open the run.bat file.
-
If using a UNIX system, open the run.sh file.
-
-
Add the arguments to the start command, located at the end of the run script:
-
The arguments should be added after the
-cp %CLASSPATH%argument. -
To modify the idfserver.log path, use the -
Didf.logpath=argument. -
To modify the idf.xml.error.log path, use the -
Didf.xmllogpath=argument.
In the following example, the start command will set the idfserver.log path to C:/logs/ldap/idfserver.log and the idf.xml.error.log path to C:/logs/errors/idf.xml.error.log:
%JAVACMD% %DEBUG% %JVM_OPTS% %SECURE% -cp %CLASSPATH% -Didf.logpath="c:/logs/ldap/idfserver.log" -Didf.xmllogpath="c:/logs/errors/idf.xml.error.log" -Djava.library.path=%HOME%/lib com.identityforge.idfserver.Main %1 %2 %3 %4 %5 %6 %7 %8 %9
-
5.10 LDAP Reconciliation Supported Queries
-
All User DN's and "uid" attribute
-
baseDn= ou=People,dc=racfxxx,dc=com
-
filter= (objectclass=*)
-
-
Single User Search for all data
-
baseDn=ou=People,dc=racfxxx,dc=com
-
filter= (uid=idxxx)
-
-
All Group DN's and "cn" attribute
-
baseDn= ou=Groups,dc=racfxxx,dc=com
-
filter= (objectclass=*)
-
-
Single Group Search for all data
-
baseDn= ou=Groups,dc=racfxxx,dc=com
-
filter= (cn=idxxx)
-
Dataset Profiles for a given USER (uid) Reconciliation Queries:
-
Dataset Profiles returned for a user
-
baseDn= ou=Datasets,dc=racfxxx,dc=com
-
filter= (uniqueMember=uid=idxxx,ou=People,dc=racfxxx,dc=com)i
OR
-
Filter= (uid=idxxx)
-
User-Defined Resources Reconciliation Queries:
-
Retrieve All User-Defined Resources: SEARCH CLASS (type)
-
baseDn= ou=Resources,dc=racfxxx,dc=com
-
Filter= (resourceType="YOUR CLASS TYPE")
This returns all LDAP DN entries and each entry will contain the Resource ID via the 'cn' LDAP attribute.
-
-
Retrieve Single User-Defined Resource: RLIST (cn) ALL
-
baseDn=ou=Resources,dc=racfxxx,dc=com
-
Filter= (cn=classID)
-
5.11 Handling PIONEER Error Messaging Exceptions in the Gateway
This section provides instructions on using the error handling feature.
The existing error handling routines have been enhanced to allow for the ability to configure what error messages to look for when deciding that a request sent to Pioneer has succeeded or failed.
Turn on or turn off the ability to examine Pioneer SAF or RACF code
Some commands will return SAF or RACF codes whenever a command fails.
To turn on the ability to automatically throw an error whenever codes greater than 0 are returned, add the property check-return-codes=yes to the racf.properties file.
Note:
Warnings may also show up as codes greater than 0 depending on the type of mainframe environment. Check for false positives with testing before determining if this is an appropriate capability to turn on before deploying to a production environment.Configuring Custom Error Messages
Many commands will require parsing out the return value looking for error messages. The error handling has been expanded to include a configuration file that allows for extending the set of error messages you might encounter.
Each error message which is being searched, is defined as a regex signature.
The RACF connector comes with a default signatures file that is located in the idfserver.jar file:
com/identityforge/idfserver/backend/racf/repository/errorMsgSignatures.xml
You can add, overwrite, or disable the defaults in favor of custom messages.
To perform this, create a new XML file representing the messages to add, replace, or disable:
conf/custom-racf-error-sig-file.xml
In the racf.properties file, add a reference to the newly created file by setting a value for the errormsg-sig-file property. In the following example, the errormsg-sig-file property has been set to the location of the newly created file:
errormsg-sig-file=../conf/custom-racf-error-sig-file.xml
Note:
Path to the configuration file is relative to the folder that the gateway is executing in (most installations will have the gateway running from within the /<gateway>/bin folder).At runtime, the contents of the custom signature file will be merged into the default file and the overrides/additions will be applied. All edits made to the custom file will require a restart of the gateway to take effect.
The following are the examples of a custom signature:
Example 1:
File - conf/custom-racf-error-sig-file.xml

    <?xml version="1.0" encoding="utf-8"?>
    <Signatures>
        <Signature id="custom1" regex="^C4R541E .*" enabled="true"/>
        <Signature id="custom2" regex="^ICH02005I .*" enabled="true"/>
        <Signature id="custom3" regex="^IKJ56701I .*" enabled="true"/>
    </Signatures>
The first signature looks for C4R541E located at the beginning of the returned message from Pioneer. If found, it would get flagged as an error and the message returned.
The second signature looks for ICH02005I located at the beginning the returned message from Pioneer. If found, it would get flagged as an error and the message returned. Modify as needed for example, signature 3 regex="^IKJ56701I .* to indicate. If found, it would get flagged as an error and the message returned.
In the preceding example, the entry enabled="true" implies that the messages defined in the regex patterns are not to be considered as errors.
Note:
Given that according to the IBM RACF manual "I" type messages are technically classified as informational and not error related, you will need to make sure that it truly is a failure on the Mainframe rather than something whereby the account gets created and Oracle Identity Manager thinks it failed. We explicitly called out this RACF code as a warning as that is what the original implementation was doing.Example 2:
File - conf/custom-racf-error-sig-file.xml <?xml version="1.0" encoding="utf-8"?><Signatures> <Signature id="custom1" regex="^ICH\d{5}I .*" enabled="true"> <Exception regex="^ICH01432I .*"/> <Exception regex="^ICH05555I .*"/> <Exception regex="^ICH01024I .*"/> </Signature<Signature id="custom2" regex=".*INVALID DEPARTMENT.*" enabled="true"/><Signature id="e2" enabled="false"/></Signatures>
The first signature looks for the ICHxxxxxxI pattern located at the beginning the returned message from Pioneer.If found, it then examines the exceptions defined. If the message started with ICH01432I or ICH05555I, it would get marked as a warning and ignored, otherwise it would get flagged as an error and the message returned.The second signature looks for INVALID DEPARTMENT to show up anywhere in the returned message. If found, it would get flagged as an error and the message returned.The third signature is an example of disabling an existing default signature. All default signatures start with "e" in the id attribute followed by a number. By referencing the id, the default signature's regex, enablement flag, and or exceptions can be replaced with a custom override. To obtain the list of default signatures currently deployed, open up the JAR file and locate the file.
com/identityforge/idfserver/backend/racf/repository/errorMsgSignatures.xml
In the preceding example, the entry enabled="true" implies that the messages defined in the regex patterns are not to be considered as errors.
Note:
Given that according to the IBM RACF manual "I" type messages are technically classified as informational and not error related, you will need to make sure that it truly is a failure on the Mainframe rather than something whereby the account gets created and Oracle Identity Manager thinks it failed. We explicitly called out this RACF code as a warning as that is what the original implementation was doing.