| Oracle® Identity Manager Administrative and User Console Guide Release 9.1.0 Part Number E10360-03 |
|
|
View PDF |
| Oracle® Identity Manager Administrative and User Console Guide Release 9.1.0 Part Number E10360-03 |
|
|
View PDF |
The Resource Management features of the Administrative and User Console enable you to manage resource objects for an organization or individual user. Managing resources includes the following activities:
Searching for and viewing the details of a resource
Disabling, enabling, and revoking a resource from users or organizations
Managing resource administrator and authorizer groups
Viewing, creating, and modifying workflows
Creating and managing IT resources
Creating and managing scheduled tasks
This chapter includes the following topics related to managing resources:
To view the details of a resource:
Note:
As described in the following procedure, when performing a search, if you select a value from a list and do not enter a corresponding search value, then an error occurs. In addition, if you select the same value twice from the lists, then an error occurs.In the Administrative and User Console, click Resource Management, and then click Manage.
The Resource Search page is displayed.
Use the fields at the top of the page to select the search criteria, and enter the corresponding search value in the adjoining field or use the asterisk (*) wildcard character. To use the Resource Type and Target criteria, select a value from the corresponding box.
From the Resource Audit Objective list, select the required option.
The Resource Audit Objective list lets you group resources by any data type. You can select multiple values for the same resource. You can also add audit schedule values for quarterly, semiannual and annual reviews in the list of values of the field, and select a combination, such as SOX and quarterly, as audit requirements.
The predefined values in the Resource Audit Objective list are as follows:
SOX (Hosts Financially Significant Information)
HIPAA (Hosts Private Healthcare Information)
GLB (Hosts Non-Public Information)
Requires Quarterly Review
Requires Annual Review
Click Search.
The results table is displayed.
Click the name of a resource. For example, you can select a resource named Oracle Identity Manager User.
The Resource Detail page is displayed.
To view detailed information about the resource, use the menu.
Detailed information that you can view includes the following:
Organization Associated With This Resource
Resource Administrators
Resource Authorizers
You can enable, delete, and revoke resources that are associated with an organization. You can also determine mapping categories for resources that are provisioned more than once to an organization.
To work with an organization that is associated with a resource:
Perform Steps 1 through 3 of the procedure described in the "Viewing Resource Details" section.
Select the Organization Associated For the Resource option.
The Organization Associated For the Resource page is displayed.
Use the options to filter the list of associated organizations.
Selecting the All option lists all the organizations. The By Status option filters the organizations on the basis of values in the Resource Status column. The organizations associated with the resource are listed under the Organization Name column. The resource status in this case, indicates that the resource is provisioned for each of the organizations listed. To modify the resource for the organization, select one of the following:
Enable
Disable
Revoke
The value in the Identifier column corresponds with a field type that you can map from the Process Definition form in the Design Console by using the Map Descriptive Field. This value lets you distinguish which mapping category is defined, such as Process Type, Organization Name, or Request Key, when the same resource has been provisioned several times to the same organization.
On the Resource Detail page, select Resource Administrator. The Resource Administrators page displays the names of groups that are assigned as administrators to this resource. This page also displays the Write Access and Delete Access permissions. These are permissions that the administrator groups have on the resource, but not with resource parameters. Write access allows the group to make changes to the resource. Delete access allows the group to delete the resource.
You can perform the following operations:
To assign a user group as administrators for resources:
Click Assign.
The Assign Administrators page is displayed.
This page displays all group names that can be assigned to this resource. Select the options to activate the write and delete access and assign the group to this resource.
Click Assign.
The Confirm Assign page is displayed. This page displays the new user groups assigned to this resource.
Click Confirm Assign or click Cancel.
The Resource Administrators page is displayed with a list of all group names associated with this resource. You can modify this information.
To administer a resource, you can create a group by using the Delegated Administrator Wizard.
Note:
When you create a group, if you belong to other groups with write and delete access, then these other groups become administrative groups for the new group. This rule is applied even when you create an organization.To create a new group:
Expand Resource Detail, click Resource Administrator, and then click Create New Group.
The Assign Administrators – Step 1: Assign Administrators page is displayed.
In the results table, click the user login names that you want in the administrative group, and then click Add.
The names appear in the Selected display panel.
Click Continue, or click Exit to end the wizard.
The Assign Administrators – Step 2: Specify Alias page is displayed.
Enter the alias name for the administrator group, and click Continue.
Otherwise, click Back to return to the previous page, or click Exit to end the wizard.
The Assign Administrators – Step 3: Specify Permissions page is displayed.
Select the Write and Delete options to assign these permissions to the administrator group, then click Continue.
Otherwise, click Back to return to the previous page, or click Exit to end the wizard.
The Assign Administrators – Step 4: Verify Delegation Information page is displayed.
To make a change to the information you entered in the previous steps, click Change.
After verifying your changes, click Continue. Click Back to return to the previous page, or click Exit to end the wizard.
The Resource Administrator page is displayed. The new group is added to the results table.
You can update the permissions of an administrative group.
To update the permissions:
Click Update Permissions.
The Update Administrators page is displayed.
To change the permission setting for an administrative group, click the options for write and delete access.
Click Update to make the modifications, otherwise, click Cancel.
The Confirmation page is displayed. It displays the administrative group names that you updated.
If these are the correct names, click Confirm Update, otherwise, click Cancel.
You can determine which user groups are authorized to provision the resource.
To determine the resource authorizer:
On the Resource Detail page, select Resource Authorizer from the menu.
The Resource Authorizers page is displayed.
To set the level of priority for authorizing this resource, select Increase/Decrease Priority.
To delete the authorizer of this resource, select the appropriate Group Name option, and then click Delete.
To add additional user groups to authorize resources, click Assign.
The Assign Authorizers page is displayed.
Select the appropriate group name option and click Assign, otherwise, click Cancel.
The Confirmation page is displayed.
If the information is correct, click Confirm Assign, otherwise, click Cancel.
The Resource Authorizers page is displayed. Note that the group name that you assigned to this resource is added to the results table.
The Resource Workflows option in the Administrative and User Console consists of the Workflow Visualizer and the Workflow Designer. Using the Workflow Visualizer, you can view workflows. Using the Workflow Designer, you can create and edit workflows. This section discusses the Workflow Visualizer.
The Workflow Visualizer tool provides a visual representation of task sequences, dependencies, and other components of a workflow definition. The visual representation provides an overview of the workflow, its relationships, and the task components that constitute the flow. You can also print the workflow view.
The Workflow Visualizer tool displays processes of types Approval and Provisioning. You use the Approval type process to approve the provisioning of Oracle Identity Manager resources to users or organizations. Unlike provisioning processes, approval processes usually consist of tasks that must be completed manually. The Provisioning type process is used to provision Oracle Identity Manager resources to users or organizations.
Note:
To access the Workflow Visualizer, the Nexaweb applet requires your Web browser configuration to use Java Virtual Machine 1.4.2.x.x.This section includes the following topics:
To open the Workflow Visualizer:
On the Resource Detail page, select Resource Workflows from the list.
The Resource Workflows page is displayed. This page displays the resource name and a table that lists the names of the workflow definitions for this resource.
To render the workflow definition into a graphic flowchart, select the required workflow.
A graphical representation of the workflow definition is displayed in a new window.
For provisioning workflows, multiple tabs are displayed on the Workflow Designer page. For approval workflows, a single workflow is displayed on the Workflow Designer page with no tabs on the page.
See Also:
"Overview of the Resource Model" for information about provisioning and approval processesThe Approval Workflow Definition is displayed as one workflow that represents the entire approval process. Provisioning workflows can have forms associated with them, and the workflow details header shows the form name. Approval workflows do not have forms associated with them, and therefore, the workflow details header shows no information on the form.
Table 12-1 lists the information fields in the Workflow Visualizer.
Table 12-1 Information Fields in the Workflow Visualizer
| Field | Description |
|---|---|
|
Workflow Name |
The name of the Process Definition. |
|
For Resource |
The name of the Object (resource object that is either approved or provisioned). |
|
Workflow Type |
The Process Definition type (Approval or Provisioning). The type also indicates whether or not the workflow is the default for the resource. |
|
Form Name |
The name of the form associated with a provisioning workflow. In case of an approval workflow, this information is not shown. |
Table 12-2 describes the toolbar menu items in the Workflow Visualizer.
Table 12-2 Toolbar Menu items in the Workflow Visualizer
| Field | Description |
|---|---|
|
Display Option |
This option lets you view the elements on the page. You can show or hide the elements on the page, which helps in keeping the page uncluttered. Display Unknown Response Code: The Unknown Response Code is defined for every task in the workflow. It is not used in the logic of the workflow. However, you can use this option to display the Unknown Response Code. Display Adapter Name On-Screen: You can display the name of the automated adapter. Display Undo Tasks: You can display the undo tasks for the tasks. Display Recovery Tasks: You can display the recovery tasks for the tasks. |
|
Generate Image |
This option enables you to save the workflow view as an image that can be printed. When you click this menu item, a new browser window opens and it displays a JPEG formatted image. The entire workflow is displayed, even parts of the flowchart that are hidden due to scrolling limitations of the display area. You can then use the standard Web browser features to save the image on your computer. |
|
Reload Workflow |
This option refreshes the workflow view and rearranges the different items on the page based on a predefined graph algorithm. |
|
Legend |
This option provides an explanation of all the visual components that are used to create the flowchart of the workflow definition. Figure 12-1 shows the Legend page. Markers The Markers nodes represent position markers for special conditions. These conditions are: Start Point: This marker represents the logical start point within the workflow. It is not an actual task within the workflow definition. On-Page Reference: This marker represents a task node that has already been drawn somewhere else in the workflow chart. It is used to show connectivity to other tasks without crowding the workflow view with crossing links. Response Sub-Tree: The Response Sub-Tree (Expansion Nodes) helps keep the workflow uncluttered by hiding significant subtrees of response nodes. You can double-click the Expansion Node marker to redraw the flowchart with the responses. Tasks The Tasks nodes represent the tasks in the workflow. They are: Manual Tasks: These tasks require user action in order to be completed. Approval processes are generally composed of manual tasks. Automated Tasks: These tasks do not require user interaction in order to be completed. Automated tasks always require a process task adapter. Provisioning processes generally consist of automated tasks. Responses The Response nodes represent the response codes that are defined on the tasks. The Response node shows the actual response code within it. The response code is based on the status that the response has set on the task. Completes Task: The process task has been completed, and this is indicated in green color. Rejected Task: The process task has been rejected, and this is indicated in red color. Cancels Task: The process task has been canceled, and this is indicated in blue color. Links Direction arrow lines connect the task and response nodes and indicate the flow of the workflow. The color of the link indicates the type of relationship between two nodes that it connects. The types of links are: Initial Task: The Initial Task is the first process task in the workflow definition. Response Generated Task: The Response Generate Task is defined as a process task that is triggered when the current task has the Completed status. In general, a new process task can be triggered when the conditional task receives a particular response code in conjunction with the running of the process task. Recovery Task: The Recovery Task is defined as a process task that is triggered when the current process task has the Rejected status. Undo Task: The Undo Task is defined as a process task that is triggered when the current process task has the Canceled status. Dependent Task: The Dependent Task is defined as a process task that is dependent on another process. Oracle Identity Manager can start this type of task only when the process task on which it is dependent is completed. |
Figure 12-1 shows the Legend page.
In addition to the Information Fields and Toolbar Menu Items of the Workflow Visualizer, the UI elements of the workflow are tasks and responses. For information about tasks and responses, see Table 12-1 and the "Creating and Configuring Tasks and Responses" section.
The Provisioning Workflow Definition is displayed with associated event tabs of the logical flow of the way tasks get executed based on their responses. The event tabs represent the various task sequences for a specific event in the workflow definition. When you click an event tab, it displays the appropriate tasks for the workflow event of the process. You can arrange the flowchart to meet your requirements. If there is no task defined for the workflow event, then the tab displays a blank view. If there is more than one task sequence for the workflow event type, then the tab displays a menu from which you can select the process flowchart that you want to view.
The Provisioning tab shows the tasks that will provision a resource. When the workflow type is Provisioning, the workflow shows all the tasks needed to provision a resource.
The Reconciliation tab shows the reconciliation event for the provisioning process with marker tasks inserted into it: either Reconciliation Insert Received, Reconciliation Update Received, or Reconciliation Delete Received. These tasks can have adapters attached to them to start a provisioning action. If a task has no adapters attached to it, then a response code of Event Processed is assigned to the task. Additional provisioning process tasks can be generated based on this response code to start a provisioning flow due to the reconciliation event.
The Service Account tab shows all the provisioning processes of service accounts for users (administrators). When a user is provisioned with a service account, Oracle Identity Manager manages a mapping from the user's identity to the service account. When the resource is revoked or the user is deleted, the provisioning process for the service account is not canceled. Instead, a task is inserted into the provisioning process to remove the mapping from the user to the service account. The provisioning processes of the service account are: Service Account Changed, Service Account Alert, and Service Account Moved.
The User Event tab shows the workflows that respond to changes to a user record, for example, updating the password or user ID.
The Org Event tab shows workflows that respond to changes to an organization record (for example, updating the name or parent name) that the resource is provisioned to or the organization of the user that the resource is provisioned to.
The Resource Event tab shows workflows that respond to state changes of the provisioned resource instance, for example, being enabled or disabled.
This section discusses the various operations that you can perform by using the Workflow Visualizer:
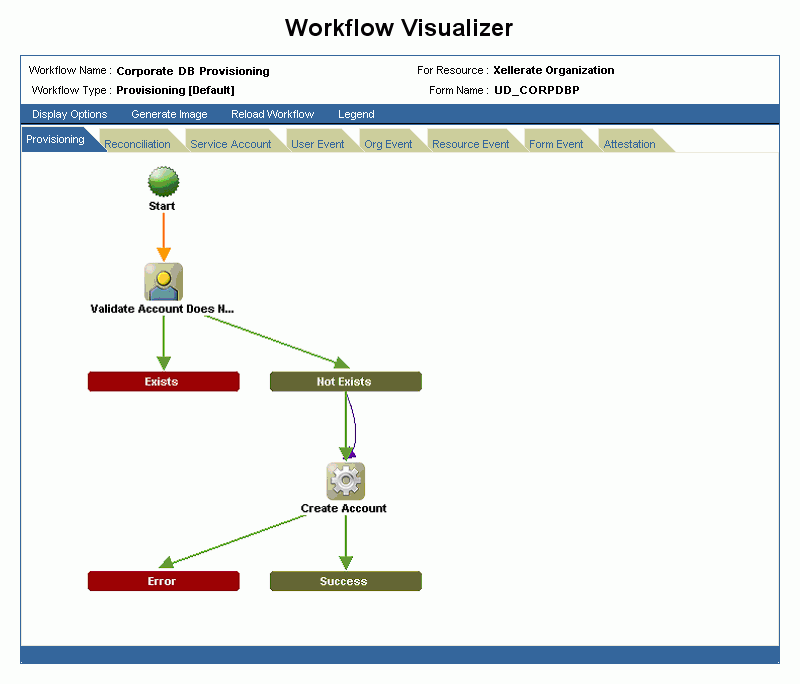
Suppose the Corporate DB Provisioning workflow definition is shown. Selecting an event tab displays the appropriate sequence of tasks for that event. These event tabs are discussed in the "Using the Provisioning Workflow Definition Event Tabs" section. Figure 12-2 shows a sample workflow in the Workflow Visualizer.
Figure 12-2 Sample Workflow Displayed in the Workflow Visualizer
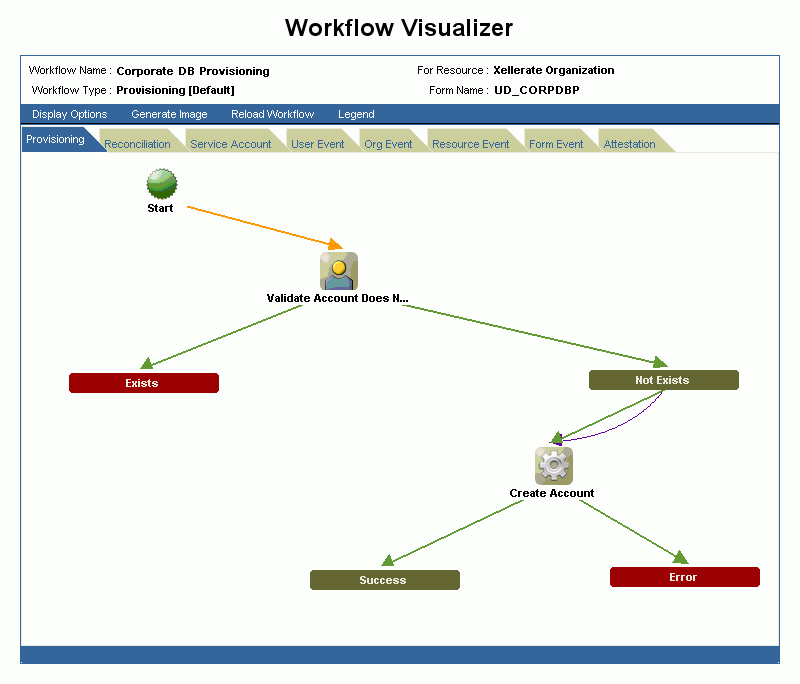
You can rearrange the graphical workflow by moving the icons that constitute the workflow definition to any location in the workflow view. As you move an icon component, the direction arrow continues to be associated with the link. The drag-and-drop functionality of the components in a workflow is illustrated in Figure 12-3.
Figure 12-3 Using Drag-and-Drop in the Workflow Visualizer
You can also use the Display Options toolbar menu item to display or hide Unknown Response Code, Adapter Name, Undo Tasks, and Recovery Tasks. The workflow automatically refreshes and redraws the workflow based on the changes that you made.
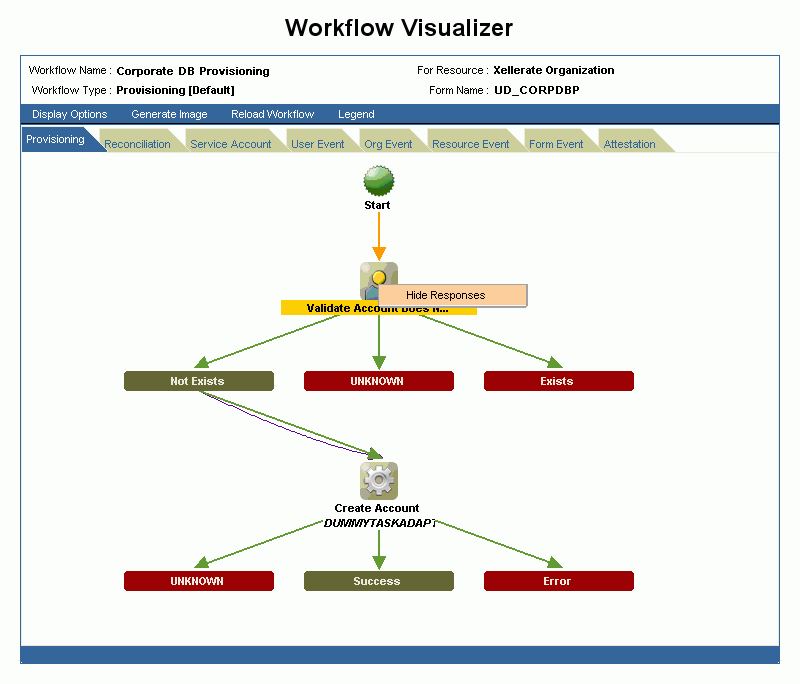
When you right-click a task node, the Hide Responses option is displayed. When you click this option, the response subtree collapses and is replaced with an expansion node. The task node label is highlighted in yellow to denote that it was collapsed. If the node is collapsed, then the Hide Responses option does not appear. Figure 12-4 shows the task node.
Figure 12-4 Using the Task Node (Shortcut Menu)
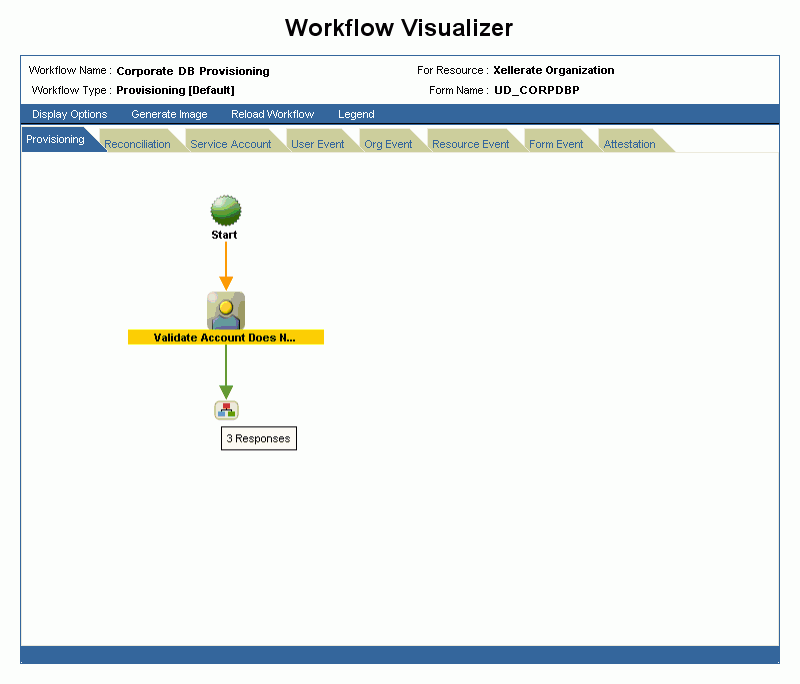
Task Nodes with more than five response codes, not including the Unknown Response code, are not to be drawn with their responses in the flowchart. Instead, an expansion node replaces the entire response subtree. When you double-click the expansion node, the flowchart is redrawn to display the response subtree for the parent task (node). The label of the task node is highlighted in yellow. Figure 12-5 shows a collapsed response subtree.
Figure 12-5 Collapsed Response Subtree in the Workflow Visualizer
Note:
When you place the cursor over the expansion node, a tooltip indicates how many response codes are associated with it. Unknown Response Codes are hidden, by default.To view detailed information about a particular task, double-click the task icon. The Task Detail page displays information about the task definition on the following tabs:
General: This tab displays task information, for example, the name and description.
Automation: This tab provides information about any adapter automating the task, its status, and variable mappings.
Task Assignment: This tab displays information about how the task is assigned and all associated information.
Depends On: This tab lists all tasks that the selected task depends on.
Resource Status Management: This tab shows the mapping between the task status and the resource status.
Table 12-3 describes the fields on the General tab:
Table 12-3 Fields on the General Tab
| Field | Description |
|---|---|
|
Task Name |
This field displays the name of the process task. |
|
Task Description |
This field displays explanatory information about the process task. |
|
Task Effect |
This field indicates the process action for this task. It can be |
|
Retry Interval |
This field indicates the time in minutes, for which you want to wait before adding this process task instance. |
|
Retry Attempt Limit |
This field indicates the number of times Oracle Identity Manager will retry a rejected task. |
|
Conditional Task |
This field specifies any condition that must be met for the process task. |
|
Complete On Recovery |
This field indicates that Oracle Identity Manager will change the status of the current process task from |
|
Allow Cancellation While Pending |
This field indicates whether or not the process task can be canceled if its status is |
|
Allow Multiple |
This field indicates whether or not the task is allowed to be inserted multiple times within a single process instance. |
|
Required For Workflow Completion |
This field indicates that the process cannot be completed if the process task does not have a |
|
Manual Insert |
This field indicates whether or not a user can manually add the current process task to the process. |
Tasks belonging to provisioning processes are usually automated. Table 12-4 describes the fields on the Automation tab.
Note:
If the task is not automated, then this tab is not displayed.Table 12-4 Fields on the Automation Tab
| Field | Description |
|---|---|
|
Adapter Name |
This field shows the name of the adapter. |
|
Adapter Status |
This field indicates whether or not the adapter is completely mapped. |
|
Adapter Variable |
This field contains a user-defined placeholder within the adapter that contains run-time application data used by its adapter tasks. |
|
Mapped? |
This field indicates whether or not the adapter variable is mapped. |
This tab specifies the assignment rules for the process task. These rules determine how the process task is assigned.
Task assignment rules are associated with tasks of approval processes, because these tasks are usually completed manually. Tasks belonging to provisioning processes are usually automated. As a result, they do not need task assignment rules.
A resource is provided with predefined provisioning statuses that represent the various statuses of the resource object throughout its lifecycle as it is provisioned to the target user or organization. This tab displays the link between the status of a process task (Task Status) and the provisioning status of the resource (Resource Status) to which it is assigned. Table 12-5 describes the fields on the Resource Status Management tab.
Table 12-5 Fields on the Resource Status Management Tab
| Field | Description |
|---|---|
|
Task Status |
The status can be one of the predefined provisioning status types. |
|
Resource Status |
The status can be one of the following: |
The Workflow Designer provides the ability to create and modify workflows. While the Workflow Visualizer provides a graphical view of the workflows, the Workflow Designer provides the ability to create workflows and to edit them.
See Also:
Oracle Identity Manager Design Console Guide for information about the Process Definition formThis section discusses the following topics:
To open the Workflow Designer:
In the left navigation pane, click Resource Management, and then click Manage. The Resource Search page is displayed.
Search for a resource.
Select a resource by clicking the resource name. The Resource Detail page is displayed.
Select Resource Workflows from the additional details list. The Resource Workflows page is displayed.
Click Create New Workflow to open the Workflow Designer and create a new workflow. Alternatively, click Edit in the Edit Workflow column of the results table to open the Workflow Designer and edit an existing workflow.
On the Resource Workflows page, when you click Create New Workflow, the Workflow Designer opens with the Create Workflow dialog box, as shown in Figure 12-6.
In this dialog box, you must specify the values that are required to create a new workflow. Table 12-6 describes the fields in the Create Workflow dialog box.
Table 12-6 Fields in the Create Workflow Dialog Box
| Field | Description |
|---|---|
|
Workflow Name |
The name of the new workflow. |
|
Workflow Type |
The Business Workflow definition type (Provisioning or Approval). Approval is selected, by default. |
|
Workflow Form |
The form associated with the resource for which the workflow is defined. The forms can be:
This field is enabled if the workflow type is Provisioning. It is disabled if the workflow type is Approval. |
|
Default Workflow |
This check box specifies whether or not the current Business Workflow is to be designated as the default approval or provisioning Business Workflow for the resource object with which it is associated. If this check box is selected, then the Business Workflow will be set as the default approval or provisioning Business Workflow for the resource object to which it is assigned. If this check box is not selected, then the process will start only if a process selection rule causes it to be selected. |
|
Create Workflow |
The button to create the workflow. |
After you click Create Workflow in the Create Workflow dialog box by selecting the Provisioning option, the Workflow Designer main page is displayed as shown in Figure 12-7.
This page has different sections, with each section giving more information or options to extend the new workflow.
The Workflow Designer main page consists of the following sections:
For Approval workflows, the Workflow Designer main page looks different without the left menu section.
This section displays the following labels that provide global information about the current workflow:
Workflow Name: The name of the current workflow
Workflow Type: The type of the current workflow, Provisioning or Approval
For Resource: The resource to which the current workflow is attached
The toolbar provides features to manage and view the workflow designer pages. This includes options to configure the global workflow information such as the name, form name, auto save, auto prepopulate, generating an image of the graphical workflow view, reloading the workflow, a popup legend, saving the workflow, and providing display options.
This section discusses the functions of the following toolbar buttons:
Clicking Workflow Configuration opens the Workflow Configuration dialog box, as shown in Figure 12-8. This dialog box provides options for configuring the current workflow.
Figure 12-8 Workflow Configuration Dialog Box
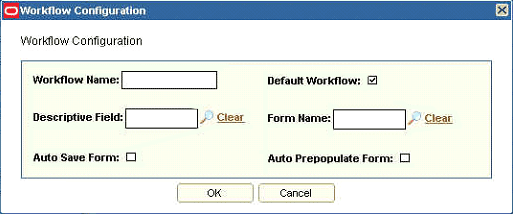
Table 12-7 describes the fields in the Workflow Configuration dialog box.
Table 12-7 Fields in the Workflow Configuration Dialog Box
| Field | Description |
|---|---|
|
Workflow Name |
The name of the current workflow. |
|
Default Workflow |
This check box specifies whether or not the current process is to be designated as the default approval or provisioning process for the resource object with which it is associated. Note: For more information about this check box, see "Creating a Workflow". |
|
Descriptive Field |
This is used to map any of the following to a particular instance of the provisioned resource:
This information is available only for the Provisioning workflow and not for the Approval workflow. |
|
Form Name |
The form assigned to the current workflow. This information is available only for the Provisioning workflow and not for the Approval workflow. |
|
Auto Save Form |
This check box is used to set autosave for the form during provisioning without prompting the user for form data. This helps in setting default values for form fields either through predetermined set default values or through data flows. This information is available only for the Provisioning workflow and not for the Approval workflow. |
|
Auto Prepopulate Form |
This check box is used to prepopulate the fields during provisioning, with data either from default values or from data flows. Setting this option lets you see the forms while provisioning, along with the data on the fields that you can modify. This information is available only for the Provisioning workflow and not for the Approval workflow. |
Clicking Task Library opens the Task Library page. The Task Library page displays a list of all the tasks in the workflow across all subworkflows. This page also shows a few parameters related to each task, such as in which subworkflows it is present (for provisioning workflows), whether or not multiple instances are allowed, whether or not cancellation while pending is allowed, retry period, and retry count. In addition, you can edit and delete tasks on this page. Figure 12-9 shows the Task Library page.
You can delete a task only after both the following conditions are met:
The task is removed from all workflows. This implies that the task is deleted by right-clicking the task on any subworkflow and clicking Remove Task and Subflow.
No instance of the task is present in the system. For instance, if a workflow is created with a task and if the resource for that workflow is provisioned to a user and the workflow is started resulting in the task being run, then an instance of that task is created in the system. In that case, the task cannot be deleted.
The Task Library page has search criteria on the top that you can use to search for tasks. The main section lists the tasks with various parameters. You can click a row to highlight it. If a task can be deleted, then the Remove Selected Task button is enabled along with the Edit Selected Task button.
Clicking Display Options opens the Set Display Options dialog box that provides options to specify how the workflow is displayed when you are designing the workflow. Figure 12-10 shows the Set Display Options dialog box.
Figure 12-10 Set Display Options Dialog Box
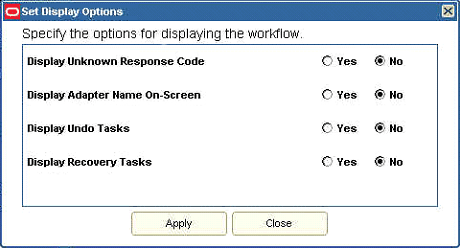
You can use this dialog box to enable or disable the following options:
Display Unknown Response Code: Display or hide unknown response codes.
Display Adapter Name On-Screen: Display or hide adapter names attached to the tasks.
Display Undo Tasks: Display or hide undo tasks.
Display Recovery Tasks: Display or hide recovery tasks.
Clicking Generate Image saves the current view of the workflow as a JPEG image. The image opens in a new browser window.
Clicking Legend opens the Legend dialog box, which is shown in Figure 12-11. This dialog box shows the following types of elements:
Markers: These elements represent a particular marking or place in the workflow. For example, the starting point, an on-page reference, or a place representing an extended workflow with more elements underneath can be represented with a marker.
You can right-click a Task element and select the option to hide the responses. When you hide a response, the icon for the Response subtree is displayed to indicate that there are hidden responses. The on-page reference marker refers to other elements on the page whose relationship is not shown with links. An example of this is a response code defined for a task and for that response a response-generated task is defined. If this response-generated task has its response referring to the original task in a circular manner, then an on-page reference marker makes it easier to show the relationship.
Tasks: These icons are used to indicate manual and automated tasks. If a task has an event handler or an adapter attached to it for autocompletion, then it is an automated task. Otherwise, it remains a manual task.
Responses: These are the different color codes used for different types of response codes, such as Completes, Rejects, and Cancels. Any user-defined response code is shown with a different color code.
Links: These are the different color codes used for links that display the relationship or linkage between elements. Depending on the type of task the link refers to, the color code for the link is different. For example, the color code indicates whether or not the task is undo or recovery. The different types of links are: Initial Task, Response Generated Task, Recovery Task, and Undo Task.
Clicking Refresh reloads the workflow to display it with default indentations and locations for the labels and icons. It regenerates the topology to arrange the elements on the workflow by using the JGraph algorithm.
Clicking Save saves all changes made to the workflow, including all the additions and modifications to the Oracle Identity Manager database.
Caution:
You must click Save to commit the changes. If you close the Workflow Designer main page without saving the workflow, then all the changes will be lost.The designer page displays the workflow with all the elements and their positions in the process flow with the help of links. This is similar to a drawing board in which the components, such as tasks and responses, can be created by using appropriate options. These components on the designer page can be further configured. On this page, the different entities of the workflow can be graphically shown along with their relationship with each other. For a newly created workflow, this page displays a start marker that indicates the starting point for the workflow process. All the objects that are added to this page are relative to this marker, which acts as a reference point.
The menu section consists of the menu items that represent a particular subsection of the workflow. This section is available only for Provisioning workflows. The menu items available are the following:
Provisioning: This is the default page displayed when the Workflow Designer application is started.
Reconciliation: This provides a list of tasks that are run on reconciliation events, such as Reconciliation Insert Received, Reconciliation Update Received, and Reconciliation Delete Received. These tasks are submenu items under the Reconciliation menu item.
Service Account: Service accounts are general administrator accounts, such as admin1, admin2, and admin3, that are used for maintenance purposes. Usually, these accounts are used to allow one system, rather than a user, to interact with another system. The model for managing and provisioning service accounts is different from standard provisioning. Service accounts are requested, provisioned, and managed in the same manner as regular accounts. Service accounts use the same resource objects, provisioning processes, and process or object forms as regular accounts. A service account is distinguished from a regular account by an internal flag. When a user is provisioned with a service account, Oracle Identity Manager manages a mapping from the user's identity to the service account. This user is considered the owner of the service account. The tasks that are available under the Service Account menu item are Service Account Change, Service Account Alert, and Service Account Moved.
User Event: This provides a list of tasks that are run based on the events on users. They have the following default names:
Change User Location
Move User
Change User Type
Change User Password
Change User Manager
Change Username
Change First Name
Change Last Name
Change User Identity
Note:
These names are derived from the decoded values ofLookup.USR_PROCESS_TRIGGERS in the design console Lookup Definition form. If the values are modified, then these names will be different accordingly.A user event can be inserted into the workflow by clicking the plus sign (+) icon next to the User Event menu item. Clicking the + icon opens the Add User Event Lookups dialog box with a list of currently available event tasks, as shown in Figure 12-12. Selecting a task and clicking Add Event to Workflows will create a new menu item under the User Event menu and open the page for that workflow.
Figure 12-12 Add User Event Lookups Dialog Box
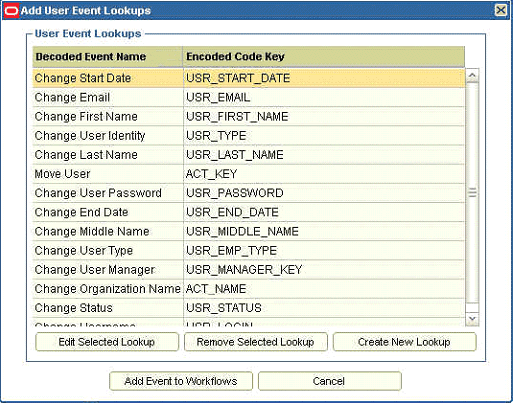
The Add User Event Lookups dialog box also provides the following options to create new lookup events and edit or remove existing lookup events:
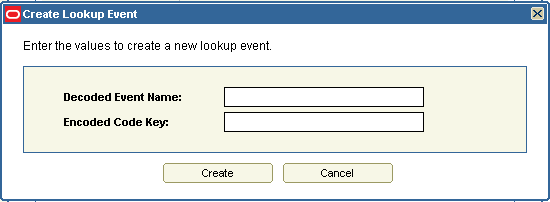
Create New Lookup: When you click this button, the Create Lookup Event dialog box is displayed, as shown in Figure 12-13.
Figure 12-13 Create Lookup Event Dialog Box
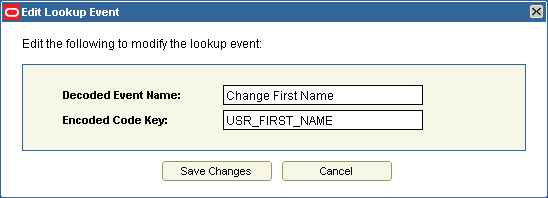
Edit Selected Lookup: When you click this button, the Edit Lookup Event dialog box is displayed, as shown in Figure 12-14.
Figure 12-14 Edit Lookup Event Dialog Box
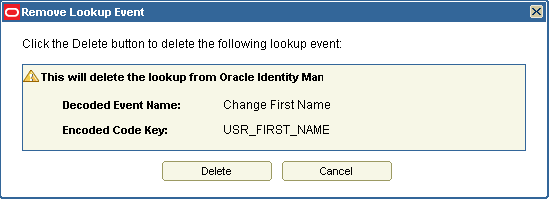
Remove Selected Lookup: When you click this button, the Remove Lookup Event dialog box is displayed, as shown in Figure 12-15.
Figure 12-15 Remove Lookup Event Dialog Box
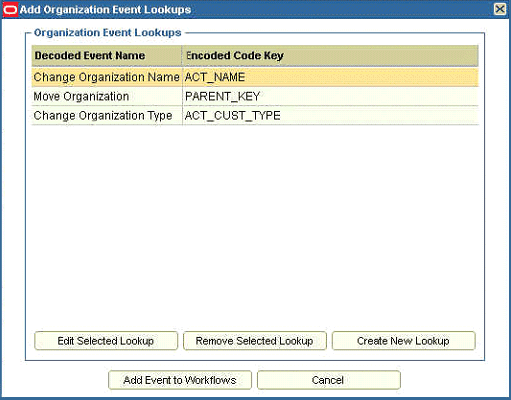
Org Event: This provides a list of tasks that are run based on the events on organizations. They have the following default names:
Change Organization Type
Change Organization Name
Move Organization
An organization event can be inserted into the workflow by clicking the + icon next to the Org Event menu item. Clicking the + icon opens the Add Organization Event Lookups dialog box with a list of currently available event tasks, as shown in Figure 12-16. You can select a task and click Add Event to Workflows to create a new menu item under the Org Event menu and open the page for that workflow.
Figure 12-16 Add Organization Event Lookups Dialog Box
The Add Organization Event Lookups dialog box also provides the following options to create new lookup events and edit or remove existing lookup events:
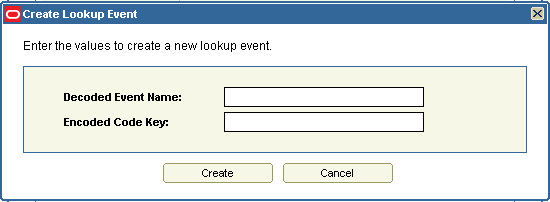
Create New Lookup: When you click this button, the Create Lookup Event dialog box is displayed, as shown in Figure 12-17.
Figure 12-17 Create Lookup Event Dialog Box
Edit Selected Lookup: When you click this button, the Edit Lookup Events dialog box is displayed, as shown in Figure 12-18.
Figure 12-18 Edit Lookup Event Dialog Box
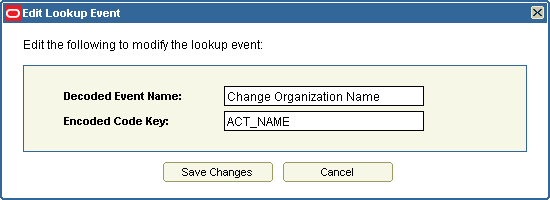
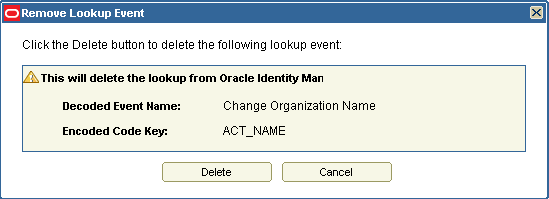
Remove Selected Lookup: When you click this button, the Remove Lookup Events dialog box is displayed, as shown in Figure 12-19.
Figure 12-19 Remove Lookup Event Dialog Box
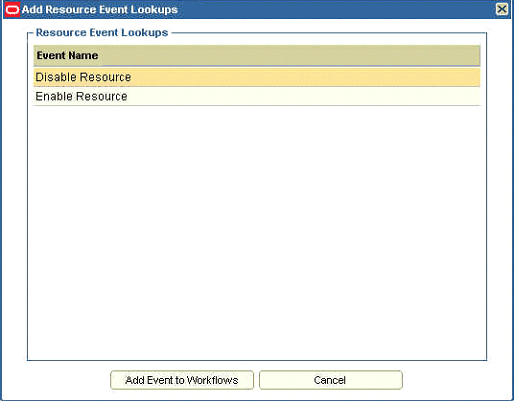
Resource Event: This provides a list of tasks that are inserted into the workflow and run when an event occurs on the resource. These events are defined as disabled or enabled events on the resource. There are submenu items for Enable Resource and Disable Resource under the Resource Event menu item. A resource event can be inserted into the workflow by clicking the + icon next to the Resource Event menu item. Clicking the + icon opens the Add Resource Event Lookups dialog box with two options, Enable Resource and Disable Resource, as shown in Figure 12-20. You can select an option and click Add Event to Workflows to create a new menu item under the Resource Event menu and open the page for that workflow.
Figure 12-20 Add Resource Event Lookups Dialog Box
Form Event: This provides a list of tasks that get inserted and run based on an event on a form field or child table. For events on parent process form fields, the name of the tasks have the following convention:
Field field_name Updated
The events on child tables are named based on the child table name and the type of event such as insert, update, and delete. A form event can be inserted into the workflow by clicking the + icon next to the menu item. Clicking the + icon opens the Add Form Event Lookups dialog box with the fields shown in Figure 12-21.
Figure 12-21 Add Form Event Lookups Dialog Box
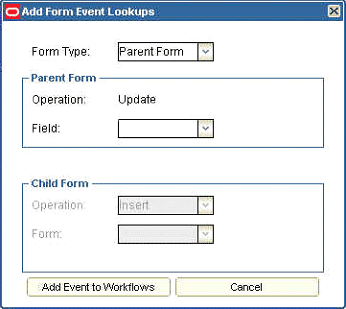
In the Add Form Event Lookups dialog box, you can select either parent form or child form in the Form Type field. When you select Parent Form, the fields in the Child Form section are disabled. Similarly, when you select Child Form, the fields in the Parent Form section are disabled. In the Parent Form section, only the Update operation is available. In the Child Form section, the available operations are Insert, Update, and Delete. These operations trigger the event. Each section has fields for the form fields of the parent form, or the form names in case of child forms. The Task names for only the child table event tasks can be modified after creation.
Note:
The parent form field event names are fixed, and the task name fields cannot be edited. Although the name is inherently in a fixed format, it can be customized and localized by updating theglobal.workflow.startMarker.UpdatedField property in the xlRichClient.properties file. See Oracle Identity Manager Administrative and User Console Customization Guide for details.Attestation: This menu item is for the attestation events. There are two types of attestation events, User Attestation and Resource Attestation. No new events can be added to attestation although the existing workflows can be modified similar to other subworkflows.
A workflow can consist of more than one task. This section discusses the following topics related to tasks:
You can right-click the designer page to display a menu with general options to create tasks and responses. The general menu options are:
Create New Task: Creates a new task with a default name, which can be further modified and configured. The task is represented as an icon.
Insert Existing Task: Displays the Existing Tasks dialog box with the list of all existing tasks across the subworkflows except the tasks present in the current subworkflow and the main user, organization, resource, and form event tasks for provisioning workflows. You can select a task and insert it in the current workflow.
Create Response: Creates a new response with a default response code, which can be further modified and configured. The response is represented as an icon.
Various options are available when you right-click the task icons, response icons, and the links between the tasks and responses.
You can right-click a task icon to display a menu that provides the following options related to tasks:
Link To Response: This option is used to link a task to a response. To use this option, first create a response. When you select this menu item, a link is displayed starting from the task icon. This link extends with the mouse pointer. When you click the response, the arrowhead of the link positions itself on the response, and the response is created for the task.
Link To Undo Task: This option is used to link two tasks with the undo relationship. It is used when you want to add a task as the undo task of the current selected task. To do this:
Select the task to which the undo task is to be added.
Right-click the task icon, and select the Link To Undo Task menu item.
Select the target tasks icon to add it as the undo task.
Note:
If the Display Undo Tasks option in the Display Options toolbar is selected with the value No, then the Undo task will not be visible after creating the undo relationship. To see the undo task, select Yes for the Display Undo Tasks option.Link To Recovery Task: This is used to link two tasks with the recovery relationship. It is used when you want to add a task as the recovery task of the currently selected task. To do this:
Select the task to which the recovery task is to be added.
Right-click the task icon, and select the Link To Recovery Task menu item.
Select the target task to add it as the recovery task.
Note:
If the Display Recovery Tasks option in the Display Options toolbar button is selected with the value No, then the recovery task will not be displayed after creating the recovery relationship. To display the recovery task, select Yes for the Display Recovery Tasks option.Remove Task and Subflow: This is used to remove a task and all the elements under the task. This includes all the links originating from the task and all their child elements and their child elements and so on. When the same task is present in multiple subworkflows and it is removed from one subworkflow, it gets removed from all the subworkflows where this task has the same parent task, which is the task whose response-generated tasks contain the current removed task.
Removing a task or the children will not delete the tasks from the system but only from the workflows. Deleting a task from the system permanently can be done from the Task Library. Removing tasks from the designer page still keeps the task definitions and removes them only from the workflows.
You can right-click a response icon to display a menu that provides the following options related to responses:
Add Response Generated Task: This is used to add a task as a response-generated task for the selected response. To do this:
Create the response-generated task.
Right-click the response, and select Add Response Generated Task. A link is created.
Select the task. The link positions on the task and the relationship are created.
Remove: This is used to remove a response. When you select this option, a confirmation page is displayed. Confirming the deletion removes the response and all its children. When a response is removed that contains generated tasks, then those tasks will be removed but not deleted. When a task is removed, it is removed only from the workflow and is not deleted permanently. You can permanently delete a task from the Task Library.
You can remove the relationships between some elements by right-clicking the link and clicking the Remove option. This option is not available for all links. For example, for reconciliation workflows, you cannot delete the default tasks connected to the start marker. Therefore, you cannot remove the relationship between the start markers and the default tasks. The link for which you can remove the relationship is highlighted with a broken arrow when you roll your mouse on the relationship. When the arrow is highlighted, right-click the arrow and the Remove option is displayed. This helps in removing the link between a response and a task and to assign another response to the task, or to assign another task to the response, without the need to delete the link and create new ones.
You can configure tasks in the Workflow Designer by using the Task Details dialog box. This dialog box is shown in Figure 12-22. To open the Task Details dialog box, double-click the task icon on the designer page.
This section discusses the following tabs in the Task Details dialog box:
General Tab
Figure 12-23 shows the General tab of the Task Details dialog box.
This tab lets you specify the general information about the task:
Task Name: This is the name of the process task. This field can be edited, except when the task name cannot be changed. For example, on the Form Events page, the event task for parent field update.
Task Description: This is descriptive information about the process task.
Retry Configuration: This section is present only for provisioning workflows and consists of the following options:
Retry Interval: If a process task has the Rejected status, then this is the time interval in minutes before Oracle Identity Manager inserts a new instance of that task with a Pending status.
Retry Attempt Limit: This is the number of times Oracle Identity Manager retries a rejected task.
Properties: This section has the following options:
Allow Multiple Instances: This check box determines whether or not the process task can be inserted into the current process more than once. If you select this check box, then multiple instances of the process task can be added to the process. If you deselect this check box, then the process task can be added to the current process only once.
Required for Workflow Completion: This check box determines whether or not the current process task must be completed for the process to be completed. If you select this check box, then the process cannot be completed if the process task does not have a Completed status. If you deselect this check box, then the status of the process task does not affect the completion status of the process.
Complete On Recovery: This check box determines whether or not the status of the task must be set to Completed on completion of the recovery tasks.
Allow Cancellation While Pending: This check box determines whether or not the process task can be canceled if its status is Pending. If you select this check box, then the process task can be canceled if it has a Pending status. If you deselect this check box, then the process task cannot be canceled if its status is Pending.
Disable Manual Insert: This check box determines whether or not a user can manually add the current task to the workflow. If this check box is selected, then the task cannot be added to the workflow manually. If you deselect this check box, then a user can add the task to the process.
Automation Tab
Figure 12-24 shows the Automation tab of the Task Details dialog box.
The Automation tab lets you attach an event handler or an adapter with the task that helps in the automation of the process task.
The options on this tab are divided into two parts. The task automation section shows the currently attached adapter with the status of the adapter. The Adapter Mappings section shows the adapter variable mappings. There are buttons on the tab that enable you to add an adapter or event handler, remove the adapter, and edit the variable mappings when an adapter is attached.
When you click Add Adapter, a dialog box is displayed. This dialog box consists of a section for the handler type with an option each for system event handlers and adapters. Selecting each option displays the corresponding descriptive text below the handler type section. You can select an item in the list and click Add.
The Adapter Mappings section shows the variables associated with the adapters along with the mappings. It displays the variable name and whether or not it has been mapped. When you select a variable, the Edit Variable Mapping button is enabled. You can click this button to open the Adapter Mappings dialog box with all the various options available to map this variable. This dialog box provides the following options:
Variable Name: This text label displays the name of the adapter variable for which you are setting a mapping, such as UUID.
Data Type: This text label displays the data type of the adapter variable. For example, String is the data type for the UUID variable.
Map To: This list displays the types of mappings that you can set for the adapter variable, such as IT Resources.
When you map the adapter variable to a location or contact, Oracle Identity Manager enables a list with values for a specific type of location or contact to which you are mapping the adapter variable. In addition, if you map the adapter variable to a custom process form and this form contains child tables, then Oracle Identity Manager enables the adjacent list. From this list, select the child table to which you are mapping the adapter variable. If you are not mapping the adapter variable to a location, contact, or child table of a custom process form, then this list is disabled.
Qualifier: This list contains the qualifiers for the mapping that is selected in the Map To list, such as IT Asset.
Old Value: This check box specifies whether or not you map the adapter variable to the value that was originally selected in the Qualifier check box before modification. Process task adapters associated with process tasks are conditionally triggered when some field on the process form is changed. If you select the Old Value option and the process task is marked Conditional, then the value that is passed to the adapter is the previous value of the field or variable for which the mapping is being selected. This is useful for fields that accept passwords. For example, if you want to disallow setting the password to the same value, then you can use the old value for comparison. If you are not mapping the adapter variable to a field that belongs to a child table of a custom process form, then this check box is disabled.
Note:
Different fields may be displayed in the Adapter Mappings dialog box, based on what you select from the Qualifier and Map To lists.Notification Tab
Figure 12-25 shows the Notification tab of the Task Details dialog box.
This tab lets you designate the e-mail notification to be generated when the current process task achieves a particular status. For each status that a task can achieve, a separate e-mail notification can be generated. If an e-mail notification is no longer valid, then you can remove it from the Notification tab.
Note:
For Oracle Identity Manager to send an e-mail notification to a user, a template for the e-mail message must first be created by using the E-mail Definition form.There are three buttons in the dialog box: Add Notification, Remove Notification, and Edit Notification. You can use these buttons to configure the notifications tab by adding, deleting, and editing notifications.
Task Assignment Tab
Figure 12-26 shows the Task Assignment tab of the Task Details dialog box.
This tab lets you add task assignment rules for the current task. It provides options to add the rules, assignment type, whom the task must be assigned to, adapter, e-mail template, and escalation time. The added rules are displayed in a tree based on the priority. The shortcut menu that is displayed when you right-click the rule provides options to change the priority of the rule, and to edit or delete the rule.
When you click Add Task Assignment Rule, the Task Assignment Rule dialog box opens with different input fields needed for assignments, as shown in Figure 12-27.
Figure 12-27 Task Assignment Rule Dialog Box
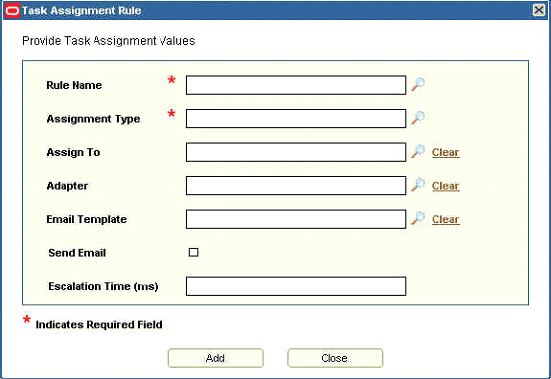
The Task Assignment Rule dialog box provides the following options:
Rule Name: A lookup field with a list of the rules.
Assignment Types: A lookup field with the following options for assignment types:
Object Administrator User with Least Load
Group User with Least Load
Request Target Users ManagerObject Authorizer User with Highest Priority
Object Administrator
UserGroup User with Highest Priority
Object Authorizer User with Least Load
Requestor's Manager
Group
Assign To: A lookup field. The values of this field vary with the selection in the Assignment Types field. Therefore, the value selected in the Assignment Types field is validated first.
Adapter: A lookup field that brings up a list of the available task assignment adapters.
Email Template: A lookup field that opens a dialog box with a list of e-mail templates from which to choose.
Send Email: A check box. When this is selected, Oracle Identity Manager sends the e-mail notification to a user or user group after the current process task is assigned.
Escalation Time (ms): A text field to specify the amount of time (in milliseconds) in which the user or user group has to complete the process task. The user or user group is associated with the rule that Oracle Identity Manager triggers. If this process task is not completed within the allotted time, then Oracle Identity Manager reassigns it to another user or user group. The escalation rule adheres to the order defined by the assignment type parameter.
When an assignment rule is created, it is displayed in the Task Assignment tab of the Task Details dialog box with a tree structure.
Depends On Tab
Figure 12-28 shows the Depends On tab of the Task Details dialog box.
This tab lets you add tasks that the current task will depend on. This is useful in setting up dependencies between tasks. This dialog box consists of buttons to add and remove tasks from this list. Any task in this list must be run before the current task is run.
When you click Add Preceding Task, the Assign Preceding Task dialog box is displayed. This dialog box list the tasks and the corresponding workflows in which they are used. You can select a task from this list and click OK.
When you select a task from the list and click Remove Preceding Task, the task is removed from the list.
Resource Status Management Tab
Figure 12-29 shows the Resource Status Management tab of the Task Details dialog box.
Figure 12-29 Resource Status Management Tab
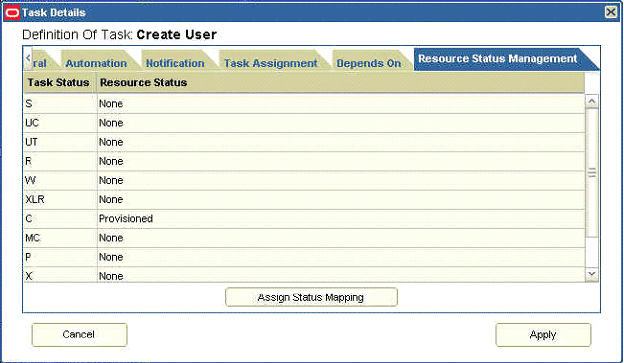
This tab lets you establish a link between the status of a process task and the provisioning status of the resource object to which it is assigned.
A resource object contains data that is used to provision resources to users and applications. This data includes approval and provisioning processes. In addition, a resource object is provided with predefined provisioning statuses. Provisioning status changes through the life cycle of the resource object after the provisioning kicks off. The provisioning status represents the various statuses of the resource object throughout its lifecycle when it is provisioned to the target user or organization. The provisioning status of a resource object is determined by the status of its associated approval and provisioning processes, as well as the tasks that comprise these processes. For this reason, a link between the status of a process task and the provisioning status of the resource object to which it is assigned must be provided.
This tab provides two columns that display the tasks status and the resource status. When no mappings are done, the list under the resource status column has a value of None for all task status. When you click Assign Status Mapping, the Object Status dialog box is displayed. This dialog box has the list of resource statuses from which to select and map to the task status.
After you make changes on all the tabs of the Task Details dialog box, click Apply to apply all changes to the task. Alternatively, click Cancel to cancel the operation.
You can double-click a response icon to open the Response Details dialog box that provides options to configure the response. Figure 12-30 shows the Response Details dialog box.
The Response Details dialog box has the following fields:
Response Code: This field is used to specify the response code. This code for the response uniquely identifies a response for a task.
Response Status: This lookup field is used to select the response status, such as Cancelled, Completed, or Rejected.
Response Description: This field is used to provide a description of the response.
After you specify the response configuration information, click Update Response to apply the input for the response. In the designer page, the response code is displayed in the response icon.
Data flows are used for transferring data to the workflow form fields without the need for the user to enter information. This is used for both provisioning and reconciliation. For provisioning, form data flows are used. For reconciliation, reconciliation data flows are used.
This section discusses the following topics:
Form data flows are used to set data flows between the resource form fields and workflow form fields. You can configure data flows in the Configure Data Flows page, which you can open by performing the following steps:
In the left navigation pane, click Resource Management, and then click Manage. The Resource Search page is displayed.
Search for a resource.
Select the resource by clicking the resource name. The Resource Detail page is displayed.
Select Resource Workflows from the additional details list. The Resource Workflows page opens.
In the Form Data Flow column, the Configure link is displayed only for workflows that have forms attached. The forms can be workflow forms or forms for the associated resource. Click Configure to open the Configure Form Data Flows page, which is shown in Figure 12-31.
Figure 12-31 Configure Form Data Flows Page
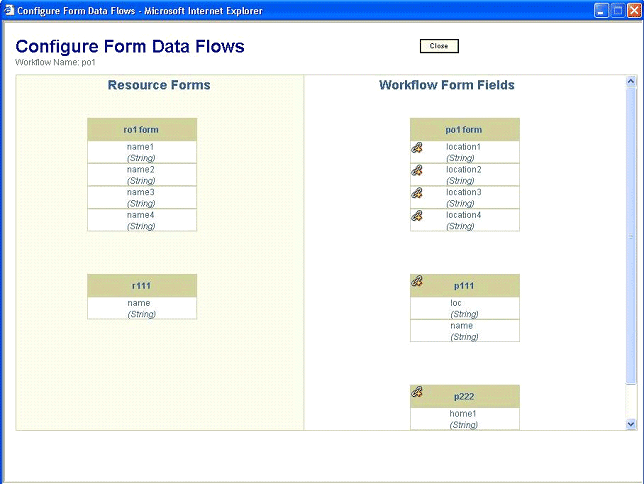
Adding data flow between fields enables automatic transfer of the form field values from source fields to destination fields. The source fields are from the resource forms and the destination fields are from the process forms.
The form data flow rules are as follows:
Each destination field can have only one source field. In other words, a process form field cannot act as a destination field for more than one source field.
A resource parent form field can flow to either a process parent form field or a process child form field.
A resource child form field can flow to only a process child form field.
The data flow is always from the resource forms to process forms and never the other way.
The left-hand section of the Configure Form Data Flows page shows the resource forms, and the right-hand section shows the workflow forms and their respective fields. The destination icons are visible in the parent workflow form fields. The link icons are visible in the child tables in the workflow. Clicking a link icon displays the options that you can use to link on the resource forms.
You can click a link on the resource form fields or child table to generate the data flow and to display a link depicting the data flow. The links between the form fields is blue. The link between the child tables at the table level is brown in color.
When a link is established, the icon on the corresponding workflow field or table changes to a broken link icon. You can click the broken link icon to remove the data flow.
Reconciliation data flows are similar to form data flows except that the flow is from reconciliation fields to workflow fields instead of between resource fields and workflow fields. For a trusted resource, the user attributes are displayed instead of the workflow form fields. The user interface for reconciliation data flow is also similar to that of form data flows.
The Configure Reconciliation Data Flows page is used to define the relationship between the data elements in the target resource or trusted source and the fields within Oracle Identity Manager with which they are to be linked.
Only the fields defined in the Reconciliation Fields section of the associated resource are available for mappings. These mappings are used to determine which fields in Oracle Identity Manager must be populated with the information provided by using reconciliation events from the target system. In addition, for target resources, the key fields are indicated on this tab. Key fields are fields for which the values on the process form and the reconciliation event must be the same for a match to be generated on the Processes Matched Tree tab of the Reconciliation Manager form.
Note:
The reconciliation fields created in the Reconciliation Fields tab of the associated resource can be of the types Multi-Valued, String, Number, Date, and IT resource.You configure reconciliation data flow on the Configure Reconciliation Data Flows page, which is similar to the Configure Form Data Flows page. The reconciliation data flow rules are as follows:
When a workflow form field or child table is mapped to a reconciliation field, it cannot be mapped to another field unless the first one is removed.
Each reconciliation field can be mapped only once.
Figure 12-32 shows the Configure Reconciliation Data Flows page.
Figure 12-32 Configure Reconciliation Data Flows Page
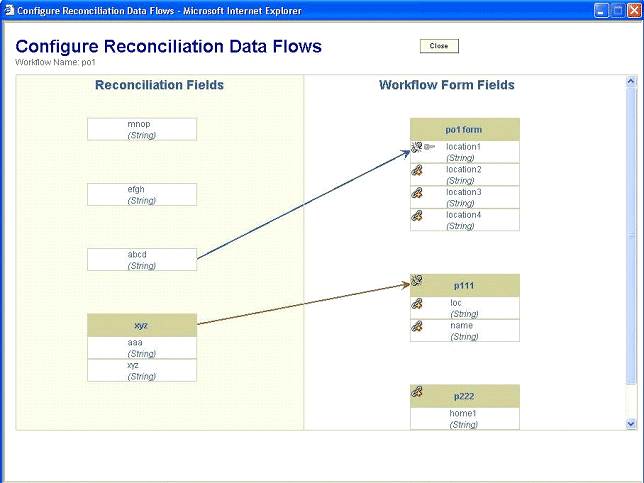
An additional property for reconciliation data flows that is not present in the case of form data flows is called the Key Reconciliation field. Each workflow field that is mapped for data flow can be set as a key field for reconciliation. This means that the reconciliation rules corresponding to this field must be met. This is represented in the form of a disabled key icon next to an established data flow. By default, each field is not a key field. To set a field as a key field, click the key icon. Click the key icon again to remove the key field setting.
Clicking the key icon sets the field as a key field, and the icon changes to an enable key icon. Clicking the icon again removes the field as a key field.
See Also:
The "Workflow Designer Localization" section in Oracle Identity Manager Globalization Guide for information about localization in the Workflow Designer
Appendix A in Oracle Identity Manager Administrative and User Console Customization Guide for information about customizing the Workflow Designer
The "What's New" chapter in Oracle Identity Manager API Usage Guide for information about the API methods used by the Workflow Designer
Note:
This feature is in the process of being migrated from the Design Console to the Administrative and User Console. For the current Oracle Identity Manager release, this feature is available in both consoles.To create an IT resource:
Expand Resource Management.
Click Create IT Resource.
On the Step 1: Provide IT Resource Information page, enter the following information:
IT Resource Name: Enter a name for the IT resource.
IT Resource Type: Select an IT resource type for the IT resource.
If you want to create an IT resource of the Remote Manager type, then select Remote Manager from the IT Resource Type list.
Remote Manager: If you want to associate the IT resource with a particular remote manager, then select the remote manager from this list. If you do not want to associate the IT resource with a remote manager, then leave this field blank.
Note:
If you select Remote Manager from the IT Resource Type list, then you must not select a remote manager from the Remote Manager list.Click Continue.
On the Step 2: Specify IT Resource Parameter Values page, specify values for the parameters of the IT resource and then click Continue.
The Step 3: Set Access Permission to IT Resource page is displayed. On this page, the SYSTEM ADMINISTRATORS group is displayed by default in the list of groups that have Read, Write, and Delete permissions on the IT resource that you are creating.
On the Step 3: Set Access Permission to IT Resource page, if you want to assign groups to the IT resource and set access permissions for the groups, then:
a. Click Assign Group.
b. For the groups that you want to assign to the IT resource, select Assign and the access permissions that you want to set. For example, if you want to assign the ALL USERS group and set the Read and Write permissions to this group, then you must select the respective check boxes in the row, as well as the Assign check box, for this group.
c. Click Assign.
On the Step 3: Set Access Permission to IT Resource page, if you want to modify the access permissions of groups assigned to the IT resource, then:
Note:
You cannot modify the access permissions of theSYSTEM ADMINISTRATORS group. You can modify the access permissions of only other groups that you assign to the IT resource.a. Click Update Permissions.
b. Depending on whether you want to set or remove specific access permissions for groups displayed on this page, select or deselect the corresponding check boxes.
c. Click Update.
On the Step 3: Set Access Permission to IT Resource page, if you want to unassign a group from the IT resource, then:
Note:
You cannot unassign theSYSTEM ADMINISTRATORS group. You can unassign only other groups that you assign to the IT resource.a. Select the Unassign check box for the group that you want to unassign.
b. Click Unassign.
Click Continue.
On the Step 4: Verify IT Resource Details page, review the information that you provided on the first, second, and third pages. If you want to make changes in the data entered on any page, click Back to revisit the page and then make the required changes.
To proceed with the creation of the IT resource, click Continue.
The Step 5: IT Resource Connection Result page displays the results of a connectivity test that is run using the IT resource information. If the test is successful, then click Create. If the test fails, then you can perform one of the following steps:
Click Back to revisit the previous pages and then make corrections in the IT resource creation information.
Click Cancel to stop the procedure, and then begin from the first step onward.
Proceed with the creation process by clicking Continue. You can fix the problem later, and then rerun the connectivity test by using the Diagnostic Dashboard.
Note:
If no errors are encountered, then the label of the button is Create, not Continue.See "Test Basic Connectivity" for more information.
Click Finish.
Note:
This feature is in the process of being migrated from the Design Console to the Administrative and User Console. For the current Oracle Identity Manager release, this feature is available in both consoles.To locate an IT resource:
Expand Resource Management.
Click Manage IT Resource.
On the Manage IT Resource page, you can use one of the following search options to locate the IT resource that you want to view:
IT Resource Name: Enter the name of the IT resource, and then click Search.
IT Resource Type: Select the IT resource type of the IT resource, and then click Search.
Click Search.
On the Manage IT Resource page, the list of IT resources that meet the search criteria is displayed.
From this point onward, you can perform one of the following procedures on the IT resource:
To view an IT resource:
From the list of IT resources displayed in the search results, click the IT resource name.
Note:
If you want to edit the IT resource, then click the edit icon in the same row.If you want to view the IT resource parameters and their values, then select IT Resource Parameters from the list at the top of the page. Similarly, if you want to view the administrative groups assigned to the IT resource, then select IT Resource Administrative Groups from the list.
To modify an IT resource:
From the list of IT resources displayed in the search results, click the edit icon for the IT resource that you want to modify.
If you want to modify values of the IT resource parameters, then:
Select Details and Parameters from the list at the top of the page.
Make the required changes in the parameter values.
To save the changes, click Update.
If you want to modify the administrative groups assigned to the IT resource, first select Administrative Groups from the list at the top of the page and then perform the required modification.
If you want to unassign an administrative group, select the Unassign check box in the row in which the group name is displayed and then click Unassign.
Note:
When you click Unassign, the administrative groups that you select are immediately unassigned from the IT resource. You are not prompted to confirm that you want to unassign the selected administrative groups.
You cannot unassign the SYSTEM ADMINISTRATORS group.
If you want to assign new administrative groups to the IT resource, then:
a. Click Assign Group.
b. For the administrative groups that you want to assign to the IT resource, select the access permission check boxes and the Assign check box.
c. Click Assign.
If you want to modify the access permissions of the administrative groups that are currently assigned to the IT resource, then:
a. Click Update Permissions.
b. Depending on the changes that you want to make, select or deselect the check boxes in the table.
Note:
You cannot change the access permissions of theSYSTEM ADMINISTRATORS group.c. To save the changes, click Update.
Note:
This feature is in the process of being migrated from the Design Console to the Administrative and User Console. For the current Oracle Identity Manager release, this feature is available in both consoles.
If you want to delete a scheduled task, then use the Design Console.
For information about predefined scheduled tasks, see "Predefined Scheduled Tasks" in Oracle Identity Manager Design Console Guide
To create a scheduled task:
Expand Resource Management.
Click Create Scheduled Task.
On the Step 1: Provide Scheduled Task Details and Schedule page, enter the following information:
Task Name: Enter a name for the scheduled task.
Class Name: Specify the Java class for running the scheduled task. To do this, click the magnifying glass icon to open the Class Name list of values and then select a class. Alternatively, enter the class name.
Status: Specify whether or not you want to leave the task in the enabled state after it is created. In the enabled state, the task is ready for use. If the task is disabled, then you must enable it before you can use it.
Max Retries: Enter an integer value in this field. This number represents the number of times Oracle Identity Manager must attempt to complete the task before assigning the ERROR status to the task. The default value is 1.
Next Start: Use the date editor to specify the date when you want the task to run. After you select a date value in the date editor, you can modify the time value that is automatically displayed in the Next Start field.
Frequency: Specify the frequency at which you want the task to run.
Click Continue.
On the Step 2: Define Scheduled Task Attributes page, create attributes for the task as follows:
In the Attribute field, enter the name of the attribute.
In the With field, enter the value of the attribute.
Click Add.
Repeat Steps 5a through 5c for each attribute that you want to add.
Note:
Each attribute that you add is displayed in a table. The attributes you add are not posted to the Oracle Identity Manager database until you complete the procedure to create the scheduled task. If required, you can modify the value of a newly added attribute by selecting it from the Attribute list, and then editing its value. To delete an attribute, click the cross-shaped icon displayed for that attribute.Click Continue.
On the Step 3: Verify Scheduled Task Details page, review the information that you provided on the first and second pages. If you want to make changes in this information, click Back to revisit the first or second page and then make the required changes.
To proceed with the creation of the scheduled task, click Continue.
If the creation process is successful, then a message stating that the scheduled task has been created is displayed.
Note:
This feature is in the process of being migrated from the Design Console to the Administrative and User Console. For the current Oracle Identity Manager release, this feature is available in both consoles.To locate a scheduled task:
Expand Resource Management.
Click Manage Scheduled Task.
On the Scheduled Task Management page, you can use any one or a combination of the search options provided to locate a scheduled task. Click Search after you specify the search criteria.
Each row of the search results table displays the following information about a scheduled task:
Scheduled Task: This column displays the name of the scheduled task. If you want to view the details of the scheduled task, then click its name in this column.
Status: This column displays the status of the scheduled task. The status can be one of the following:
INACTIVE: The scheduled task has been run successfully, and it is set to run again at the date and time specified in the Next Start field.
RUNNING: The scheduled task is currently running.
COMPLETED: The scheduled task has been run successfully, but will not run again (the frequency is set at the Once option).
ERROR: An error was encountered due to which the task could not be started.
FAILED: The scheduled task failed while running.
Frequency: This column displays the frequency at which the scheduled task has been set to run.
Last Start: This column displays the date and time at which the scheduled task began its last run.
Last Stop: This column displays the date and time at which the scheduled task ended its last run.
Next Start: This column displays the date and time at which the scheduled task will begin its next run.
Edit: This column displays the edit icon for each scheduled task. Click the edit icon if you want to modify the task.
Enable: For a particular scheduled task, if the Enable link is displayed in this column, then it means that the scheduled task is currently disabled and you can enable the task by clicking the Enable link. If Enabled is displayed, then it means that the task is already enabled.
Disable: For a particular scheduled task, if the Disable link is displayed in this column, then it means that the scheduled task is currently enabled and you can disable the task by clicking the Disable link. If Disabled is displayed, then it means that the task is already disabled.
Run Now: For a particular scheduled task, if the Status column displays INACTIVE and if the gray button is displayed in the Enable column (implying that the task is in the enabled state), then you can run the task by clicking the button in the Run Now column. This button cannot be used if any one of the following conditions is true:
The Status column displays RUNNING, which means that the task is currently running.
The Enable column displays the green button (and the Disable column displays the gray button), which means that the task must be enabled before it can be run.
Note:
The Stop Execution option is not available in the Administrative and User Console. If you want to stop a task, then click Stop Execution on the Task Scheduler form of the Design Console.The following sections describe the procedures that you can perform by using the features of the Scheduled Task Management page:
To view the details of a scheduled task, click the task name in the Scheduled Task column of the search results table displayed on the Scheduled Task Management page.
After viewing the scheduled task details, click Edit if you want to modify the scheduled task. Alternatively, you can click Run now if you want to run the scheduled task. As mentioned earlier, only a scheduled task that is currently ENABLED can be run.
To modify the details of a scheduled task:
In the search results table displaying the list of scheduled tasks, click the edit icon in the Edit column of the table.
Note:
If you want to run the task, click the task name in the first column of the search results table and then click Run now. After you click Run now, you need not perform the rest of the steps in this procedure.If you want to stop a scheduled task while it is running, then use the Stop Execution feature of the Design Console. See "The Task Scheduler Form" in Oracle Identity Manager Design Console Guide for information about this feature.
On the Scheduled Task Details page, you can modify all the details of the scheduled task, except for the task name and class name. See "Creating Scheduled Tasks" for information about each GUI element displayed on the Scheduled Task Details page.
Click Continue.
If required, modify the attributes of the scheduled task. You can modify values of existing attributes, delete attributes, or add new ones.
Click Save Changes to commit all the changes to the database.