| Oracle® Access Manager Identity and Common Administration Guide 10g (10.1.4.2.0) Part Number B32419-01 |
|
|
View PDF |
| Oracle® Access Manager Identity and Common Administration Guide 10g (10.1.4.2.0) Part Number B32419-01 |
|
|
View PDF |
This chapter focuses on the auditing features and how to configure these using the Identity System console. The following topics are provided:
Note:
For details about installing audit-to-database components, see the Oracle Access Manager Installation Guide.The auditing feature collects and presents data pertaining to policy and profile settings, system events, and usage patterns. Oracle Access Manager can generate two types of audit reports:
Static: These reports are derived from policy and profile information that is stored on the Oracle Access Manager directory server.
See "Static Audit Reports" for details.
Dynamic: These reports are derived from Access System and Identity System events that are collected from the servers in your system.
At the most detailed level, dynamic audit reports reveal when a system event was triggered and who triggered it. At a higher level, these reports can reveal component load levels, resource request patterns, system intrusion attempts, and overall system performance. See "Static Audit Reports" for details.
In addition to auditing, Oracle Access Manager supports logging, SNMP monitoring, and other reporting features. See Chapter 9, "Reporting" for details.
You can record all dynamic audit reports and some static audit reports to disk file, to a relational database, or both. Some static reports can also be displayed in limited form through the graphical user interface.
Database auditing provides the following advantages over file based auditing in the area of security:
All audit information is stored in a central database that can be protected by any security methods that your database supports.
The audit-to-file option records data to a plain-text file on each server that collects audit data. Such files are not protected by database-level security.
WARNING:
To take full advantage of database security, make sure you turn off the audit-to-file feature for all Access and Identity Servers in your system. You should also store the password to the default audit database user account in the RDBMS profile on the directory server rather than in the ODBC.ini file (if used) on each server host.
Data can be sent to an audit database using the transport security methods supported by ODBC or OCI, as applicable to your database.
Using the audit database, Crystal Reports can generate security-related statistics.
For instance, you can track the number of resource requests that were refused during a given interval or compile a list of users who are locked out of the system.
Auditing-to-database can assist in compliance reporting for regulatory acts such as Sarbanes-Oxley, Gramm-Leach-Billey, and HIPAA (the Health Information Privacy and Accountability Act of 1996).
Auditing, whether to database or file, can slow the performance of your Oracle Access Manager System. You can control the impact of auditing as follows:
Turn on auditing only for selected servers.
See "To enable and configure auditing for each Identity Server" and "To enable and configure auditing for each Access Server" for details.
Turn on auditing only for selected profile attributes, events, and Identity System applications.
See "To specify global Identity System events and profile attributes for audit" and "To specify User, Group, or Organization Manager events for audit" for details.
Increase the database audit retry interval so that whenever the connection to the database is broken, the server does not initiate thrashing by resending a failed write attempt before the connection is restored.
You control this interval with the DBAuditRetryInterval parameter in the globalparams.xml file in the following directory:
Component_install_dir\apps\common\bin
where Component_install_dir is the installation directory of the server whose audit behavior you want to control. This parameter takes as a value the number of seconds to wait before initiating another attempt to write data to the audit database.
For file-based auditing only, increase the size of the audit buffer.
This measure reduces the number of times the audit feature accesses your hard disk. See "To enable and configure auditing for each Identity Server" and "To enable and configure auditing for each Access Server" for details.
For file-based auditing only, lengthen the interval between buffer flushes.
This reduces the number of times the auditing feature writes to disk, but it also increases the potential amount data you lose in a system failure.
WARNING:
Only fatal errors are flushed to file if a server fails. All other audit items in the buffer at the moment of the failure are lost. Therefore, by increasing the buffer size or lengthening the interval between buffer flushes, you increase the potential volume of audit data lost in the event of a system failure.
Static audit reports are generated from policy and profile information stored on the Oracle Access Manager directory server. You can generate five types of static reports:
Table 11-1 Static Audit Report Types
| Report Type | Description |
|---|---|
|
User Access Privilege Report |
A global list of resources that users or groups of users can access at a specified point in time. They are also referred to as filtered profile queries. See "To create and manage user access privilege reports" for details. |
|
Resource Access Privilege Report |
A global list of users who are authorized to access a specified resource or group of resources at a specified point in time. They are also referred to as filtered policy queries. See the procedure "To create and manage user access privilege reports" for details. |
|
Access Test |
A limited, on-screen display that verifies whether a specified user or group of users can access a specified resource at a specified point in time. You cannot test for access to randomly defined groups of resources the way you can with the preceding two types of filtered queries. |
|
Access System Diagnostic Report |
An on-screen table of status information for some or all of the Access Servers in your system. This includes details about the directory components to which the Access Servers are connected. See Table 11-2 for details. |
|
Identity System Diagnostic Report |
An on-screen table of status information for some or all of the Identity Servers in your system. This includes details about the directory components to which the Identity Server(s) are connected. See Table 11-2 for details. |
To be able to send data to the audit database, you must install and configure one of the following databases on a host within your domain:
Microsoft SQL Server for environments where the Oracle Access Manager servers all run on Windows.
Oracle Database for environments where the computer hosting the Oracle Access Manager server contains either an Oracle database server or an Oracle database client that is configured to talk to an Oracle database server.
The Oracle database client that resides on the computer hosting the Oracle Access Manager server can run on a different platform from the Oracle database server. For example, the Oracle Access Manager server and Oracle database client can run on a supported Unix host and the Oracle database server can be on a Windows host.
In addition, you can install and configure Crystal Reports presentation software on a Windows machine in your Oracle Access Manager domain. See "To install Crystal Reports" for details.
You can control the type and amount of audit data collected by each server. For example, you can configure the Master Audit Rule on an Access Server to record authentication failures, but not authentication successes. See "To modify audit output formatting for the Access System" for details. Or, you can configure the Application Auditing Policy on an Identity Server to record the time and date of each user logon, but not the time of logout or session expiration. See "To modify audit output formatting for the Identity System" for details.
If you send data to the audit database, you can display the collected information in Crystal Reports templates that have been preconfigured to present audit data. The generated audit reports fall into the following categories:
Global View Access
Authentication
Authorization
Activity
Identity Management
See "About Audit Reports" for details.
You set all audit options through configuration pages in Oracle Access Manager, as detailed in Table 11-2:
Table 11-2 Where to Set Audit Options
| Audit-Related Functionality | Location in GUI | Scope |
|---|---|---|
|
Enable file-based auditing and database auditing, and modify audit file attributes on an individual Identity Server. |
Identity System Console, System Configuration, Identity Server, ServerName, Modify where ServerName specifies the Identity Server you want to modify |
Per server |
|
Modify the default formatting used for file-based and database auditing, including date format, date separator, message format, escape character, record separator, and field separator. To enable database auditing, you must replace the default message format string. See "To modify audit output formatting for the Identity System". If you modify any other attributes, you may have to reconfigure your Crystal Report templates and repository settings. |
Identity System Console, Common Configuration, Master Audit Policy, Modify |
Global for file-based and database auditing in the Identity System |
|
Specify the Identity System events to be audited. This includes successes and failures for login and logout, and password management. |
Identity System Console, Common Configuration, Global Auditing Policies, Modify |
Global for file-based and database auditing and for all applications in the Identity System |
|
Create or modify RDBMS profiles and associated database instances. (These are necessary only for database auditing.) |
Identity System Console, System Configuration, Directory Profiles, Configure RDBMS Profiles, Modify or Access System Console, System Configuration, Server Settings, Configure RDBMS Profiles, Modify |
Global for database auditing only |
|
Specify the Identity Servers to be included in the on-screen diagnostics display. Note: To ensure that the Diagnostics page displays the current status of a given Server, exercise the connection to that server by attempting a login or a user search before accessing the Diagnostics display. |
Identity System Console, System Configuration, Diagnostics |
Global (for the Identity System only) or for a server |
|
Activate the collection of audit success and audit failure data for the following events: Search, View Profile, Modify Profile, View Location, Modify Location, Substitute Right, Workflow, Configuration, Deactivated User, Reactivated User, Created User, Deleted User, and Workflow Duration. |
Identity System Console, User Manager Configuration, Audit Policies, Modify |
Global (for User Manager reports only) |
|
Activate the collection of success and failure data for the following events: Search, View Profile, Modify Profile, View My Group, View Group Member, Expand Group, Subscribe Group, Workflow, Configuration, and Workflow Duration. |
Identity System Console, Group Manager Configuration, Audit Policies, Modify |
Global (for Group Manager reports only) |
|
Activate the collection success and failure data for the following events: Search, View Profile, Modify Profile, Containment Profile, Container Limit, View Location, Modify Location, Workflow, Configuration, and Workflow Duration. |
Identity System Console, Org. Manager Configuration, Audit Policies |
Global (for Organization Manager reports only) |
|
Enable file-based and or database auditing and modify audit file attributes on an individual Access Server. |
Access System Console, Access System Configuration, Access Server Configuration, ServerName, Modify where ServerName specifies the Access Server you want to modify. |
Per server |
|
Create or modify RDBMS profiles and associated database instances. (These are necessary only for database auditing.) |
Access System Console, System Configuration, Server Settings, Configure RDBMS Profiles, Create (or Modify) or Identity System Console, System Configuration, Directory Profiles, Configure RDBMS Profiles |
Global (for both file-based and database auditing) |
|
Create or modify a master audit rule, which covers the following: audit events (success and failure of authentications and authorizations), audit event mapping, date format, escape character, audit record format, and cache formatting. To enable database auditing, you must replace the default audit record format string. See "To modify audit output formatting for the Access System" for details. If you modify any other attributes, you may have to reconfigure your Crystal Report templates and repository settings. |
Access System Console, Access System Configuration, Common Information Configuration, Master Audit Rule, Modify |
Global (for both file-based and database auditing within the Access System) |
|
You can specify the Access Server(s) to be included in the on-screen diagnostics display. Note: To ensure that the Diagnostics page displays the current status of a given Oracle Access Manager Server, exercise the connection to that server by attempting a login or a user search before accessing the Diagnostics display. |
Access System Console, System Management, Diagnostics |
Global (for the Access system only) or for a server |
|
Create, modify and manage Global User Access Privilege Reports. |
Access System Console, System Management, Manage Reports, Add or Modify |
For a server |
Displaying audit reports on-screen or sending audit output to disk files does not require the installation of special components.
Auditing to a database is restricted to certain Oracle Access Manager system configurations and requires the installation of special components, as detailed in the following sections.
The rest of this section discusses the following topics:
The following are requirements when configuring auditing:
For auditing with Oracle Access Manager 10.1.4.0.1, verify that you can reach the target database using the database client's SQLplus.
For auditing with Oracle Access Manager 10.1.4.0.1, ensure that the ORACLE_HOME environment variable is set appropriately.
For auditing with Oracle Access Manager 10.1.4.0.1, apply the most recent hot fixes and patches for the release before activating file auditing and database auditing at the same time.
For Oracle Access Manager 10.1.4.0.1 and later versions, you have a full range of operating system choices if Oracle OCI is used for database auditing.
Database auditing requires special components, as outlined in the next section. Installation details are available in the Oracle Access Manager Installation Guide.
To enable auditing to a database, you must install various components listed in Table 11-3:
Table 11-3 Special Components Needed for Database Auditing
| Platform | Installation Notes |
|---|---|
|
Oracle Access Manager 10.1.4.0.1 on Windows and supported Unix platforms with the Oracle Call Interface (OCI) |
The following are supported options:
To obtain the latest platform support information, see "Updates to Supported Versions and Platforms". |
|
Oracle Access Manager 10.1.4.2 on Windows and supported Unix platforms with the Oracle Call Interface (OCI) |
The following are supported options:
Notes: To obtain the latest platform support information, see "Updates to Supported Versions and Platforms". |
|
Oracle Access Manager 10.1.4.0.1 or 10.1.4.2 on Windows with ODBC |
Requirements on a Windows platform with ODBC for the Oracle Database server:
Requirements on a Windows platform with ODBC for MS SQL Server:
Notes: When using SQL Server, all servers that are connected to the audit database run on Windows hosts. If you use SQL Server, you do not have to install additional database drivers. To obtain the latest platform support information, see "Updates to Supported Versions and Platforms". |
|
Crystal Reports |
You install Crystal Reports plus a required patch on a Windows machine that can access the ODBC database. See "Setting up Audit Reports" for details. The Crystal Reports host must run Windows The following Crystal Reports packages have been tested: Crystal Reports 9.22a, Advanced Edition, patch = CR90DBEXWIN_EN_200403 |
To see the latest supported versions and platforms for this integration refer to Metalink, as follows.
To view information on Metalink
Go to the following URL:
Click the Certify tab.
Click View Certifications by Product.
Select the Application Server option and click Submit.
Choose Oracle Application Server and click Submit.
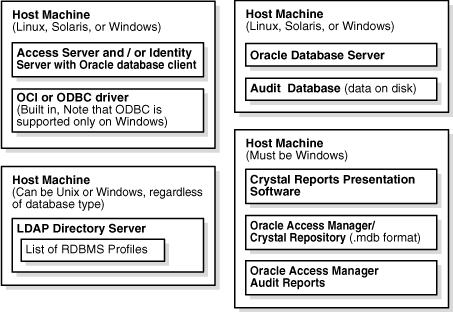
Figure 11-1 and Figure 11-2 show a distributed environment with Oracle Access Manager servers on one or more host machines, the OCI or ODBC-compatible database server on another host, and the Crystal Reports application on yet another host.
In a simpler deployment, you can install your entire Oracle Access Manager system and all database auditing components on one Windows computer. In a single-host scenario, if you install Oracle database with ODBC, you need only one table of ODBC data-source definitions (one ODBC.ini file) on your host.
Figure 11-1 and Figure 11-2 illustrate the components that you install and configure to enable auditing to database.
Figure 11-1 Audit-to-Database Architecture: SQL Server
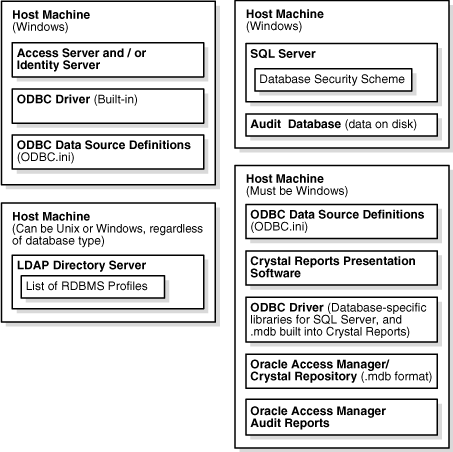
Figure 11-1 shows an audit-to-database architecture on SQL Server that is distributed across four host machines. In this configuration, all Access and Identity Servers must run on Windows, and the database must run on Windows. The LDAP Server does not have to be Windows-based.
Figure 11-2 illustrates the following architecture for auditing using the Oracle Database:
The Identity or Access Server can reside on Windows or on a supported Unix platforms for auditing.
On Windows, ODBC and OCI connection types are supported for the audit database.
On a Unix platform, only an OCI connection type is supported.
On a computer that hosts a version 10.1.4.0.1 Identity or Access Server, if you use an OCI connection type, the host must contain an ORACLE_HOME version 10.1.0.5 installation area.
The 10.1.0.5 ORACLE_HOME can be an Oracle Database client installation or an Oracle Database server installation.
On a computer that hosts a version 10.1.4.2 Identity or Access Server, if you use an OCI connection type, the host does not require an ORACLE_HOME installation area.
If you use an ODBC connection type on Windows, the computers that host the Identity and Access Servers do not require an ORACLE_HOME of exactly version 10.1.0.5.
The Oracle Database server can reside on a different computer, and it can be version 9.2.0.7, 10.1.0.5, or 10.2.0.2.
Figure 11-2 Audit-to-Database Architecture: Oracle Database
The following sections describe configuration requirements if you are auditing to an Oracle database that uses an OCI connection type:
For Oracle Access Manager 10.1.4.0.1, if you are auditing to an Oracle database that uses an OCI connection type, the host computers for the Identity Servers and the Access Servers must contain one of the following:
Oracle Database server 10.1.0.5
Oracle Database client 10.1.0.5
If any host for an Identity Server or Access Server does not already have an Oracle Database client or server, you must install one.
For Oracle Access Manager 10.1.4.2, the OCI Instant Client binaries are installed on the Identity and Access Servers. As a result, you are not required to have an Oracle home directory that contains the Oracle Database server or client.
For Oracle Access Manager 10.1.4.2, you must set the TNS_ADMIN environment variable to the directory that contains the following file:
Oracle_database_server/NETWORK/ADMIN/tnsnames.ora
If the audit database server resides on a different host computer than the Identity and Access Servers, copy the file tnsnames.ora to a directory on the Identity or Access Server host and set the TNS_ADMIN environment variable to the new directory where tnsnames.ora resides.
Finally, for the OCI Instant Client 10.1.0.5 on a supported Unix platform, the configuration file tnsnames.ora has a limitation. All entries in this file must fit on one line. A complete entry is similar to the following:
OCIDB2=(DESCRIPTION=(ADDRESS=(PROTOCOL=TCP)(HOST=host)(PORT=1521))(CONNECT_DATA=SERVICE_ NAME=OCIDB2)))
If an entry extends over more than one line, Oracle Access Manager servers may fail when resolving the service name that is used to connect to the Oracle Database server.
ODBC data-source definitions encapsulate all the information necessary for a client application such as an Oracle Access Manager server or Crystal Reports to connect with ODBC 3.0-compatible databases formatted for SQL Server or Microsoft Access (.MCPO).
ODBC data-source definitions are stored in a file named ODBC.ini on each Windows computer that hosts an application connected to the audit database. Only one such list of ODBC data-source definitions should exist on a given machine, and that file should be shared by all the applications that connect to the audit database.
Users generally add or modify data source definitions through a Windows administration GUI.
Because this GUI hides many configuration details, users may never become aware that ODBC.ini exists, much less learn its location.
If you are auditing to an Oracle database that uses an ODBC connection type, users may also need to set the environment variable ORACLE_HOME. This is the case if the host machine for the Oracle Access Manager component being audited contains an Oracle database client that is configured to talk to an Oracle database server on a different machine. If the Oracle Database server resides on the same machine as the component being audited, users do not have to set ORACLE_HOME.
The following table lists the most important attributes in a data source definition:
Table 11-4 Key Attributes in an ODBC Data-Source Definition
| Attribute | Description |
|---|---|
|
DSN (Data Source Name) |
Identifies a unique data source definition to all the clients that access a given data source. (The term DSN is often used incorrectly to denote an entire ODBC data source definition.) A DSN must be unique within your Oracle Access Manager environment. Furthermore, all the ODBC.ini files and RDBMS profiles referencing a particular DSN must contain identical information related to that DSN, including login name, password, database, and so on. |
|
User |
Identifies the database user account authorized to access and modify the ODBC data source. When an Oracle Access Manager server or the Crystal Reports application needs to access the data source, it uses this account to supply credentials to the database security scheme. For SQL Server, the default user account is "sa," which stands for system administrator. |
|
Password |
This is the password associated with the account specified by User Name. You specify this password in the default user account for the audit database and again in either the RDBMS profile or the ODBC data source definition in the ODBC.ini file on each Oracle Access Manager server connected to the audit database. If you specify a password in both the ODBC data source definition and the RDBMS profile, you should know that the former stores the password string on each Oracle Access Manager host in unencrypted form in ODBC.ini, which is a plain text file, while the latter stores the string in encrypted form on just the Oracle Access Manager LDAP directory server. |
|
Database |
This is the name of the target data source, which, in the case of the audit-to-database feature, is one of the following: |
|
Server |
This the name of the machine on which the RDBMS server (SQL Server) resides. |
|
Port |
This is the port on which the RDBMS server listens for incoming requests. |
|
Driver |
The fully qualified path to the ODBC driver libraries on the local machine. |
|
Description |
Details to help you identify the data source definition. |
An ODBC driver library is specific to the type of database server to which you are connecting and the platform on which the driver is installed.
Each ODBC driver provides libraries that facilitate connection to the audit database.
An ODBC driver must exist on each machine hosting an Oracle Access Manager server that connects to the audit database. When both an Access Server and a Identity Server reside on the same machine, only a single ODBC driver is required for that host.
By default, Windows installs the ODBC driver for SQL Server in the \Windows\System32 directory. It is accessible through the ODBC Data Source Administrator, which you launch by navigating to Start, Programs, Administrative Tools, Data Sources (ODBC).
The About tab in the ODBC Data Source Administrator displays the driver version number. If, for any reason, the installed version is lower than 3.5, or the driver is damaged or missing, you can download a replacement from the following Web site:
The self-installing file is named odbc35in.exe.
An RDBMS profile is a definition for an audit database where all Identity and Access servers send audit data. RDBMS profiles can be defined for primary and secondary database instances for use in the event of failover.
RDBMS profiles reside on the Oracle Access Manager directory server, where they are accessed by all the Access and Identity Servers that are connected to that directory server. You configure RDBMS profiles in the Access System Console or the Identity System Console. See "To create an RDBMS profile" for details.
Generally, reporting (static reports) and auditing (dynamic reports) share a single RDBMS profile. All the Access and Identity Servers that use a particular feature (such as reporting and auditing) must use the same RDBMS profile.
LDAP database profiles are server- and operation-specific. They can be shared by Access and Identity Servers, but they do not need to be. Two or more Access or Identity Servers can each use a different LDAP database profile even though each LDAP database profile is set up for the same LDAP server and operation.
Each RDBMS profile can be configured for an ODBC or an OCI connection type. The RDBMS profile contains a database instance definition that configures the connection between an Access or Identity Server and the audit database. For an ODBC connection type, the database instance includes the DSN (Data Source Name) for the ODBC data source definition that is used to connect to the audit database. It also includes a copy of the attributes listed in Table 11-4.
The same DSN appears in the ODBC.ini file of every machine that hosts an Access or Identity Server that is connected to the audit database. Details associated with the DSN stored in the RDBMS profile server must match exactly the details associated with every instance of that DSN in the ODBC.ini files throughout your Oracle Access Manager system.
If the associated attributes fail to match, the values for USER and PASSWORD recorded in the RDBMS profile take precedence over the corresponding values stored in ODBC.ini. On the other hand, the values for DATABASE and other attributes stored in ODBC.ini take precedence over the corresponding values in the RDBMS profile. The values in one location are never overwritten by the values stored in the other location.
Each RDBMS profile can be configured for an ODBC or an OCI connection type. The RDBMS profile contains a database instance definition that configures the connection between an Access or Identity Server and the audit database. For an OCI connection type, you specify a Global Database Name (GDN) in the database instance definition. The database instance also includes a copy of the attributes listed in Table 11-4.
The audit database collects data from all the Access Servers and Identity Servers in your system. Oracle Access Manager supports the following:
ODBC 3.0-compliant databases on SQL Server, which runs on the Windows platform
ODBC 3.0- and OCI-compliant Oracle Database running on Windows and UNIX-based computers
Within the context of the auditing to a database, the Oracle Repository and the Crystal Repository are synonymous because you link them through the orMap.ini file. See the procedure "To edit orMap.ini".
This repository is a Microsoft Access format (.mdb) database that contains the following resources:
.gif files used in Audit Reports
SQL queries and commands used in Audit Reports
Custom functions
Templates that give Audit Reports a consistent look and feel
Sample reports
Figure 11-3 shows the organization of common, identity, and access resources in the repository.
Figure 11-3 Organization of resources in the repository
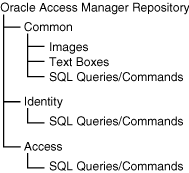
Table 11-4 describes the audit reports:
Table 11-5 Content Types in the Audit Reports
| Audit Data Type | Audit Report Type | Description |
|---|---|---|
|
Authentication/Dynamic |
The number of authentication successes and failures that occurred on a given server or across the Oracle Access Manager system during a given interval. |
|
|
Authorization/Dynamic |
The number of authorization successes and failures that occurred on a given server or across the Oracle Access Manager system during a given interval. |
|
|
Access Failures by User |
Authorization/Activity/Dynamic |
The number of authorization requests from a given user that failed during a given interval. |
|
Access Failures by Resource |
Authorization/Activity/Dynamic |
The number of authorization requests for a given resource that failed during a given interval. |
|
Access Privileges |
Filtered Query/Static |
Two types of access privilege reports are supported:
When this information is recorded to a file or database, it is referred to as a User Access Privilege Report or advanced Filtered Profile Query. See the procedure "To create and manage user access privilege reports" for details. When simpler queries are displayed through the GUI, they are referred to as Access Tester output. This type of audit information is static. It is derived from policy information that is stored on the directory server rather than collected on a historical, event-by-event basis from an Access Server or Identity Server. |
|
User Profile History |
Identity Management/Dynamic |
Changes to password, policy, profile, and so on for all users. |
|
Group History |
Identity Management/Dynamic |
A list of groups that a user has been added to or removed from in a given interval. |
|
Revoked Users |
Identity Management/Dynamic |
A list of users who have been locked out of the system. |
|
Deactivated Users |
Identity Management/Dynamic |
A list of users whose access accounts have been deactivated. Lists of reactivated users can also be generated. |
|
Password Changes |
Identity Management/Dynamic |
The number of passwords that have been changed throughout the system during a given interval. |
|
User Status Changes |
Identity Management/Dynamic |
The groups to which a given user or users has been added within a given interval. |
|
Identity History |
Identity Management/Dynamic |
Changes to password, policy, profile, and so on for one or more individual users. |
|
Workflow Execution Time |
Identity Management/Dynamic |
The average and maximum length of time it has taken to complete a workflow during a given period. |
You turn file-based auditing on and off as well as change the name and location of the audit file generated by an individual Access Server or Identity Server through the Oracle Access Manager GUI. By default, the audit flag is off for all Oracle Access Manager Servers. The following two procedures detail the steps for activating and configuring file-based auditing for Identity Servers and Access Servers, respectively.
Note that you must activate the auditing flag for each Oracle Access Manager server individually.
You can also modify the defaults for the following three categories of audit settings:
Common: See "To specify global Identity System events and profile attributes for audit" for details.
Oracle Access Manager server-specific: See the procedures "To enable and configure auditing for each Identity Server" and "To enable and configure auditing for each Access Server" for details.
Identity System application-specific: See the procedure "To specify User, Group, or Organization Manager events for audit" for details.
The categories in the preceding list apply to both file-based and database auditing.
To configure file-based auditing for an Identity Server
From the Identity System landing page, click Identity System Console.
If you are already logged in to the Identity System, click the Identity System Console tab.
Click the System Configuration sub-tab, then click Identity Servers in the left navigation pane.
From the list of identity servers, select the link for the server that you want to modify.
Review the Audit to File settings.
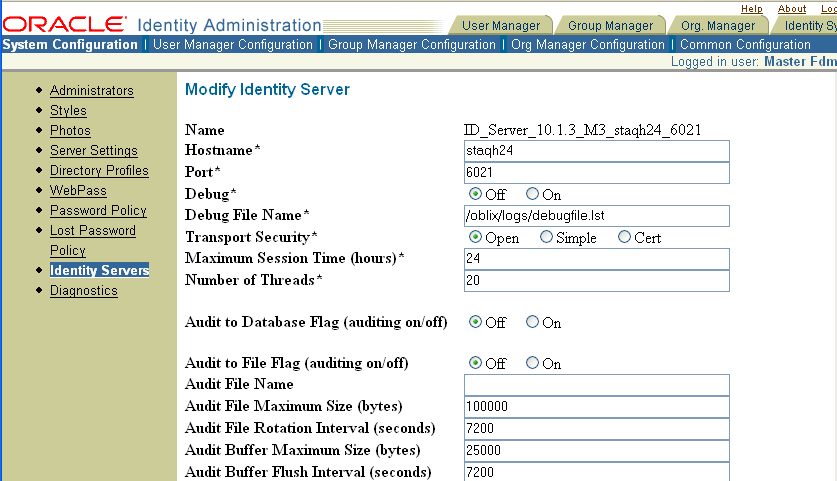
Table 11-6 describes the audit-to-file configuration parameters.
Table 11-6 Audit-to-File Configuration Parameters
| Parameter | Description | Default |
|---|---|---|
|
Audit to File Flag |
The radio buttons turn the audit to file feature to On or Off |
Off |
|
Audit File Name |
You can specify the absolute path and name of the audit file for the Access or Identity Server you are auditing. You may find it convenient to specify something similar to the following: Component_install_dir\oblix\log\auditfile.lst where Component_install_dir is the root installation directory for the associated Access or Identity Server. |
[blank] |
|
Audit File Maximum Size |
The approximate size, in bytes, at which the existing audit file is closed and renamed to the following
where AuditFIleName is the name of the audit file, and TimeStamp is a numerical representation, in seconds since midnight, January 1, 1971, of the moment when the file was created. By default, AuditFileName is AuditFile. Simultaneously, a new audit file named AuditFileName is created and opened for input. |
100000 |
|
Audit File Rotation Interval |
How often, in seconds, the audit file is renamed and a new one created to replace it. Time-based rotation occurs regardless of the current size of the audit file. See the previous row in this table for details. |
7200 |
|
Audit Buffer Maximum Size |
The amount of audit data, in bytes, that can be accumulated in a buffer before the entire buffer is written to disk. |
[blank] |
|
Audit Buffer Flush Interval |
The number of seconds after which the content of the audit buffer is written to the audit file regardless of the amount of data in the buffer. |
7200 |
To configure file-based auditing for an Access Server
From the landing page for the Access System, click the link for the Access System Console.
If you are already logged in to the Access System and are working in the Policy Manager, click the Access System Console link at the top of the page.
Click the Access System Configuration tab, then click Access Server Configuration in the left navigation pane.
From the list in the Access Server Configuration page, select the Access Server you want to modify.
In the Details for Access Server page, examine the audit file settings.
If you wish to change any of them, click the Modify button at the bottom of the page.
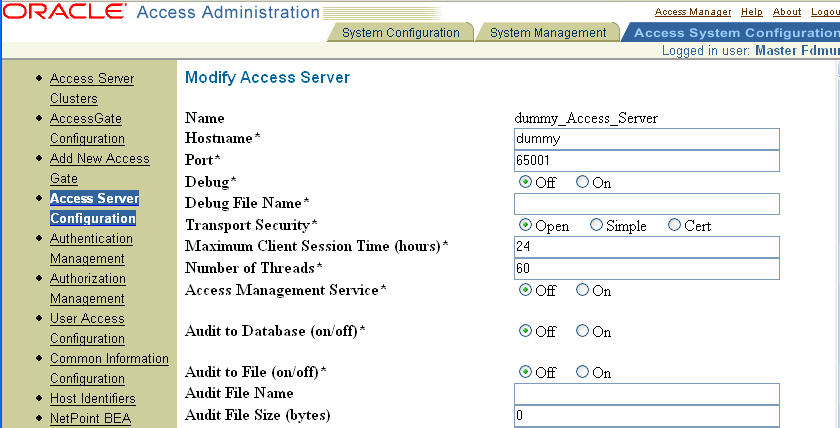
In the Modify Access Server page, modify the Audit File parameters.
The following are high-level tasks for setting up database auditing:
Task overview: Enabling database auditing
Set up and verify your Oracle Access Manager environment.
See "Setting Up Your System for Database Auditing" for details.
Install and configure your RDBMS application (SQL Server or the Oracle database), then create and configure the Oracle Access Manager audit database.
See "Setting Up Your System for Database Auditing" for details.
Configure Oracle Access Manager for database auditing.
For an OCI connection type, you create an RDBMS profile. For an ODBC connection type, this involves enabling your Oracle Access Manager servers to connect to the audit database by creating ODBC data source definitions and an RDBMS profile. You also need to configure and verify both your Identity and Access systems for auditing.
See "Configuring Auditing" for details.
Install and configure Crystal Reports, then verify that the Oracle Access Manager audit templates can display audit database information.
See "Setting up Audit Reports" for details.
The Oracle Access Manager audit database is an ODBC 3.0 compliant database running on SQL Server or the Oracle Database, or an OCI-compliant Oracle Database.
Task overview: Preparing for the audit database
If you are installing SQL Server, read "About installing SQL Server (Windows)".
Create and configure the Oracle Access Manager audit database on the database server.
See the procedures "SQL Server on Windows: To create the audit database", "Oracle Database on Windows: To create the audit database", or "Oracle Database on a supported Unix platform: To create the audit database".
When creating the Oracle database, specify the Unicode character set (AL32UTF8).
The SQL Server installation uses the Unicode character set UCS-2 by default.
Select UTF-8 as the national character set.
Upload the auditing and reporting schema to the auditing database.
Create an ODBC data source definition (System DSN) on each Oracle Access Manager server that will send data to the audit database.
See the procedures "To create an ODBC data source definition (Windows)".
Create an RDBMS profile on the Oracle Access Manager LDAP directory server so that each Access or Identity Server that is connected to the directory server can recognize the ODBC data source definition on its host machine.
Restart all your Oracle Access Manager servers.
See "To make the RDBMS profile visible (Windows)" or "To make the RDBMS profile visible (supported Unix platforms)".
You can use the Standard, Enterprise, or Developer Edition of SQL Server 2000.
If you plan to implement other Oracle Access Manager features that use SQL Server (for example, the SharePoint Portal Server integration), the auditing feature can share a single SQL Server installation with the these other features, provided that SQL installation meets the minimum requirements dictated by each feature.
Follow the instructions supplied by Microsoft to install SQL Server. The installation wizard prompts you to specify setup options. In most cases, you should accept the defaults as you progress through the wizard pages, but first check the following table and enter any settings that differ from the defaults:
Table 11-7 Special Settings for SQL Server Installation
| Wizard Page Setting | What to Specify |
|---|---|
|
autorun.exe opening screen |
SQL Server 2000 Components, Install Database Server |
|
Installation target |
"Local Computer" |
|
Installation option |
"Create a new instance of SQL Server" |
|
Type of installation |
"Server and Client Tools" |
|
Instance name |
"Default" |
|
Type of setup |
"Typical" |
|
Services accounts |
"Use the same account for each service. Auto Start SQL User Service" |
|
Service settings |
"Use Local System account" The default login name, which is also referred to as the Login ID or User Name, is "sa," and the password can be blank if the box labeled "blank password" is checked. The password can be whatever you wish if "blank password" is not checked. In any case, record the login name and associated password so that you can duplicate them exactly when you create your RDBMS profile and the ODBC data source definitions on each Oracle Access Manager server host. |
|
Authentication mode |
"Mixed Mode" |
After you have installed SQL Server, proceed to "SQL Server on Windows: To create the audit database".
The procedure for creating the Oracle Access Manager audit database differs depending on whether you are using SQL Server or the Oracle Database.
SQL Server on Windows: To create the audit database
On the machine hosting SQL Server, navigate to:
My Computer, Manage, Services and Applications, Microsoft SQL Servers, hostname
where hostname is the Windows Services name for the machine hosting SQL Server.
In the left pane of the Computer Management window, right-click Databases in the branch beneath the host name of the machine on which SQL Server is installed, then click New Database.
Select a descriptive name for the database, then click OK.
An icon representing the new database appears in the right hand pane of the Computer Management window.
Proceed to "Uploading the Audit Schema".
Oracle Database on Windows: To create the audit database
Start the Oracle Database server.
Start the Database Configuration Assistant by clicking Start, Programs, Oracle - OraDb10g_home1, Configuration and Migration tools, Database configuration assistant.
When the wizard prompts you for a Global Database Name, record the name and use it in the database instance definition of the RDBMS profile in Oracle Access Manager.
In the Initialization Parameters screen, choose AL32UTF8 as the database character set, and choose UTF8 as the national character set.
Proceed to "Uploading the Audit Schema".
Oracle Database on a supported Unix platform: To create the audit database
Start the Oracle Database server located in the following directory:
ORACLE_HOME/bin/dbca
Start the Database Configuration Assistant.
When the wizard prompts you for a Global Database Name, record the name and use it in the database instance definition of the RDBMS profile in Oracle Access Manager.
In the Initialization Parameters screen, choose AL32UTF8 as the database character set, and choose UTF8 as the national character set.
Tune the audit schema.
See "Tuning the Audit Schema" for details.
Upload the audit schema.
See "Uploading the Audit Schema" for details.
If you perform auditing using the Oracle database with OCI, you must use the default schema. You cannot use the information in this section.
For MS SQL Server and the Oracle database using an ODBC connection type, you can optionally tune the audit schema before or after uploading it. In this section, tuning refers to increasing or decreasing the maximum length of audit record fields of type ncharvar in MS SQL Server or ncharvar2 in the Oracle database.
The audit schema path for MS SQL Server is as follows:
OracleAccessManager_Install_dir\oblix\reports\crystal\audit.sql
By default, the values of all nvarchar fields for the Identity and Access Server audit records in MS SQL Server are truncated to the first 170 characters. For MS SQL Server 2000, the total size of a record cannot exceed a limit of 8060 bytes. Each nvarchar occupies 2 bytes of memory. The maximum size of each nvarchar field with default schema is 340 bytes. The maximum size of the default audit record is 7836 bytes, equivalent to (340 * 23) + 8 + (2 * 2) + 4.
The audit schema path for the Oracle database is as follows:
OracleAccessManager_Install_dir\oblix\reports\crystal\audit_oracle.sql
By default, the values of all nvarchar2 fields for the Identity and Access Server audit records in the Oracle database are truncated to the first 255 characters.
You can increase or decrease the column lengths of the following fields:
adminDN
applicationInfo
applicationName
exceptionString
objects
reason
sourceUserDN
targetUserDN
url
userProfileAttrs
webGateContextInfo
For example, in an Oracle database using an ODBC connection type, if the default maximum length of the exceptionString field is insufficient, you can increase it, for example, to a maximum of 400 characters.
You can modify the audit schema before uploading it, or if you have previously uploaded the audit schema and it contains audit records, you can modify the existing schema.
To modify the default length of fields
Open the following file in a text editor:
component_installdir/apps/common/bin/globalparams.xml
Where component_installdir is the installlation directory for the Access or Identity Server.
In the globalparams.xml file for both the Access Server and the Identity Server, set the value of the DBAuditTruncateDataToColLength parameter to "true".
See the parameter reference appendix in the Oracle Access Manager Customization Guide for details.
If the schema has been uploaded to the database, you can also use the alter command to modify the length for an nvarchar field in the database.
The following is an example for the MS SQL Server database:
alter table oblix_audit_events alter column exceptionString nvarchar(400);
The following is an example for the Oracle Server database:
alter table oblix_audit_events modify exceptionString nvarchar2(400);
If schema has not yet been uploaded to the database server, change the column lengths in the database before uploading it, using the instructions for the database.
The audit schema enables you to import audit data from the Oracle Access Manager servers and export that data to the Crystal Repository, where it is presented in Oracle Access Manager audit reports.
Task overview: Uploading the audit schema
Copy the Oracle Access Manager audit schema and supporting resources from an Oracle Access Manager server host to the Oracle Access Manager audit database host.
The copy procedure differs depending whether you are performing a Windows-to-Windows or Unix-to-Unix transfer. See:
"To copy the audit and reporting schema to the audit database host" for details.
Upload the audit and reporting schema to your audit database and verify that the upload was successful, which differs depending on whether you are using SQL Server or the Oracle Database. See:
To copy the audit and reporting schema to the audit database host
On any machine hosting a Oracle Access Manager server, locate the directory containing the Oracle Access Manager audit schema by navigating to:
Component_Install_dir\oblix\reports\crystal
where Component_Install_dir is the root installation directory of your Oracle Access Manager server (IdentityServer_install_dir\identity\, for example).
Using any of the means available for your particular operating system and network domain, copy the file audit.sql to a directory on the machine hosting your Oracle Access Manager auditing database.
This procedure isn't necessary if you installed your audit database on the same machine as one of your Oracle Access Manager servers.
Continue with the following procedures as is appropriate for the database application you are using:
SQL Server on Windows: To upload the audit schema
On the machine hosting SQL Server, navigate to:
Start, Programs, Microsoft SQL Server, Query Analyzer
If the "Connect to SQL Server" page is not already displayed in the SQL Query Analyzer window, navigate to:
File, Connect
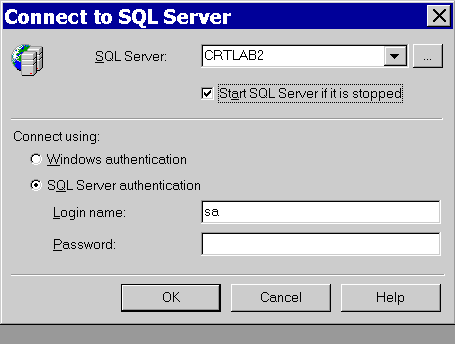
In the Connect to SQL Server page, verify that the Windows Service name of your SQL Server host is displayed in the field labeled SQL Server.
Check "Start SQL Server if it is stopped."
Set "Connect using" to "SQL Server authentication."
Enter the login name and password you selected when installing SQL Server, then click OK.
A Query window will open in the SQL Query Analyzer window.
Launch the Oracle Access Manager audit database in the SQL Query Analyzer.
In the SQL Query Analyzer menu, navigate to:
File, Open
Navigate to "audit.sql" which is located under the directory you copied from your Oracle Access Manager server to your audit database host in the preceding procedure.
For details, see the procedure "To copy the audit and reporting schema to the audit database host". The specific location of audit.sql is:
..\reports\crystal\audit.sql
In the Query window, add the following line to the very beginning of the file audit.sql:
use AuditDBName;
where AuditDBName specifies the Oracle Access Manager audit database you created in the procedure "SQL Server on Windows: To create the audit database". In our example, we named the database NPAuditDB.
For all SQL statements, don't forget to place a semi-colon at the end of the line.
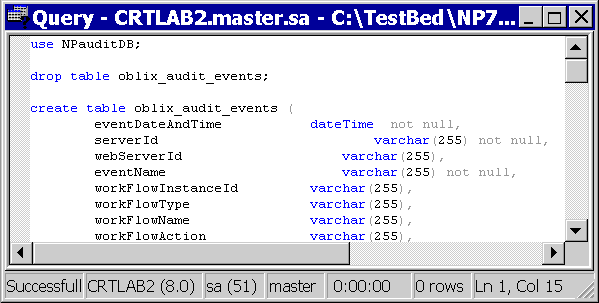
Press F5 to execute the command. Alternatively, select Query, Execute from the SQL Query Analyzer menu.
The first time you do this, the application will return the following error message:
cannot drop the table 'oblix_audit_events', because it does not exist in the system catalog yet
This is both customary and logical, because the table did not exist when the "use" command was executed. If you save audit.sql and subsequently re-execute this command, the error message will not reappear, because the table now exists.
Minimize, but do not close the Query window; you will need to add another line to audit.sql when you verify that the schema have uploaded successfully. Proceed to: "SQL Server on Windows: To verify the audit schema".
SQL Server on Windows: To verify the audit schema
Perform a "dummy" select from the oblix_audit_events table.
Add the following line immediately beneath the line you added to audit.sql in the procedure "SQL Server on Windows: To upload the audit schema":
select * from oblix_audit_events;
Remember to include a semi-colon at the end of the line.
Click F5 to execute the command.
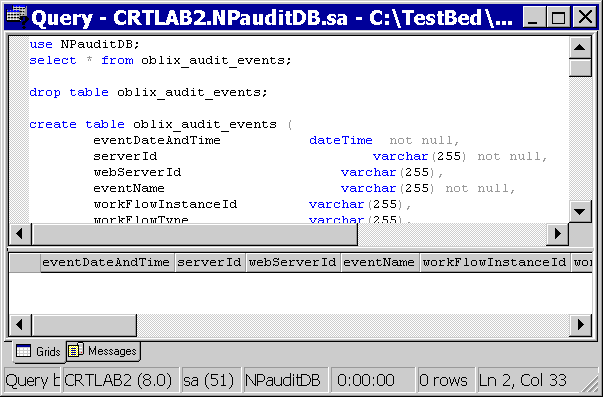
Column headings such as eventDateAndTime appear in a pane immediately beneath the code pane in the Query window. These indicate that the audit.sql schema uploaded successfully.
In the SQL Query Analyzer window, click File, Save to record the changes to your audit.sql, which is now linked to your Oracle Access Manager audit database.
Proceed to "SQL Server on Windows: To upload and verify the access reporting schema" next.
The next procedure is similar to the previous procedures (where you uploaded and verified the audit schema using the oblix_audit_events table. In the following procedure, you copy table definitions and commands for oblix_rpt_as_reports, oblix_rpt_as_resource, and oblix_rpt_as_users from the audit.sql file into the Query Analyzer workspace, and execute them.
SQL Server on Windows: To upload and verify the access reporting schema
On the machine hosting SQL Server, perform the following activities as needed to login:
Navigate to Start, Programs, Microsoft SQL Server, Query Analyzer
If the "Connect to SQL Server" page is not already displayed in the SQL Query Analyzer window, navigate to: File, Connect.
In the Connect to SQL Server page, verify that the Windows Service name of your SQL Server host is displayed in the field labeled SQL Server.
Check "Start SQL Server if it is stopped."
Set "Connect using" to "SQL Server authentication."
Enter the login name and password you selected when installing SQL Server, then click OK.
A Query window will open in the SQL Query Analyzer window.
Launch the Oracle Access Manager audit database in the SQL Query Analyzer, as follows:
In the SQL Query Analyzer menu, navigate to File, Open
Navigate to the audit.sql file under the directory you copied from your Oracle Access Manager server to your audit database host earlier. For example:
IdentityServer_install_dir\identity\oblix\reports\crystal\audit.sql
In the Query window, add the following line to the very beginning of the file audit.sql:
use AuditDBName;
where AuditDBName specifies the Oracle Access Manager audit database you created in the procedure "SQL Server on Windows: To create the audit database". In our example, we named the database NPAuditDB.
For all SQL statements, don't forget to place a semi-colon at the end of the line.
Add all drop and create commands for the three Oracle Access Manager tables (oblix_rpt_as_reports, oblix_rpt_as_resources, and oblix_rpt_as_users) to the Query Analyzer window and execute these at one time, as follows:
Copy the drop table oblix_rpt_as_reports, oblix_rpt_as_resources, and oblix_rpt_as_users information (3 drop commands followed by 3 create table commands) together from the audit.sql file and paste these into the Query Analyzer window at once.
Note:
Copy all at one time and do not change the order of these commands. There are dependencies between the tables.Press F5 to execute the commands at one time (or select Query, Execute from the SQL Query Analyzer menu).
Minimize, but do not close the Query window; you will need to add another line to audit.sql when you verify that the schema have uploaded successfully.
Verify information for the oblix_rpt_as_reports, oblix_rpt_as_resources, and oblix_rpt_as_users tables as follows:
Perform a "dummy" select from the oblix_rpt_as_reports, oblix_rpt_as_resources, and oblix_rpt_as_users tables (individually or all at once).
Add the following line immediately beneath the line you added from audit.sql in the procedure "SQL Server on Windows: To upload the audit schema":
select * from oblix_rpt_as_reports;
select * from oblix_rpt_as_resources;
select * from oblix_rpt_as_users;
Click F5 to execute the command.
Proceed to "Enabling Access and Identity Servers to Connect to the Audit Database".
The next two procedures are similar to the previous procedures. However, these are specific to the Oracle Database on Windows or a UNIX-based platform.
Oracle Database on Windows or a UNIX-based Platform: To upload and verify the audit schema
Start the Oracle Database server and the iSQL*Plus application.
Connect to the iSQL *Plus web application of Oracle DB server.
A typical URL for this is the following:
http://oracle_DB_host_name:port/isqlplus/
Where Oracle_DB_host_name is the name of the Oracle Database instance and port is the port number that you have chose during the installation of the Oracle Database server.
Log in to iSQL *Plus by providing the user name, password and GDN of the database.
Copy the schema definition from the following file to the iSQL*Plus Workspace page:
Identity_Server_install_dir\oblix\reports\crystal\audit_oracle.sql
Click the Execute button.
To verify the audit schema, enter the following command in iSQL*Plus:
desc oblix_audit_events
Alternatively, you can enter the select * command for oblix_audit_events; in iSQL*Plus.
Proceed to "Oracle Database on Windows or a UNIX-based Platform: To upload and verify the access reporting schema" next.
The next procedure is similar to the previous procedures (where you uploaded and verified the audit schema using the oblix_audit_events table. In the following procedure, you copy table definitions for oblix_rpt_as_reports, oblix_rpt_as_resource, and oblix_rpt_as_users from the audit.oracle.sql file into the iSQL *Plus web application of Oracle DB server, and execute them.
Oracle Database on Windows or a UNIX-based Platform: To upload and verify the access reporting schema
Login to the iSQL *Plus, as needed:
Start the Oracle Database server and the iSQL*Plus application
Connect to the iSQL *Plus web application of Oracle DB server.
Log in to iSQL *Plus by providing the user name, password and GDN of the database.
Add all drop and create commands for the three Oracle Access Manager tables (oblix_rpt_as_reports, oblix_rpt_as_resources, and oblix_rpt_as_users), and execute as follows:
Add all drop and create commands for the three Oracle Access Manager tables (oblix_rpt_as_reports, oblix_rpt_as_resources, and oblix_rpt_as_users) from the following file to the iSQL*Plus Workspace page:
Identity_Server_install_dir\oblix\reports\crystal\audit_oracle.sql
Click the Execute button
Verify the schema for all three Oracle Access Manager tables (oblix_rpt_as_reports, oblix_rpt_as_resources, and oblix_rpt_as_users) individually or all at once with the following command in iSQL*Plus:
desc oblix_rpt_as_reports;
desc oblix_rpt_as_resources;
desc oblix_rpt_as_users;
Alternatively, you can enter the select * command for the three Oracle Access Manager tables oblix_rpt_as_reports; oblix_rpt_as_resources; oblix_rpt_as_users; in iSQL*Plus.
Proceed to "Enabling Access and Identity Servers to Connect to the Audit Database".
You enable your servers to connect to the audit database by creating a RDBMS profile on the directory server and ODBC data source definitions on each machine hosting a server that connects to the audit database. A single, unique System DSN (System-wide Data Source Name) connects all of these objects.
It is extremely important that every attribute associated with a given DSN in both the RDBMS profile and the ODBC data source definitions on the server hosts match exactly. For details, see "To create a primary RDBMS instance".
Task overview: Enabling Oracle Access Manager servers to connect to the audit database
All—Set the value of the SQLDBType parameter in globalparams.xml.
Windows—create an ODBC data source definition (System DSN) on each Oracle Access Manager Server host.
All—Using either the Identity System Console or the Access System Console, create an RDBMS profile on the directory server.
See "Task overview: Setting up an RDBMS profile". This includes the following tasks:
Create a primary RDBMS instance as described in "To create a primary RDBMS instance".
Create optional secondary RDBMS instances for your RDBMS profile as described in "Task overview: To create a secondary RDBMS instance".
Restart all Oracle Access Manager servers as described in "To make the RDBMS profile visible (Windows)".
To set the SQLDBType parameter
Open the following file:
Component_install_dir/identity/apps/common/bin/globalparams.xml
where component_install_dir is the location where the Access or Identity Server was installed.
Set the value of the SQLDBType parameter in globalparams.xml as follows:
Oracle: Indicates an Oracle Database that uses an ODBC connection type.
Oracle_OCI: Indicates an Oracle Database that uses an OCI connection type.
SQLServer: Indicates a SQL Server database.
To create an ODBC data source definition (Windows)
On a Oracle Access Manager server host you wish to connect to the audit database, navigate to: Start, Settings, Control Panel, Administrative Tools, Data Sources (ODBC).
Click the System DSN tab.
Click Add.
From the list of database drivers, select SQL Server, then click Finish.
In the Name field, type a descriptive name.
For instance, AuditSysDSN stands for the System DSN for the audit database. Write this name down, because you will have to use this exact character string for the OBDC data source definitions on every other Oracle Access Manager Server host, and for the primary RDBMS instance in your RDBMS profile as well.
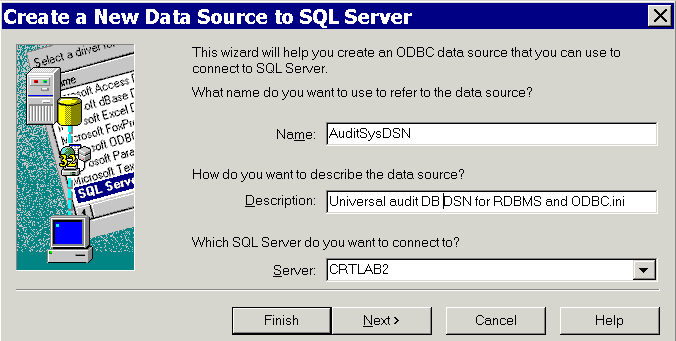
In the Description field enter notes to help users identify this object.
In the Server field, select the Windows Services name of the host on which the Oracle Access Manager audit database is running, then click Next.
When the next page appears, select "With SQL server authentication. . ."
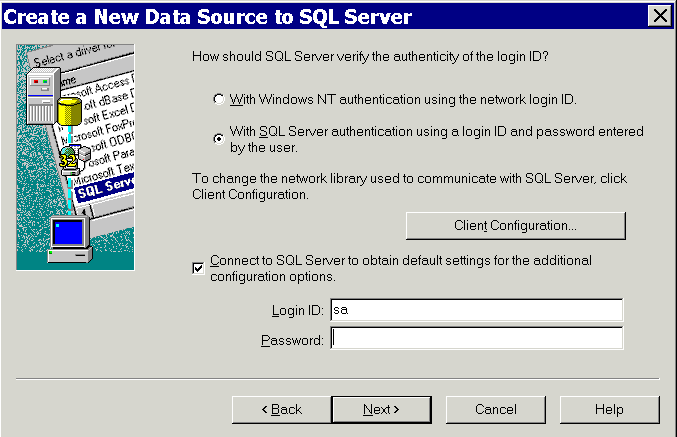
Verify that "Connect to SQL server to obtain . . ." is selected.
Type the Login ID and password you specified when you installed SQL Server.
Leaving the default settings on the next two pages untouched, click Next, then click Finish.
After a page appears listing the settings for the new ODBC data source definition, click Test Data Source.
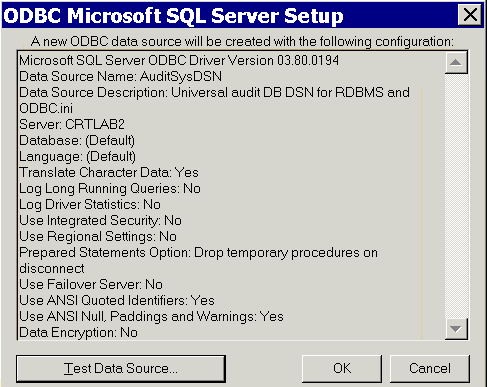
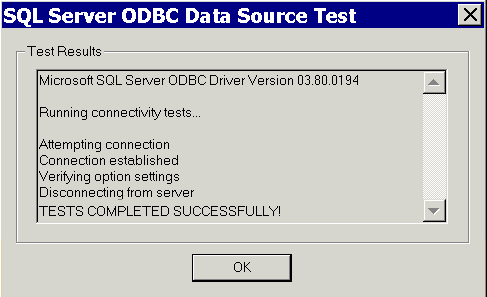
After a page appears to announce success, click OK three times to dismiss the open pages.
Repeat this procedure on every Oracle Access Manager server host you wish to connect to the audit database.
Make sure you use the exact same settings in every case, and for your RDBMS database instances as well. Proceed to "Task overview: Setting up an RDBMS profile".
Task overview: Setting up an RDBMS profile
Create an RDBMS profile.
See "To create an RDBMS profile" for details.
Create a primary RDBMS instance.
See the procedure "To create a primary RDBMS instance" for details.
Create (optional) secondary RDBMS instances.
See "Task overview: To create a secondary RDBMS instance" for details.
Make the RDBMS profile visible.
As appropriate for the database application you are using, See the procedure "To make the RDBMS profile visible (Windows)" or "To make the RDBMS profile visible (supported Unix platforms)".
From the Identity System Console, click System Configuration, then click the link for Directory Profiles in the left navigation pane, then click the Add button in the Configure RDBMS Profiles section of the Configure Profiles page.
Alternatively, from the Access System Console, click System Configuration, then click Server Settings in the left navigation pane, then click the Add button in the Configure RDBMS Profiles section of the page.
The Create RDBMS Profile page is identical for the Identity System Console and the Access System Console.
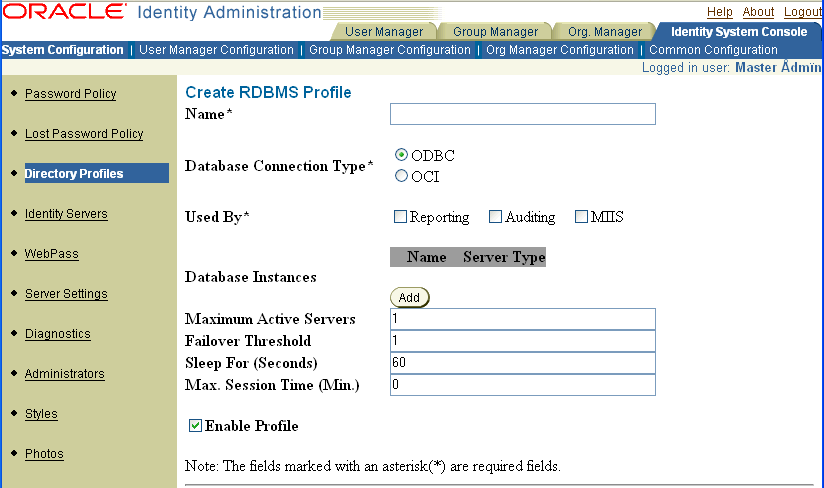
In the Name field, enter a descriptive name.
For instance AuditDBSysDSN refers to the System DSN created for the audit database. You are creating an RDBMS profile on this page, but this name provides a convenient universal name to identify matching sets of data source definition values in the RDBMS profile and the ODBC.ini files on each Oracle Access Manager server host.
The name of each RDBMS profile on a directory server must be unique.
In the Database Connection Type field, select the type of connection that your database uses.
In the Used By field, check the Reporting and Auditing options.
Verify that the Enable Profile box is selected.
Proceed to "To create a primary RDBMS instance" .
To create a primary RDBMS instance
Navigate to the Create RDMBS Profile page, as described in "To create an RDBMS profile".
From the Create RDBMS Profile page, click the Add button next to the table labeled Database Instances.
In the Name field of the Create Database Instance page, enter a descriptive name.
For convenience, you can use the universal name you gave to the RDBMS Profile, such as AuditDBSysDSN.
The following field will either be DSN Name or GDN, depending on whether you specified an ODBC or an OCI connection type for the database.
For SQL Server, you can use the same name for the database instance and the RDBMS profile, for example AuditDBSysDSN. For the Oracle database, use the GDN that you specified when configuring the database. See "Oracle Database on Windows: To create the audit database" or "Oracle Database on a supported Unix platform: To create the audit database" for details.
WARNING:
The character string you specify as the DSN for your RDBMS instance must match exactly the DSN you specify for the ODBC data source definition on each Oracle Access Manager server. Furthermore, the values for all other database instance attributes must be empty or match exactly the values for the corresponding attributes in the ODBC data source definitions throughout your Oracle Access Manager system.
In the Database field, specify the name of the audit database.
This example uses NBAuditDB.
In the User name field, enter the login name you specified when you created the audit database.
Enter the password associated with the audit database login name.
Leave the other fields at their default settings.
You can change them later, if necessary.
Click Save to commit the database instance settings you have entered.
When the Modify RDBMS Profile page appears, click Save to commit the RDBMS profile settings you have entered.
If you wish to create a secondary RDBMS instance, proceed to the task overview immediately following.
Otherwise, proceed to "To make the RDBMS profile visible (Windows)" or "To make the RDBMS profile visible (supported Unix platforms)".
Task overview: To create a secondary RDBMS instance
Perform all the steps in "Creating the Audit Database".
For convenience, you may want to name the second instance of the audit database something like NPAuditDB_2.
Perform all the steps in "Uploading the Audit Schema".
Perform steps 5 through 11 in "To create an RDBMS profile".
For convenience, you may want to specify the name of the RDBMS instance and the DSN name as something like AuditDBSysDSN_2.
After the Modify RDBMS Profile page appears, verify that the Server Type for your secondary RDBMS instance is set to secondary.
Add the ODBC data source definitions for the secondary RDBMS instance (s) to ODBC.ini on each Oracle Access Manager server host.
As appropriate for the database application you are using, see "To create an ODBC data source definition (Windows)".
As appropriate for the database application you are using, proceed to "To make the RDBMS profile visible (Windows)" or "To make the RDBMS profile visible (supported Unix platforms)".
To make the RDBMS profile visible (Windows)
On any Oracle Access Manager server host, navigate to My Computer, Manage, Services and Applications, Services.
Right-click the icon representing the Oracle Access Manager server on the machine, then select Restart from the dropdown menu.
If you installed both an Access Server and a Identity Server on the same machine, perform this procedure for both servers.
Repeat this procedure for all the Oracle Access Manager server hosts you wish to connect tot the audit database.
Proceed to "Configuring Auditing" .
To make the RDBMS profile visible (supported Unix platforms)
On a machine hosting a Oracle Access Manager server, run one of the following commands to stop your Oracle Access Manager server.
Access Servers: stop_access_server
Identity Servers: stop_ois_server
Run one of the following commands to start your Oracle Access Manager server.
Access Servers: start_access_server
Identity Servers: start_ois_server
Repeat this procedure for all the Oracle Access Manager server hosts you wish to connect to the audit database.
Proceed to "Configuring Auditing" .
You can configure Oracle Access Manager for both file-based and database auditing.
By default, both file-based auditing and database auditing are turned off for all Oracle Access Manager servers. You can manually enable file-based and database auditing for each Oracle Access Manager server in your system.
You can configure audit options on a system-wide, server, event, and application basis. See "About Audit Options" for a summary.
The defaults for auditing are optimal for most situations. You need to turn on the type or types of auditing you want on the Oracle Access Manager servers that you want to audit. If you send data to the audit database, you must also replace the default audit data format string on both the Identity and Access systems. See "To modify audit output formatting for the Identity System" and "To modify audit output formatting for the Access System" for details.
Note that the global auditing settings that you configure in the Common Configuration sub-tab of the Identity System Console are different from the application-specific events that you audit from the sub-tabs for User, Group, and Org. Manager Configuration.
Task overview: To configure auditing
Turn on either or both file-based and database auditing for each Identity Server, and modify audit file attributes, if you wish.
See "To enable and configure auditing for each Identity Server".
Configure the audit output formatting for the Identity System.
See "To modify audit output formatting for the Identity System" for details.
Specify what data for which events will be audited.
This includes the following categories:
Events common to the User, Group, and Organization Manager applications.
See "To specify global Identity System events and profile attributes for audit" for details.
User, Group, or Organization Manager events.
See "To specify User, Group, or Organization Manager events for audit" for details.
Verify that all Identity Servers can record data to the audit database.
See "To verify that all Identity Servers can record data to the audit database (Windows)" for details.
Turn on file-based or database auditing for individual Access Servers, and modify audit file attributes, if you wish.
See "To enable and configure auditing for each Access Server" for details.
Globally modify the audit output formatting for the Access system.
See "To modify audit output formatting for the Access System" for details.
Create and manage User access privilege reports.
See "To create and manage user access privilege reports" for details.
To enable and configure auditing for each Identity Server
From the Identity System Console, click the System Configuration sub-tab, then click Identity Servers in the left navigation pane.
Click the link for the server that you want to modify, then click Modify.
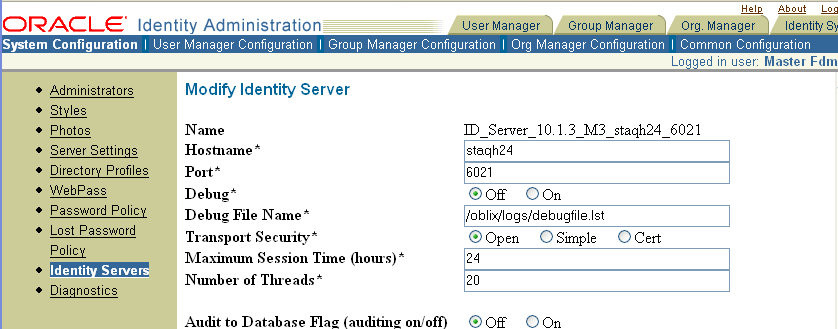
Set the file auditing and database auditing flags according to your preference, and change whichever audit file attributes you prefer.
Click save to put your changes into effect.
For database auditing, open the globalparams.xml file in the following directory. For example:
Component_install_dir/identity/apps/common/bin/globalparams.xml
where component_install_dir is the location where the Access or Identity Server was installed.
Set the value of the SQLDBType parameter in globalparams.xml as follows:
Oracle: Indicates an Oracle Database that uses an ODBC connection type.
Oracle_OCI: Indicates an Oracle Database that uses an OCI connection type.
SQLServer: Indicates a SQL Server database. This is the default.
Repeat this for all Identity Servers in your Oracle Access Manager system, then proceed to "To modify audit output formatting for the Identity System" .
To modify audit output formatting for the Identity System
From the Identity System Console, click the Common Configuration sub-tab, then click Master Audit Policy in the left navigation pane, then click Modify.
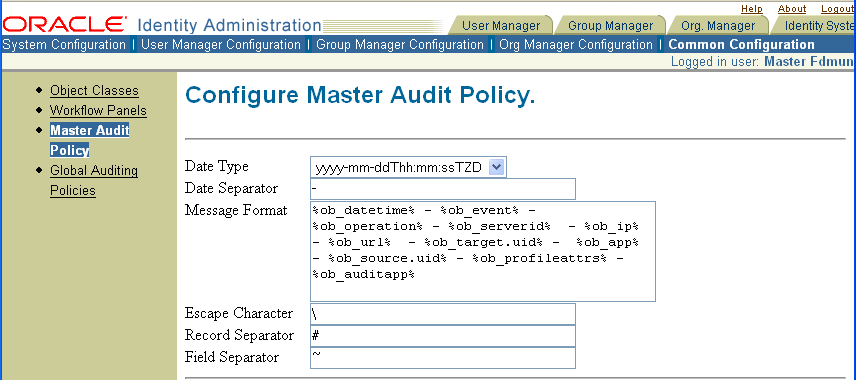
Click anywhere within the Message Format text box, press Control-A to select everything within the text box, even the contents that are obscured, then press Delete.
In the empty text box, insert the following string:
%ob_datetime% - %ob_event% - %ob_operation% - %ob_serverid% - %ob_ip% - %ob_url% - %ob_target.uid% - %ob_app% - %ob_source.uid% - %ob_profileattrs% - %ob_auditapp%
Do not add a semi-colon or line return to the end of the string.
If you prefer, modify the default values in the Date Type, Date Separator, Escape Character, Record Separator, and Field Separator fields.
Note that if you change any of these values, you will need to reconfigure the Crystal report templates used to generate Audit Reports.
Click Save.
The new message format string and any other changes you made will display in the Configure Master Audit Policy page.
The new message format string applies across the Identity System, so you do not need to repeat the process for the other Identity Servers, but you do need to perform a similar procedure to set the format string for the Access system.
See "To modify audit output formatting for the Access System" for details.
Proceed to "To specify global Identity System events and profile attributes for audit".
To specify global Identity System events and profile attributes for audit
From the Identity System Console click the Common Configuration sub-tab, then click Global Auditing Policies in the left navigation pane, then click Modify.
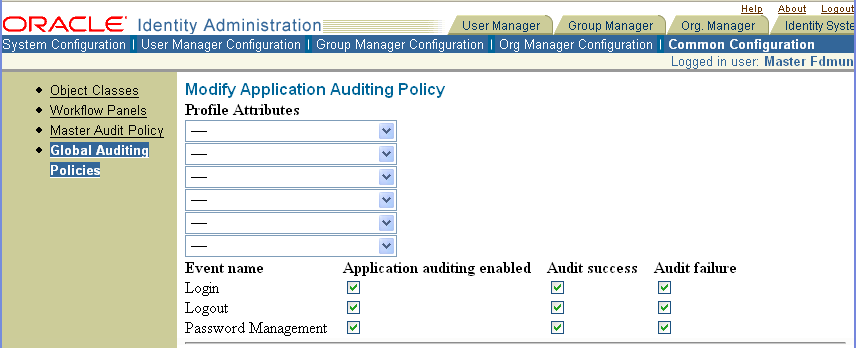
Select up to five profile attributes to audit.
Profile attributes (Full Name, Employee Number, Department Number, and the like) are specific to the user performing the action/event being audited (Search or View Profile or Modify Profile, for example). The purpose of profile attributes is to help you identify the user performing the action/event.
WARNING:
To avoid exposing a challenge phrase or response attribute, Oracle recommends that you do not select these as profile attributes for auditing. If you add a challenge phrase or response as a profile attribute, it is audited in proprietary encoded format.
Modify the default audit flag settings for the common User, Group, and Organization Manager application events you prefer.
Click Save to apply these settings to all the Identity Servers in your system.
Proceed to "To specify User, Group, or Organization Manager events for audit".
To specify User, Group, or Organization Manager events for audit
From the Identity System Console, click the User, Group, or Org. Manager Configuration sub-tab, then click Audit Policies in the left navigation pane, then click Modify.
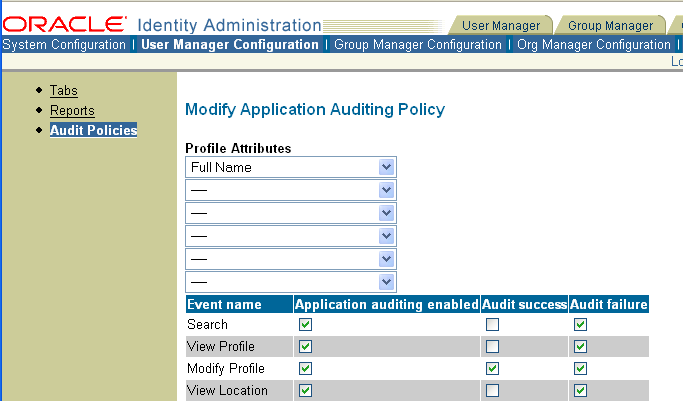
Select up to five profile attributes to audit.
Profile attributes (Full Name, Employee Number, Department Number, and the like) are specific to the user performing the action/event being audited (Search or View Profile or Modify Profile, for example). The purpose of profile attributes is to help you identify the user performing the action/event.
WARNING:
To avoid exposing a challenge phrase or response attribute, Oracle recommends that you do not select these as profile attributes for auditing. If you add a challenge phrase or response as a profile attribute, it is audited in proprietary encoded format.
Modify the default audit flag settings for whichever common User Manager application events you prefer.Identity Server
Click Save to apply these settings to all the Identity Servers in your system.
To verify that all Identity Servers can record data to the audit database (Windows)
From any page in the Identity System Console for any Identity Server for which you have completed all the audit setup procedures up to this point, click Logout in the upper right corner of the application window.
Click OK when asked if you really want to log out.
Open the SQL Server Query Analyzer window on the machine hosting your audit base.
You minimized this window when you completed the procedure "SQL Server on Windows: To verify the audit schema".
If, for any reason, the window is no longer open, re-launch it by navigating to: Start, Programs, Microsoft SQL Server, Query Analyzer, File, Open, Login_Credentials, OK, File, Open, audit_sql_path, OK
where Login_Credentials is the user name and password you specified when installing SQL Server and audit_sql_path is the path to the audit.sql file you copied to the audit database host and subsequently modified in the procedure "SQL Server on Windows: To verify the audit schema".
Press F5 to execute audit.sql.
You previously saved audit.sql after adding the following lines:
use AuditDBName;
select * from oblix_audit_events;
where AuditDBName specifies the audit database you created in the procedure "SQL Server on Windows: To create the audit database".
The column headings for the Oracle Access Manager schema appear at the bottom of the Query window with particulars for the logout under the appropriate columns.

Proceed to "To enable and configure auditing for each Access Server".
To verify that all Identity Servers can record data to the audit database (Supported Unix platforms)
From any page in the Identity System Console of any Identity Server for which you have completed all the audit setup procedures up to this point, click Logout in the upper right corner of the application window.
Click OK when asked if you really want to log out.
Perform the following in the iSQL *Plus Web application of the Oracle Database Server:
Log in to iSQL *Plus by providing the user name, password, and GDN of the database.
Enter following command in the iSQL *Plus Workspace:
select * from oblix_audit_events;
The columns headings for the Oracle Access Manager audit schema appear in the iSQL *Plus Workspace page. Information regarding logout appears under the appropriate column headings.
Proceed to "To enable and configure auditing for each Access Server".
To enable and configure auditing for each Access Server
On any Access Server you plan to connect to the audit database, navigate to: Access System Console, Access System Configuration, Access Server Configuration, ServerName, Modify
where ServerName specifies the Access Server you want to modify.

Set the file auditing and database auditing flags according to your preference.
Change whichever audit file attributes you prefer, then click Save to commit your changes.
If you change any of the attributes marked with asterisks, you must restart your Access Server to make the changes take effect.
Repeat this for all Access Servers in your Oracle Access Manager system, then proceed to "To modify audit output formatting for the Access System".
For database auditing, open the globalparams.xml file in the following directory:
Component_install_dir/apps/common/bin/
where component_install_dir is the location where the Access or Identity Server was installed.
Set the value of the SQLDBType parameter in globalparams.xml as follows:
SQLServer: Indicates a SQL Server database. This is the default.
Oracle: Indicates an Oracle Database that uses an ODBC connection type.
Oracle_OCI: Indicates an Oracle Database that uses an OCI connection type.
To modify audit output formatting for the Access System
On any Access Server you plan to connect to the audit database, navigate to: Access System Console, Access System Configuration, Common Information Configuration, Master Audit Rule, Add (or Modify).
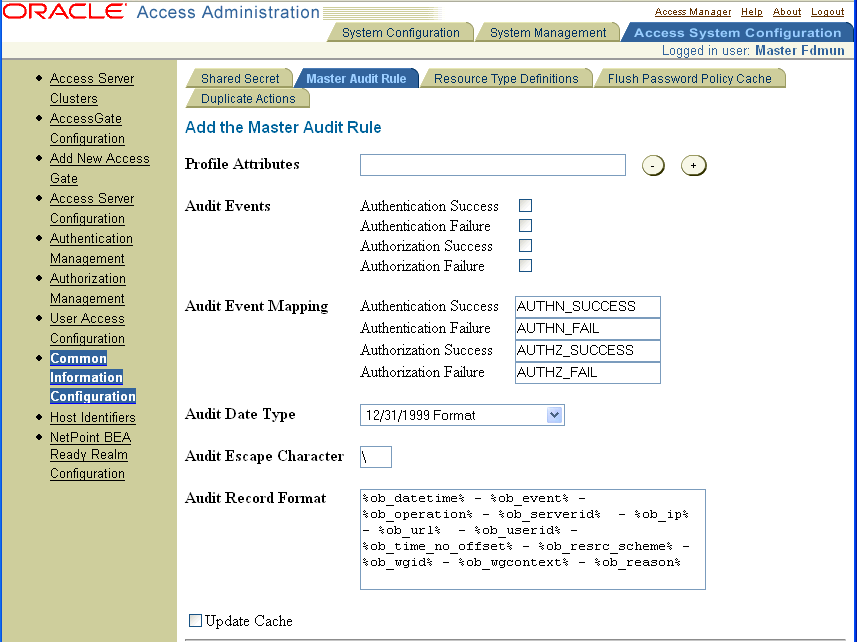
Click anywhere within the Audit Record Format text box, press Control-A to select everything within the text box, even the contents that are obscured, then press Delete.
In the empty text box, insert exactly what appears in the following string:
%ob_datetime% - %ob_event% - %ob_operation% - %ob_serverid% - %ob_ip% - %ob_url% - %ob_userid% - %ob_time_no_offset% - %ob_resrc_scheme% - %ob_wgid% - %ob_wgcontext% - %ob_reason%
Do not add a semi-colon or line return to the end of the string.
In the Profile Attributes box, type the name of a profile attribute you want to audit, then click the plus sign (+) to the right of the text box.
Repeat this step to add other profile attributes.
Select the events you want to audit.
If you prefer, modify the default event mappings.
If you prefer, modify the default values in the Audit Date Type and Audit Escape Character fields. Remain aware that if you do change any of these values, you need to reconfigure the Crystal report templates used to generate Audit Reports.
Click Save.
The new message format string and any other changes you made appear in the Master Audit Rule page.
The new message format string applies across the Access System, so you do not need to repeat the process for the other Access Servers, but you do need to perform a similar procedure to replace the format string for the Identity System.
See "To modify audit output formatting for the Identity System".
Proceed to "To create and manage user access privilege reports" .
To create and manage user access privilege reports
On any Access Server you plan to connect to the audit database, navigate to Access System Console, System Management, Manage Reports, Add.
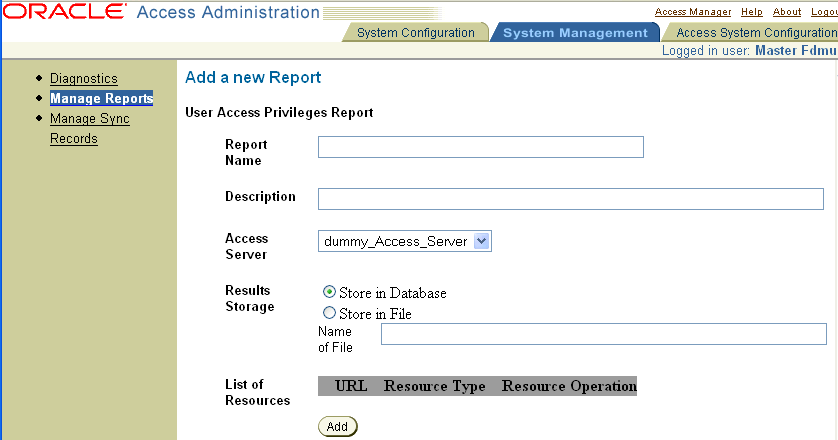
In the Report Name field, type a descriptive name such as "Midnight Access."
In the Description field, type a longer explanation of the report content, such as "Who has night shift access to the loading dock shipping manifest URLs."
Specify whether to send the information to the audit database or the audit file on the local host. If you specify the audit file, you must provide a file name.
In the "From this IP Address field," type the IP of the host for a specific web browser whose access you want to test.
In the "Date/Time..." field, select the date, time, and time zone for which you wish to test access.
This can be a point in the future, because the audit feature does not actually report the historical results of a actual access attempt; rather, it consults the policy and profile information stored on the Oracle Access Manager directory server to calculate whether the specified users currently have permission to access the specified resource at the specified time.
Click the Add button near the List of Resources label to add URLs to the list of resources to be tested.
The Add Resource Rule page appears.
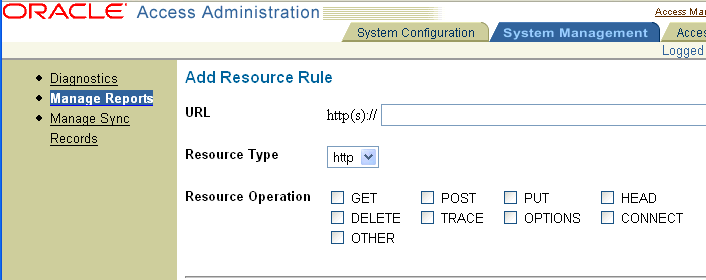
Type the URL to be tested.
Set the Resource type to http or ejb.
Check the action(s) you want tested.
Click Save to return to the Add a New Report page.
Click Add again to add another resource to be tested, or proceed to the next step.
You can test access for all users, or you can use the Selector to test access for specific users.
See "The Selector" for details on the Selector.
When you are done with the Selector and the Add a new Report page reappears, click Save to commit your changes.
To make use of the preconfigured Crystal Reports templates supplied with Oracle Access Manager, you must install the Crystal Reports application on a Windows machine within your Oracle Access Manager server domain. (Crystal Reports cannot be installed on Unix machines, but it can make use of information in a database generated by the Oracle Database installed on a Unix machine.)
In addition to installing Crystal Reports 9, you must also install a patch.
The Oracle Access Manager server installation directories are installed with certain templates, sample reports, database schema, and database drivers which are used by the Crystal Reports application. These are distinct from the Crystal Reports software itself. You must copy then from a Oracle Access Manager server install directory to the machine hosting your Crystal Reports software.
Task overview: To set up audit reports
Install Crystal Reports 9.22a on a Windows machine that can connect to the machine hosting SQL Server or the Oracle Database.
Install the mandatory patch for Crystal Reports 9.
Copy the Oracle Access Manager audit report templates, the Crystal Repository, and associated resources to the machine hosting Crystal Reports.
Connect Crystal Reports to the Oracle Access Manager audit database by creating an ODBC data source definition and editing orMap.ini.
Connect Crystal Reports to the Crystal database by creating an ODBC data source definition and editing orMap.ini.
Connect Crystal Reports to the oblix_audit_events table.
Obtain a copy of the Crystal Reports 9.22 installation package from the vendor.
Launch setup.exe and follow the prompts.
Specify whichever installation directory you prefer.
When prompted, enter the product key, which is provided with the purchase of the reporting package.
When prompted, specify "typical" for the installation type.
Proceed to "To install the patch for Crystal Reports".
To install the patch for Crystal Reports
Download the Crystal Reports 9 patch from the following Web site:
http://support.businessobjects.com/communityCS/ FilesAndUpdates/cr90dbexwin_en.zip.asp
Unzip cr90dbexwinen.zip into a temporary folder on your hard disk, then launch CR90DBEXWIN_EN_200403.EXE.
Follow the prompts to complete the patch installation.
Proceed to "To copy the Oracle Access Manager-specific Crystal resources" .
To copy the Oracle Access Manager-specific Crystal resources
Using whatever methods you are comfortable with, copy the following resources from a Oracle Access Manager server installation to a directory of your choice on the machine hosting Crystal Reports.
Component_install_dir\oblix\reports
Where Component_install_dir is the root installation directory for an Identity Server that is connected to the audit database.
Make sure to copy everything in "..\reports" and its subdirectories. The following diagram shows the resources copied to the Crystal Reports machine.
Figure 11-4 Resources copied to the Crystal Reports machine
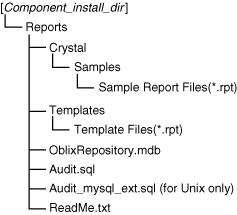
Proceed to "To connect Crystal Reports to the audit database" .
To connect Crystal Reports to the audit database
Follow the procedure described in "To create an ODBC data source definition (Windows)" so that Crystal Reports can connect to the audit database.
Make sure that the DSN you specify and all associated details match exactly the values you specified for the RDBMS profile and the ODBC data source definitions you created for the Oracle Access Manager servers that connect to the audit database.
Proceed to "Task overview: To connect Crystal Reports to the Oracle Repository".
Task overview: To connect Crystal Reports to the Oracle Repository
Create an ODBC data source definition to connect Crystal Reports to the Oracle/Crystal Repository (.mdb database).
Edit orMap.ini to equate the Oracle Repository with the Crystal Repository.
To create an ODBC data source definition to connect Crystal Reports to the Oracle/Crystal Repository
Follow the general procedure described in "To create an ODBC data source definition (Windows)" so that Crystal Reports can connect to the audit database.
Except where noted in the steps that follow, use the values specified in the original procedure.
When prompted for a database driver, select "Microsoft Access driver (.mdb)."
For the Name parameter, choose some self-explanatory name such as OracleRepositorySysDSN.
Proceed to "To edit orMap.ini".
On the machine hosting Crystal Reports, navigate to:
C:\Program Files\Common Files\Crystal Decisions\2.5\bin
Open the file orMap.ini in any plain text editor.
Replace the line "Crystal Repository=Crystal Repository" with the following:
Crystal Repository = repository_DSN
where repository_DSN is the System DSN you created for the OracleRepository .mdb file. We have been using OracleRepositorySysDSN in our example.
Proceed to "To connect Crystal Reports to the oblix_audit_events table".
To connect Crystal Reports to the oblix_audit_events table
In Crystal Reports, open the report.
Press F5 to connect the report with the audit database.
If you are prompted for new parameter values, provide appropriate parameter values for the report.
Select the ODBC data source that is connected to the audit database and click Next.
Enter the user ID and password, and click Finish.
From the Database menu, select Set Datasource Location.
In the Current Data Source section, select the report name.
In the Replace with section, select History, then select the ODBC Data source name used to connect to the audit database, then select the User Id used while connecting, then select Tables , then oblix_audit_events.
Click Update.
To view the report, click Close.