| Oracle® Web Services Manager Administrator's Guide 10g (10.1.3.3.0) Part Number E10299-01 |
|
|
View PDF |
| Oracle® Web Services Manager Administrator's Guide 10g (10.1.3.3.0) Part Number E10299-01 |
|
|
View PDF |
This chapter includes the following sections:
For information on backing up and recovering your Oracle Web Services Manager system refer to Oracle Application Server Administrator's Guide.
A password hash is as sensitive as a password. Never send a password or its hash over an unencrypted communication channel. Oracle recommends that you use HTTPS between all communication points in your Oracle Web Services Manager (Oracle WSM) deployment in order to transmit passwords securely.
Oracle WSM does not support secure JDBC connections.
By default, Web Services Manager Control browser session will time out after 60 minutes. You can change the session timeout by editing the following file:
ORACLE_HOME/owsm/config/ccore/ui-config-common.properties
Edit the ui.session.timeout parameter and enter the number of minutes your browser session will remain active before timing out.
After editing this parameter, use the wsmadmin deploy control command and redeploy the Web Services Manager Control application. For more information on redeploying the application, see Oracle Web Services Manager Deployment Guide.
If you have installed Oracle WSM as part of Oracle Application Server 10g Release 3 (10.1.3.1.0) release, refer to Chapter 14, "OC4J Java Single Sign-On" in Oracle Containers for J2EE Security Guide for information on setting your browser session.
A service may need to be deactivated for any of the following reasons:
The service is no longer needed.
If you change the protocol for a Web service, you must first deactivate the service, then reregister it with the new protocol.
If you change the service definition or service usage, you must deactivate the service, then reregister it with the new definition.
Once a service is deactivated, you must reregister the service to make it active again. See "To add a Web service to a gateway" for the procedure to register a Web service.
From the navigation pane of Web Services Manager Control, select Policy Management, then select Register Services.
Click Services for the gateway whose service you want to deactivate.
Click Deactivate service for the service you want to deactivate.
After a service is registered to a gateway, you can return to the service list display and edit service details, for example, changing the WSDL URL for the Web service endpoint, adding Oracle WSM administrators and support groups, updating the service description, or making changes to the service protocol detail information or policies enforced for specific services.
To edit the Web service properties
From the navigation pane of Web Services Manager Control, select Policy Management, then select Register Services.
Click Services for the gateway whose services you want to view or edit.
The Web Services Manager Control displays the gateway's current list of services.
Click Edit for the particular service whose information and details you want to view or update.
The Web Services Manager Control displays parameters, groups with access, and other information for the selected service.
From this page, you can update the service description, make changes to the service protocol detail (Modify Protocol Parameters), make changes to the policy enforced for the specific service (Modify Policy), or change the Oracle WSM groups who are given Oracle WSM Modify and View permissions for the service.
Note:
You can also view and edit information for a specific service policy by selecting Policy Management, clicking the Manage Policies menu option, selecting a gateway, and then choosing View Details or Edit for a specific service.When you have finished making changes, click Save.
Oracle WSM saves your changes and displays a confirmation message in Web Services Manager Control.
Note:
After making changes to a service registered to an Oracle WSM gateway, Commit Policy appears in red in the gateway list display, prompting you to update the gateway with new policy information. Click Commit to update the gateway with the service and policy changes you have made.Web services that are registered at a gateway can be made available to others by publishing the following URL:
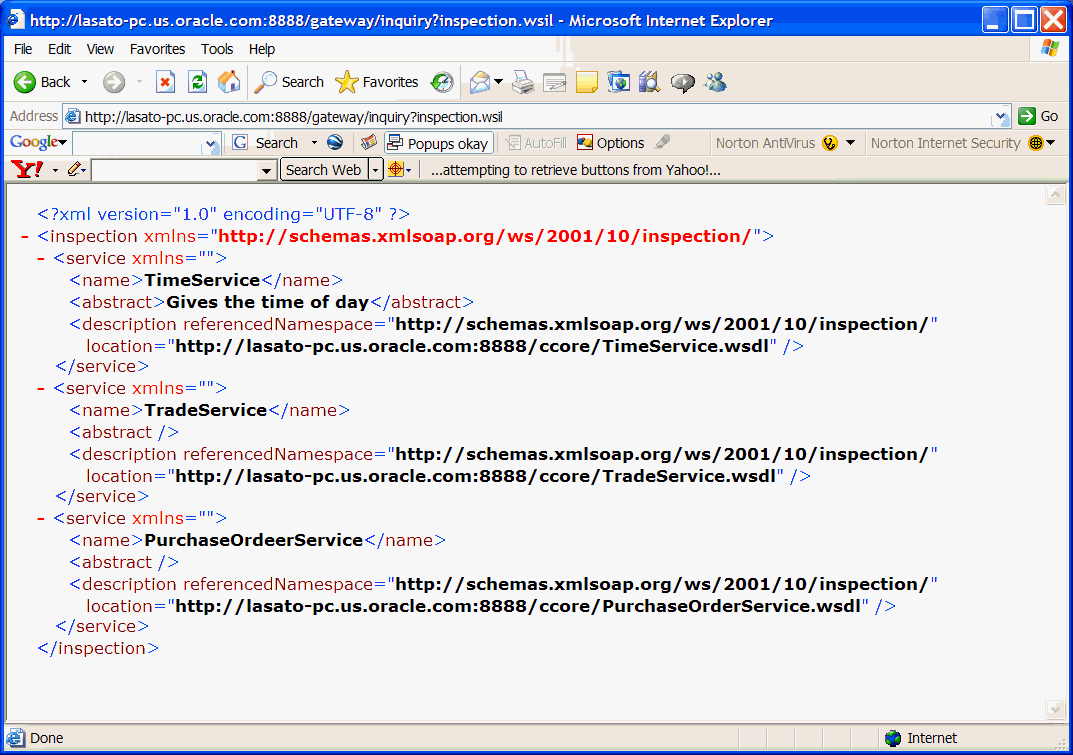
http://hostname:port/gateway/inquiry?inspection.wsil
The variable hostname is the Application Server host name and port is the port on which the server is listening.
Figure 9-1 shows three services registered at the example gateway.
Figure 9-1 Registered Services at a Gateway

When the URL is entered, the WSIL file is automatically generated, and all Web services registered to the gateway are added to the WSIL file. All information required by WSIL is extracted from the service information.
Once a gateway or agent has been registered, you can use Web Services Manager Control and navigate to the Edit Component Properties page, where you can view and make changes to the component. Registered agents and gateways periodically search for changes in the component properties and these changes are communicated to the policy enforcement point.
To navigate to the Edit Component Properties page
From the navigation pane of Web Services Manager Control, select Policy Management, then select Manage Policies.
Click the Edit icon for the component whose properties you want to edit.
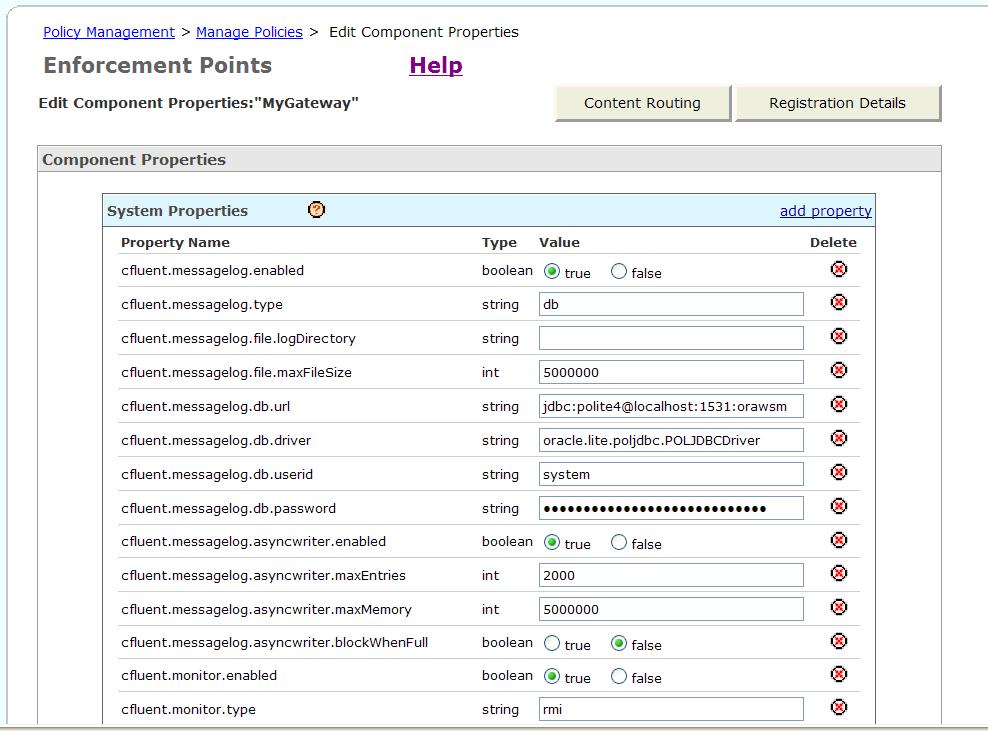
The Edit Component Properties page is displayed (Figure 9-2).
Figure 9-2 Edit Component Properties Page

From the Edit Component Properties page, you can do any of the following:
View and edit the properties of the gateway or agent.
Click add property to add a property for the gateway or agent.
Click Registration Details to get to the Registration Details page for the gateway or agent. On that page you can view and edit the basic parameters for your component.
To edit the component properties
The properties for the component are displayed on the Edit Component Properties page. Click the question mark (?) for help on the properties.
From the Edit Component Properties page, edit the desired properties, and click Save.
A confirmation message is displayed.
Note:
The confirmation message reminds you that this change must be committed.Click Ok.
Commit the changes to have them take effect.
To view and edit the registration details
From the Edit Component Properties page, click Registration Details.
The Registration Details page is displayed.
Make any changes to the properties on the page, and click Save.
A confirmation message is displayed.
Click Ok to return to the Edit Component Properties page.
Click Save.
A confirmation message is displayed.
Note:
The confirmation message reminds you that this change must be committed.Click Ok.
Commit the changes to have them take effect.
To add a new property
From the Edit Component Properties page, click add property at the top of the page.
Scroll to the bottom of the page where there are several text boxes. Enter the name of the property, select the data type from the list, the default value (optional), and a brief description of the property.
Click Save.
A confirmation message is displayed.
Note:
The confirmation message reminds you that this change must be committed.Click Ok.
Commit the changes to have them take effect.
Once a policy enforcement point is registered, you can make changes to the component properties or to its registration details, you can add new properties, and you can edit the policies assigned to the policy enforcement point. In order for any of these changes to take effect, you must commit the changes to the Oracle WSM Database.
To commit your changes
From the navigation pane of Web Services Manager Control, select Policy Management, then select Manage Policies.
In the List of Components, click Policies for the desired gateway or agent.
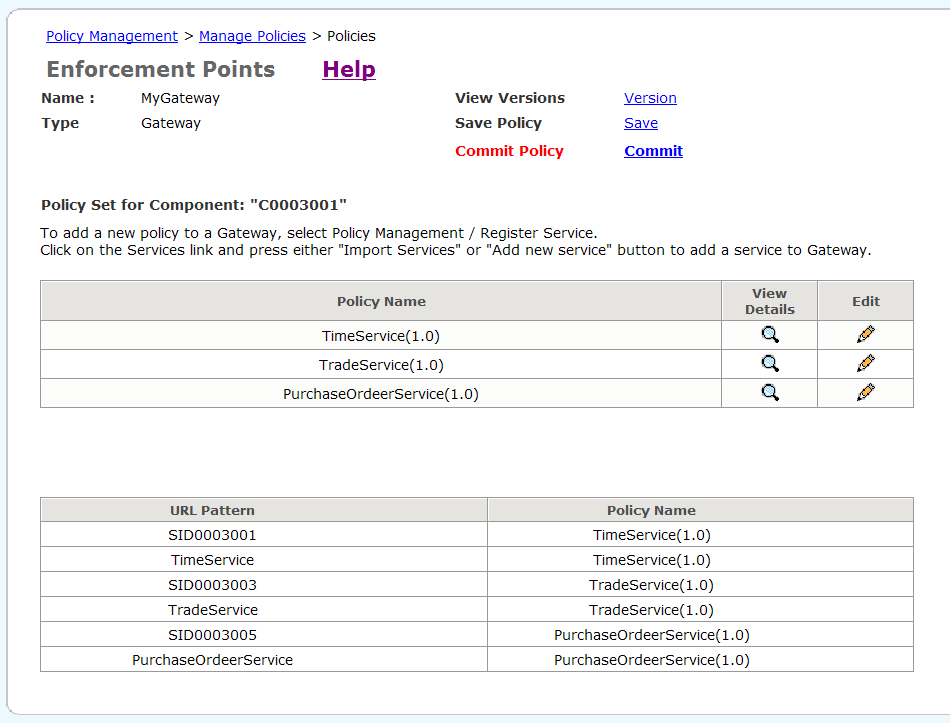
In the Policies page, if the Commit Policy field appears in red text, click Commit to commit any outstanding changes that have been made to the policy enforcement point.
Figure 9-3 Commit Policy Field in Red Text

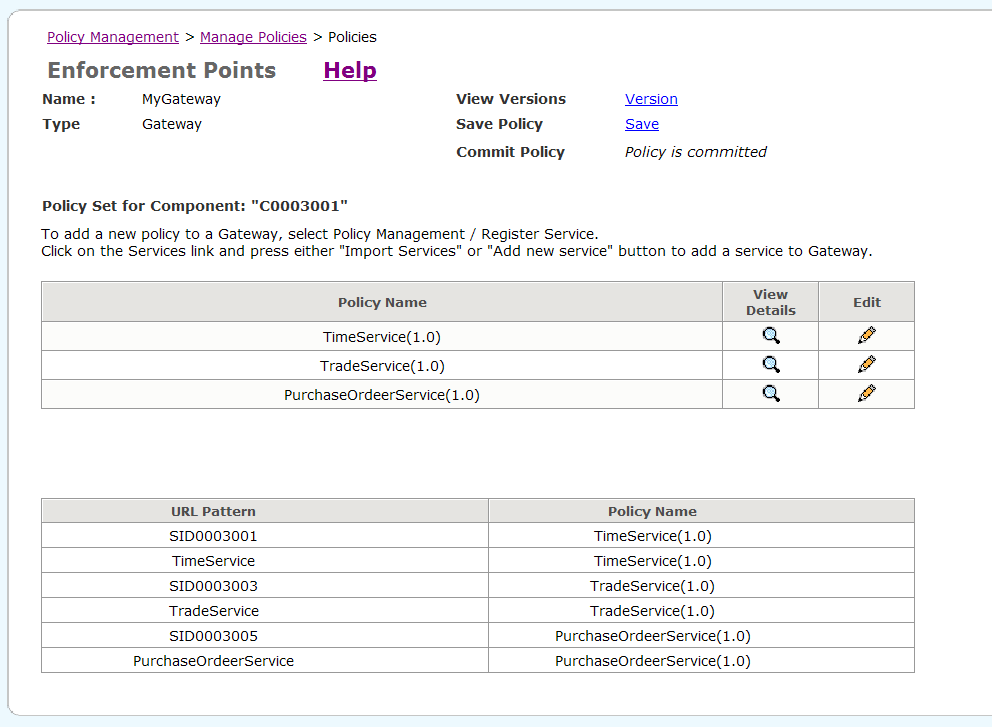
The page refreshes and the commit link is replaced with the message Policy is committed.
Figure 9-4 Policies Page Showing the Policy Is Committed

You can configure when connections to the LDAP directory and Active Directory server time out. By default, the connections do not time out.
Each instance of a policy step creates one or two long-lived connections to LDAP directory or Active Directory. If your system is configured to forcibly terminate long-lived connections, you may want to configure a connection time out to avoid request failures. Set the time out value to be close to, but lower than the time out value used for the enforced terminations.
To configure the connection time out
Open the following file:
ORACLE_HOME/opmn/conf/opmn.xml
Find the process-type id whose value is the name of the instance in which Oracle Web Services Manager is installed. This may be "home", or it could be another instance name. For example:
...
<ias-component id="default_group">
   <process-type id="home" module-id="OC4J" status="enabled">
...
Find the data id="java-options" in the category id="start-parameters" section of the file.
...
<category id="start-parameters">
   <data id="java-options" value="-server -XX:MaxPermSize=128M .../>
</category>
...
Add the connection lifetime parameter under java-options. For example:
-Doracle.wsm.directory.timeout=3600000
The value indicates the number of milliseconds Oracle Web Services Manager will try to connect to the LDAP server or Active Directory Server before it times out.
Restart the Oracle Application Server for the configuration changes to take effect.
When you display the message logs for a component, by default, Oracle WSM displays up to 500 of the most recent message logs. If there are more than 500 message logs, you will not be able to view messages 501 and beyond. You can configure the number of messages that are displayed by editing the following file:
ORACLE_HOME/owsm/config/ccore/ui-config-installer.properties
Edit the ui.messagelog.maxViewableMessageLogs property and specify the maximum number of messages you want displayed. By default, this property is set to 500.
ui.messagelog.maxViewableMessageLogs=500
If you do not want to set a limit, that is, you want to be able to see all messages, then specify zero (0), as in
ui.messagelog.maxViewableMessageLogs=0
Using Web Services Manager Control, you can delete message logs that you no longer need from Oracle WSM Database.
To purge message logs
From the navigation pane of Web Services Manager Control, select Operational Management, then select Overall Statistics. Select Message Logs, then select Purge Message Logs.
In the Component list, select the component whose message logs you want to delete.
In the Time Range list, select the period for which you want to delete the message logs.
Note:
For example, if you select Before 60 days, any message logs with timestamps earlier than the previous 60 days will be deleted. If the current date and time is March 31, 2007, 8:00 a.m., then message logs with timestamps before January 30, 2007, 8:00 a.m., will be deleted. Message logs with timestamps from January 30, 2007, 8:00 a.m. through March 31, 2007, 8:00 a.m. are preserved.A message appears asking you to confirm that you want to purge the message logs. Click OK.
A message confirms that the purge was successful.
Oracle has provided a SQL file that you can execute to create the following indexes on the PIPELINES table:
IDX_PIPELINES_POLICY_ID index on the POLICY_ID column
IDX_PIPELINES_MAJOR_MINOR_VER index on the PIPELINE_MAJOR_VER and PIPELINE_MINOR_VER columns
Creating Indexes for the Oracle Database
Complete the following steps to create the indexes for the Oracle Database and Oracle Lite Database.
Locate the SQL file used to generate the indexes for your database in the following location:
ORACLE_HOME/config/db/oracle/PolicyRepository/PipelinesIndexes.sql
The variable, ORACLE_HOME, is the location where Oracle WSM is installed.
Copy the SQL file to the ORACLE_HOME where Oracle Database is installed.
Connect to the Oracle Database and execute the SQL script.
Creating Indexes for the Oracle Lite Database
Complete the following steps to create the indexes for the Oracle Lite Database.
Locate the SQL file used to generate the indexes for your database in the following location:
ORACLE_HOME/config/db/olite/PolicyRepository/PipelinesIndexes.sql
The variable, ORACLE_HOME, is the location where Oracle WSM is installed.
Copy the SQL file to the ORACLE_HOME where Oracle Lite is installed.
Connect to the Oracle Lite Database and execute the SQL script.
If you change the port on which Oracle Application Server listens for HTTP requests, then the ports on which the Oracle WSM Policy Manager and Web Services Manager Control are listening for HTTP will also change. Therefore, other applications that communicate with Oracle WSM Policy Manager and Web Services Manager Control must be updated with the new HTTP port. For more information on the interaction between Oracle WSM components, see the Oracle WSM deployment diagram in Chapter 1, "Planning an Oracle Web Services Manager Deployment" in Oracle Web Services Manager Deployment Guide.
The following procedures must be performed to make the required changes.
Web Services Manager Control, Oracle WSM Gateway, and Oracle WSM Agents communicate with Oracle WSM Policy Manager. Therefore, you must reconfigure these applications to point to the new Oracle WSM Policy Manager endpoint.
To reconfigure Web Services Manager Control
Edit the following files:
ORACLE_HOME/owsm/config/ccore/ui-config-installer.properties
ORACLE_HOME/owsm/config/ccore/policyui-config-installer.properties
In each file, edit the ui.pm.server.httpPort property with the new HTTP port.
Redeploy the Web Services Manager Control using the wsmadmin deploy command.
See Oracle Web Services Manager Deployment Guide for more information on the wsmadmin deploy command.
To reconfigure Oracle WSM Gateway
In the ORACLE_HOME/owsm/config/ccore/gateway-config-installer.properties file, edit the gateway.policymanagerURL property with the updated URL to the Oracle WSM Policy Manager.
Redeploy the Oracle WSM Gateway using the wsmadmin deploy command.
See Oracle Web Services Manager Deployment Guide for more information on the wsmadmin deploy command.
To reconfigure Oracle WSM Server Agents
In the ORACLE_HOME/owsm/config/serveragent/serveragent-config-installer.properties file, edit the agent.policymanagerURL property with the updated URL to the Oracle WSM Policy Manager.
Redeploy the server agent using the wsmadmin deploy command.
See Oracle Web Services Manager Deployment Guide for more information on the wsmadmin deploy command.
To reconfigure Oracle WSM Client Agents
In the ORACLE_HOME/owsm/config/clientagent/clientagent-config-installer.properties file, edit the agent.policymanagerURL property with the updated URL to the Oracle WSM Policy Manager.
Redeploy the client agent using the wsmadmin deploy command.
See Oracle Web Services Manager Deployment Guide for more information on the wsmadmin deploy command.
Note:
For OC4J Server Agents and J2EE client agents, you can avoid redeploying the agent by updating the following files:ORACLE_HOME/owsm/config/interceptors/component_ID/config/clientagent/clientagent-config-installer.properties
ORACLE_HOME/owsm/config/interceptors/component_ID/config/serveragent/serveragent-config-installer.properties
The variable, component_ID, is the component ID of the agent.
Edit the agent.policymanagerURL property with the updated URL to the Oracle WSM Policy Manager.
When the HTTP port changes, the virtualized endpoints that Oracle WSM Gateway exposes to Web services clients also change. The URL for the Oracle WSM Gateway must be updated, and any Web services that use that virtualized URL must also be updated.
To update the Oracle WSM Gateway URL
From Web Services Manager Control, navigate to the Policy Management page.
Click Edit for the Oracle WSM Gateway.
Click Registration Details.
Edit the Component URL property with the updated URL.
Web Services Clients
Web services clients that use the virtualized Web service URL and WSDL exposed by the Oracle WSM Gateway must be reconfigured and redeployed with the new Web service URL and WSDL values.