| Oracle® Enterprise Service Bus Quick Start Guide 10g (10.1.3.1.0) Part Number B28212-01 |
|
|
View PDF |
| Oracle® Enterprise Service Bus Quick Start Guide 10g (10.1.3.1.0) Part Number B28212-01 |
|
|
View PDF |
This chapter describes the system requirements for, and instructions on how to install, Oracle Enterprise Service Bus through Oracle Application Server SOA Suite. It also provides steps on starting the required software to run the tutorial.
This chapter contains the following topics:
"Hardware and Software Requirements for Installing Oracle Enterprise Service Bus Server"
"Starting and Stopping Oracle Enterprise Service Bus Components"
Before you install Oracle Enterprise Service Bus Server, ensure that the system on which you plan to install it meets the requirements described in Table 2-1.
Table 2-1 System Requirements for Installing Oracle Enterprise Service Bus
| Element | Requirement | Checked by Installer (Yes/No) |
|---|---|---|
|
Operating system |
The operating system requirements for Oracle Enterprise Service Bus are the same as those for Oracle Application Server. In addition, the Oracle Enterprise Service Bus has the same requirements as Oracle Application Server for the following:
Refer to Oracle Application Server Installation Guide 10g Release 3 (10.1.3) for the operating system you are using. |
Yes |
|
Disk space |
2 GB |
No |
|
Memory |
1.5 GB RAM minimum |
Yes |
|
Swap space |
1535 MB minimum |
Yes |
|
Web browser |
Internet Explorer 6.0 SP2, Netscape 7.2, Mozilla 1.7, Firefox 1.0.4 |
No |
|
Monitor |
Configured to display at least 256 colors |
Yes |
|
CPU Speed |
1 GHz |
Yes |
The operating system user performing the installation must belong to the Administrators group.
Note:
The user must be listed directly in the Administrators group. The user cannot belong to the group indirectly (for example, by being a member of a group that is part of the Administrators group).To check if you belong to the Administrators group for Windows 2000, Windows 2003, and Windows XP, perform the following steps:
For Windows 2000 and Windows XP, right-click My Computer on the Desktop, and select Manage. The Computer Management window is displayed.
Note:
For Windows 2003, right-click the local computer icon on the desktop and select Manage.On the left pane, expand the Local Users and Groups option, and select Users. The name, full name, and description of the users on the computer are listed on the right side.
Right-click the user that you want to set as administrator, and select Properties. The Properties dialog box is displayed.
Select the Member Of tab.
If you are not a member of the Administrators group, get an administrator to add you to the group or log in as a user who is a member of the Administrators group.
The operating system user who will be installing Oracle Application Server needs to set (or unset) the following environment variables.
ORACLE_HOME: Must not be set.
ORACLE_SID: Must not be set.
TNS_ADMIN: Must not be set.
PATH: Must not be longer than 1023 characters.
TEMP: Optional. If unset, defaults to C:\temp
To set environment variables, perform the following steps:
Display the System Control Panel.
Windows 2000: Click Start, Settings, Control Panel, and System.
Windows 2003: Click Start, Control Panel, and System.
Windows XP: Click Start, Control Panel, and then double-click System.
Click the Advanced tab.
Click Environment Variables. The Environment Variables dialog box is displayed.
To change the value of a variable, select the variable and click Edit.
Oracle Enterprise Service Bus is installed as part of Oracle Application Server SOA Suite. Following list provides the installation types provided by Oracle Application Server SOA Suite:
Basic Install
This installation type installs the J2EE Server and the SOA Suite of applications including BPEL, ESB, OWSM.
Note:
This guide covers only Basic Installation. For more information on Oracle Application Server SOA Suite installation, refer to the Oracle Application Server Installation Guide for your operating system.Advanced Install
This installation type provides options for different types of install, custom port selection, renaming OC4J instance name, RAC databases, and more.
To install Oracle Enterprise Service Bus, you need to perform the following steps:
Download the Oracle Application Server SOA Suite from otn.oracle.com or the Oracle Application Server SOA Suite install CD. Expand the content if necessary into the local file system.
Navigate to the Disk1 folder.
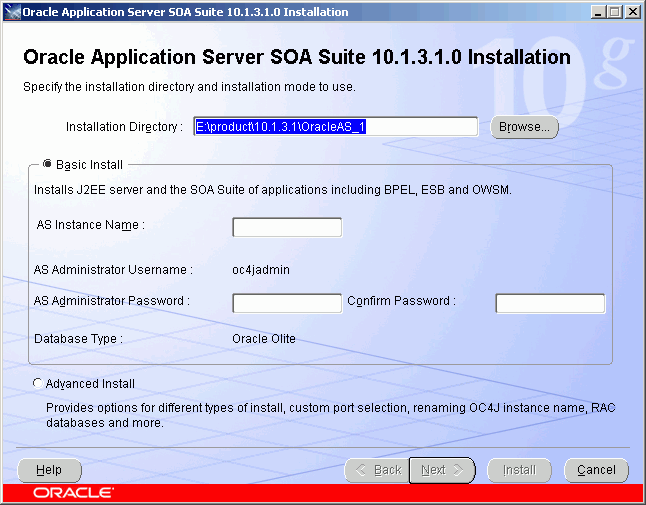
Double-click setup.exe. The Oracle Application Server SOA Suite 10.1.3.1.0 Installation dialog box is displayed, as shown in Figure 2-1.
Figure 2-1 Oracle Application Server SOA Suite 10.1.3.1.0 Installation

Select Basic Install.
Specify field values as described in the following list.
AS Instance Name: myesbsoa
AS Administrator Password: welcome1
Confirm Password: welcome1
Click Install. The Preparing to Install message box is displayed.
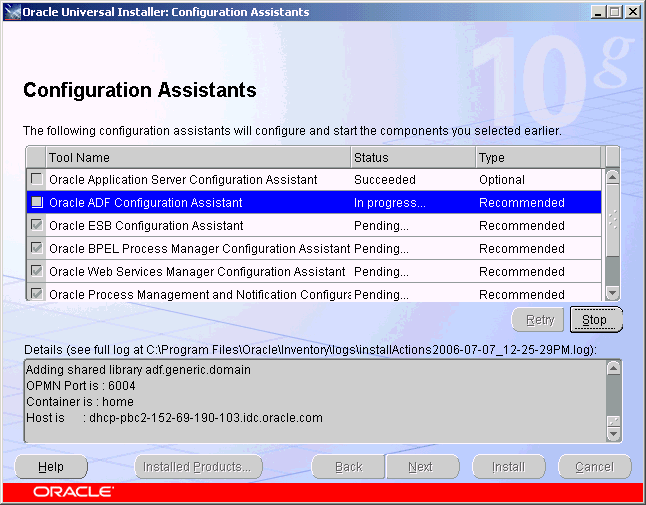
When the Installation completes, the Configuration Assistants page is displayed, as shown in Figure 2-2.
Figure 2-2 The Configuration Assistants Page

Allow the configuration assistants to run. When they complete, the End of Installation page is displayed, as shown in Figure 2-3.
Click Exit, and then Yes when prompted for confirmation.
The following sections describe how to start and stop all the Oracle Enterprise Service Bus components:
Follow these instructions to start and stop the server:
Select Start, All Programs, Oracle - Oracle_Home, Oracle Process Manager, Start Oracle Process Manager to start all process.
Select Start, All Programs, Oracle - Oracle_Home, Oracle Process Manager, Stop Oracle Process Manager to stop all process.
Select Start, All Programs, Oracle - Oracle_Home, Oracle ESB, ESB Control to open the Oracle Enterprise Service Bus Control Console. This prompts you to enter your single sign-on username and password. Enter your single sign-on username and password, and click Login. The Oracle Enterprise Service Bus Control Console is displayed.
Using the Command Prompt
You can also start and stop all the Oracle Enterprise Service Bus SOA Suite components using the command prompt. Follow these instructions to start and stop Oracle Enterprise Service Bus SOA Suite components in the command prompt using Oracle Process Manager:
Start a command prompt and navigate to the Oracle_Home\opmn\bin folder.
Type the following command to start all processes:
opmnctl startall
Type the following command to check the status of all the processes registered with opmn:
opmnctl status
Type the following command to stop all processes:
opmnctl shutdown
To deinstall Oracle Enterprise Service Bus, follow these steps:
On the host where Oracle Enterprise Service Bus is installed, log in as the system user who installed the instance you want to deinstall.
Stop all processes associated with the instance of Oracle Enterprise Service Bus you want to deinstall.
Refer to Oracle Application Server Administrator's Guide for information on how to stop the processes.
From the desktop Start button, select All Programs > Oracle – Oracle-Home > Oracle Installation Products > Universal Installer, where Oracle_Home is the name of the Oracle home where you installed Oracle Enterprise Service Bus.
An Oracle Universal Install Window window opens to inform you that the Oracle Universal Install is being prepared for launch. This window closes and the Welcome page for Oracle Universal Install displays.
In the Welcome page, click Deinstall Products. The Inventory dialog box is displayed.
Select the instance of Oracle Enterprise Service Bus that you want to deinstall, and then click Remove. A Confirmation dialog box is displayed.
Verify that the products and components listed are the ones you want to deinstall, and then click Yes. The Remove dialog box is displayed.
Monitor the progress of the deinstallation. When it completes, in the Inventory dialog box, click Close.
In the Welcome page, click Cancel, and then Yes, when you are asked for confirmation.
Restart your computer to stop any remaining processes associated with the deinstallation.
Delete any files that remain in the deleted instance's Oracle home directory.
To deinstall the Oracle Enterprise Service Bus SOA Suite, perform the following steps:
On the host where Oracle Enterprise Service Bus is installed, log in as the system user who installed the instance you want to deinstall.
Stop all processes associated with the instance of Oracle Enterprise Service Bus SOA Suite that you want to deinstall.
From the desktop Start button, select All Programs, Oracle – Oracle-Home, Oracle Installation Products, Deinstall where Oracle_Home is the name of the Oracle home where you installed Oracle Enterprise Service Bus SOA Suite.
The Oracle Application Server 10.1.3.1.0 SOA Deinstallation dialog box is displayed with the following message:
"This will deinstall the following Oracle Application Server 10.1.3.1.0 instance:
J2EE Server, SOA Suite, and Process Management."
Check the Clean up the Oracle home after deinstallation check box, and click OK.
You have successfully deinstalled the Oracle Enterprise Service Bus SOA Suite.