3 Configuring the Connector
This chapter provides the following information for setting up and configuring the CA Service Desk Connector and related tasks:
Configuring the Connector
Perform the following steps for basic configuration:
-
As Super Administrator, from the Enterprise Manager console, click Setup.
The Overview of Setup page appears.
-
Click Management Connectors in the left pane.
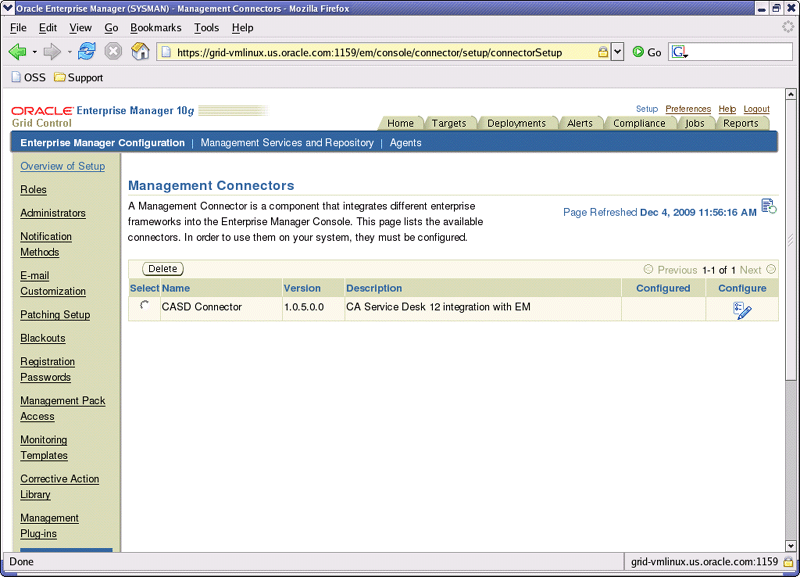
The Management Connectors page appears. For the CA Service Desk Connector row, the Configured column should be blank, as shown in Figure 3-1.
Note:
A check mark instead indicates that the Connector is already configured. -
Click the Configure icon for the CA Service Desk Connector.
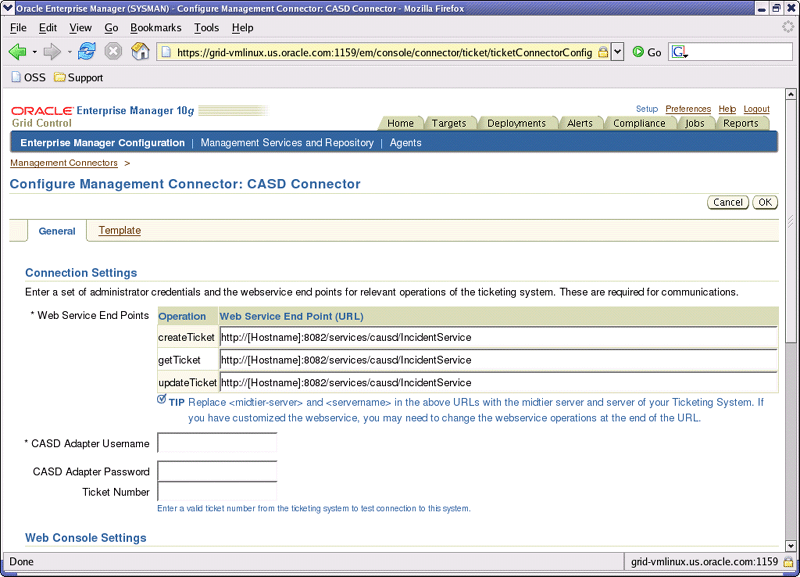
The General tab of the Configure Management Connector page appears, as shown in Figure 3-2.
-
Provide the required settings. See Providing General Settings for details.
-
Click OK.
The Management Connectors page reappears. The row for the CA Service Desk Connector should have a check mark in the Configured column.
-
Optionally you can click the configure icon again to check for the available ticket templates.
-
Click the Ticket Templates tab.
All out-of-box ticket templates should appear in the table.
If any of the ticket templates are missing, you can register them using the emctl command from the ORACLE_HOME/bin directory, where ORACLE_HOME is the Oracle home directory of OMS.
If you choose HTTPS as the protocol to establish a connection between CASD and Enterprise Manager, see Adding Signed Certificates to Wallet Manager.
Providing General Settings
The following sections explain how to provide various configuration details.
Connection Settings
The CA Service Desk Connector communicates with the Service Desk through a web service provided by the CASD Adapter. Mandatory fields are indicated by an asterisk (*).
-
Web Service End Points - End points to createTicket, updateTicket, and getTicket web services exposed by the CASD Adapter. See "Using the Correct URL for CASD Adapter Operations" in Appendix A for additional information.
-
CASD Adapter Username - User name that was configured for accessing the Adapter web service in step 10 of the appropriate adapter installation section ( Installing the Adapter on Unix for Unix and Installing the Adapter on Windows for Windows).
-
CASD Adapter Password - Password that was configured for accessing the Adapter web service in step 11 of the appropriate adapter installation section ( Installing the Adapter on Unix for Unix and Installing the Adapter on Windows for Windows).
-
Ticket Number - Enter a valid ticket number if you want to test the connection when you save the configuration.
-
If you do not enter a ticket number, no message appears on the Management Connectors page after you click OK and the configuration is saved.
-
If you specify the correct Web service end points and enter a valid ticket number, the following message appears on the Management Connectors page after you click OK:
Connection test succeeded. The configuration was saved.
-
If you have not previously saved the connector configuration and entered an invalid ticket number, the following message appears on the Management Connectors page after you click OK:
Connection test failed. The configuration was saved.
-
If you have saved the connector configuration before, specify incorrect Web service end points, and specify either a valid or invalid ticket number, the following message appears on the Management Connectors page after you click OK:
Connection test failed. The configuration was not saved.
-
Web Console Settings
Web Console settings are required if you want the Connector to provide links to CA Service Desk tickets created by Enterprise Manager in the context of an alert.
To enable this functionality, provide the following Web console settings.
-
Enable web console - Check this box to enable launching of the CASD ticket page within context from Enterprise Manager.
-
CASD Server Port - Port number used by the CASD server for the web console.
-
CASD Server Host - Host name or IP address of the CASD server that hosts the web console.
Grace Period
You can enable and disable the grace period and configure its value. By default, the grace period is disabled. See Grace Period for details. This setting applies to all alerts the CA Service Desk Connector processes.
Working with Ticket Templates
The following sections provide information about registering, removing, replacing, and adding ticket templates.
Registering Ticket Templates
You need to register ticket templates before they are recognized in Enterprise Manager. For Auto Ticketing, a notification method is created for each registered ticket template and a ticket is created and updated based on the ticket template associated with the selected notification method. For manual ticketing, registered ticket templates are available for selection.
All registered ticket templates are displayed in the Configure Management Connector Ticket Templates page. To register additional ticket templates that you create, see Installing the Connector.
See Also:
Table 2-1, "emctl Parameters"Viewing Template Code
Click a template name to view the XSLT code for the template.
The ticket templates are in XSLT format. A basic knowledge of XSLT is required to understand the code.
Removing a Template
To remove a template, do the following:
Important:
If the template you delete has a notification rule associated with it, ticketing will not work for this particular notification rule after the deletion.-
Select the template and click Remove.
-
At the prompt, confirm the removal.
-
Before you exit the page, click OK for the deletion to take effect.
Note:
Unless you click OK before you exit, the template is not deleted. The next time you go to the Ticket Template page, the templates reappear.
Though the ticket template is removed from the Enterprise Manager repository, it is still available on OMS in the Connector home directory. You can re-register the ticket template later if required.
Replacing Templates
To replace an existing ticket template, complete these steps:
-
Delete the ticket template.
-
Register the new template using emctl.
Adding New Templates
To add templates other than the out-of-box templates Oracle provides, you should define new templates and register them using emctl.
See Also:
Customizing Ticket Templates
