| Oracle® Business Intelligence Applications Fusion Edition Installation and Configuration Guide Release 7.9.5 Part Number E12083-01 |
|
|
View PDF |
| Oracle® Business Intelligence Applications Fusion Edition Installation and Configuration Guide Release 7.9.5 Part Number E12083-01 |
|
|
View PDF |
This chapter explains how to install and set up the Oracle Business Intelligence Applications components. It contains the following main topics:
Section 4.1, "About Oracle Business Intelligence Applications Topologies"
Section 4.2, "Installation and Configuration Process Task List"
Section 4.3, "Mandatory Requirements and Pre-installation Tasks"
Section 4.4, "Installing Oracle Business Intelligence Applications Software"
Section 4.5, "Installing Informatica PowerCenter Services Software"
Section 4.7, "Configuring Informatica PowerCenter Components"
Section 4.10, "Creating the Oracle Business Analytics Warehouse Database Tables"
Section 4.13, "Configuring Relational Connections In Informatica Workflow Manager"
Section 4.15, "Miscellaneous and Additional Configuration Tasks"
For information about supported Windows versions, see System Requirements and Supported Platforms for Oracle Business Intelligence Applications Fusion Edition.
Oracle Business Intelligence Applications and Informatica PowerCenter can be deployed flexibly across a wide range of topologies on different platforms and combinations of platform.
This section uses an example to explain a typical topology for an Oracle Business Intelligence Applications deployment. The figure below shows a typical deployment topology.
In the figure above, note the following:
Installation
Machine A (Windows-only)
Machine A is a machine that has installed Oracle Business Intelligence Enterprise Edition or Oracle Business Intelligence Standard Edition One, on which you run the Oracle Business Intelligence Applications installer to install the Oracle Business Intelligence Applications files.
Note: The instance of Oracle Business Intelligence Enterprise Edition or Oracle Business Intelligence Standard Edition One does not need to be the functional version of Oracle Business Intelligence Enterprise Edition that you will use to deploy dashboards in your live system. This instance is only required to enable the Oracle Business Intelligence Applications installer to install the Oracle Business Intelligence Applications files on a machine.
After the Oracle Business Intelligence Applications files have been installed on Machine A, the DAC Client is deployed to Machine B, and the DAC Server is deployed to Machine C.
In addition, the following files are copied from the installation machine (Machine A) to the Business Intelligence Deployment Tier (Machine Group G) as follows:
- The OracleBI\Server\Repository\EnterpriseBusinessAnalytics.rpd file is copied from Machine A to the machine that runs the BI Server in Machine Group F, or to Machine G.
- The OracleBIData\Web\Catalog\EnterpriseBusinessAnalytics\*.* files are copied from Machine A to the machine that runs the BI Presentation Services Catalog in Machine Group F, or to Machine G.
You typically develop the RPD and Presentation Catalog and perform customization changes to fit your business requirements.
ETL Tier (Functional)
Machine B (Windows-only)
Machine B is a machine that runs the DAC Client and Informatica PowerCenter Client Tools.
Machine C (Windows, Unix, Linux)
Machine C is a machine that runs the DAC Server and Informatica PowerCenter Services.
Machine D (Windows, Unix, Linux)
Machine D is a machine that hosts the transactional (OLTP) database.
Machine E (Windows, Unix, Linux)
Machine E is a machine that hosts the Oracle Business Analytics Warehouse database.
BI Deployment Tier (Functional)
The BI Deployment Tier (Functional) tier is used to deploy the business intelligence dashboards, can have either of the following:
Machine Group F (Windows, Unix, Linux)
Machine Group F is a group of machines that runs the Oracle Business Intelligence Enterprise Edition components. For example, one machine might rung the BI Server and BI Applications RPD, and another machine might run the BI Presentation Services and the Oracle Business Analytics Warehouse.
Note: You can also run Oracle Business Intelligence Applications on a single machine installation of Oracle Business Intelligence Standard Edition One.
The Oracle Business Intelligence Applications installation and configuration process consists of the following tasks. Complete each of these tasks in the order listed below.
Before you start to install Oracle Business Intelligence Applications and Informatica PowerCenter Services, make sure that you have satisfied the requirements, as follows:
Decide on the Data Movement Type that you will need (for more information, see Section 4.3.3, "Code Page and Data Movement Requirements").
Create the required databases to store the Informatica repository, DAC repository, and Oracle Business Analytics Warehouse. In addition, install database connectivity software and create of ODBC connections. For more information, see Section 4.3.4.1, "Create Databases".
Make sure that a complete installation of Oracle Business Intelligence Enterprise Edition or Oracle Business Intelligence Standard Edition One is installed on the machine on which you want to install Oracle Business Intelligence Applications (for more information, see Section 4.3.1, "Oracle Business Intelligence Infrastructure Requirements").
Note: This instance does not need to be the functional version of Oracle Business Intelligence Enterprise Edition or Oracle Business Intelligence Standard Edition One that you will use to deploy dashboards in your live system. This instance is only required to enable the Oracle Business Intelligence Applications installer to install the Oracle Business Intelligence Applications files on a machine.
Read the Informatica PowerCenter overview section and plan your Informatica topology before you install Informatica PowerCenter (for more information, see Section 4.3.2, "Informatica PowerCenter Requirements").
Make sure that you have installed Java JDK on the DAC Client and DAC Server machine (for more information, see Section 4.3.4.5, "How to Install the Java JDK").
Install the Oracle Business Intelligence Applications Version 7.9.5 software (for more information, see Section 4.4, "Installing Oracle Business Intelligence Applications Software"), as follows:
If you do not have Java SDK installed, install Java SDK on the DAC Client and DAC Server machines. For more information, see Section 4.3.4.5, "How to Install the Java JDK".
Run the Oracle installer to install the Oracle Business Intelligence Applications software. For more information, see Section 4.4.1, "How to Run the Oracle Business Intelligence Applications Installer (Windows)".
Install Informatica PowerCenter Server and Client Tools Version 8.1.1 SP4 software (for more information, see Section 4.5, "Installing Informatica PowerCenter Services Software"), as follows:
Run the Informatica PowerCenter installer to install Informatica PowerCenter Client Tools (including PowerCenter Workflow Manager, PowerCenter Designer, PowerCenter). For more information, see Section 4.5.1, "How to Install Informatica PowerCenter Client Tools".
Run the Informatica PowerCenter installer to install Informatica PowerCenter Services. For more information, see Section 4.5.2, "How to Install Informatica PowerCenter Services".
Restore the pre-built repository file (for more information, see Section 4.6, "Restoring the Oracle Business Intelligence Pre-Built Repository").
Configure the Informatica PowerCenter components (for more information, see Section 4.7, "Configuring Informatica PowerCenter Components"), as follows:
Use the Informatica PowerCenter Administration Console to specify the server port number. For more information, see Section 4.7.3, "Setting PowerCenter Integration Services Custom Properties".
Configure the required relational connections. For more information, see Section 4.13.2, "Configuring Relational Connections in Informatica PowerCenter Workflow Manager".
Install and Configure the DAC Client. For more information, see Section 4.8, "Installing and Configuring the DAC Client".
Use the DAC client to create the DAC metadata repository (for more information, see Section 4.9, "Importing the DAC Metadata").
Create the Oracle Business Analytics Warehouse tables. For more information, see Section 4.10, "Creating the Oracle Business Analytics Warehouse Database Tables".
Install and configure the DAC server. For more information, see Section 4.11, "How to Install and Configure the DAC Server".
Configure DAC Integration Settings. For more information, see Section 4.12, "Configuring the DAC Settings".
Configure Informatica Workflow Manager. For more information, see Section 4.13, "Configuring Relational Connections In Informatica Workflow Manager".
Perform required post-installation tasks (for more information, see Section 4.15, "Miscellaneous and Additional Configuration Tasks").
For additional and supporting configuration tasks, see Section 4.15, "Miscellaneous and Additional Configuration Tasks".
Note:
After you have completed the above steps and completed any customization that you need to make, you are ready to perform a full load of your OLTP data. For an example of performing a full load of OLTP data, see Section 4.16, "About Running A Full Load ETL". For detailed information about using the DAC to perform ETL, see Oracle Business Intelligence Data Warehouse Administration Console Guide.This section includes mandatory requirements that you must satisfy and pre-installation tasks that you must perform before you can deploy Oracle Business Intelligence Applications, and contains the following topics:
Oracle Business Intelligence Applications has the following infrastructure requirements:
For installing Oracle Business Intelligence Applications, you must have installed Oracle Business Intelligence infrastructure on a Windows machine where you will run the Oracle Business Intelligence Applications installer. The Oracle Business Intelligence Infrastructure instance must be a complete installation of Oracle Business Intelligence Enterprise Edition or Oracle Business Intelligence Standard Edition One. If you install Oracle Business Intelligence Enterprise Edition, you must install it using use the Complete setup type option.
Note: This instance does not need to be the functional version of Oracle Business Intelligence Enterprise Edition that you will use to deploy reports and dashboards in your live system. This instance is only required to enable the Oracle Business Intelligence Applications installer to install the Oracle Business Intelligence Applications files on a machine.
For running Oracle Business Intelligence Applications, you must have installed an Oracle Business Intelligence infrastructure. The Oracle Business Intelligence infrastructure required to run Oracle Business Intelligence Applications may be either Oracle Business Intelligence Enterprise Edition or Oracle Business Intelligence Standard Edition One. The Oracle Business Intelligence infrastructure uses the Oracle Business Analytics Warehouse as a datasource, the prebuilt EnterpriseBusinessAnalytics.rpd as the repository for the Oracle BI Server, and provides users with the Oracle BI Applications reports and dashboards.
To determine the minimum version of Oracle Business Intelligence infrastructure that is supported for this release of Oracle Business Intelligence Applications, refer to the System Requirements and Supported Platforms for Oracle Business Intelligence Applications Fusion Edition for Oracle Business Intelligence Applications.
This section contains requirements information for Informatica PowerCenter.
Oracle Business Intelligence Applications Version 7.9.5 requires Informatica PowerCenter Version 8.1.1. SP4.
If you license Informatica PowerCenter with Oracle Business Intelligence Applications, you install Informatica PowerCenter Version 8.1.1 SP4 from the Oracle Business Intelligence Applications installation disk (for more information, see Section 4.5, "Installing Informatica PowerCenter Services Software").
If you license Informatica PowerCenter separately and you do not have Informatica PowerCenter Version 8.1.1 SP4, you must upgrade your Informatica PowerCenter license to Version 8.1.1 SP4 before deploying Oracle Business Intelligence Applications.
Informatica PowerCenter 8.1.1 has significant architecture changes from previous versions. Before installing Oracle Business Intelligence Applications, Oracle recommends that you do the following:
Read the Informatica PowerCenter documentation to familiarize yourself with the new architecture, components and features. Informatica PowerCenter 8.1.1 SP 4 documentation is included on the Informatica PowerCenter DVD provided with Oracle Business Intelligence Applications.
Plan your topology carefully before installing Informatica PowerCenter Services.
You must install Informatica PowerCenter Client Tools on the same machine as the DAC Client, and to install Informatica PowerCenter Services on the same machine as the DAC Server.
Informatica PowerCenter Services runs on 32-bit or 64-bit platforms. For more information see the topic titled 'Working with 32-bit and 64-bit Platforms' in the chapter on PowerCenter Pre-requisites in the PowerCenter Installation and Configuration Guide.
About Changes In Informatica Terminology
This section lists changes in terminology in Informatica PowerCenter 8.1.1 SP4.
Table 4-1 Changes in Informatica Terminology
| Term used in 7.1.x versions of Informatica PowerCenter | Term used in 8.1.1 version of Informatica PowerCenter |
|---|---|
|
Informatica Repository |
Informatica Repository The Informatica Repository is managed by the Repository Service. |
|
Informatica Repository Server |
Not applicable. This component does not exist in Informatica PowerCenter 8.1.1. The Informatica Repository is managed by the Repository Service. |
|
Informatica Server |
Integration Services |
|
Not applicable. |
Repository Service |
The Oracle Business Analytics Warehouse can be deployed in various code page environments and supports global deployments. Data movement in the following source database and data warehouse configuration modes are supported:
Unicode to Unicode
Code page (multi- or single-byte) to Unicode
Code page to Code page (where the code pages are the same)
Oracle Business Intelligence Applications uses Informatica PowerCenter to perform extract-transform and load routines to move data from source database(s) to the Oracle Business Analytics Warehouse.
During the installation and configuration procedures described in this chapter, you will make various settings to enable accurate data movement. Use the guidelines and references noted below to determine values for these settings that are appropriate for your environment:
Determining the source to target configuration mode. Consult your database administrator to determine the code page your source OLTP database uses. Based on the type of data that will be moved from one or more source databases to the Oracle Business Analytics Warehouse, determine what code page you will need to use for the Oracle Business Analytics Warehouse database. Consider future requirements for storing data when determining what code page to use for the Oracle Business Analytics Warehouse.
For accurate data movement from source database to target, the code page of the Oracle Business Analytics Warehouse (target) must be superset of the code page of the source database. Informatica considers a code page to be a superset of another code page when the code page contains all the characters encoded in the other code page and additional characters not encoded in the other code page.
If your source to target configuration mode for data movement is Unicode to Unicode, you will set a custom property called SiebelUnicodeDB on the Integration Services. Configuration modes of code page to Unicode or code page to code page do not require this property to be set.
Note: To enable data movement from source(s) to the Oracle Business Analytics Warehouse, you will set relaxed Code Page Validation for the Integration Services. You must ensure that the target code page is a superset of the source code page for accurate data movement.
Determining the Data Movement Mode. Before you deploy Oracle Business Intelligence Applications, you must determine what data movement mode to use (ASCII or Unicode) for the PowerCenter Integration Service. The Character Data Movement Mode is an Informatica PowerCenter Integration Service option that you choose based on whether you want to move single-byte or multi-byte data. Choose Unicode if non-ASCII characters have to be moved. Otherwise, choose ASCII. The Data Movement Mode option is configurable and can be reset after installation.
Determining code pages for Informatica PowerCenter components. In addition to source and target code pages, Informatica PowerCenter uses code pages for PowerCenter Client, the Integration Service, the Informatica Repository, and PowerCenter command line programs (pmcmd and pmrep, which are used by DAC to communicate with PowerCenter Services). Carefully review, particularly if your environment requires Data Mode Movement mode to be set to UNICODE, the Informatica documentation on 'Understanding Globalization' in the PowerCenter Administration Guide. The section discusses code page compatibility and code page requirements for the Informatica components.
Setting environment variables. The Informatica installer requires the appropriate locale to be set on UNIX machines. Use LANG, LC_CTYPE or LC_ALL to set the UNIX code page. The installer uses the locale environment variable to generate the list of compatible code pages. For more information, see the topic titled 'Locale Environment Variables' in the PowerCenter Installation and Configuration Guide.
If your environment uses Oracle or DB2 database, you need to set environment variables NLS_LANG or DB2CODEPAGE. For information on how to set these environment variables see Section 4.3.4.2.1, "Setting the NLS_LANG Environment Variable for Oracle Databases" and Section 4.3.4.2.2, "Setting the DB2CODEPAGE Environment Variable for DB2 Databases".
Configuring Relational Connections. When you configure relational connections in the Workflow Manager, choose a code page that is compatible with the code page of the database client. If you set a database environment variable to specify the language for the database, ensure the code page for the connection is compatible with the language set for the variable. For example, if you set the NLS_LANG environment variable for an Oracle database, ensure that the code page of the Oracle connection is identical to the value set in the NLS_LANG variable.
For more information about data movement modes, refer to the Informatica PowerCenter documentation. Informatica PowerCenter 8.1.1 SP 4 documentation is provided in the Third_Party_Software\Informatica folder of the Oracle Business Intelligence Applications Release 7.9.5 installation disk.
This section explains the mandatory tasks that you must perform for an Oracle Business Intelligence Applications deployment, and contains the following topics:
This section provides information on creating databases required by Oracle Business Intelligence Applications components and Informatica PowerCenter.
Before you install Oracle Business Intelligence Applications and Informatica PowerCenter, use your target database tool to create database instances to hold the following:
the DAC metadata repository.
the Informatica repository.
the PowerCenter domain configuration.
the Oracle Business Analytics Warehouse.
Note: Make sure that the Oracle Business Analytics Warehouse instance is granted the SSE_ROLE (for more information, see Section 4.3.4.1.1, "How to Create the SSE Role").
You can store both the DAC metadata repository and the Oracle Business Analytics Warehouse in separate databases, or in the same database.
For information about supported database platforms, see System Requirements and Supported Platforms for Oracle Business Intelligence Applications Fusion Edition. The Informatica and DAC repositories are not supported on DB2-390 or Teradata databases. If your source or Oracle Business Analytics Warehouse database is DB2-390, or your Oracle Business Analytics Warehouse database is Teradata, you need to use a DB2-UDB, MS SQL Server, or Oracle database for both the DAC repository and the Informatica repository.
For details on creating the Informatica repository and PowerCenter domain configuration databases, see the section on creating databases in the PowerCenter Installation and Configuration Guide. Informatica PowerCenter 8.1.1 SP 4 documentation is included on the Informatica PowerCenter DVD provided with Oracle Business Intelligence Applications.
Follow this procedure to create the SSE role for the Oracle Business Analytics Warehouse database.
To create the SSE Role
Create a database role named SSE_ROLE (SSEROLE for DB2 390 databases). Assign this role to the database user. For instructions on creating roles, see the documentation provided with your database.
For example, on an Oracle database you might use the 'CREATE ROLE' SQL command to create the role, and the GRANT command to assign privileges to the role, and to assign the role to the data warehouse database account.
Note the following:
For an Oracle database, when you create the SSE_ROLE role, you need to grant the following privileges:
CONNECT
RESOURCE
For an Oracle database, if the DAC repository and the Informatica repository are stored in a different database to the data warehouse database, the SSE_ROLE must have the following additional privileges:
READ
WRITE
UPDATE
DELETE
GRANT
If you are using a Teradata database, you do not need to create the SSE role. If you are using a DB2 390 database, you can use an alternative SSE role name to SSEROLE if required. To specify a different role name, modify the 'set GRANTEE="SSEROLE"' line in the OracleBI\dwrep\createwtables.bat file.
You must install and configure the appropriate database native connectivity client software on the machines that will host the Informatica PowerCenter Services and DAC Server, and DAC Client.
The machines that will host these components require connectivity to the Oracle Business Analytics Warehouse (target) database, transactional (source) database(s), and the DAC and Informatica repository databases.
Notes
For instructions on how to install and configure the native database client connectivity software, refer to the PowerCenter Installation and Configuration Guide:
To install and configure on the Windows machine that will host the DAC Client and PowerCenter Tools, see section 'Connecting to Databases from Windows' in the Informatica Installation and Configuration Guide. Also refer to this section if the DAC Server and PowerCenter Services will be installed on Windows.
To install and configure on a UNIX or Linux machine that will host the DAC Server and PowerCenter Services, see section 'Connecting to Databases from UNIX'.
Informatica PowerCenter 8.1.1 SP 4 documentation is included on the Informatica PowerCenter DVD provided with Oracle Business Intelligence Applications.
For Oracle databases, set the NLS_LANG environment variable on the machines where the Oracle client was installed, as described in Section 4.3.4.2.1, "Setting the NLS_LANG Environment Variable for Oracle Databases".
For DB2 databases, set the DB2CODEPAGE environment variable on the machines where the DB2 client was installed, as described in Section 4.3.4.2.2, "Setting the DB2CODEPAGE Environment Variable for DB2 Databases".
Follow this procedure to set the NLS_LANG environment variable for Oracle databases.
Note:
You need to set the NLS_LANG environment variable on each machine that has the Oracle client installed.To set the NLS_LANG environment variable for Oracle databases
Determine the NLS_LANG value.
In the data warehouse database, run the command
SELECT * FROM V$NLS_PARAMETERS
Make a note of the NLS_LANG value, which is in the format [NLS_LANGUAGE]_[NLS_TERRITORY].[NLS_CHARACTERSET].
For example: American_America.UTF8
For Windows:
Navigate to Control Panel > System and click the Advanced tab. Click Environment Variables.
In System variables section, click New.
In the Variable Name field, enter NLS_LANG.
In the Variable Value field, enter the NLS_LANG value that was returned in Step 0.
The format for the NLS_LANG value should be [NLS_LANGUAGE]_[NLS_TERRITORY].[NLS_CHARACTERSET].
For example: American_America.UTF8.
Note:
The NLS_LANG character set should reflect the setting of the operating system character set of the client. For example, if the database character set is AL32UTF8 and the client is running on a Windows operating system, then you should not set AL32UTF8 as the client character set in the NLS_LANG parameter because there are no UTF-8 WIN32 clients. Instead, the NLS_LANG setting should reflect the code page of the client. For example, on an English Windows client, the code page is 1252. An appropriate setting for NLS_LANG is AMERICAN_AMERICA.WE8MSWIN1252.Setting NLS_LANG correctly allows proper conversion from the client operating system character set to the database character set. When these settings are the same, Oracle assumes that the data being sent or received is encoded in the same character set as the database character set, so character set validation or conversion may not be performed. This can lead to corrupt data if the client code page and the database character set are different and conversions are necessary
For UNIX and Linux, set the variable as shown below:
setenv NLS_LANG <NLS_LANG>
For example: setenv NLS_LANG American_America.UTF8.
If your data is 7-bit or 8-bit ASCII and the Integration Service is running on UNIX or Linux, then set NLS_LANG <NLS_LANGUAGE>_<NLS_TERRITORY>.WE8ISO8859P1
Caution:
Make sure you set the NLS_LANG variable correctly, as stated in this procedure, or your data will not display correctly.Follow this procedure to set the DB2CODEPAGE environment variable for DB2 databases on machines that have the DB2 client installed.
To set the DB2CODEPAGE environment variable for DB2 databases
Determine the DB2CODEPAGE value.
Connect to the Source database, using the following command:
SELECT CODEPAGE FROM SYSCAT.DATATYPES WHERE TYPENAME = 'VARCHAR'
Make a note of the result.
For example: 1208
For Windows:
Navigate to Control Panel > System and click the Advanced tab. Click Environment Variables.
In System variables section, click New.
In the Variable Name field, DB2CODEPAGE.
In the Variable Value field, enter the value that was returned in Step 0.
For UNIX or Linux, set the variable as shown below:
setenv DB2CODEPAGE <DB2CODEPAGE value>
For example: setenv 1208.
The DAC Client uses an ODBC connection to create and alter tables in the Oracle Business Analytics Warehouse. Create an ODBC connection to the Oracle Business Analytics Warehouse database on the machine that hosts the DAC Client, as described below.
Additionally, if your source system is Siebel CRM, you must create an ODBC connection to the OLTP (source) database on the machine where you will install Oracle Business Intelligence Applications software. This ODBC connection will be used by the ddlimp utility.
For the ODBC connections to - Oracle databases, you must use the Oracle Merant ODBC Driver that is installed with the Oracle Business Intelligence Applications installer. For all other databases, you should use ODBC drivers supplied by your database vendor.
To create ODBC connections for DB2 databases:
Using the DB2 Client Configuration Assistant, create a database connection to the Oracle Business Analytics Warehouse database on the machine that will host the DAC Client. If your source system is Siebel CRM, also create an ODBC connection to the transactional database on the machine where you will run the Oracle Business Intelligence Applications installer.
Note: If you use the DB2 Client Configuration Assistant to create database connections, you can omit step 2, because the DB2 Client Configuration Assistant automatically creates System DSNs (default behavior).
If necessary, on Windows, in the System DSN tab of the ODBC Data Source Administrator, create an ODBC connection to the Oracle Business Analytics Warehouse (and, if your source system is Siebel CRM, to the transactional database) using an ODBC driver.
Test the connections to make sure they work.
To create ODBC connections for Oracle databases:
Note: You must use the Oracle Merant ODBC driver to create the ODBC connections. The Oracle Merant ODBC driver is installed by the Oracle Business Intelligence Applications installer. Therefore, you will need to create the ODBC connections after you have run the Oracle Business Intelligence Applications installer and have installed the DAC Client.
On the machine that will host the DAC Client, use the System DSN tab of the ODBC Data Source Administrator to create an ODBC connection to the Oracle Business Analytics Warehouse database using the Oracle Merant ODBC driver that is supplied with Oracle Business Intelligence Applications.
For example, you might create a database connection called Connect_to_OLAP.
(If your source system is Siebel CRM) In Windows, in the System DSN tab of the ODBC Data Source Administrator, create an ODBC connection to the Siebel transactional database using the Oracle Merant Closed driver.
Test the connections to make sure they work.
To create ODBC connections for SQL Server databases:
In Windows, in the System DSN tab of the ODBC Data Source Administrator, create the following:
an ODBC connection to the Oracle Business Analytics Warehouse database on the machine that will host the DAC Client.
(If your source system is Siebel CRM) an ODBC connection to the transactional database on the machine where you will run the Oracle Business Intelligence Applications installer
Note: Select SQL Server as the ODBC driver.
Test the connections to make sure they work.
Note: When you use the ODBC Data Source Administrator to create a database connection, make sure that you select the SQL Server authentication option using a login ID and password entered by the user.
To create ODBC connections for Teradata databases:
On the Windows machine that will host the DAC Client, in the System DSN tab of the ODBC Data Source Administrator, create an ODBC connection to the Oracle Business Analytics Warehouse Teradata database.
Set the following parameters:
Field=Enter
DateFormat=AAA
SessionMode=ANSI
NoScan=Yes
For Unicode environments, in the Teradata ODBC Driver Advanced Options dialog, set the Character Set parameter to UTF8.
Before you run the Informatica PowerCenter installer, you must set environment variables as described in 'Step 5. Configure Environment Variables' in the chapter 'Before You Install' in the PowerCenter Installation and Configuration Guide. For UNIX machines, you must set environment variables for database client, Library Path and Locale as described. Informatica PowerCenter 8.1.1 SP 4 documentation is included on the Informatica PowerCenter DVD provided with Oracle Business Intelligence Applications.
The DAC Client and DAC Server require Java JDK. Install Java JDK on the machines that will host the DAC Client and DAC Server. On Windows, you must install JDK with no spaces in the directory path.
This step can be optional or mandatory, depending on where you want to install the DAC server and the DAC client. Java SDK must be installed on the machines where the DAC server or DAC client are installed. If a machine has the Oracle Business Intelligence infrastructure installed, the Java SDK will already be installed on that machine.
If required, you can have other versions of SDK installed on the same server to support other applications. For example, you might have Java SDK version 1.5 installed for the DAC, and Java SDK version 1.4.2 installed for a different application that is not supported on Java SDK version 1.5.
Note:
For information about which version of the Java SDK is supported, see System Requirements and Supported Platforms for Oracle Business Intelligence Applications Fusion Edition.To install Java SDK
Download and install the Java JDK for your operating system(s) from a web site that provides Java JDK downloads (for example, the Sun or IBM web site). You must download and install the Java JDK for either 32 bit or 64 bit depending on your operating system.
Note:
On Windows, make sure that there are no spaces in the JDK directory path. If there are spaces in the directory path, the DAC will not start (the \OracleBI\DAC\startclient.bat file will fail).To run the DAC Client or DAC Server, you need to have libraries from an open source software product called Hibernate. Hibernate libraries are not installed as part of Oracle Business Intelligence Applications 7.9.x., but have to be downloaded from the Hibernate Web site.
Oracle recommends that you download Hibernate Core Package Version 3.2.x GA or later. Newer versions of Hibernate Core Package 3.2 are now generally available (for example, Hibernate Core Package Version 3.2.5 GA). DAC is supported on the libraries of these versions also. You can download Hibernate Core Package from http://www.hibernate.org.
To download the Hibernate libraries:
Go to the Web site http://hibernate.org.
Navigate to the Download area and download Hibernate Core Package Version 3.2.x. GA to a local machine.
Unzip the files and directories in the hibernate-<3.2.x>.ga.zip file (for example, hibernate-3.2.2.ga.zip).
This section explains how to install Oracle Business Intelligence Applications.
The Oracle Business Intelligence Applications installer runs on Windows, and requires the Oracle Business Intelligence infrastructure to be installed. For more information on Oracle Business Intelligence infrastructure requirements, including versions supported for this release of Oracle BI Applications, see Section 4.3.1, "Oracle Business Intelligence Infrastructure Requirements".
This section explains how to install the Oracle Business Intelligence Applications files using the Oracle Business Intelligence Applications Installation Wizard.
When you run the Oracle Business Intelligence Applications Installation Wizard, the Oracle Business Intelligence Applications files are installed into the existing Oracle Business Intelligence infrastructure directory (for example, <DRIVE>:\OracleBI\).
Note:
If you have a previous version of Oracle Business Intelligence Applications installed, you must uninstall this version before you run the installer for Oracle Business Intelligence Applications Version 7.9.5. If you do not uninstall the old version, some Version 7.9.5 directories will not be correctly installed. (Make a back-up of your RPD, presentation catalog, and DAC and dwrep directories before you uninstall the old version.)To install Oracle Business Intelligence Applications on Windows
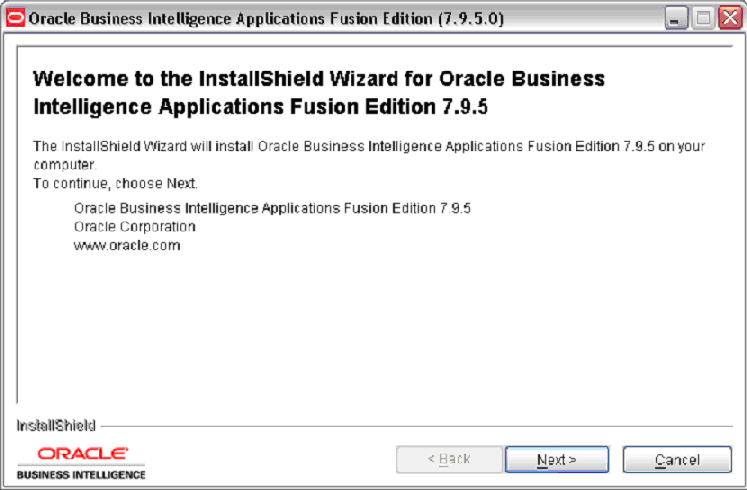
Access the installation files on the installation CD-ROM, and then run the program setup.exe to display the Welcome page.
Note:
To run the installer in console (or text) mode, run the command setup.exe -console. You do not see following dialogue screens in console installation mode. Instead, you enter input as plain text in the terminal window when prompted.Click Next to display the Oracle Business Intelligence infrastructure and Java SDK directory location page.
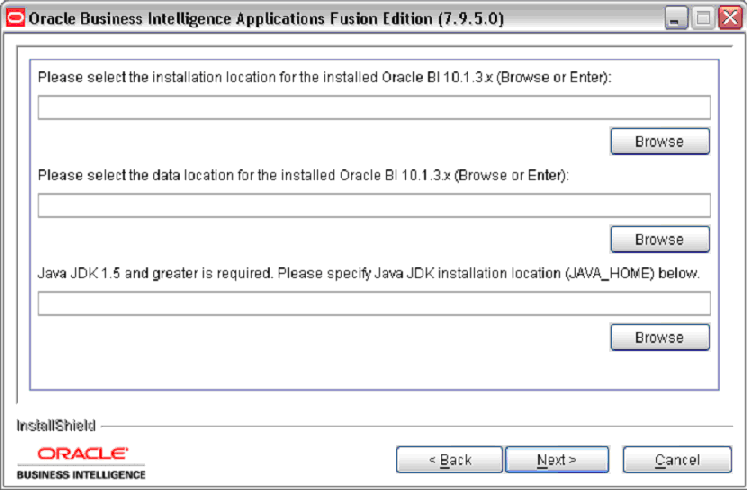
Enter or browse for the location for the Oracle Business Intelligence infrastructure (for example, <DRIVE>:\OracleBI\), the Oracle Business Intelligence infrastructure data (for example, <DRIVE>:\OracleBIData\), and the Java SDK (for example, <DRIVE>:\jdk1.5).
Click Next to display the Select Oracle Business Intelligence Applications page.
At the Select Oracle Business Intelligence Applications page, select the applications that you want to install, then click Next.
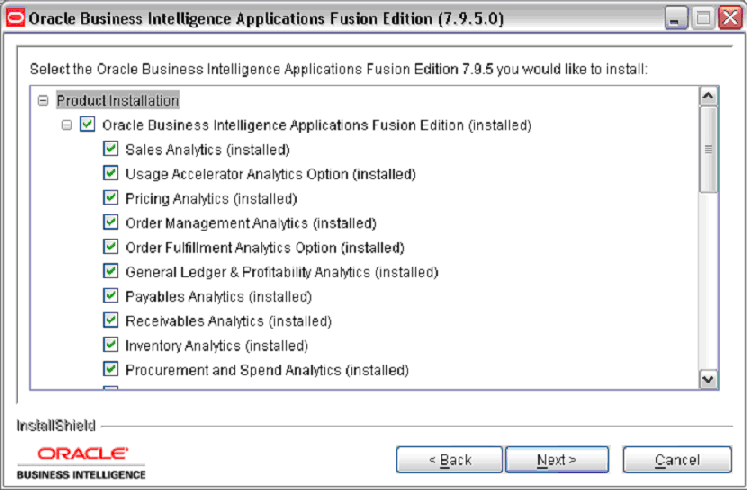
To determine the applications you should install for the Oracle Business Intelligence Applications licenses you have purchased, see the spreadsheet entitled '2-Installer Options' in the Oracle Business Intelligence Applications Fusion Edition Licensing and Packaging Guide. This guide is part of the Oracle Business Intelligence Media Pack.
Once you have installed applications, you can deploy them for one or more source systems selectively when you create the DAC metadata repository in a later step (for more information, see Section 4.9, "Importing the DAC Metadata").
If you selected more than one application on the Select Oracle Business Intelligence Applications page, click Next at the informational page.
At the summary page, review the summary information and click Next to start the installation.
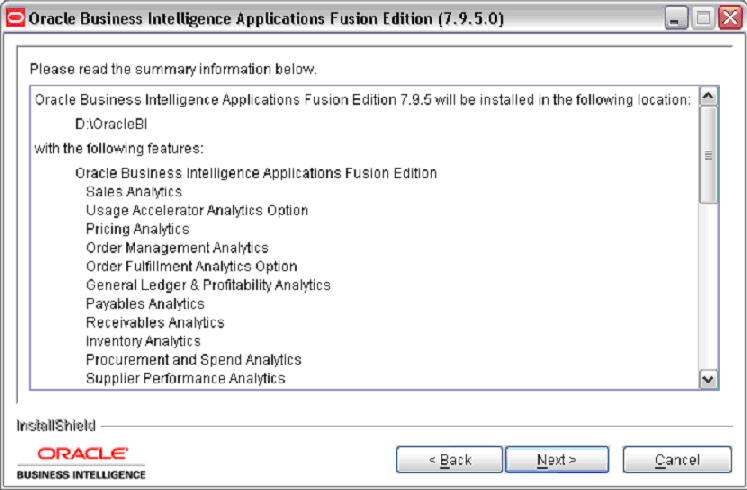
The installer installs the Oracle Business Intelligence Applications directories and files in the Oracle Business Intelligence infrastructure installation (for example, <DRIVE>:\OracleBI\), and installs the Oracle BI Repository file and Presentation Catalog.
Note:
Even when the progress bar on the installer reports 100% complete, you must wait until the Finish button is displayed.Click Finish.
Tip:
Look in the <DRIVE>:\OracleBI\Document\version_apps.txt file in the Oracle Business Intelligence infrastructure directory to check that you have installed the correct version of Oracle Business Intelligence Applications.When the installation is complete, verify that the following directories or files are installed:
The DAC folder.
The dwrep folder.
The Oracle Business Intelligence Applications repository file named EnterpriseBusinessAnalytics.rpd in the OracleBI\server\Repository folder.
The Presentation Catalog in the OracleBIData\web\catalog folder. The Presentation Catalog is provided as a zipped file named EnterpriseBusinessAnalytics.zip and will need to be unzipped before it can be used.
Language files (for the languages available for Oracle BI Applications) in OracleBIData\web\res folder.
Seed Data folder containing localization files.
Upgrade folder containing repository files from previous versions of Oracle BI Application and Siebel Analytics Application releases.
Notes
The credentials required to log into the EnterpriseBusinessAnalytics.rpd file using the Oracle Business Intelligence Administration Tool are:
Username: Administrator
Password: SADMIN
Refer to the Oracle Business Intelligence Enterprise Edition or Oracle Business Intelligence Standard Edition One documentation for more information on working with the repository and Presentation Catalog.
This section explains how to install Informatica PowerCenter Services, and contains the following topics:
Section 4.5.1, "How to Install Informatica PowerCenter Client Tools"
Section 4.5.2, "How to Install Informatica PowerCenter Services"
Notes
You need to determine the machines that will host Informatica PowerCenter Services and Informatica PowerCenter Client Tools. The PowerCenter Services can be installed on UNIX or on Windows. The PowerCenter Client Tools must be installed on Windows.
Oracle recommends that you:
- co-locate the DAC Client with the PowerCenter Client Tools.
- co-locate the DAC Server with the PowerCenter Services.
DAC produces parameter files that are used by Informatica. If an Execution plan fails in DAC and you want to debug the workflow by running it directly from Informatica, then the parameter file produced by DAC should be visible to Informatica.
You must meet all requirements and complete pre-install tasks as described in Section 4.3, "Mandatory Requirements and Pre-installation Tasks" and in chapter 'Before You Install' of the PowerCenter Installation and Configuration Guide. Informatica PowerCenter 8.1.1 SP 4 documentation is included on the Informatica PowerCenter DVD provided with Oracle Business Intelligence Applications.
When you install PowerCenter Services and Client Tools version 8.1.1 SP4, use the Informatica PowerCenter installation documentation in conjunction with the steps provided in the following sections. The Oracle Business Intelligence Applications Installation and Configuration Guide summarizes the steps and assumes a single-machine installation for the PowerCenter Services components. Note: For a new installation, you must select the 'Create new PowerCenter Repository' option on the PowerCenter Repository Configuration screen.
Note:
If you have licensed Informatica PowerCenter separately from Oracle Business Intelligence Applications, skip this section and go to section Section 4.6, "Restoring the Oracle Business Intelligence Pre-Built Repository".Make sure that you have updated to the required version of Informatica PowerCenter (for more information, see Section 4.3.2, "Informatica PowerCenter Requirements").
This section explains how to install Informatica PowerCenter 8.1.1 SP4 Client Tools for an Oracle Business Intelligence Applications deployment. For detailed generic information about installing Informatica 8.1.1, refer to the Informatica PowerCenter Installation and Configuration Guide, and related documentation.
Note: Oracle recommends that you co-locate the PowerCenter Client Tools with the the DAC Client.
Follow this procedure to install the Informatica PowerCenter Client Tools for an Oracle Business Intelligence Applications deployment.
To install Informatica PowerCenter Client tools on Windows
Run the program install.exe from the PowerCenter_8.1.1_SE_for_Windows folder on the Informatica PowerCenter DVD provided with Oracle Business Intelligence Applications.
Alternatively, run install.bat from the PowerCenter_8.1.1_SE_for_<OS>\Client\Disk1 folder.
If the installer displays the 'Please select an option to install' dialog, click Client.
Follow the instructions on the Informatica PowerCenter Client 8.1.1 installation wizard.
Install Informatica PowerCenter SP4 patch from the PowerCenter_8.1.1_SP4_for_<OS>\Client\Disk1 folder on the Informatica PowerCenter DVD provided with Oracle Business Intelligence Applications, as follows:
Install Client - accept all default installation settings.
This section explains how to install Informatica PowerCenter Services 8.1.1 SP4 for an Oracle Business Intelligence Applications deployment. For detailed generic information about installing Informatica 8.1.1, refer to the Informatica PowerCenter Installation and Configuration Guide, and related documentation.
This section explains how to install Informatica PowerCenter Services for an Oracle Business Intelligence Applications deployment. During the Informatica PowerCenter Services installation, you must select the 'Create new PowerCenter Repository' option on the PowerCenter Repository Configuration screen.
Note: Oracle recommends that you co-locate the PowerCenter Services with the DAC Server.
To install Informatica PowerCenter Services
Start the Informatica PowerCenter Services installer.
To start the installer on Windows, insert the Informatica PowerCenter DVD provided with Oracle Business Intelligence Applications into the DVD drive and run install.exe from the PowerCenter_8.1.1_SE_Windows folder. At the 'Please select an option to install dialog', click Server.
To start the installer on UNIX or Linux, run install.sh at a shell command line. The PowerCenter 8.1.1 installation files are located in folder PowerCenter_8.1.1_SE_<OS> on the Informatica PowerCenter DVD provided with Oracle Business Intelligence Applications.
On UNIX and Linux, the PowerCenter installer checks the operating system and verifies that the environment variables are correctly set. The environment variables must be specifically set to enable the PowerCenter installer to run processes and connect to databases and services. If the environment variables are not set, the PowerCenter installer gives you the option to stop the installation and modify the environment variables.
On UNIX or Linux, select the option to use the GUI mode installation.
Follow the instructions on the Informatica PowerCenter Services installation wizard, as shown in the following table.
Note:
The installation wizard pages that you see depend on the licensing options that you have purchased. For example, the Application Server Configuration page is only displayed if you have purchased the PowerCenter Data Analyzer option.| Page | Your Action | Notes |
|---|---|---|
| Welcome | Click Next. | |
| License Key | Click Browse, then locate and select the license key text file. | If you have purchased the 'Informatica OEM PowerCenter ETL Server and PowerConnect Adapters' license from Oracle, use the Oracle_All_OS_Prod.key license key file. This file is located in the DVD root directory of the Informatica PowerCenter DVD that is provided with Oracle Business Intelligence Applications. |
| Installation Prerequisites | ||
| Installation Set | Select the Install PowerCenter 8.1.1. radio button. | For information about upgrading to Informatica PowerCenter 8.1.1, refer to Informatica PowerCenter Installation and Configuration Guide. |
| DA & MM License Key | Not applicable. | |
| Installation directory | Specify the installation folder. | On Windows, do not install Informatica in a directory that has a space in the directory name. For example, do not install in D:\Program Files\INFA. If you do install into a directory with a space in the name, you will cause errors in the DAC. |
| Application Server Configuration | Not applicable. | |
| Pre-Installation Summary | Click Install. | |
| Installing... | Not applicable. | |
| Domain Configuration | At the Create or Join Domain page, select the Create New Domain radio button. | |
| Domain Configuration | At the Configure Domain Database page, specify the database details. | Configure Domain Database page:
|
| Domain Configuration | At the Configure Domain page, specify the domain details. | Configure Domain page:
|
| Domain Configuration | ||
| Node Configuration | At the PowerCenter Repository Configuration page, select the Create new PowerCenter repository radio button, and specify the Services details. You must specify the appropriate repository Code Page setting. | PowerCenter Repository Configuration page:
|
| Node Configuration | At the Configure Integration Service page, select the Create Integration Service check box.
Select the data character movement mode, either ASCII or Unicode. |
PowerCenter Services Configuration page:
|
| Authentication | Not applicable. | |
| Repository Configuration | Not applicable. | |
| Post-Installation Summary | Click Done. |
Stop any Informatica services that are running.
Install the Informatica PowerCenter SP4 patch from the PowerCenter_8.1.1_SP4_<OS> folder, as follows:
Install Server - select the Custom installation mode and clear the check box for PowerCenter Data Analyzer 8.1.1 SP4 and PowerCenter Metadata Manager 8.1.1 SP4. Accept the other default installation settings.
An Informatica repository file called Oracle_BI_DW_Base.rep is installed into the OracleBI\dwrep\Informatica\Repository directory during the Oracle Business Intelligence Applications installation. For use with deployments where the Oracle Business Analytics Warehouse is on Teradata, a repository file called Oracle_BI_DW_Teradata.rep is installed.
You use the Restore option in Informatica PowerCenter Administration Console to load the pre-built Oracle_BI_DW_Base repository or Oracle_BI_DW_Teradata (in a Teradata environment).
To load the pre-built Oracle_BI_DW_Base.rep or Oracle_BI_DW_Teradata.rep repository into Informatica
Copy the file Oracle_BI_DW_Base.rep (or Oracle_BI_DW_Teradata.rep) from the OracleBI\dwrep\Informatica\Repository directory on the machine where the Oracle Business Intelligence Applications installer was run to the following folder on the machine where Informatica PowerCenter Services has been installed:
On Windows, to the \Informatica PowerCenter8.1.1\server\infa_shared\Backup directory.
On UNIX or Linux, to $Informatica/PowerCenter8.1.1/server/infa_shared/Backup directory.
In Informatica PowerCenter Administration Console, select the select the Repository Service that was created during the installation process (for example, Oracle_BI_DW_Base or Oracle_BI_DW_Teradata).
For information about how to connect to Informatica PowerCenter Administration Console, see Section A.3, "How to Log Into Informatica PowerCenter Administration Console".
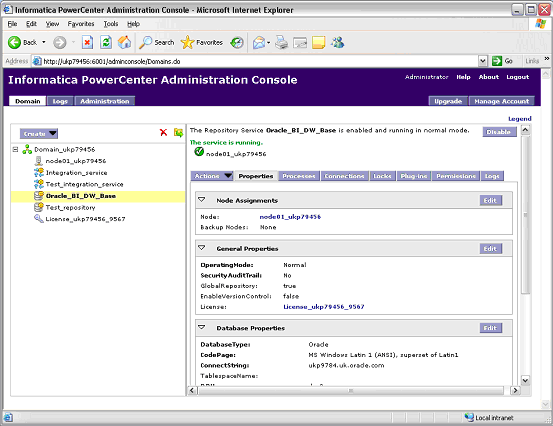
In the Properties tab, click Edit in the General properties area.
Make sure that the OperatingMode value is Exclusive.
Click OK.
Choose Actions, then Delete Contents.
At the Delete contents for <repository name> dialog, enter the repository username and password (for example, Administrator\Administrator), then click OK.
Choose Actions > Restore Contents.
At the Restore Contents dialog, select Oracle_BI_DW_Base (or Oracle_BI_DW_Teradata for Teradata installations) from the Select backup file drop down list.
Select the Restore as new check box.
Click OK to start the restore process.
When the restore process is complete, click Close (or click Save first to save the logging information).
When the restore is complete (the process typically takes approximately ten to twenty minutes), you will see a 'Success' message.
When a repository is restored, the repository becomes a standalone repository. After restoring the repository, you need to promote it to a global repository.
In the Properties tab, click Edit in the General properties area.
Change the OperatingMode value to Normal.
If prompted, enter the repository username and password.
Note:
The pre-built Oracle_BI_DW_Base and Oracle_BI_DW_Teradata repository files are versioned from Oracle Business Intelligence Applications Version 7.9.3 and higher. For more information about the versioned repositories, see Appendix J, "About the Versioned Informatica Repository".This section explains how to install and configure Informatica PowerCenter Services for use with Oracle Business Intelligence Applications, and contains the following topics:
Section 4.7.2, "Setting PowerCenter Integration Services Relaxed Code Page Validation"
Section 4.7.3, "Setting PowerCenter Integration Services Custom Properties"
You need to copy source files and lookup files from the Oracle Business Intelligence Applications installation directory to the Informatica directory on the Informatica PowerCenter Services machine.
Note: The following instructions assume the Informatica default directory locations for source and look up files.
To copy source files and lookup files on Windows
Copy the source files in \OracleBI\dwrep\Informatica\SrcFiles to \Informatica PowerCenter8.1.1\server\infa_shared\SrcFiles on the Informatica PowerCenter Services machine.
Copy the lookup files in \OracleBI\dwrep\Informatica\LkpFiles to Informatica PowerCenter8.1.1\server\infa_shared\LkpFiles on the Informatica PowerCenter Services machine.
To copy source files and lookup files on UNIX or Linux
Copy the source files in \OracleBI\dwrep\Informatica\SrcFiles to the $Informatica/PowerCenter8.1.1/server/infa_shared/SrcFiles on the Informatica PowerCenter Services machine.
Copy the lookup files in \OracleBI\dwrep\Informatica\LkpFiles to the $Informatica/PowerCenter8.1.1/server/infa_shared/LkpFiles on the Informatica PowerCenter Services machine.
PowerCenter Integration Services must be configured for relaxed code page validation.
To configure Informatica PowerCenter Integration Services for relaxed code page validation:
Log in to Informatica PowerCenter Administration Console.
Select the Integration Service.
Click the Properties tab > Configuration Properties > Edit.
Change the value for property 'ValidateDataCodePages' from 'Yes' to 'No'.
To set Informatica PowerCenter Integration Services Custom Properties
In Informatica PowerCenter Administration Console, select the Integration Service.
For example, on the machine where Informatica PowerCenter Services is installed, choose Programs, then Informatica PowerCenter 8.1.1, the Services, then Launch Admin Console.
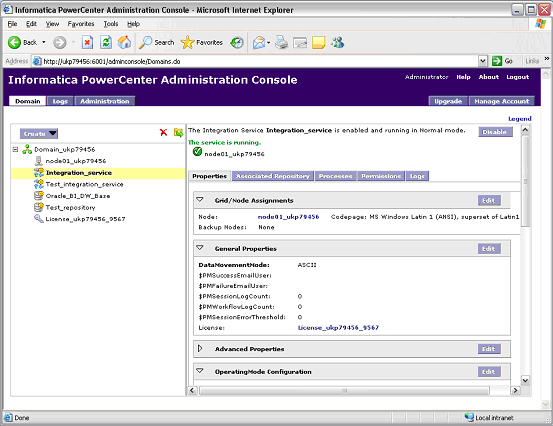
Display the Properties tab.
In the Custom Properties area, click Edit.
Create a Custom Property by clicking Add to display new Name and Value fields.
For each of the custom properties in the table below, click Add and add a new custom property with an appropriate value:
Table 4-2 Custom Properties for Informatica PowerCenter Integration Services
| Custom Properties Name | Custom Properties Value | Notes |
|---|---|---|
|
ValidateDataCodePages |
No |
|
|
ServerPort |
<Server Port Number> |
For <Server port number>, enter the number of an available port. For example, 4006.This custom property configures Informatica PowerCenter Services to listen on <Server port number>. The DAC communicates with the PowerCenter Integration Services service using this port. |
|
overrideMpltVarWithMapVar |
Yes |
|
|
DisableDB2BulkMode |
Yes |
Add this custom property and set value to Yes if your Oracle Business Analytics Warehouse is on DB2/390 database. |
|
SiebelUnicodeDB |
[user_OLTP]@[connectString_OLTP] [user_OLAP]@[ConnectString_OLAP] For example, oltp@db204007.host.com olap@db204008.host.com. Note: Always leave a space between the connection strings. |
Set this value if your data movement is from Unicode to Unicode |
Click OK to save the details.
Make sure that the Integration Service and Repository Service that you created during the Informatica PowerCenter installation are running.
The Integration Service and Repository Service must be registered in the DAC in a later step (for more information, see Section 4.12.2, "How to Register the Informatica Services in the DAC").
This section explains how to install and configure the DAC Client, and contains the following topics:
This section explains how to install and set up the DAC Client.
The DAC Client is installed by the Oracle Business Intelligence Applications installer. The DAC Client only runs on a Windows platform. Oracle recommends that you run the DAC Client on the Windows machine that runs the Informatica PowerCenter Client Tools. This section explains how to install and configure a DAC Client.
Note: You do not need Oracle Business Intelligence Enterprise Edition installed on a machine to run a DAC Client.
Notes
JDK 1.5 or higher should be installed. For more information, see Section 4.3.4.5, "How to Install the Java JDK".
Download the Hibernate files from the Hibernate web site. For more information, see Section 4.3.4.6, "Download Hibernate Libraries".
To install and set up the DAC Client, do the following:
Copy the \OracleBI\DAC\ directory and its sub-folders from the Oracle Business Intelligence Applications installation (on Windows) to the target Windows machine (for example, to a directory called /DAC/).
Alternatively, if the target machine already has an Oracle Business Intelligence infrastructure installed (for example, Oracle Business Intelligence Enterprise Edition), you can run the Oracle Business Intelligence Applications installer on the target machine to install the DAC Client. For information about how to run the Oracle Business Intelligence Applications installer, see Section 4.4.1, "How to Run the Oracle Business Intelligence Applications Installer (Windows)").
Note: If you will run the DAC Client from the machine on which the Oracle Business Intelligence Applications software was run, ignore this step and proceed to step 2.
Copy the hibernate files to the appropriate DAC directories, as follows:
Copy the Hibernate files from the \hibernate-3.2 directory where you downloaded and unzipped the Hibernate files to the \DAC directory on the DAC Client machine, as described in the table below.
Note:
You do not need to copy any of the other files in the \hibernate-3.2 directory to the \OracleBI\DAC directory.Install JDBC drivers for DAC database connectivity.
You must install the appropriate JDBC driver in the DAC\lib directory to enable DAC database connectivity. If the required JDBC drivers are not already installed, you need to install the JDBC driver on the machines where the DAC Client is installed.
To install JDBC drivers in the OracleBI\DAC\lib directory
Oracle. If you are using an Oracle database (other than 8.x), find the directory where Oracle is installed. Copy the file named ojdbc14.jar in the jdbc\lib directory and paste it in the OracleBI\DAC\lib directory.
If you are using Oracle 8.x, copy the file named classes12.zip and paste it in the OracleBI\DAC\lib directory. Also, edit the ORACLELIB setting in the config.bat file as follows:
set ORACLELIB=%DAC_HOME%\lib\classes12.zip
DB2. If you are using a DB2 database, find the directory where DB2 is installed. In the Java sub-directory copy the file named db2java.zip and paste it in the OracleBI\DAC\lib directory.
Note:
If your source or target database is DB2-UDB, you also need to create DB2-UDB stored procedures to be used during the ETL process. For instructions, see Section 4.15.4, "How to Create Stored Procedures for DB2-UDB".MSSQL. Data Warehouse Administration Console is configured for Microsoft SQL Server 2005 JDBC drivers. If you are using a Microsoft SQL Server database, then download the Microsoft SQL Server 2005 JDBC Driver file sqljdbc.jar and copy it to the \DAC\lib\ directory.
You can use the Microsoft SQL Server 2000 JDBC Driver files if you edit the \conf\connection_templates.xml file and un-comment the section that starts <!-- THIS SECTION IS FOR SQL SERVER 2000. Comment this section while using SQL Server 2005.-->.
Download he SQL Server JDBC drivers for SQL Server 2000 from the Microsoft web site. Copy the Copy the files msbase.jar, mssqlserver.jar, and msutil.jar to the \DAC\lib folder.
Note:
You need the Microsoft SQL Server 2005 JDBC Driver 1.1 for SQL Server 2000 or SQL Server 2005.Teradata. If you are using a Teradata database, copy the files tdgssconfig.jar, TdgssUserConfigFile.xml, terajdbc4.jar, log4j.jar, and tdgssjava.jar from the Teradata installation directory to the \OracleBI\DAC\lib directory. Depending on the Teradata JDBC version, you might not have some of the above files.
Configure DAC config.bat file and configure a connection for DAC repository, as follows:
In the DAC directory, open the config.bat file.
Edit the JAVA_HOME variable to point to the directory where you installed the Java SDK.
Make sure there are no spaces in the path reference.
For example:
set JAVA_HOME=d:\jdk1.5
Edit the DAC_HOME variable to point to the directory where you installed the DAC.
For example:
set DAC_HOME=d:\OracleBI\DAC
The DAC Client uses the Informatica pmrep and pmcmd command line programs to communicate with Informatica PowerCenter. The DAC Client uses pmrep to synchronize DAC tasks with Informatica workflows and to keep the DAC task source and target tables information up to date.
The pmrep program is installed in the Informatica PowerCenter Client and Informatica PowerCenter Services bin directories. Because of the requirement to co-locate the DAC Client with the PowerCenter Client, the pmrep program is available on the machine for the DAC Client to use.
The pmcmd program is installed in the PowerCenter Services bin directories. If PowerCenter Services 8.1.1 SP 4 has been installed on the same machine as the DAC Client and PowerCenter Client 8.1.1 SP4, copy the pmcmd program from the PowerCenter 8.1.1\server\bin directory to PowerCenter 8.1.1\client\bin directory.
If the DAC Client machine does not co-host the PowerCenter Services, follow the instructions below to install pmcmd on the DAC Client machine:
If Informatica PowerCenter Services 8.1.1 SP 4 is installed on a Windows machine other than the one that hosts the DAC Client, do the following:
Copy the pmcmd.exe file from the \PowerCenter 8.1.1\server\bin directory on the machine where PowerCenter Services is installed to the \PowerCenter 8.1.1\client\bin directory on the DAC Client machine.
If Informatica PowerCenter Services is installed on a UNIX or Linux machine, and an installation on Windows is not available, run the Informatica PowerCenter Services installer on the DAC Client machine or (any other Windows machine) to install only Integration Services as follows:
Run the Informatica PowerCenter Services installer as described in section Section 4.5.2, "How to Install Informatica PowerCenter Services".
In the Domain Configuration section, on the Create or Join Domain page, select the Create New Domain radio button
At the Configure Domain Database page, specify the database details for the domain configuration database.
You may use the same database that stores the domain configuration for your PowerCenter Services installation on UNIX. However, you will have to create a different database account.
At the Configure Domain page, specify the domain details.
Note: Do not check the Create Repository Service check box.
Complete the installation.
Apply Service Pack 4.
Copy the pmcmd.exe file located in PowerCenter 8.1.1\server\bin to PowerCenter 8.1.1\client\bin.
In order for the DAC Client to be able to use the pmrep and pmcmd programs, you need to define the path of the Informatica Domain file 'domains.infa'.
To define the Informatica Domains File path:
Locate the file domains.infa in the root Informatica PowerCenter installation directory and note down the directory path of this file.
For example, D:\Informatica\PowerCenter8.1.1.
Create an environment variable called INFA_DOMAINS_FILE with the value set to the directory path to the domans.infa file, as follows:
On Windows, display the Windows Environment Variables dialog (that is, from the Windows Control Panel, choose System, then Advanced, then Environment Variables), and create a System variable with the following values:
Variable name: INFA_DOMAINS_FILE
Variable value: <directory path of domains file>\domains.infa
The path should include the name of the file. For example, 'D:\Informatica\PowerCenter8.1.1\domains.infa'.
Add the directory path to Informatica PowerCenter binaries to the PATH environment variable as follows:
In the Windows System Properties > Environment Variables dialog, add the path of the Informatica \Client\bin directory to the PATH environment variable. For example: <drive>:\Informatica\PowerCenter8.1.1\client\bin.
From a Windows command prompt, execute pmrep and then pmcmd. The test is successful if the pmrep and pmcmd prompts appear.
If pmrep and pmcmd are not recognized, then:
Ensure Service Pack 4 has been applied to Informatica PowerCenter 8.1.1.
Verify that the INFA_DOMAINS_FILE variable points to the domains.infa file located in the Informatica directory.
Verify that the PATH variable includes the path to the Informatica binaries (\Informatica\PowerCenter\client\bin), and that pmrep.exe and pmcmd.exe exist in the \bin folder.
This section explains how to create a DAC Connection. A DAC connection is a stored set of login details that enable you to log into the DAC Client and connect to the DAC Repository.
Note: Before you start this procedure, you need to create a database for the DAC metadata repository. For more information, see Section 4.3.4.1, "Create Databases".
To create a DAC connection
Start the DAC client by navigating to the \DAC directory and double-clicking the startclient.bat file.
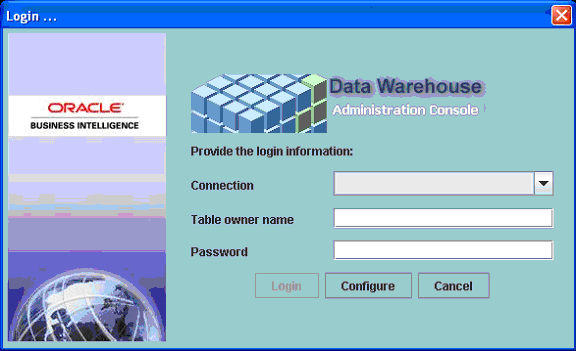
Note:
If you installed the DAC Client by running the Oracle Business Intelligence Applications installer, you can also start the DAC Client from the Start menu > Oracle Business Intelligence > Oracle DAC > DAC Client.In the Login... dialog, select Configure.
In the Configuring... dialog, select Create Connection, and then click Next.
Enter the appropriate connection details as specified in the table below.
| Field | Required Value |
|---|---|
| Name | Specify a unique name for the connection to the DAC repository (for example, DAC). |
| Connection type | Specify the type of database in which the DAC repository is stored. |
| Connection String, or Database name, or TNS Name, or Instance | Specify the database name or database account name of the DAC repository.
If you are using:
|
| Database Host | Specify the machine name of the machine where the DAC Repository database resides. |
| Database Port | Specify the port number on which the database listens. For example, for an Oracle database the default port is 1521, or for a SQL Server database the default port is 1433. |
To test the connection, select Test Connection and enter the Table owner name and password for the DAC repository.
Select Apply to save the connection details and return to the login dialog.
Select the new connection from the Connection drop down list, specify a table owner name and password for the DAC repository, and click Login.
The DAC Repository that you connect to does not contain the DAC repository tables. In the following section (Section 4.8.4, "Creating the DAC Repository Schema"), you will create the DAC repository schema.
When you log into DAC and connect to a DAC repository for the first time, the DAC detects that the DAC schema does not exist in the database and you are asked whether you want to create a repository.
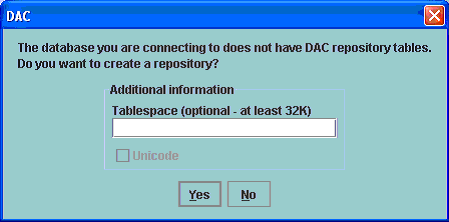
In the dialog box, click Yes to create the repository tables.
For a repository on Oracle or DB2 database, optionally specify a tablespace.
The Unicode check box is available for a repository on MS SQL Server or DB2 database. Check the Unicode check box if your deployment requires a Unicode schema to be created. To determine if your deployment requires a Unicode schema for the DAC repository, see Section 4.3.3, "Code Page and Data Movement Requirements".
This section explains how to import metadata into the DAC repository.
Note:
The DAC client can connect to only one DAC repository at a time.To import metadata into the DAC repository
In the DAC Client, choose Tools, then DAC Repository Management, then Import to display the Import dialog.
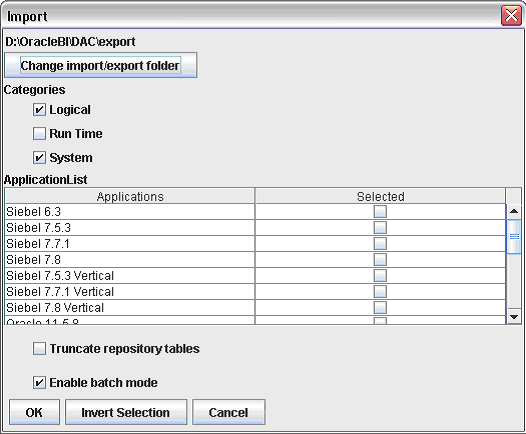
Make sure that the correct \DAC\export\ directory is displayed at the top of the dialog (for example, <drive letter>:\OracleBI\DAC\export). If necessary, use the 'Change import/export directory' button to select the \DAC\export\ directory. If the wrong directory is selected, the Applications list will be empty
Select the Logical check box, and the System check box.
In the Applications List table, use the check boxes in the Selected column to specify the source system applications for which you import the ETL metadata, as follows:
Select the check box next to Universal.
To avoid possible ETL errors in other applications (for example, missing tasks), you must import the Universal application.
Select the check box for any other business applications that you want to deploy.
Tip:
Make a note of the Application names that you select. When you create data warehouse tables later in the configuration process, you might need to type in the names exactly as they are displayed here (for more information, see Section 4.10.1, "How to Create Data Warehouse Tables").Select the Categories options as follows:
| Categories Options | Description |
|---|---|
| Logical | Imports all information contained in the DAC Design view and the execution plan information for the DAC Execute view. |
| Run Time | Imports ETL Run History and the last refresh date information. |
| System | Imports all information contained in the DAC Setup view, except passwords for servers and database connections. |
Click OK to display the Importing tables dialog.
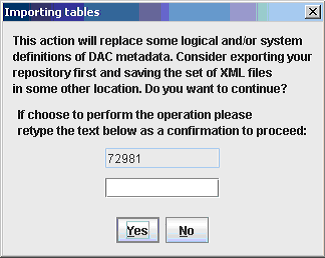
To confirm that you want to import the seed data selected, re-type the text in the text box and click Yes.
If prompted to verify that you want to continue with the Import, click Yes.
When the process is complete, the DAC displays a status box containing a success or failure message. If the process fails, use the \DAC\log\import.log file to diagnose errors.
Note:
The import process typically takes between one and five hours, depending on the location of the database that stores the DAC repository, the speed of the network, and the number of applications selected in the Applications list on the Import dialog.Click OK.
If your source or target database is a DB2-390 database, run DAC_DB2390_Source.sql or DAC_DB2390_Target.sql immediately after importing the seed data by connecting to the database where the DAC repository resides. These files are stored in the \DAC\ directory.
This section explains how to create tables in the Oracle Business Analytics Warehouse database.
Note: Before you start this procedure, you need to create a database for the data warehouse (for more information, see Section 4.3.4.1, "Create Databases").
The Oracle Business Analytics Warehouse tables are created by the DAC Client. The DAC Client uses ODBC connections to the Oracle Business Analytics Warehouse database for this procedure. Ensure that you have created an ODBC connection to the Oracle Business Analytics Warehouse database as described in Section 4.3.4.3, "Create ODBC Database Connections".
If your Oracle Business Analytics Warehouse database is Oracle, you must use the Oracle Merant ODBC driver to create the ODBC connection. This driver is installed by the Oracle Business Intelligence Applications. The DAC Client must be installed by running the Oracle Business Intelligence Applications installer so that the driver is installed on the machine. Create the ODBC DSN to the Oracle Business Analytics Warehouse as described in Section 4.3.4.3, "Create ODBC Database Connections".
Before you perform the procedures described in this section make sure that the SSE role has been created for the Oracle Business Analytics Warehouse, and that the database user has been associated with the role (for more information, see Section 4.3.4.1.1, "How to Create the SSE Role").
If your Oracle Business Analytics Warehouse database is not Teradata, refer to Section 4.10.1, "How to Create Data Warehouse Tables" to create the data warehouse tables.
If you are using a Teradata database as the Oracle Business Analytics database, the DAC creates a SQL file to create the schema tables, not the tables themselves. Follow the steps in Section 4.10.2, "How to Create Data Warehouse Tables on a Teradata Database".
Note: Additional work by the database administrator is required if the data warehouse tables need to be moved to different tablespaces for performance or manageability reasons.
Use this procedure to create the data warehouse tables.
To create data warehouse tables
In the DAC Client, choose Tools, then ETL Management, then Configure.
For more information about logging into the DAC, see Section A.1, "How to Log Into the DAC Client").
In the Sources dialog, select the database platform for the target data warehouse and source transactional database.
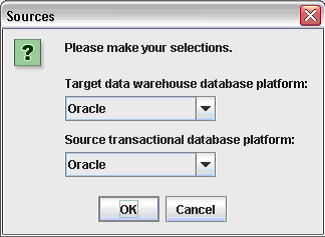
Click OK to display the Data Warehouse Configuration Wizard.
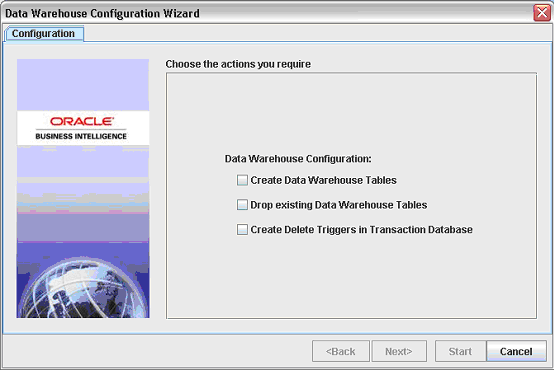
Select the Create Data Warehouse Tables check box, and click Next.
The Data Warehouse tab is active.
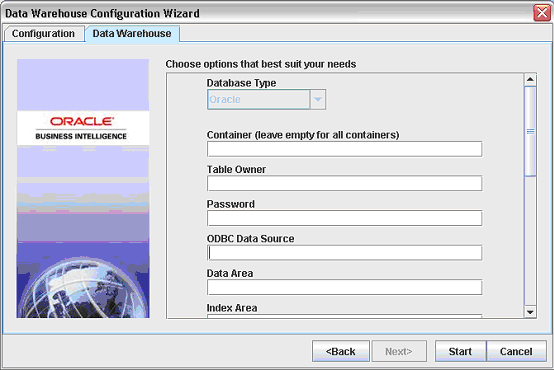
Enter the details of the database in which you want to store the data warehouse.
The information that you need to enter is dependent on the type of target database that you are using to store the data warehouse.
| Field | Description |
|---|---|
| Database Type | (Read only) Type of database, as specified by the 'Target data warehouse database platform' field on the Sources dialog (see step 2).
If the database type is DB2 390, then check the 390 Database check box. |
| Container | The name of the source business applications for which you want to create the data warehouse tables.
Note: You must leave this field blank, unless told to specify a value by Oracle Support. If you leave the Container field blank, the DAC creates a container by default for all of the following:
For example, you might do the following:
If you leave the Container field blank, the The DAC will create the following containers:
If there tables that are common to them, then only one table will be created. For example, if there is a table called W_ORG_D in Oracle 11.5.9 and Oracle 11.5.10, then the DAC will create only one table called W_ORG_D. If columns are different for the same table across containers, then DAC will create a table that has all the columns in the same table. If you only want to deploy a sub-set of the source business applications for which you imported seed data earlier, then use this field to specify a container name. When you specify a container name, you must enter the names of the applications exactly as they are displayed on the seed data Import dialog. For example:
For more information about containers, see Oracle Business Intelligence Data Warehouse Administration Console Guide. |
| Table Owner | Valid database owner, username, or account that you set up to hold the data warehouse (for more information, see Section 4.3.4.1, "Create Databases"). |
| Password | Valid database user password for the database owner, username, or account that you specified in the Table Owner field (for more information, see Section 4.3.4.1, "Create Databases"). |
| ODBC Data Source | Data Source Name (DSN) for the Oracle Business Analytics Warehouse.
You need to specify the name of the ODBC connection (for example, Connect_to_OLAP) that you created for the data warehouse. For more information, see Section 4.3.4.3, "Create ODBC Database Connections". |
| Data Area | (Optional) Tablespace where data warehouse tables are created. |
| Index Area | (Optional) Indexspace where data warehouse indices are created (applicable only to Oracle and DB2 databases). |
| Is Unicode | Specifies whether the data warehouse database is Unicode. The database must be set to support a Unicode schema (for more information, see Section 4.3.3, "Code Page and Data Movement Requirements"). |
Click Start.
The Run Status tab displays information about the process, as follows:
If a 'Success' message is displayed, the data warehouse tables have been created. If you want to see log information about the process, use the following log files.
\OracleBI\DAC\config\generate_ctl.log - A log of the schema definition process, including details of any conflicts between containers.
\OracleBI\DAC\config\createtables.log - A log of the ddlimp process.
If a 'Failure' message is displayed, the data warehouse tables have not been created. Use the log information in \OracleBI\DAC\config\generate_ctl.log to diagnose the error. The createtables.log is not generated.
This section explains how to create and delete data warehouse tables on a Teradata database. Before you start, make sure that the tables that you create are case specific by setting the session mode to ANSI in your Teradata ODBC configuration (for more information, see Section 3.7, "Teradata-Specific Database Guidelines for Oracle Business Analytics Warehouse").
Note:
For Unicode environments, perform these procedures using a login that has the default character set UTF-8.To create data warehouse tables on a Teradata database
In the DAC Client, choose Tools, then ETL Management, then Configure.
For more information about logging into the DAC, see Section A.1, "How to Log Into the DAC Client").
In the Sources dialog, select 'Teradata' as the database platform for the source data warehouse, and select the appropriate database type for the target transactional database.
Click OK to display the Data Warehouse Configuration Wizard.
Click the 'Generate create statements for Data Warehouse Tables' check box, then click Next to display the Data Warehouse SQL tab.
Use the Container field to specify individual containers, or leave blank to deploy all containers.
Click Start.
The Run Status tab displays information about the process, as follows:
If a 'Success' message is displayed, the data warehouse tables have been created. If you want to see log information about the process, use the following log files.
\OracleBI\DAC\config\generate_ctl.log - A log of the schema definition process, including details of any conflicts between containers.
\OracleBI\DAC\config\createtables.log - A log of the ddlimp process.
If a 'Failure' message is displayed, the data warehouse tables have not been created. Use the log information in \OracleBI\DAC\config\generate_ctl.log to diagnose the error. The createtables.log is not generated.
Copy the SQL file created in step 6 from \conf\sqlgen\sql\Teradata into SQL Assistant and execute the SQL.
This section explains how to install and configure the DAC Server, and contains the following topics:
Section 4.11.1, "Overview to Installing and Configuring the DAC Server"
Section 4.11.3, "Configuring the Connection Between the DAC Server and DAC Repository"
Section 4.11.4, "Enabling DAC Server Communication with Informatica PowerCenter"
The DAC Server is installed by the Oracle Business Intelligence Applications installer. The DAC Server runs on Windows, Unix, and Linux platforms. Oracle recommends that you co-locate the DAC Server on the machine that runs the Informatica PowerCenter Services.
Note: You do not need Oracle Business Intelligence Enterprise Edition installed on a machine to run the DAC Server. If you want to use the Oracle Business Intelligence Applications installer to install the DAC Server on a Windows machine, you do need an Oracle Business Intelligence infrastructure installed (either with Oracle Business Intelligence Enterprise Edition or Oracle Business Intelligence Standard Edition One).
When installing a DAC Server, note the following pre-requisites:
Make sure that JDK 1.5 or higher is installed. For more information, see Section 4.3.4.5, "How to Install the Java JDK".
On UNIX or Linux, make sure that a zip and unzip utility is installed.
Make sure that Informatica PowerCenter Services is co-located on the machine that will host the DAC Server. For more information, see Section 4.5, "Installing Informatica PowerCenter Services Software".
The domain should be set properly and the server port set as a custom property.
Make sure that database connectivity software has been installed for connection to source(s), to the Oracle Business Analytics Warehouse, and to the Informatica repository/DAC repository databases. For more information, see Section 4.3.4.2, "Install Database Connectivity Software".
On the machine that hosts Informatica PowerCenter Services, install a DAC Server by following the steps in this section.
You can install the DAC Server on Windows, UNIX, or Linux machines.
To install the DAC Server on Windows, see Section 4.11.2.1, "How to install a DAC Server on Windows".
To install the DAC Server on UNIX or Linux, see Section 4.11.2.2, "How to install a DAC Server on UNIX or Linux".
If you plan to run the DAC Server from the same machine that hosts the DAC Client, then no further steps are necessary to install of the DAC Server. Proceed to section Section 4.11.3, "Configuring the Connection Between the DAC Server and DAC Repository".
To install a DAC Server on a Windows machine that is different from the machine on which the DAC Client has been installed and configured, you can do either of the following:
If the target machine already has an Oracle Business Intelligence infrastructure installed (either with Oracle Business Intelligence Enterprise Edition or Oracle Business Intelligence Standard Edition One), you can run the Oracle Business Intelligence Applications installer on the target machine to install the DAC Server. For information about how to run the Oracle Business Intelligence Applications installer, see Section 4.4.1, "How to Run the Oracle Business Intelligence Applications Installer (Windows)").
(Recommended) You can install a DAC Server by copying across the \DAC\ directory from the Windows machine on which you installed and configured the DAC Client, as follows:
Copy the \OracleBI\DAC\ directory from the DAC Client machine to the target machine.
Note: The \DAC directory name on the target machine should not contain spaces.
Note:
If you have copied the DAC folder from the DAC Client machine and the DAC Client has been configured to use the Hibernate libraries, you do not have to install the Hibernate libraries again. Otherwise, install Hibernate files following instructions in described in step 2 of Section 4.8.1, "How to Install and Set Up the DAC Client".Copy the appropriate jdbc driver(s) to the \DAC\lib folder on the target machine. Follow instructions in described in step 3 of Section 4.8.1, "How to Install and Set Up the DAC Client".
Configure DAC config.bat file, as follows:
In the DAC directory, open the config.bat file.
Edit the JAVA_HOME variable to point to the directory where you installed the Java SDK.
Make sure there are no spaces in the path reference.
For example:
set JAVA_HOME=d:\jdk1.5
Edit the DAC_HOME variable to point to the directory where you installed the DAC.
For example:
set DAC_HOME=d:\OracleBI\DAC
Oracle does not provide an installer for Oracle Business Intelligence Applications on Unix or Linux. Therefore, to install a DAC Server on Unix or Linux, you copy the \DAC folder from the Windows machine on which the DAC Client is installed to a Unix or Linux machine, as described below.
To copy over the DAC Server to a Unix or Linux machine:
On the Windows machine on which the DAC Client is installed, create a temporary directory (for example, a directory named \OracleBI_UNIX\).
You will use this temporary directory to create a zip file for the Unix/Solaris or Linux deployment.
Copy the \DAC\ directory to the temporary directory (for example, \OracleBI_UNIX\.
From the \DAC\ directory in the temporary directory, remove the \export and \icons sub-folders.
Zip up the temporary directory (for example, \OracleBI_Solaris\).
Copy the ZIP file to the target Unix or Linux machine.
Note: If you use FTP to copy the zip file, use binary mode.
On the target UNIX or Linux machine, place the zip file in a directory where you want to install the DAC server.
On the target machine, unzip the zip file.
Shell scripts are provided in the /DAC directory. After copying these files to a UNIX or Linux machine and before using them, you might need to use a MS-DOS to UNIX conversion tool to convert the script files to UNIX format (that is, remove the carriage return and line feed characters). Alternatively, you can manually remove the carriage return and line feed characters from the script files. For more information, see Section A.6, "About the DAC Server Scripts for Bash and C Shells".
On the UNIX or Linux machine copy the appropriate jdbc driver(s) to the /DAC/lib directory as described below. You must copy all jdbc drivers for the database platforms that host source(s), Oracle Business Analytics Warehouse, and DAC repository databases:
Oracle. If you are using an Oracle database (other than 8.x), locate the directory where the Oracle client is installed on the machine. Copy the file named ojdbc14.jar in the jdbc/lib directory and paste it in the $DAC/lib folder, as described below.
Note: Do not copy the ojdbc14.jar file from a different machine.
If you are using Oracle 8.x, copy the file named classes12.zip and paste it in the $DAC/lib folder. Also, edit the ORACLELIB setting in the config.sh or config.csh file as follows:
setenv ORACLELIB=$DAC_Home/lib/classes12.zip
The config.sh and config.csh files are located in the /DAC/ directory.
DB2. If you are using a DB2 database, find the directory where the DB2 client is installed on the machine. In the Java sub-directory, copy the file named db2java.zip and paste it in the $DAC/lib folder.
Note: Do not copy the db2java.zip file from a different machine.
MSSQL. The DAC is configured for Microsoft SQL Server 2005 JDBC drivers. If you are using a Microsoft SQL Server database, then download the Microsoft SQL Server 2005 JDBC Driver file sqljdbc.jar and copy it to the /DAC/lib directory.
Note: You need the Microsoft SQL Server 2005 JDBC Driver 1.1 for SQL Server 2000 or SQL Server 2005.
You can use the Microsoft SQL Server 2000 JDBC Driver files if you edit the /DAC/conf/connection_templates.xml file and un-comment the section that starts <!-- THIS SECTION IS FOR SQL SERVER 2000. Comment this section while using SQL Server 2005.--> Download he SQL Server JDBC drivers for SQL Server 2000 from the Microsoft web site. Copy the Copy the files msbase.jar, mssqlserver.jar, and msutil.jar to the /DAC/lib folder.
Teradata. If you are using a Teradata database, copy the files tdgssconfig.jar, TdgssUserConfigFile.xml, terajdbc4.jar, log4j.jar, and tdgssjava.jar from the Teradata installation directory to the /DAC/lib directory. Depending on the Teradata JDBC version, you might not have some of the above files.
If required, edit the config.sh or config.csh file located in the /DAC directory to point to the correct version of the Java JDK by setting the JAVA_HOME environment variable.
You must configure the connection between the DAC Server and the DAC repository.
On Windows, you can use the DAC Client to configure a DAC Server that runs in the same \DAC folder. Optionally, or to configure a DAC Server installed in another folder or on another Windows machine, use the serverSetupPrompt.bat file to configure the repository connection.
On UNIX or Linux, use the serverSetupPrompt.sh or serverSetupPrompt.csh script to configure the connection between the DAC Server and the DAC repository, as follows:
To configure the DAC Server repository connection using the DAC Client, see Section 4.11.3.1, "How to Configure the DAC Server Repository Connection Using the DAC Client (Windows)".
To configure the DAC Server repository connection using the serverSetupPrompt scripts, see Section 4.11.3.2, "How to Configure the DAC Server Repository Connection Using serverSetupPrompt Scripts (Windows, UNIX or Linux)".
If the DAC Server is co-located with a configured DAC Client in the same \DAC folder, you can set the connection between the DAC Server and DAC repository using the DAC Client, as described below.
To configure the connection between the DAC server and the DAC repository using the DAC Client
In the DAC Client, choose Tools, then DAC Server Management, then DAC Server Setup.
For more information about logging into the DAC, see Section A.1, "How to Log Into the DAC Client").
Note: The DAC repository that you connect to using the DAC Client is the one that will store the DAC Server repository connection information that you will specify in this procedure.
A confirmation dialog asks you to confirm that you want to configure the DAC repository connection.
Click Yes to display the Server Configuration dialog.
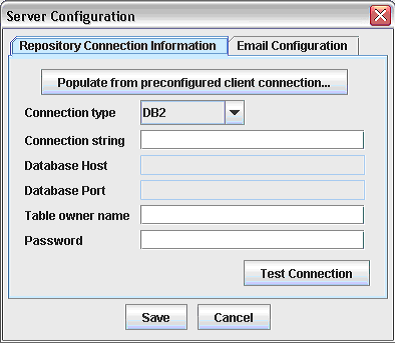
In the Repository Connection Information tab, enter the appropriate information, as described in the table below.
Tip:
If the DAC Server is running on the same machine as the DAC Client, click Populate from preconfigured client connection to populate the fields with connection details from the DAC Client.| Field | Description |
|---|---|
| Connection type | Select the type of database that you are using to store the DAC metadata repository. Depending on what type you select, the connection details below change (see Connection fields below). |
| Connection fields (for example, Instance, TNS Name, Connection string/Database name. | Specify connection details for the database that stores the DAC metadata repository.
|
| Table owner name | The database table name or instance (for example, DAC) that you created to store the DAC repository (for more information, see Section 4.3.4.1, "Create Databases"). |
| Password | The database or instance password (for example, DAC). |
Note:
The DAC repository details that you specify here must match the DAC repository details that you specified in the following tasks:- When you created a database to store the DAC repository (for more information, see Section 4.3.4.1, "Create Databases").
- When you created a DAC connection (for more information, see Section 4.8.3, "How to Create a DAC Connection").
Click Test Connection to make sure the DAC repository connection works.
Click Save.
Use the serverSetupPrompt.sh or serverSetupPrompt.csh file to configure the connection between the DAC Server and the DAC repository when the DAC Server is installed on UNIX or Linux, as described below. For more information on the DAC Server scripts, see Section A.6, "About the DAC Server Scripts for Bash and C Shells".
Use the serverSetupPrompt.bat file to configure the connection between the DAC Server and the DAC repository when the DAC Server is installed on Windows, as described below.
To configure the connection between the DAC Server and the DAC repository using the serverSetupPrompt files:
Run the serverSetupPrompt script, as follows:
On Windows, double-click the serverSetupPrompt.bat located in the \DAC directory.
On UNIX or Linux, run serverSetupPrompt.sh or serverSetupPrompt.csh located in the /DAC directory.
Enter 1 in the 'Please make your selection' prompt to enter repository connection information.
Enter the number for the type of database storing the DAC repository from the list of connection type choices.
Enter the connection information as described in the Connection Information table in section Section 4.11.3.1, "How to Configure the DAC Server Repository Connection Using the DAC Client (Windows)".
Enter 2 to test the DAC repository connection.
Enter 5 to save changes.
Enter 6 to exit.
The DAC Server uses the following command line programs to communicate with Informatica PowerCenter:
pmrep is used to communicate with PowerCenter Repository Services.
pmcmd is used to communicate with PowerCenter Integration Services.
The DAC Server uses the pmcmd program to run the Informatica workflows using PowerCenter Integration Services. The pmrep and pmcmd programs are installed during the PowerCenter Services installation in the bin folder of the server directory. Oracle recommends that you co-locate the PowerCenter Services with the DAC Server so that the pmrep and pmcmd programs are available on the machine for the DAC Server to use. To enable the DAC Server to communicate with Informatica PowerCenter Services using the pmrep and pmcmd programs, you need to define the path of the Informatica Domain file 'domains.infa', and set appropriate environment variables as follows:
If your DAC Server is installed on Windows, see Section 4.11.4.1, "How to Set Environment Variables on Windows".
If your DAC Server is installed on UNIX or Linux, see Section 4.11.4.2, "How to Set Environment Variables on UNIX or Linux".
To set the environment variables on Windows:
Locate the file domains.infa in the root Informatica PowerCenter installation directory and note down the directory path of this file.
For example, D:\Informatica\PowerCenter8.1.1.
Create an environment variable called INFA_DOMAINS_FILE with the value set to the directory path to the domans.infa file, as follows:
On Windows, display the Windows Environment Variables dialog (that is, from the Windows Control Panel, choose System, then Advanced, then Environment Variables), and create a System variable with the following values:
Variable name: INFA_DOMAINS_FILE
Variable value: <<directory path of domain file>\domains.infa>
The Variable value should include the domains.infa file name. For example, D:\Informatica\PowerCenter8.1.1\domains.infa.
Add the directory path to Informatica PowerCenter binaries to the PATH environment variable as follows:
In the Windows System Properties > Environment Variables dialog, add the path of the Informatica \server\bin directory to the PATH environment variable. For example: <drive>:\Informatica\PowerCenter8.1.1\server\bin.
Verifying that the DAC Server is able to use pmrep and pmcmd
From a Windows command prompt, execute pmrep and then pmcmd. The test is successful if the pmrep and pmcmd prompts appear.
If pmrep and pmcmd are not recognized, then:
Ensure Service Pack 4 has been applied to Informatica PowerCenter 8.1.1.
Verify that the INFA_DOMAINS_FILE variable points to the domains.infa file located in the Informatica directory.
Verify that the PATH variable includes the path to the Informatica binaries (\Informatica\PowerCenter\server\bin).
Use the dac_env.sh or dac_env.csh file to set the appropriate environment variables on a Unix or Linux machine. For more information on the DAC Server scripts, see Section A.6, "About the DAC Server Scripts for Bash and C Shells".
To set environment variables on a Unix or Linux machine:
Open the dac_env.sh file or dac_env.csh file for editing.
The files are located in the /DAC directory.
Locate the OS section for the operating system on which your DAC Server is installed.
Uncomment out the line to set the library path environment variable, and replace %DAC_PMCMD_PATH% with the path to the PowerCenter Services binaries.
For example, using the dac_env.sh file, if the DAC Server is on Solaris or Linux, in the SOLARIS\LINUX section, change the following line from:
#export LD_LIBRARY_PATH=${LD_LIBRARY_PATH}:%DAC_PMCMD_PATH%
To:
export LD_LIBRARY_PATH=${LD_LIBRARY_PATH}:/home/Informatica/PowerCenter8.1.1/server/bin
In the Common section for Informatica Configuration, set the environment variables for PATH, PM_HOME, INFA_DOMAINS_FILE as follows:
Replace %INFORMATICA_SERVER_LOCATION% with the path to Informatica PowerCenter Services installation.
Replace %DAC_PMCMD_PATH% with the path to Informatica PowerCenter Services binaries.
Replace %DOMAINS.INFA_FILE_LOCATION% with the path to the domains.infa file.
Include the name of the file. For example, /home/Informatica/PowerCenter8.1.1/domains.infa.
For example, using the dac_env.sh file, change the following lines in the common section from:
export PATH=${PATH}:%DAC_PMCMD_PATH%:%INFORMATICA_SERVER_LOCATION%:.
export PM_HOME=%INFORMATICA_SERVER_LOCATION%
export INFA_DOMAINS_FILE=%DOMAINS.INFA_FILE_LOCATION%
To:
export PATH=${PATH}:/home/Informatica/PowerCenter8.1.1/server/bin
export PM_HOME=/home/Informatica/PowerCenter8.1.1/server
export PM_HOME=/home/Informatica/PowerCenter8.1.1/server
export INFA_DOMAINS_FILE= /home/Informatica/PowerCenter8.1.1/domains.infa
#export LANG=C (uncomment if required)
#export LC_ALL=C (uncomment if required)
If required, edit the dac_env.sh file and change the source command from:
source ./dac_env.sh
To:
. ./dac_env.sh
Verifying that the DAC Server on a Unix or Linux machine is able to use pmrep and pmcmd
Invoke config.sh or config.csh to set environment. For example, . ./config.sh. Then, invoke pmcmd.
Make sure that invoking pmcmd starts the pmcmd shell. If you get a 'command not found' error, then the location of the PowerCenter Services is not properly added to PATH in dac_env.sh or dac_env.csh. Review all environment variable settings to ensure they are correctly set.
Then, invoke pmrep, and make sure that invoking pmrep starts the pmrep shell. If you get a 'command not found' error, then the location of the PowerCenter Services is not properly added to PATH in dac_env.sh or dac_env.csh. Review all environment variable settings to ensure they are correctly set.
On some shells, export commands in dac_env.sh and config.sh might not work correctly. In this case, try breaking the commands in two. For example, from:
export JAVA_HOME=/opt/java1.5
To:
JAVA_HOME=/opt/java1.5
export JAVA_HOME
To verify that the DAC Server on uses the correct Java JDK:
Invoke config.sh or config.csh to set environment.
For example:
. ./config.sh
Verify Java availability and version by typing the following command:
$JAVA –version
For example, the following information is returned:
java version "1.5.0_06"
Java(TM) 2 Runtime Environment, Standard Edition (build 1.5.0_06-b05)
Java HotSpot(TM) Server VM (build 1.5.0_06-b05, mixed mode)
If you receive a 'command not found' error message, or the Java version is lower than 1.5, then the JAVA_HOME parameter in config.sh or config.csh is pointing to a non-existent or incorrect Java JDK location.
On Windows, start the DAC Server by double-clicking the \DAC\startserver.bat script.
On UNIX or Linux, start the DAC Server by executing either startserver.sh or startserver.csh.
For more information on starting and stopping the DAC Server on Windows, UNIX or Linux, see Section A.2, "How to Start and Stop the DAC Server".
This section explains how to configure DAC settings, and contains the following topics:
You must start the DAC Server to complete certain steps in the procedures described below. For information on how to start the DAC Server, see Section A.2, "How to Start and Stop the DAC Server".
This section describes the DAC System Properties to set to ensure proper integration between the DAC Client, the DAC Server and Informatica.
To set DAC System Properties:
In the DAC Client, display the Setup view.
For more information about logging into the DAC, see Section A.1, "How to Log Into the DAC Client").
Display the DAC System Properties tab.
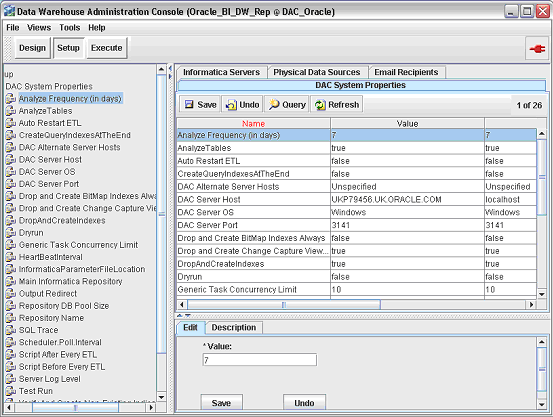
Set values for the following properties:
Note: For the full list of DAC System Properties and their descriptions, see Section A.7.1, "How to Set Up DAC System Properties".
This section explains how to register the Informatica PowerCenter Integration Services service and the Informatica PowerCenter Repository Service in the DAC Client.
When you register Informatica Services in the DAC Client, note the following:
You must register one or more Integration Services service in the DAC Client.
You must register one Repository Service in the DAC Client.
Tip:
For details of the PowerCenter Services that you need to register, log into the Informatica PowerCenter Administration Console (for more information, see Section A.3, "How to Log Into Informatica PowerCenter Administration Console").To register Informatica Services in the DAC Client:
In the DAC Client, display the Setup view, then display the Informatica Servers tab.
For more information about logging into the DAC, see Section A.1, "How to Log Into the DAC Client").
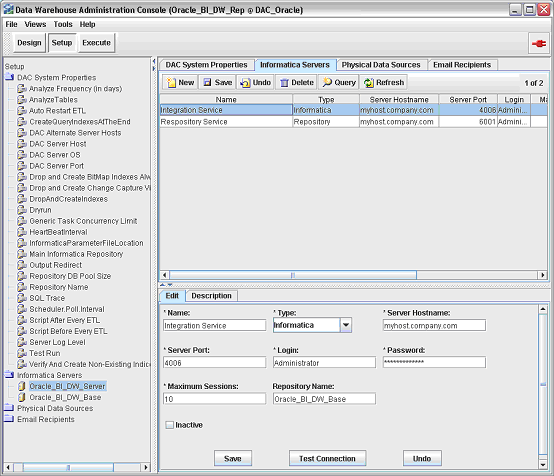
For the Informatica Integration Service that you want to register, do the following:
Register the Informatica Integration Services service, by modifying the record with Name = Oracle_BI_DW_Server and entering the following information in the Edit tab:
| Field | Enter |
|---|---|
| Name | Logical name for the Integration Service (for example, Integration_Service). |
| Type | Choose Informatica. |
| Server Hostname | Integration Service host name or IP address. For example, myhost.company.com. |
| Server Port | The port that the DAC uses to communicate with the Integration Services service (for example, 4006).
Specify the port number that you configure for the Integration Services service to listen on when setting the ServerPort custom property in Section 4.7.3, "Setting PowerCenter Integration Services Custom Properties". |
| Login | Informatica Repository user name who has appropriate privileges to execute workflows (for example, Administrator). |
| Password | Informatica Repository user password. |
| Maximum Sessions | Maximum number of workflows that can be executed in parallel on the Informatica PowerCenter Integration Services service. If the number of sessions is zero or is not specified, the DAC Server assigns the default value of 10. |
| Repository Name | Enter the name of the Oracle BI Applications repository that you restored in Section 4.6, "Restoring the Oracle Business Intelligence Pre-Built Repository". For example, Oracle_BI_DW_Base (or Oracle_BI_DW_Teradata for Teradata installations). |
| Inactive | Indicates whether the Informatica PowerCenter Integration Services service is active or inactive. |
If you want to test the connection, click Test Connection.
Note: Integration Services must be running (for more information about starting Integration Services, see Section A.4, "How to Start and Stop Informatica Services").
Click Save to save the details.
Register the Informatica Repository Service, by modifying the record with Name = Informatica_REP_Server and entering the following information:
| Field | Enter |
|---|---|
| Name | Logical name for the Repository Service (for example, Repository_Service). |
| Type | Choose Repository. |
| Server Hostname | Repository Service host name or IP address. |
| Server Port | Port where the Repository Service connects for requests. (The default port number is 6001.) |
| Login | Informatica Repository user name that has appropriate privileges to execute workflows (for example, Administrator). |
| Password | Informatica Repository user password (for example, Administrator). |
| Maximum Sessions | Maximum number of workflows that can be executed in parallel on the Informatica PowerCenter Integration Services service. If the number of sessions is zero or is not specified, the DAC Server assigns the default value of 10. |
Click Test Connection to make sure that the connection works.
Click Save to save the details.
Follow this procedure to specify the transactional and data warehouse data sources in the DAC.
To specify transactional and data warehouse data sources
In the DAC Client, display the Setup view.
For more information about logging into the DAC, see Section A.1, "How to Log Into the DAC Client").
Display the Physical Data Sources tab.
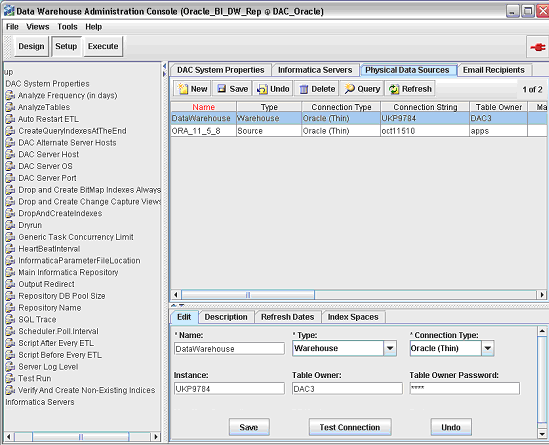
The Physical Data Sources tab displays a pre-created record for the data warehouse with name DataWarehouse, and one or more records for the OLTP sources. The records that are created by DAC for the OLTP sources depend on the business application source systems you selected when importing the DAC metadata (for more information, see Section 4.9, "Importing the DAC Metadata").
For each record, enter the following information in the Edit sub-tab:
| Field | Description |
|---|---|
| Name | Logical name for the OLAP or OLTP database connection. Do not change the default values. For example, you must specify DataWarehouse as the name of the OLAP data source.
Note: When you create an Execution Plan to perform an ETL, you need to use the OLAP and OLTP data source names that you specify here as the Parameter values for the Execution Plan parameters DBConnection_OLTP and DBConnection_OLAP. For more information about setting the Parameter values for an Execution Plan, see Oracle Business Intelligence Data Warehouse Administration Console Guide. |
| Type |
Do not change the default values. |
| Connection Type | Type of database. Possible values are:
Select the Type based on your database. |
| Instance or TNS Name or Connection String or Database Name (NOTE: The field name changes based on the Connection Type selection.) | Enter the value appropriate for your database.
For an Oracle database instance, enter the database SID (that is the SERVICE_NAME = value in the tnsnames.ora file in \network\admin\. For an Oracle TNS Name, enter the TNS entry name that is specified in the tnsnames.ora file in \network\admin\. |
| Table Owner | Valid database user. |
| Table Owner Password | Valid database user password. |
| Max Num Connections | Maximum number of database connections this connection pool can contain. |
| DB Host | Machine name or instance where the database resides. For example, databasename.us.company.com. |
| Port | Port number where the database listens (for example 1521 is the default for an Oracle database). |
| Priority | Number used to generate dependencies when designing execution plans. |
| Data Source Number | Unique number assigned to the data source category so that the data can be identified in the data warehouse. For example, the value '1' is used for Siebel data sources.
If you are editing a data source template for a data source type, Oracle recommends that you do not change the value that is set out-of-the-box. If you are specifying a data source without using a pre-defined template, you must use the correct value for that data source category. For example, if you specify an Oracle EBS R12 data source, you must specify the DATASOURCE_NUM_ID value '9'. For a complete list of supported data sources and DATASOURCE_NUM_ID values, see Section 7.1.2.1, "How to Configure Data Source Num IDs" This value is passed as a parameter to the Informatica workflows. If you are using multiple sources, each data source has a unique number. Typically, all source dependent extracts will use this parameter to populate the DATASOURCE_NUM_ID column, and the source independent workflows will carry these values to the final dimension and fact tables. |
| Default Index Space | (Oracle specific) Specifies the table space in which the DAC drops and creates indices against this database connection
To use the default table space, leave this field blank. |
Click Test Connection to make sure the connection works.
Click Save.
This section explains how to log into Informatica PowerCenter Workflow Manager and define relational connections, and contains the following topics:
Section 4.13.1, "How to Log Into Informatica PowerCenter Workflow Manager"
Section 4.13.2, "Configuring Relational Connections in Informatica PowerCenter Workflow Manager"
Note: Before you log into Workflow Manager, start the Informatica services (for more information, see Section A.4, "How to Start and Stop Informatica Services").
To log into Informatica Workflow Manager, do the following:
On the Informatica PowerCenter Client machine, start Informatica PowerCenter Workflow Manager.
Choose Repository, then Add, to display the Add Repository dialog.
At the Add Repository dialog, specify Oracle_BI_DW_Base (or the appropriate repository name) in the Repository field, and Administrator in the Username field, then click OK to save the details.
Choose Repository, then Connect, to display the Connect to Repository dialog.
Use the Password field to specify the Administrator password (for example, Administrator).
If the Connection Settings area is not displayed, click More.
Click Add (next to the Domain drop down list) to display the Add Domain dialog.
At the Add Domain Dialog, specify the name of the domain that was created when you installed Informatica PowerCenter Services (for example, Domain_<hostname>), and the fully qualified hostname for the gateway host (for example, mymachine@us.company.com) and port for the gateway port (for example, 6001).
Click OK to save the details and close the Add Domain dialog.
Click Connect.
To configure the relational connections, you need to do the following:
Use Informatica PowerCenter Workflow Manager to configure the relational connections, as follows:
For all databases, follow the steps in Section 4.13.2.1, "How to configure the relational connections".
Additionally, for Teradata databases, follow the steps in Section 4.13.2.2, "(Teradata specific) How to configure the Informatica Repository for Teradata external loader connections".
Note: The Informatica services must be running to perform these tasks. To start the Informatica services, see Section A.4, "How to Start and Stop Informatica Services".
Follow this procedure to configure relational connections:
In Informatica PowerCenter Workflow Manager, choose Connections, then Relational to display the Relational Connection Browser.
You need to create a connection for each transactional (OLTP) database, and a connection for the Oracle Business Analytics Warehouse (OLAP) database.
For each database connection that you need to create, do the following:
Click New to display the Select Subtype dialog, select the appropriate database type (for example, Oracle), then click OK.
Click New to display the Connection Object Definition dialog, and enter the details.
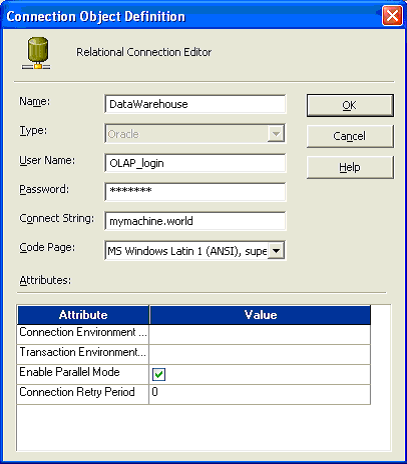
Click OK to save the details.
Notes:
If the target database is Oracle, DB2, or Teradata, use the settings as follows:
Click New and select the type as Oracle, DB2, then click OK.
Name: DataWarehouse, for connection to the Oracle Business Analytics Warehouse.
You must specify 'DataWarehouse' exactly as it appears in the Physical Data Sources tab in the DAC Setup View. For the connection to the OLTP, specify the name exactly as it appears in the Physical Data Sources tab in the DAC Setup View. For example, if your source system is Siebel ver 7.8.x then you name this connection as SEBL_78. For more information, see Section 4.12.3, "How to Set Physical Data Sources".
User Name: Database user name.
Password: Database user password.
Connect string: Connect string for the database (refer to the Informatica Help for information about specifying this value).
Code Page: Code page compatible with the code page of the database client. If NLS_LANG (for Oracle database) or DB2CODPAGE (for DB2 database) has been set, then the Code Page value should be a code page compatible with the language set by these variables. For more information, see Section 4.3.3, "Code Page and Data Movement Requirements".
If the target database is SQL Server, use the settings as follows:
Click New and select the type as ODBC, then click OK.
Name: DataWarehouse, for the connection to the Oracle Business Analytics Warehouse. You must specify 'DataWarehouse' exactly as it appears in the Physical Data Sources tab in the DAC Setup View.For the connection to the OLTP, specify the name exactly as it appears in the Physical Data Sources tab in the DAC Setup View. (For example, if your source system is Siebel ver 7.8.x then you name this connection as SEBL_78). For more information, see Section 4.12.3, "How to Set Physical Data Sources".
User Name: Database user name.
Password: Database password.
Connect string: Connect string for the connecting to the database (refer to the Informatica Help for information about specifying this value).
Code Page: Code page compatible with the code page of the database client.
Click Close to close the Relational Connection Browser.
Follow this procedure to configure the Informatica repository in Informatica PowerCenter Workflow Manager for Teradata external loader connections.
In Informatica PowerCenter Workflow Manager, choose Connections, then Loader to display the Loader Connection Browser.
In the Objects dialog, select Teradata_Tpump_Upsert, and then click Edit.
Edit the User Name, Password, TDPID, Database Name, and other attributes as necessary.
Repeat these steps for the following objects:
Teradata_Tpump_Update
Teradata_Tpump_Insert
Teradata_Tpump_Delete
Teradata_FastLoad
For Unicode environments, append -c UTF8 to the value for the External Loader Executable attribute for each external loader.
For example:
fastload -c UTF8
tpump -c UTF8
Click Close to close the Loader Connection Browser.
If your source to target data movement configuration is Unicode to Unicode, you need to create a custom property called SiebelUnicodeDB on Integration Services. If your source to target data movement configuration is either Code Page to Code Page or Code Page to Unicode, you do not need to create this property. For more information on supported source to target configuration modes, and how to determine the source to target configuration for your environment, seeSection 4.3.3, "Code Page and Data Movement Requirements".
To create and set the SiebelUnicodeDB custom property on Integration Services:
Log in to Informatica PowerCenter Administration Console. For information on how to log into PowerCenter Administration Console, see Section A.3, "How to Log Into Informatica PowerCenter Administration Console".
Select the Integration Service.
In the Properties tab, scroll down to the Custom Properties area, and click Edit.
In the Name field, enter the following:
SiebelUnicodeDB
In the Value field, enter the following:
[user_OLTP]@[connectString_OLTP] [user_OLAP]@[ConnectString_OLAP]
Where:
[user_OLTP] is the database user for the OLTP source database. It must match exactly the value you entered for the User Name field when creating the relational connection for the OLTP in Informatica Workflow Manager.
[ConnectString_OLTP] is the connect string for the OLTP. It must match exactly the value you entered for the Connect String field when creating the relational connection for the OLTP in Informatica Workflow Manager.
[user_OLAP] is the database user for the Oracle Business Analytics Warehouse database. It must match exactly the value you entered for the User Name field when creating the relational connection for the data warehouse in Informatica Workflow Manager.
[ConnectString_OLAP] is the connect string for the data warehouse. It must match exactly the value you entered for the Connect String field when creating the relational connection for the data warehouse in Informatica Workflow Manager.
Note: Always leave a space between the strings for OLTP and OLAP. You must enter the user names and connection strings in the same case as you used for the relational connections in Informatica Workflow Manager.
For more information about Relational Connections, see Section 4.13.2, "Configuring Relational Connections in Informatica PowerCenter Workflow Manager".
This section provides configuration steps that are needed to complete configuration of the Oracle BI Applications environment. Not all the sections may be applicable for your environment. Complete the tasks based on your environment and requirements.
Section 4.15.2, "How to Set Up the HOSTS File for Teradata Installations on Windows"
Section 4.15.3, "How to Update Siebel Transactional Database Schema Definitions"
Section 4.15.4, "How to Create Stored Procedures for DB2-UDB"
Section 4.15.5, "Teradata-Specific Installation and Configuration Checklist"
Section 4.15.6, "How to Configure Email Recipients in the DAC Client"
Section 4.15.8, "How to Back Up and Restore the Informatica Repository (Optional)"
Section 4.15.10, "Migrating Seed Data from a Siebel Source System to the Oracle BI Repository"
If you have a Unicode environment on a Teradata database, you need to set the code page file property of sessions that use the Teradata external loaders to use the code page UTF8. You need to follow this procedure to set the code page file property for each session that uses a Teradata external loader.
To set the code page file property for a Unicode environment on a Teradata database
In Informatica PowerCenter Workflow Manager, drag a Workflow into the Workflow Designer pane.
In the Workflow Designer pane, double click the Task (for example, SDE_PSFT_APTermsDimension) to display the Edit Tasks dialog.
Display the Mappings tab
Select Target in the left pane. In the Properties section, click on the Set File link.
In the Flat Files - Targets dialog, in the File Properties area, click Advanced.
In the Fixed Width Properties - Targets dialog, in the Code Page area, select UTF-8 encoding of Unicode.
If you are using a Teradata database, you need to set the TDPID parameter on the machine where the Informatica PowerCenter Integration Services service is installed by adding an entry in the HOSTS file.
To set up the HOSTS file for Teradata installations
On the machine where the Informatica PowerCenter Integration Services service is installed, go to the \<SystemRoot>\system32\drivers\etc directory and open the HOSTS file.
In the HOSTS file, enter a line in the following format:
<IP address of remote server> <remote server> <remote server>COP<n>
For example:
172.20.176.208 tdatsvr tdatsvrCOP1
where tdatsvrCOP1 is the alias for the remote server. The alias must begin with an alphabetic string and end with the COP n suffix, where n is a number between 1 and the total number of applications processors that are associated with the Teradata communications processor.
Save the HOSTS file.
For more information about setting the TDPID parameter, see the Teradata documentation.
Note:
You must perform the following steps for each Siebel source database type.This section explains how to update Transactional Database Schema Definitions, and contains the following sections:
Section 4.15.3.1, "How to Run the DDLIMP Tool From The Command Line"
Section 4.15.3.2, "How to Apply Siebel (CRM) Schema Changes For Oracle, DB2/UDB, MSSQL"
Section 4.15.3.3, "How to Apply CRM Schema Changes For DB2 on 390 or z/os"
Section 4.15.3.4, "How to Verify the Siebel (CRM) Schema Changes"
When you use the DDLIMP utility from a command line to update schema definitions, refer to the following notes:
To run DDLIMP from command line, run the following command:
\OracleBI\dwrep\bin\DDLIMP /U <USER> /P <PASSWORD> /C <ODBC_DSN> /GSSE_ROLE /F <..\OracleBI\dwrep\DDL_OLTP.CTL> /L <..\oracleBI\dwrep\DDL_OLTP.log>
NOTE: Where <ODBC_DSN> is the ODBC connection created as described in section Section 4.3.4.3, "Create ODBC Database Connections".
\OracleBI\dwrep\bin\DDLIMP /U <USER> /P <PASSWORD> /C <ODBC_DSN> /GSSE_ROLE /W Y /Z Y /F <..\OracleBI\dwrep\DDL_OLTP.CTL> /L<..\oracleBI\dwrep\DDL_OLTP.log>
Additionally you can use the following commands:
/W Y (if the OLTP database is Unicode).
/Z Y (if the OTTP database is DB2 and Unicode).
/B <TABLE_SPACE_NAME> if you want to create these table in a separate table space.
/X <INDEX_TABLE_SPACE_NAME> if you want to create the indexes in a separate table space.
/Y Storage File for DB2/390.
To enable change capture for Oracle's Siebel adapters, you use the ddlimp control file to apply Siebel (CRM) schema changes, which updates the required image tables in the OLTP.
Note:
Using the ddlimp control file to apply schema changes replaces the use of SIF files in Siebel Tools in previous product releases.How to Apply Oracle's CRM Schema Changes For Oracle, DB2/UDB, MSSQL
On the machine where Oracle Business Intelligence Applications is installed, run the following command:
..\OracleBI\dwrep\bin\DDLIMP /U <USER> /P <PASSWORD> /C <ODBC connect string> /G SSE_ROLE /F <..\OracleBI\dwrep\DDL_OLTP.CTL> /L <..\oracleBI\dwrep\DDL_OLTP.log>
Note:
If you are applying schema changes to a Siebel CRM Version 6.3, specify DDL_OLTP_63.CTL as the /F parameter instead of DDL_OLTP.CTL.For example:
DDLIMP /U SADMIN /P SADMIN /C SIEBEL_OLTP /G SSE_ROLE /F <DRIVE>:\OracleBI\dwrep\DDL_OLTP.CTL /L <DRIVE>:\OracleBI\dwrep\DDL_OLTP.log
Notes:
/P <PASSWORD> - The password for Oracle's CRM OLTP.
/C <ODBC connect string> - The name of the ODBC connect string.
For Oracle databases, use the Oracle Merant ODBC Drivers (installed with Oracle Business Intelligence Applications).
In addition, you can use the following commands:
/W Y - (if the OLTP database is Unicode).
/Z Y - (if the OLTP database is DB2 and Unicode or the OLTP database is MS SQL Server and Unicode).
/B <TABLE_SPACE_NAME> - If you want to create these table in a separate table space.
/X <INDEX_TABLE_SPACE_NAME> - If you want to create the indexes in a separate table. space.
/Y - Storage File for DB2/390.
Restart all servers.
How to apply CRM schema changes for DB2 on 390 or z/os
Edit the following parameters in the Storage control files located in \OracleBI\dwrep\Storeage_DDL_OLTP.CTL:
%1 - Replace with a 2 character database name.
%indBufPool - Replace it with a index buffer pool name.
%4kBulfPool - Replace it with a 4k TBS buffer pool name.
%32kBufPool - Replace it with a 32K TBS Buffer Pool name.
On the machine where Oracle Business Intelligence Applications is installed, run the following command:
..\OracleBI\dwrep\bin\DDLIMP /U <USER> /P <PASSWORD> /C <ODBC_CSN> >>> /G SSE_ROLE /F \OracleBI\dwrep\DDL_OLTP_DB2390.CTL> /L <..\oracleBI\dwrep\DDL_OLTP.log> /5 Y /A <SCHEMA_OWNER> /Y ..\OracleBI\dwrep\Storeage_DDL_OLTP.CTL
Notes:
/P <PASSWORD> - The password for Oracle's CRM OLTP.
/C <ODBC connect string> - The name of the ODBC connect string.
For Oracle databases, use the Oracle Merant ODBC Drivers.
In addition, you can use the following commands:
/W Y - (if the OLTP database is Unicode).
/Z Y - (if the OLTP database is DB2 and Unicode or the OLTP database is MS SQL Server and Unicode).
/B <TABLE_SPACE_NAME> - If you want to create these table in a separate table space.
/X <INDEX_TABLE_SPACE_NAME> - If you want to create the indexes in a separate table. space.
/Y - Storage File for DB2/390.
To create indices for the tables created, run the following SQL Script from the DB2 command line utility connected to your OLTP Schema:
\OracleBI\Dwrep\Create_OLTP_Db2390_index.sql
After applying Siebel (CRM) schema changes, you need to verify that appropriate tables were created in the transactional database.
To verify Siebel (CRM) schema changes
For Oracle's Siebel Business Applications, make sure that the following tables were created in the transactional database:
S_ETL_R_IMG_1 through S_ETL_R_IMG_166
S_ETL_I_IMG_1 through S_ETL_D_IMG_166
S_ETL_D_IMG_1 through S_ETL_D_IMG_166
S_ETL_PARAM
S_ETL_PRD_ATTR
S_ETL_PRD_REL
Note:
Delete triggers are only used supported with Siebel CRM database.Delete records in Siebel CRM sources are not propagated to the Data Warehouse tables. However the mechanism to identify the delete records is provided, as follows:
The DAC can create delete triggers on source tables (please refer to Oracle Business Intelligence Data Warehouse Administration Console User Guide. These triggers write the primary keys of deleted records with the flag D in the corresponding S_ETL_I_IMG table. You need to write a custom SDE extract to pull these deleted primary keys from the image table and take corresponding action on the Datawarehouse table.
The DAC uses siebstat and siebtrun stored procedures when running ETL processes. Typically, these stored procedures are available in your transactional database; they might not be available on the data warehouse database.
If you need to install the DB2 stored procedures manually, they are located in the installation directory \OracleBI\dwrep\siebproc\db2udb\. There is a sub-directory for each platform. For example, stored procedures for the Windows platform are stored in the sub-directory \OracleBI\dwrep\siebproc\db2udb\win32\.
Each platform-specific directory contains the following sub-directories:
\siebproc\ (containing stored procedures for a 32-bit DB2 environment)
\siebproc64\ (containing stored procedures for a 64-bit DB2 environment)
These directories also contain the files siebproc.sql and sqlproc.ksh, which are used to create the function. For more information, see Section 4.15.4.2, "How to Create DB2 stored procedures").
This section describes how to verify the existence of stored procedures.
To verify the existence of these procedures, follow the steps below.
From a DB2 command prompt or control center, issue the following SQL scripts:
db2 => create table test_siebproc(id int);
DB20000I  The SQL command completed successfully.

db2 => insert into test_siebproc(id) values (1);
DB20000I  The SQL command completed successfully.

db2 => call siebtrun('TEST_SIEBPROC');
SQL0805N  Package "NULLID.SYSSH200" was not found.  SQLSTATE=51002
Note:
If you get an error message, you do not have the required stored procedures.Creating stored procedures must be performed by the database administrator (for more information, see Section 4.15.4.2, "How to Create DB2 stored procedures").
This section describes how to create DB2 stored procedures.
To create DB2 stored procedures
Copy the DB2 stored procedure directory (i.e. \siebproc\ or \siebproc64\) from the appropriate platform-specific directory to a directory on the DB2 server side.
For example, for a 32-bit DB2 environment on a Windows platform, you might copy the directory \OracleBI\dwrep\siebproc\db2udb\win32\siebproc\ to the directory d:\Program Files\SQLLIB\function\ on the DB2 server side.
Note:
For more information about the location of DB2 stored procedures, see Section 4.15.4, "How to Create Stored Procedures for DB2-UDB").If you copied stored procedures for a 64-bit DB2 environment, on the DB2 server side, rename the \siebproc64\ directory to \siebproc\.
For example, if you copied stored procedures to d:\Program Files\SQLLIB\function\siebproc64\, rename this directory to d:\Program Files\SQLLIB\function\siebproc\.
Once these procedures are created, you can verify that they exist. After the test is complete, you can drop the table TEST_SIEBPROC.
Table 4-4 provides a list of Teradata-specific installation and configuration steps that are performed during the Oracle Business Intelligence Applications installation and configuration process. You should review this list to make sure that you have performed all of the required Teradata-specific steps.
Table 4-4 Teradata-Specific Installation Checklist for Windows
| Action | Link to Topic |
|---|---|
|
Review Teradata-specific database guidelines. |
Section 3.7, "Teradata-Specific Database Guidelines for Oracle Business Analytics Warehouse". |
|
Create or drop data warehouse tables. |
Section 4.10.2, "How to Create Data Warehouse Tables on a Teradata Database". |
|
Create or restore the Informatica repository using the Informatica Repository Manager. You cannot create or restore the Informatica repository using the DAC. |
Section 4.6, "Restoring the Oracle Business Intelligence Pre-Built Repository". |
|
Configure the source and data warehouse database relational connections in Informatica PowerCenter Workflow Manager. You cannot use the DAC's Data Warehouse Configurator to configure relational connections. |
Section 3.7, "Teradata-Specific Database Guidelines for Oracle Business Analytics Warehouse". |
|
Set the Code Page File Property for Unicode Environments. |
|
|
Set up the HOSTS file. |
Section 4.15.2, "How to Set Up the HOSTS File for Teradata Installations on Windows". |
Follow this procedure to configure email recipients.
To configure email recipients in the DAC client
In the DAC Client, display the Setup view.
For more information about logging into the DAC, see Section A.1, "How to Log Into the DAC Client").
Display the Email Recipients tab.
Click New.
In the Edit tab below, enter the following information:
| Field | Description |
|---|---|
| Name | Logical name of the user to be notified. |
| Email Address | Email address where the notification is sent. |
| Notification Level | The notification levels are as follows:
|
| Inactive | Indicates whether the selected email activation is active or inactive. |
| Needs Authentication | Read only value that specifies whether the corporate email server requires authentication (this value is set by choosing Tools, then DAC Server Setup). |
Follow this procedure to configure the email administrator account In the DAC Client, which enables the recipient to receive ETL status updates automatically. For example, the data warehousing administrator might want to be informed when an ETL routine has completed.
The DAC server has a built-in login-authentication based email (SMTP) client, which connects to any SMTP login-authenticating server.
Note:
For the email functionality to work, you must be using an SMTP server in which the SMTP authentication mode LOGIN is enabled. For example, if you are using Microsoft Exchange Server, you must enable the SMTP module and enable authentication in the Basic Mode. The SMTP server outbound email authentication must be turned on for the DAC server to be able to send email notifications.To configure the email administrator account in the DAC Server
In the DAC Client, choose Tools, then DAC Server Management, then DAC Server Setup.
For more information about logging into the DAC, see Section A.1, "How to Log Into the DAC Client".
A confirmation dialog asks you to confirm that you want to configure the DAC repository connection.
Click Yes.
The Server Configuration dialog appears.
Display the Email Configuration tab, and enter the email details for the email address to which you want to send DAC server information emails.
Click Save.
Once the configuration has been completed, you can start the DAC Server.
To stop and start the Informatica repository
In Informatica PowerCenter Administration Console, in the Domain tab, select the Repository Service (for example, Oracle_BI_DW_Base).
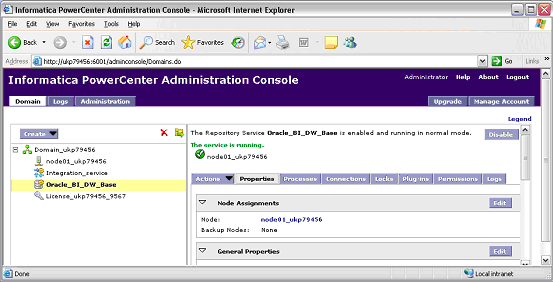
Do one of the following:
To back up the Informatica Repository, choose Actions, then Back Up Contents.
To restore the Informatica Repository, choose Actions, then Restore Contents. For detailed information on procedures to Back up and restore repositories, refer to the Informatica Repository Guide.
You set Source System Parameters (also known as DAC ETL Preferences) in the DAC to specify how the ETL routines process data for a container. For example, if operating in the United States, you might set the $$DLFT_COUNTRY to 'USA' to identify your data.
Note:
The following preferences are applied to all tasks within a container. If extracting data from more than one source, these preferences will need to be re-applied to each associated container. They can be overridden at the task level by adding the parameter to the specific task and assigning a value there.To set DAC source system parameters
In the DAC Client, display the Design view.
For more information about logging into the DAC, see Section A.1, "How to Log Into the DAC Client").
Make sure that you have selected the correct container from the containers drop down list. You cannot edit out-of-the box containers. Make a copy of an existing container in order to make edits.
Display the Source System Parameters tab.
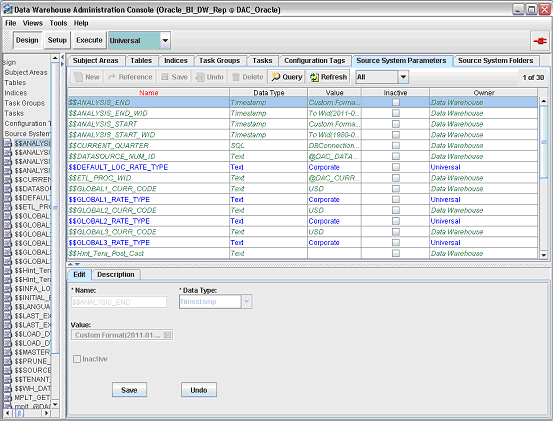
Note:
For information about recommended settings for specific databases, see Chapter 3, "Pre-installation and Predeployment Requirements for Oracle Business Intelligence Applications".Use the Edit tab below the list of Source System Parameters to change the value of parameters in the list.
Click Save.
This section describes how to move localized string content from the S_MSG table in a Siebel OLTP database to the W_LOCALIZED_STRING_G table in the Business Analytics Warehouse database. Use the following steps:
Export the customized localization data in the S_MSG table using the DATAEXP command from a command prompt, as shown in the following sample text:
DATAEXP /U <Username for OLTP read access> /P <Password> /C <Siebel_OLTP odbc> /D <Table Owner> /F CUSTSTRINGS.DATA /W Y /L <EXPCUST.LOG>
Respond to the prompts as follows:
When you are prompted for the TABLE_NAME to export, enter S_MSG and press ENTER.
When you are prompted for the WHERE CLAUSE for filtering records from the table, enter WHERE LAST_UPD > '1/1/1980' and press ENTER twice.
A message is displayed that indicates the number of rows that were exported. Press ENTER to enter the Database Table Name and to end the process.
Import the data into the W_LOCALIZED_STRING_G table using the data file that you generated in the previous step.
Use the /R 1000000 argument in the DATAIMP command to insert the customized strings beyond Row Id 1000000.
Import the localization data into the W_LOCALIZED_STRING_G table.
After you have installed and configured Oracle Business Intelligence Applications, your Oracle Business Analytics Warehouse (OLAP) database is empty. You need to perform a full load ETL to populate your Oracle Business Analytics Warehouse.
The ETL processes for Oracle Business Intelligence Applications are created and managed in the DAC. For detailed information about running ETLs In the DAC Client, see Oracle Business Intelligence Data Warehouse Administration Console Guide.
For an example of using the DAC to run a Full Load ETL, see Section 4.16.1, "An Example of Running a Full Load ETL".
This section uses an example to show you how to get started quickly with running a full load ETL. In this example, you have installed Oracle Financial Analytics with an Oracle EBS OLTP data source, and you want to load OLTP data for the subject area Receivables, as follows:
In the DAC Client, choose File, then New Source System Container, to display the New Source System Container dialog, and specify details of the new container.
For more information about logging into the DAC, see Section A.1, "How to Log Into the DAC Client").
Select the Create as a Copy of Existing Container radio button, and select the appropriate container (for example, Oracle 11.5.10) from the Existing Containers drop down list, then click OK.
In the Design view, display the Source System Parameters tab and set the parameters appropriately.
In the Setup view, display the DAC System Parameters tab and set the properties appropriately.
Display the Execute view, and display the Execution Plan tab.
Click New, display the Edit tab, and use the Name field to specify a name for the ETL process.
Display the Subject Areas tab and click Add/Remove to display the Choose Subject Areas dialog.
Select the new container that you created in step 4 from the container drop down list at the top of the Choose Subject Areas dialog.
Select Financials - Receivables, click Add, then click OK.
Display the Parameters tab, and click Generate.
On the Parameters tab, edit the parameters as follows:
Edit the value of DBConnection_OLAP and set it to the same value as the name of the OLAP database that you specified in the Physical Data Source dialog (for example, DataWarehouse).
Edit the value of DBConnection_OLTP and set it to the same value as the name of the OLTP database that you specified in the Physical Data Source dialog (for example, ORA_11_5_8).
If there is a FlatFileConnection parameter, edit the value of FlatFileConnection and set it to the same value as the name of the flat file data source that is specified in the Physical Data Source dialog (for example, ORA_11_5_8_Flatfile).
On the Execution Plans tab, click Build.
On the Execution Plans tab, click Run Now.
The DAC will perform a full load for Financials - Receivables.
Use the Current Run tab to check the status of the ETL run.
If the ETL run was successful, you will see 'Success' in the Run Status field, and the End Timestamp value will be set to the time and date when the ETL was completed.
If the ETL run fails, use the information in the Description tab and the Audit Trail tab to diagnose the error that caused the failure.
Tip:
If an ETL run fails, you cannot re-run the ETL until the failed ETL has been cleared from the Current Run tab. To clear an ETL from the Current Run tab, right click on the ETL and select Mark As Completed.