 Understanding the Online Application for Admission
This chapter describes the two sample Online Application for Admission dialogs included with the Online Marketing to Student Administration integration. It includes the following sections:
Understanding the Online Application for Admission.
Dialog Flow.
Broadcast Email Document.
User Authentication.
Audience Definition.
Web Documents.
Confirmation Email.
Banner Ad Response.
Moving Data from CRM to Student Administration.
Making Changes to the Online Application
Understanding the Online Application for AdmissionThe Online Application for Admission provides a self-service channel in which prospective students can apply for admission to the academic institution by completing an online application.
Prospective students access the online application for admission either by clicking a link in a broadcast email message or by clicking an online banner ad. The institution can also choose to have the student provide a user name and password before being allowed access to the application. If the student is contacted via a broadcast email message, he or she has the option of “opting out” of the dialog and not receiving further email communication from the institution.
The Online Application for Admission is delivered as an example of how Online Marketing dialogs can be used for this purpose. Because the example Online Application might not meet your school-specific requirements, you should always clone it and customize it to fit your needs.
Two sample Online Applications are included in the Marketing to Student Administration integration:
Great Lakes University undergraduate application (CS_GLAKE_UGRD_APP).
PS University School of Law application (CS_PSUNV_LAW_APP).
The Great Lakes application includes “attractive” web pages and many inputted items, and requires the user to log in before completing it. The PS University School of Law application includes simpler web pages and does not require login.
Both sample online applications use the business unit EGUBU.
Note. The illustrations in this chapter show the Online Application customized to use the logo and graphical style of Great Lakes University. Images of email messages and web pages show the Preview version of the document—the preview tags in curly braces ({}) represent content that will be merged when the document is Live.
Dialog FlowThe following illustration shows the flow of the Online Application for Admission:
Broadcast Email DocumentThe broadcast email document invites the prospect to apply for admission. Prospects can click a link to proceed, or click another link to opt out of future mailings.
The Apply for Admission link takes the prospect to the Application Welcome and Instructions page.
The Opt Out link takes the prospect to the Opt Out dialog.
See Designing Email Documents.
User AuthenticationOnline dialogs can be either authenticated (login required) or non-authenticated (no login required). In the included sample application dialogs, the Great Lakes University dialog is authenticated and the PeopleSoft University School of Law dialog is non-authenticated.
In the Great Lakes University example, before an applicant can access the authenticated Online Application, he or she must log in with a user name and password. When the applicant clicks on the link in the invitation email, the Login screen is displayed. If the applicant already has a user ID and password, he or she can enter it; otherwise, the Create an Account link allows the creation of a new login.
After the applicant is authenticated, he or she is taken to the Welcome page.
Note. An institution can choose to display the Welcome page before the login page, as opposed to following it as shown in the sample dialog. To do this, you must create a separate dialog with the Welcome page and then include a cross-dialog link to bring applicants from the Welcome page to the login page.
Note. You can customize the Login page using Set Up CRM, Product Related, Online Marketing, Global Options, Dialog Login Page, but the default appearance is as shown. Note also that the Login page is a system page, so any changes you make to it will be reflected in all dialogs that require authentication.
See Also
 Non-Authenticated Dialogs
In a dialog that does not use authentication (users do not need to log in), applicants are added as new individuals by means of an Update Profile activity included in the dialog flow rather than by using their login information. Clicking on the link in the email takes the applicant directly to the first page of the application process.
Because the Online Applications use solely custom profile fields (not basic profile fields), the Update Profile action updates the CDM data in the basic profiles with the applicant's entered Last Name and Email Address. The rest of the applicant's data (address, phone number, and so forth) is not saved in the CDM core details at this time, but when the data is transferred back to the CRM database from the Student Administration system, it will be populated into the CRM core data fields at that point.
Note. An alternative approach to saving contact information is to include the minimum required fields Last Name and Email Address from the Individual Basics profile in the Personal Information page: however, the custom profile fields should still be updated with that information since that is the data being sent to the Student Administration system.
Authentication and Email Addresses
The values of the Email Address and Alternative Email Address fields are dependent on the context of the dialog's marketing role. If the dialog is targeted for Consumers, then the Email Address is assumed to be the Home Email Address, and the Alternative Email Address is the Business Email Address. If the dialog is targeted toward Contacts, then the Email Address is assumed to be the Business Email Address and the Alternative Email Address is the Home Email Address. This can cause confusion with authenticated dialogs if a new role is added to an existing individual. If the role types are different, the user might see that the email addresses are changed from their values when they were previously entered, due to the role mapping.
Audience DefinitionThe audiences for the Online Application for admission are named CS_GLAKE_UGRD_APPL (for Great Lakes University) and CS_PSUNV_LAW_APPL (for PeopleSoft University School of Law) and consist of people who meet the following criteria:
Have never received the broadcast email.
Have “Do Not Email” set to “N” or empty.
Have a valid email address (Email Address is not empty).
Are not deceased (Deceased flag is “N” or empty).
Are prospects, not applicants.
Have selected Institution “X” and Career “Y”.
Admit Term is 1047 (starting in Fall of 2004).
The sample audiences have a SetID of PSUSI.
The audience content is also limited based on the user’s security profile. This is discussed in the chapter describing data integration.
See Data Integration.
Web DocumentsThis section describes the web documents included as part of the Online Application for Admission. These include:
Welcome page.
Personal Information page.
Parental and Emergency Contact Information page.
Employment History page.
Educational Background page.
Admission Term and Program page.
Honors/Awards and Extracurricular Activities page.
Academic Documents page.
Thank You page.
The application is built at the Institution/Career level. Each application must be assigned to an Application Center, allowing you to control who can view applicants for each institution/career. The application contains three hidden fields: Application Center, Institution, and Career. By default these values are set to PSUNV for PeopleSoft University School of Law and GLAKE for Great Lakes University. When you clone the dialog to customize it for your needs, you can set these values as needed.
See Also
PeopleSoft 8 SP1 Application Fundamentals for Student Administration and Contributor Relations Solutions PeopleBook, “Securing Recruiting and Admissions”
Welcome PageThis page introduces the applicant to the online application process and describes the information needed to complete the application.
Note. The applicant does not need to complete the application in one session; the system saves the applicant's progress so he or she can resume later. Previous answers are pre-filled, and the applicant can click the Next button to reach the stopping point.
Clicking the Begin Application button takes the applicant to the Personal Information page.
Personal Information PageThis page is where the applicant provides basic personal data: name, address, contact information, citizenship status, and so forth.
Clicking the Save and Continue button saves the progress and takes the applicant to the Parental and Emergency Contact page.
Parental and Emergency Contact Information PageThe Parental and Emergency Contact Information page is where the applicant enters information about his or her parents, along with a person to contact in case of emergency.
Clicking the Save and Continue button saves the progress and takes the applicant to the Employment History page.
Employment History PageThe Employment History page is where the applicant provides information about his or her most recent job(s).
Clicking the Save and Continue button saves the progress and takes the applicant to the Educational Background page.
Educational Background PageThe Educational Background page is where the applicant provides information about previous high school and post-secondary education. The applicant can use the School Search tool to locate the ID number for an institution or, if the ID is not in the system, enter the name manually.
The School Search Tool invokes a Student Administration search page that allows you to search for schools. You can search by country, state, and city. After the school is found, you must copy the organization ID from the lookup page to the appropriate fields on the page. If a school cannot be found, you can complete the High School ID Not Found section of the page.
Clicking the Save and Continue button saves the progress and takes the applicant to the Admission Term and Program page.
Admission Term and Program PageThe Admission Term and Program page is where the applicant supplies information about the term, program, and plan for which he or she is applying.
Clicking the Save and Continue button saves the progress and takes the applicant to the Honors/Awards and Extracurricular Activities page.
Honors/Awards and Extracurricular Activities PageThe Honors/Awards and Extracurricular Activities page is where the applicant provides information about honors and awards he or she has received, along with any extracurricular activities in which he or she participated.
Clicking the Save and Continue button saves the progress and takes the applicant to the Academic Documents page.
Academic Documents PageThe Academic Documents page allows the applicant to include an essay and also to upload documents relative to the application (such as a letter of recommendation).
Note. You can only upload one file to the File field; if you upload another file, the first one is overwritten. If it is necessary for the applicant to include more than one file, you will need to customize this page and add more File fields.
Clicking the Save and Continue button saves the progress and takes the applicant to the Submit Application page.
Submit Application PageAfter you have completed all the forms in the application, you can submit it. Submission populates a message to pass the user entries to EDI TS189 Staging, CRM File Attachment and CRM Long Text tables in Student Administration.
To submit the application, select Yes and click the Continue button to submit the application. The applicant can also click the web link to return to the Welcome page and review or change the information he or she has entered before submitting.
If you're not ready to submit the application yet, select No and click the Continue button. The system displays the Application Saved But Not Submitted page.
If the application is saved without submitting and the applicant has provided the required data, next time he or she clicks the link in the broadcast email to resume the application process the previously entered data is pre-filled on the web pages.
Thank You PageAfter the applicant submits the application, this page thanks the applicant for the submission.
Opt Out DialogThe Online Applications include a link to an Opt Out dialog that allows respondents to choose not to receive further mailings.
Refer to the Sample Dialogs documentation for a description of the Opt Out dialog.
See Opt-Out Dialog.
Banner Ad ResponseNot all applications for admission are received as a result of a broadcast email invitation. Within a school's web site at the Institution Career level, a banner ad link can invoke the application dialog for that combination of Institution and Career. The dialog as initiated by the banner ad is almost identical to that initiated by the broadcast email; this section describes the differences.
Dialog FlowThe dialog flow is identical to the broadcast email version, with the following exceptions:
There is no broadcast email element. Applicants start the dialog by clicking the link in the banner ad, which takes them to the first page of the application.
There is no opt-out capability, as this concept does not apply if the applicant initiates contact.
Web DocumentsThe following differences apply to the dialog's web documents:
There is no opportunity to pre-fill information, since the applicant is not known in advance.
There are no opt-out documents.
Moving Data from CRM to Student AdministrationOnce the data has been collected from the applicant, a PeopleCode custom action named CS_CRM_TS189 consolidates the related data into a CRM record that is then used to construct an application message to send to Student Administration. The submissions are subscribed to the EDI TS189 Staging, CRM File Attachments, and CRM Long Text Responses components in the Student Administration system under Develop Enrollment, Process External Data, Use A-F.
The following diagram shows the process:
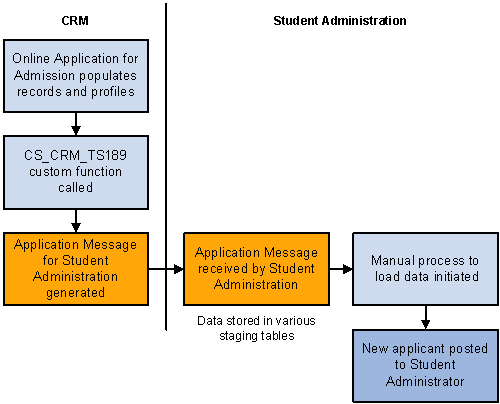
Process for Moving Data to Student Administration
Processing Applications in Student AdministrationAfter the data has been loaded into these staging tables, Long Text (the application essay) can be viewed under Student Admissions, External Test Score Processing, CRM Long Text Attachments, while File Attachment (letters of recommendation) can be viewed under Student Admissions, External Test Score Processing, CRM File Attachments. Run the EDI TS189 Org Search and the EDI TS189 Person Search/Post processes to post the application data into the Student Administration system. When running the EDI TS189 Person Search/Post process, run the PSJob called ADCRMPST. This job runs the EDI TS189 Search/Post process as well as posting the File Attachments and Long Text Responses for the applicant. You can optionally run the ADAPPPST process first, then run the SAD_CRM_SYN2 Application Engine program if you wish to run each process separately. Once the application data has been posted, run the EDI TS189 Purge process to remove the data from the EDI TS189 Staging tables.
Student Administration Questions and File AttachmentsEssay questions are subscribed in the CRM Long Text Responses component. File attachments are subscribed in the CRM Attachments component. Both components are found under Develop Enrollment, Process External Data, Use A-F. When the application is posted, essays and file attachments are stored under Develop Enrollment, Evaluate Applicants, Use. The post process stores this data according to the ID, Institution, and Career for which the application was created.
The file attachments are transferred from the file server used with the dialog for the online application. You must define the Student FTP Server ID and the CRM FTP Server ID on the Application Center Table under Design Student Administration, Design Admissions, Setup, Application Center Table for this transfer to occur.
CS_CRM_TS189 Custom ActionThe CS_CRM_TS189 custom action consolidates data into a CRM record that is used to construct the application message to send the information to Student Administration. It has the following parameters:
|
Parameter Name |
Description |
|
dialogID |
The Online Marketing dialog ID for the dialog from which the data is being sent. |
|
bas_sys_id |
The temporary ID the system assigns to the applicant for the duration of the application process. |
See Also
http://www.peoplesoft.com/corp/en/products/appconnect/catalog/eip_catalog.jsp
PeopleSoft 8 SP1 Recruiting and Admissions PeopleBook, “Performing EDI TS189 Application Transactions”
Making Changes to the Online ApplicationFor detailed information on how to make changes to Online Marketing dialogs (including the Online Application), refer to your Online Marketing documentation.
Adding Fields to the Online Application
Adding Long Text (Text Block) and File attachments as well as other field types to the Online Applications requires customizations to the dialogs that are discussed in the Online Marketing documentation. You may also contact PeopleSoft Global Services for more details.
Considerations When Cloning the Online ApplicationYou should keep the same considerations in mind when cloning the Online Application that you observe when cloning the sample dialogs. Refer to the Sample Dialogs documentation for more information.
See Sample Dialogs.