| Oracle® Retail Price Management Oracle® Retail Price Management User Guide Release 15.0 E64977-01 |
|

 Previous |
 Next |
| Oracle® Retail Price Management Oracle® Retail Price Management User Guide Release 15.0 E64977-01 |
|
Previous |
Next |
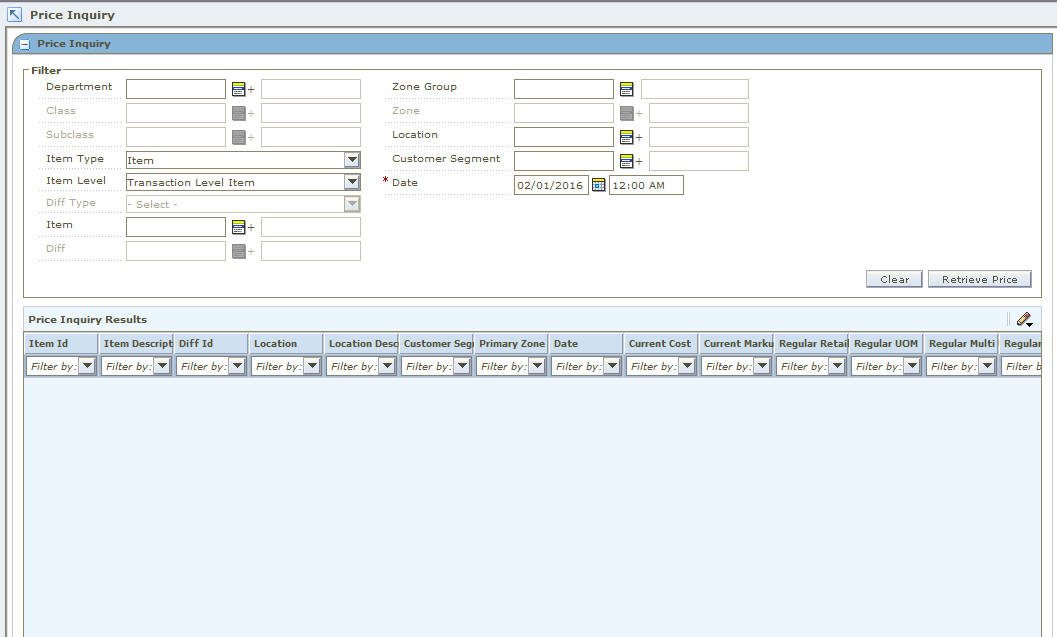
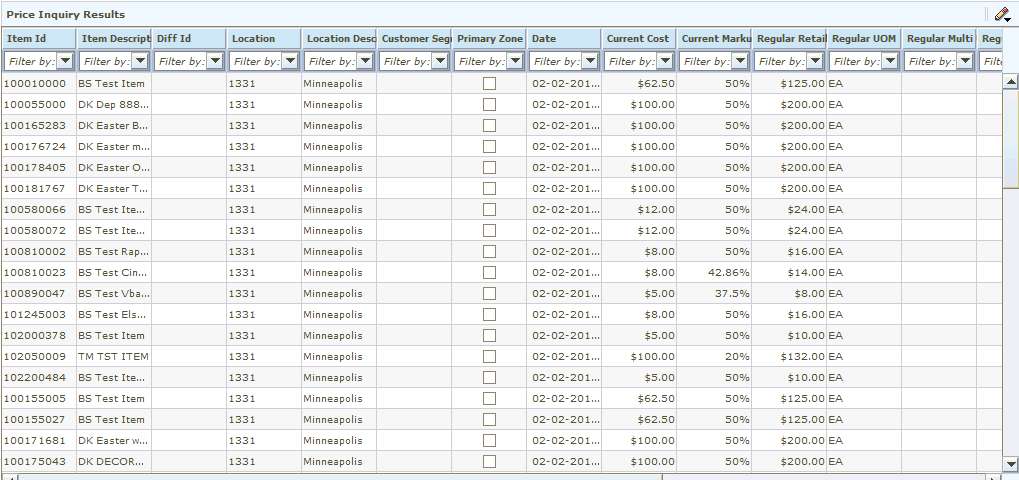
The Price Inquiry workspace allows you to look up the price of an item for a selected date and location. The following information appears in the Price Inquiry Results table:
Table 3-1 Price Inquiry Results
| Column | Description |
|---|---|
|
Item ID/Description |
Item ID/Description |
|
Diff ID |
The differentiators for the parent item if Parent Item/Diff type is selected. |
|
Location/Description |
The selected locations, zones, or zone groups depending on selected criteria. |
|
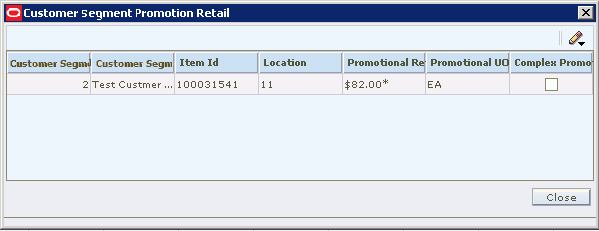
Customer Segment Promotion Retail |
Indicates if a customer segment retail is available through a link to a popup window. |
|
Primary Zone |
Selected if the zone is within the primary zone group. |
|
Date |
The selected date. The date the item/location price is valid far. |
|
Regular Retail |
The regular price of the item/location for the specified date. |
|
Regular Retail UOM |
The unit of measure of the regular item/location. |
|
Regular Multi-Units |
The regular multi-units of the item/location. |
|
Regular Multi-Units Retail |
The regular multi-unit price of the item/location. |
|
Regular Multi-Units Retail UOM |
The unit of measure of the regular item/location multi-unit. |
|
Clearance Retail |
The clearance price of the item/location for the specified date. |
|
Clearance Retail UOM |
The unit of measure of the clearance item/location. |
|
Promotional Retail |
The promotional price of the item/location for the specified date. |
|
Promotional Retail UOM |
The unit of measure of the promotional item/location. |
|
Complex Promotion |
Selected if the item/location is included on a complex promotion. |
Regular retail and multi-unit prices are calculated as follows:
Table 3-2 Regular Retail and Multi-unit Price Calculation
| Location Hierarchy | Transaction Level Item | Parent Item | Parent Item/Diff |
|---|---|---|---|
|
Location |
Transaction level price at the location. |
Average of prices for all transaction level items under parent at the location. |
Average of prices for all transaction level items under parent/diff at the location. |
|
Zone |
Average of transaction level prices for all locations in the zone. |
Average of prices for all transaction level items under parent at all the locations in the zone. |
Average of prices for all transaction level item sunder parent/diff at the locations in the zone. |
|
Primary Zone |
Primary zone price. |
Average of prices for all transaction level items under parent in the primary zone. |
Average of prices for all transaction level items under parent/diff in the primary zone. |
|
Note: "Price" refers to Regular Retail or Regular Multi-Units Retail. |
|||
Clearance and promotion prices are calculated as follows:
Table 3-3 Clearance and Promotion Price Calculation
| Location Hierarchy | Transaction Level Item | Parent Item | Parent Item/Diff |
|---|---|---|---|
|
Location |
Transaction level price at the location. |
Average of prices for all transaction level items under parent at the location. |
Average of prices for all transaction level items under parent/diff at the location. |
|
Zone |
Average of transaction level prices for all locations in the zone. |
Average of prices for all transaction level items under parent at all the locations in the zone. |
Average of prices for all transaction level item sunder parent/diff at the locations in the zone. |
|
Note: "Price" refers to Clearance Retail or Promotional Retail. |
|||
Navigate: From the Task Pad, select Price Inquiry > Retrieve Item Price. The Price Inquiry workspace opens.
Enter criteria as necessary to restrict the search to the price changes you want to maintain.
Table 3-4 Search Criteria
| Field | Criteria |
|---|---|
|
Merchandise Level |
Select criteria in the following fields to search for prices in a specific merchandise level:
|
|
Customer Segment |
Select the specific customer segment that you want to search on. If no customer segment is selected, data for all customer segments will be available. |
|
Zone/Location |
Select Zone Groups, Zones, and Locations to search for prices from specific zones or locations. |
|
Date |
Select the date you need to retrieve a price for. |
Click Retrieve Price. Your results appear in the Price Inquiry Results table.
|
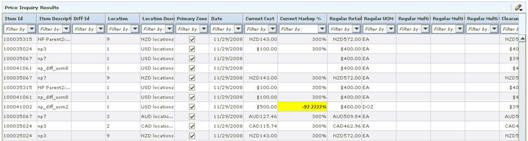
Note: If the current margin on an item is negative, the Current Markup % field in the Price Inquiry Results table is highlighted to call your attention to the negative margin. |
In the Customer Segment column, click on the Exists link. The Customer Segment Promotion Retail window opens with the customer segment details.
Click Close to close the window.
The following window is an example of negative margin highlighted.
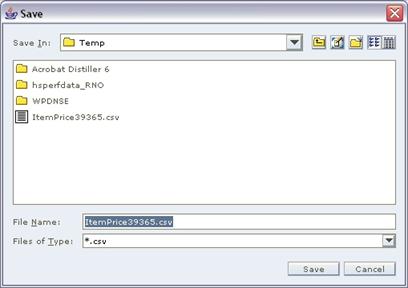
Select the row you want to export by clicking the box to the left of the row. Press and hold the Ctrl key while selecting to select multiple rows.
Click Export. The Save window opens.
Select a location to save the file to from the Save In drop-down list.
Enter a name for the file in the File Name field.
Click Save. The file is saved.
Open the file in the program of your choice, such as a spreadsheet or word processor.
A price guide allows you to create a uniform price strategy. You can use price guides to maintain consistent price points. You can determine if the prices in a guide should be rounded in the same manner or if they should all end in the same digits.
Price guides can be set up at the corporate level or at the department level. A corporate-level price guide is created and maintained at the corporate level, but can be referenced by many departments. If any changes are made to a corporate price guide, all departments that are linked to the corporate guide will reflect the updated changes. A department-level price guide is created and maintained at the department level.
After price guides are defined, they can be used when setting up pricing strategies, price changes, clearances, and promotions. Price guides are also used when creating the primary zone group for a merchandise level. When a price guide is attached to a primary zone group definition, it will be applied to the initial prices proposed by RPM during the initial price setting process in RMS (if the proposed price falls within one of the defined intervals on the guide).
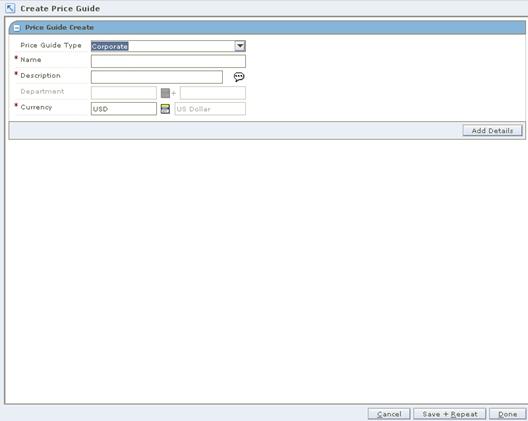
Navigate: From the Task Pad, select Price Guides > Create Price Guide. The Create Price Guide workspace opens.
In the Price Guide Type field, select the type of price guide you are creating.
In the Name field, enter the name of the price guide.
In the Description field, enter a description of the price guide.
In the Department field, enter the ID of the department, or click the LOV and select a department.
|
Note: This field is available only if Department is selected in the Price Guide Type field. |
In the Currency field, select the currency for the price guide.
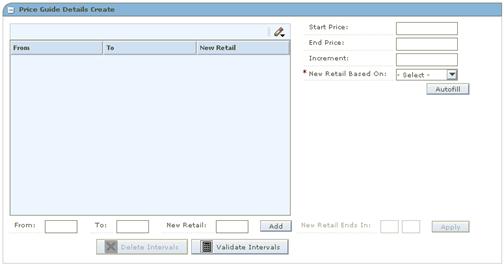
Click Add Details. The Price Guide Details Create pane opens.
In the From field, enter the low price of the interval.
In the To field, enter the high price of the interval.
|
Note: The value in the From field must be lower than the value in the To field. |
In the New Retail field, enter the price that all values in the interval adjust to.
Click Add. The information is added to the table.
In the Start Price field, enter the low price of the block of intervals.
In the End Price field, enter the high price of the block of intervals.
In the Increment field, enter the amount each interval should increase by.
In the New Retail Based On field, select how the new retail price should be determined:
From Price: The new price will be set to the same value as the value in the From column on the list of intervals.
To Price: The new price will be set to the same value as the value in the To column on the list of intervals.
Average Price: The new retail will be set to the average of values in the From and To columns on the list of intervals.
Click Autofill. The information is added to the table.
|
Note: If the End Price is not divisible by the value in the Increment field, RPM will suggest the last valid price in the range. Click Yes to accept the price and continue, or click No to cancel the process. |
Select the intervals you want to add ends in value.
In the New Retail Ends In field, enter the digits the price ends in.
|
Note: The number of fields available are determined by the currency used for the price guide. If your currency uses decimals the number of fields corresponds to the number of decimals used in the currency. |
Click Apply. The New Retail field on the selected intervals in the table is updated with the Ends In Digits specified by the user.
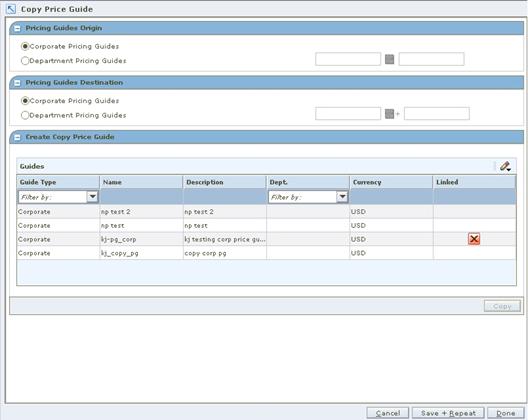
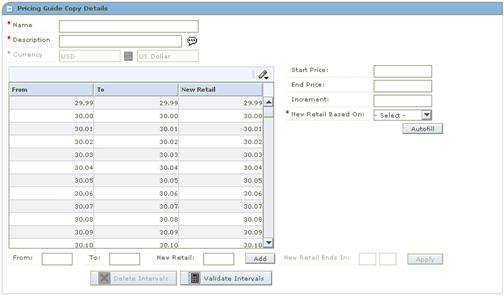
Navigate: From the Task Pad, select Price Guides > Copy Price Guide. The Copy Price Guide workspace opens.
In the Price Guides Origin pane, select the type of the price guide you are copying.
If you select Department Pricing Guides, enter the department ID in the field to the right, or click the LOV and select a department.
|
Note: Price guides that match the criteria entered appear in the Create Copy Price Guide pane. |
In the Price Guides Destination pane, select the type of the price guide you are creating.
If you select Department Pricing Guides, enter the department ID in the field to the right, or click the LOV and select a department.
In the Create Copy Price Guide pane, select the price guide you want to copy.
Click Copy. The Pricing Guide Copy Details pane opens.
Maintain the price guide as necessary.
Click Done to save any changes and close the workspace.
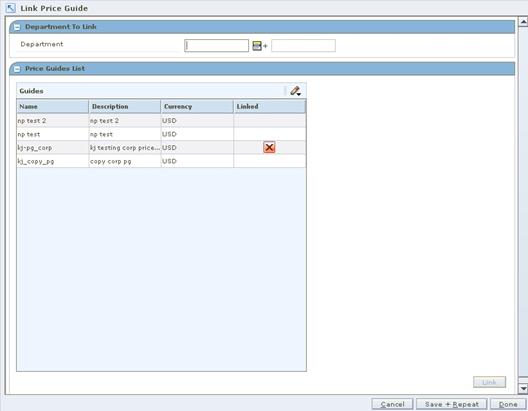
Navigate: From the Task Pad, select Price Guides > Link Price Guide. The Link Price Guide workspace opens.
In the Department field, enter the ID of the department that you want to link to a corporate price guide.
In the Price Guides List pane, select the corporate price guide you want to link to.
Click Link. A red X appears in the Linked column, indicating that the corporate price guide has been linked.
Click Done to save any changes and close the workspace.
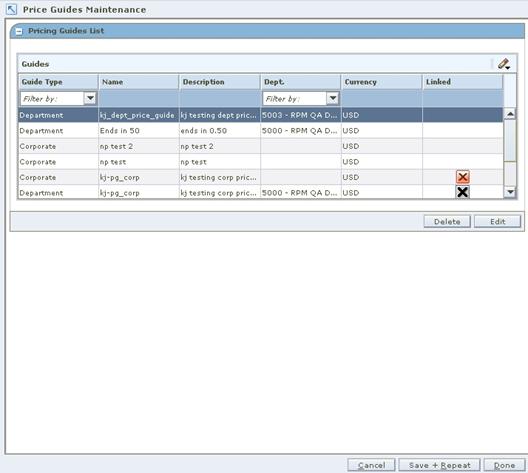
Navigate: From the Task Pad, select Price Guides > Maintain Price Guide. The Price Guides Maintenance workspace opens.
|
Note: If you are copying a price guide, start from step 3. |
From the Pricing Guides List, select the price guide you want to edit.
|
Note: Linked department price guides cannot be edited. They can only be viewed. The details of a linked department price guide are owned at the corporate level, so changes must be made to the corporate price guide. |
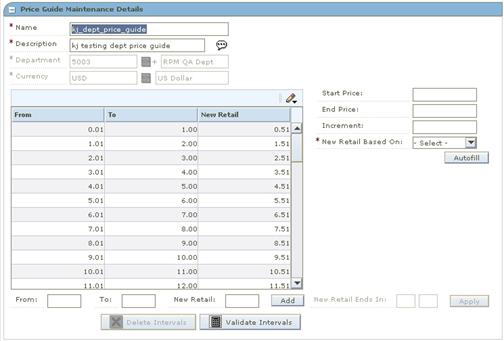
Click Edit. The Price Guide Maintenance Details pane opens.
Edit the enabled fields as necessary.
Update the intervals as necessary.
Add price intervals individually.
Add multiple price intervals.
Define the ends in price.
To delete an interval:
Select the intervals you want to delete.
Click Delete Intervals. The intervals are removed from the table.
To verify if the intervals are sequential:
Click Verify Intervals. If non-sequential intervals exist, an error message appears.
Click OK. The non-sequential values are highlighted in red.
Correct the intervals as necessary.
- Add price intervals individually.
- Delete an interval.
Click Done to save any changes and close the workspace.
The pricing office of your organization determines the optimum strategies for using RPM in your business. After these strategies are decided, you can define the candidate rules and set up the following parameters:
Candidate rules
Variables for candidate rules
You use candidate rules to search the database for items that need to be highlighted for pricing review. Candidate rules determine which item/locations will have retail prices proposed in clearance worksheets. In other types of worksheets, they provide a way to identify and track specific items during the worksheet review process.
Candidate rules are defined at the corporate level. You can modify any of the candidate rule parameters. Some rules have variable values. These values are assigned and can be modified at the department level.
|
Note: Rules that have variables defined are run only against items in Departments where a value has been assigned to the variable. If there is no variable value for a Department, the candidate rule will not run against items from that Department. |
There are two types of candidate rules: Inclusion and Exclusion. Exclusion rules are always run first and identify items that will not be included in the worksheet review. Inclusion rules can contain a variable for Department level differences in the value to be searched against. Items that meet an inclusion candidate rule are flagged on the worksheet. Items that meet an exclusion candidate rule do not appear on the worksheet.
|
Note: Candidate rules are run against the worksheet when it is first created. They are not run again if the worksheet is updated. |
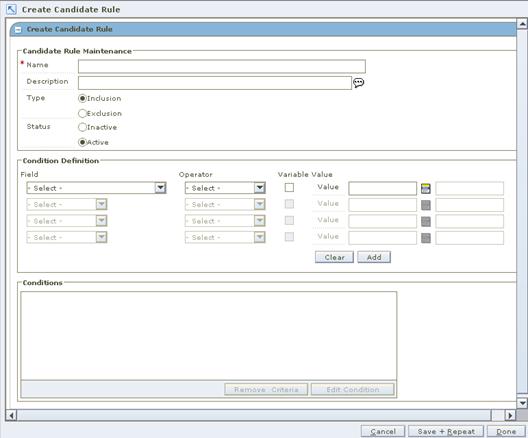
Navigate: From the Task Pad, select Candidate Rules > Create Candidate Rules. The Create Candidate Rule workspace opens.
In the Name field, enter the name of the candidate rule.
In the Description field, enter a description of the candidate rule. This description can be up to 250 characters.
Against Type, select the kind of candidate rule that you are creating.
Against Status, select the active status of the rule. Only active rules are run during a review period.
In the Field column, select the field to which the candidate rule is applied.
In the Operator column, select the relationship that the Field item has to the Value or Variable Name.
|
Note: All options may not be available for some field types. |
In the Value field, enter the ID of value or click the LOV and select a value.
|
Note: If you enter a Value, the rule runs against all Departments that use this value in the rule. If you enter a Variable, you can assign the value of the Variable by Department. |
Select the Variable checkbox.
If the Variable is a new variable, select the New checkbox.
In the Value field, enter the name if it is a new variable or click the LOV and select an existing variable.
Enter additional conditions as necessary.
Click Add. The condition opens in the conditions area.
|
Note: A single rule can have multiple conditions. If multiple conditions exist for a rule, an item must meet all of the conditions in order for the rule to be met. |
Click Done to save any changes and close the window.
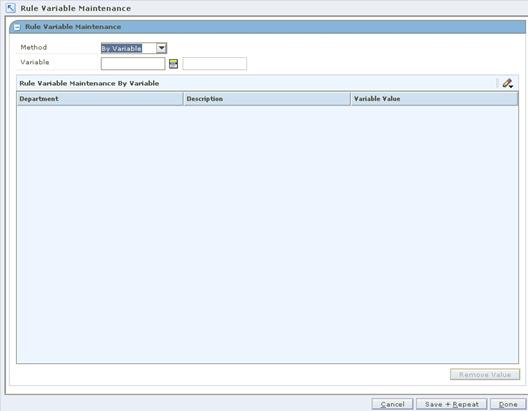
Navigate: From the Task Pad, select Candidate Rules > Maintain Rule Variables. The Rule Variable Maintenance workspace opens.
In the Method field, select how you want to update the rule variables.
In the Variable/Department field, select the value you want to use to update the rule variable.
In the Variable Value field, enter the value to be associated with the variable when the rule is run against items in the department.
To update the values for multiple departments:
Multi-select the departments you want to update.
In the Value field following the Rule Variable Maintenance By Variable table, enter the value to be associated with the variable when the rule is run against items in the department.
Click Apply.
Click Done to save any changes and close the workspace.
|
Note: If the variable is attached to a candidate rule, you must delete the candidate rule before you can delete the variable. To delete the candidate rule, see "Delete a Candidate Rule". |
In the Department field, enter the Department number or click (LOV) and select from the list of values.
Click View. A list of the defined variables with their assigned values appears.
Select the radio button for the candidate rule variable that you want to remove.
Click Delete. A message appears, "This variable will be deleted for all Departments. Do you want to continue?"
Click OK. The variable is removed from the list.
|
Note: To leave the window without making changes, click Cancel. |
|
Note: Rules that have variables defined are run only against items in Departments where a value has been assigned to the variable. If there is no variable value for a Department, the candidate rule will not run against items from that Department. |
In the Department field, enter the Department number, or click the LOV and select from the list of values.
Click View. A list of the defined variables with their assigned values appear.
|
Note: To apply the same variable to more than one Department, select the desired Departments from the list. |
In the Value field for the candidate rule variable that you want to edit, enter the appropriate value.
Click Save. The information is saved.
|
Note: To exit the window without making changes, click Cancel. |
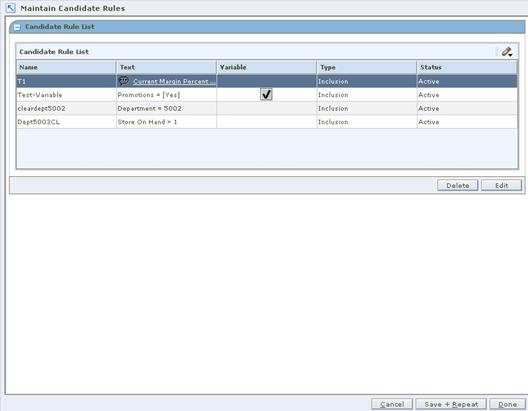
Navigate: From the Task Pad, select Candidate Rules > Maintain Candidate Rules. The Maintain Candidate Rules workspace opens.
Select the candidate rule you want to change.
Click Edit. The Candidate Rule Maintenance workspace opens with information about the selected candidate rule.
Change information in any of the fields, as necessary.
If you want to use the value as a variable:
Check the box against Use value as variable.
Enter or click the LOV to display a list of existing values.
Select an appropriate value from the list.
If you want to edit only the Condition portion of a rule:
|
Note: To add a new Condition to a rule without changing any existing Conditions, use the following steps c-d. |
In the Conditions box, select the Condition that you want to change.
Click Edit. The components of the selected condition are displayed in the Field, Operator, and Values or Variable Name fields.
Enter the appropriate information in the Field, Operator, and Values or Variable Name fields.
To include the new or updated Condition without removing the existing Condition, click Add.
Or
To substitute the existing Condition with the one you just created or edited, click Replace.
To return to the Candidate Rules window, click Cancel. All information that you did not save in the Candidate Rule Maintenance window is lost.
To delete a condition, select the condition in the Conditions box.
Click Delete. The condition is removed.
To apply all of the changes that you made in this window, click Save. You are returned to the Candidate Rules window.
Navigate: From the Task Pad, select Candidate Rules > Maintain Candidate Rules. The Maintain Candidate Rules workspace opens with all of the current candidate rules listed.
Select the candidate rule you want to delete.
Click Delete. A message appears, "Are you sure you want to delete the selected rule?"
Click OK to delete the rule. The rule is removed from the list.
|
Note: Variables are not deleted if you delete a rule that has a condition with variables and values assigned at the Department level. This feature allows you to use the existing variables and assigned values when you create a new rule. To delete the variables, see "Delete a Candidate Rule". |
Zone structures allow you to group locations that are priced the same. Additionally, you can identify the types of pricing the zone is used for; Regular, Promotional, or Clearance. There are several components that you need to define in order to use zone structures.
Zone groups are a collection of zones. You can define multiple zone groups that are suited to your business. After you define the zone group, you can define the zones in the zone group. A location (store or warehouse) can only exist once in a given zone group. Multiple currencies may exist within a zone group.
A zone is a group of locations that are priced the same within a zone group. Locations within a zone must have the same currency. Not all locations must be assigned to a zone.
The primary zone group is used to determine how items are initially priced in the merchandising system. When you create a primary zone group, you identify the merchandise hierarchy level, the zone group, the markup percent, the markup type, and the price guide. The merchandise hierarchy assigned to a new item in merchandising system will determine the primary zone group definition in RPM used to initially price the item. Based on the information associated with the primary zone group and the cost of the item, as entered in the merchandising system, prices will be proposed.
|
Note: See the Oracle Retail Price Management Implementation Guide for more details on primary zone groups and best practices. |
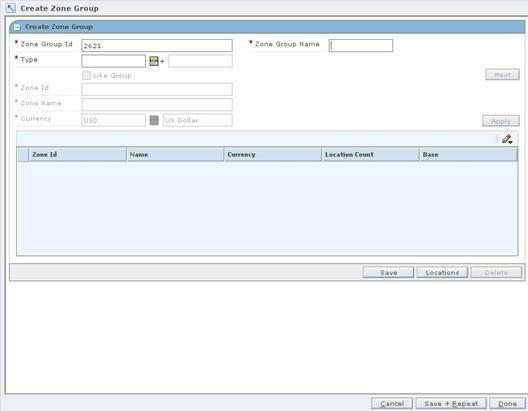
Navigate: From the Task Pad, select Zone Structure > Create Zone Group. The Create Zone Group workspace opens.
In the Zone Group ID field, edit the generated Zone Group ID field as necessary.
|
Note: The Zone Group ID field appears with the next available number. If you choose to update the field, you must choose a unique ID. |
In the Zone Group Name field, enter a description of the zone group.
In the Type field, enter the type of pricing this zone group is used for, or click the LOV and select a type.
Click Next. Your zone group is created.
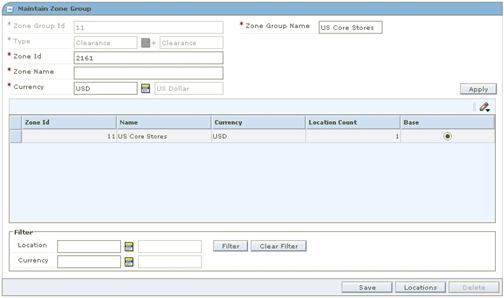
In the Zone ID field, edit the generated Zone Group ID field as necessary.
|
Note: The Zone ID field appears with the next available number. If you choose to update the field, you must choose a unique ID. |
In the Zone Name field, enter a description for the zone.
In the Currency field, enter the currency for the zone, or click the LOV and select a currency.
Click Apply. Your zone is added to the table.
Add the appropriate number of zones for your zone group.
Select a zone.
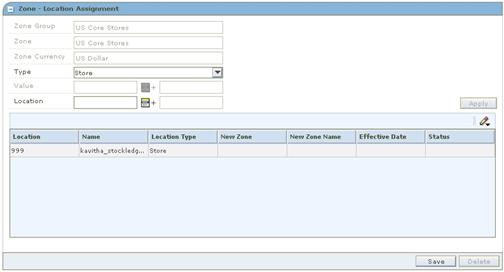
Click Locations. The Zone Location Assignment pane opens.
In the Type field, select the type of location you want to add to the zone.
In the Value field, enter the ID of the location or location group, or click the LOV and select a location or location group.
Click Apply to add the location or location group to the list of locations.
Click Save to commit any changes.
Click Done to save any changes and close the workspace.
|
Note: When you add a location to an already created zone, a location move request is created in Approved status. The location move request will wait for the next scheduling batch, and that batch program will process the addition. |
In the Zone Group ID field, edit the generated Zone Group ID field as necessary.
|
Note: The Zone Group ID field appears with the next available number. If you choose to update the field, you must choose a unique ID. |
In the Zone Group Name field, enter a description for the zone group.
In the Type field, enter the pricing strategy that the zone group will use, or click the LOV and select a type.
Select the Like Group checkbox.
Click Next. The Like Group pane opens.
Enter the ID of the zone group that you want to copy, or click the LOV and select a group.
Click Done to save any changes and close the workspace.
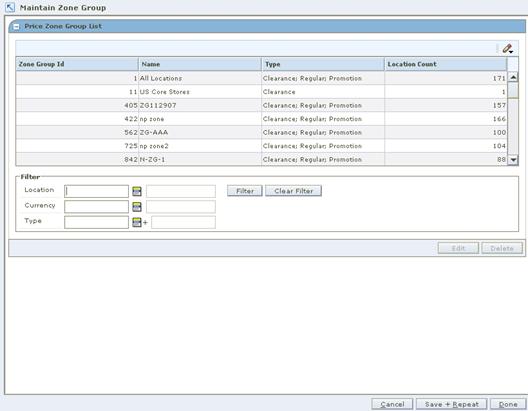
Navigate: From the Task Pad, select Zone Structure > Maintain Zone Group. The Maintain Zone Group workspace opens.
Filter for the records as necessary:
In the Location, Currency, and Type fields, enter the criteria you want to filter for.
Click the filter button. Zone groups that match your criteria appear in the following table.
|
Note: Click the clear filter button to remove the filter criteria. All zone groups appear in the following table. |
To delete a zone group:
Select a zone group.
Click Delete. The zone group, zones, and locations are removed.
Select a zone group.
Click Edit. The Maintain Zone Group pane opens.
After the zone has been added to the zone group, the currency cannot be changed. A zone with an incorrect currency can be deleted and then re-created with the correct currency.
|
Note: If there are no locations in the zone, the currency field is editable. If locations exist in the zone, then the currency field is NOT editable. |
Add zones to the zone group.
To delete a zone:
Select a zone.
Click Delete. The zone is removed from the list of zones.
|
Note: You must first delete all locations from the zone before you delete it. |
Select a zone.
Click Locations. The Zone - Location Assignment pane opens.
Add locations to the zone.
|
Note: When you add a location to a zone that was previously saved, a location move is scheduled. See "Maintain Location Move". |
To delete a location from a zone.
Select a location.
Click Delete. The location is removed from the list of locations.
|
Note: When you add or delete a location in a zone, a location move request is created in Approved status. The location move request will wait for the next scheduling batch, and that batch program will process the addition or deletion. |
Click Done to save any changes close the workspace.
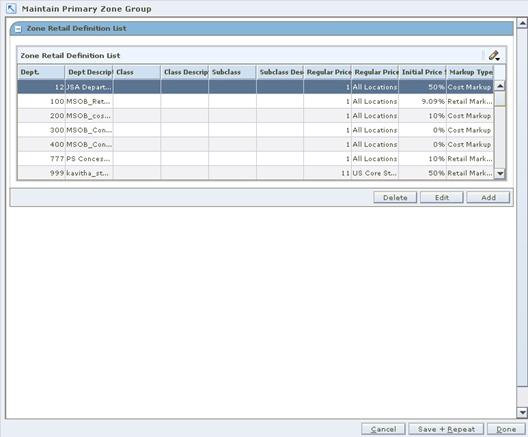
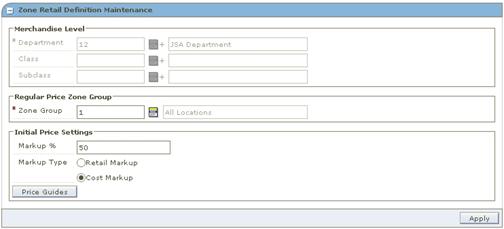
Navigate: From the Task Pad, select Zone Structure > Maintain Primary Zone Groups. The Maintain Primary Zone Group workspace opens.
Click Add. The Zone Retail Definition Maintenance pane opens.
In the Department field, enter the ID of the department, or click the LOV and select a department.
In the Class field, enter the ID of the class, or click the LOV and select a class.
In the Subclass field, enter the ID of the subclass, or click the LOV and select a subclass.
|
Note: You must select the merchandise hierarchy levels above class and subclass before you identify class and subclass. Class and subclass are not required. You can define a primary zone group at the Department level. |
In the Zone Group field, enter the ID of the zone group you want to associate with the selected merchandise hierarchy level, or click the LOV and select a zone group.
|
Note: Zone Groups that include regular price are the only type of zone groups that can be attached to a primary zone group. |
In the Initial Price Settings pane:
In the Markup % field, enter the percent of markup that is applied to the cost of the item.
Select either Retail Markup or Cost Markup to indicate how the markup is calculated.
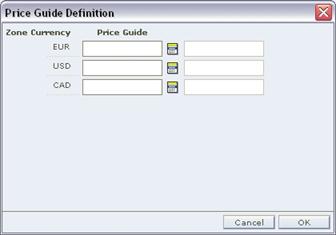
To add a price guide, click Price Guides. The Price Guide Definition dialog opens.
For each currency, enter a price guide ID, or click the LOV and select a price guide.
|
Note: Only price guides that are associated with the department selected in the Zone Retail Definition Maintenance pane appear. For each currency, you can select a price guide, if a price guide has been set up for the currency and department. |
Click OK to save any changes and close the window.
Click Apply to add your changes to the table.
Click Done to save any changes and close the workspace.
Navigate: From the Zone Structure menu, select Maintain Primary Zone Groups. The Maintain Primary Zone Group workspace opens.
Click Edit. The Zone Retail Definition Maintenance pane opens.
Edit the enabled fields as necessary.
Click Apply.
Click Done to save any changes and close the workspace.
Select a primary zone group.
Click Delete. A message is displayed: "All selected rows will be deleted."
Click Yes. The primary zone group is removed from the table.
Click Done to save any changes and close the workspace.
|
Note: For more information on restrictions when deleting a Primary Zone Group, see the Oracle Retail Merchandising Implementation Guide for more details. |
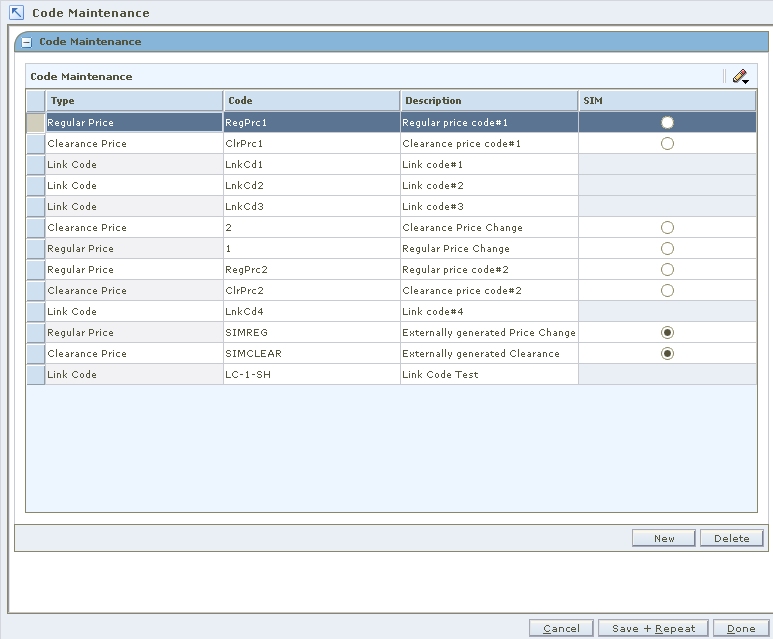
The foundation area allows you to maintain reason codes and link codes. Reason codes are used to explain the rationale for clearances and price changes. Link codes are used to associate items to each other at a location and price them exactly the same.
The Maintain Link Codes area allows you to assign link codes to a transaction level item/location. The items can be associated to the code through the merchandise hierarchy, at the item level, or through item attributes such as diff or diff type. Locations can be associated to the code through the zone group or zone or by entering the location directly.
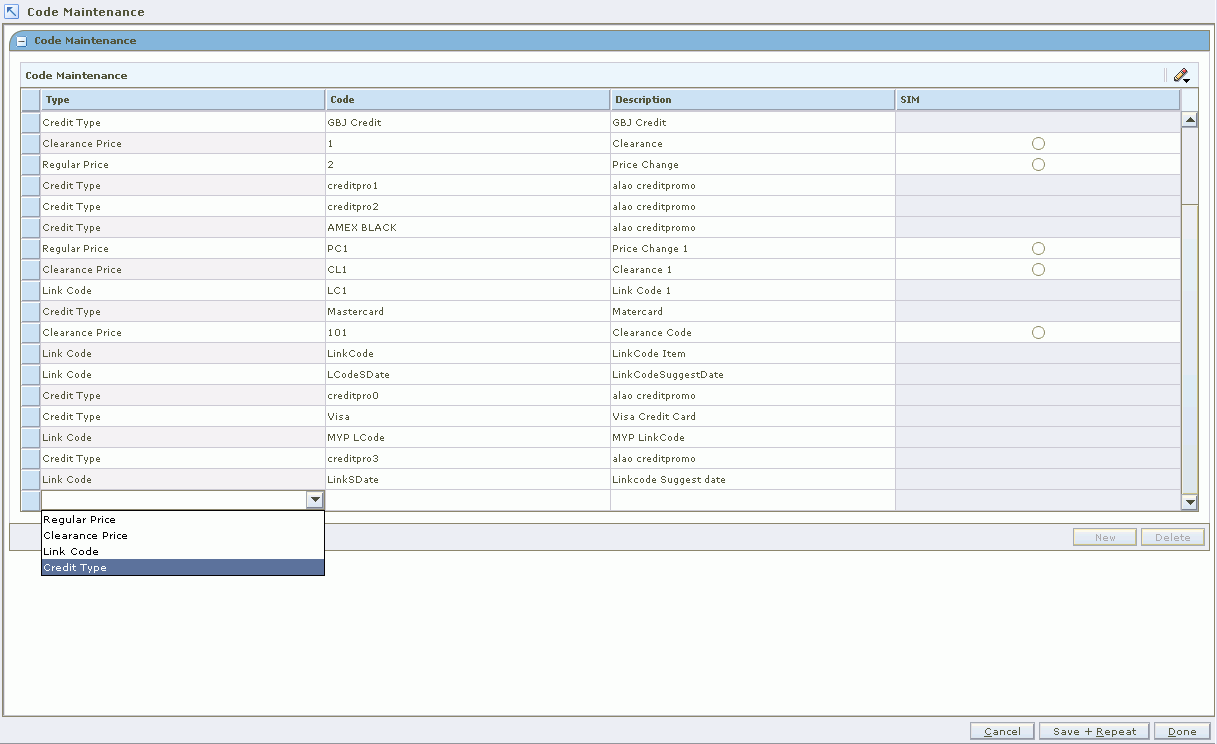
Navigate: From the Task Pad, select Foundation > Code Maintenance. The Code Maintenance workspace opens.
Click New. The next line on the table is enabled.
In the Type field, select one of the following types of code you are creating.
Regular Price
Clearance Price
Link Code
Credit Type
In the Code field, enter a unique identifier for the code.
In the Description field, enter description of the code.
In the SIM field, select the radio button to indicate that the reason code is used exclusively by Store Inventory Management (SIM).
|
Note: Only one reason code for price changes and clearances can be assigned as a SIM reason code. |
Click Done to save any changes and close the workspace.
Navigate: From the Task Pad, select Foundation > Code Maintenance. The Code Maintenance workspace opens.
Select the field you want to edit.
Make necessary changes.
In the SIM field, select the radio button to indicate that the reason code is used exclusively by Store Inventory Management (SIM).
You are prompted to confirm your choice to change the SIM reason code.
|
Note: Only one reason code for price changes and clearances can be assigned as a SIM reason code. |
Click Save + Repeat to commit your changes.
Click Done to save any changes and close the workspace.
Navigate: From the Task Pad, select Foundation > Code Maintenance. The Code Maintenance workspace opens.
Select the record you want to delete.
Click Delete. The record is removed from the table.
|
Note: You cannot delete a reason or link code that is in use. |
Click Done to close the window.
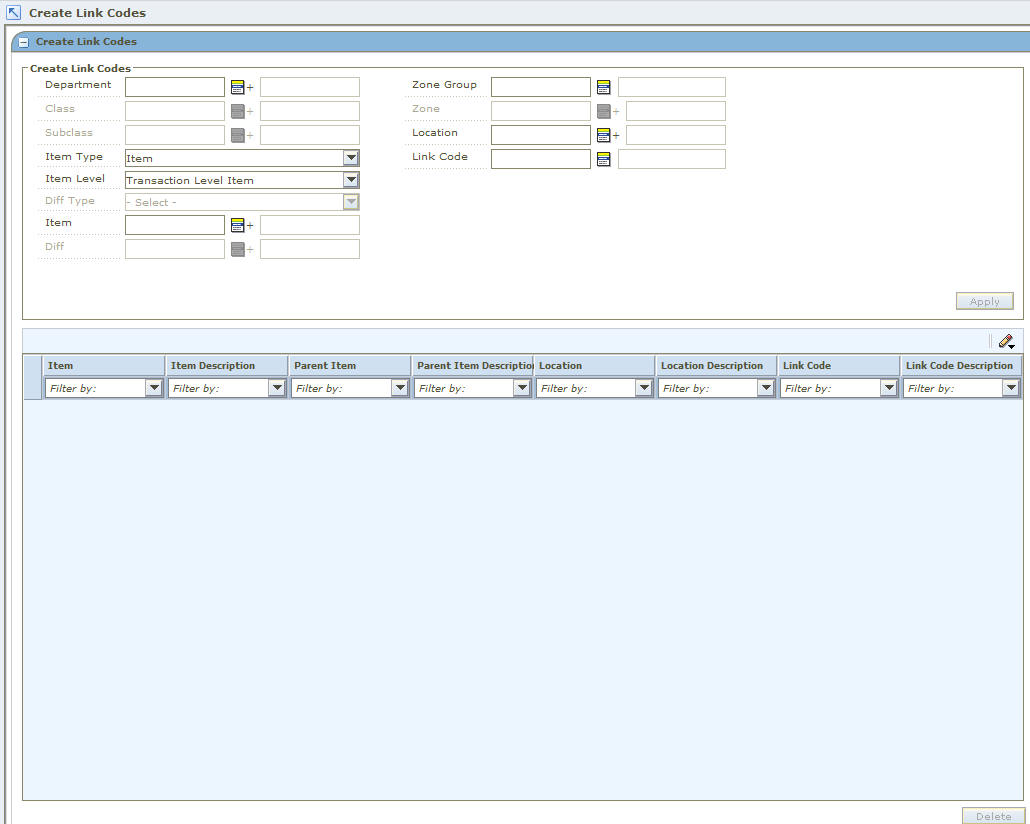
Navigate: From the Task Pad, select Link Codes > Create Link Codes. The Create Link Codes workspace opens.
Enter the Department for which you want to create the link code.
|
Note: You must enter a department. Subsequent merchandise levels are enabled as you add the level above. You can enter more than one department, in which case you cannot enter class or subclass. |
Select the item type for the link code from the Item Type drop-down list.
Item: Select an item for the link code.
In the Item Level drop-down list, select Parent Item, Parent Item/Diff, or Transaction Level Item.
If enabled, select a diff type from the Diff Type drop-down list.
In the Item field, enter the ID of the item(s) to which you want the link code, or click the LOV and select an item.
If enabled, enter the ID of the diff(s), or click the LOV and select a diff.
Item List: Select an item list for the link code.
Enter the ID of the item list you want the link code to apply to, or click the LOV and select an item list.
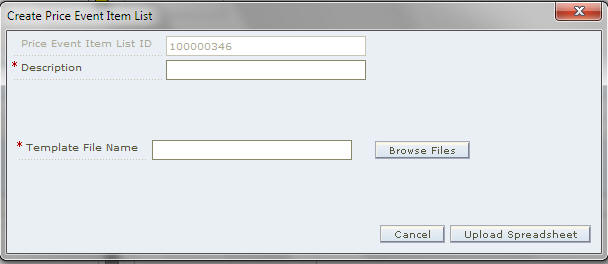
Price Event Item List: After selecting Price Event Item List for your Item Type, click Upload Spreadsheet. A pop-up window opens that gives the user a prefilled system assigned price event item list ID.
In the description field, enter a name for your Price Event Item List.
In the Template File Name field, enter a file name or select a file using the Browse to find a file on your computer.
Once the file is selected, click Upload Spreadsheet, the pop-up window will close and the price event item list details displays in the Item List field.
Click View Items. A pop-up window opens where the items in the price event item list are displayed.
Click OK to close window.
|
Note: Price event item lists created and used in RPM are considered one time use only. You can upload the same spreadsheet multiple times but you cannot reuse a price event item list by keying the ID number associated to the list. A new ID will be assigned each time the spreadsheet is uploaded. |
Select the locations for the link code:
Zone Group: Enter the ID of the zone group that contains the zones to which the link code should apply, or click the LOV and select a zone group.
Zone: Enter the ID of the zone that contains the locations to which the link code should apply, or click the LOV and select a zone.
Location: Enter the ID of the location the link code should apply to, or click the LOV and select a location.
Select the link code. Enter the ID of the link code that will be created, or click the LOV and select a link code.
Click Apply. The following may occur:
A row is added to the table for each transaction level item/location that meets the selected criteria.
An existing row changes based on the selected criteria.
Click Done to save any changes and close the workspace.
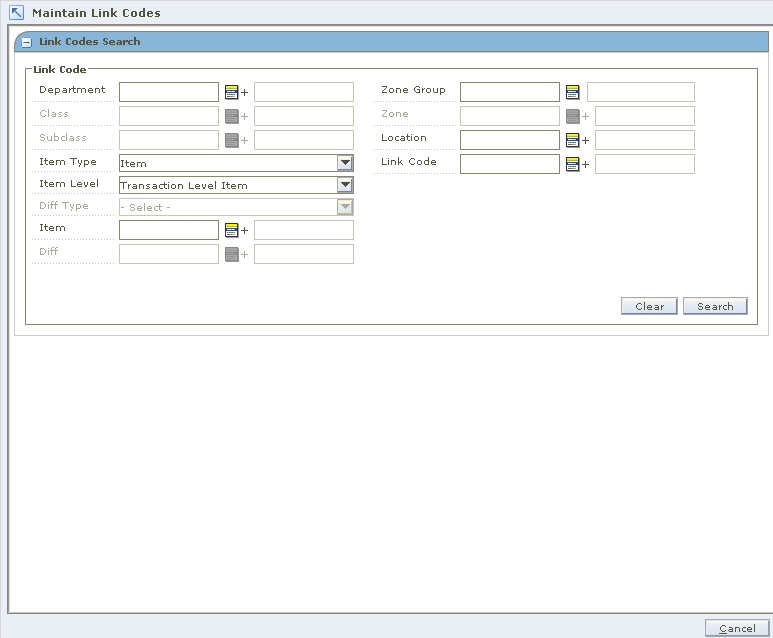
This section describes how to search for a link code, override a link code, update link codes, and delete a link code relationship.
Navigate: From the Task Pad, select Link Codes > Maintain Link Codes. The Maintain Link Codes workspace opens.
In the Link Codes Search pane, enter criteria as necessary to restrict the search to the link codes you want to maintain.
Click Search. Your results appear in the Maintain Link Codes table.
Search for and retrieve the link codes you want to maintain. Your results appear in the Maintain Link Codes table.
|
Note: You must enter a department. Subsequent merchandise levels are enabled as you add the level above. You may enter more than one department, in which case you cannot enter class or subclass. |
Select the locations for the link code:
Zone Group: Enter the ID of the zone group that contains the zones the link code should apply to, or click the LOV and select a zone group.
Zone: Enter the ID of the zone that contains the locations the link code should apply to, or click the LOV and select a zone.
Location: Enter the ID of the location the link code should apply to, or click the LOV and select a location.
Select the item type for the link code from the Item Type drop-down list.
Item: Select an item or for the link code.
In the Item Level drop-down list, select Parent Item, Parent Item/Diff, or Transaction Level Item.
If enabled, select a diff type from the Diff Type drop-down list.
In the Item field, enter the ID of the item(s) you want the link code to apply to, or click the LOV and select an item.
If enabled, enter the ID of the diff(s), or click the LOV and select a diff.
Item List: Select an item list for the link code.
Enter the ID of the item list you want the link code to apply to, or click the LOV and select an item list.
Click Apply. The following may occur:
A row is added to the table for each transaction level item/location that meets the selected criteria.
An existing row changes based on the selected criteria.
Click Done to save any changes and close the workspace.
In the Maintain Link Codes table, select the rows you want to edit by clicking the box to the left of the row. Press and hold the Ctrl key while selecting to select multiple rows. Click Select All to select all the rows.
Right-click in the Link Code field. The Link Code dialog opens.
Enter the ID of the link code in the Edited Value field, or click the LOV and select a code.
Click OK. Your changes appear in the table.
In the Maintain Link Codes table, select the row you want to delete by clicking the box to the left of the row. Press and hold the Ctrl key while selecting to select multiple rows. Click Select All to select all the rows.
Click Delete. You are prompted to confirm your decision.
Click Yes. The link code relationship is deleted.
This section describes how to search for a Market Basket Code, maintain Market Basket Codes, update Market Basket Codes, and delete a Market Basket Code Relationship.
Navigate: From the Task Pad, select Market Basket Codes > Maintain Market Basket Codes. The Maintain Market Basket Codes workspace opens.
Enter criteria as necessary to restrict the search to the market basket codes you want to maintain.
Click Search. Your results appear in the Market Basket Codes table.
Search for and retrieve the market basket codes you want to maintain. Your results appear in the Maintain Market Basket Codes table.
Enter the ID of the merchandise level you want to apply the market basket to, or click the LOV and select the appropriate merchandise level.
|
Note: You must enter a department. Subsequent merchandise levels are enabled as you add the level above. You may enter more than one department, in which case you cannot enter class or subclass. |
Select the zones for the market basket:
Zone Group: Enter the ID of the zone group that contains the zones the market basket should apply to, or click the LOV and select a zone group.
Zone: Enter the ID of the zone the market basket should apply to, or click the LOV and select a zone.
Select the item type for the market basket code from the Item Type drop-down list.
Item: Select an item for the market basket code.
In the Item Level drop-down list, select Parent Item, Parent Item/Diff, or Transaction Level Item.
If enabled, select a diff type from the Diff Type drop-down list.
In the Item field, enter the ID of the item(s) you want the market basket code(s) to apply to, or click the LOV and select an item.
If enabled, enter the ID of the diff, or click the LOV and select a diff.
Item List: Select an item list for the market basket code.
Enter the ID of the item list you want the market basket code(s) to apply to, or click the LOV and select an item list.
Price Event Item List: After selecting Price Event Item List for your Item Type, click Upload Spreadsheet. A pop-up window opens that gives the user a prefilled system assigned price event item list ID. Enter the ID of the item list you want the link code to apply to, or select an item from the drop-down list.
In the description field, enter a name for your Price Event Item List.
In the Template File Name field you have the option to either key in a file name or select a file using the browse button to find a file on your computer.
Once the file is selected, click Upload Spreadsheet, the pop-up window will close and the price event item list details displays in the Item List field. Enter the ID of the item list you want the link code to apply to, or select an item from the drop-down list.
Click View Items. A pop-up window opens where the items in the price event item list are displayed.
Click Select. Items that meet your criteria are added to the Item Selection table.
|
Note: Price event item lists created and used in RPM are considered one time use only. You can upload the same spreadsheet multiple times but you cannot reuse a price event item list by keying the ID number associated to the list. A new ID will be assigned each time the spreadsheet is uploaded. |
In the Margin Market Basket Code field, enter the ID of the code, or click the LOV and select the code.
OR
Select the Remove Margin Market Basket Code checkbox to disassociate the margin market basket code from the item(s)/zone(s) that meet the selected criteria.
In the Competitive Market Basket Code field, enter the ID of the code, or click the LOV and select the code.
OR
Select the Remove Competitive Market Basket Code checkbox to disassociate the competitive market basket code from the item(s)/zone(s) that meet the selected criteria.
Click Apply. The following may occur:
A row is added to the table for each transaction level item/location that meets the selected criteria.
An existing row changes based on the selected criteria.
Click Done to save any changes and close the workspace.
In the Market Basket Codes table, select the row you want to edit by clicking the box to the left of the row. Press and hold the Ctrl key while selecting to select multiple rows. Click Select All to select all the rows.
Right click the field you want to edit:
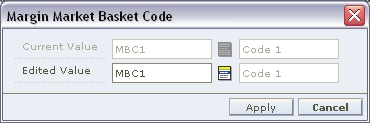
Margin Market Basket Code - The Margin Market Basket Code dialog opens.
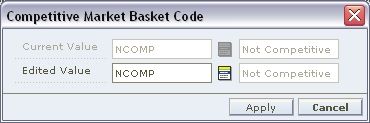
Competitive Market Basket Code - The Competitive Market Basket Code dialog opens.
Enter the ID of the Market Basket Code in the Edited Value field, or click the LOV and select a code. Or Clear the field to dissociate the market basket code from the selected record.
Click OK. Your changes appear in the table.
In the Market Basket Codes table, select the row you want to delete by clicking the box to the left of the row. Press and hold the Ctrl key while selecting to select multiple rows. Click Select All to select all the rows.
Click Delete. You are prompted to confirm your decision.
Click Yes. The market basket code relationship is deleted.
Calendars are used to define review periods for your pricing strategies. A review period is the amount of time that you have to act on pricing events generated in the worksheet before they expire.
After you create a calendar, you can maintain the different aspects of that calendar. You can modify the name, description, or end date of the calendar. You can also change the rules and exceptions for future review periods.
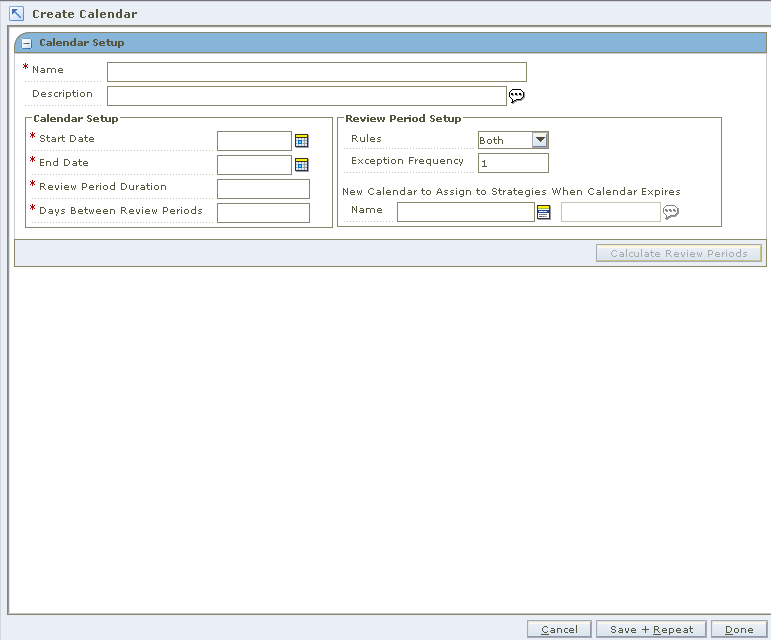
Navigate: From the Task Pad, select Calendar > Create Calendar. The Create Calendar workspace opens.
In the Calendar Setup pane, in the Name field, enter a name for the calendar.
In the Description field, you can enter a description for the Calendar. Click the button next to the description field to open an editing window.
In the Calendar Setup area, in the Start Date field, enter the date the calendar becomes active, or click the calendar button and select a date.
In the End Date field, enter the date the calendar is no longer active.
In the Review Period Duration field, enter the length of the review period in days.
In the Days Between Review Periods field, enter the number of days between review periods.
|
Note: The last review period duration plus the days between review periods must exactly reach the end date of the calendar. If this is not the case, the system can automatically adjust the end date, or you can chose to modify the Review Period Duration, Days Between Review Periods or End Date fields yourself. |
In the Review Period Setup area, from the Rules drop-down list, select the type of rules to apply for the review period.
Inclusion - Items that meet inclusion candidate rules will be highlighted in the worksheet.
Exclusion - Items that meet exclusion candidate rules will be excluded from the worksheet.
Both - Both, inclusion and exclusion candidate rules are applied for the review period.
None - No rules are applied for the review period.
In the Exception Frequency field, enter the frequency, in review periods, that RPM should process exceptions from the merchandising system.
Enter 1 for every review period.
Enter 2 for every other review period.
Enter 3 for every third review period.
Enter 0 if you never want RPM to process exceptions.
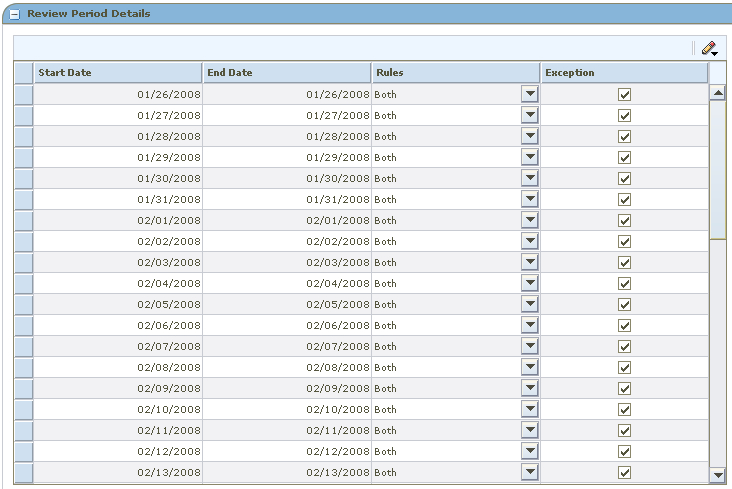
Click Calculate Review Periods. The review periods are calculated and the Review Period Details pane opens.
In the Review Period Details pane, in the Rules and Exceptions fields, edit as necessary for each review period.
Click Done at the bottom of the workspace. The new calendar is added and the Maintain Calendar workspace closes.
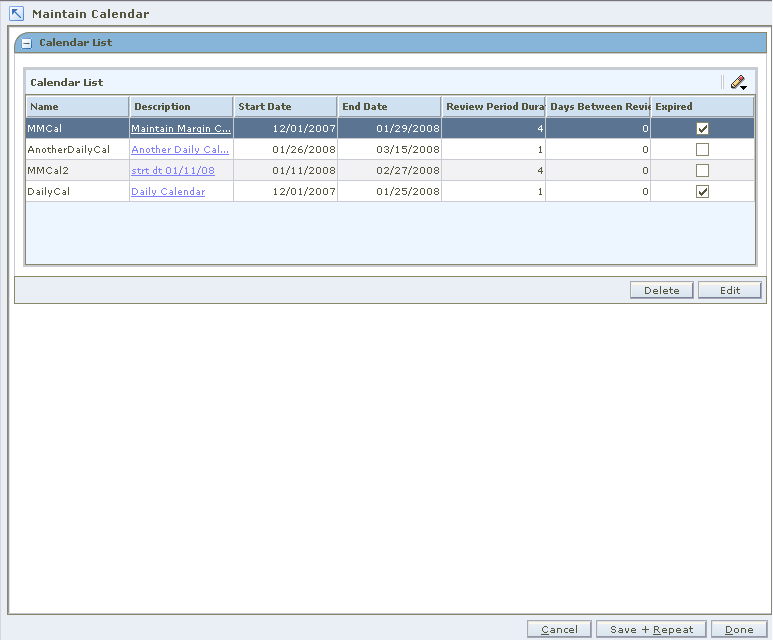
Navigate: From the Task Pad, select Calendar > Maintain Calendar. The Maintain Calendar workspace opens.
Select the calendar you want to maintain from the Calendar List pane.
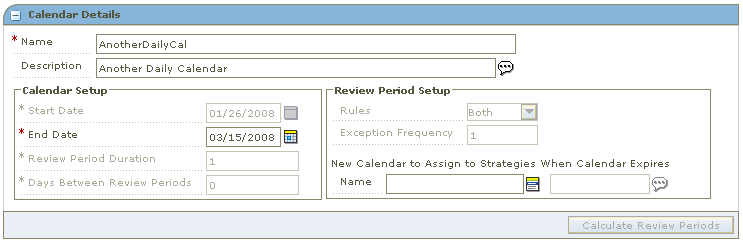
Click Edit. The Calendar Details and Review Period Details panes are displayed and the fields that can be changed are enabled.
Edit the enabled fields as necessary.
Calendar Detail
End Date: Select the end date for the calendar.
New Calendar to Assign to Strategies when Calendar expires: Select the calendar that replaces the current calendar after the end date.
Review Period Details
Rules: Select Inclusion, Exclusion, Both, or None.
Exceptions: Select if exceptions, from the merchandising system, should be processed during the review period.
Click Calculate Review Periods. If edits are made to the calendar detail, you must click Calculate Review Periods.
Click Done.
You can move a location from one zone to another within a zone group. The process allows a location to keep all location level pricing events while it transfers from the old zone's pricing strategies to those of the new zone, while at the same time inheriting the pricing events of the new zone.
|
Note: System options control whether promotions are allowed to overlap a scheduled location move, and whether a location automatically inherits pricing of the new zone. See "System Options Definitions" for more information about Location Moves options. |
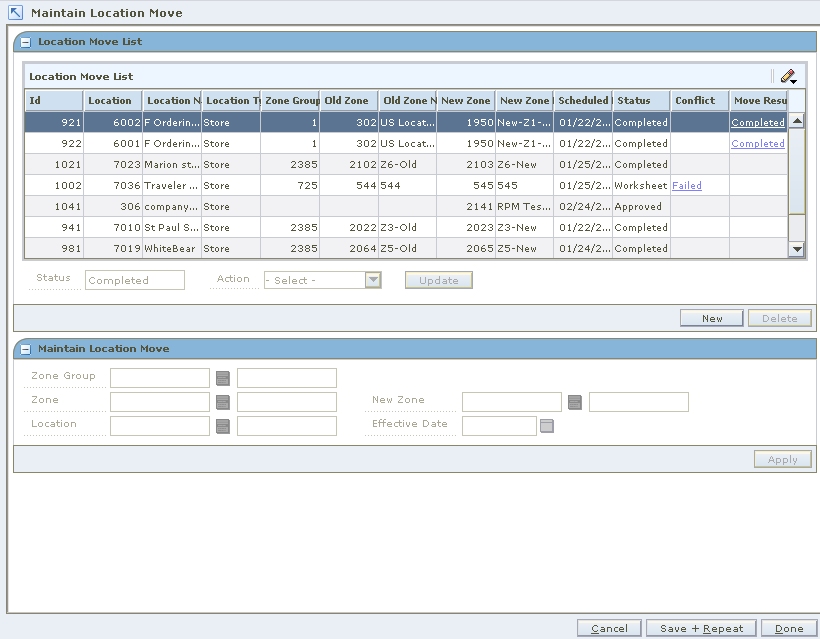
Navigate: From the Task Pad, select Zone Structure > Maintain Location Move. The Maintain Location Move workspace opens.
Click New. The Zone Group Field is enabled on the Maintain Location Move pane.
In the Zone Group field, enter the zone group of the location you need to move, or click the LOV and select a zone group.
In the Zone field, enter zone of the location you need to move, or click the LOV and select a zone.
In the Location field, enter the location you need to move, or click the LOV and select a Location.
In the New Zone field, enter the zone to move the location to, or click the LOV and select the new zone.
In the Effective Date field, enter the date the location should move zones, or click the calendar button and select a date.
|
Note: The Effective Date you can set depends on the number of days set in the system option Location Move Lead Time. The earliest date a location move can be created is today's date plus the location move lead time. |
Click Apply. The location move request appears with a status of Worksheet on the Location Move list.
Select a location move request with a status of Worksheet.
Select Submit from the Action drop-down list.
Click Update.
A confirmation prompt is displayed. Click Yes.
The location move request is changed to a status of Pending.
If no conflicts are found, the location move request is changed to a status of Submitted.
After a location move request is in Submitted status, the request can be approved, rejected, or returned to Worksheet status.
Select Approve from the Action drop-down list.
Click Update.
A confirmation prompt is displayed. Click Yes.
The location move request is changed to a status of Pending.
If no conflicts are found, the location move request is changed to a status of Approved.
|
Note: An alert is displayed when conflict checking is complete. |
After a location move request is in Approved status, the move will be scheduled by the location move scheduling batch job. A location move request in Approved status can be changed back to Worksheet status, edited, and resubmitted if necessary. A location move in Scheduled status cannot be moved back to Approved, Worksheet, or Submitted status.
Select a location move request with a status of Submitted.
Select Reject from the Action drop-down list.
Click Update.
A confirmation prompt is displayed. Click Yes.
The location move request is changed to a status of Rejected.
A rejected location move can be changed back to Worksheet status. In Worksheet status, the request can be edited and resubmitted, or it can be deleted.
Select a location move with a status of Failed, Rejected, Submitted, or Approved.
Select Worksheet from the Action drop-down list.
Click Update. The location move request is changed back to Worksheet status.
Edit the location move request as needed. If the request failed, fix the conflicts that caused the failure.
After you edit a location move request, you can submit the request again.
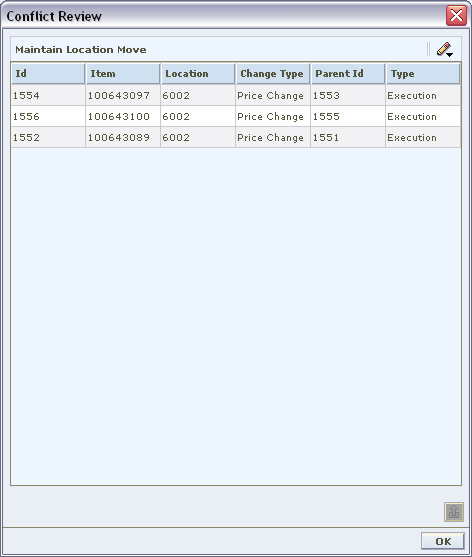
In the Conflict column, click the Failed link. The Conflict Review window opens with the conflict information displayed.
Click OK to close the Conflict Review window.
|
Note: Only location moves in Worksheet status can be deleted. |
Select a location move with a status of Worksheet.
Click Delete.
A confirmation prompt is displayed. Click Yes. The location move request is deleted.
If RPM created any exceptions or exclusions in order for the location to be moved successfully, those items are viewable in the move results column.
In the Move Results column, click the Completed link. The Conflict Review window opens, with move results information displayed.
Navigate: From the Task Pad, select Finance Details > Create/Maintain Finance Details. The Maintain Finance Details workspace opens.
To add a new credit card type, click New.
To create a new credit card type, refer to "Create a Code".
In the Credit Type field, select the credit card type.
In the Bank Name field, enter the name of the credit card issuing bank.
In the BIN Number From and To fields, enter the respective bank index numbers.
Click Apply.