| Oracle® Retail Price Management User Guide Release 16.0 E80052-01 |
|

 Previous |
 Next |
A price change is the permanent change in the price of an item. You can use the price guides to move the new price to established price points or round the price.
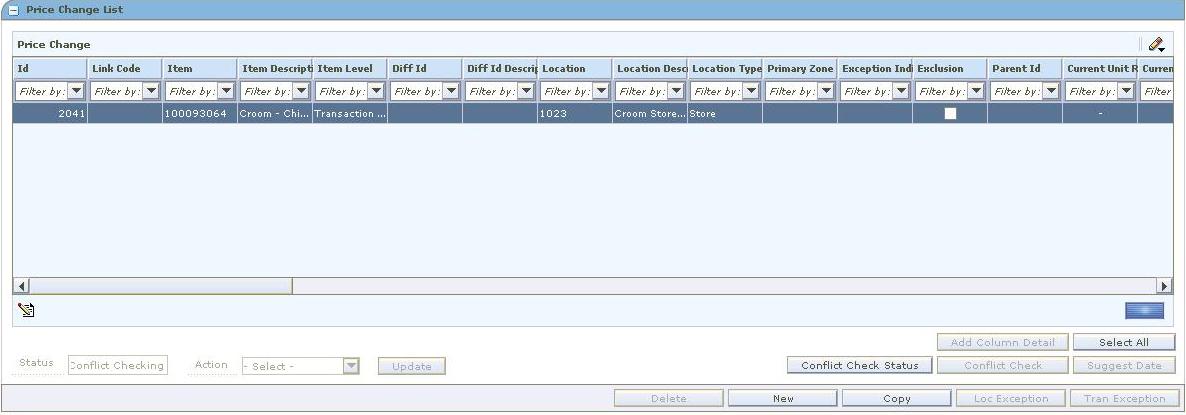
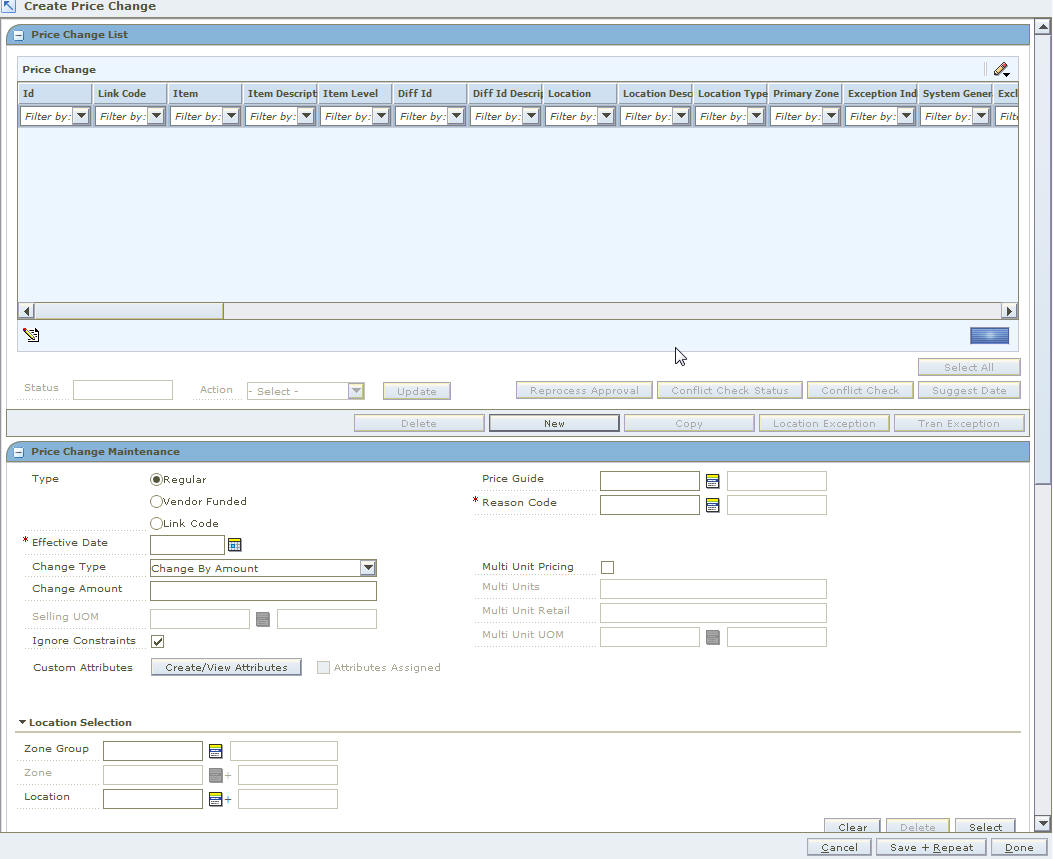
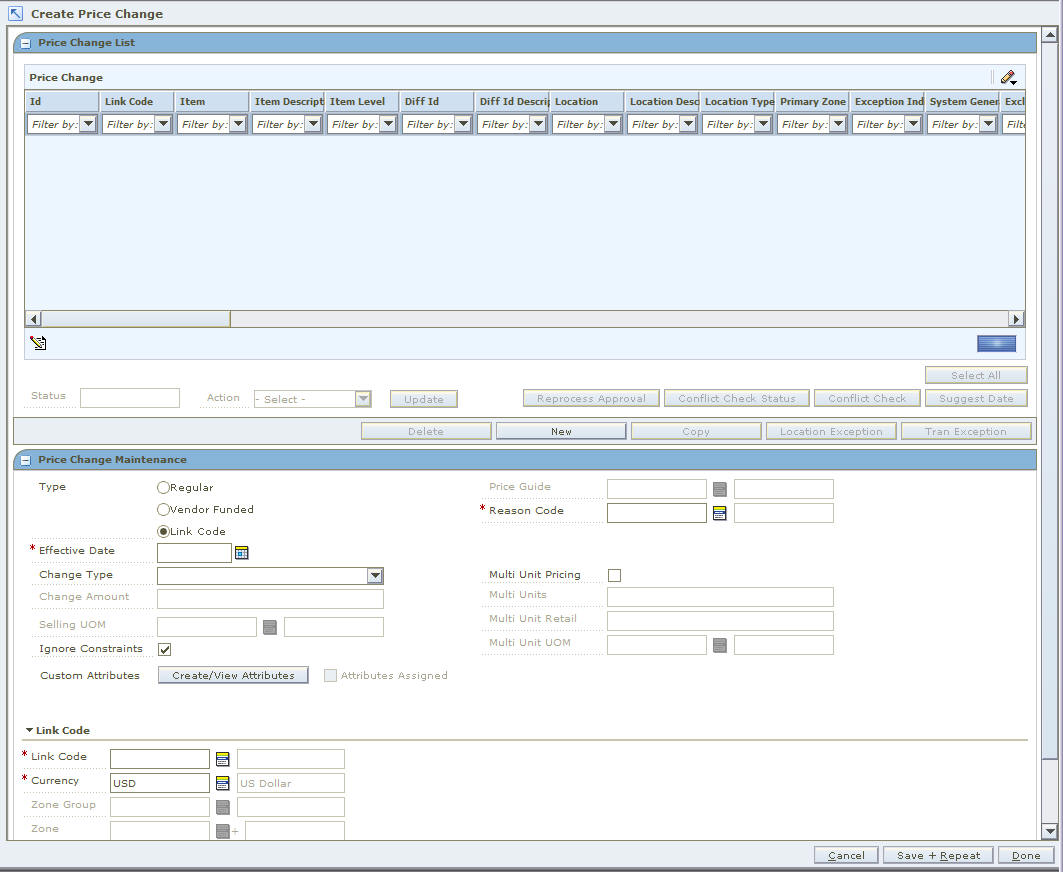
The Create Price Change workspace allows you to establish the price changes for an item or group of items at a location or group of locations. When you open the window, the Price Change List and Price Change Maintenance panes open. After you create your price change in the Price Change Maintenance pane, it is added to the Price Change List pane.
If you select locations with multiple currencies, you can only choose to create a price change by percent or to reset the point of sale (POS) price. You cannot create multi-unit pricing across multiple currencies.
Create price change allows you to create the following types of price changes.
Regular - The price change is occurring at the retailer's initiative.
Vendor Funded - The supplier is subsidizing a portion of the price change.
Link codes - Associate items to each other at a location and price them exactly the same.
When a price change is added to RPM, it must go through a series of checks before it can be applied to an item/location. Depending on your user role, you may not be able to move the retail price change to the next status. A change to submitted or approved status, or from worksheet back to approved, results in a conflict check. A change to approved status results in the application of area differential strategies for the price change. A price change may be in any of the following statuses:
Table 6-1 Status of Price Changes
| Status | Definition |
|---|---|
|
Worksheet |
The price change has been started, but not reviewed or sent out. |
|
Submitted |
The price change has been completed and is pending review. Conflict checking has occurred for the price change. |
|
Approved |
The price change has been reviewed and accepted. The price change is communicated to the locations for which the price change is effective. |
|
Executed |
The new prices established are effective for the item/location. |
|
Rejected |
The price change has been reviewed and declined. |
After you create a price change, you can maintain different aspects of the price change. You can create exceptions to the items and locations that exist on the price change, change the specifics of the price change, and can copy an existing price change.
The following procedures allow you to navigate and search for price changes through the Maintain Price Change task on the Task Pad; however, you can accomplish these same tasks after you create a price change and the price change is displayed in the Price Change List pane in the Create Price Change workspace.
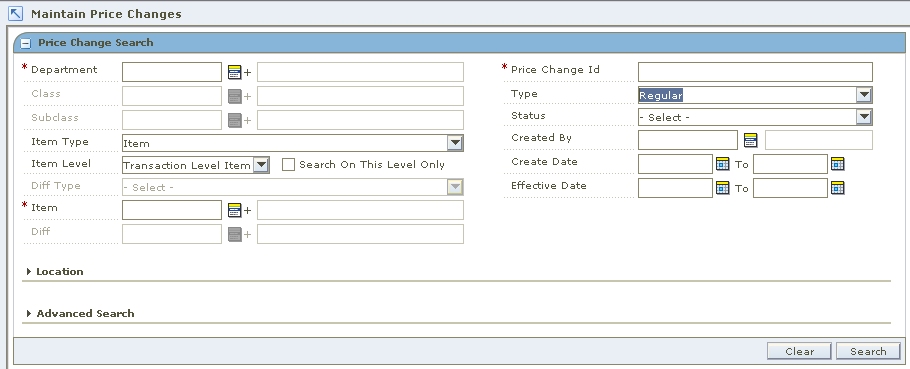
Navigate: From the Task Pad, select Price Changes > Maintain Price Change. The Price Change Search pane opens.
Enter criteria as necessary to restrict the search to the price changes you want to maintain.
Table 6-2 Search Criteria
| Field | Criteria |
|---|---|
|
Department |
Enter the Department ID or select a department from the list. |
|
Class |
Enter the Class ID or select a class from the list. |
|
Subclass |
Enter the Subclass ID or select a subclass from the list. |
|
Price Change ID |
Select price change IDs to search for specific price changes. |
|
Type |
Select Regular, Vendor Funded, Link Code, or All price change types. |
|
Status |
Select Approved, Executed, Rejected, Submitted, or Worksheet status price changes. |
|
Item Type |
Select the item type — Item, Item List, or Price Event Item List. |
|
Item Level |
Select the item level — Parent Item or Parent Item/Diff or Transaction Level Item. |
|
Search On This Level Only |
Select the Search on this Level Only check box to restrict the search to the selected level. The item list level price events are displayed. |
|
Diff Type |
Select a Diff type. This field is enabled only when you select Parent Item/Diff as item level. |
|
Created By |
Enter a username to search for price changes created by a specific user. |
|
Create Date |
Select a create date to search for price changes with a specific create date. |
|
Effective Date |
Select an effective date to search for price changes with a specific effective date. |
|
Item |
Enter the Item ID or select an item from the list. |
|
Diff |
Enter the Differential value or select the value from the list. This field is enabled only when you select Parent Item/Diff as item level. |
|
Zone Group |
Enter the Zone Group ID or select a zone group. |
|
Zone/Location |
Select Zone Groups, Zones, and Locations to search for price changes from specific zones or locations. |
|
Approved By |
Enter a username to search for price changes approved by a specific user. |
|
Reason Code |
Select reason codes. |
|
Deal ID |
Select deal IDs to search for price changes related to specific deals. First select Vendor Funded from the Type field. |
|
Deal Detail ID |
Select deal detail IDs to search for price changes related to specific deal details. First select Vendor Funded from the Type field, then select a deal from the Deal ID field. |
|
Approved Date |
Select an approved date to search for price changes with a specific approved date. |
|
Price Guide |
Select price guides to search for price changes with specific price guides. |
|
Market Basket Code |
Select a Market Basket Code to search for price changes with a specific Market Basket Code. |
|
Link Code |
Select a Link Code to search for price changes with a specific Link Code. |
|
Merchandise Level |
Select criteria in the following fields to search for price changes in a specific merchandise level:
|
Click Search. Your results appear in the Price Change List pane.
Whenever the status of a price event changes, conflict checking is performed and the conflicts are displayed.
Conflict checking is done for the following status changes:
Worksheet to Approved
Worksheet to Submitted
Submitted to Approved
Approved to Worksheet
The existence of any conflict is identified by a binocular icon in the conflicts column of the multi-record block. To review a conflict, click on the binocular icon, the Conflict Review List window opens.
If the event type is Price Change or Clearance, the promotion ID and promotion component ID are not displayed. The promotion ID and promotion component ID are displayed if the event type is Promotion.
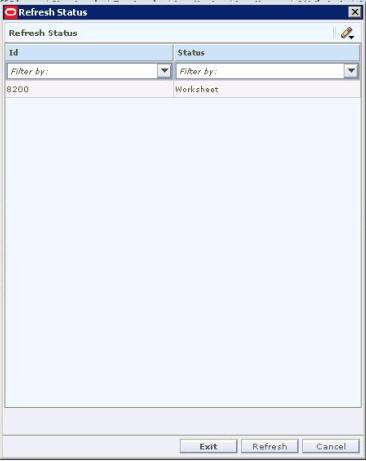
In the Maintenance workspace, click Conflict Check Status. The Refresh Status window opens.
Click Refresh to update the conflict checking state in the window.
Click Exit to go back to the price event window.
The status in the multi-record block is refreshed.
Click Cancel to close the status window without making any changes or refreshing the price event.
Navigate: From the Task Pad, select Price Changes > Create Price Change. The Create Price Change workspace opens.
In the Price Change Maintenance pane, in the Type field, select Regular.
In the Effective Date field, enter the date the price change should go into effect, or click the calendar button and select a date.
|
Note: The Effective Date you set depends on the number of days set in the system option Price Change Processing Days. The earliest date that price changes can be created is the current date plus the price change processing days. If you have emergency price change permission, Price Change Processing Days will be ignored. |
In the Price Guide field, enter the ID of the price guide you want to apply to the price change, or click the LOV and select a price guide.
|
Note: The price guide only applies to the items in the same department as the price guide and locations that share the same currency as the currency on the price guide.When an item list or price event item list is used during the creation of a price event, the selected price guide will only apply to items for the department assigned to the price guide. If other departments exist, the price guide rules will be ignored for any items not in the price guide department. If price guide is set up at corporate level, all items will be included. |
In the Reason Code field, enter the ID of the reason code for which you are creating the price change, or click the LOV and select a reason code.
In the Price Change Type field, select the type of price change that is occurring.
|
Note: If you selected locations with multiple currencies, you can only choose to create a price change by percent or to reset the POS price. |
Change By Percent - A price for an item is changed by a percentage added to or removed from the basis regular retail. The percent of change is determined by the percent entered in the Change Amount field.
Change By Amount - A price for an item is changed by an amount added or removed from the basis regular retail. The amount of change is determined by the amount entered in the Change Amount field.
Fixed Price - The price for the item will be at a specified retail that will be defined in the change amount field.
Reset POS Price - The item will be recognized on a price change but no change to the retail will occur. When you select Reset POS Price, the Change Amount field and Selling UOM field will be disabled.
In the Change Amount field, enter an amount.
Enter or select a value in the Selling UOM field (Optional for a Fixed Price change). If you leave this field blank, the selling unit of measure will default to the current selling unit of measure for the items/location combination. (The Selling UOM field is only active for a Fixed Price change.)
|
Note: If you do not specify a Selling UOM value, and the selected items do not have the same selling unit of measure, a conflict will be returned and you will need to enter a selling UOM value before submitting the price change to the conflict checking engine again. |
If appropriate, define the multi-unit pricing for a price change:
Select the Multi Unit Pricing check box.
In the Multi Units field, enter the number of units that are part of the price change.
In the Multi Unit Retail field, enter the new price for the items.
In the Multi Unit UOM field, enter the ID of the unit of measure that applies to the price change, or click the LOV and select a unit of measure.
If appropriate, select the Ignore Constraints box. When unchecked, the promotion constraints will be taken into account when conflict checking is performed on the price change. When checked, promotion constraints will be ignored when conflict checking is performed on the price change.
If appropriate, click Create/View Custom Attributes. A pop-up window opens that displays a list of eligible custom attributes for the price event type. Values for a custom attribute can be keyed manually in the window. Once all attribute information is complete, click Done or Cancel to exit without updating.
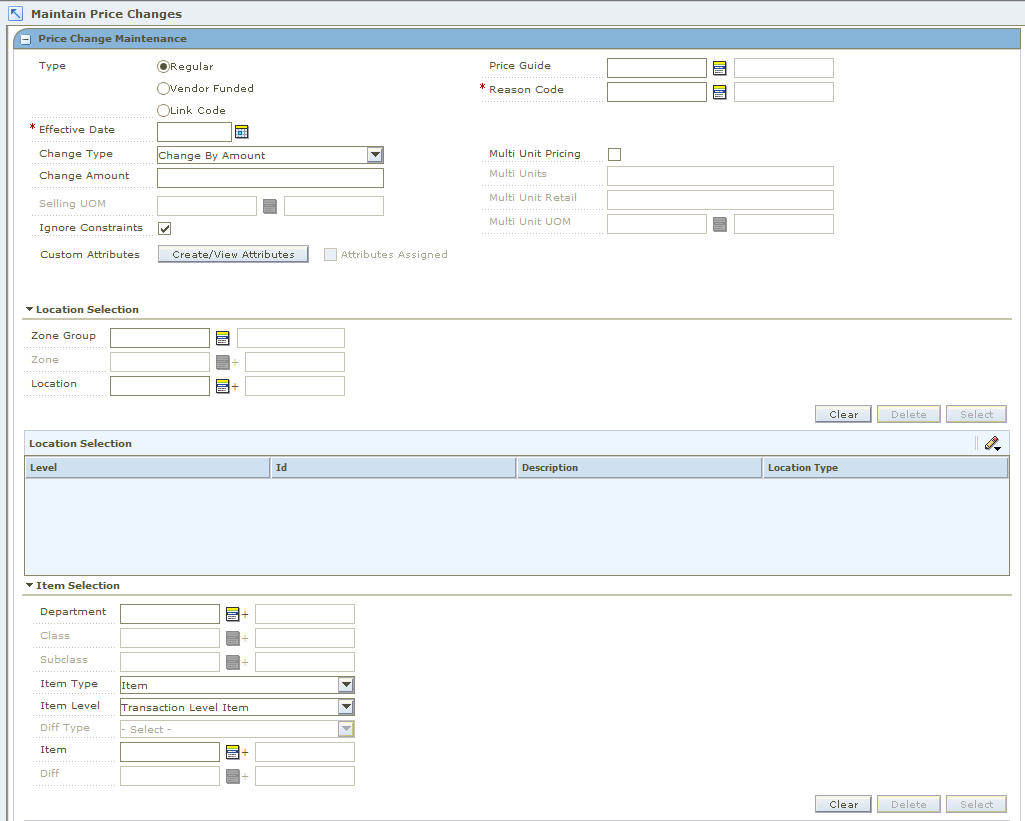
In the Location Selection area, select how you want to add locations to the price change.
Zone Group - Enter the ID of the zone group that contains the locations to add to the price change, or click the LOV and select a zone group.
Zone - Enter the ID of the zone to add to the price change, or click the LOV and select a zone.
Location - Enter the ID of the location that you want to add to the price change, or click the LOV and select a location.
|
Note: You can create price changes at the zone or location level. |
Click Select. The zones and/or locations that meet your criteria are added to the table in the Location Selection table.
In the Price Change Maintenance pane, in the Item Selection area, select items on the price change using the available fields.
|
Note: All fields with LOV buttons allow multiple selections. |
To select items from all available items, enter an ID in the Item field, or click the LOV and select item.
Or
Enter information in the enabled fields to limit the items available in the Item field.
In the Department field, enter a department number, or click the LOV and select a department.
In the Class field, enter a class number, or click the LOV and select a class.
In the Subclass field, enter a subclass number, or click the LOV and select a subclass.
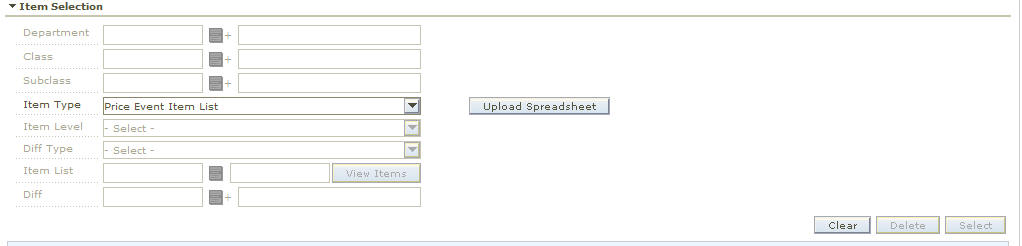
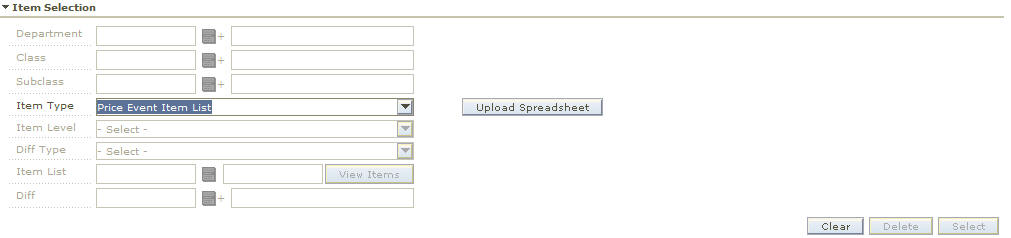
In the Item Type drop-down list, select Item, Item List, or Price Event Item List.
|
Note: If you select Item List from the Item Type drop down, only item lists will be selectable from the Item field. If you select Item, only single items that conform to the other criteria specified will be selectable.If you select Price Event Item List, the Upload Spreadsheet button will appear, giving you that option. |
In the Item Level drop-down list, select Parent Item, Parent Item/Diff, or Transaction Level Item.
|
Note: The Diff Type and Diff fields are only enabled if Parent Item/Diff is selected.If the Item Type is selected as Price Event Item List, all other selection fields will be left blank and protected. |
In the Diff Type drop-down list, select a diff type.
In the Diff drop-down list, select a diff.
In the Item field, click the LOV and select items.
|
Note: If the Item Type is selected as Item List, the Item Level is defaulted to Item List and the Item Editor defaults to Item List.If the Item Type is selected as Price Event Item List, all other selection fields will be left blank and protected. |
In the Item List field, enter the item list ID or select the item list from the LOV.
Click View Items. A pop-up window opens where the items in the item list are displayed.
Click Select. Items that meet your criteria are added to the Item Selection table.
If the Item Type is Item List, then the item list ID is populated in the ID column of the Item Selection MRB as a hyperlink. Click the hyperlink to view the items in the item list.
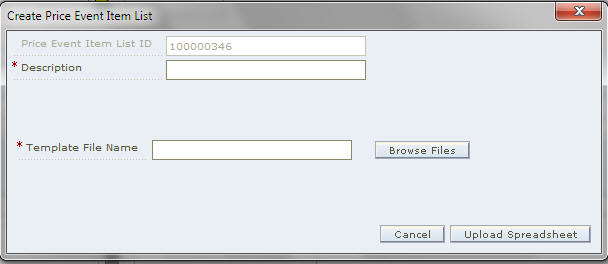
After selecting Price Event Item List for your Item Type, click Upload Spreadsheet. A pop-up window opens that gives the user a prefilled system assigned price event item list ID.
In the description field, enter a name for your Price Event Item List.
In the Template File Name field you have the option to either key in a file name or select a file using the browse button to find a file on your computer.
Once the file is selected click Upload Spreadsheet, the pop-up window will close and the price event item list details will display in the Item List field.
Click View Items, a pop-up window opens where the items in the price event item list are displayed.
Click Select. Items that meet your criteria are added to the Item Selection table.
|
Note: Price event item lists created and used in RPM are considered one time use only. You can upload the same spreadsheet multiple times but you cannot reuse a price event item list by keying the ID number associated to the list. A new ID will be assigned each time the spreadsheet is uploaded. |
In the Price Change Maintenance pane, click Apply to create price changes. One price change will be created for each item/location intersection.
If the Item Type is Item List, then the item list ID is populated in the item column of the Price Change List MRB with a hyperlink. Click the hyperlink to view the items in the item list.
|
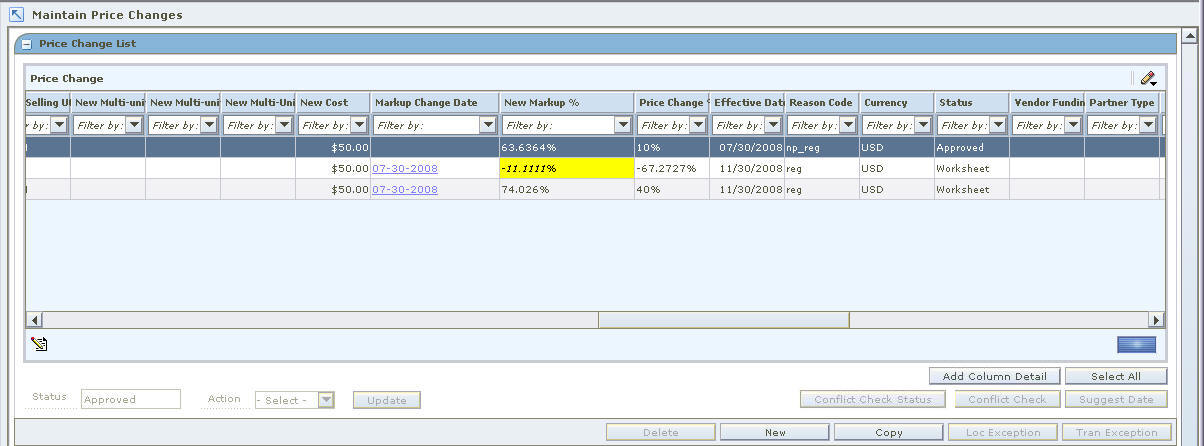
Note: If a price change you apply results in a negative margin for an item/location combination, the New Markup field will be highlighted to call the negative margin to your attention. (If the Add Column Detail button is displayed, click the button to view full details, including negative margins.) See "View Margins (Margin Visibility)" for more information. |
Change the status of your price change as appropriate.
Click Done to save your changes and close the workspace.
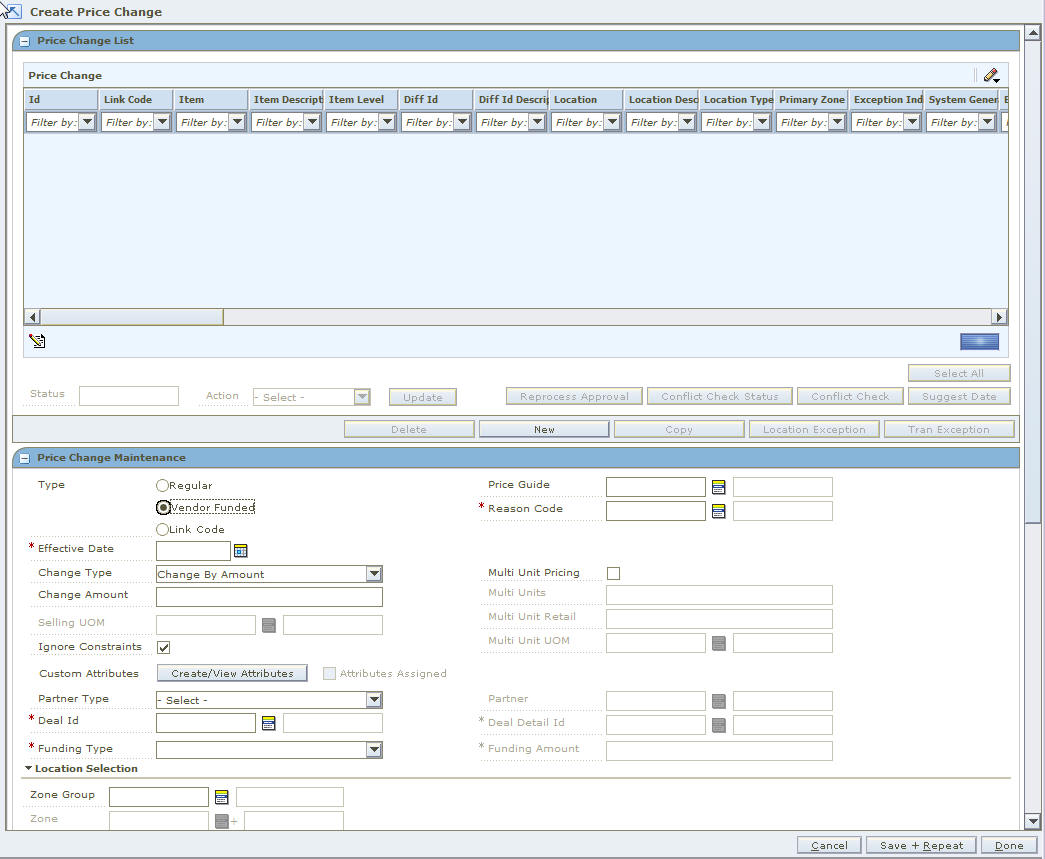
Navigate: From the Task Pad, select Price Changes > Create Price Change. The Create Price Change workspace opens.
In the Price Change Maintenance pane, in the Type field, select Vendor Funded.
In the Effective Date field, enter the date the price change should go into effect, or click the calendar button and select a date.
|
Note: The Effective Date you can set depends on the number of days set in the system option Price Change Processing Days. The earliest date price changes can be created is today's date plus the price change processing days. If you have emergency price change permission, Price Change Processing Days will be ignored. |
In the Price Guide field, enter the ID of the price guide you want to apply to the price change, or click the LOV and select a price guide.
|
Note: The price guide only applies to the items in the same department as the price guide.When an item list or price event item list is used during the creation of a price event, the selected price guide will only apply to items for the department assigned to the price guide. If other departments exist, the price guide rules will be ignored for any items not in the price guide department. If price guide is set up at corporate level, all items will be included. |
In the Reason Code field, enter the ID of the reason code for which you are creating the price change, or click the LOV and select a reason code.
In the Price Change Type field, select the type of price change that is occurring.
|
Note: If you selected locations with multiple currencies, you can only choose to create a price change by percent or reset the POS price. |
Change By Percent - A price for an item is changed by a percentage added to or removed from the basis regular retail. the percent of change is determined by the percent entered in the Change Amount field.
Change By Amount - A price for an item is changed by an amount added or removed from the basis regular retail. The amount of change is determined by the amount entered in the Change Amount field.
Fixed Price - The price for an item will be at a specified retail that will be defined in the change amount field.
In the Change Amount field, enter an amount.
If appropriate, define the multi unit pricing for a price change:
Select the Multi Unit Pricing check box.
In the Multi Units field, enter the number of units that are part of the price change.
In the Multi Unit Retail field, enter the new price for the items.
In the Multi Unit UOM field, enter the ID of the unit of measure that applies to the price change, or click the LOV and select a unit of measure.
If appropriate, select the Ignore Constraints box. When unchecked, the promotion constraints will be taken into account when conflict checking is performed on the price change. When checked, promotion constraints will be ignored when conflict checking is performed on the price change.
If appropriate, click Create/View Custom Attributes. A pop-up window opens that displays a list of eligible custom attributes for the price event type. Values for a custom attribute can be keyed manually in the window. Once all attribute information is complete, click Done or Cancel to exit without updating.
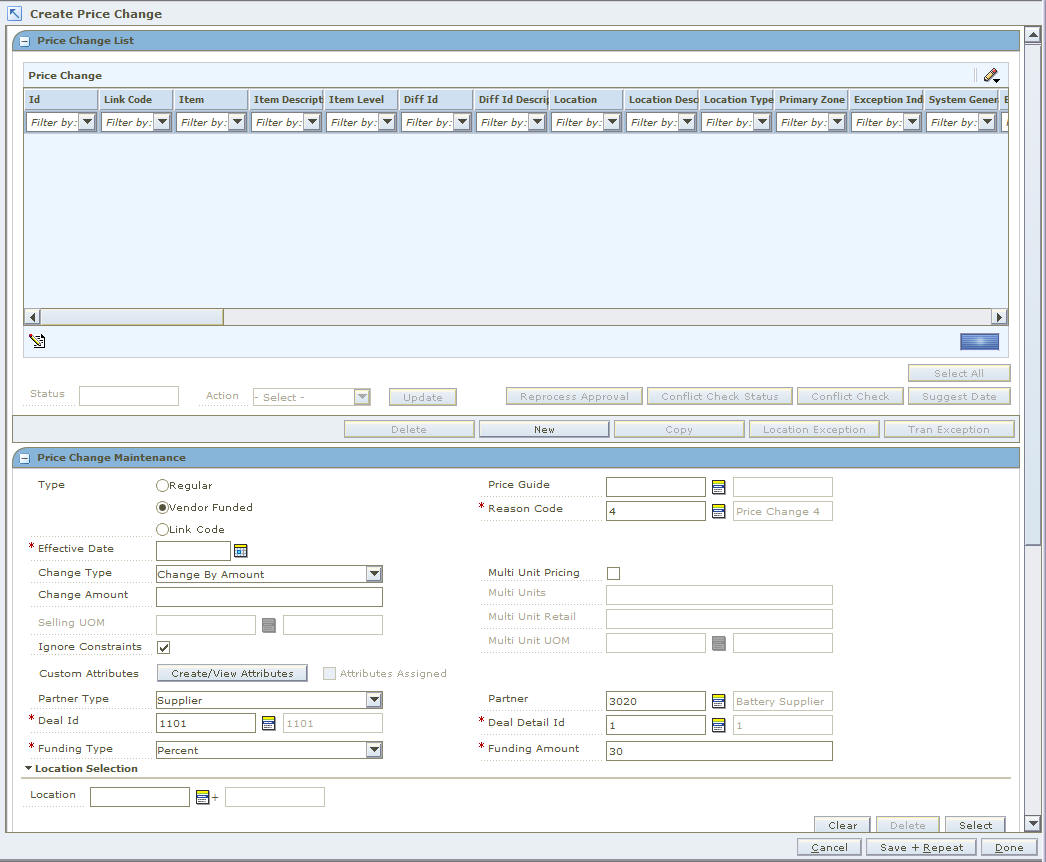
In the Price Change Maintenance pane, in the Partner Type drop-down list, select the partner type.
Manufacturer
Distributor
Wholesaler
Supplier
In the Partner field, enter the ID of the partner with the deal, or click the LOV and select a partner.
In the Deal ID field, enter the ID of the deal, or click the LOV and select a deal.
In the Deal Detail ID field, enter the ID of the deal details, or click the LOV and select the deal details.
In the Funding Type field, enter the type of funding, or click the LOV and select a type.
In the Funding Amount field, enter the amount of funding.
In the Zone Group field, enter the ID of the zone group that contains the locations you want to add to the price change, or click the LOV and select a zone group.
In the Zone field, enter the ID of the zone that contains the locations you want to add to the price change, or click the LOV and select a zone.
|
Note: The Zone field is limited by the currency entered in step 2. |
In the Location field, enter the ID of the location that you want to add to the price change, or click the LOV and select a location.
|
Note: You can create price changes at the zone level. Locations are not required. |
In the Item Selection area, in the Item field, enter an item ID, or click the LOV and select items.
|
Note: Only items on the deal are selectable. |
Click Select. The items appear in the Item Selection table.
In the Item Selection pane, click Apply to add all your changes.
|
Note: If a price change you apply results in a negative margin for an item/location combination, the New Markup field will be highlighted to call the negative margin to your attention. (If the Add Column Detail button is displayed, click the button to view full details, including negative margins.) See "View Margins (Margin Visibility)" for more information. |
Change the status of your price change as appropriate.
Click Done to save your changes and close the workspace.
Once the price change is completed, highlight and select the items you wish to create an exception for.
Click Location Exception or the Tran Exception.
Navigate to location exception LOV or the tran exception LOV and choose the item or location you wish to create an exception for.
Navigate to the change type and select Exclude. The location is excluded from the price change. When the change type of exclude is selected, the change amount is disabled.
Apply the changes to the record block. The appropriate exclusion/exception flags will result.
Approve the price change event.
|
Note: Location exception and exclusion can be created at Item List level also. |
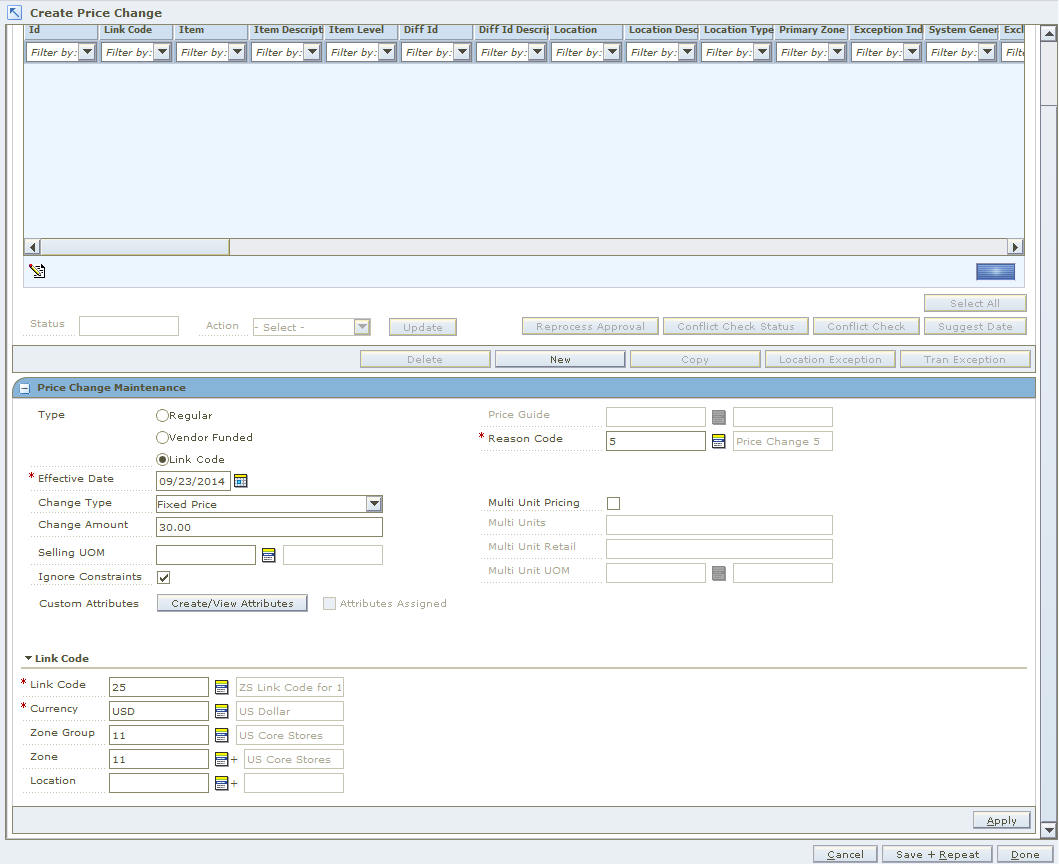
Navigate: From the Task Pad, select Price Changes > Create Price Change. The Create Price Change workspace opens.
In the Price Change Maintenance pane, select Link Code.
In the Effective Date field, enter the date the price change is should go into effect, or click the calendar button and select a date.
|
Note: The Effective Date you can set depends on the number of days set in the system option Price Change Processing Days. The earliest date price changes can be created is the current date plus the price change processing days. If you have emergency price change permission, Price Change Processing Days will be ignored. |
In the Reason Code field, enter the ID of the reason code for which you are creating the price change, or click the LOV and select a reason code.
In the Change Type field, select Fixed Price. The price for the item will be at a specified retail that will be defined in the change amount field. Link code price changes can only be set up as fixed price.
In the Change Amount field, enter an amount.
If appropriate, define the multi unit pricing for a price change:
Select the Multi Unit Pricing check box.
In the Multi Units field, enter the number of units that are part of the price change.
In the Multi Unit Retail field, enter the new price for the items.
In the Multi Unit UOM field, enter the ID of the unit of measure that applies to the price change, or click the LOV and select a unit of measure.
If appropriate, select the Ignore Constraints box. When unchecked, the promotion constraints will be taken into account when conflict checking is performed on the price change. When checked, promotion constraints will be ignored when conflict checking is performed on the price change.
If appropriate, click Create/View Custom Attributes. A pop-up window opens that displays a list of eligible custom attributes for the price event type. Values for a custom attribute can be keyed manually in the window. Once all attribute information is complete, click Done or Cancel to exit without updating.
In the Currency field, enter the currency code, or click the LOV and select the currency.
In the Link Code area of the Price Change Maintenance pane, in the Link Code field, enter the ID of the link code, or click the LOV and select a link code.
In the Zone Group field, enter the ID of the zone group that contains the locations you want to add to the price change, or click the LOV and select a zone group.
In the Zone field, enter the ID of the zone that contains the locations you want to add to the price change, or click the LOV and select a zone.
|
Note: The Zone field is limited by the currency entered in step 2. |
In the Location field, enter the ID of the location that you want to add to the price change, or click the LOV and select a location.
|
Note: You can create price changes at the zone level. Locations are not required. |
In the Price Change Maintenance pane, click Apply to add all your changes.
|
Note: If a price change you apply results in a negative margin for an item/location combination, the New Markup field will be highlighted to call the negative margin to your attention. (If the Add Column Detail button is displayed, click the button to view full details, including negative margins.) See "View Margins (Margin Visibility)" for more information. |
Change the status of your price change as appropriate.
Click Done to save your changes and close the workspace.
Navigate: From the Task Pad, select Price Changes > Maintain Price Change. The Price Change Search pane opens.
Search for and retrieve the price change you want to maintain. Your results are displayed in the Price Change List pane.
|
Note: If you are in the Create Price Change workspace your price changes are displayed in the Price Change List pane when you click Apply. You do not need to open the Maintain Price Change workspace. |
Select the price change for which you want to change the status.
In the table, select a row.
Click Select All. All records in the Price Change List pane are selected.
In the Action field, select the status to which you want to move the price change.
Click Update. You are prompted to confirm your decision.
Click OK.
The current price change is displayed in the upper half of the window. Price changes promotions, and/or clearances for the same item/location are displayed in the lower half of the window.
Click Cancel to close the window. See "Maintain a Price Change" for more information on how to adjust a price change.
Click Done to save any changes and close the window.
Navigate: From the Task Pad, select Price Changes > Maintain Price Change. The Price Change Search window opens.
Search for and retrieve the price change you want to maintain. Your results appear in the Price Change List pane.
From the list of results, select the price change you want to maintain. The price change details appear in the Price Change Maintenance pane.
If necessary, change the status of the price change to Worksheet.
Edit the enabled fields as necessary.
|
Note: You cannot change the items and locations on a price change. |
Click Apply to add all any changes.
Click Done to save any changes and close the window.
From the list of results, select the price change you want to copy.
Click Copy. The price change details appear in the Price Change Maintenance pane.
Edit the enabled fields as necessary.
Click Apply to add all any changes.
Click Done to save any changes and close the window.
|
Note: Effective dates, exceptions, and status are not copied when copying a price change. |
From the list of results, select the price change you want to delete.
Click Delete. You are prompted to confirm your decision.
Click Yes. The price change is deleted.
Click Done to close the window.
|
Note: Only price changes with a status of Worksheet can be deleted. |
From the list of results, select the price change you want to check.
Click Conflict Check.
If no conflicts exist, click OK.
If conflicts exist, you must adjust the details of your price change before you can move the price change to the next status.
Click Done to save any changes and close the window.
From the list of results, select the price change you want to suggest a date for.
Click Suggest Date. The system runs a check of promotion constraints, then calculates an appropriate date and places it in the effective date field.
Click Done to save any changes and close the window.
|
Note: Location exceptions can only be created for Zone Level price changes. |
From the list of results, select the price change.
Click Location Exceptions. The locations selection area of the Price Change Maintenance pane is enabled.
In the Location field, enter the ID of the location where items are different than the zone on the price change, or click the LOV and select a location in the zone.
In the enable price change fields, enter information about the price change for the item/location.
|
Note: To create a Location Exclusion, select the type Exclude. |
Click Apply to add any changes.
Click Done to save any changes and close the window.
|
Note: Item exceptions at the transaction level can occur only when the price change was created at the item parent, item parent/diff, item list, or price event item list level. |
From the list of results, select the price change.
Click Tran Exceptions. The item selection area of the Price Change Maintenance pane is enabled.
In the Item field, enter the ID of the item for which items are different than the parent item on the price change, or click the LOV and select an item.
In the enable price change fields, enter information about the price change for the item.
Click Apply to add any changes.
Click Done to save any changes and close the window.
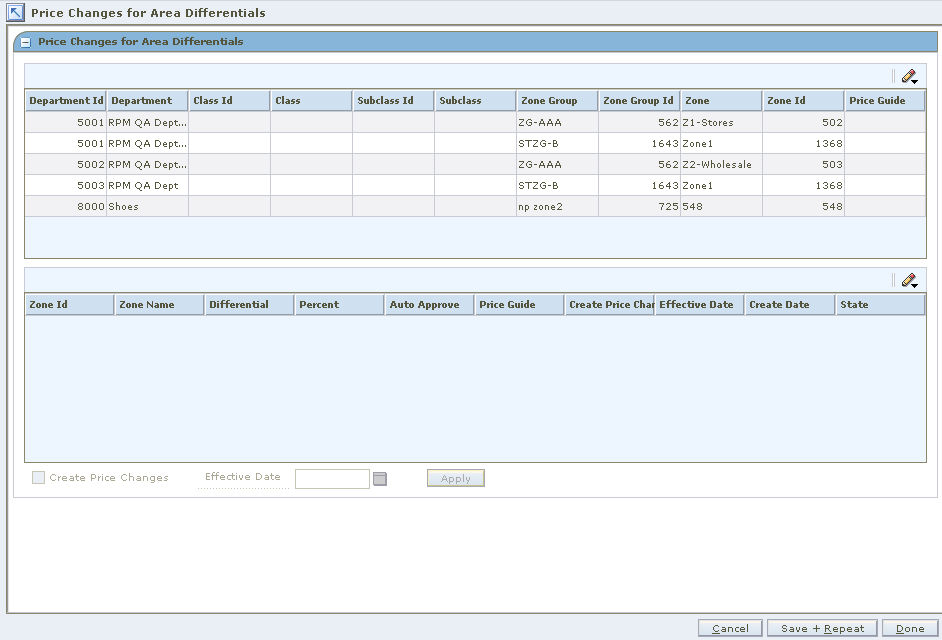
Navigate: From Task Pad, select Price Changes> Price Changes for Area Differentials. The Price Changes for Area Differentials window opens.
Select Primary area from the top Multi-Record Block.
Secondary areas for the Primary area will appear in the bottom Multi-Record Block. Select the secondary area you want to create price changes for.
Click Create Price Changes.
Enter an Effective Date.
Click Apply.