| Oracle® Retail Merchandising System User Guide 16.0 E65443-01 |
|

 Previous |
 Next |
The following information describes the foundation data within RMS.
The organizational hierarchy allows you to create the relationships that are necessary in order to support the operational structure of a company. You can create a preferred organizational structure to support consolidated reporting at various levels of the company. Also, you can assign responsibility for any level of the hierarchy to a person or persons in order to satisfy internal reporting requirements.
The following default organizational levels are used within RMS:
Company: The highest default organizational and merchandise unit defined in RMS. Only one company can be defined.
Chain: The first level below the company level in the organizational hierarchy. The definition of a chain is based on the needs of the company, but a chain can be used to group various store formats, concepts, and geographical locations within the organization.
Area: The second level below the company level in the organizational hierarchy. The definition of an area is based on the needs of the company, but an area is used typically to define a geographical group within the organization. An area can belong to only one chain.
Region: The third level below the company level in the organizational hierarchy. The definition of a region is based on the needs of the company, but a region can be used to group geographical locations within the organization. A region can belong to only one area.
District: The fourth level below the company level in the organizational hierarchy. The definition of a district is based on the needs of the company, but a district is used typically to group geographical locations within the organization. A district can belong to only one region.
Channel: A channel grouping mechanism for a multi-channel environment. You can associate a channel with a location when you create or edit a store or virtual warehouse.
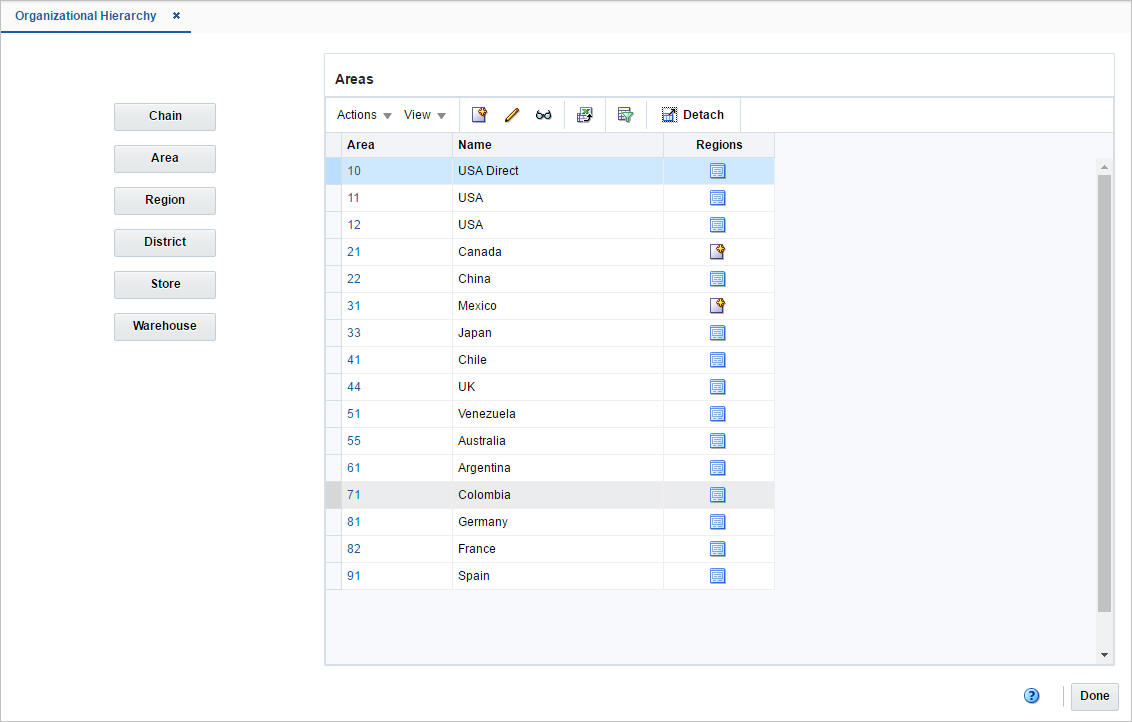
The Organizational Hierarchy window allows you to create, edit and view the organizational hierarchy of the company.
To access the Organizational Hierarchy window from the Task menu, select Foundation Data > Locations > Organizational Hierarchy.
The Organizational Hierarchy window contains the following sections.
The Organizational Hierarchy structure on the left side of the window contains the following buttons.
Table 2-1 Hierarchy Structure - Buttons and Description
| Buttons | Description |
|---|---|
|
Chain |
Displays the available chains in the table. |
|
Area |
Displays the available areas in the table. |
|
Region |
Displays the available regions in the table. |
|
District |
Displays the available districts in the table. |
|
Store |
Displays the available stores in the table. |
|
Warehouse |
Displays the available warehouse in the table. |
The Hierarchy table displays the available entries of the selected hierarchy level. For example, if you select the Chain button, all available chains are displayed in this table.
The table displays the following columns by default.
Hierarchy ID, depending on the selected hierarchy button.
Name of the hierarchy level, for example, the name of the chain.
Next hierarchy level, for example, Area.
This column contains either the Create or the Details icon.
If the next level has been created, the Detail icon is displayed. Use the icon to maintain or view the details of the next level.
If the next level has not been created, the Create icon is displayed. Use the icon to create the next level.
This column is not available for stores and warehouses.
Use the Actions menu and icons to apply actions to the table. You can perform the actions listed below.
Table 2-2 Hierarchy Table - Actions Menu/Icons and Description
| Actions Menu/Icons | Description |
|---|---|
|
Create and Create icon |
You can create a new hierarchy level by selecting Actions > Create or by using the Create icon. For more information about how to create the individual hierarchy levels, see the following sections: |
|
Edit and Edit icon |
Select Actions > Edit or use the Edit icon to edit the selected hierarchy level. |
|
View and View icon |
To view a hierarchy level:
|
|
Export to Excel and Export to Excel icon |
You can export the records in the table to a Microsoft Excel spreadsheet by selecting Actions > Export to Excel or by using the Export to Excel icon. |
You can customize the view of the table. Use the View Menu and icons to customize the view as listed below.
Table 2-3 Hierarchy Table - View Menu/Icons and Description
| View Menu/Icons | Description |
|---|---|
|
Columns |
You can manage which of the columns will be shown in the table by clicking the Show All and Manage Columns options. |
|
Detach and Detach icon |
You can view the tables in the application in a separate window by clicking Detach or by using the Detach icon. |
|
Sort |
You can sort columns by the following options:
|
|
Reorder Columns |
You can reorder columns by clicking the Reorder Columns option. |
|
Query by Example and Query by Example icon |
You can filter the items by one or multiple column values by clicking the Query by Example option or by using the Query by Example icon. |
To create a chain, follow the steps below.
From the Tasks menu, select Foundation Data > Locations > Organizational Hierarchy. The Organizational Hierarchy window appears.
Select the Chain button. All available chains are displayed in the table.
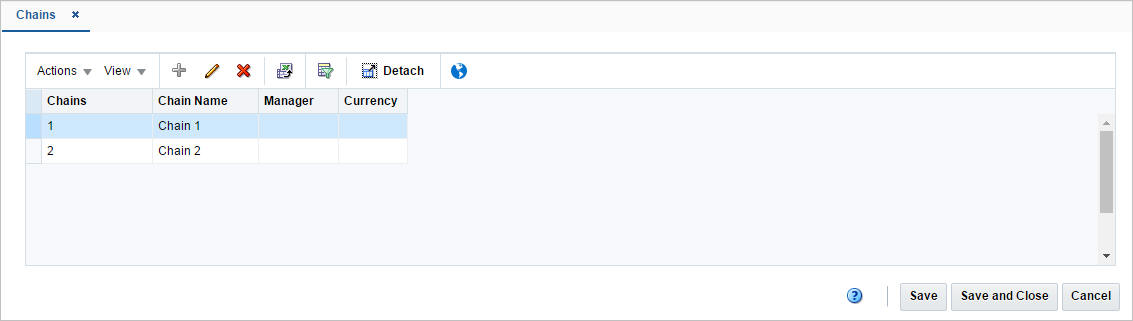
In the table, select Actions > Create, or use the Create icon. The Chains window appears.
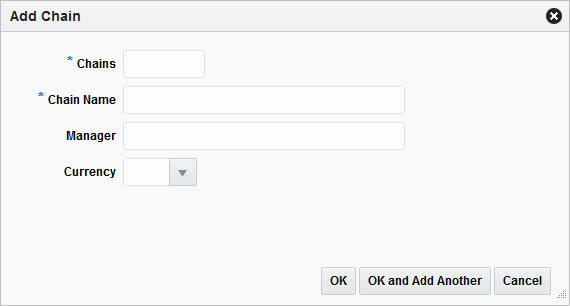
Then select Actions > Add, or use the Add icon. The Add Chain window appears.
In the Chains field, enter a unique number. This field is a required field.
In the Chain Name field, enter the name of the chain. This field is a required field.
In the Manager field, enter the name of the manager who is responsible for the chain.
In the Currency field, enter, select or search for the chain's currency code.
Then choose one of the following options.
Click OK to save the chain and close the window.
Click OK and Add Another to save the current chain and add additional entries.
Click Cancel to reject all entries and close the window.
To edit a chain, follow the steps below.
From the Tasks menu, select Foundation Data > Locations > Organizational Hierarchy. The Organizational Hierarchy window appears.
Select the Chain button. The available chains are displayed in the table.
Select a record in the table.
Then click the chain ID link, or select Actions > Edit, or use the Edit icon. The Chains window appears.
Select a record in the table.
Select Actions > Edit, or use the Edit icon. The Edit Chain window appears.
The Chain field displays the selected chain ID.
Edit the chain name, manager and/or currency, if necessary.
Then choose one of the following options.
Click OK to add your to the table and close the window.
Click Cancel to reject all entries and close the window.
The Chain window allows you to create, edit, view, and delete a chain in the organizational hierarchy. A chain is below the company and above the area in the organizational hierarchy. You can use the chain level to define a variety of store formats, concepts, or geographical groupings.
Use the Actions Menu and icons to apply actions to the table. You can perform the actions listed below.
Table 2-5 Chains - Actions Menu/Icons and Description
| Actions Menu/Icons | Description |
|---|---|
|
Add and Add icon |
You can add new chains by selecting Actions > Add or by using the Add icon. For more information about how to add new chains, see the Creating a Chain section. This function is not available in edit mode. |
|
Delete and Delete icon |
You can delete chains:
|
|
Edit and Edit icon |
Select Actions > Edit or use the Edit icon to edit the selected chain. For more information about how to edit a chain, see the Editing Chains section. |
|
Export to Excel and Export to Excel icon |
You can export the records in the table to a Microsoft Excel spreadsheet by selecting Actions > Export to Excel or by using the Export to Excel icon. |
|
Translate and Translate icon |
You can create a translation by selecting Actions > Translate or by using the Translate icon. |
You can customize the view of the table by using the options in the View Menu and icons listed below.
Table 2-6 Chains - View Menu/Icons and Description
| View Menu/Icons | Description |
|---|---|
|
Columns |
You can manage which of the columns will be shown in the table by clicking the Show All and Manage Columns options. |
|
Detach and Detach icon |
You can view the tables in the application in a separate window by clicking Detach or by using the Detach icon. |
|
Sort |
You can sort columns by the following options:
|
|
Reorder Columns |
You can reorder columns by clicking the Reorder Columns option. |
|
Query by Example and Query by Example icon |
You can filter the records by one or multiple column values by clicking the Query by Example option or by using the Query by Example icon. |
The toolbar contains the following icon and buttons.
Table 2-7 Chains Toolbar - Icons/Buttons and Description
| Icons/Buttons | Description |
|---|---|
|
Help icon |
You can access the online help for a particular page by clicking the Help icon. |
|
Save |
Click Save to save the entered records. |
|
Save and Close |
Click Save and Close to save the entered records and close the window. |
|
Cancel |
Click Cancel to reject all entries and close the window. |
|
Done |
If you open the window in view mode, the Done button is displayed. Click Done to close the window. |
To create an Area, follow the steps below.
From the Tasks menu, select Foundation Data > Locations > Organizational Hierarchy. The Organizational Hierarchy window appears.
Select the Area button. All available areas are displayed in the table.
In the table, select Actions > Create, or use the Create icon. The Areas window appears.
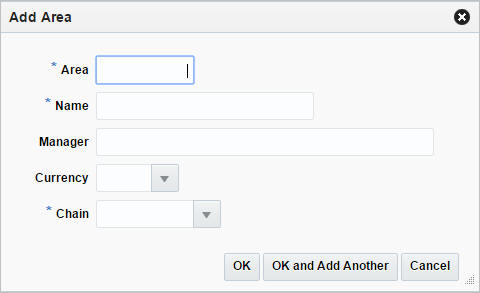
Then select Actions > Add, or use the Add icon. The Add Area window appears.
In the Area field, enter a unique number. This field is a required field.
In the Name field, enter the name of the area. This field is a required field.
In the Manager field, enter the name of the manager who is responsible for the area.
In the Currency field, enter, select or search for the area's currency code.
In the Chain field, enter, select or search for the chain ID which is associated with the area. This field is a required field.
Then choose one of the following options.
Click OK to save the area and close the window.
Click OK and Add Another to save the current area and add additional entries.
Click Cancel to reject all entries and close the window.
To edit an area, follow the steps below.
From the Tasks menu, select Foundation Data > Locations > Organizational Hierarchy. The Organizational Hierarchy window appears.
Select the Area button. The available areas are displayed in the table.
Select a record in the table.
Then click the area ID link, or select Actions > Edit, or use the Edit icon. The Areas window appears.
Select a record in the table.
Select Actions > Edit, or use the Edit icon. The Edit Area window appears.
The Area field displays the selected area ID.
Edit the area name, manager, currency and/or chain, if necessary.
Then choose one of the following options.
Click OK to add your changes to the table and close the window.
Click Cancel to reject all entries and close the window.
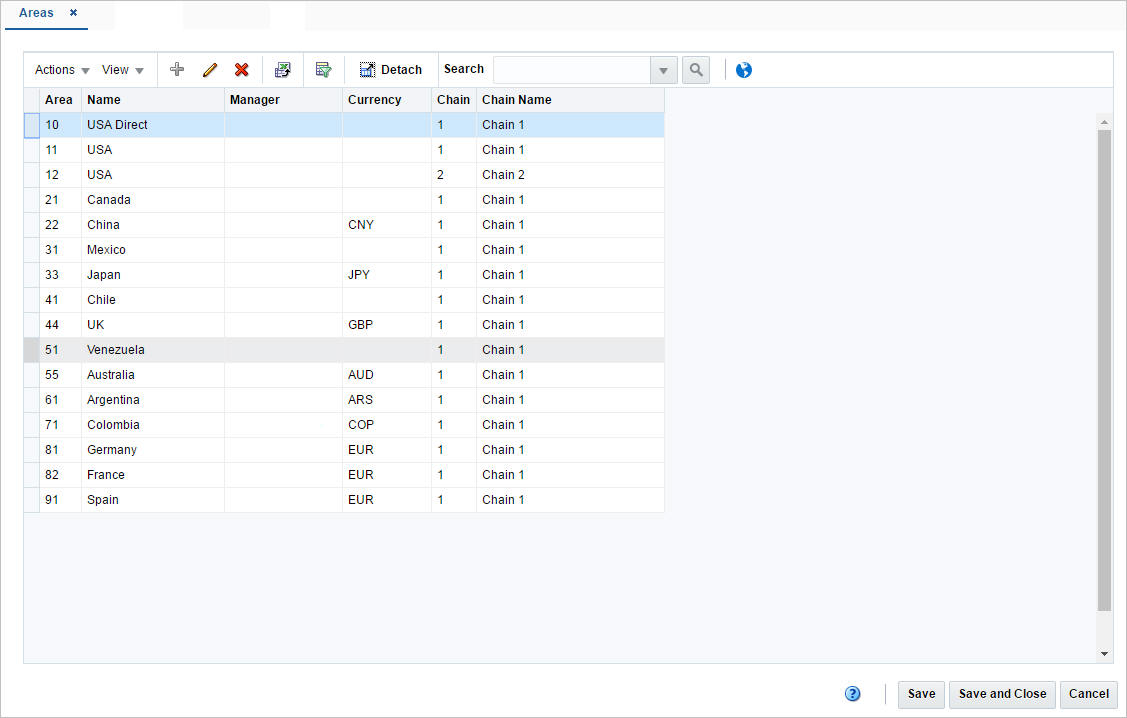
The Areas window allows you to create, edit, delete, or view an area in the organizational hierarchy. Area is below chain and above region in the organizational hierarchy. Typically, an area is used to define a geographical grouping within the organization. An area can belong to only one chain within the organizational hierarchy.You can associate location traits with an area. Location traits that are applied to an area are applied automatically to the regions, districts, and stores within the area.
Use the Actions Menu and icons to apply actions to the table. You can perform the actions listed below.
Table 2-8 Areas - Actions Menu/Icons and Description
| Actions Menu/Icons | Description |
|---|---|
|
Add and Add icon |
You can add new areas by selecting Actions > Add or by using the Add icon. For more information about how to add new areas, see the Creating an Area section. This function is not available in edit mode. |
|
Delete and Delete icon |
You can delete areas:
|
|
Edit and Edit icon |
Select Actions > Edit or use the Edit icon to edit the selected area. For more information about how to edit an area, see the Editing Areas section. |
|
Export to Excel and Export to Excel icon |
You can export the records in the table to a Microsoft Excel spreadsheet by selecting Actions > Export to Excel or by using the Export to Excel icon. |
|
Search and Search icon |
You can search for the corresponding chain of an area:
|
|
Translate and Translate icon |
You can create a translation by selecting Actions > Translate or by using the Translate icon. |
You can customize the view of the table by using the options in the View Menu.
For more information about the View Menu and icons, see Table 2-6, "Chains - View Menu/Icons and Description".
The toolbar contains the following icon and buttons.
Table 2-9 Areas Toolbar - Icons/Buttons and Description
| Icons/Buttons | Description |
|---|---|
|
Help icon |
You can access the online help for a particular page by clicking the Help icon. |
|
Save |
Click Save to save the entered records. |
|
Save and Close |
Click Save and Close to save the entered records and close the window. |
|
Cancel |
Click Cancel to reject all entries and close the window. |
|
Done |
If you open the window in view mode, the Done button is displayed. Click Done to close the window. |
To create a region, follow the steps below.
From the Tasks menu, select Foundation Data > Locations > Organizational Hierarchy. The Organizational Hierarchy window appears.
Select the Region button. All available regions are displayed in the table.
In the table, select Actions > Create. The Regions window appears.
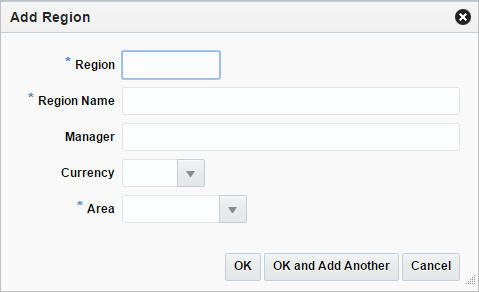
Then select Actions > Add, or use the Add icon. The Add Region window appears.
In the Region field, enter a unique number. This field is a required field.
In the Region Name field, enter the name of the region. This field is a required field.
In the Manager field, enter the name of the manager who is responsible for the region.
In the Currency field, enter, select or search for the region's currency code.
In the Area field, enter, select or search for the area ID which is associated with the region. This field is a required field.
Then choose one of the following options.
Click OK to save the region and close the window.
Click OK and Add Another to save the current region and add additional entries.
Click Cancel to reject all entries and close the window.
To edit a region, follow the steps below.
From the Tasks menu, select Foundation Data > Locations > Organizational Hierarchy. The Organizational Hierarchy window appears.
Select the Region button. The available regions are displayed in the table.
Select a record in the table.
Then click the region ID link, or select Actions > Edit, or use the Edit icon. The Regions window appears.
Select a record in the table.
Select Actions > Edit, or use the Edit icon. The Edit Region window appears.
The Region field displays the selected region ID.
Edit the region name, manager, currency and/or area, if necessary.
Then choose one of the following options.
Click OK to add your changes to the table and close the window.
Click Cancel to reject all entries and close the window.
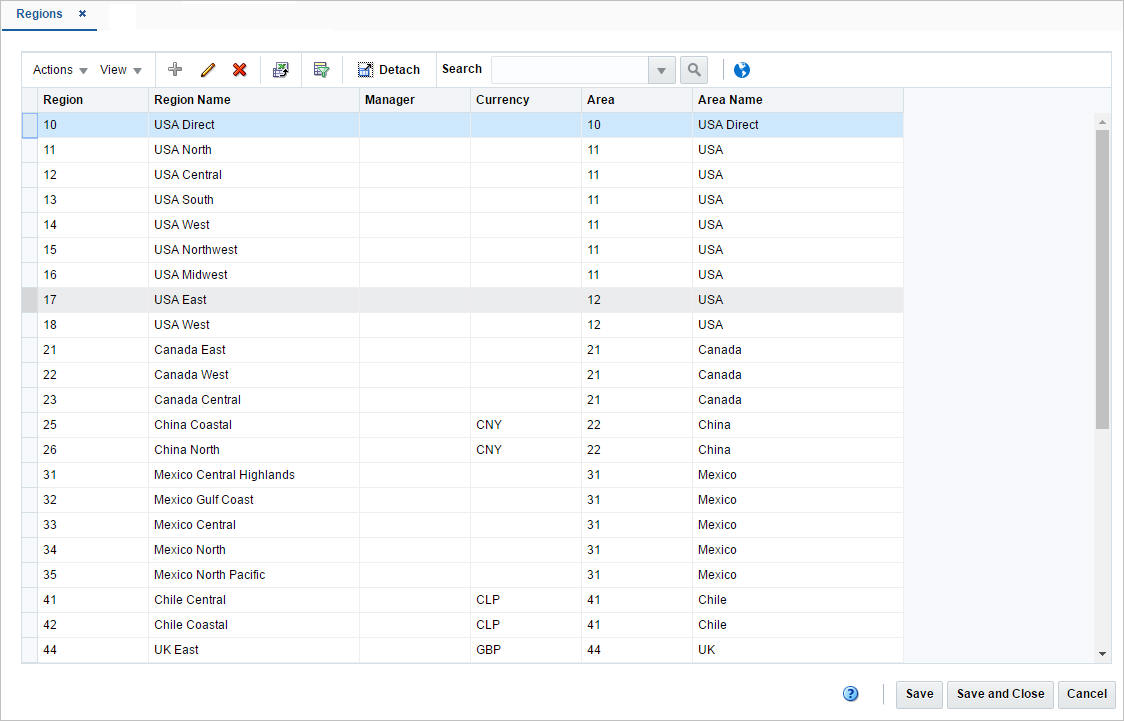
The Regions window allows you to add, edit, delete, and view a region in the organizational hierarchy. A region is below the area and above the district in the organizational hierarchy. Typically, the region is used to define a geographical grouping within the organization.
Use the Actions Menu and icons to apply actions to the table. You can perform the actions listed below.
Table 2-10 Regions - Actions Menu/Icons and Description
| Actions Menu/Icons | Description |
|---|---|
|
Add and Add icon |
You can add a new region by selecting Actions > Add or by using the Add icon. For more information about how to add a new region, see the Creating a Region section. This function is not available in edit mode. |
|
Delete and Delete icon |
You can delete regions:
|
|
Edit and Edit icon |
Select Actions > Edit or use the Edit icon to edit the selected region. For more information about how to edit a region, see the Editing Regions section. |
|
Export to Excel and Export to Excel icon |
You can export the records in the table to a Microsoft Excel spreadsheet by selecting Actions > Export to Excel or by using the Export to Excel icon. |
|
Search and Search icon |
You can search for the corresponding area of a region:
|
|
Translate and Translate icon |
You can create a translation by selecting Actions > Translate or by using the Translate icon. |
You can customize the view of the table by using the options in the View Menu.
For more information about the View Menu and icons, see Table 2-6, "Chains - View Menu/Icons and Description".
The toolbar contains the following icon and buttons.
Table 2-11 Regions Toolbar - Icons/Buttons and Description
| Icons/Buttons | Description |
|---|---|
|
Help icon |
You can access the online help for a particular page by clicking the Help icon. |
|
Save |
Click Save to save the entered records. |
|
Save and Close |
Click Save and Close to save the entered records and close the window. |
|
Cancel |
Click Cancel to reject all entries and close the window. |
|
Done |
If you open the window in view mode, the Done button is displayed. Click Done to close the window. |
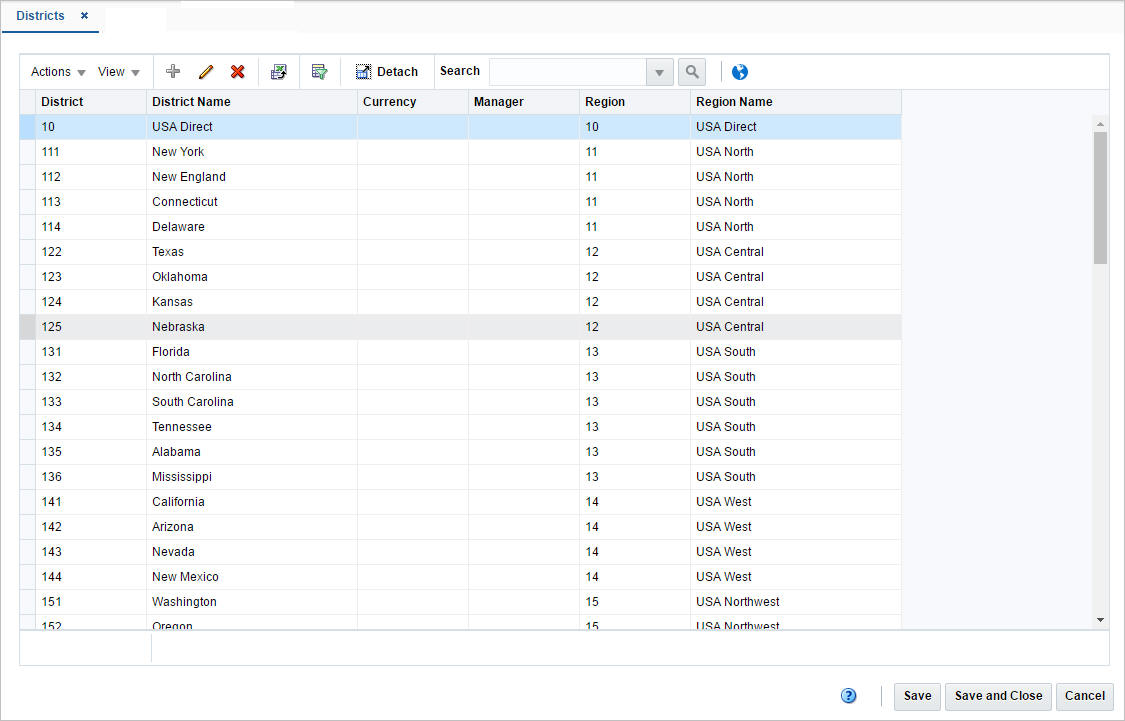
To create a district, follow the steps below.
From the Tasks menu, select Foundation Data > Locations > Organizational Hierarchy. The Organizational Hierarchy window appears.
Select the District button. All available districts are displayed in the table.
In the table, select Actions > Create. The Districts window appears.
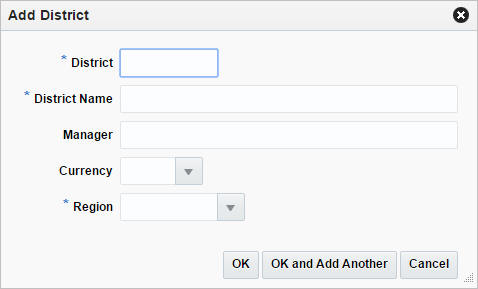
Then select Actions > Add, or use the Add icon. The Add District window appears.
In the District field, enter a unique number. This field is a required field.
In the District Name field, enter the name of the district. This field is a required field.
In the Manager field, enter the name of the manager who is responsible for the district.
In the Currency field, enter, select or search for the district's currency code.
In the Region field, enter, select or search for the region ID which is associated with the district. This field is a required field.
Then choose one of the following options.
Click OK to save the district and close the window.
Click OK and Add Another to save the current district and add additional entries.
Click Cancel to reject all entries and close the window.
To edit a district follow the steps below.
From the Tasks menu, select Foundation Data > Locations > Organizational Hierarchy. The Organizational Hierarchy window appears.
Select the District button. The available districts are displayed in the table.
Select a record in the table.
Then click the district ID link, or select Actions > Edit, or use the Edit icon. The Districts window appears.
Select a record in the table.
Select Actions > Edit, or use the Edit icon. The Edit District window appears.
The District field displays the selected region ID.
Edit the district name, manager, currency and/or region, if necessary.
Then choose one of the following options.
Click OK to add your changes to the table and close the window.
Click Cancel to reject all entries and close the window.
The Districts window allows you to add, edit, delete, and view a district in the organizational hierarchy. A district is below the region and above the store in the organizational hierarchy. Typically, the district is used to define a geographical grouping within the organization.
Use the Actions Menu and icons to apply actions to the table. You can perform the actions listed below.
Table 2-12 Districts - Actions Menu/Icons and Description
| Actions Menu/Icons | Description |
|---|---|
|
Add and Add icon |
You can add a new district by selecting Actions > Add or by using the Add icon. For more information about how to add a new district, see the Creating a District section. This function is not available in edit mode. |
|
Delete and Delete icon |
You can delete districts:
|
|
Edit and Edit icon |
Select Actions > Edit or use the Edit icon to edit the selected district. For more information about how to edit a district, see the Editing Districts section. |
|
Export to Excel and Export to Excel icon |
You can export the records in the table to a Microsoft Excel spreadsheet by selecting Actions > Export to Excel or by using the Export to Excel icon. |
|
Search and Search icon |
You can search for the districts belonging to the entered region:
|
|
Translate and Translate icon |
You can create a translation by selecting Actions > Translate or by using the Translate icon. |
You can customize the view of the table by using the options in the View Menu.
For more information about the View Menu and icons, see Table 2-6, "Chains - View Menu/Icons and Description".
The toolbar contains the following icon and buttons.
Table 2-13 Districts Toolbar - Icons/Buttons and Description
| Icons/Buttons | Description |
|---|---|
|
Help icon |
You can access the online help for a particular page by clicking the Help icon. |
|
Save |
Click Save to save the entered records. |
|
Save and Close |
Click Save and Close to save the entered records and close the window. |
|
Cancel |
Click Cancel to reject all entries and close the window. |
|
Done |
If you open the window in view mode, the Done button is displayed. Click Done to close the window. |
To create a store, follow the steps listed below.
From the Tasks menu, select Foundation Data > Locations > Organizational Hierarchy. The Organizational Hierarchy window appears.
Select the Store button. All available stores are displayed in the table.
In the table, select Actions > Create, or use the Create icon. The Store window appears.
Enter the necessary information for the store. For more information about the available fields in the Store window, see the Store Window section.
To edit a store, follow the steps below.
From the Tasks menu, select Foundation Data > Locations > Organizational Hierarchy. The Organizational Hierarchy window appears.
Select the Store button. The available regions are displayed in the table.
Select a record in the table.
Then click the store ID link, or select Actions > Edit, or use the Edit icon. The Store window appears.
Edit the fields, if necessary. For more information about the available fields in the Store window, see the Store Window section.
|
Note: You cannot edit the Company Store ID, Currency, Org Unit and Transfer Entry. Additionally you cannot select or deselect the Stockholding checkbox in edit mode. |
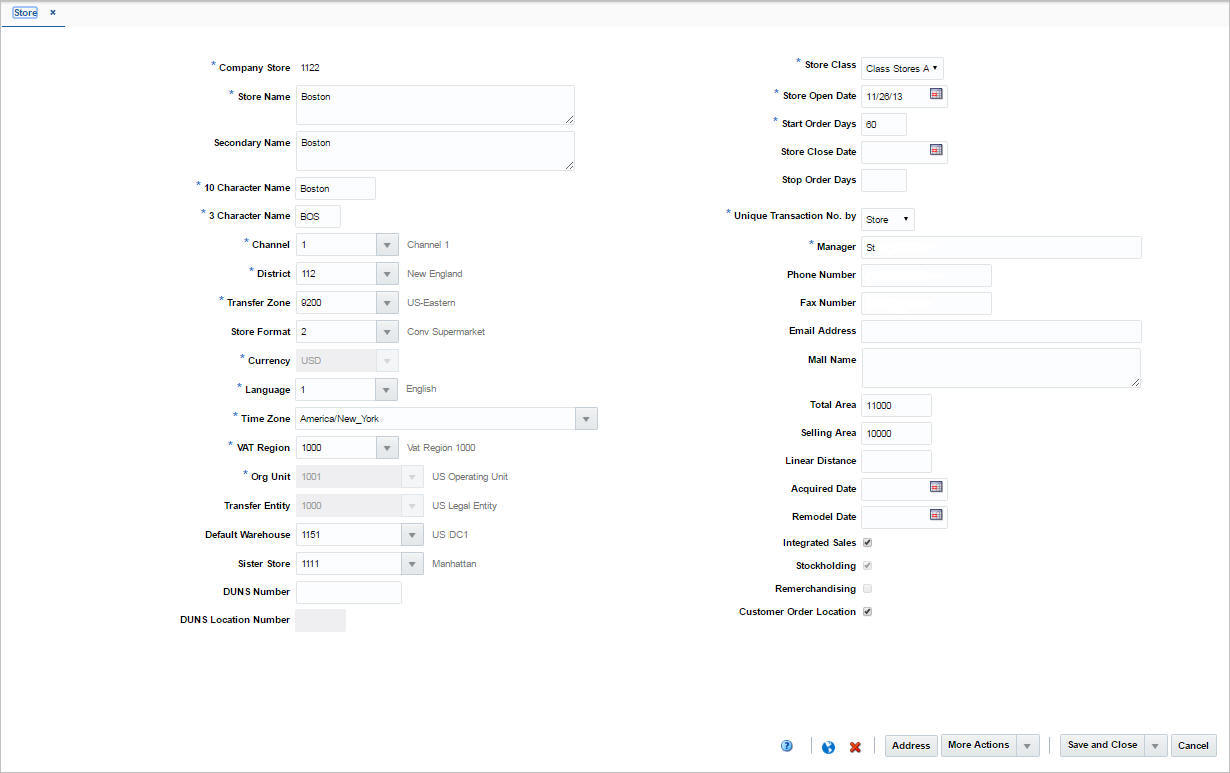
The Store window allows you to create, edit, delete, and view a store in the organizational hierarchy. The store is the lowest level of the organizational hierarchy. The store may be defined as the selling entity. The store is crucial because it is the level at which business transactions are processed. A store can belong to only one district within the organizational hierarchy.
You can navigate to other windows in order to set up attributes, the square area of the store's departments, location traits, associations with competitors' stores, activity and delivery schedules, and geocodes.
Table 2-14 Store Window - Fields and Description
| Fields | Description |
|---|---|
|
Store |
Select the store type from the list. Possible store types are:
The Store field next to the store type enables. Enter a unique ID for the store. This field is a required field. |
|
Store Name |
Enter a unique description for the store. This field is a required field. |
|
Secondary Name |
Enter the secondary name for the store. |
|
10 Character Name |
Enter up to 10 character abbreviation for the store. This field is a required field. |
|
3 Character Name |
Enter up to 3 character abbreviation for the store. This field is a required field. |
|
Channel |
Enter, select or search for the channel of business to which the store belongs. This field is a required field. |
|
District |
Enter, select or search for the district ID. This field is a required field. |
|
Transfer Zone |
Enter, select or search for the transfer zone. This field is a required field. |
|
Store Format |
Enter, select or search for the store format ID. For example, select Mall. |
|
Currency |
Enter, select or search for the currency code. This field is a required field. |
|
Language |
Enter, select or search for the language code for the store. This field is a required field. |
|
Time Zone |
Enter, select or search for the time zone of the store. This field is a required field. |
|
VAT Region |
Enter, select or search for the VAT region code for the store. This field is a required field. |
|
Org Unit |
Enter, select or search for the organizational unit ID. This field is available if Oracle Financials is integrated. This field is a required field, if available. |
|
Transfer Entity |
Enter, select or search for the transfer entity ID. |
|
Default Warehouse |
Enter, select or search for the default warehouse of the store. This field is only enabled, if you have specified a channel ID. For Franchise stores, this field is a required field. |
|
Sister Store |
Enter, select or search for the store number. This field is used to copy the store's history when defining allocations for new stores. |
|
DUNS Number |
Enter the Dun & Bradstreet Data Universal Numbering System (DUNS) number. The DUNS number is a nine digit code that identifies your store. |
|
DUNS Location Number |
Enter the DUNS location number. The DUNS location number is a four digit code that identifies the locations of your store. This field is only enabled, if you have entered the DUNS number for your store. |
|
Store Class |
The Store Class field is disabled, if you selected the store type Company. The Store Class field is defaulted to Class X if you selected the store type Franchise. Select the Store Class from the list. A store is grouped under the class based on the sale or the location. |
|
Store Open Date |
Enter the date when the store opens or use the Calendar icon to select a date. This field is a required field. |
|
Start Order Days |
Enter the number of days before the store opens to start ordering merchandise. |
|
Store Close Date |
Enter the date when the store closes or use the Calendar icon to select a date. |
|
Stop Order Days |
Enter the number of days before the store closes to stop ordering merchandise. |
|
Unique Transaction No. by |
Select the store or register for the Unique Transaction Number By from the list. This field indicates if the transaction number in the store is generated uniquely across store or at each register. This field is a required field. |
|
Manager |
Enter the name of the store manager. |
|
Phone Number |
Enter the phone number. |
|
Fax Number |
Enter the fax number. |
|
Email Address |
Enter the email address. |
|
Mall Name |
Enter the mall name, if necessary. |
|
Total Area |
Enter the total space of the store. |
|
Selling Area |
Enter the selling space available at the store. |
|
Linear Distance |
Enter the shelving space available at the store. |
|
Acquired Date |
Enter the date when the store has been acquired or use the Calendar icon to select a date. |
|
Remodel Date |
Enter the date when the store has been remodeled or use the Calendar icon to select a date. |
|
Integrated Sales checkbox |
The Integrated Sales checkbox is selected by default. You cannot load the sales for that store in ReSa, if the Integrated Sales option is not selected. |
|
Stockholding checkbox |
If the store is intended to be stockholding, this option must be selected. The Stockholding option is selected by default. |
|
Remerchandising checkbox |
Select the Remerchandising checkbox, if the store is undergoing a significant remerchandising effort as an indicator to Advanced Inventory Planning (AIP) application. |
|
Customer Order Location checkbox |
This option is available if the store type is Company and also for stock holding Franchise Stores. If the option is enabled, the store can be used to source or fulfill customer orders. |
|
Customer |
Only enabled, if the store type Franchise has been selected. Enter, select or search for the customer the franchise store belongs to. |
The Like Store section of the Store window allows you to create a store with the same assortment of items as another store. Also, you can choose to copy replenishment information, delivery schedules, and dates when closed as well as items on clearance from the existing store to the new store.
In the Store window, expand the Like Store section.
In the Like Store field, enter, select or search for the desired store ID.
In the Information to Copy section, select the desired checkboxes to copy the following information from the selected store:
Select the Replenishment Information to copy the replenishment information.
Select Delivery Schedule to copy delivery schedules.
Select Activity Schedule to copy dates when the store is closed.
Select Clearance Items to copy items on clearance to the new store.
In the Zoning Location section of the Store window you can associate a store with a retail price and a cost location. To add this information follow the steps below.
In the Store window, expand the Zoning Location section.
In the Pricing Store field, enter, select or search for the pricing store ID.
In the Cost Location field, select the location type from the list.
The field next to the location type enables. Enter, select or search for the cost location ID.
The toolbar contains the following icon and buttons.
Table 2-15 Store Toolbar - Icons/Buttons and Description
| Icons/Buttons | Description |
|---|---|
|
Help icon |
You can access the online help for a particular page by clicking the Help icon. |
|
Translate and Translate icon |
You can create a translation by selecting Actions > Translate or by using the Translate icon. |
|
Delete icon |
To delete a store:
|
|
Address |
Opens the Address window. For more information about how to add an address to a warehouse, see the Addresses Window section. |
|
More Actions |
Click More Actions to see a list of additional actions that can be performed in the Store window.
|
|
Save and Close |
Click Save and Close to save the entered records and close the window. |
|
Save and Create Another |
Click Save and Create Another to save the entered records and add additional entries. This option is only available, if you create a store. |
|
Save and Edit Another |
Click Save and Edit Another to save the entered records and edit additional entries. This option is only available in edit mode. |
|
Cancel |
Click Cancel to reject all entries and close the window. |
|
Done |
If you open the window in view mode, the Done button is displayed. Click Done to close the window. |
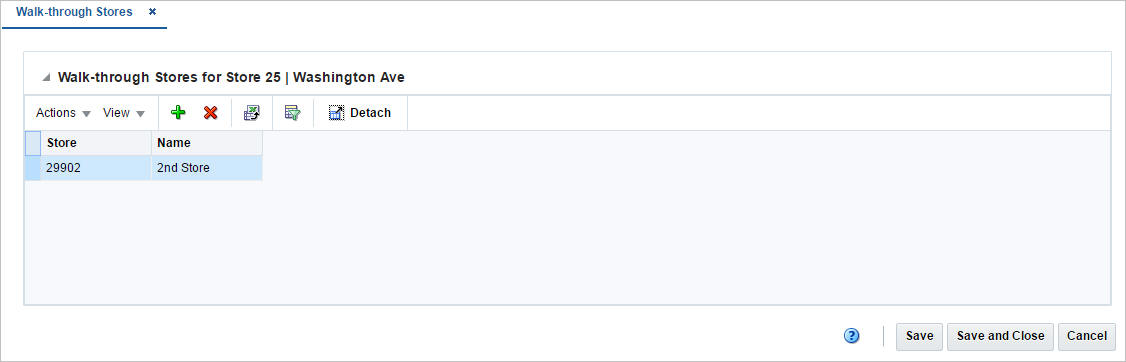
The Walk-through Stores window allows you to define several stores in one location. Each store may operate as a separate entity, however the stores are located in the same physical location. You can associate multiple stores as walk through locations. Walk-through stores can be uploaded into the system, or you can add walk through locations to a store. You must set up the stores and then associate one with another.
Use the Actions Menu and icons to apply actions to the table. You can perform the actions listed below.
Table 2-16 Walk-through Stores Table - Actions Menu/Icons and Description
| Actions Menu/Icons | Description |
|---|---|
|
Add and Add icon |
You can add walk-through stores to a store by selecting Actions > Add or by using the Add icon. For more information about how to add walk-through stores, see the Adding a Walk-Through Store section. |
|
Delete and Delete icon |
You can delete a walk-through store from a store.
|
|
Export to Excel and Export to Excel icon |
You can export the records in the table to a Microsoft Excel spreadsheet by selecting Actions > Export to Excel or by using the Export to Excel icon. |
You can customize the view of the table by using the options in the View Menu and icons listed below.
Table 2-17 Walk-through Stores Table - View Menu/Icons and Description
| View Menu/Icons | Description |
|---|---|
|
Columns |
You can manage which of the columns will be shown in the table by clicking the Show All and Manage Columns options. |
|
Detach and Detach icon |
You can view the tables in the application in a separate window by clicking Detach or by using the Detach icon. |
|
Sort |
You can sort columns by the following options:
|
|
Reorder Columns |
You can reorder columns by clicking the Reorder Columns option. |
|
Query by Example and Query by Example icon |
You can filter the items by one or multiple column values by clicking the Query by Example option or by using the Query by Example icon. |
The toolbar contains the following icons and buttons.
Table 2-18 Walk-through Toolbar - Icons/Buttons and Description
| Icons/Buttons | Description |
|---|---|
|
Help icon |
You can access the online help for a particular page by clicking the Help icon. |
|
Save |
Click Save to save the entered records. |
|
Save and Close |
Click Save and Close to save the entered records and close the window. |
|
Cancel |
Click Cancel to reject all entries and close the window. |
|
Done |
If you open the window in view mode, the Done button is displayed. Click Done to close the window. |
To add walk through stores to a store, follow the steps below.
From the Tasks menu, select Foundation Data > Locations > Organizational Hierarchy. The Organizational Hierarchy window appears.
Select the Store button. The available stores are displayed in the table.
In the Store column, click the store ID link, or mark a record and select Actions > Edit, or use the Edit icon. The Store window appears.
In the Store window, select More Actions > Walk Through. The Walk-through Stores window appears.
Then select Actions > Add or use the Add icon. The Add Walk-through Stores window appears.
In the Store field, enter the store ID.
In the Name field, enter the store name.
Then choose one of the following options.
Click OK to save the current store as walk-through store and close the window.
Click OK and Add Another to save the current store and add additional entries.
Click Cancel to reject all entries and close the window.
In the Walk-through Stores window, choose one of the following options.
Click Save to save your changes.
Click Save and Close to save your changes and close the window.
Click Cancel to reject all entries and close the window.
To create a warehouse, follow the steps listed below.
From the Tasks menu, select Foundation Data > Locations > Organizational Hierarchy. The Organizational Hierarchy window appears.
Select the Warehouse button. All available warehouses are displayed in the table.
In the table, select Actions > Create. The Warehouse window appears.
Enter all the necessary information. For more information about the available fields in the Warehouse window, see the Warehouse Window section.
To edit a warehouse, follow the steps below.
From the Tasks menu, select Foundation Data > Locations > Organizational Hierarchy. The Organizational Hierarchy window appears.
Select the Warehouse button. The available warehouses are displayed in the table.
Select a record in the table.
Then click the warehouse ID link, or select Actions > Edit, or use the Edit icon. The Warehouse window appears.
Edit the fields, if necessary. For more information about the fields in the Warehouse window, see the Warehouse Window section.
|
Note: You cannot edit the Warehouse ID, Currency, and Primary Virtual Warehouse fields. |
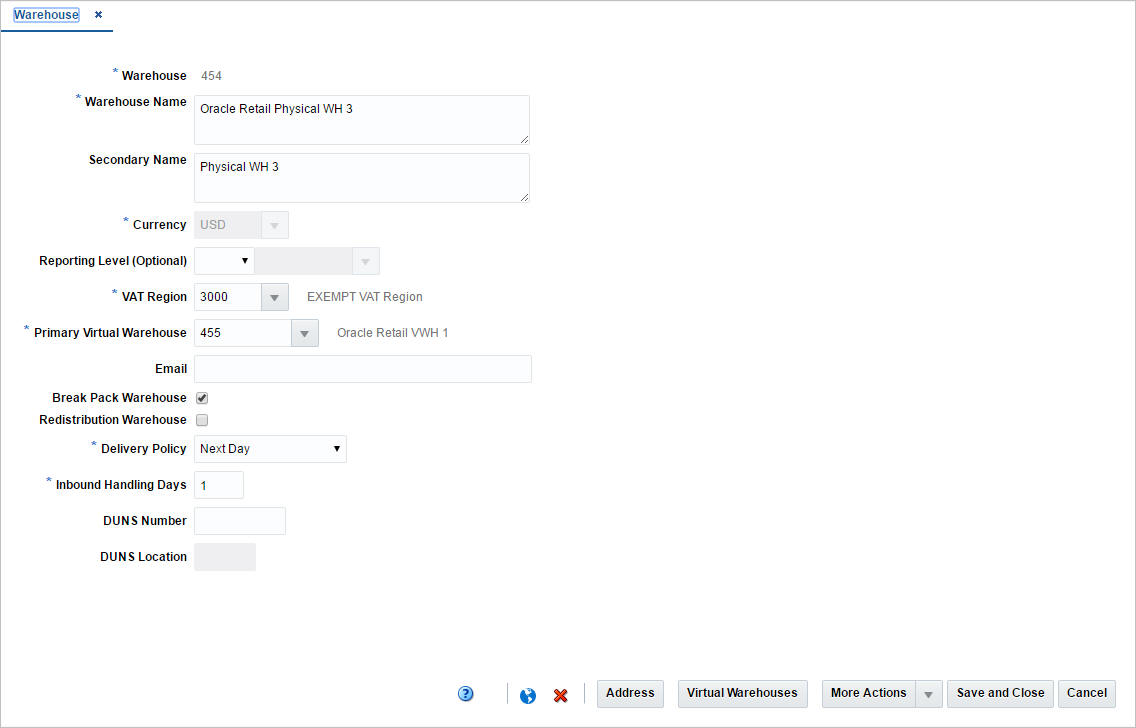
The Warehouse window allows you to create, edit, delete, and view a warehouse. The warehouse is the entity within RMS that defines the physical storage, cross-dock, or distribution facility in an organization. The warehouse has all of the transaction capability of the store, except for sales and price changes. You can specify at which organizational level a warehouse is reported.
You also have the option to designate a warehouse as a redistribution warehouse. A redistribution warehouse does not actually hold stock and cannot be used as a distribution center. With the existence of a redistribution warehouse, you can create purchase orders before the distribution center is known. Orders must be redistributed to actual warehouses or stores when the locations become known and before the merchandise is shipped.
You can access additional windows in order to set up attributes, activity schedules, and delivery schedules.
Table 2-19 Warehouse Window - Fields and Description
| Fields | Description |
|---|---|
|
Warehouse |
Enter a unique ID for the warehouse. This field is a required field. |
|
Warehouse Name |
Enter a unique description for the warehouse. This field is a required field. |
|
Secondary Name |
Enter the secondary name for the warehouse. |
|
Currency |
Enter, select or search for the currency code. This field is a required field. |
|
Reporting Level (Optional) |
Select a reporting level from the list. |
|
VAT Region |
Enter, select or search for a VAT region for the warehouse. This field is a required field. |
|
Primary Virtual Warehouse |
This field is enabled when at least one virtual warehouse is created. Enter, select or search for the primary virtual warehouse. |
|
|
Enter an email address for the warehouse. |
|
Break Pack Warehouse checkbox |
Select the checkbox to indicate that the warehouse is capable of distributing less that the supplier case quantity. |
|
Redistribution Warehouse checkbox |
Select the checkbox to indicate that the warehouse distributes to other warehouses. |
|
Delivery Policy |
Select a delivery policy from the list. |
|
Inbound Handling Days |
Enter the number of days that the warehouse requires to receive any item and move the item to the shelf, so that it is ready to be picked. Next Day indicates that the if a location is closed, the warehouse will deliver on the next day. Next Valid Delivery Day indicates that the warehouse will wait until the next scheduled delivery day before delivering the item. |
|
DUNS Number |
Enter the Dun & Bradstreet Data Universal Numbering System (DUNS) number. The DUNS number is a nine digit code that identifies your store. |
|
DUNS Location Number |
Enter the DUNS location number. The DUNS location number is a four digit code that identifies the locations of your store. This field is only enabled, if have entered the DUNS number for your store. |
|
Zoning Location section: This section is only available, when you create a new warehouse |
|
|
Cost Location |
Select a cost location type from the list. The location ID field enables, enter, select or search for the location. |
The toolbar contains the following icons and buttons.
Table 2-20 Warehouse Toolbar - Icons/Buttons and Description
| Icons/Buttons | Description |
|---|---|
|
Help icon |
You can access the online help for a particular page by clicking the Help icon. |
|
Translate and Translate icon |
You can create a translation by selecting Actions > Translate or by using the Translate icon. |
|
Delete icon |
To delete a warehouse:
|
|
Address |
Opens the Address window. For more information about how to add an address to a warehouse, see the Addresses Window section. |
|
Virtual Warehouses |
Opens the Virtual Warehouses window. For more information about how to create a virtual warehouse, see the Virtual Warehouses Window section. |
|
More Actions |
Click More Actions to see a list of additional actions that can be performed in the Warehouse window.
|
|
Save and Close |
Click Save and Close to save the entered records and close the window. |
|
Save and Create Another |
Click Save and Create Another to save the entered records and add additional entries. This option is only available, if you create a warehouse. |
|
Save and Edit Another |
Click Save and Edit Another to save the entered records and edit additional entries. This option is only available in edit mode. |
|
Cancel |
Click Cancel to reject all entries and close the window. |
|
Done |
If you open the window in view mode, the Done button is displayed. Click Done to close the window. |
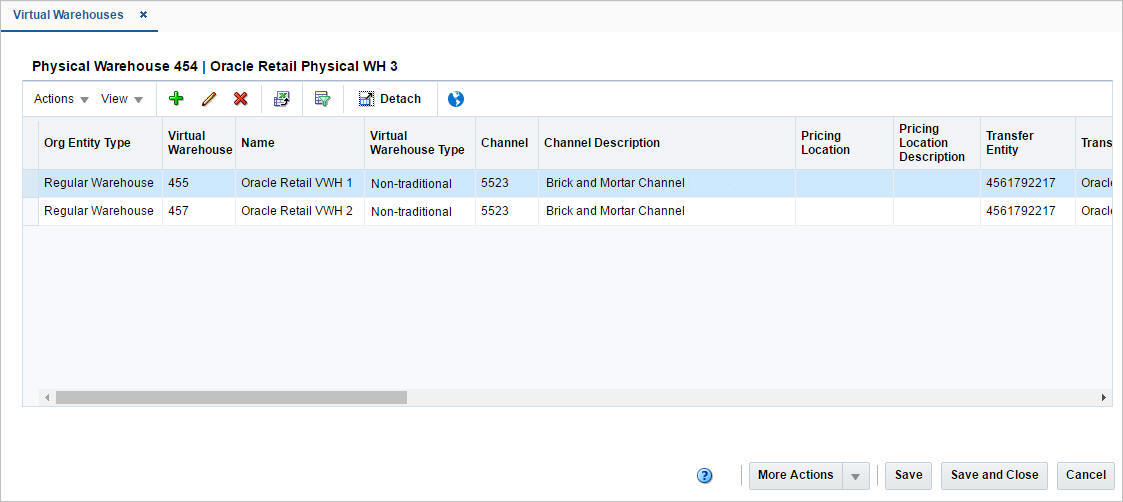
The Virtual Warehouse window allows you to divide a physical warehouse into one or more virtual warehouses. Virtual warehouses are used in a multi-channel environment to track ownership of inventory by channel. You associate each virtual warehouse with a channel. If the virtual warehouse contains a finishing location, you can indicate an additional virtual warehouse within the channel.
Virtual warehouses are considered stockholding locations, while the physical warehouse is considered a non-stockholding location.
Use the Actions Menu and icons to apply actions to the table. You can perform the actions listed below.
Table 2-21 Virtual Warehouses - Actions Menu/Icons and Description
| Actions Menu/Icons | Description |
|---|---|
|
Add and Add icon |
You can add a virtual warehouse to a physical one by selecting Actions > Add or by using the Add icon. For more information about how to add a virtual warehouse, see the Adding Virtual Warehouses section. |
|
Edit and Edit icon |
You can edit a virtual warehouse by selecting Actions > Edit or by using the Edit icon. For more information about how to edit a virtual warehouse, see the Editing Virtual Warehouses section. |
|
Delete and Delete icon |
You can delete a virtual warehouse:
|
|
Export to Excel and Export to Excel icon |
You can export the records in the table to a Microsoft Excel spreadsheet by selecting Actions > Export to Excel or by using the Export to Excel icon. |
|
Translate and Translate icon |
You can create a translation by selecting Actions > Translate or by using the Translate icon. |
You can customize the view of the table. Use the View Menu and icons to customize the view as listed below.
Table 2-22 Virtual Warehouses - View Menu/Icons and Description
| View Menu/Icons | Description |
|---|---|
|
Columns |
You can manage which of the columns will be shown in the table by clicking the Show All and Manage Columns options. |
|
Detach and Detach icon |
You can view the tables in the application in a separate window by clicking Detach or by using the Detach icon. |
|
Sort |
You can sort columns by the following options:
|
|
Reorder Columns |
You can reorder columns by clicking the Reorder Columns option. |
|
Query by Example and Query by Example icon |
You can filter the records by one or multiple column values by clicking the Query by Example option or by using the Query by Example icon. |
The toolbar contains the following icons and buttons.
Table 2-23 Virtual Warehouse Toolbar - Icons/Buttons and Description
| Icons/Buttons | Description |
|---|---|
|
Help icon |
You can access the online help for a particular page by clicking the Help icon. |
|
More Actions |
Click More Actions to see a list of additional actions that can be performed in the Virtual Warehouse window.
|
|
Save |
Click Save to save the entered records. |
|
Save and Close |
Click Save and Close to save the entered records and close the window |
|
Cancel |
Click Cancel to reject all entries and close the window. |
|
Done |
If you open the window in view mode, the Done button is displayed. Click Done to close the window. |
To add a virtual warehouse to a physical warehouse, follow the steps below.
From the Tasks menu select Foundation Data > Locations > Organizational Hierarchy. The Organizational Hierarchy window appears.
Select the Warehouse button. The available warehouses are displayed in the table.
Select a record in the table.
Then, select Actions > Edit or use the Edit icon. The Warehouse window appears.
Click the Virtual Warehouse button. The Virtual Warehouses Window appears.
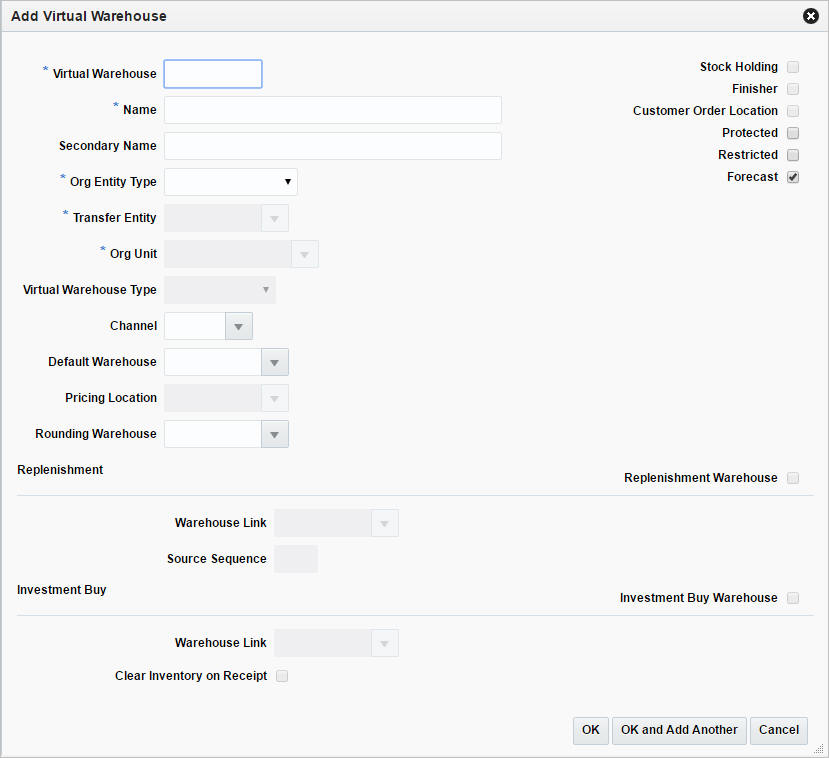
Select Actions > Add or use the Add icon. The Add Virtual Warehouse window appears.
In the Virtual Warehouse field, enter a unique warehouse ID. This field is a required field.
In the Name field, enter the name of the warehouse. This field is a required field.
In the Secondary Name field, enter the secondary name for the warehouse.
In the Org Entity Type field, select the org entity type from the list. This field is a required field.
In the Transfer Entity field, enter, select or search for the transfer entity. This field is a required field.
In the Org Unit field, enter, select or search for the org unit. This field is a required field.
In the Virtual Warehouse Type field, select a warehouse type from the list. This field is a required field.
In the Channel field, enter, select or search for a channel. This field is a required field.
In the Default Warehouse field, enter, select or search for the warehouse.
In the Pricing Location field, enter, select or search for the pricing location ID. This field is a required field.
In the Rounding Warehouse field, enter select or search for the warehouse.
Select the Stock Holding checkbox to indicate that the warehouse is a stock holding one.
|
Note: If you select Regular Warehouse as the Org Entity Type, the Stock Holding checkbox is selected and disabled. You cannot deselect this checkbox. |
Select the Finisher checkbox to indicate that the warehouse is a finisher location.
Select the Customer Order Location checkbox to indicate that the warehouse is a location where the customer places orders.
Select the Protected checkbox to indicate that the warehouse is affected last in transactions where inventory is removed or affected first in short-shipment type transactions where inventory is being added.
Select the Restricted checkbox to indicate that the virtual warehouses is restricted from receiving stock during an inbound transaction.
Select the Forecast checkbox to indicate that the warehouse should be included in forecast calculations.
Select the Replenishment checkbox to indicate that the virtual warehouse is included in the net inventory calculations for the replenish able warehouse.
In the Warehouse Link field, enter, select or search for the corresponding link.
Then select one of the following options.
Click OK to add the current warehouse and close the window.
Click OK and Add Another to add the current warehouse and add additional warehouses.
Click Cancel to reject all entries and close the window.
To edit a virtual warehouse to a physical warehouse, follow the steps below.
From the Tasks menu select Foundation Data > Locations > Organizational Hierarchy. The Organizational Hierarchy window appears.
Select the Warehouse button. The available warehouses are displayed in the table.
Select a record in the table.
Select Actions > Edit or use the Edit icon. The Warehouse window appears.
Click the Virtual Warehouses button. The Virtual Warehouses Window appears.
Select a record in the table.
Select Actions > Edit or use the Edit icon. The Edit Virtual Warehouse window appears.
Edit the fields, if necessary.
Then select one of the following options.
Click OK to save your changes and close the window.
Click Cancel to reject all entries and close the window.
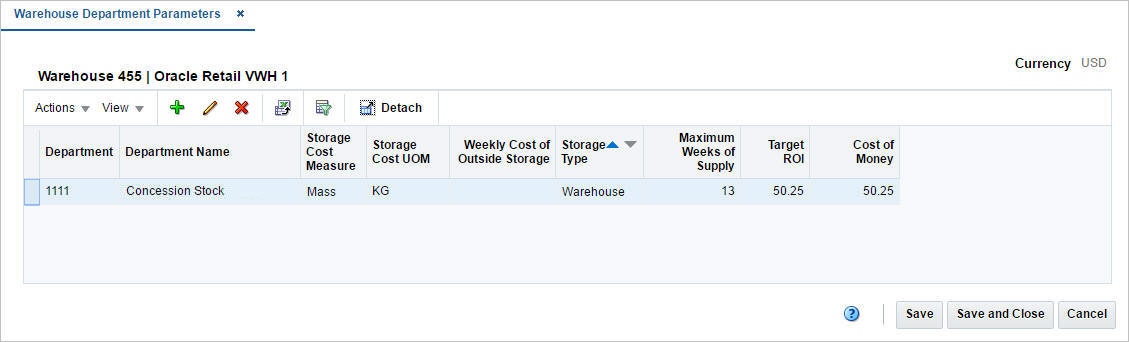
The Warehouse Department window allows you to specify investment buy parameters at the warehouse or warehouse/department level. You can set up costs of storage and other parameters for a specific warehouse. Within the warehouse, you can set up several sets of investment buy parameters which are specific for a set of items, such as frozen goods.
Use the Actions Menu and Icons to apply actions to the table. You can perform the actions listed below.
Table 2-24 Warehouse Department Parameters - Actions Menu/Icons and Description
| Actions Menu/Icons | Description |
|---|---|
|
Add and Add icon |
You can add parameters by selecting Actions > Add or by using the Add icon. For more information about how to add parameters, see the Adding Warehouse Department Parameters section. |
|
Edit and Edit icon |
You can edit parameters by selecting Actions > Edit or by using the Edit icon. For more information about how to edit parameters, see the Editing Virtual Warehouses section. |
|
Delete and Delete icon |
You can delete parameters:
|
|
Export to Excel and Export to Excel icon |
You can export the records in the table to a Microsoft Excel spreadsheet by selecting Actions > Export to Excel or by using the Export to Excel icon. |
You can customize the view of the table. Use the View Menu and icons to customize the view as listed below.
Table 2-25 Warehouse Department Parameters - View Menu/Icons and Description
| View Menu/Icons | Description |
|---|---|
|
Columns |
You can manage which of the columns will be shown in the table by clicking the Show All and Manage Columns options. |
|
Detach and Detach icon |
You can view the tables in the application in a separate window by clicking Detach or by using the Detach icon. |
|
Reorder Columns |
You can reorder columns by clicking the Reorder Columns option. |
|
Query by Example and Query by Example icon |
You can filter the items by one or multiple column values by clicking the Query by Example option or by using the Query by Example icon. |
The toolbar contains the following icons and buttons.
Table 2-26 Warehouse Department Parameters Toolbar - Icons/Buttons and Description
| Icons/Buttons | Description |
|---|---|
|
Help icon |
You can access the online help for a particular page by clicking the Help icon. |
|
Save |
Click Save to save the entered records. |
|
Save and Close |
Click Save and Close to save the entered records and close the window. |
|
Cancel |
Click Cancel to reject all entries and close the window. |
|
Done |
If you open the window in view mode, the Done button is displayed. Click Done to close the window. |
To add warehouse department parameters, follow the steps below.
From the Tasks menu select Foundation Data > Locations > Organizational Hierarchy. The Organizational Hierarchy window appears.
Select the Warehouse button. The available warehouses are displayed in the table.
Select a record in the table.
Select Actions > Edit or use the Edit icon. The Warehouse window appears.
Click the Virtual Warehouse button. The Virtual Warehouses Window appears.
Select More Actions > Warehouse Department Parameters. The Warehouse Department Parameters window appears.
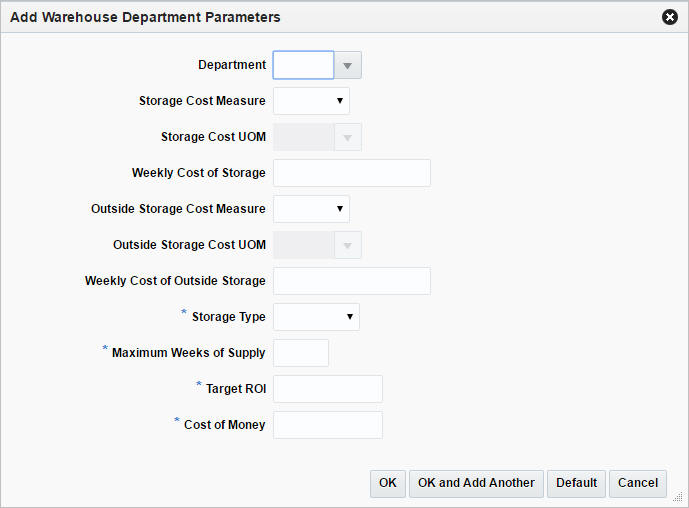
Then, select Actions > Add or use the Add icon. The Add Warehouse Department Parameter window appears.
In the Department field, enter, select or search for the department.
In the Storage Cost Measure field, select the cost measure from the list. The Storage Cost UOM field enables.
In the Storage Cost UOM field, enter, select or search for the unit of measure.
|
Note: This field is disabled, if you select Eaches as a storage cost measure. |
In the Weekly Cost of Storage field, enter the weekly cost of storage value.
In the Outside Storage Cost Measure field, select an outside cost measure from the list. The Outside Storage Cost UOM field enables.
In the Outside Storage Cost UOM field, enter, select or search for the unit of measure.
In the Weekly Cost of Outside Storage field, enter the weekly cost of outside storage value.
In the Storage Type field, select the type from the list. This field is a required field.
In the Maximum Weeks of Supply field, enter the number of weeks. This field is a required field.
In the Target ROI field, enter the target ROI (Return of Investment). This field is a required field.
In the Cost of Money field, enter the cost.
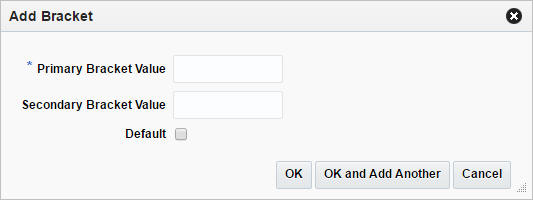
Then choose one of the following options.
Click OK to save the current parameter and close the window.
Click OK and Add Another to save the current parameter and add additional entries.
Click Default to save the current parameter and set it as the default value.
Click Cancel to reject all entries and close the window.
To edit warehouse department parameters, follow the steps below.
From the Tasks menu select Foundation Data > Locations > Organizational Hierarchy. The Organizational Hierarchy window appears.
Select the Warehouse button. The available warehouses are displayed in the table.
Select a record in the table.
Select Actions > Edit or use the Edit icon. The Warehouse window appears.
Click the Virtual Warehouses button. The Virtual Warehouses Window appears.
Select More Actions > Warehouse Department Parameters. The Warehouse Department Parameters window appears.
Select a record in the table.
Select Actions > Edit or use the Edit icon. The Edit Warehouse Department Parameter window appears. The parameters of the selected record are shown.
Edit the values, if necessary.
Then choose one of the following options.
Click OK to save your changes and close the window.
Click Default to save the current parameter and set it as default value.
Click Cancel to reject all entries and close the window.
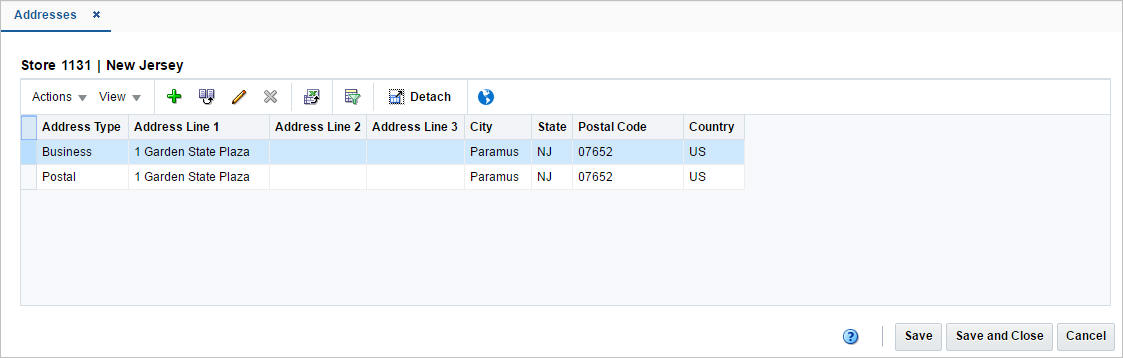
The Addresses window allows you to add, add from existing, edit, delete or view multiple addresses and contact information for either stores, warehouses, suppliers, or partners. You can set up multiple addresses per address type. Each location or vendor that is added requires that a mandatory address is added. Once you have entered a mandatory address, you cannot delete it. However, you can edit the mandatory address to maintain the correct address. Address types are defined as mandatory and/or permanent in the database.
Use the Actions Menu and Icons to apply actions to the table. You can perform the actions listed below.
Table 2-27 Addresses - Actions Menu/Icons and Description
| Actions Menu/Icons | Description |
|---|---|
|
Add and Add icon |
You can add new addresses by selecting Actions > Add or by using the Add icon. For more information about how to add addresses, see the Adding an Address section. |
|
Add from Existing and Add from Existing icon |
You can create a new address from an existing address by selecting Actions > Add from Existing or by using the Add from Existing icon. For more information about how to add an address from an existing one, see the Adding an Address from Existing section. |
|
Edit and Edit icon |
Select Actions > Edit or use the Edit icon to edit the selected address. For more information about how to edit an address, see the Editing an Address section. |
|
Delete and Delete icon |
You can delete an address:
|
|
Export to Excel and Export to Excel icon |
You can export the records in the table to a Microsoft Excel spreadsheet by selecting Actions > Export to Excel or by using the Export to Excel icon. |
|
Other Attributes |
Select an attribute from the Other Attribute Menu. The Attribute window displaying details of the selected attributes, appears. For more information about this option, see the Application Administration chapter, section "Custom Flex Attributes Display". |
|
Translate and Translate icon |
You can create a translation by selecting Actions > Translate or by using the Translate icon. |
You can customize the view of the table. Use the View Menu and icons to customize the view as listed below.
Table 2-28 Addresses - View Menu/Icons and Description
| View Menu/Icons | Description |
|---|---|
|
Columns |
You can manage which of the columns will be shown in the table by clicking the Show All and Manage Columns options. |
|
Detach and Detach icon |
You can view the tables in the application in a separate window by clicking Detach or by using the Detach icon. |
|
Sort |
You can sort columns by the following options:
|
|
Reorder Columns |
You can reorder columns by clicking the Reorder Columns option. |
|
Query by Example and Query by Example icon |
You can filter the items by one or multiple column values by clicking the Query by Example option or by using the Query by Example icon. |
The toolbar contains the following icons and buttons.
Table 2-29 Addresses Toolbar - Icons/Buttons and Description
| Icons/Buttons | Description |
|---|---|
|
Help icon |
You can access the online help for a particular page by clicking the Help icon. |
|
Save |
Click Save to save the entered records. |
|
Save and Close |
Click Save and Close to save the entered records and close the window. |
|
Cancel |
Click Cancel to reject all entries and close the window. |
|
Done |
If you open the window in view mode, the Done button is displayed. Click Done to close the window. |
To maintain addresses, follow the steps below.
To maintain an address for a store:
From the Tasks menu, select Foundation Data > Locations > Organizational Hierarchy. The Organizational Hierarchy window appears.
Select the Store button. The available stores are displayed in the table.
In the Store column, click the store ID link, or mark a record and select Actions > Edit, or use the Edit icon. The Store window appears.
Then select More Actions > Address. The Addresses window appears.
To maintain an address for a warehouse:
From the Tasks menu, select Foundation Data > Locations > Organizational Hierarchy. The Organizational Hierarchy window appears.
Select the Warehouse button. The available stores are displayed in the table.
In the Warehouse column, click the store ID link, or mark a record and select Actions > Edit, or use the Edit icon. The Warehouse window appears.
Then select More Actions > Address. The Addresses window appears.
To maintain an address for a supplier:
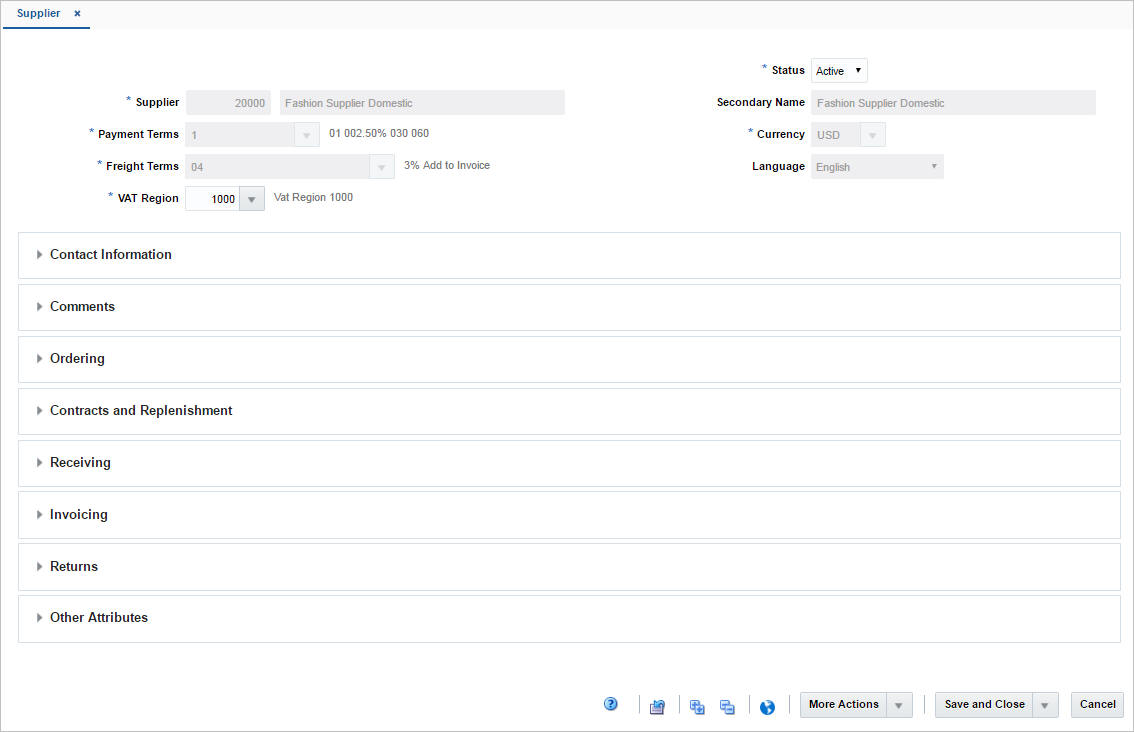
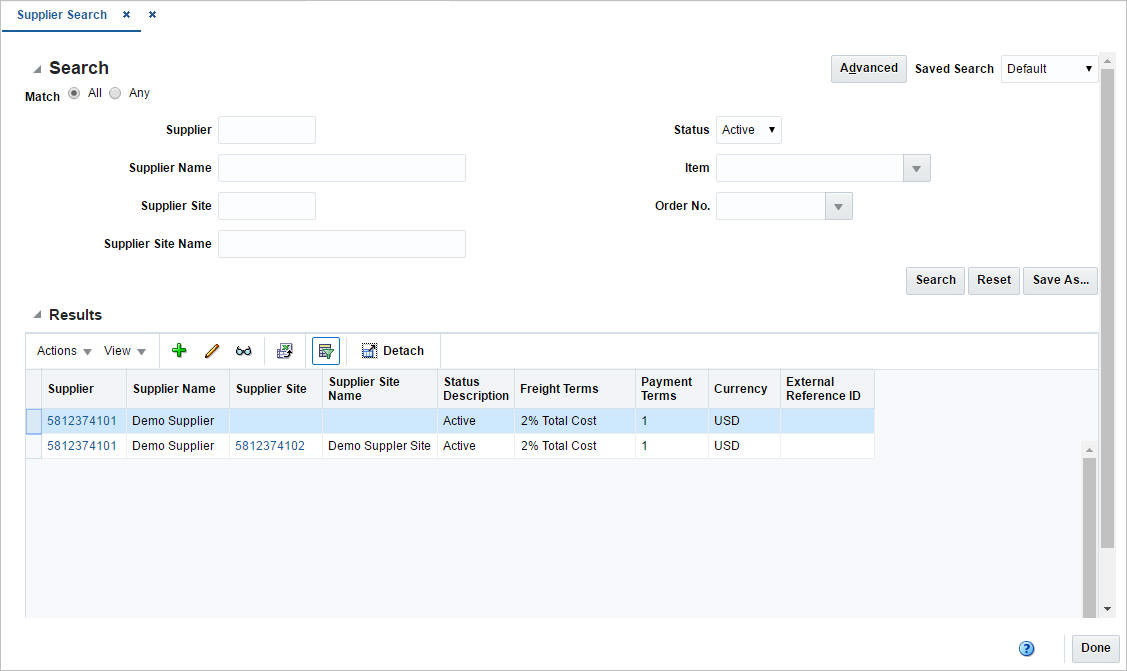
From the Tasks menu, select Foundation Data > Suppliers and Partners > Manage Supplier. The Supplier Search window appears.
Enter or select search criteria as desired to make the search more restrictive.
Click Search. The suppliers that match the search criteria are displayed in the Results section.
In the Supplier/Supplier Site column, click the supplier/supplier site ID link, or mark a record and select Actions > Edit, or use the Edit icon. The Supplier/Supplier Site window appears.
Select More Actions > Address. The Addresses window appears.
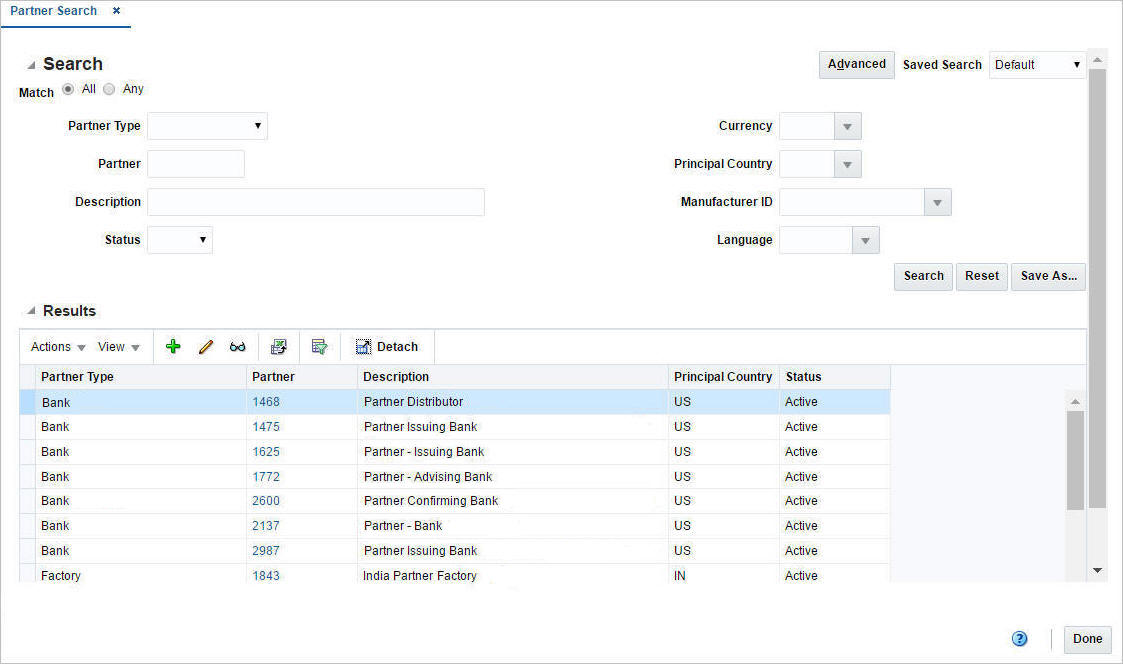
To maintain an address for a partner:
From the Tasks menu, select Foundation Data > Suppliers and Partners > Manage Partner. The Partner Search window appears.
Enter or select search criteria as desired to make the search more restrictive.
Click Search. The partners that match the search criteria are displayed in the Results section.
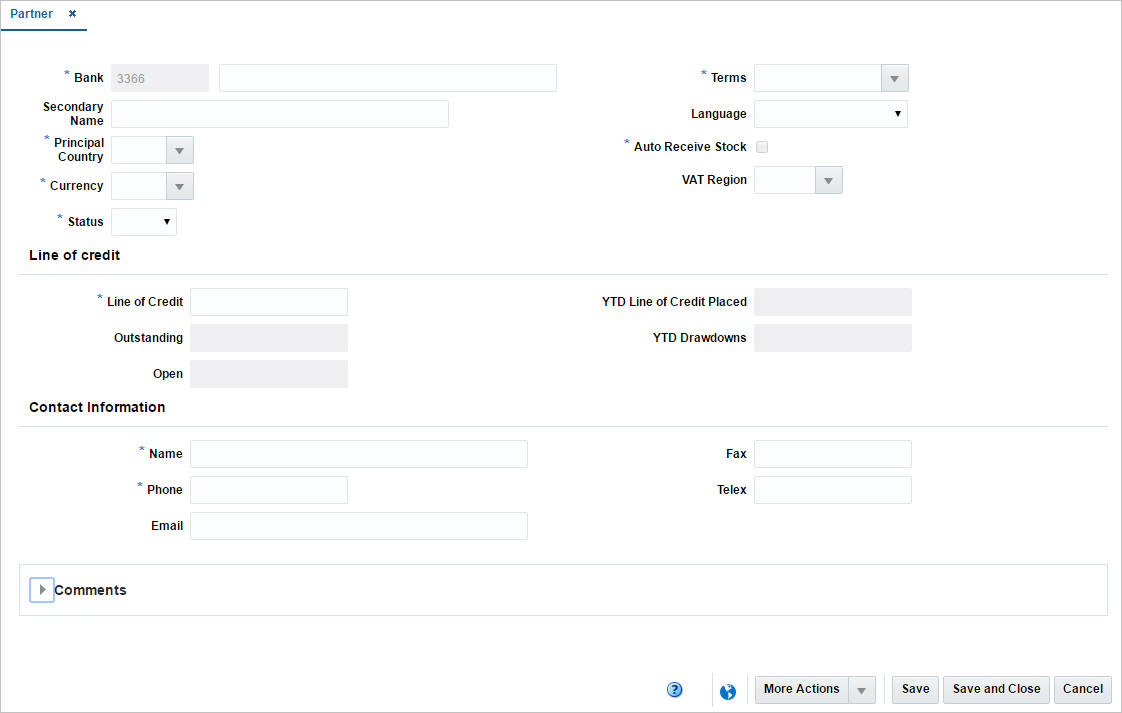
In the Partner Site column, click the partner ID link, or mark a record and select Actions > Edit, or use the Edit icon. The Partner window appears.
Select More Actions > Address. The Addresses window appears.
To add an address in the Addresses window:
In the table, select Actions > Add or use the Add icon. The Add Address window appears.
In the Address Type field, select the corresponding type.
The Apply to all Undefined Required Types checkbox, indicates that the current address information is added to each required address type. This checkbox is selected by default.
In the Address information section, enter the following details.
In the Address field, enter the full address. This field is a required field.
In the City field, enter the city in which the store is located. This field is a required field.
In the State field, select a state from the list.
In the Postal Code field, enter the postal code of the store.
In the Country field, enter, select or search for the country. This field is a required field.
Select the Primary Address checkbox to indicate that the current address is a primary address.
In the Contact information section, you can enter the following details.
In the Name field, enter the name of the contact person associated to the store.
In the Phone field, enter the phone number of the contact.
In the Fax field, enter the fax number.
In the Pager field, enter the pager number.
In the Email field, enter the email address.
Then choose one of the following options.
Click OK to save the current address and close the window.
Click OK and Add Another to save the current address and add additional entries.
Click Cancel to reject all entries and close the window.
To add a new address from an existing address, follow the steps below.
In the Address window, select a record in the table.
Select Actions > Add from Existing or use the Add from Existing icon. The Add Address window appears.
In the Address Type field, select the corresponding type.
The address and contact fields enable and display the data of the selected address. Change the entries as necessary.
|
Note: The Primary Address field is disabled. |
Then choose one of the following options.
Click OK to save the current address and close the window.
Click OK and Add Another to save the current address and add additional entries.
Click Cancel to reject all entries and close the window.
To edit an address, follow the steps below.
In the Addresses window, select a record in the table.
Select Actions > Edit or use the Edit icon. The Edit Address window appears.
In the Address Type field shows the type of the selected address. You cannot edit this field.
The address and contact fields display the data of the selected address. Change the entries as necessary.
|
Note: The Primary Address field is disabled. |
Then choose one of the following options.
Click OK to save the your changes and close the window.
Click Cancel to reject all entries and close the window.
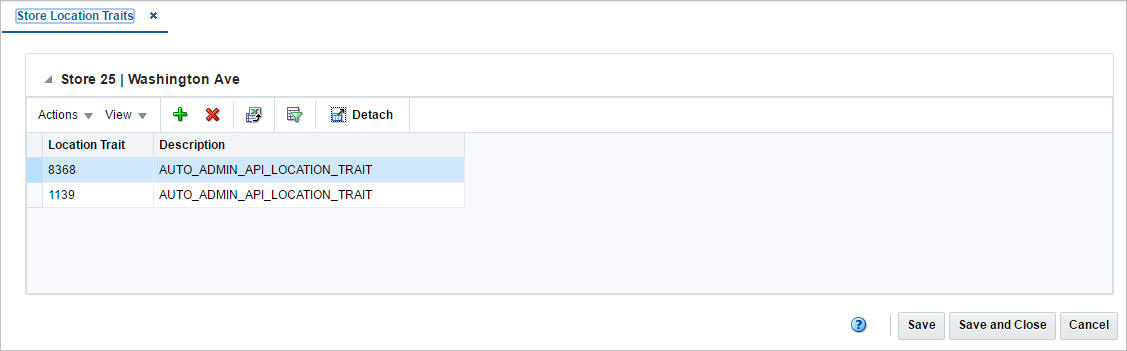
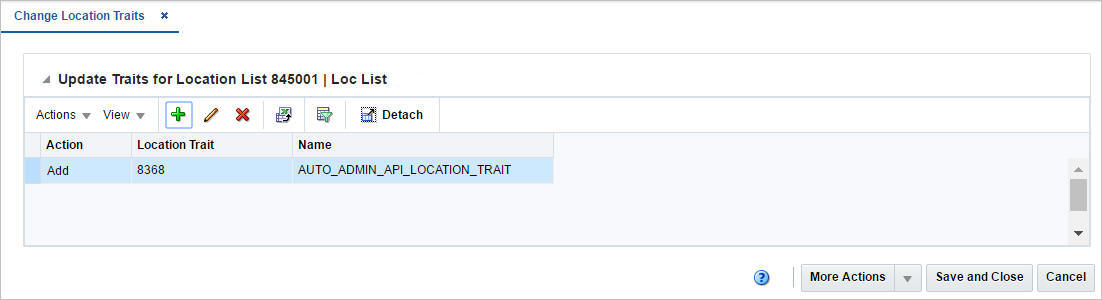
The Store Location Traits window allows you to add, delete, and view location traits. You can group areas, regions, districts, or stores by location traits.
At the store level, location traits can be used as a grouping mechanism when you:
Record Attributes for a Store
Add Locations to a Location List
Use the Actions Menu and Icons to apply actions to the table. You can perform the actions listed below.
Table 2-30 Store Location Traits - Actions Menu/Icons and Description
| Actions Menu/Icons | Description |
|---|---|
|
Add and Add icon |
You can add location traits by selecting Actions > Add or by using the Add icon. For more information about how to add location traits, see the Adding Store Location Traits section. |
|
Delete and Delete icon |
You can delete location traits:
|
|
Export to Excel and Export to Excel icon |
You can export the records in the table to a Microsoft Excel spreadsheet by selecting Actions > Export to Excel or by using the Export to Excel icon. |
You can customize the view of the table. Use the View Menu and icons to customize the view as listed below.
Table 2-31 Store Location Traits - View Menu/Icons and Description
| View Menu/Icons | Description |
|---|---|
|
Columns |
You can manage which of the columns will be shown in the table by clicking the Show All and Manage Columns options. |
|
Detach and Detach icon |
You can view the tables in the application in a separate window by clicking Detach or by using the Detach icon. |
|
Reorder Columns |
You can reorder columns by clicking the Reorder Columns option. |
|
Query by Example and Query by Example icon |
You can filter the items by one or multiple column values by clicking the Query by Example option or by using the Query by Example icon. |
The toolbar contains the following icons and buttons.
Table 2-32 Store Location Traits Toolbar - Icons/Buttons and Description
| Icons/Buttons | Description |
|---|---|
|
Help icon |
You can access the online help for a particular page by clicking the Help icon. |
|
Save |
Click Save to save the entered records. |
|
Save and Close |
Click Save and Close to save the entered records and close the window. |
|
Cancel |
Click Cancel to reject all entries and close the window. |
|
Done |
If you open the window in view mode, the Done button is displayed. Click Done to close the window. |
To add a location trait to the store, follow the steps below.
From the Tasks menu, select Foundation Data > Locations > Organizational Hierarchy. The Organizational Hierarchy window appears.
Select the Store button. The available stores are displayed in the table.
In the Store column, click the store ID link, or mark a record and select Actions > Edit, or use the Edit icon. The Store window appears.
In the Store window, select More Actions > Location Traits. The Store Location Traits window appears.
Then select Actions > Add or use the Add icon. The Add Location Trait window appears.
In the Location Trait window. Enter, select or search for the desired location trait ID.
Then choose one of the following options.
Click OK to add the location trait and close the window.
Click OK and Add Another to save the current record and add additional entries.
Click Cancel to reject all entries and close the window.
The Location Delivery Schedules window allows you to create, edit, and view delivery schedules for items from a supplier or warehouse to stores and warehouses. After you create a delivery schedule, you can define exceptions to the schedule by specifying which items are not to be delivered to the location on a specific delivery day.
When the Use Location Delivery Schedule system parameter is selected, the replenishment feature uses the delivery schedule to calculate lead times for the items at the location. When there is a delivery schedule for a supplier or warehouse at a location, the specified lead times for the item are the minimum amount of time in which a purchase order can be delivered to that location.
When the delivery date of the purchase order does not fall on a delivery day of the supplier or warehouse, the lead time is calculated by taking the minimum lead time and adding additional days to reach the next valid delivery day. In effect, the lead time is extended until the next delivery day of the supplier or warehouse. Extending the lead time increases the number of units required to replenish the item. The lead time is only extended when the replenishment method is Dynamic, Dynamic - Seasonal, Dynamic - Issues, or Floating Point.
The Location Delivery Schedule window contains the following sections.
The header displays the Source and Destination Location field.
In the Source field, select the source type, store or warehouse. Then, enter, select or search for the source ID.
In the Destination Location field, select the destination type, store or warehouse. Then, enter, select or search for the destination ID.
When you access the Location Delivery Schedules window from the Warehouse window, the Destination Locations fields are populated with the selected warehouse. The Source fields are blank and enabled. Once you choose a source, the table displays records matching the source and destination locations values.
When you access the Location Delivery Schedules window from the Supplier Site window, the Source fields are populated with the selected supplier site. The Destination Locations fields are blank and enabled. Once you choose a destination, the table displays records for the source and destination values.
The table displays the available delivery schedules for the selected location.
Use the Actions Menu and icons to apply actions to the Delivery Schedules Table. You can perform the actions listed below.
Table 2-33 Location Delivery Schedules Table - Actions Menu/Icons and Description
| Actions Menu/Icons | Description |
|---|---|
|
Delete and Delete icon |
You can delete delivery schedules from the table.
|
|
Manage Schedules button |
Opens the Manage Delivery Schedules window. For more information about how to manage delivery schedules for a location, see the Managing Location Delivery Schedules section. |
|
Export to Excel and Export to Excel icon |
You can export the records in the table to a Microsoft Excel spreadsheet by selecting Actions > Export to Excel or by using the Export to Excel icon. |
You can customize the view of the table by using the options in the View Menu.
Table 2-34 Delivery Schedules Table - View Menu/Icons and Description
| View Menu/Icons | Description |
|---|---|
|
Columns |
You can manage which of the columns will be shown in the table by clicking the Show All and Manage Columns options. |
|
Detach and Detach icon |
You can view the tables in the application in a separate window by clicking Detach or by using the Detach icon. |
|
Sort |
You can sort columns by the following options:
|
|
Reorder Columns |
You can reorder columns by clicking the Reorder Columns option. |
|
Query by Example and Query by Example icon |
You can filter the items by one or multiple column values by clicking Query by Example or by using the Query by Example icon. |
The Toolbar contains the following icons and buttons.
Table 2-35 Location Delivery Schedules Toolbar - Icons/Buttons and Description
| Icons/Buttons | Description |
|---|---|
|
Help icon |
You can access the online help for a particular page by clicking the Help icon. |
|
Refresh icon |
You can refresh the window by clicking the Refresh icon. All entries are reset and not saved. This option is not available, if you enter the window through the Supplier Site window. |
|
Exceptions |
Opens the Source Delivery Exceptions window. For more information about this function, see the Source Delivery Exceptions Window section. |
|
Save and Close |
Click Save and Close to save the entered records and close the window. |
|
Save and Create Another |
Select Save and Create Another to save the current record and enter additional records. This option is not available, if you enter the window through the Supplier Site window. |
|
Cancel |
Click Cancel to reject all entries and close the window. |
To manage location delivery schedules, follow the steps below. You can enter the Location Delivery Schedules window in different ways.
To add a delivery schedule at the store or warehouse level:
From the Tasks menu, select Foundation Data > Locations > Organizational Hierarchy. The Organizational Hierarchy window appears.
Select the Store/Warehouse button. The available stores/warehouses are displayed in the table.
Select a record in the table.
In the Store/Warehouse column, click the store/warehouse ID link, or mark a record and select Actions > Edit, or use the Edit icon. The Store/Warehouse window appears.
Click More Actions > Delivery Schedules. The Location Delivery Schedules window appears.
Store/Warehouse Level:
In the Source fields, select supplier site or warehouse. Then enter, select or search for the source ID.
The Destination Locations fields display the information of the selected store/warehouse.
To manage delivery schedules, see the Managing Delivery Schedules section.
To add a delivery schedule at the supplier level:
From the Tasks menu, select Foundation Data > Suppliers and Partners > Manage Supplier. The Supplier Search window appears.
Enter or select search criteria as desired to make the search more restrictive.
Click Search. The suppliers that match the search criteria are displayed in the Results section.
In the Supplier Site column, click the supplier site ID link, or mark a record and select Actions > Edit, or use the Edit icon. The Supplier Site window appears.
Select More Actions > Delivery Schedule. The Location Delivery Schedules window appears.
Supplier Level:
In the Source fields display the information of the selected supplier.
The Destination Locations field, select a destination type from the list. Then select the location ID.
To manage delivery schedules, see the Managing Delivery Schedules section.
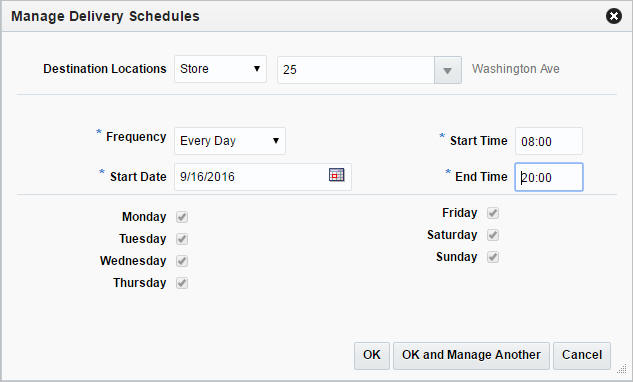
In the Delivery Schedules window, follow the steps below.
In the table, select the Manage Schedules button. The Manage Delivery Schedules window appears.
The Destination Location fields display the store information.
In the Frequency field, select the desired time span from the list.
In the Start Date field, enter the start date or use the Calendar icon to select a date.
In the Start Time field, enter the starting time of the schedule.
In the End Time field, enter the end time of the schedule.
Select the checkboxes of the desired weekdays of the delivery schedule.
Then choose one of the following options.
Click OK to add the current schedule and close the window.
Click OK and Manage Another to add the current schedule and add additional entries.
Click Cancel to reject all entries and close the window.
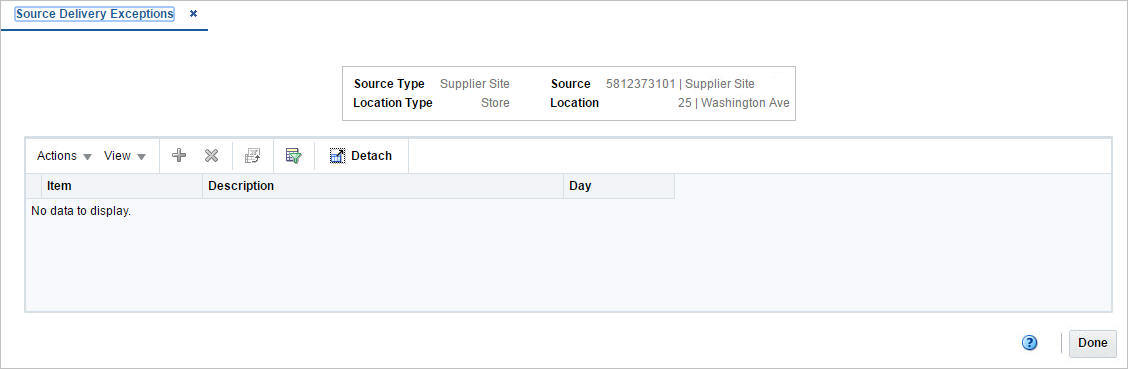
The Source Delivery Exceptions window allows you to define exceptions to the delivery date of a supplier at a store or warehouse. You specify which items are not to be delivered to the location on a specific delivery date.
The Source Delivery Exceptions Window contains the following sections.
Header
The header displays the source type, ID and name as well as the location type, ID and name.
The table displays the item for which the delivery exception is valid.
Use the Actions Menu and icons to apply actions to the table. You can perform the actions listed below.
Table 2-36 Exceptions Table - Actions Menu/Icons and Description
| Actions Menu/Icons | Description |
|---|---|
|
Add and Add icon |
You can add new exceptions for a delivery schedule by selecting Actions > Add or by using the Add icon. For more information about how to add new exceptions for a delivery schedule, see the Adding Source Delivery Exceptions section. |
|
Delete and Delete icon |
You can delete exceptions from a delivery schedule:
|
|
Export to Excel and Export to Excel icon |
You can export the records in the table to a Microsoft Excel spreadsheet by selecting Actions > Export to Excel or by using the Export to Excel icon. |
You can customize the view of the table by using the options in the View Menu.
Table 2-37 Exceptions Table - View Menu/Icons and Description
| View Menu/Icons | Description |
|---|---|
|
Columns |
You can manage which of the columns will be shown in the table by clicking the Show All and Manage Columns options. |
|
Detach and Detach icon |
You can view the tables in the application in a separate window by clicking Detach or by using the Detach icon. |
|
Sort |
You can sort columns by the following options:
|
|
Reorder Columns |
You can reorder columns by clicking the Reorder Columns option. |
|
Query by Example and Query by Example icon |
You can filter the items by one or multiple column values by clicking the Query by Example option or by using the Query by Example icon. |
The toolbar contains the following icons and buttons.
Table 2-38 Exceptions Toolbar - Icons/Buttons and Description
| Icons/Buttons | Description |
|---|---|
|
Help icon |
You can access the online help for a particular page by clicking the Help icon. |
|
Save |
Click Save to save the entered records. |
|
Save and Close |
Click Save and Close to save the entered records and close the window. |
|
Cancel |
Click Cancel to reject all entries and close the window. |
|
Done |
If you open the window in view mode, the Done button is displayed. Click Done to close the window. |
To add a delivery exception for a supplier to a warehouse or store, follow the steps below. You can enter the Source Delivery Exceptions window in different ways
Navigate: through Store/Warehouse window
From the Tasks menu, select Foundation Data > Locations > Organizational Hierarchy. The Organizational Hierarchy window appears.
Select the Store/Warehouse button. The available stores/warehouses are displayed in the table.
Select a record in the table.
In the Store/Warehouse column, click the store/warehouse ID link, or mark a record and select Actions > Edit, or use the Edit icon. The Store/Warehouse window appears.
Click More Actions > Delivery Schedules. The Location Delivery Schedules window appears.
Click Exceptions. The Source Delivery Exceptions window appears.
Navigate: through Supplier Site window
From the Tasks menu, select Foundation Data > Suppliers and Partners > Manage Suppliers. The Supplier Search window appears.
Enter or select search criteria as desired to make the search more restrictive.
Click Search. The suppliers that match the search criteria are displayed in the Results section.
In the Supplier Site column, click the supplier site ID link, or mark a record and select Actions > Edit, or use the Edit icon. The Supplier Site window appears.
Select More Actions > Delivery Schedule. The Location Delivery Schedules window appears.
Click Exceptions. The Source Delivery Exceptions window appears.
In the Source Delivery Exceptions window, follow the steps below.
In the table, select Actions > Add, or use the Add icon. The Add Exceptions window appears.
In the Item Type field, select the type, item or item list.
In the Item field, enter select or search for the item.
In the Date field, enter the day on which you do not want the item or item list delivered or use the Calendar icon to select a date.
Then choose one of the following options.
Click OK to add the current exception and close the window.
Click OK and Add Another to add additional exceptions.
Click Cancel to reject all entries and close the window.
To create a location list, follow the steps below.
You can enter the Create Location List window in different ways.
From the Tasks menu, select Foundation Data > Locations > Create Location List. The Create Location List window appears.
From the Tasks menu, select Foundation Data > Locations > Manage Location List. Search for location lists. Then select Actions > Create or use the Create icon. The Create Location List window appears.
Enter the data, as necessary.
For more information about the available fields in the Location List window, see the Location List Window section.
The Location List window allows you to create, edit, or view basic information about a location list. You can indicate whether the location list is static or dynamic. Dynamic lists can be rebuilt on demand. You can indicate whether a dynamic location list can also be rebuilt by a scheduled batch program. The ID of the user who created the location list and the date on which it was created appear. You can also view the number of locations that make up the location list.
The Location List window contains the following fields.
Table 2-39 Location List - Fields and Description
| Fields | Description |
|---|---|
|
Location List |
Displays the location list ID and description of the selected list. |
|
Comments |
Add comments to the selected location list. |
|
Hierarchy Level: |
|
|
The name of this field depends on the hierarchy level the location list is associated to. |
|
|
Chain |
Enter, select or search for the chain. |
|
Area |
Enter, select or search for the area. |
|
Region |
Enter, select or search for the region. |
|
District |
Enter, select or search for the district. |
|
Store |
Enter, select or search for the store. |
|
Warehouse |
Enter, select or search for the warehouse. |
|
Static checkbox |
If selected, the location list is static. You can not add additional locations to the list. If not selected, the location list is dynamic. |
|
Private checkbox |
This checkbox Select the checkbox to indicate that the security for a location list is on. |
|
Batch Rebuild checkbox |
If selected, the dynamic location list is rebuilt automatically by a scheduled batch program based on the original criteria. |
|
Total Locations |
Displays the total number of locations on the selected location list. |
|
Created |
Displays the date, when list has been created, and the user, who created the list. |
|
External Ref. No |
Displays a reference number, if available. |
The Toolbar contains the following icons and buttons.
Table 2-40 Toolbar Icon/Buttons and Description
| Icon/Buttons | Description |
|---|---|
|
Help icon |
You can access the online help for a particular page by clicking the Help icon. |
|
Delete icon |
You can delete the current location list by selecting the Delete icon. You are prompted, if you want to delete the record. Select Yes to confirm the prompt. |
|
More Actions |
Click More Actions to see a list of additional actions that can be performed in the Location List window.
|
|
Save |
Click Save to save the entered records. |
|
Save and Close |
Click Save and Close to save the entered records and close the window. |
|
Cancel |
Click Cancel to reject all entries and close the window. |
|
Done |
If you open the window in view mode, the Done button is displayed. Click Done to close the window. |
The Location List Detail window allows you to add, delete, and view the locations that make up a location list.
The Location List Detail window contains the following sections.
Location List Detail Header
The header contains the location list ID and description.
The table displays all the locations making up the location list. The location type, location ID, name and status are displayed by default.
Use the Actions Menu and icons to apply actions to the table. You can perform the actions listed below.
Table 2-41 Location List Details - Actions Menu/Icons and Description
| Actions Menu/Icons | Description |
|---|---|
|
Add and Add icon |
You can add locations to the current list, by selecting Actions > Add, or use the Add icon. For more information about how to create/add a location to the location list, see the Adding Locations to Location Lists section. |
|
Delete and Delete icon |
You can delete a location from the location list:
|
|
Export to Excel and Export to Excel icon |
You can export the records in the table to a Microsoft Excel spreadsheet by selecting Actions > Export to Excel or by using the Export to Excel icon. |
You can customize the view of the table by using the options in the View Menu.
Table 2-42 Location List Detail - View Menu/Icons and Description
| View Menu/Icons | Description |
|---|---|
|
Columns |
You can manage which of the columns will be shown in the table by clicking the Show All and Manage Columns options. |
|
Detach and Detach icon |
You can view the tables in the application in a separate window by clicking Detach or by using the Detach icon. |
|
Reorder Columns |
You can reorder columns by clicking the Reorder Columns option. |
|
Query by Example and Query by Example icon |
You can filter the items by one or multiple column values by clicking Query by Example or by using the Query by Example icon. |
The Toolbar contains the following icons and buttons.
Table 2-43 Location List Detail Toolbar - Icons/Buttons and Description
| Icons/Buttons | Description |
|---|---|
|
Help icon |
You can access the online help for a particular page by clicking the Help icon. |
|
Save |
Click Save to save the entered records. Only displayed, if the location list is static. |
|
Save and Close |
Click Save and Close to save the entered records and close the window. Only displayed, if the location list is static. |
|
Rebuild |
Opens the Location List Rebuild window. Only displayed, if the location list is dynamic. For more information about how to rebuild a location list, see the Rebuilding Location Lists section. |
|
Rebuild and Close |
Rebuilds the current location list and closes the window. Only displayed, if the location list is dynamic. For more information about how to rebuild a location list, see the Rebuilding Location Lists section. |
|
Cancel |
Click Cancel to reject all entries and close the window. |
|
Done |
If you open the window in view mode, the Done button is displayed. Click Done to close the window. |
To add a location to the selected location list, follow the steps below.
From the Tasks menu, select Foundation Data > Locations > Manage Location List. The Manage Location List window appears.
Enter or select search criteria as desired to make the search more restrictive.
Click Search. The items that match the search criteria are displayed in the Results section.
Select a record in the Results section.
Then select Actions > Edit, or use the Edit icon. The Location List window appears.
Select More Actions > Locations. The Location List Detail window appears.
Then select Actions > Add or use the Add icon. The Add Location window appears.
In the Type field, enter the location type. For example, select Warehouse.
In the Location field, enter, select or search for the location ID.
Then select one of the following options.
Click OK to add the new location and close the window.
Click OK and Add Another to add additional entries.
Click Cancel to reject all entries and close the window.
The Location List Criteria window allows you to add, edit, delete and view the criteria by which locations are grouped on a location list. The criteria that you enter become the conditions of a Where clause in a SQL statement. You can test the criteria and view the SQL statement before they are applied to the location list.
The Location List Criteria window contains the following sections.
Location List Criteria Header
The header contains the location list ID and description and location type.
The table lists the elements and values of the criteria.
Use the Actions Menu and icons to apply actions to the table. You can perform the actions listed below.
Table 2-44 Location List Criteria Table - Actions Menu/Icons and Description
| Actions Menu/Icons | Description |
|---|---|
|
Add and Add icon |
You can add location criteria to a location list by selecting Actions > Add or by using the Add icon. For more information about how to add a location criteria to a location list, see the Adding Location List Criteria section. |
|
Edit and Edit icon |
You can edit location criteria by selecting Actions > Edit or by using the Edit icon. For more information about how to edit location criteria, see the Editing Location List Criteria section. |
|
Delete and Delete icon |
You can delete location criteria from a location list:
|
|
Build List and Build List button |
After you have made all necessary changes in the table, click Build List to rebuild the location list. |
|
Locations and Locations button |
Opens the Location List Detail window to view the individual locations of the list. For more information about this function, see the Location List Detail Window window. |
|
Test SQL and Test SQL button |
Click Test SQL to test the validity of the criteria. A prompt is displayed, if an error occurs. |
|
Export to Excel and Export to Excel icon |
You can export the records in the table to a Microsoft Excel spreadsheet by selecting Actions > Export to Excel or by using the Export to Excel icon. |
You can customize the view of the table by using the options in the View Menu.
Table 2-45 Location List Criteria Table - View Menu/Icons and Description
| View Menu/Icons | Description |
|---|---|
|
Columns |
You can manage which of the columns will be shown in the table by clicking the Show All and Manage Columns options. |
|
Detach and Detach icon |
You can view the tables in the application in a separate window by clicking Detach or by using the Detach icon. |
|
Sort |
You can sort columns by the following options:
|
|
Reorder Columns |
You can reorder columns by clicking the Reorder Columns option. |
The Toolbar contains the following icon and buttons.
Table 2-46 Location List Criteria Toolbar - Icons/Buttons and Description
| Icons/Buttons | Description |
|---|---|
|
Help icon |
You can access the online help for a particular page by clicking the Help icon. |
|
More Actions |
Click More Actions to see a list of additional actions that can be performed in the Location List Criteria window.
|
|
Save |
Click Save to save the entered records. |
|
Save and Close |
Click Save and Close to save the entered records and close the window. |
|
Cancel |
Click Cancel to reject all entries and close the window. |
|
Done |
If you enter the window in view mode, the Done button is displayed. Click Done to close the window. |
To maintain location list criteria, follow the steps below.
From the Tasks menu, select Foundation Data > Locations > Manage Location List. The Manage Location List window appears.
Enter or select search criteria as desired to make the search more restrictive.
Click Search. The items that match the search criteria are displayed in the Results section.
Select a record in the Results section.
Then click the location list link, or select Actions > Edit, or the Edit icon. The Location List window appears.
Select More Actions > Criteria. The Location List Criteria window appears.
Update the location list criteria, as necessary.
To add location list criteria, follow the steps below.
Go to the Location Type field, in the top right corner of the window. Select a location type.
Then select Actions > Add or use the Add icon. The Add Criteria window appears.
In the Element field, select an element from the list.
|
Note: If the Element is Cost Zone or Store Grade, you can specify which group (cost zone group or store grade group) the zone or grade is a member of. |
In the Comparison field, select a sign from the list.
In the Value field, enter a value.
In the Logic Operation field, select an option from the list.
In the Related Value field, enter, select or search for the value.
Then choose one of the following options.
Click OK to add your entries and close the Add Criteria window.
Click OK and Add Another to add additional entries.
Click Cancel to reject all entries and close the Add Criteria window.
Click the Test SQL button to test, if the entered criteria is valid.
|
Note: If the location list criteria is not valid, a message is displayed. |
Click Build List to rebuild the location list.
Then choose one of the following options.
Click Save to save your entries.
Click Save and Close to save your entries and close the window.
Click Cancel to reject all entries and close the window.
To edit location list criteria, follow the steps below.
Select a record in the table.
Then select Actions > Edit or use the Edit icon. The Edit Criteria window appears.
Edit the fields, as necessary.
Then choose one of the following options.
Click OK to save your changes and close the Edit Criteria window.
Click Cancel to reject all entries and close the Edit Criteria window.
Click the Test SQL button to test, if the entered criteria is valid.
|
Note: If the location list criteria is not valid, a message is displayed. |
Click Build List to rebuild the location list.
Then choose one of the following options.
Click Save to save your changes.
Click Save and Close to save your changes and close the window.
Click Cancel to reject all entries and close the window.
To rebuild a location list, follow the steps below.
From the Tasks menu, select Foundation Data > Locations > Manage Location List. The Manage Location List window appears.
Enter or select search criteria as desired to make the search more restrictive.
Click Search. The items that match the search criteria are displayed in the Results section.
Select a record in the Results section.
Then select Actions > Edit, or use the Edit icon. The Location List window appears.
Select More Actions > Location List Rebuild. The Location List Rebuild window appears. The location list details are displayed.
Select the Rebuild Location List checkbox, to rebuild the current list.
Then choose one of the following options.
Click Execute and Close to rebuild the selected location list and close the window.
Click Cancel to reject all entries and close the window.
The Manage Location Lists option opens the Location List Search window. In the Location List Search window you can perform the following actions.
Search for a location list by various search criteria
View the entered search results
View a location list
Create a location list
Create a location list from an already existing location list
Edit a location list
You can access the Location List Search window from the Task menu, select Foundation Data > Locations > Manage Location Lists. The Location List Search window appears.
The Location List Search window contains the following sections.
Search
For details about the search, see the Searching for a Location List section.
To search for a location list:
From the Task menu, select Foundation Data > Locations > Manage Location Lists. The Location List Search window appears.
You can search for a location list by using basic or advanced search criteria, depending on the requirement. The basic mode is the default search mode.
Click Advanced to access the search section in advanced mode.
Click Basic to return to basic mode.
To search for a location list by using basic search criteria:
Enter, select or search for one or all of the following basic search criteria.
Table 2-47 Location List Search - Basic Search Criteria and Description
| Fields | Description |
|---|---|
|
Match option |
Check radio button All or Any. All - only location lists matching all entered search criteria are shown. Any - location lists matching any of the entered search criteria are shown. |
|
Location List |
Enter the location list ID. |
|
Description |
Enter a location list description. |
|
Type |
Select the location list type, Static or Dynamic, from the list. |
|
Created Date |
Enter the create date of the location list or use the Calendar icon to select a date. |
|
Store |
Enter, select or search for the store ID. |
|
Store Name |
Enter the store name. |
|
Warehouse |
Enter, select or search for the Warehouse ID. |
|
Warehouse Name |
Enter the name of warehouse. |
Click the Saved Search list to select one of the saved search criteria. Selecting a saved search populates the search section with the saved search criteria. If the run automatically function is enabled for the search, the search is executed immediately.
You can also personalize your saved searches by selecting Personalize. The Personalized Saved Searches window appears.
For more information about the Personalized Saved Search, see the Common User Interface Controls chapter, section "Personalize Saved Search".
Click Search. The location lists that match the search criteria are displayed in the Results section.
Click Reset to clear the search section and results.
Click Save As... to save the current search criteria. The Create Saved Search window appears.
For more information about how to save your search criteria, see the Common User Interface Controls chapter, section "Create Saved Search".
Click Done to close the window.
To search for a location list by using advanced search criteria:
To search by using advanced search criteria, enter or select one or all of the advanced search criteria.
To narrow down the search, use the list next to the search fields. For example, determine if the entered value should be equal or not equal to the search result.
Click the Saved Search list to select one of the saved search criteria. Selecting a saved search populates the search section with the saved search criteria. If the run automatically function is enabled for the search, the search is executed immediately.
You can also personalize your saved searches by selecting Personalize. The Personalized Saved Searches window appears.
For more information about the Personalized Saved Search, see the Common User Interface Controls chapter, section "Personalize Saved Search".
Click Search. The location lists that match the search criteria are displayed in the Results section.
Click Reset to clear the search section and results.
Click Save As... to save the current search criteria. The Create Saved Search window appears.
For more information about how to save your search criteria, see the Common User Interface Controls chapter, section "Create Saved Search".
Click Add Fields to add more fields for the advanced search. To remove the field from the search, click the x right next to the field.
Click Reorder to change the order of the available search fields. The Reorder Search Fields window appears.
Select the desired search field and use the up and down arrows to rearrange the order of the fields.
Click OK to confirm the new order of the fields and close the window.
Click Cancel to reject any changes and close the window.
Click Done to close the window.
The Results section lists the retrieved location lists. The Results table shows the following columns by default.
Location List
Description
Type
Created and Last Rebuild Date
Total Locations
Use the Actions Menu and icons to apply actions to the table. You can perform the actions listed below.
Table 2-48 Results - Actions Menu/Icons and Description
| Actions Menu/Icons | Description |
|---|---|
|
Create and Create icon |
Select Actions > Create or use the Create icon to create a new location list. For more details about how to create a location list, see the Creating Location Lists section. |
|
Create from Existing and Create from Existing icon |
Select Actions > Create from Existing or use the Create from Existing icon to create a new location list from an existing location list. The Location List window appears. For more information about this function, see the Creating Location Lists from Existing section. |
|
Edit and Edit icon |
Select Actions > Edit or use the Edit icon to edit the selected location list. For more information about how to edit a location list, see the Editing Location Lists section. |
|
View and View icon |
To view a location list:
|
|
Export to Excel and Export to Excel icon |
You can export the records in the table to a Microsoft Excel spreadsheet by selecting Actions > Export to Excel or by using the Export to Excel icon. |
|
Mass Change |
The Mass Change menu contains the following options:
|
You can customize the view of the table by using the options in the View Menu.
Table 2-49 Results - View Menu/Icons and Description
| View Menu/Icons | Description |
|---|---|
|
Columns |
You can manage which of the columns will be shown in the table by clicking the Show All and Manage Columns options. |
|
Detach and Detach icon |
You can view the tables in the application in a separate window by clicking Detach or by using the Detach icon. |
|
Sort |
You can sort columns by the following options:
|
|
Reorder Columns |
You can reorder columns by clicking the Reorder Columns option. |
|
Query by Example and Query by Example icon |
You can filter the items by one or multiple column values by clicking Query by Example or by using the Query by Example icon. |
The toolbar contains the following icons and buttons.
To create a location list from an existing location list, follow the steps below.
From the Tasks menu, select Foundation Data > Locations > Manage Location List. The Manage Location List window appears.
Enter or select search criteria as desired to make the search more restrictive.
Click Search. The items that match the search criteria are displayed in the Results section.
Select a record in the Results section.
Then select Actions > Create from Existing, or use the Create from Existing icon. The Location List window appears. The data of the existing location list is displayed.
Change the fields, if necessary.
For more information about the available fields in the Location List window, see the Location List Window section.
Then choose one of the following options.
Click Save to save the new location list.
Click Save and Close to save the new location list and close the window.
Click Cancel to reject all entries and close the window.
To edit a location list, follow the steps below.
From the Tasks menu, select Foundation Data > Locations > Manage Location List. The Manage Location List window appears.
Enter or select search criteria as desired to make the search more restrictive.
Click Search. The items that match the search criteria are displayed in the Results section.
Select a record in the Results section.
Then select Actions > Edit, or use the Edit icon. The Location List window appears. The data of the selected location list is displayed.
Change the fields, if necessary.
For more information about the available fields in the Location List window, see the Location List Window section.
Then choose one of the following options.
Click Save to save your changes.
Click Save and Close to save your changes and close the window.
Click Cancel to reject all entries and close the window.
The Change Cost Zones window allows you to change the cost zone for all stores and warehouses on a location list.
The Changing Cost Zones window contains the following fields.
Table 2-51 Cost Zones - Fields and Description
| Fields | Description |
|---|---|
|
Location List |
This field displays the location list number and description. |
|
Zone Group |
Enter, select or search for the current zone group. This field is a required field. |
|
New Zone |
Enter, select or search for the new cost zone. This field is a required field. |
The toolbar contains the following icons and buttons.
Table 2-52 Change Cost Zones Toolbar - Icons/Buttons and Description
| Icons/Buttons | Description |
|---|---|
|
Help icon |
You can access the online help for a particular page by clicking the Help icon. |
|
More Actions |
Click More Actions to see a list of additional actions that can be performed in the Change Cost Zones window.
|
|
Save |
Click Save to save your changes. |
|
Save and Close |
Click Save and Close to save your changes and close the window. |
|
Cancel |
Click Cancel to reject all entries and close the window. |
To update the cost zone for all stores and warehouses on a location list, follow the steps listed below.
From the Tasks menu, select Foundation Data > Locations > Manage Location List. The Location List Search window appears.
Enter or select search criteria as desired to make the search more restrictive.
Click Search. The location lists that match the search criteria are displayed in the Results section.
Select a record in the Results table.
Then select Actions > Mass Update > Create Cost Zone Change. The Change Cost Zones window appears.
In the Zone Group field, enter, select or search for the group.
In the New Zone field, enter, select or search for the new cost zone.
Then choose one of the following options.
Click Save to save the new cost zone.
Click Save and Close to a save the new cost zone and close the window.
Click Cancel to reject all entries and close the window.
In the Change Location Traits window you can update location traits for a specific location list. The Change Location Traits window contains the following sections.
Change Location Traits Header
The header displays the location list ID and description.
In the table add, edit or delete traits of the selected location list.
Use the Actions Menu and icons to apply actions to the table. You can perform the actions listed below.
Table 2-53 Change Location Traits Table - Actions Menu/Icons and Description
| Actions Menu/Icons | Description |
|---|---|
|
Add and Add icon |
You can add a location trait to the location list by selecting Actions > Add or by using the Add icon. For more information about how to add a location trait to the selected location list, see the Adding Location Traits section. |
|
Delete and Delete icon |
You can delete a location trait from a location list:
|
|
Edit and Edit icon |
Select Actions > Edit or use the Edit icon to edit the selected location trait. For more information about how to edit a trait of a location list, see the Editing Location Traits section. |
|
Export to Excel and Export to Excel icon |
You can export the records in the table to a Microsoft Excel spreadsheet by selecting Actions > Export to Excel or by using the Export to Excel icon. |
You can customize the view of the table. Use the View Menu and icons to customize the view as listed below.
Table 2-54 Change Location Traits Table - View Menu/Icons and Description
| View Menu/Icons | Description |
|---|---|
|
Columns |
You can manage which of the columns will be shown in the table by clicking the Show All and Manage Columns options. |
|
Detach and Detach icon |
You can view the tables in the application in a separate window by clicking Detach or by using the Detach icon. |
|
Sort |
You can sort columns by the following options:
|
|
Reorder Columns |
You can reorder columns by clicking the Reorder Columns option. |
|
Query by Example and Query by Example icon |
You can filter the items by one or multiple column values by clicking the Query by Example option or by using the Query by Example icon. |
The toolbar contains the following icons and buttons.
Table 2-55 Change Location Traits Toolbar - Icons/Buttons and Description
| Icons/Buttons | Description |
|---|---|
|
Help icon |
You can access the online help for a particular page by clicking the Help icon. |
|
More Actions |
Click More Actions to see a list of additional actions that can be performed in the Change Location Traits window.
|
|
Save and Close |
Click Save and Close to save the entered records and close the window. |
|
Cancel |
Click Cancel to reject all entries and close the window. |
To update the location traits by location list, follow the steps listed below.
From the Tasks menu, select Foundation Data > Locations > Manage Location List. The Location List Search window appears.
Enter or select search criteria as desired to make the search more restrictive.
Click Search. The location lists that match the search criteria are displayed in the Results section.
Select a record in the Results table.
Then select Actions > Mass Update > Change Location Traits. The Change Location Traits window appears.
Update the traits for the selected location list.
To add a location trait, follow the steps below.
In the Change Location Traits window, select Actions > Edit or use the Edit icon. The Edit Location Trait window appears.
In the Action field, select if you want to Add or Delete the location trait. This field is a required field.
|
Note: You can also delete a location trait by selecting the Delete icon in the table. |
In the Location Trait field, enter, select or search for the location trait. This field is a required field.
Then choose one of the following options.
Click OK to add the trait and close the window.
Click OK and Add Another to add the current trait and add additional entries.
Click Cancel to reject all entries and close the window.
To edit a location trait, follow the steps below.
In the Change Location Traits window, select Actions > Edit or use the Edit icon. The Edit Location Trait window appears.
In the Action field, change the action, if necessary.
In the Location Trait field, enter select or search for another location trait, if necessary.
Then choose one of the following options.
Click OK to edit the current trait and close the window.
Click OK and Add Another to add the current trait and add additional entries.
Click Cancel to reject all entries and close the window.
The Cost Zones window allows you to create, maintain, and view the cost zones for a selected cost zone group. You can categorize stores into zones based on a costing strategy. For each cost zone group, one cost zone is set as the base cost zone. The base cost zone indicates that the price for the item is based on the price of the item in the zone. When a new cost zone group is created, all locations must be added to the group. The locations can exist individually within a group or locations can be grouped into cost zones.
The Cost Zones window contains the following sections.
The Cost Zone Groups section allows you to add, delete, or view cost zone groups. A cost zone group is a grouping mechanism that allows you to categorize stores into zones based on a costing strategy. This grouping mechanism is available only when you are tracking Estimate Landed Costs (ELC).
The table displays the zone group, cost level and description by default.
Description
You can edit the Description column directly in the table.
Use the Actions Menu and icons to apply actions to the table. You can perform the actions listed below.
Table 2-56 Cost Zone Group - Actions Menu/Icons and Description
| Actions Menu/Icons | Description |
|---|---|
|
Add and Add icon |
You can add new cost zone groups by selecting Actions > Add or by using the Add icon. For more information about how to add new cost zone groups, see the Adding Cost Zone Groups section. |
|
Delete and Delete icon |
You can delete cost zone groups:
|
|
Export to Excel and Export to Excel icon |
You can export the records in the table to a Microsoft Excel spreadsheet by selecting Actions > Export to Excel or by using the Export to Excel icon. |
|
Translate and Translate icon |
You can create a translation by selecting Actions > Translate or by using the Translate icon. |
You can customize the view of the table by using the options in the View Menu.
Table 2-57 Cost Zone Groups/Zones/ Locations - View Menu/Icons and Description
| View Menu/Icons | Description |
|---|---|
|
Columns |
You can manage which of the columns will be shown in the table by clicking the Show All and Manage Columns options. |
|
Detach and Detach icon |
You can view the tables in the application in a separate window by clicking Detach or by using the Detach icon. |
|
Sort |
You can sort columns by the following options:
|
|
Reorder Columns |
You can reorder columns by clicking the Reorder Columns option. |
|
Query by Example and Query by Example icon |
You can filter the records by one or multiple column values by clicking the Query by Example option or by using the Query by Example icon. |
The Cost Zones section allows you to add, delete, and view the cost zones for a selected cost zone group.
The table displays the zone ID, description, locations, currency and base cost checkbox by default.
Description
You can edit the Description column directly in the table.
Base Cost
Select the Base Cost checkbox, to indicate that the price for the item is based on the price of the item in the zone.
Use the Actions Menu and icons to apply actions to the table. You can perform the actions listed below.
Table 2-58 Cost Zones - Actions Menu/Icons and Description
| Actions Menu/Icons | Description |
|---|---|
|
Add and Add icon |
You can add new cost zones to a cost zone group by selecting Actions > Add or by using the Add icon. For more information about how to add a new cost zone to a cost zone group, see the Adding Cost Zones section. |
|
Delete and Delete icon |
You can delete cost zones from a cost zone group:
|
|
Export to Excel and Export to Excel icon |
You can export the records in the table to a Microsoft Excel spreadsheet by selecting Actions > Export to Excel or by using the Export to Excel icon. |
|
Translate and Translate icon |
You can create a translation by selecting Actions > Translate or by using the Translate icon. |
You can customize the view of the table by using the options in the View Menu.
For more information about the View Menu and icons of the table, see Table 2-57, "Cost Zone Groups/Zones/ Locations - View Menu/Icons and Description"
The Cost Zone Locations section allows you to add, edit, delete, or view locations in the cost zone. In edit mode, you may add locations to a cost zone or move locations to a different cost zone.
Locations cannot be edited for any cost zone group at the location level because the location is a cost zone group.
The table displays the location type, ID and location name as well as the primary discharge port and port description by default.
Primary Discharge Port
You can edit the primary discharge port for a location directly in the table.
Use the Actions Menu and icons to apply actions to the table. You can perform the actions listed below.
Table 2-59 Cost Zone Locations - Actions Menu/Icons and Description
| Actions Menu/Icons | Description |
|---|---|
|
Add and Add icon |
You can add new locations to a cost zone by selecting Actions > Add or by using the Add icon. For more information about how to add new cost zone locations to a cost zone, see the Adding Cost Zone Locations section. |
|
Edit and Edit icon |
Select Actions > Edit or use the Edit icon to edit the selected cost zone location. For more information about how to edit cost zone locations, see the Editing Cost Zone Locations section. |
|
Delete and Delete icon |
You can delete cost zone locations from a cost zone:
|
|
Export to Excel and Export to Excel icon |
You can export the records in the table to a Microsoft Excel spreadsheet by selecting Actions > Export to Excel or by using the Export to Excel icon. |
You can customize the view of the table by using the options in the View Menu.
For more information about the View Menu of the table, see Table 2-57, "Cost Zone Groups/Zones/ Locations - View Menu/Icons and Description"
The Toolbar contains the following icons and buttons.
Table 2-60 Cost Zones Toolbar - Icons/Buttons and Description
| Icons/Buttons | Description |
|---|---|
|
Help icon |
You can access the online help for a particular page by clicking the Help icon. |
|
Save |
Click Save to save the entered records. |
|
Save and Close |
Click Save and Close to save the entered records and close the window. |
|
Cancel |
Click Cancel to reject all entries and close the window. |
To maintain Cost Zones, follow the steps below.
From the Tasks menu, select Foundation Data > Locations > Cost Zones. The Cost Zones window appears.
Update the cost zones, as necessary.
To add cost zone groups, follow the steps listed below.
Open the Cost Zones Group section.
Then select Actions > Add or use the Add icon. The Add Cost Zone Groups window appears.
In the Zone Group field, enter a unique zone group ID. This field is a required field.
In the Description field, enter a unique description for the zone group.
In the Cost Level field, select the cost level from the list.
In the Like Group field, enter, select or search for a group to copy the zones and locations of the selected group to the new group.
Then select one of the following options.
Click OK to add the new cost zone group and close the window.
Click OK and Add Another to add additional cost zone groups.
Click Cancel to reject all entries and close the window.
To add a new cost zone to a cost zone group, follow the steps below.
In the Cost Zones window, select a record in the Cost Zone Groups section.
All the available cost zones for the selected cost zone group are displayed in the Cost Zones section.
In the Cost Zones section, select Actions > Add or use the Add icon. The Add Cost Zone window appears.
In the Zone field, enter a unique Zone ID.
In the Description field, enter a unique zone description.
In the Currency field, enter, select or search for the currency ID.
Then choose one of the following options.
Click OK to add the new cost zone and close the window.
Click OK and Add Another to add additional cost zones.
Click Cancel to reject all entries and close the window.
|
Note: If the cost level of the new cost zone group is Location, a cost zone for each location is created automatically.You have to add all locations for a new cost zone group. If any location is missing from the group, you will receive a message listing all missing locations when you save your changes in the Cost Zones window. |
To add cost zone locations to a cost zone, follow the steps listed below.
In the Cost Zones window, select a record in the Cost Zones section.
The available locations for the selected cost zone are displayed in the Cost Zone Locations table.
In the Cost Zone Locations table, select Actions > Add or use the Add icon. The Add Cost Zone Locations window appears.
In the Location field, select the location type from the list. The field next to the location type enables. Enter, select or search for the location ID.
In the Discharge Port field, select, enter or search for the port.
Then choose one of the following options.
Click OK to add the location and close the window.
Click OK and Add Another to add additional locations.
Click Cancel to reject all entries and close the window.
To edit a cost zone location, follow the steps listed below.
In the Cost Zones window, select the record you want to edit in the Cost Zone Locations table.
Then select Actions > Edit or use the Edit icon. The Edit Cost Zone Location window appears.
The warehouse/store ID and description of the selected record are displayed.
In the New Zone field, enter, select or search for a new zone, if you want to move the current location to another zone.
In the Discharge Port field, enter, select or search for another port.
Then choose one of the following options.
Click OK to save your changes and close the window.
Click Cancel to reject all entries and close the window.
The Merchandise Hierarchy window allows you to create, edit, and view a member of the selected level of the merchandise hierarchy.
The Merchandise Hierarchy window contains the following sections.
The Merchandise Hierarchy structure on the left side of the window contains the following buttons.
Table 2-61 Merchandise Hierarchy Structure - Buttons and Description
| Buttons | Description |
|---|---|
|
Division |
Displays the available divisions in the table. |
|
Group |
Displays the available groups in the table. |
|
Department |
Displays the available departments in the table. |
|
Class |
Displays the available classes in the table. |
|
Subclass |
Displays the available subclasses in the table. |
The Hierarchy table displays the available entries of the selected hierarchy level.
For example, if you select the Division button, all available divisions are displayed in this table.
The table displays the following columns by default.
Hierarchy ID, depending on the selected hierarchy button.
Name of the hierarchy level, for example, the name of the chain.
Next hierarchy level, for example, Group
This column contains either the Create icon or the Details icon.
If the next level has been created, the Detail icon is displayed. Use the icon to maintain or view the details of the next level.
If the next level has not been created, the Create icon is displayed. Use the icon to create the next level.
This column is not available for subclasses.
Use the Actions menu and icons to apply actions to the table. You can perform the actions listed below.
Table 2-62 Merchandise Hierarchy Table - Actions Menu/Icons and Description
| Actions Menu/Icons | Description |
|---|---|
|
Create and Create icon |
You can create a new hierarchy level by selecting Actions > Create or by using the Create icon. For more information about how to create the individual hierarchy levels, see the following sections: |
|
Edit and Edit icon |
Select Actions > Edit or use the Edit icon to edit the selected hierarchy level. For more information about how to edit a hierarchy level, see the following sections. |
|
View and View icon |
To view a hierarchy level:
|
|
Export to Excel and Export to Excel icon |
You can export the records in the table to a Microsoft Excel spreadsheet by selecting Actions > Export to Excel or by using the Export to Excel icon. |
You can customize the view of the table by using the options in the View Menu.
Table 2-63 Merchandise Hierarchy Table - View Menu/Icons and Description
| View Menu/Icons | Description |
|---|---|
|
Columns |
You can manage which of the columns will be shown in the table by clicking the Show All and Manage Columns options. |
|
Detach and Detach icon |
You can view the tables in the application in a separate window by clicking Detach or by using the Detach icon. |
|
Sort |
You can sort columns by the following options:
|
|
Reorder Columns |
You can reorder columns by clicking the Reorder Columns option. |
|
Query by Example and Query by Example icon |
You can filter the items by one or multiple column values by clicking the Query by Example option or by using the Query by Example icon. |
To create a division, follow the steps below.
Click the Division button. All available divisions are displayed in the table.
In the table, select Actions > Create, or use the Create icon. The Divisions window appears.
Select Actions > Add, or use the Add icon. The Add Division window appears.
In the Division field, enter a unique ID for the division.
In the Name field, enter a name for the division.
In the Total Market Amount field, enter the amount of annual sales that the division is expected to generate in thousands.
In the Buyer Name field, enter, select or search for the buyer ID who is responsible for the division.
In the Merchandiser Name field, enter, select or search for the merchandiser ID who is responsible for the division.
Then choose one of the following options.
Click OK to add the division and close the window.
Click OK and Add Another to add additional divisions.
Click Cancel to reject all entries and close the window.
To edit a division, follow the steps below.
Click the Division button. All available divisions are displayed in the table.
Select Actions > Edit, or use the Edit icon. The Divisions window appears.
Select a record in the table.
Then select Actions > Edit, or use the Edit icon. The Edit Division window appears.
The information of the selected division is displayed. Change the values, as necessary. You cannot change the division ID.
Then choose one of the following options.
Click OK to save your changes and close the window.
Click Cancel to reject all entries and close the window.
The Divisions window allows you to add, edit, delete and view divisions in the merchandise hierarchy. A division is below the company and above the group in the merchandise hierarchy. Typically, the division is used to signify the type of merchandise that your organization offers, such as hardlines or apparel.
Use the Actions Menu and icons to apply actions to the table. You can perform the actions listed below.
Table 2-65 Divisions - Actions Menu/Icons and Description
| Actions Menu/Icons | Description |
|---|---|
|
Add and Add icon |
You can add a new division by selecting Actions > Add or by using the Add icon. The Add function is not available, if you are in edit mode. For more information about how to add a new division, see the Creating Divisions section. |
|
Delete and Delete icon |
You can delete chains:
|
|
Edit and Edit icon |
Select Actions > Edit or use the Edit icon to edit the selected division. For more information about how to edit a division, see the Editing Divisions section. |
|
Export to Excel and Export to Excel icon |
You can export the records in the table to a Microsoft Excel spreadsheet by selecting Actions > Export to Excel or by using the Export to Excel icon. |
|
Translate and Translate icon |
You can create a translation by selecting Actions > Translate or by using the Translate icon. |
You can customize the view of the table by using the options in the View Menu and icons listed below.
Table 2-66 Divisions - View Menu/Icons and Description
| View Menu/Icons | Description |
|---|---|
|
Columns |
You can manage which of the columns will be shown in the table by clicking the Show All and Manage Columns options. |
|
Detach and Detach icon |
You can view the tables in the application in a separate window by clicking Detach or by using the Detach icon. |
|
Sort |
You can sort columns by the following options:
|
|
Reorder Columns |
You can reorder columns by clicking the Reorder Columns option. |
|
Query by Example and Query by Example icon |
You can filter the records by one or multiple column values by clicking the Query by Example option or by using the Query by Example icon. |
The toolbar contains the following icon and buttons.
Table 2-67 Divisions Toolbar - Icons/Buttons and Description
| Icons/Buttons | Description |
|---|---|
|
Help icon |
You can access the online help for a particular page by clicking the Help icon. |
|
Save |
Click Save to save the entered records. |
|
Save and Close |
Click Save and Close to save the entered records and close the window. |
|
Cancel |
Click Cancel to reject all entries and close the window. |
|
Done |
If you open the window in view mode, the Done button is displayed. Click Done to close the window. |
To create a group, follow the steps below.
Click the Group button. All available groups are displayed in the table.
In the table, select Actions > Create, or use the Create icon. The Groups window appears.
Select Actions > Add, or use the Add icon. The Add Group window appears.
In the Group field, enter a unique ID for the group. This field is a required field.
In the Name field, enter a name for the group. This field is a required field.
In the Division field, enter, select or search for the division ID of the division associated with the group. This field is a required field.
In the Buyer Name field, enter, select or search for the buyer ID who is responsible for the group.
In the Merchandiser Name field, enter, select or search for the merchandiser ID who is responsible for the group.
Then choose one of the following options.
Click OK to add the group and close the window.
Click OK and Add Another to add additional divisions.
Click Cancel to reject all entries and close the window.
To edit a group, follow the steps below.
Click the Group button. All available groups are displayed in the table.
Select Actions > Edit, or use the Edit icon. The Groups window appears.
Select a record in the table.
Then select Actions > Edit, or use the Edit icon. The Edit Group window appears.
The information of the selected group is displayed. Change the values, as necessary. You cannot change the group ID.
Then choose one of the following options.
Click OK to save your changes and close the window.
Click Cancel to reject all entries and close the window.
The Groups window allows you to add, edit, delete, and view a group in the merchandise hierarchy. A group is below the division and above the department in the merchandise hierarchy. A group can belong to only one division.
Use the Actions Menu and icons to apply actions to the table. You can perform the actions listed below.
Table 2-68 Groups - Actions Menu/Icons and Description
| Actions Menu/Icons | Description |
|---|---|
|
Add and Add icon |
You can add a new group by selecting Actions > Add or by using the Add icon. The Add function is not available, if you are in edit mode. For more information about how to add a new group, see the Creating Groups section. |
|
Edit and Edit icon |
Select Actions > Edit or use the Edit icon to edit the selected group. For more information about how to edit a group, see the Editing Groups section. |
|
Delete and Delete icon |
You can delete chains:
|
|
Export to Excel and Export to Excel icon |
You can export the records in the table to a Microsoft Excel spreadsheet by selecting Actions > Export to Excel or by using the Export to Excel icon. |
|
Search and Search icon |
You can search for the corresponding division of a group:
|
|
Translate and Translate icon |
You can create a translation by selecting Actions > Translate or by using the Translate icon. |
You can customize the view of the table by using the options in the View Menu and icons listed below.
Table 2-69 Groups - View Menu/Icons and Description
| View Menu/Icons | Description |
|---|---|
|
Columns |
You can manage which of the columns will be shown in the table by clicking the Show All and Manage Columns options. |
|
Detach and Detach icon |
You can view the tables in the application in a separate window by clicking Detach or by using the Detach icon. |
|
Sort |
You can sort columns by the following options:
|
|
Reorder Columns |
You can reorder columns by clicking the Reorder Columns option. |
|
Query by Example and Query by Example icon |
You can filter the records by one or multiple column values by clicking the Query by Example option or by using the Query by Example icon. |
The toolbar contains the following icon and buttons.
Table 2-70 Groups Toolbar - Icons/Buttons and Description
| Icons/Buttons | Description |
|---|---|
|
Help icon |
You can access the online help for a particular page by clicking the Help icon. |
|
Save |
Click Save to save the entered records. |
|
Save and Close |
Click Save and Close to save the entered records and close the window. |
|
Cancel |
Click Cancel to reject all entries and close the window. |
|
Done |
If you open the window in view mode, the Done button is displayed. Click Done to close the window. |
To create a department, follow the steps below.
Click the Department button. All available departments are displayed in the table.
In the table, select Actions > Create, or use the Create icon. The Department window appears.
Enter the necessary information. For more information about the available fields of the Department window, see the Department Window section.
Then select one of the following options.
Click Save and Close to save the current department and close the window.
Click Save to save the current department.
Click Save and Create Another to create additional departments.
Click Cancel to reject all entries and close the window.
To edit a department, follow the steps below.
Click the Department button. All available departments are displayed in the table.
In the table, select the department you want to edit. The Department window appears.
The information of the selected department is displayed. Change the values, as necessary. You cannot change the department ID and purchase type.
Then choose one of the following options.
Click Save and Close to save your changes and close the window.
Click Save to save your changes.
The Department window allows you to create, edit, delete, and view a department in the merchandise hierarchy.
The Department window contains the following fields.
Table 2-71 Department - Fields and Description
| Fields | Description |
|---|---|
|
Department |
Enter a unique ID for the department. Enter a name for the department in the field next to the department ID. These fields are required fields. You cannot edit the department ID in edit mode. |
|
Group |
Enter, select or search for the group ID associated with the department. This field is a required field. |
|
Profit Calculation Type |
Select a profit calculation type from the list. Possible values are:
This field is a required field. |
|
OTB Calculation Type |
Select an OTB calculation type from the list. Possible values are:
This field is a required field. |
|
Purchase Type |
The purchase type indicates the type of merchandise sold in the department. Select a purchase type from the list. Possible values are:
This field is a required field. You cannot change the purchase type in edit mode. |
|
Buyer |
Enter, select or search the buyer ID associated with the department. |
|
Merchandiser |
Enter, select or search for the merchandiser ID associated with the department. |
|
Markup Calculation Type |
Select the markup calculation type. |
|
Markup % of Cost |
Enter the markup percent of the cost. This field is a required field. You cannot change the value in edit mode. |
|
Markup % of Retail |
Enter the markup percent of the retail value. This field is a required field. You cannot change the value in edit mode. |
|
Total Market Amount (in Thousands) |
Enter the amount of annual sales that the department is expected to generate. |
|
Maximum Average Counter |
Enter the maximum average counter. This field is a required field. |
|
Average Tolerance |
Enter the average tolerance value in percent. This field is a required field. |
|
Include VAT in Retail? checkbox |
The Include VAT in Retail checkbox indicates that all prices include VAT in the retail price for all classes in the department. Clear the check box to indicate that VAT is not included in the retail price at the class level, and is applied at the POS. The Include VAT in Retail checkbox is only available, if the default tax type is set to SVAT or GTAX. |
The toolbar contains the following icon and buttons.
Table 2-72 Department Toolbar - Icons/Buttons and Description
| Icons/Buttons | Description |
|---|---|
|
Help icon |
You can access the online help for a particular page by clicking the Help icon. |
|
Delete icon |
You can delete the current department by selecting the Delete icon. You are prompted, if you want to delete the record. Select Yes to confirm the prompt. |
|
More Actions |
Click More Actions to see a list of additional actions that can be performed in the Department window.
|
|
Save |
Click Save to save the entered records. |
|
Save and Close |
Click Save and Close to save the entered records and close the window. |
|
Cancel |
Click Cancel to reject all entries and close the window. |
|
Done |
If you open the window in view mode, the Done button is displayed. Click Done to close the window. |
The Department Up Charge window displays a department's from/to location combinations and associated up charges. Up Charges are incurred when transferring items within the department or within the from and the to locations.
|
Note: This window will only be available if the RMS 'Estimated Landed Costs' indicator is set to 'Yes'. |
Each Up Charge has a:
Calculation Basis of either 'Value' or 'Specific.'
Cost Basis of either 'Weighted Average Cost' (when using Average Cost Method) or 'Unit Cost' (when using Standard Cost Method).
Component Rate of:
Monetary if Calculation Basis = 'Specific.'
Percentage if Calculation Basis = 'Value.'
Component Currency.
The Up Charge Group is used to group Up Charge Components together to show a total sum on the Transfer Up Charge window.
The Department Up Charges window contains the following sections.
Header
The header displays the department ID and description.
The Locations section displays the from and to locations containing expenses for the department.
Use the Actions Menu and icons to apply actions to the table. You can perform the actions listed below.
Table 2-73 Locations - Actions Menu/Icons and Description
| Actions Menu/Icons | Description |
|---|---|
|
Add and Add icon |
You can add new locations by selecting Actions > Add or by using the Add icon. For more information about how to add new locations, see the Adding Locations section. |
|
Delete and Delete icon |
You can delete locations:
|
|
Export to Excel and Export to Excel icon |
You can export the records in the table to a Microsoft Excel spreadsheet by selecting Actions > Export to Excel or by using the Export to Excel icon. |
You can customize the view of the table by using the options in the View Menu.
Table 2-74 Locations/Up Charges/Rate Updates - View Menu/Icons and Description
| View Menu/Icons | Description |
|---|---|
|
Columns |
You can manage which of the columns will be shown in the table by clicking the Show All and Manage Columns options. |
|
Detach and Detach icon |
You can view the tables in the application in a separate window by clicking Detach or by using the Detach icon. |
|
Sort |
You can sort columns by the following options:
|
|
Reorder Columns |
You can reorder columns by clicking the Reorder Columns option. |
|
Query by Example and Query by Example icon |
You can filter the items by one or multiple column values by clicking the Query by Example option or by using the Query by Example icon. |
The Up Charges section displays the details of the charges.
Use the Actions Menu and icons to apply actions to the table. You can perform the actions listed below.
Table 2-75 Up Charges - Actions Menu/Icons and Description
| Actions Menu/Icons | Description |
|---|---|
|
Add and Add icon |
You can add new components by selecting Actions > Add or by using the Add icon. For more information about how to add new up charges, see the Adding Components section. |
|
Edit and Edit icon |
Select Actions > Edit or use the Edit icon to edit the selected component. For more information about how to edit a charge, see the Editing Components section. |
|
Delete and Delete icon |
You can delete up charges:
|
|
Export to Excel and Export to Excel icon |
You can export the records in the table to a Microsoft Excel spreadsheet by selecting Actions > Export to Excel or by using the Export to Excel icon. |
You can customize the view of the table by using the options in the View Menu.
For more information about the View Menu, see Table 2-74, "Locations/Up Charges/Rate Updates - View Menu/Icons and Description".
In the Rate Updates section you can apply rate updates to items and transfers and allocations.
Use the Actions Menu and icons to apply actions to the table. You can perform the actions listed below.
Table 2-76 Rate Updates - Actions Menu/Icons and Description
| Actions Menu/Icons | Description |
|---|---|
|
Add and Add icon |
You can add new rate updates by selecting Actions > Add or by using the Add icon. For more information about how to add rate updates, see the Adding Rate Updates section. |
|
Edit and Edit icon |
Select Actions > Edit or use the Edit icon to edit the selected rate update. For more information about how to edit a rate update, see the Editing Rate Updates section. |
|
Delete and Delete icon |
You can delete rate updates:
|
|
Export to Excel and Export to Excel icon |
You can export the records in the table to a Microsoft Excel spreadsheet by selecting Actions > Export to Excel or by using the Export to Excel icon. |
You can customize the view of the table by using the options in the View Menu.
For more information about the View Menu, see Table 2-74, "Locations/Up Charges/Rate Updates - View Menu/Icons and Description".
The toolbar contains the following icons and buttons.
Table 2-77 Department Up Charges Toolbar - Icons/Buttons and Description
| Icons/Buttons | Description |
|---|---|
|
Help icon |
You can access the online help for a particular page by clicking the Help icon. |
|
Save |
Click Save to save the entered records. |
|
Save and Close |
Click Save and Close to save the entered records and close the window. |
|
Cancel |
Click Cancel to reject all entries and close the window. |
|
Done |
If you open the window in view mode, the Done button is displayed. Click Done to close the window. |
To maintain department up charges, follow the steps listed in the sections below.
From the Tasks menu, select Foundation Data > Items > Merchandise Hierarchy. The Merchandise Hierarchy window appears.
Click the Department button. The available Departments are displayed in the table.
In the Department column, click the department ID link, or mark a record and select Actions > Edit, or use the Edit icon. The Department window appears.
Select More Actions > Up Charges. The Department Up Charges window appears.
Update the department up charges, as necessary.
To add locations for up charges, follow the steps listed below.
In the Locations section, select Actions > Add, or use the Add icon. The Add Locations window appears.
In the From Group Type field, select a group type from the list. This field is a required field.
In the From Group field, enter, select or search for the group ID, if enabled.
In the To Group Type field, select the group type from the list. This field is a required field.
In the To Group field, enter, select or search for the group ID, if enabled.
In the Component field, enter, select or search for the component. This field is a required field.
In the Up Charge Group field, select an up charge group from the list. This field is a required field.
In the Component Rate field, enter the rate. This field is a required field.
In the Per Count field, enter the number of counts.
In the Per Count Unit of Measure, enter, select or search for the UOM.
In the Component Currency field, enter, select or search for the currency.
Then choose one of the following options.
Click OK to save the location information and close the window.
Click OK and Add Another to add additional location information.
Click Cancel to reject all entries and close window.
To add components, follow the steps listed below.
In the Up Charges section, select Actions > Add, or use the Add icon. The Add Component window appears.
In the Component field, enter, select or search for the component. This field is a required field.
In the Up Charge Group field, select the group from the list.
In the Component Rate field, enter the rate.
In the Per Count field, enter the number of counts.
In the Per Count Unit of Measure, enter, select or search for the UOM.
In the Component Currency field, enter, select or search for the currency.
Then choose one of the following options.
Click OK to save the location information and close the window.
Click OK and Add Another to add additional location information.
Click Cancel to reject all entries and close the window.
To edit existing components, follow the steps listed below.
In the Up Charges section, select Actions > Edit, or use the Edit icon. The Edit Component window appears.
Edit the fields, as necessary.
Then choose one of the following options.
Click OK to save your changes and close the window.
Click Cancel to reject all entries and close the window.
To add rate updates for items and/or transfers and allocations, follow the steps below.
In the Rate Updates section, select Actions > Add, or use the Add icon. The Add Rates window appears.
In the Effective Date field, enter the effective date or use the Calendar icon to select a date. This field is a required field.
In the Component Rate field, enter the component rate. This field is a required field.
In the Per Count field, enter the number of counts.
In the Per Count UOM, enter, select or search for the unit of measure.
In the Component Currency field, enter, select or search for the component currency code.
Select the Transfers and Allocations checkbox to apply the rate updates to transfers and allocations.
Select the Items checkbox to apply the rate updates to items.
Then choose one of the following options.
Click OK to add the rate updates and close the window.
Click OK and Add Another to add additional rate updates.
Click Cancel to reject all entries and close the window.
To edit rate updates for items and/or transfers and allocations, follow the steps below.
In the Rate Updates section, select Actions > Edit, or use the Edit icon. The Edit Rates window appears.
Edit the fields, as necessary.
Then choose one of the following options.
Click OK to add the rate updates and close the window.
Click Cancel to reject all entries and close the window.
The Department VAT window allows you to maintain and view value added tax (VAT) regions and VAT codes that are associated with a department. The VAT regions and VAT codes that are entered at the department level become the default VAT regions and VAT codes for items within the department.
The Department VAT Window contains the following sections.
Header
Department VAT Table
Use the Actions Menu and icons to apply actions to the table. You can perform the actions listed below.
Table 2-78 Department VAT Table - Actions Menu/Icons and Description
| Actions Menu/Icons | Description |
|---|---|
|
Add and Add icon |
You can add new VAT regions by selecting Actions > Add or by using the Add icon. For more information about how to add new VAT region, see the Adding VAT Regions section |
|
Delete and Delete icon |
You can delete VAT regions:
|
|
Edit and Edit icon |
Select Actions > Edit or use the Edit icon to edit the selected VAT region. For more information about how to edit a VAT region, see the Editing VAT Regions section. |
|
Export to Excel and Export to Excel icon |
You can export the records in the table to a Microsoft Excel spreadsheet by selecting Actions > Export to Excel or by using the Export to Excel icon. |
You can customize the view of the table by using the options in the View Menu.
Table 2-79 Department VAT Table - View Menu/Icons and Description
| View Menu/Icons | Description |
|---|---|
|
Columns |
You can manage which of the columns will be shown in the table by clicking the Show All and Manage Columns options. |
|
Detach and Detach icon |
You can view the tables in the application in a separate window by clicking Detach or by using the Detach icon. |
|
Reorder Columns |
You can reorder columns by clicking the Reorder Columns option. |
|
Query by Example and Query by Example icon |
You can filter the items by one or multiple column values by clicking the Query by Example option or by using the Query by Example icon. |
The toolbar contains the following icons and buttons.
Table 2-80 Department VAT Toolbar - Icons/Buttons and Description
| Icons/Buttons | Description |
|---|---|
|
Help icon |
You can access the online help for a particular page by clicking the Help icon. |
|
Save |
Click Save to save the entered records. |
|
Save and Close |
Click Save and Close to save the entered records and close the window. |
|
Cancel |
Click Cancel to reject all entries and close the window. |
|
Done |
If you open the window in view mode, the Done button is displayed. Click Done to close the window. |
To maintain Department VAT regions, follow the steps below.
From the Tasks menu, select Foundation Data > Items > Merchandise Hierarchy. The Merchandise Hierarchy window appears.
Click the Department button. The available Departments are displayed in the table.
In the Department column, click the department ID link, or mark a record and select Actions > Edit, or use the Edit icon. The Department window appears.
Select More Actions > VAT Maintenance. The Department VAT window appears.
Update the department VAT regions, as necessary.
To add VAT regions to the selected department, follow the steps below.
Select Actions > Add, or use the Add icon. The Add VAT Region window appears.
In the VAT Region field, enter, select or search for the desired region. This field is a required field.
In the VAT Type field, select the type from the list. This field is a required field.
In the VAT Code field, enter, select or search for the VAT code.
The Rate(%) and the VAT Code Description are displayed.
Then choose one of the following options.
Click OK to add the VAT region and close the window.
Click OK and Add Another to add additional VAT regions.
Click Cancel to reject all entries and close the window.
To edit VAT regions for the selected department, follow the steps below.
Select Actions > Edit, or use the Edit icon. The Edit VAT Region window appears.
In the VAT Code field, change the VAT code, as necessary.
Then choose one of the following options.
Click OK to save your changes and close the window.
Click Cancel to reject all entries and close the window.
The Merchandise Hierarchy Defaults window allows you to make certain item details available and required. These item defaults are based on the department, class, and subclass in which the item resides. The defaults may include a variety of options, such as Harmonized Tariff Schedule (HTS), item attributes, and tickets. You can set up the defaults when creating a department, class, or subclass. For example, you can indicate that items in a selected department cannot be approved unless they have an HTS code. On the other hand, you can make the HTS option unavailable for items in the selected department.
When creating defaults at the department level, you can add information only for the classes and subclasses within that department. For example, if you enter department 1000 and make the default both available and required, every class and subclass within department 1000 inherits the same default settings. If you enter department 2000 and class 3000, every subclass within department 2000 and class 3000 inherits the same default settings.
The Merchandise Hierarch Defaults window contains the following sections.
Use the Actions Menu and icons to apply actions to the table. You can perform the actions listed below.
Table 2-81 Merchandise Hierarchy Defaults - Actions Menu/Icons and Description
| Actions Menu/Icons | Description |
|---|---|
|
Add and Add icon |
You can add new default information by selecting Actions > Add or by using the Add icon. For more information about how to add default information, see the Adding Defaults section. |
|
Delete and Delete icon |
You can delete default information for a department:
|
|
Edit and Edit icon |
Select Actions > Edit or use the Edit icon to edit the selected default information. For more information about how to edit default information for a department, see the Editing Defaults section. |
|
Export to Excel and Export to Excel icon |
You can export the records in the table to a Microsoft Excel spreadsheet by selecting Actions > Export to Excel or by using the Export to Excel icon. |
|
Copy All button |
Use the Copy All button to copy item defaults from one subclass to another. For more information about this function, see the Copy All section. This button is only available at the subclass level. |
You can customize the view of the table by using the options in the View Menu.
Table 2-82 Merchandise Hierarchy Defaults - View Menu/Icons and Description
| View Menu/Icons | Description |
|---|---|
|
Columns |
You can manage which of the columns will be shown in the table by clicking the Show All and Manage Columns options. |
|
Detach and Detach icon |
You can view the tables in the application in a separate window by clicking Detach or by using the Detach icon. |
|
Sort |
You can sort columns by the following options:
|
|
Reorder Columns |
You can reorder columns by clicking the Reorder Columns option. |
|
Query by Example and Query by Example icon |
You can filter the items by one or multiple column values by clicking the Query by Example option or by using the Query by Example icon. |
The toolbar contains the following icons and buttons.
Table 2-83 Merchandise Hierarchy Defaults Toolbar - Icons/Buttons and Description
| Icons/Buttons | Description |
|---|---|
|
Help icon |
You can access the online help for a particular page by clicking the Help icon. |
|
Save |
Click Save to save the entered records. |
|
Save and Close |
Click Save and Close to save the entered records and close the window. |
|
Cancel |
Click Cancel to reject all entries and close the window. |
|
Done |
If you open the window in view mode, the Done button is displayed. Click Done to close the window. |
To maintain merchandise hierarchy defaults, follow the steps below.
From the Tasks menu, select Foundation Data > Items > Merchandise Hierarchy. The Merchandise Hierarchy window appears.
Click the Department/Class/Subclass button. The available departments/classes/subclasses are displayed in the table.
In the Department/Class/Subclass column, click the department ID link, or mark a record and select Actions > Edit, or use the Edit icon. The Department/Class/Subclass window appears.
Select More Actions > Merchandise Hierarchy Defaults. The Merchandise Hierarchy Defaults window appears.
Update the hierarchy default information, as necessary.
To add item defaults for the selected hierarchy level, follow the steps below.
In the table, select Actions > Add, or use the Add icon. The Add Merchandise Hierarchy Defaults window appears.
In the Information field, select the default information you want to add.
In the Class field, enter, select or search for the class ID. This field is only enabled, if you add an item default for a department.
In the Subclass field, enter, select or search for the subclass ID. This field is only enabled, if you add an item default for a department.
Indicate, if the information is unavailable or available for the items in the selected department/class/subclass.
Select the Required checkbox to indicate that the information is required for items in the selected department/class/subclass.
Then choose one of the following options.
Click OK to add the default information and close the window.
Click OK and Add Another to add additional defaults.
Click Cancel to reject all entries and close the window.
To edit item defaults for the selected hierarchy level, follow the steps below.
In the table, select Actions > Edit, or use the Edit icon. The Edit Merchandise Hierarchy Defaults window appears.
Change the checkboxes, as necessary. All other fields are disabled.
Then choose one of the following options.
Click OK to save your changes and close the window.
Click Cancel to reject all entries and close the window.
To copy all item defaults from one subclass to another, follow the steps below.
In the table, select the Copy All button. The Copy From window appears.
In the Department field, enter, select or search for the department you want to copy from.
In the Class field, enter, select or search for the class ID.
In the Subclass field, enter, select or search for the subclass ID.
Then choose one of the following options.
Click OK to copy the item defaults from the selected hierarchy and close the window.
Click Cancel to reject all entries and close the window.
To create a class, follow the steps below.
Click the Class button. The Department field is displayed.
In the Department field, enter, select or search for the department ID.
In the table, select Actions > Create, or use the Create icon. The Classes window appears. The selected department ID and description are displayed in the header.
Select Actions > Add, or use the Add icon. The Add Class window appears.
In the Class field, enter a unique ID for the class. This field is a required field.
In the Name field, enter a name for the class. This field is a required field.
Select the Include VAT in Retail checkbox to indicate that the retail price includes VAT.
|
Note: The Include in VAT Retail checkbox is only displayed, if VAT at the class level is indicated in the RMS system settings.If you do not select the checkbox, you indicate that VAT should be applied to the retail price at the point of sale when setting up a store. |
Then choose one of the following options.
Click OK to add the class and close the window.
Click OK and Add Another to add additional classes.
Click Cancel to reject all entries and close the window.
To edit a class, follow the steps below.
Click the Class button. The Department field is displayed.
In the Department field, enter, select or search for the department ID. The classes for the selected department are displayed in the table.
Select Actions > Edit, or use the Edit icon. The Classes window appears.
Select a record in the table.
Then select Actions > Edit, or use the Edit icon. The Edit Class window appears.
The information of the selected class is displayed. Change the values, as necessary. You cannot change the class ID.
Then choose one of the following options.
Click OK to save your changes and close the window.
Click Cancel to reject all entries and close the window.
The Classes window allows you to add, edit, delete, and view a class in the merchandise hierarchy. A class is below the department and above the subclass in the merchandise hierarchy.
A class can belong to only one department. A class further defines the type of merchandise sold in a department. For example, a department for Men's Shirts might have the classes Casual, Business, and Formal.
When VAT is enabled at the class level in RMS, you can indicate whether the retail price should include the VAT or not. If you choose not to indicate that VAT is included at the class level, then you should indicate to include it at the POS.
Finally, you can associate user defined attributes with a class.
Use the Actions Menu and icons to apply actions to the table. You can perform the actions listed below.
Table 2-84 Classes - Actions Menu/Icons and Description
| Actions Menu/Icons | Description |
|---|---|
|
Add and Add icon |
You can add a new class by selecting Actions > Add or by using the Add icon. The Add function is not available, if you are in edit mode. For more information about how to add a new class, see the Creating Classes section. |
|
Edit and Edit icon |
Select Actions > Edit or use the Edit icon to edit the selected class. For more information about how to edit a class, see the Editing Classes section. |
|
Delete and Delete icon |
You can delete classes:
|
|
Export to Excel and Export to Excel icon |
You can export the records in the table to a Microsoft Excel spreadsheet by selecting Actions > Export to Excel or by using the Export to Excel icon. |
|
Translate and Translate icon |
You can create a translation by selecting Actions > Translate or by using the Translate icon. |
You can customize the view of the table by using the options in the View Menu.
Table 2-85 Classes - View Menu/Icons and Description
| View Menu/Icons | Description |
|---|---|
|
Columns |
You can manage which of the columns will be shown in the table by clicking the Show All and Manage Columns options. |
|
Detach and Detach icon |
You can view the tables in the application in a separate window by clicking Detach or by using the Detach icon. |
|
Sort |
You can sort columns by the following options:
|
|
Reorder Columns |
You can reorder columns by clicking the Reorder Columns option. |
|
Query by Example and Query by Example icon |
You can filter the records by one or multiple column values by clicking the Query by Example option or by using the Query by Example icon. |
The toolbar contains the following icon and buttons.
Table 2-86 Classes Toolbar - Icons/Buttons and Description
| Icons/Buttons | Description |
|---|---|
|
Help icon |
You can access the online help for a particular page by clicking the Help icon. |
|
More Actions |
Click More Actions to see a list of additional actions that can be performed in the Classes window.
|
|
Save |
Click Save to save the entered records. |
|
Save and Close |
Click Save and Close to save the entered records and close the window. |
|
Cancel |
Click Cancel to reject all entries and close the window. |
|
Done |
If you open the window in view mode, the Done button is displayed. Click Done to close the window. |
To create a subclass, follow the steps below.
Click the Subclass button. The Department field is displayed.
In the Department field, enter, select or search for the department ID. The Class field enables.
In the Class field, enter, select or search for the class ID. The available subclasses are displayed in the table.
Select Actions > Create, or use the Create icon. The Subclasses window appears. The selected department/class ID and description are displayed in the header.
Select Actions > Add, or use the Add icon. The Add Subclass window appears.
In the Subclass field, enter a unique ID for the subclass. This field is a required field.
In the Name field, enter a name for the subclass. This field is a required field.
Then choose one of the following options.
Click OK to add the subclass and close the window.
Click OK and Add Another to add additional subclasses.
Click Cancel to reject all entries and close the window.
To edit a subclass, follow the steps below.
Click the Subclass button. The Department field is displayed.
In the Department field, enter, select or search for the department ID. The Class field is enabled.
In the Class field, enter, select or search for the Class ID. The available subclasses are displayed in the table.
In the table, select Actions > Edit, or use the Edit icon. The Subclasses window appears.
Select a record in the table.
Then select Actions > Edit, or use the Edit icon. The Edit Subclass window appears.
The information of the selected subclass is displayed. Change the values, as necessary. You cannot change the subclass ID.
Then choose one of the following options.
Click OK to save your changes and close the window.
Click Cancel to reject all entries and close the window.
The Subclasses window allows you to add, edit, delete, and view a subclass in the merchandise hierarchy. A subclass is below a class in the merchandise hierarchy. A subclass can belong to only one class. A subclass further defines the type of merchandise sold in a department and class.
You can associate user defined attributes with a subclass.
Use the Actions Menu and icons to apply actions to the table. You can perform the actions listed below.
Table 2-87 Subclasses - Actions Menu/Icons and Description
| Actions Menu/Icons | Description |
|---|---|
|
Add and Add icon |
You can add new subclasses by selecting Actions > Add or by using the Add icon. The Add function is not available, if you are in edit mode. For more information about how to add a new subclass, see the Creating Subclasses section. |
|
Edit and Edit icon |
Select Actions > Edit or use the Edit icon to edit the selected subclass. For more information about how to edit a subclass, see the Editing Subclasses section. |
|
Delete and Delete icon |
You can delete subclasses:
|
|
Export to Excel and Export to Excel icon |
You can export the records in the table to a Microsoft Excel spreadsheet by selecting Actions > Export to Excel or by using the Export to Excel icon. |
|
Translate and Translate icon |
You can create a translation by selecting Actions > Translate or by using the Translate icon. |
You can customize the view of the table by using the options in the View Menu.
Table 2-88 Subclasses - View Menu/Icons and Description
| View Menu/Icons | Description |
|---|---|
|
Columns |
You can manage which of the columns will be shown in the table by clicking the Show All and Manage Columns options. |
|
Detach and Detach icon |
You can view the tables in the application in a separate window by clicking Detach or by using the Detach icon. |
|
Sort |
You can sort columns by the following options:
|
|
Reorder Columns |
You can reorder columns by clicking the Reorder Columns option. |
|
Query by Example and Query by Example icon |
You can filter the records by one or multiple column values by clicking the Query by Example option or by using the Query by Example icon. |
The toolbar contains the following icon and buttons.
Table 2-89 Subclasses Toolbar - Icons/Buttons and Description
| Icons/Buttons | Description |
|---|---|
|
Help icon |
You can access the online help for a particular page by clicking the Help icon. |
|
More Actions |
Click More Actions to see a list of additional actions that can be performed in the Classes window.
|
|
Save |
Click Save to save the entered records. |
|
Save and Close |
Click Save and Close to save the entered records and close the window. |
|
Cancel |
Click Cancel to reject all entries and close the window. |
|
Done |
If you open the window in view mode, the Done button is displayed. Click Done to close the window. |
The Pending Merchandise Hierarchy option opens the Pending Merchandise Hierarchy Search window. In the Pending Merchandise Hierarchy Search window you can perform the following actions.
Search for pending hierarchy levels by various search criteria
View the entered search results
View and edit the action type of the hierarchy level
The Pending Merchandise Hierarchy Search window contains the following sections.
Search
For more information about the search, see the Searching for a Pending Merchandise Hierarchy section.
To search for a pending merchandise hierarchy level:
From the Task menu, select Foundation Data > Items > Pending Merchandise Hierarchy. The Pending Merchandise Hierarchy Search window appears.
You can search for a hierarchy by using basic or advanced search criteria, depending on the requirement. The basic mode is the default search mode.
Click Advanced to access the search section in advanced mode.
Click Basic to return to the basic mode.
To search for a hierarchy level by using basic search criteria:
Enter, select or search for one or all of the following basic search criteria.
Table 2-90 Pending Merchandise Hierarchy Search - Basic Search Criteria and Description
| Fields | Description |
|---|---|
|
Match option |
Check radio button All or Any. All - only hierarchy levels matching all entered search criteria are shown. Any - hierarchy levels matching any of the entered search criteria are shown. |
|
Action Type |
Select an action type from the list. Possible action types are:
|
|
Effective Date |
Enter an effective date or use the Calendar icon to select a date. |
|
Division |
Enter, select or search for a division. |
|
Group |
Enter, select or search for a group. |
|
Department |
Enter, select or search for a department. |
|
Class |
Enter, select or search for a class. |
|
Subclass |
Enter, select or search for a subclass. |
Click on the Saved Search list to select one of the saved search criteria. Selecting a saved search populates the search section with the saved search criteria. If the run automatically function is enabled for the search, the search is executed immediately.
You can also personalize your saved searches by selecting Personalize. The Personalized Saved Searches window appears.
For more information about the Personalized Saved Search, see the Common User Interface Controls chapter, section "Personalize Saved Search".
Click Search. The pending hierarchy levels that match the search criteria are displayed in the Results section.
Click Reset to clear the search section and results.
Click Save As... to save the current search criteria. The Create Saved Search window appears.
For more information about how to save your search criteria, see the Common User Interface Controls chapter, section "Create Saved Search".
Click Done to close the window.
To search for a hierarchy level by using advanced search criteria:
To search by using advanced search criteria, enter or select one or all of the advanced search criteria.
To narrow down the search, use the list next to the search fields. For example, determine if the entered value should be equal or not equal to the search result.
Click on the Saved Search list to select one of the saved search criteria. Selecting a saved search populates the search section with the saved search criteria. If the run automatically function is enabled for the search, the search is executed immediately.
You can also personalize your saved searches by selecting Personalize. The Personalized Saved Searches window appears.
For more information about the Personalized Saved Search, see the Common User Interface Controls chapter, section "Personalize Saved Search".
Click Search. The pending hierarchy levels that match the search criteria are displayed in the Results section.
Click Reset to clear the search section and results.
Click Save As... to save the current search criteria. The Create Saved Search window appears.
For more information about how to save your search criteria, see the Common User Interface Controls chapter, section "Create Saved Search".
Click Add Fields to add more fields for the advanced search. To remove the field from the search, click the x right next to the field.
Click Reorder to change the order of the available search fields. The Reorder Search Fields window appears.
Select the desired search field and use the up and down arrows to rearrange the order of the fields.
Click OK to confirm the new order of the fields and close the window.
Click Cancel to reject any changes and close the window.
Click Done to close the window.
The Results section lists the retrieved pending merchandise hierarchy levels.
Use the Actions Menu and icons to apply actions to the table. You can perform the actions listed below.
Table 2-91 Results - Actions Menu/Icons and Description
| Actions Menu/Icons | Description |
|---|---|
|
Edit and Edit icon |
Select Actions > Edit or use the Edit icon to edit the selected merchandise hierarchy level. For more information about how to edit a pending merchandise hierarchy level, see the Editing a Pending Merchandise Hierarchy section. |
|
View and View icon |
To view a pending merchandise hierarchy level:
|
|
Export to Excel and Export to Excel icon |
You can export the records in the table to a Microsoft Excel spreadsheet by selecting Actions > Export to Excel or by using the Export to Excel icon. |
You can customize the view of the table by using the options in the View Menu.
Table 2-92 Results - View Menu/Icons and Description
| View Menu/Icons | Description |
|---|---|
|
Columns |
You can manage which of the columns will be shown in the table by clicking the Show All and Manage Columns options. |
|
Detach and Detach icon |
You can view the tables in the application in a separate window by clicking Detach or by using the Detach icon. |
|
Sort |
You can sort columns by the following options:
|
|
Reorder Columns |
You can reorder columns by clicking the Reorder Columns option. |
|
Query by Example and Query by Example icon |
You can filter the items by one or multiple column values by clicking Query by Example or by using the Query by Example icon. |
The Pending Merchandise Hierarchy window allows you to maintain movements within the merchandise hierarchy. Movements within the merchandise hierarchy will lead to the eventual reclassification of the items within the reclassified level. When an item is reclassified, sales history, purchase orders, inventory, and planning information is reclassified as well.
Only Level 1 items can be reclassified. Any prepacks, Level 2, or Level 3 items associated with the Level 1 item are also reclassified.
The Pending Merchandise Hierarchy window contains the following fields.
Table 2-94 Pending Merchandise Hierarchy - Fields and Description
| Fields | Description |
|---|---|
|
Action Type |
Displays, if you add or edit a merchandise hierarchy. |
|
Effective Date |
Enter an effective date or use the Calendar icon to select a date. |
|
Hierarchy Level |
Displays the hierarchy level. |
|
Hierarchy Level ID and Description |
Displays the hierarchy level. Enter a description. You can create a translation by selecting the Translate icon. |
|
Buyer |
Enter, select or search for the buyer. |
|
Total Market Amount (in Thousands) |
Enter the total market amount in thousands. |
|
Merchandiser |
Enter, select or search for the merchandiser. |
|
Domain |
This field contains the unique number representing the domain. The domain number is used when interfacing data to external systems using domains. |
|
Markup Calculation Type: |
|
|
% of Cost |
Indicates that the markup is calculated as a percentage of the cost. |
|
% of Retail |
Indicates that the markup is calculated as a percentage of the Retail value. |
|
Profit Calculation Type: |
|
|
Direct Cost |
Indicates that the profit is calculated by direct cost. |
|
Retail Inventory |
Indicates that the profit is calculated by retail inventory. |
|
Open To Buy (OTB) Calculation Type: |
|
|
Cost |
Determines that the OTB is calculated by costs in this hierarchy level. |
|
Retail |
Determines that the OTB is calculated by retail value in this hierarchy level. |
|
Purchase Order Type: |
|
|
Normal Merchandise |
Indicates that the items in the department are ordered, invoiced, and recorded in the stock ledger. |
|
Consignment Stock |
Indicates that the items in the department are ordered, invoiced, and recorded in the stock ledger. Accounts receivable and accounts payable are not recorded for this item type. The consignment rate is recorded at the item/supplier level. |
|
Concession Stock |
Indicates that the items in the department are ordered, invoiced, and recorded in the stock ledger. Accounts receivable and accounts payable are not recorded for this item type. The concession rate is recorded at the item/supplier level. |
|
For Departments the Markup Calculation Type, OTB Calculation Type and Purchase Order Type are not available. |
|
|
Markup % of Cost |
Displays the budgeted markup as percentage of the costs. |
|
Markup % of Retail |
Displays the markup in %. When the retailer uses Simple VAT or Global Tax, this value excludes VAT. |
|
Maximum Average Counter |
Displays the maximum count of days with acceptable data to include on average for items within the hierarchy type. |
|
Average Tolerance % |
Displays a tolerance percentage value which is used as average for items within this value. This value sets a range for appropriate data and constrain outliers. |
The toolbar contains the following icons and buttons.
Table 2-95 Pending Merchandise Hierarchy Toolbar - Icons/Buttons and Description
| Icons/Buttons | Description |
|---|---|
|
Help icon |
You can access the online help for a particular page by clicking the Help icon. |
|
Save |
Click Save to save the entered records. |
|
Save and Close |
Click Save and Close to save the entered records and close the window. |
|
Cancel |
Click Cancel to reject all entries and close the window. |
|
Done |
If you open the window in view mode, the Done button is displayed. Click Done to close the window. |
To edit the pending merchandise hierarchy, follow the steps below.
From the Tasks menu, select Foundation Data > Items > Pending Merchandise Hierarchy. The Pending Merchandise Hierarchy Search window appears.
Enter or select search criteria as desired to make the search more restrictive.
Click Search. The actions that match the search criteria are displayed in the Results section.
In the Action Type column, click the action link, or mark a record and select Actions > Edit, or use the Edit icon. The Pending Merchandise Hierarchy window appears.
Edit the fields, as necessary.
Then choose one of the following options.
Click Save to save your changes.
Click Save and Close to save your changes and close the window.
Click Cancel to reject all entries and close the window.
Reclassification window allows you to move an item or item list from one department/class/subclass to another.
You can determine which item or item list needs to be reclassified, under which department, class, subclass, and the effective date. A batch process reclassifies those items whose effective date is the next day.
The Reclassification window contains the following sections.
The Reclassification table lists the reclassification ID, description, date as well as the pending hierarchy level information. In this table you can to add, delete, or view the reclassification events that have not been processed yet.
Use the Actions Menu and icons to apply actions to the table. You can perform the actions listed below.
Table 2-96 Reclassification - Actions Menu/Icons and Description
| Actions Menu/Icons | Description |
|---|---|
|
Add and Add icon |
You can add new reclassifications for an item or an item list by selecting Actions > Add or by using the Add icon. For more information about how to add a new reclassification, see the Adding a New Reclassification section. |
|
Delete and Delete icon |
You can delete a reclassification:
|
|
Export to Excel and Export to Excel icon |
You can export the records in the table to a Microsoft Excel spreadsheet by selecting Actions > Export to Excel or by using the Export to Excel icon. |
|
Translate and Translate icon |
You can create a translation by selecting Actions > Translate or by using the Translate icon. |
You can customize the view of the table by using the options in the View Menu.
Table 2-97 Reclassification - View Menu/Icons and Description
| View Menu/Icons | Description |
|---|---|
|
Columns |
You can manage which of the columns will be shown in the table by clicking the Show All and Manage Columns options. |
|
Detach and Detach icon |
You can view the tables in the application in a separate window by clicking Detach or by using the Detach icon. |
|
Sort |
You can sort columns by the following options:
|
|
Reorder Columns |
You can reorder columns by clicking the Reorder Columns option. |
|
Query by Example and Query by Example icon |
You can filter the items by one or multiple column values by clicking the Query by Example option or by using the Query by Example icon. |
|
Wrap icon |
You can wrap the values in the table column by first clicking the column on which you would like the text to wrap and then using the Wrap icon. |
The Details section lists the item ID, description and current merchandise hierarchy level information.
Use the Actions Menu and icons to apply actions to the table. You can perform the actions listed below.
Table 2-98 Reclassification - Actions Menu/Icons and Description
| Actions Menu/Icons | Description |
|---|---|
|
Delete and Delete icon |
You can delete reclassification details:
|
|
Export to Excel and Export to Excel icon |
You can export the records in the table to a Microsoft Excel spreadsheet by selecting Actions > Export to Excel or by using the Export to Excel icon. |
|
Wrap icon |
You can wrap the values in the table column by first clicking the column on which you would like the text to wrap and then using the Wrap icon |
You can customize the view of the table. Use the View Menu and icons to customize the view as listed below.
Table 2-99 Reclassification - View Menu/Icons and Description
| View Menu/Icons | Description |
|---|---|
|
Columns |
You can manage which of the columns will be shown in the table by clicking the Show All and Manage Columns options. |
|
Detach and Detach icon |
You can view the tables in the application in a separate window by clicking Detach or by using the Detach icon. |
|
Sort |
You can sort columns by the following options:
|
|
Reorder Columns |
You can reorder columns by clicking the Reorder Columns option. |
|
Query by Example and Query by Example icon |
You can filter the items by one or multiple column values by clicking the Query by Example option or by using the Query by Example icon. |
|
Wrap icon |
You can wrap the values in the table column by first clicking the column on which you would like the text to wrap and then using the Wrap icon. |
The toolbar contains the following icons and buttons.
Table 2-100 Reclassifications Toolbar - Icons/Buttons and Description
| Icons/Buttons | Description |
|---|---|
|
Help icon |
You can access the online help for a particular page by clicking the Help icon. |
|
Save |
Click Save to save your entered records. |
|
Save and Close |
Click Save and Close to save the entered records and close the window. |
|
Cancel |
Click Cancel to reject all entries and close the window. |
|
Done |
If you open the window in view mode, the Done button is displayed. Click Done to close the window. |
To add a reclassification, follow the steps below.
From Task Menu, select Foundation Data > Items > Reclassification. The Reclassification window appears.
In the table, select Actions > Add, or use the Add icon. The Add Reclassification window appears.
In the Description field, enter a description for the new reclassification event.
In the Reclass Date field, enter the date when the item/item list must be reclassified, or use the Calendar icon to select a date.
Then select, if you want to reclassify an item or item list.
Enter, select or search for the desired item or item list.
Then select the new hierarchy for the item or item list. In the Department field, enter select, or search for the new department.
In the Class field, enter, select or search for the new class.
In the Subclass field, enter, select or search for the new subclass.
Then choose one of the following options.
Click OK to save the new reclassification and close the window.
Click OK and Add Another to add additional reclassifications.
Click Cancel to reject all entries and close the window.
When items are moved from one department, class, and subclass combination to another, several other modules can be affected.
Sales history: A reclassification event does not rebuild sales history automatically. A reclassification does not affect previously recorded sales history. RMS maintains three levels of rolled up sales history: department, class, and subclass. Optional batch programs are available that can be used to rebuild the rolled up sales history.
Stock ledger: Stock ledger transactions are written to move the inventory amount associated with an item from the old department, class, and subclass to the new. Existing stock ledger transactions are not updated to reflect the hierarchy change.
Open to buy: Open to buy (OTB) records are updated for all orders that are approved, but have not yet been received.
Forecasts: If the reclassified item is forecastable and the new hierarchy values move the item to a new forecast domain, then an indicator is reset for the item at the item/store level. This change indicates to the program responsible for extracting sales history that the next time sales history is extracted from RMS for that item and store combination, all sales history should be extracted. Normally, only the sales history that occurred since the last data export is extracted.
The following check are preformed when you reclassify an item.
The following edit checks are performed as you set up a reclassification event. The event cannot be created if:
The item exits in another reclassification event.
The item is a consignment department, but the new department is not a consignment. Likewise, if the item is in a department that is not a consignment department, but the new department is a consignment department.
One or more items on the reclassification event exist on approved partially received orders.
Other edit checks that can cause a reclassification event to fail also occur during the batch processing of the event. A reclassification cannot occur if:
The item is on a Unit and Value stock count. The items to be counted have already been determined based on the department, class, and subclass specified when the stock count was created. The stock count is scheduled after the effective date of the reclassification event.
The item is forecastable, but the new hierarchy values with which the item is associated do not have an associated forecast domain.
The new department, class, and subclass contain a required user defined attribute that must be entered at the item level.
The new department, class, and subclass contain a user defined attribute that defaults at the item level, but the item does not have this UDA defined.
The Create Item List option opens the Item List window. In the Item List window you can create, edit, and view basic information about an item list.
You can indicate whether the item list is static or dynamic. The ID of the user who created the item list and the date on which it was created are displayed in this window. The number of items that make up the item list are also displayed. You can use this window for mass change or mass creation.
The Item List window contains the following sections.
|
Note: This section is only available, if the Data Level Security is enabled. |
The Item List header contains the following fields.
Table 2-101 Item List - Fields and Description
| Fields | Description |
|---|---|
|
Item List |
The Item List field displays the generated item list ID. Enter the item list description in the field next to the item list ID. |
|
Comments |
Enter comments for the item list, if necessary. |
|
Static checkbox |
Select the Static checkbox to indicate that the item list cannot be rebuilt. |
|
Private checkbox |
Select the checkbox to indicate that the user level security for an item list is enabled. Only the user who created the item list can select the list for transactions. |
|
Created |
Displays the user who created the list as well as the date the list was created. |
|
Last Rebuild Date |
Displays the date of the last rebuild of the item list. |
The Allowed Hierarchies section displays organizational and merchandising hierarchies from which the items can be part of the item list. This section is only available, if the Data Level Security is enabled.
The table displays the following columns by default.
Department ID and name
Class ID and name
Subclass ID and name
Use the Actions Menu and icons to apply actions to the table. You can perform the actions listed below.
Table 2-102 Allowed Hierarchies - Actions Menu/Icons and Description
| Actions Menu/Icons | Description |
|---|---|
|
Add and Add icon |
You can add a merchandise hierarchy for the item list by selecting Actions > Add or by using the Add icon. For more information about how to add a merchandise hierarchy for the item list, see the Creating Item Lists section, step 7. |
|
Delete and Delete icon |
You can delete cost zone locations from a cost zone:
|
|
Export to Excel and Export to Excel icon |
You can export the records in the table to a Microsoft Excel spreadsheet by selecting Actions > Export to Excel or by using the Export to Excel icon. |
You can customize the view of the table by using the options in the View Menu.
Table 2-103 Allowed Hierarchies - View Menu/Icons and Description
| View Menu/Icons | Description |
|---|---|
|
Columns |
You can manage which of the columns will be shown in the table by clicking the Show All and Manage Columns options. |
|
Detach and Detach icon |
You can view the tables in the application in a separate window by clicking Detach or by using the Detach icon. |
|
Sort |
You can sort columns by the following options:
|
|
Reorder Columns |
You can reorder columns by clicking the Reorder Columns option. |
|
Query by Example and Query by Example icon |
You can filter the items by one or multiple column values by clicking the Query by Example option or by using the Query by Example icon. |
The toolbar contains the following icons and buttons.
Table 2-104 Item List Toolbar - Icons/Buttons and Description
| Icons/Buttons | Description |
|---|---|
|
Help icon |
You can access the online help for a particular page by clicking the Help icon. |
|
Delete icon |
Use the Delete icon to delete the current item list. |
|
More Actions |
Click More Actions to see a list of additional actions that can be performed in the item list window.
|
|
Save |
Click Save to save the entered records. |
|
Save and Close |
Click Save and Close to save the entered records and close the window. |
|
Save and Create Another |
Click Save and Create Another to save the entered records and add additional entries. This option is only available, if you create an item list. |
|
Save and Edit Another |
Click Save and Edit Another to save the entered records and edit additional entries. This option is only available in edit mode. |
|
Cancel |
Click Cancel to reject all entries and close the window. |
|
Done |
If you open the window in view mode, the Done button is displayed. Click Done to close the window. |
To create an item list, follow the steps below.
From the Task menu, select Foundation Data > Items > Create Item List. The Item List window appears.
The Item List field displays the generated list ID. Enter the description for the item list in the field next to the item list ID.
In the Comments field, enter comments for the list, if necessary.
Select the Static checkbox, as necessary.
|
Note: If you create a static item list, you cannot rebuild the list on demand. |
Select the Private checkbox to indicate whether the user level security for an item list is enabled or disabled.
If the user level security is enabled, only the person who created the item list can select the list for transactions.
The Total Items field, lists the total number of items on the item list.
If the Allowed Hierarchy section is enabled. Add a merchandise hierarchy to the item list, for which the list is available.
|
Note: This section is only available, if the Data Level Security is enabled. |
In the Area field, enter, select or search for the organizational value for which you have access.
Then select Actions > Add, or use the Add icon. The Allowed Merchandise Hierarchy window appears.
In the Group Type field, select a group type from the list.
In the Department field, enter, select or search for a department.
In the Class field, enter, select or search for a class.
In the Subclass field, enter, select or search for a subclass.
Then choose one of the following options.
Click OK to save the hierarchy and close the window.
Click OK and Add Another to add additional merchandise hierarchies.
Click Cancel to reject all entries and close the window.
Then add items to the list. Select More Actions > Items. The Item List Items window appears.
For more information about how to add items to an item list, see the Adding Items to Item Lists, step 6.
Add item criteria to the list, if necessary. Select More Actions > Criteria. The Item List Criteria window appears.
For more information about how to add item list criteria, see the Adding Item List Criteria section, step 6.
Then choose one of the following options.
Click Save and Close to save your entries and close the Item List window.
Click Save and Create Another to create additional item lists.
Click Cancel to reject all entries and close the Item List window.
To rebuild a location list, follow the steps below.
From the Tasks menu, select Foundation Data > Items > Manage Item List. The Item List Search window appears.
Enter or select search criteria as desired to make the search more restrictive.
Click Search. The item lists that match the search criteria are displayed in the Results section.
In the Item List column, click the item list ID link, or mark a record and select Actions > Edit, or use the Edit icon. The Item List window appears.
Select More Actions > Rebuild. The Item List Rebuild window appears. The item list details are displayed.
Then choose one of the following options.
Click Execute and Close to rebuild the selected item list and close the window.
Click Cancel to reject all entries and close the window.
The Item List Criteria window allows you to add, delete and view the criteria by which items are grouped on an item list.
The Item List Criteria window contains the following sections.
Item List Criteria Header
The Item List Criteria header displays the item list ID and description.
The Item List Criteria table displays the already defined criteria.
Use the Actions Menu and icons to apply actions to the table. You can perform the actions listed below.
Table 2-105 Item List Criteria - Actions Menu/Icons and Description
| Actions Menu/Icons | Description |
|---|---|
|
Add and Add icon |
You can add new criteria to the item list by selecting Actions > Add or by using the Add icon. For more information about how to add new criteria to the item list, see the Adding Item List Criteria section. |
|
Delete and Delete icon |
You can delete criteria from the item list:
|
|
Export to Excel and Export to Excel icon |
You can export the records in the table to a Microsoft Excel spreadsheet by selecting Actions > Export to Excel or by using the Export to Excel icon. |
|
Wrap icon |
You can wrap the values in the table column by first clicking the column on which you would like the text to wrap and then using the Wrap icon. |
You can customize the view of the table by using the options in the View Menu.
Table 2-106 Item List Criteria - View Menu/Icons and Description
| View Menu/Icons | Description |
|---|---|
|
Columns |
You can manage which of the columns will be shown in the table by clicking the Show All and Manage Columns options. |
|
Detach and Detach icon |
You can view the tables in the application in a separate window by clicking Detach or by using the Detach icon. |
|
Sort |
You can sort columns by the following options:
|
|
Reorder Columns |
You can reorder columns by clicking the Reorder Columns option. |
|
Query by Example and Query by Example icon |
You can filter the items by one or multiple column values by clicking the Query by Example option or by using the Query by Example icon. |
The toolbar contains the following icons and buttons.
Table 2-107 Item List Criteria Toolbar - Icons/Buttons and Description
| Icons/Buttons | Description |
|---|---|
|
Help icon |
You can access the online help for a particular page by clicking the Help icon. |
|
More Actions |
Click More Actions to see a list of additional actions that can be performed in the Warehouse window.
|
|
Save |
Click Save to save the entered records. |
|
Save and Close |
Click Save and Close to save the entered records and close the window. |
|
Cancel |
Click Cancel to reject all entries and close the window. |
|
Done |
If you open the window in view mode, the Done button is displayed. Click Done to close the window. |
To add criteria to an item list, follow the steps below.
From the Tasks menu, select Foundation Data > Items > Manage Item List. The Item List Search window appears.
Enter or select search criteria as desired to make the search more restrictive.
Click Search. The item lists that match the search criteria are displayed in the Results section.
In the Item List column, click the item list ID link, or mark a record and select Actions > Edit, or use the Edit icon. The Item List window appears.
Select More Actions > Criteria. The Item List Criteria window appears.
Select Actions > Add, or use the Add icon. The Add Criteria window appears.
Select Include/Exclude to indicate that items meeting the criteria should be included/excluded from the item list.
In the Merchandise Type field, select the merchandise type from the list.
In the Department, Class and Subclass field, enter, select or search for the corresponding IDs.
In the Season field, enter, select or search for the season. The Phase field enables.
In the Phase field, enter, select or search for the phase.
In the UDA (User-defined Attributes) field, enter, select or search for the attribute.
In the Supplier Site field, enter, select or search for the supplier site.
In the Diff 1-4 fields, enter, select or search for the desired differentiators.
Use the Calculate Item List Count icon to calculate the total of items matching the selected criteria and how many items are already part of the current item list.
Then choose one of the following options.
Click OK to include/exclude the items with the selected criteria to/from the item list and close the window.
Click OK and Add Another to include/exclude additional criteria.
Click Cancel to reject all entries and close the window.
The Item List Items window allows you to maintain and view the item details for an item list. You can add or remove items individually to/from an item list. Item lists may contain any type of items. However, you cannot add items below transaction level to the item list.
The Item List Items window contains the following sections.
Item List Items Header
The Item List Items header displays the item list ID and description.
The table displays the items of the selected item list.
Use the Actions Menu and icons to apply actions to the table. You can perform the actions listed below.
Table 2-108 Item List Items - Actions Menu/Icons and Description
| Actions Menu/Icons | Description |
|---|---|
|
Add and Add icon |
You can add new items to an item list by selecting Actions > Add or by using the Add icon. For more information about how to add new items to an item list, see the Adding Items to Item Lists section. |
|
Delete and Delete icon |
You can delete an item from an item list:
|
|
Export to Excel and Export to Excel icon |
You can export the records in the table to a Microsoft Excel spreadsheet by selecting Actions > Export to Excel or by using the Export to Excel icon. |
|
Wrap icon |
You can wrap the values in the table column by first clicking the column on which you would like the text to wrap and then using the Wrap icon. |
You can customize the view of the table by using the options in the View Menu.
Table 2-109 Item List Items - View Menu/Icons and Description
| View Menu/Icons | Description |
|---|---|
|
Columns |
You can manage which of the columns will be shown in the table by clicking the Show All and Manage Columns options. |
|
Detach and Detach icon |
You can view the tables in the application in a separate window by clicking Detach or by using the Detach icon. |
|
Sort |
You can sort columns by the following options:
|
|
Reorder Columns |
You can reorder columns by clicking the Reorder Columns option. |
|
Query by Example and Query by Example icon |
You can filter the items by one or multiple column values by clicking the Query by Example option or by using the Query by Example icon. |
The toolbar contains the following icons and buttons.
Table 2-110 Item List Items Toolbar - Icons/Buttons and Description
| Icons/Buttons | Description |
|---|---|
|
Help icon |
You can access the online help for a particular page by clicking the Help icon. |
|
Criteria |
Opens the Item List Criteria window. For more information about this function, see the Item List Criteria Window section. |
|
Save |
Click Save to save the entered records. |
|
Save and Close |
Click Save and Close to save the entered records and close the window. |
|
Cancel |
Click Cancel to reject all entries and close the window. |
|
Done |
If you open the window in view mode, the Done button is displayed. Click Done to close the window. |
To add an item to an item list, follow the steps below.
From the Tasks menu, select Foundation Data > Items > Manage Item List. The Item Search List window appears.
Enter or select search criteria as desired to make the search more restrictive.
Click Search. The item lists that match the search criteria are displayed in the Results section.
In the Item List column, click the item list ID link, or mark a record and select Actions > Edit, or use the Edit icon. The Item List window appears.
In the table, select More Actions > Items. The Item List Items window appears.
Select Actions > Add, or use the Add icon. The Add Item window appears.
Enter, select or search for the desired item.
Then choose one of the following options.
Click OK to add the item to the list and close the window.
Click OK and Add Another to add additional items to the list.
Click Cancel to reject all entries and close the window.
The Manage Item Lists option opens the Item List Search window. In the Item List Search window you can perform the following actions.
Search for an item list by various search criteria
View the entered search results
View an item list
Create an item list
Create an item list from an already existing item list
Edit an item list
You can access the Item List Search window from the Task menu, select Foundation Data > Items > Manage Item Lists. The Item List Search window appears.
The Item List Search window contains the following sections.
Search
For more information about how to search for an item list, see the Searching for an Item List section.
To search for an item list:
From the Task menu, select Foundation Data > Item > Manage Item Lists. The Item List Search window appears.
You can search for an item list by using basic or advanced search criteria, depending on the requirement. The basic mode is the default search mode.
Click Advanced to access the search section in advanced mode.
Click Basic to return to the basic mode.
To search for an item list by using basic search criteria:
Enter, select or search for one or all of the following basic search criteria.
Table 2-111 Item List Search - Basic Search Criteria and Description
| Fields | Description |
|---|---|
|
Match option |
Check radio button All or Any. All - only item lists matching all entered search criteria are shown. Any - item lists matching any of the entered search criteria are shown. |
|
Item List |
Enter the item list ID. |
|
Description |
Enter the item description. |
|
Type |
Select a type from the list. |
|
Created Date |
Enter a created date or use the Calendar icon to select a date. |
|
Created By |
Select the desired user from the list. |
|
Item |
Enter or search for an item. |
|
Item Description |
Enter the item description. |
Click the Saved Search list to select one of the saved search criteria. Selecting a saved search populates the search section with the saved search criteria. If the run automatically function is enabled for the search, the search is executed immediately.
You can also personalize your saved searches by selecting Personalize. The Personalized Saved Searches window appears.
For more information about the Personalized Saved Search, see the Common User Interface Controls chapter, section "Personalize Saved Search".
Click Search. The item lists that match the search criteria are displayed in the Results section.
Click Reset to clear the search section and results.
Click Save As... to save the current search criteria. The Create Saved Search window appears.
For more information about how to save your search criteria, see the Common User Interface Controls chapter, section "Create Saved Search".
Click Done to close the window.
To search for an item list by using advanced search criteria:
To search by using advanced search criteria, enter or select one or all of the advanced search criteria.
Table 2-112 Item List Search - Advanced Search Criteria and Description
| Fields | Description |
|---|---|
|
Item List |
Enter the item list ID. |
|
Description |
Enter the item description. |
|
Type |
Select a type from the list. |
|
Created Date |
Enter a created date or use the Calendar icon to select a date. |
|
Created By |
Select the desired user from the list. |
|
Item |
Enter or search for an item. |
|
Item Description |
Enter the item description. |
|
Division |
Enter, select or search for the division. |
|
Group |
Enter, select or search for the group. |
|
Department |
Enter, select or search for the department. |
|
Class |
Enter, select or search for the class. |
|
Subclass |
Enter select or search for the subclass. |
To narrow down the search, use the list next to the search fields. For example, determine, if the entered value should be equal or not equal to the search result.
Click the Saved Search list to select one of the saved search criteria. Selecting a saved search populates the search section with the saved search criteria. If the run automatically function is enabled for the search, the search is executed immediately.
You can also personalize your saved searches by selecting Personalize. The Personalized Saved Searches window appears.
For more information about the Personalized Saved Search, see the Common User Interface Controls chapter, section "Personalize Saved Search".
Click Search. The item lists that match the search criteria are displayed in the Results section.
Click Reset to clear the search section and results.
Click Save As... to save the current search criteria. The Create Saved Search window appears.
For more information about how to save your search criteria, see the Common User Interface Controls chapter, section "Create Saved Search".
Click Add Fields to add more fields for the advanced search. To remove the field from the search, click the x right next to the field.
Click Reorder to change the order of the available search fields. The Reorder Search Fields window appears.
Select the desired search field and use the up and down arrows to rearrange the order of the fields.
Click OK to confirm the new order of the fields and close the window.
Click Cancel to reject any changes and close the window.
Click Done to close the window.
The Results section lists the retrieved item lists. The Results table shows the following columns by default.
Item List ID
Description
Type
Total Items
Created Date
Created By
Use the Actions Menu and icons to apply actions to the table. You can perform the actions listed below.
Table 2-113 Results - Actions Menu/Icons and Description
| Actions Menu/Icons | Description |
|---|---|
|
Create and Create icon |
Select Actions > Create or use the Create icon to create a new item list. For more details about how to create an item list, see the Creating Item Lists section. |
|
Create from Existing and Create from Existing icon |
To copy from an existing item list:
|
|
Edit and Edit icon |
To edit an item list:
|
|
View and View icon |
To view a item list:
|
|
Mass Change |
The Mass Change menu contains the following options:
|
|
Create |
The Create menu contains the following options:
|
|
Export to Excel and Export to Excel icon |
You can export the records in the table to a Microsoft Excel spreadsheet by selecting Actions > Export to Excel or by using the Export to Excel icon. |
You can customize the view of the table. Use the View Menu and icons to customize the view as listed below.
Table 2-114 Results - View Menu/Icons and Description
| View Menu/Icons | Description |
|---|---|
|
Columns |
You can manage which of the columns will be shown in the table by clicking the Show All and Manage Columns options. |
|
Detach and Detach icon |
You can view the tables in the application in a separate window by clicking Detach or by using the Detach icon. |
|
Sort |
You can sort columns by the following options:
|
|
Reorder Columns |
You can reorder columns by clicking the Reorder Columns option. |
|
Query by Example and Query by Example icon |
You can filter the items by one or multiple column values by clicking Query by Example or by using the Query by Example icon. |
The toolbar contains the following icons and buttons.
The Change VAT Rates window allows you to edit a VAT code for multiple items by item list.
From the Tasks menu, select Foundation Data > Items > Manage Item List. The Item List Search window appears.
Enter or select search criteria as desired to make the search more restrictive.
Click Search. The item lists that match the search criteria are displayed in the Results section.
Select a record in the table.
Then select Actions > Mass Change > VAT Rates. The Change VAT Rates window appears.
Enter the necessary data.
The window contains the following fields.
Table 2-116 Change VAT Rates - Fields and Description
| Fields | Description |
|---|---|
|
VAT Region |
Enter, select or search for a VAT region ID. This field is a required field. |
|
Type |
Select the desired type from the list. This field is a required field. |
|
Code |
Enter, select or search for the desired VAT code. This field is a required field. |
|
Active Date |
Enter an active date on which the VAT code becomes effective or use the Calendar icon to select a date. This field is a required field. |
|
Reverse VAT checkbox |
Select the checkbox, if the reverse charge VAT is applicable for the item. |
|
Rate % |
Displays the VAT in percentage. |
The toolbar contains the following icons and buttons.
Table 2-117 Change VAT Rates Toolbar - Icons/Buttons and Description
| Icons/Buttons | Description |
|---|---|
|
Help icon |
You can access the online help for a particular page by clicking the Help icon. |
|
Refresh icon |
Use the Refresh icon to clear all fields in the window. |
|
Save and Close |
Click Save and Close to save the changed records and close the window. |
|
Save and Edit Another |
Click Save and Edit Another to save the changed records and edit additional VAT rates. |
|
Cancel |
Click Cancel to reject all entries and close the window. |
|
Done |
If you open the window in view mode, the Done button is displayed. Click Done to close the window. |
The Change UDAs window allows you to mass update the user defined attributes for all items in an item list.
The Change UDAs window contains the following sections.
Header
The header contains the item list ID and description.
This section displays the user defined values for the item list.
Use the Actions Menu and icons to apply actions to the table. You can perform the actions listed below.
Table 2-118 List of Values - Actions Menu/Icons and Description
| Actions Menu/Icons | Description |
|---|---|
|
Add and Add icon |
You can add a new value to the item list by selecting Actions > Add or by using the Add icon. For more information about how to add new values to the item list, see the Adding User Defined Values section. |
|
Delete and Delete icon |
You can delete UDA values from an item list:
|
|
Export to Excel and Export to Excel icon |
You can export the records in the table to a Microsoft Excel spreadsheet by selecting Actions > Export to Excel or by using the Export to Excel icon. |
You can customize the view of the table by using the options in the View Menu.
Table 2-119 List of Values/Dates/Free Form Text - View Menu/Icons and Description
| View Menu/Icons | Description |
|---|---|
|
Columns |
You can manage which of the columns will be shown in the table by clicking the Show All and Manage Columns options. |
|
Detach and Detach icon |
You can view the tables in the application in a separate window by clicking Detach or by using the Detach icon. |
|
Sort |
You can sort columns by the following options:
|
|
Reorder Columns |
You can reorder columns by clicking the Reorder Columns option. |
|
Query by Example and Query by Example icon |
You can filter the items by one or multiple column values by clicking the Query by Example option or by using the Query by Example icon. |
This section contains the user defined dates for the item list.
Use the Actions Menu and icons to apply actions to the table. You can perform the actions listed below.
Table 2-120 Dates - Actions Menu/Icons and Description
| Actions Menu/Icons | Description |
|---|---|
|
Add and Add icon |
You can add new dates to the item list by selecting Actions > Add or by using the Add icon. For more information about how to add new dates to the item list, see the Adding Dates for UDAs section. |
|
Delete and Delete icon |
You can delete dates from the item list:
|
|
Export to Excel and Export to Excel icon |
You can export the records in the table to a Microsoft Excel spreadsheet by selecting Actions > Export to Excel or by using the Export to Excel icon. |
You can customize the view of the table by using the options in the View Menu.
For more information about the View menu, see Table 2-119, "List of Values/Dates/Free Form Text - View Menu/Icons and Description"
The Free Form Text section displays the user defined text for the item list.
Use the Actions Menu and icons to apply actions to the table. You can perform the actions listed below.
Table 2-121 Free Form Text - Actions Menu/Icons and Description
| Actions Menu/Icons | Description |
|---|---|
|
Add and Add icon |
You can add new text to the item list by selecting Actions > Add or by using the Add icon. For more information about how to add new texts to the item list, see the Adding Text for UDAs section. |
|
Delete and Delete icon |
You can delete text from the item list:
|
|
Export to Excel and Export to Excel icon |
You can export the records in the table to a Microsoft Excel spreadsheet by selecting Actions > Export to Excel or by using the Export to Excel icon. |
|
Wrap icon |
You can wrap the values in the table column by first clicking the column on which you would like the text to wrap and then using the Wrap icon. |
You can customize the view of the table by using the options in the View Menu.
For more information about the View Menu, see Table 2-119, "List of Values/Dates/Free Form Text - View Menu/Icons and Description".
The toolbar contains the following icons and buttons.
Table 2-122 Change UDAs Toolbar - Icons/Buttons and Description
| Icons/Buttons | Description |
|---|---|
|
Help icon |
You can access the online help for a particular page by clicking the Help icon. |
|
Save and Close |
Click Save and Close to save the entered records and close the window. |
|
Cancel |
Click Cancel to reject all entries and close the window. |
|
Done |
If you open the window in view mode, the Done button is displayed. Click Done to close the window. |
To add, change, or delete UDAs, follow the steps below
From the Tasks menu, select Foundation Data > Items > Manage Item Lists. The Item List Search window appears.
Enter or select search criteria as desired to make the search more restrictive.
Click Search. The item lists that match the search criteria are displayed in the Results section.
Select a record in the table.
Then select Actions > Mass Change > User Defined Attributes. The Change UDAs window appears.
In the List of Values section select Actions > Add, or use the Add icon. The Add, Change, or Delete UDA window appears.
Select one of the following actions
Add All
Adds the attribute to all items of the selected item list.
Add Where Not Exists
Adds the attribute only to items where the attribute does not yet exist.
Change
Changes the attribute for the items on the item list.
Delete
Deletes the attribute from all items on the item list.
In the UDA field, enter, select or search for the desired attribute.
In the UDA Value field, enter, select or search for the value.
Then choose one of the following options.
Click OK to update the attribute in the item list.
Click OK and Add Another to update the attribute and add additional ones.
Click Cancel to reject all entries and close the window.
To add, change or delete dates for user defined attributes, follow the steps below.
In the Dates section, select Actions > Add, or use the Add icon. The Add, Change, or Delete window appears.
Select one of the following actions
Add All
Adds the date to all attributes.
Add Where Not Exists
Adds the date only to attributes where no date yet exists.
Change
Changes the dates for the selected attribute.
Delete
Deletes the date from the selected attribute.
In the UDA field, enter, select or search for the desired attribute.
In the Date field, enter the desired date or use the Calendar icon to select a date.
Then choose one of the following options.
Click OK to update the date in the item list.
Click OK and Add Another to update the date and add additional ones.
Click Cancel to reject all entries and close the window.
To add, change, or delete text for user defined attributes, follow the steps below.
In the Free Form Text section, select Actions > Add, or use the Add icon. The Add, Change, or Delete window appears.
Select one of the following actions
Add All
Adds the text to all items on the item list.
Add Where Not Exists
Adds the text only to items on the item list where no text yet exists.
Change
Changes the text for the items on the selected item list.
Delete
Deletes the text from all items of the selected item list.
In the UDA field, enter, select or search for the desired attribute.
In the Text field, enter the desired text.
Then choose one of the following options.
Click OK to update the text for the items of the list.
Click OK and Add Another to update the text and add additional ones.
Click Cancel to reject all entries and close the window.
The Change Seasons window allows you to change the seasons and phases for all items in an item list. You can add, change, or delete existing seasons and phases.
The Change Season window contains the following sections.
Header
The header displays the item list ID and description.
The table displays the actions to be performed, the existing seasons and phases to be changed or deleted as well as the new seasons and phases to be added for all items on the item list.
Use the Actions Menu and icons to apply actions to the table. You can perform the actions listed below.
Table 2-123 Change Season Table - Actions Menu/Icons and Description
| Actions Menu/Icons | Description |
|---|---|
|
Add and Add icon |
You can add, change, or delete seasons and phases by selecting Actions > Add or by using the Add icon. For more information about how to maintain seasons and phases, see the Maintaining Seasons and Phases section. |
|
Delete and Delete icon |
You can delete actions:
|
|
Export to Excel and Export to Excel icon |
You can export the records in the table to a Microsoft Excel spreadsheet by selecting Actions > Export to Excel or by using the Export to Excel icon. |
You can customize the view of the table by using the options in the View Menu.
Table 2-124 Change Seasons - View Menu/Icons and Description
| View Menu/Icons | Description |
|---|---|
|
Columns |
You can manage which of the columns will be shown in the table by clicking the Show All and Manage Columns options. |
|
Detach and Detach icon |
You can view the tables in the application in a separate window by clicking Detach or by using the Detach icon. |
|
Sort |
You can sort columns by the following options:
|
|
Reorder Columns |
You can reorder columns by clicking the Reorder Columns option. |
|
Query by Example and Query by Example icon |
You can filter the items by one or multiple column values by clicking the Query by Example option or by using the Query by Example icon. |
The toolbar contains the following icons and buttons.
Table 2-125 Change Seasons Toolbar - Icons/Buttons and Description
| Icons/Buttons | Description |
|---|---|
|
Help icon |
You can access the online help for a particular page by clicking the Help icon. |
|
Save |
Click Save to save the entered records. |
|
Save and Close |
Click Save and Close to save the entered records and close the window. |
|
Cancel |
Click Cancel to reject all entries and close the window. |
|
Done |
If you open the window in view mode, the Done button is displayed. Click Done to close the window. |
To maintain seasons and phases for an item list, follow the steps below.
From the Tasks menu, select Foundation Data > Items > Manage Item List. The Item Search window appears.
Enter or select search criteria as desired to make the search more restrictive.
Click Search. The item lists that match the search criteria are displayed in the Results section.
Select a record in the table.
Then select Actions > Mass Change > Seasons/Phases. The Change Seasons window appears.
To add a season and phase, follow the steps listed below.
Select Actions > Add or use the Add icon. The Add, Change, or Delete Season/Phase window appears.
Select Add.
In the Season field, enter, select or search for the season you want to add.
In the Phase field, enter, select or search for the phase you want to add.
Then choose one of the following options.
Click OK to save the changes and close the window.
Click OK and Add Another to maintain additional entries.
Click Cancel to reject all entries and close the window.
To change a season/phase, follow the steps below.
Select Actions > Add or use the Add icon. The Add, Change, or Delete Season/Phase window appears.
Select Change.
Select a Season/Phase you want to change.
In the Season field, enter, select or search for the season you want to change.
In the Phase field, enter, select or search for the phase.
Then select a new season/phase.
In the Season field, enter, select or search for the season you want to change.
In the Phase field, enter, select or search for the phase.
Then choose one of the following options.
Click OK to save the changes and close the window.
Click OK and Add Another to maintain additional entries.
Click Cancel to reject all entries and close the window.
To delete a season and phase, follow the steps listed below.
Select Actions > Add or use the Add icon. The Add, Change, or Delete Season/Phase window appears.
Select Delete.
In the Season field, enter, select or search for the season you want to delete.
In the Phase field, enter, select or search for the phase you want to delete.
Then choose one of the following options.
Click OK to save the changes and close the window.
Click OK and Add Another to maintain additional entries.
Click Cancel to reject all entries and close the window.
The Differentiator Groups window is used for maintaining differentiator groups. Differentiator groups are used to simplify associating items with multiple differentiators. Differentiator groups can also be assigned to levels of merchandise or organizational hierarchies. You can add, edit, delete or view differentiator groups in this window.
The Differentiator Groups window contains the following sections.
The Groups section displays the available differentiator groups.
Use the Actions Menu and icons to apply actions to the table. You can perform the actions listed below.
Table 2-126 Groups - Actions Menu/Icons and Description
| Actions Menu/Icons | Description |
|---|---|
|
Add and Add icon |
You can add new groups by selecting Actions > Add or by using the Add icon. For more information about how to add groups, see the Adding a New Differentiator Group section. |
|
Delete and Delete icon |
You can delete differentiator groups:
|
|
Edit and Edit icon |
Select Actions > Edit or use the Edit icon to edit the selected groups. For more information about how to edit a group, see the Editing a Differentiator Group section. |
|
Export to Excel and Export to Excel icon |
You can export the records in the table to a Microsoft Excel spreadsheet by selecting Actions > Export to Excel or by using the Export to Excel icon. |
|
Translate and Translate icon |
You can create a translation by selecting Actions > Translate or by using the Translate icon. |
You can customize the view of the table by using the options in the View Menu.
Table 2-127 Groups/Group Details- View Menu/Icons and Description
| View Menu/Icons | Description |
|---|---|
|
Columns |
You can manage which of the columns will be shown in the table by clicking the Show All and Manage Columns options. |
|
Detach and Detach icon |
You can view the tables in the application in a separate window by clicking Detach or by using the Detach icon. |
|
Sort |
You can sort columns by the following options:
|
|
Reorder Columns |
You can reorder columns by clicking the Reorder Columns option. |
|
Query by Example and Query by Example icon |
You can filter the items by one or multiple column values by clicking the Query by Example option or by using the Query by Example icon. |
In the Group Details section you can maintain the differentiators that are members of the group and specify their listing order.
Use the Actions Menu and icons to apply actions to the table. You can perform the actions listed below.
Table 2-128 Group Details - Actions Menu/Icons and Description
| Actions Menu/Icons | Description |
|---|---|
|
Add and Add icon |
You can add new groups by selecting Actions > Add or by using the Add icon. For more information about how to add groups, see the Adding Group Details to Differentiator Groups section. |
|
Delete and Delete icon |
You can delete differentiator groups:
|
|
Edit and Edit icon |
Select Actions > Edit or use the Edit icon to edit the selected groups. For more information about how to edit a group, see the Editing a Differentiator Group section. |
|
Export to Excel and Export to Excel icon |
You can export the records in the table to a Microsoft Excel spreadsheet by selecting Actions > Export to Excel or by using the Export to Excel icon. |
|
Translate and Translate icon |
You can create a translation by selecting Actions > Translate or by using the Translate icon. |
You can customize the view of the table by using the options in the View Menu.
For more information about the View Menu, see Groups/Group Details- View Menu/Icons and Description.
The toolbar contains the following icons and buttons.
Table 2-129 Differentiator Groups Toolbar - Icons/Buttons and Description
| Icons/Buttons | Description |
|---|---|
|
Help icon |
You can access the online help for a particular page by clicking the Help icon. |
|
Save and Close |
Click Save and Close to save the entered records and close the window. |
|
Cancel |
Click Cancel to reject all entries and close the window. |
|
Done |
If you open the window in view mode, the Done button is displayed. Click Done to close the window. |
To add a new differentiator group, follow the steps below.
From the Tasks menu, select Foundation Data > Items > Differentiator > Groups. The Differentiator Groups window appears.
In the Groups section, select Actions > Add, or use the Add icon. The Add Group window appears.
In the Group field, enter the group name. This is a required field.
In the Group Description field, enter a more detailed description for the group. This is a required field.
In the Type field, enter, select or search for a type ID. This field is a required field.
In the Area field, enter, select or search for an area.
In the Division field, enter, select or search for a division.
Then choose one of the following options.
Click OK to add the group and close the window.
Click OK and Add Another to add additional groups.
Click Cancel to reject all entries and close the window.
To add details to differentiator groups, follow the steps below.
In the Group Detail section, select Actions > Add, or use the Add icon. The Add Detail window appears.
In the Sequence field, enter the sequence number for the group detail.
|
Note: You can also add the sequence number for the group detail, directly in the table. |
In the Diff Type Description field, enter, select or search for the diff type description. This field is a required field.
Then choose one of the following options.
Click OK to add the detail to the diff group and close the window.
Click OK and Add Another to add additional details to the diff group.
Click Cancel to reject all entries and close the window.
To edit a diff group, follow the steps listed below.
From the Tasks menu, select Foundation Data > Items > Differentiator > Groups. The Differentiator Groups window appears.
In the Groups section, select Actions > Edit, or use the Edit icon. The Edit Group window appears.
In the Group Description field, change the description for the group, as necessary.
In the Area field, enter, select or search for another area, if necessary.
In the Division field, enter, select or search for another division, if necessary.
Then choose one of the following options.
Click OK to edit the group and close the window.
Click Cancel to reject all entries and close the window.
The Create Diff Range option opens the Differentiator Range window. In this window you can create, edit, delete and view ranges of differentiators.
A differentiator range is a list of differentiators that are grouped under one ID. A differentiator range can be used to apply multiple differentiators to an item with less repetition and effort than applying each differentiator ID individually.
The Differentiator Range window contains the following sections.
The Range section contains the following fields.
Table 2-130 Range - Fields and Description
| Fields | Description |
|---|---|
|
Range |
Enter a range. |
|
Translate and Translate icon |
You can create a translation by using the Translate icon. |
|
Range Type |
Select a range type from the list. |
|
Type 1 - 3 |
Enter, select or search for a type. You can add up to 3 diff types. |
|
Group |
Enter, select or search for groups for diff types 1-3. |
In the Detail section you can add, edit, delete and view diffs of the diff range.
|
Note: If you create a new diff range, press Add Details to open this section. |
Use the Actions Menu and icons to apply actions to the table. You can perform the actions listed below.
Table 2-131 Details - Actions Menu/Icons and Description
| Actions Menu/Icons | Description |
|---|---|
|
Add and Add icon |
You can add new diffs to a diff range by selecting Actions > Add or by using the Add icon. For more information about how to add diffs to a diff range, see the Adding Diff Group Details section. |
|
Edit and Edit icon |
Select Actions > Edit or use the Edit icon to edit the selected diff of a diff range. For more information about how to edit a diff, see the Editing Diff Group Details section. |
|
Delete and Delete icon |
You can delete details for diffs from a diff range:
|
|
Export to Excel and Export to Excel icon |
You can export the records in the table to a Microsoft Excel spreadsheet by selecting Actions > Export to Excel or by using the Export to Excel icon. |
You can customize the view of the table by using the options in the View Menu.
Table 2-132 Details- View Menu/Icons and Description
| View Menu/Icons | Description |
|---|---|
|
Columns |
You can manage which of the columns will be shown in the table by clicking the Show All and Manage Columns options. |
|
Detach and Detach icon |
You can view the tables in the application in a separate window by clicking Detach or by using the Detach icon. |
|
Sort |
You can sort columns by the following options:
|
|
Reorder Columns |
You can reorder columns by clicking the Reorder Columns option. |
|
Query by Example and Query by Example icon |
You can filter the items by one or multiple column values by clicking the Query by Example option or by using the Query by Example icon. |
The toolbar contains the following icons and buttons.
Table 2-133 Differentiator Range Toolbar - Icons/Buttons and Description
| Icons/Buttons | Description |
|---|---|
|
Help icon |
You can access the online help for a particular page by clicking the Help icon. |
|
Delete icon |
Use the Delete icon to delete the current differentiator range. |
|
Refresh icon |
Use the Refresh icon to clear the window. This icon is only available in Edit mode, when entered through the Manage Range option. |
|
Like Range button |
Opens the Like Range Selection window, to create a diff range from an existing range.
This button is only available, if you create a differentiator range. |
|
Add Details button |
Opens the Detail section, to enter the details for the diff range. For more information about this section, see the Detail section. This button is only available, if you create a differentiator range. |
|
Save and Close |
Click Save and Close to save the entered records and close the window. |
|
Save |
Click Save to save the entered record. |
|
Save and Create Another |
Click Save and Create Another to save the entered records and add additional entries. This option is only available, if you create a differentiator range. |
|
Save and Edit Another |
Click Save and Edit Another to save the entered records and edit other entries. This option is only available, in edit mode, when entered through the Manage Range window. |
|
Cancel |
Click Cancel to reject all entries and close the window. |
To create a diff range, follow the steps below.
From the Tasks menu, select Foundation Data > Items > Differentiators > Create Range. The Differentiator Range window appears.
In the Range Field, enter a range ID and description of the diff range.
In the Range Type field, select a type from the list.
|
Note: After you have entered the diff range ID, description and type, the Like Range button enables. Use the button to create a diff range from an existing one. |
In the Type fields, enter, select or search for the desired diff types you want to include in the range.
In the Group fields, enter, select or search for the desired diff groups you want to include in the range.
|
Note: Repeat steps 4 - 5 for up to three diff type/group combinations.To include diffs in the diff range, see the Adding Diff Group Details section. |
Then select one of the following options.
Click Save and Close to save the current diff range and close the window.
Click Save to save the current diff range.
Click Save and Create Another to save the current entry and create additional diff ranges.
Click Cancel to reject all entries and close the window.
To add a diff to a diff range, follow the steps below.
In the Differentiator Range window, click Add Details to enable the Detail section.
Then select Actions > Add, or use the Add icon. The Add Detail window appears.
In the Differentiator Group field, enter, select or search for a new diff you want to add to the diff range.
In the Ratio/Percentage field, enter the rate/percentage for the selected diff.
Then choose one of the following options.
Click OK to add the diff to the table and close the window.
Click OK and Add Another to add the current diff and add additional diffs.
Click Cancel to reject all entries and close the window.
To edit a diff of a diff range, follow the steps below.
In the Differentiator Range window, open the Detail section.
Then select Actions > Edit or use the Edit icon. The Edit Detail window appears.
In the Differentiator Group field(s), enter, select or search for a another diff.
In the Ratio/Percentage field, enter the rate/percentage for the selected diff.
Then choose one of the following options.
Click OK to save the changes and close the window.
Click Cancel to reject all entries and close the window.
The Manage Diff Ranges option opens the Manage Range window. In this window you can delete a diff range or add, edit, delete or view diff range details.
To manage a diff range, follow the steps below.
For more information about the available fields and functions in this window, see the Creating Differentiator Ranges section.
From the Tasks menu, select Foundation Data > Items > Differentiators > Manage Diff Ranges. The Manage Range window appears.
In the Range Field, enter, select or search for the diff range ID you want to edit. The diff range description and range type as well as the diff types and groups are displayed.
Change the diff range description, if necessary.
In the Details section, add, edit or delete diff range details, as necessary.
|
Note: To include diffs in the diff range, see the Adding Diff Group Details section.To edit diffs of a diff range, see the Editing Diff Group Details section. |
Then select one of the following options.
Click Save and Close to save your changes and close the window.
Click Save to save your changes.
Click Save and Edit Another to save the current change and edit additional diff ranges.
Click Cancel to reject all entries and close the window.
In the Differentiator Ratio window you can create, edit, or view a differentiator ratio. The differentiator ratio is based on the sales history for an item in the department, class, and subclass. You can select the type of sales (regular, promotional, or clearance) and the time period to include in the calculation of the differentiator ratio in this window. The ratio is calculated by a batch program.
The Differentiator Ratio window contains the following fields.
Table 2-134 Differentiator Ratio - Fields and Description
| Fields | Description |
|---|---|
|
Ratio |
The ratio ID is generated automatically. Enter a description for the ratio. This field is a required field. |
|
Translate icon |
You can create a translation by using the Translate icon. |
|
Generated By |
Select manual or system if the diff ratio is calculated manually or through a batch program' If you select Manual, the Like Ratio button enables. All other fields are disabled. |
|
Like Ratio button |
Opens the Like Ratio Selection window, to create a diff ratio from an existing ratio. This button is only available, if you create a differentiator ratio. |
|
Department |
Enter, select or search for the department. This field is a required field. |
|
Class |
Enter, select or search for the class. This field is a required field. |
|
Subclass |
Enter, select or search for the subclass. |
|
Group 1 - 3 |
Enter, select or search for the groups. |
|
Sales Type to Use: |
Select the sales type you want to use for the diff ratio. |
|
Regular |
Indicates that you want to use regular sales. |
|
Promotional |
Indicates that you want to use promotional sales. |
|
Clearance |
Indicates that you want to use clearance sales. |
|
Build Time Period: |
Select the time period for the diff ratio. |
|
Period Type |
Displays the type of period to take the sales history for. Select the period type from the list. |
|
From |
Displays the starting date for the sales history to be used. Enter a from date or use the Calendar icon to select a date. |
|
Back To |
Displays the weeks back of sales history to be used. Enter a back to date or use the Calendar icon to select a date. |
|
Review Every |
Enter the number of weeks. |
|
Last Review Date |
Displays the last review date. |
The toolbar contains the following icons and buttons.
Table 2-135 Differentiator Ratio Toolbar - Icons/Buttons and Description
| Icons/Buttons | Description |
|---|---|
|
Help icon |
You can access the online help for a particular page by clicking the Help icon. |
|
Refresh icon |
You can refresh the window by clicking the Refresh icon. All entries are reset and not saved. |
|
Details button |
Opens the Differentiator Detail window. For more information about this function, see the Differentiator Ratio Detail Window section |
|
Save and Close |
Click Save and Close to save the entered records and close the window. |
|
Save and Create Another |
Click Save and Create Another to save the entered records and add additional entries. This option is only available, if you create a new diff ratio. |
|
Save and Edit Another |
Click Save and Edit Another to save the entered records and edit additional entries. This option is only available in edit mode. |
|
Cancel |
Click Cancel to reject all entries and close the window. |
|
Done |
If you open the window in view mode, the Done button is displayed. Click Done to close the window. |
To create a diff ratio, follow the steps below.
From the Tasks menu, select Foundation Data > Items > Differentiators > Create Ratio. The Differentiator Ratio window appears.
In the Ratio field, enter the description of the diff ratio.
In the Generated By area, select System or Manual.
If you select System:
Enter, select or search for the department, class, and subclass.
Enter, select or search for up to three diff groups to be associated with this ratio.
In the Sales Type area, select the types of sales you want to include in the ratio.
In Build Time Period area, select the type of time period. Then enter the dates.
In the Review Every Week(s) field, enter how often the ratio should be reviewed.
If you select Manual:
The Like Ratio button enables, all other fields are disabled.
Select the Like Ratio button. The Select Like Ratio window appears.
In the Ratio field, enter, select or search for the diff ratio you want to copy from.
Then choose:
Click OK. The settings of the selected diff ratio are applied to the current diff ratio.
Click Cancel to reject all entries and close the window.
To edit a diff ratio, follow the steps below.
From the Tasks menu, select Foundation Data > Items > Differentiators > Manage Ratio. The Differentiator Ratio window appears.
Enter or select search criteria as desired to make the search more restrictive.
Click Search. The diff ratios that match the search criteria are displayed in the Results section.
In the Ratio column, click the ratio link, or mark a record and select Actions > Edit, or use the Edit icon. The Differentiator Ratio window appears.
Edit the fields, as necessary.
In the Differentiator Ratio Detail window you can edit and view the results of a differentiator ratio that has been calculated by a batch program. In edit mode, if you select a store that is not yet associated with the current diff ratio, you can base the store's ratios on those for another store. After you select a store or all stores, you can edit the quantity for each diff or diff combination.
The Differentiator Ratio Detail window contains the following sections.
Header
The header displays the ratio, department, class and subclass ID and description.
The table contains the diff IDs and description as well as the quantity.
Use the Actions Menu and icons to apply actions to the table. You can perform the actions listed below.
You can customize the view of the table by using the options in the View Menu.
Table 2-137 Diff Ratio Detail Table - View Menu/Icons and Description
| View Menu/Icons | Description |
|---|---|
|
Columns |
You can manage which of the columns will be shown in the table by clicking the Show All and Manage Columns options. |
|
Detach and Detach icon |
You can view the tables in the application in a separate window by clicking Detach or by using the Detach icon. |
|
Sort |
You can sort columns by the following options:
|
|
Reorder Columns |
You can reorder columns by clicking the Reorder Columns option. |
|
Query by Example and Query by Example icon |
You can filter the items by one or multiple column values by clicking the Query by Example option or by using the Query by Example icon. |
The toolbar contains the following icons and buttons.
Table 2-138 Diff Ratio Detail Toolbar - Icons/Buttons and Description
| Icons/Buttons | Description |
|---|---|
|
Help icon |
You can access the online help for a particular page by clicking the Help icon. |
|
Refresh icon |
You can refresh the window by clicking the Refresh icon. All entries are reset and not saved. |
|
Recalculate icon |
Use the Recalculate icon to update the ratios in the Diff Ratio column. |
|
Save and Close |
Click Save and Close to save the entered records and close the window. |
|
Save and Edit Another |
Click Save and Edit Another to save the changed records and edit additional entries. |
|
Cancel |
Click Cancel to reject all entries and close the window. |
|
Done |
If you open the window in view mode, the Done button is displayed. Click Done to close the window. |
To edit diff ratio details, follow the steps below.
Edit the description, sales types, and review number as necessary.
Click Detail. The Differentiator Ratio Detail window appears.
In the Level field, select if you want to edit the diffs at all stores, or at a specific store. Then enter, select or search for the store ID.
Click Search.
If you select a store that is not yet associated with the diff ratio, you are prompted to add the store using another store as template.
Select Yes to confirm the prompt. The Create Like Store window appears.
In the Store field, enter, select or search for the store.
Then choose one of the following options.
Click OK to copy the details and close the window.
Click Cancel to reject all entries and close the window.
Edit the quantity of each diff as necessary in the table.
Click the Recalculate icon to update the ratios in the Ratio column.
Then choose one of the following options.
Click Save to save your changes.
Click Save and Close to save your changes and close the window.
Click Save and Edit Another to edit additional diff ratios.
The Manage Diff Ratios option opens the Differentiator Ratio Search window. In this window you can perform the following actions.
Search for diff ratios by various search criteria
View the search results
View a diff ratio
Create a diff ratio
Edit diff ratio
You can access the Differentiator Ratio Search window from the Task menu, select Foundation Data > Items > Differentiators > Manage Diff Ratios. The Differentiator Ratio Search window appears.
The Differentiator Ratio Search window contains the following sections.
Search
For more information about how to search for a diff ratio, see the Searching for a Diff Ratio section.
To search for a Diff Ratio:
From the Task menu, select Foundation Data > Items > Differentiators > Manage Diff Ratios. The Differentiator Ratio Search window appears.
You can search for a diff ratio by using basic or advanced search criteria, depending on the requirement. The basic mode is the default search mode.
Click Advanced to access the search section in advanced mode.
Click Basic to return to basic mode.
To search for a diff ratio by using basic search criteria:
Enter, select or search for one or all of the following basic search criteria.
Table 2-139 Diff Ratio Search - Basic Search Criteria and Description
| Fields | Description |
|---|---|
|
Match option |
Check radio button All or Any. All - only diff ratios matching all entered search criteria are shown. Any - diff ratios matching any of the entered search criteria are shown. |
|
Ratio |
Enter the ratio ID. |
|
Description |
Enter the ratio description. |
|
Last Review Date |
Enter the last review date or use the Calendar icon to select a date. |
|
Department |
Enter, select or search for the department. |
|
Class |
Enter, select or search for the class. |
|
Subclass |
Enter, select or search for the subclass. |
Click the Saved Search list to select one of the saved search criteria. Selecting a saved search populates the search section with the saved search criteria. If the run automatically function is enabled for the search, the search is executed immediately.
You can also personalize your saved searches by selecting Personalize. The Personalized Saved Searches window appears.
For more information about the Personalized Saved Search, see the Common User Interface Controls chapter, section "Personalize Saved Search".
Click Search. The diff ratios that match the search criteria are displayed in the Results section.
Click Reset to clear the search section and results.
Click Save As... to save the current search criteria. The Create Saved Search window appears.
For more information about how to save your search criteria, see the Common User Interface Controls chapter, section "Create Saved Search".
Click Done to close the window.
To search for a diff ratio by using advanced search criteria:
To search by using advanced search criteria, enter or select one or all of the advanced search criteria.
Table 2-140 Diff Ratio Search - Advanced Search Criteria and Description
| Fields | Description |
|---|---|
|
Match option |
Check radio button All or Any. All - only diff ratios matching all entered search criteria are shown. Any - diff ratios matching any of the entered search criteria are shown. |
|
Ratio |
Enter the ratio ID. |
|
Description |
Enter the ratio description. |
|
Last Review Date |
Enter the last review date or use the Calendar icon to select a date. |
|
Department |
Enter, select or search for the department. |
|
Class |
Enter, select or search for the class. |
|
Subclass |
Enter, select or search for the subclass. |
|
Division |
Enter, select or search for the division. |
|
Group |
Enter, select or search for the group. |
To narrow down the search, use the list next to the search fields. For example, determine if the entered value should be equal or not equal to the search result.
Click the Saved Search list to select one of the saved search criteria. Selecting a saved search populates the search section with the saved search criteria. If the run automatically function is enabled for the search, the search is executed immediately.
You can also personalize your saved searches by selecting Personalize. The Personalized Saved Searches window appears.
For more information about the Personalized Saved Search, see the Common User Interface Controls chapter, section "Personalize Saved Search".
Click Search. The diff ratios that match the search criteria are displayed in the Results section.
Click Reset to clear the search section and results.
Click Save As... to save the current search criteria. The Create Saved Search window appears.
For more information about the Personalized Saved Search, see the Common User Interface Controls chapter, section "Personalize Saved Search".
Click Add Fields to add more fields for the advanced search. To remove the field from the search, click the x right next to the field.
Click Reorder to change the order of the available search fields. The Reorder Search Fields window appears.
Select the desired search field and use the up and down arrows to rearrange the order of the fields.
Click OK to confirm the new order of the fields and close the window.
Click Cancel to reject any changes and close window.
Click Done to close the window.
The Results section lists the retrieved diff ratios. The Results table shows the following columns by default.
Ratio
Description
Department and Department Name
Class and Class Name
Subclass and Subclass Name
Last Review Date
Use the Actions Menu and icons to apply actions to the table. You can perform the actions listed below.
Table 2-141 Results - Actions Menu/Icons and Description
| Actions Menu/Icons | Description |
|---|---|
|
Create and Create icon |
Select Actions > Create or use the Create icon to create a new diff ratio. The Differentiator Ratio window appears. For more details about how to create a new diff ratio, see the Creating a Differentiator Ratio section. |
|
Edit and Edit icon |
Select Actions > Edit or use the Edit icon to edit the selected diff ratio. For more information about how to edit a diff ratio, see the Editing a Differentiator Ratio section. |
|
View and View icon |
To view a diff ratio:
|
|
Export to Excel and Export to Excel icon |
You can export the records in the table to a Microsoft Excel spreadsheet by selecting Actions > Export to Excel or by using the Export to Excel icon. |
You can customize the view of the table by using the options in the View Menu.
Table 2-142 Results - View Menu/Icons and Description
| View Menu/Icons | Description |
|---|---|
|
Columns |
You can manage which of the columns will be shown in the table by clicking the Show All and Manage Columns options. |
|
Detach and Detach icon |
You can view the tables in the application in a separate window by clicking Detach or by using the Detach icon. |
|
Sort |
You can sort columns by the following options:
|
|
Reorder Columns |
You can reorder columns by clicking the Reorder Columns option. |
|
Query by Example and Query by Example icon |
You can filter the items by one or multiple column values by clicking Query by Example or by using the Query by Example icon. |
The supplier management feature allows you to add, edit, and view the following information about suppliers:
Multiple contact persons and addresses: You can enter multiple addresses of different types, such as business, invoice, order, postal, remittance, and returned goods.
Financial arrangements: You can indicate the payment terms, freight terms, currency, settlement code, and payment method.
Inventory management parameters: You can set up a replenishment cycle, order attributes, scaling attributes and constraints, order minimum constraints, and due order processing. You can also indicate whether quality control checking is required and what percentage of the received goods must be checked.
Return to vendor (RTV) requirements: You can indicate whether returns are allowed, whether an authorization number is required, the minimum value of a return, the preferred courier, and the handling charge.
Required documents: You can select which documents, if any, are required by the supplier.
Expense profiles: You can enter the supplier's costs by country or by cost zone.
Types of electronic data interchange (EDI) transactions: You can indicate which EDI transactions the supplier can process.
Generic attributes: You can indicate which attributes apply to the supplier, such as co-op agreement terms, volume rebate terms, whether a PO is required, or whether items are pre-ticketed.
Import attributes: You can enter import-related information such as agent, advising and issuing banks, lading and discharge ports, manufacturer ID, and beneficiary.
Invoice matching attributes: You can indicate when debit memos are sent, whether invoices and debit memos are approved automatically, whether the supplier is allowed to charge freight, and whether invoices are pre-paid. (Oracle Retail Invoice Matching must be installed.)
Supplier traits: You can select the traits by which you want to group the supplier with other suppliers.
Payment types by store: You can select the methods by which the supplier can be paid, such as cash, money order, and by invoice. You can also indicate the payment type by store.
Delivery schedules at stores and warehouses: After you create a delivery schedule, you can specify which items are not to be delivered to the location on a specific delivery day.
Vendor managed inventory (VMI): Use VMI to allow a supplier to manage the inventory levels of designated product at the warehouse. Inventory data is shared with the supplier, who uses the information to create inbound purchase orders, which will achieve and/or maintain budgeted inventory and service levels in the warehouse.
The Supplier/Supplier Site window allows you to create, edit, and view suppliers and supplier sites. Suppliers are vendors that provide your stores and warehouses with merchandise.
Depending on how you enter the window, the label varies.
If you enter the window for a parent supplier, the window is labeled Supplier. For more information about how to create a supplier, see the Creating a Supplier section.
If you enter the window for another supplier site of a supplier, the window is labeled Supplier Site. For more information about how to create a supplier site, see the Creating a Supplier/Supplier Site section.
You can indicate whether the supplier/supplier site is active or inactive. You can also enter the primary contact, financial, shipping, and payment information.
The Supplier window contains the following sections.
The header contains the following fields.
Table 2-144 Header - Fields and Description
| Fields | Description |
|---|---|
|
Supplier |
The supplier ID is generated automatically. Enter the supplier name. This field is a required field. |
|
Payment Terms |
Enter, select or search for the supplier's payment terms. This field is a required field. |
|
Freight Terms |
Enter, select or search for the supplier's freight terms. This field is a required field. |
|
VAT Region |
Enter, select or search for the supplier's VAT region. This field is a required field. |
|
Status |
Select, if the current supplier is an active or inactive supplier. This field is a required field. |
|
Secondary Name |
Enter the secondary name for the supplier. |
|
Currency |
Enter, select or search for the supplier's currency. This field is a required field. |
|
Language |
Select the supplier's language from the list. |
In the Contact Information section enter the name, phone number, email address, fax, telex and pager for the primary contact person at the supplier's location.
Name and Phone are required fields.
In the Comments section you can enter any comments relevant for the supplier.
The Ordering section contains the following fields and checkboxes.
Table 2-145 Ordering - Fields/Checkboxes and Description
| Fields/Checkboxes | Description |
|---|---|
|
Inventory Management Level |
Select an inventory management level from the list. This field is a required field. |
|
Ship Method |
Select a shipping method for the supplier from the list. |
|
Lead Time |
Enter the amount of time a supplier needs between receiving an order and having the order ready to ship. This value will be defaulted to item/supplier relationships. |
|
Delivery Policy |
Select a delivery policy from the list. This field is a required field. |
|
Quantity Level |
Select a quantity level from the list to indicate purchase order quantities that are communicated to the supplier in multiples of units (eaches) or cases. This field is a required field. |
|
DSD checkbox |
Select the checkbox to indicate that the supplier can provide direct store deliveries. |
|
Premark checkbox |
Select the checkbox to indicate that the supplier will break orders into separate, marked boxes that can be shipped directly to stores. |
|
Bracket Costing checkbox |
Select the checkbox to indicate that the supplier uses bracket costing in its pricing. |
|
Back Orders checkbox |
Select the checkbox to indicate the supplier accepts back orders. |
|
EDI: |
|
|
Orders checkbox |
Select the checkbox to indicate that the orders are transmitted electronically. |
|
Order Changes checkbox |
Select the checkbox to indicate that order changes are transmitted electronically. |
|
Order Acknowledgments checkbox |
Select the checkbox to indicate that order acknowledgments are transmitted electronically. |
The Contracts and Replenishment section contains the following fields and checkboxes.
Table 2-146 Contracts and Replenishment - Fields/Checkboxes and Description
| Fields/Checkboxes | Description |
|---|---|
|
Scale AIP Orders checkbox |
Select the checkbox to indicate that AIP (Advanced Inventory Planning) is allowed to do order scaling. Order scaling refers to the increase and decrease of the order quantity within constraints to meet purchasing objectives and increase efficiency. |
|
VMI Order Status |
Select the VMI order status from the list. |
|
VMI Channel |
Enter, select or search for the VMI channel. |
|
EDI Availability checkbox |
Select the checkbox to indicate that the supplier processes orders through EDI (Electronic Data Interchange). |
|
EDI Contracts checkbox |
Select the checkbox to indicate that the supplier process contracts through EDI. |
|
Auto Contract Approval checkbox |
Select the checkbox to indicate that contract orders are created in Approved status. |
The Receiving section contains the following fields and checkboxes.
Table 2-147 Receiving - Fields/Checkboxes and Description
| Fields/Checkboxes | Description |
|---|---|
|
QC Required checkbox |
Select the checkbox to indicate that goods received from the supplier must be inspected for quality. |
|
QC % |
Enter what percentage of the goods must be inspected. |
|
QC Frequency |
Enter how often the items will be inspected. |
|
EDI ASN checkbox |
Select the checkbox to indicate that the advanced shipping notice (ASN) is transmitted electronically. |
|
Vendor Control Required checkbox |
Select the checkbox to indicate that orders from this supplier require vendor control by default. |
|
Vendor Control % |
Displays the percentage of items per receipt that are marked for vendor checking. |
|
Vendor Control Frequency |
Displays the frequency in which items per receipt are marked for vendor checking. |
This section contains the following fields and checkboxes.
Table 2-148 Invoicing - Fields/Checkboxes and Description
| Fields/Ceckboxes | Description |
|---|---|
|
Settlement Code |
Select the settlement code from the list. This field is a required field. |
|
Payment Method |
Select the payment method from the list. |
|
Send Debit Memos |
Select how often debit memos should be sent to the supplier. |
|
Receive Invoice |
Select where invoices from this supplier are received, either at the store or centrally through corporate accounting. This field is only enabled, if invoice matching is used. |
|
Pay Invoice |
Indicates where invoices from this supplier are paid, either at the store or centrally through corporate accounting. Valid values are S (paid at the store) and C (paid centrally). This field only displays Store, if ReSA is used to accept payment at the store level. Additionally, the field is only enabled, if invoice matching is used. |
|
Invoice at |
Select, if invoice amounts are net or gross values. |
|
Final Match Destination checkbox |
Select this checkbox to indicate that the supplier can ship to the final destination as per allocation. |
|
EDI Invoice checkbox |
Select the checkbox to indicate that the invoices are transmitted electronically. |
|
Auto-approve Invoices checkbox |
Select this checkbox to indicate that the supplier's invoice matches can be automatically approved for payment. This field is only enabled, if invoice matching is used. |
|
Auto-approve Debit Memos checkbox |
Select this checkbox to indicate that debit memos sent to the supplier can be automatically approved on creation. This field is only enabled, if invoice matching is used. |
|
Allow Supplier to Charge-Freight checkbox |
Select this checkbox to indicate that the supplier is allowed to charge freight costs to the client. This field is only enabled, if invoice matching is used. |
|
Invoices Pre-paid for Supplier checkbox |
Select this checkbox to indicate that all invoices for the supplier can be considered pre-paid invoices. This field is only enabled, if invoice matching is used. |
|
Services Performed Confirmation Required checkbox |
Select this checkbox to indicate that all suppliers services, for example shelf stocking, must be confirmed before the invocie can be paid. |
The Returns section contains the following fields and checkboxes.
Table 2-149 Returns - Fields/Checkboxes and Description
| Fields/Checkboxes | Description |
|---|---|
|
Returns Allowed checkbox |
Select the checkbox to indicate that this supplier allows returns. |
|
Authorization Required checkbox |
Select the checkbox to indicate that returns must be accompanied by an authorization number when sent back to the vendor. |
|
Maximum Return Amount |
Enter the maximum amount allowed for returns. |
|
Courier |
Enter the courier for the returns. |
|
Handling % |
Enter the handling percentage. |
The Other Attributes section contains the following fields
Table 2-150 Other Attributes - Fields and Description
| Fields | Description |
|---|---|
|
DUNS Number |
Enter the appropriate Dun and Bradstreet codes to identify the supplier. |
|
DUNS Location Number |
Enter the appropriate Dun and Bradstreet codes to identify the supplier location. |
|
EDI Sales |
Select the EDI Sales from the list. |
|
External Ref. ID |
Displays the external reference ID, if available. |
|
Cost Change Variance: |
|
|
Amount |
This field displays the cost change variance as amount. |
|
Percent |
This field displays the cost change variance in percent. |
In the Importers/Exporters section you can add, edit, delete and view importers/exporters that the supplier uses. This section is only available for supplier sites.
Use the Actions Menu and icons to apply actions to the table. You can perform the actions listed below.
Table 2-151 Importers/Exporters - Actions Menu/Icons and Description
| Actions Menu/Icons | Description |
|---|---|
|
Add and Add icon |
You can add new importers/exporters for the supplier by selecting Actions > Add or by using the Add icon. For more information about how to add new importers/exporters, see the Adding Importers/Exporters section. |
|
Delete and Delete icon |
You can delete importers/exporters:
|
|
Edit and Edit icon |
Select Actions > Edit or use the Edit icon to edit the selected importer/exporter. For more information about how to edit an importer/exporter, see the Editing Importers/Exporters section. |
|
Export to Excel and Export to Excel icon |
You can export the records in the table to a Microsoft Excel spreadsheet by selecting Actions > Export to Excel or by using the Export to Excel icon. |
You can customize the view of the table by using the options in the View Menu.
Table 2-152 Importers/Exporters/Routing Locations - View Menu/Icons and Description
| View Menu/Icons | Description |
|---|---|
|
Columns |
You can manage which of the columns will be shown in the table by clicking the Show All and Manage Columns options. |
|
Detach and Detach icon |
You can view the tables in the application in a separate window by clicking Detach or by using the Detach icon. |
|
Sort |
You can sort columns by the following options:
|
|
Reorder Columns |
You can reorder columns by clicking the Reorder Columns option. |
|
Query by Example and Query by Example icon |
You can filter the items by one or multiple column values by clicking the Query by Example option or by using the Query by Example icon. |
In the Routing Locations section you can add, edit, delete and view routing locations for the supplier. This section is only available for supplier sites.
Use the Actions Menu and icons to apply actions to the table. You can perform the actions listed below.
Table 2-153 Routing Locations - Actions Menu/Icons and Description
| Actions Menu/Icons | Description |
|---|---|
|
Add and Add icon |
You can add new routing locations for the supplier by selecting Actions > Add or by using the Add icon. For more information about how to add new routing locations, see the Adding Routing Locations section. |
|
Delete and Delete icon |
You can delete routing locations:
|
|
Edit and Edit icon |
Select Actions > Edit or use the Edit icon to edit the selected routing location. For more information about how to edit a routing location, see the Editing Routing Locations section. |
|
Export to Excel and Export to Excel icon |
You can export the records in the table to a Microsoft Excel spreadsheet by selecting Actions > Export to Excel or by using the Export to Excel icon. |
You can customize the view of the table by using the options in the View Menu.
For more information about the View Menu and icons, see Importers/Exporters/Routing Locations - View Menu/Icons and Description
The toolbar contains the following icons and buttons.
Table 2-154 Supplier Toolbar - Icons/Buttons and Description
| Icons/Buttons | Description |
|---|---|
|
Help icon |
You can access the online help for a particular page by clicking the Help icon. |
|
Refresh icon |
You can refresh the window by clicking the Refresh icon. All entries are reset and not saved. |
|
Expand and Collapse icons |
You can expand all the sections and collapse all the sections in the window by clicking the Expand and Collapse icons. |
|
Translate and Translate icon |
You can create a translation by selecting Actions > Translate or by using the Translate icon. |
|
More Actions |
Click More Actions to see a list of additional actions that can be performed in the Supplier/Supplier Site window. For more information about the More Actions menu, see the Supplier/Supplier Site - More Actions Menu section. |
|
Save and Close |
Click Save and Close to save the entered records and close the window. |
|
Save and Create Another |
Click Save and Create Another to save the entered records and add additional entries. This option is only available, if you create a new supplier/supplier site. |
|
Save and Edit Another |
Click Save and Edit Another to save the entered records and add additional entries. This option is only available, in edit mode. |
|
Cancel |
Click Cancel to reject all entries and close the window. |
|
Done |
If you open the window in view mode, the Done button is displayed. Click Done to close the window. |
Use the More Actions menu to navigate to the following windows. The More Actions menu contains the following options.
Table 2-155 More Actions Menu - Buttons and Description
| Action Buttons | Description |
|---|---|
|
More Actions |
You can navigate to the following windows by using the More Actions menu. |
|
|
|
The menu options below are only available for supplier sites. |
|
|
|
|
|
|
|
|
|
|
|
|
|
|
|
To create a supplier, follow the steps below.
From the Tasks menu, select Foundation Data > Suppliers and Partners > Create Supplier. The Supplier window appears.
The supplier ID is generated automatically. Enter the necessary information in the individual sections.
For more information about the available sections of the Supplier window, see the Supplier/Supplier Site Window section.
Then choose one of the following options.
Click Save to save the supplier.
Click Save and Close to save the supplier and close the window.
Click Save and Create Another to save the current supplier and create additional supplier entries.
Click Cancel to reject all entries and close the window.
|
Note: You can also create a supplier in the Supplier Search screen, for more information about this function, see the Creating a Supplier/Supplier Site section. |
To add importers/exporters to a supplier site, follow the steps below.
In the Importers/Exporters section, select Actions > Add or use the Add icon. The Add Importer/Exporter window appears.
In the Type field, select if you want to add an importer or exporter. This field is a required field.
In the Importer/Exporter field, enter, select or search for the importer/exporter ID and description. This field is a required field.
Select the Default checkbox to indicate that the current importer/exporter is the supplier's default importer/exporter.
Then choose one of the following options.
Click OK to add the importer/exporter and close the window.
Click OK and Add Another to add additional importers/exporters.
Click Cancel to reject all entries and close the window.
To edit importers/exporters for a supplier site, follow the steps below.
In the Importers/Exporters section, select Actions > Edit or use the Edit icon. The Edit Importer/Exporter window appears.
Change the Type and Importer/Exporter field as well as the Default checkbox, as necessary.
Then choose one of the following options.
Click OK to save your changes and close the window.
Click Cancel to reject all entries and close the window.
To add routing locations to a supplier site, follow the steps below.
In the Routing Locations section, select Actions > Add or use the Add icon. The Add Routing Locations window appears.
In the Routing Location field, enter, select or search for the location ID. This field is a required field.
Select the Default checkbox to indicate that the current routing location is the supplier's default routing location.
Then choose one of the following options.
Click OK to add the routing location and close the window.
Click OK and Add Another to add additional routing locations.
Click Cancel to reject all entries and close the window.
To edit routing locations for a supplier site, follow the steps below.
In the Routing Locations section, select Actions > Edit or use the Edit icon. The Edit Routing Locations window appears.
Change the Routing Location field and Default checkbox, as necessary.
Then choose one of the following options.
Click OK to save your changes and close the window.
Click Cancel to reject all entries and close the window.
The Supplier Import Attributes window allows you to enter import information about a particular supplier. You can track information specific to the supplier, such as:
Agent
Factory
Advising bank
Issuing bank
Lading port
Discharge port
Manufacturer ID
Additional partner information
Beneficiary information
The Supplier Import Attributes window contains the following sections.
Header
The header displays the supplier site ID and name.
The Import Attributes section contains the following fields.
Table 2-156 Import Attributes - Fields and Description
| Fields | Description |
|---|---|
|
Agent |
Enter, select or search for the agent ID. |
|
Factory |
Enter, select or search for the factory ID. |
|
Advising Bank |
Enter, select or search for the ID of the advising bank. |
|
Issuing Bank |
Enter, select or search for the ID of the issuing bank. |
|
Lading Port |
Enter, select or search for the ID of the lading port. |
|
Discharge Port |
Enter, select or search for the ID if the discharge port. |
|
Manufacturer |
Enter the manufacturer. |
|
Supplier Related to Manufacturer checkbox |
Select the checkbox to indicate that the supplier is related to the manufacturer. |
|
Partner |
Select a partner type from the list. In the field next to the partner type, enter, select or search for the partner ID. You can add up to three partners in this window. |
The Beneficiary Attributes section contains the following fields.
Table 2-157 Beneficiary Attributes - Fields and Description
| Fields | Description |
|---|---|
|
Beneficiary checkbox |
Select the checkbox to indicate that the supplier can be a beneficiary in a Letter of Credit transaction. |
|
With Recourse checkbox |
Select the checkbox to indicate that the paying bank will be able to claim refunds from the beneficiary in case the letter of credit documents are not paid by the issuing bank. |
|
Revocable checkbox |
Select the checkbox to indicate that the Letter of Credit is revocable. If the LC is revocable, it can be amended or cancelled by the buyer or buyers bank at any time. If the LC is not revocable, the buyer as well as seller must approve any changes. |
|
Place of Expiry |
Enter, select or search for the place of expiry. |
|
Drafts At |
Select the drafts at entry from the list. |
|
Payment Terms |
Select the appropriate payment terms from the list. |
|
Variance Percent |
Enter the variance in percent. |
|
LC Negotiation Days |
Enter the negotiating days for the LC. |
The toolbar contains the following icons and buttons.
Table 2-158 Supplier Import Attributes Toolbar - Icons/Buttons and Description
| Icons/Buttons | Description |
|---|---|
|
Help icon |
You can access the online help for a particular page by clicking the Help icon. |
|
Save |
Click Save to save the entered records. |
|
Save and Close |
Click Save and Close to save the entered records and close the window. |
|
Cancel |
Click Cancel to reject all entries and close the window. |
|
Done |
If you open the window in view mode, the Done button is displayed. Click Done to close the window. |
The Supplier Inventory Management window allows you to create, maintain, delete and view inventory management information for a supplier site, or for a department and supplier site.
The Supplier Inventory Management window contains the following sections.
Header
The header contains the supplier site ID, name, department, location type and ID.
The Replenishment section contains the following fields.
Table 2-159 Replenishment - Fields and Description
| Fields | Description |
|---|---|
|
Order Control |
Select how the POs are processed for the supplier from the list. |
|
Review Cycle |
Select how often the items are reviewed for replenishment from the list. |
|
Weekdays checkboxes |
Select the day on which the items are reviewed.
|
|
Single Loc on Order checkbox |
Select the checkbox, if only one location can be on an order. |
The Due Order Processing section contains the following fields.
Table 2-160 Due Order Processing - Fields and Description
| Fields | Description |
|---|---|
|
Due Order Processing checkbox |
Select the checkbox to have due order processing performed for replenishment items from the supplier. |
|
Create Non-Due Orders checkbox |
Select the checkbox to have purchase orders created in Worksheet status for items that are not due to be ordered. |
|
Due Order Level |
Select the level at which the due order processing is based from the list. |
|
Service Basis |
Select the parameter that is used in calculating the stock out level from the list |
The Investment Buy section contains the following fields.
The Scaling section contains the following fields.
Table 2-162 Scaling - Fields and Description
| Fields | Description |
|---|---|
|
Scale Orders to Constraints checkbox |
Select the checkbox to enable the scaling constraints area. |
|
Multiple Vehicles checkbox |
Select the checkbox to indicate that multiple vehicles may be used when delivering the order. |
|
Scaling Objective |
Select whether purchase orders are scaled to the minimum or maximum values of the scaling constraints. |
|
Scaling Level |
Select the level at which the scaling is performed. |
|
Primary: |
In the Scaling Constraints Primary column, complete the following fields. |
|
Type |
Select the primary type of constraint to use when scaling orders. |
|
UOM |
If you select Mass or Volume as the primary type, enter, select or search for the unit of measure. |
|
Currency |
If you select Amount as the primary type, the currency code is displayed in this field. |
|
Maximum Value |
Enter the maximum value of the constraint. |
|
Tolerance |
Enter the percentage tolerance for the maximum value of constraint. |
|
Minimum Value |
Enter the minimum value of the constraint. |
|
Tolerance |
Enter the percentage tolerance for the minimum value of the constraint. |
|
Secondary: |
In the Scaling Constraints Secondary column, complete the following fields. |
|
Type |
Select the secondary type of constraint to use when scaling orders. The secondary type cannot be the same as the primary type. |
|
UOM |
If you select Mass or Volume as the secondary type, enter, select or search for the unit of measure. |
|
Currency |
If you select Amount as the secondary type, the currency code is displayed in this field. |
|
Maximum Value |
Enter the maximum value of the constraint. |
|
Tolerance |
Enter the percentage tolerance for the maximum value of the constraint. |
|
Minimum Value |
Enter the minimum value of the constraint. |
|
Tolerance |
Enter the percentage tolerance for the minimum value of the constraint. |
The Rounding section contains the following fields.
Table 2-163 Rounding - Fields and Description
| Fields | Description |
|---|---|
|
Rounding Level |
Select the level to which quantities should be rounded. |
|
Rounding to Inner Threshold |
Enter the percent of the inner needed to round to an additional inner. |
|
Round to Case Threshold |
Enter the percent of the case needed to round to an additional case. |
|
Round to Layer Threshold |
Enter the percent of the layer needed to round to an additional level. |
|
Round to Pallet Threshold |
Enter the percent of the pallet needed to round to an additional pallet. |
The Supplier Minimums section contains the following fields.
Table 2-164 Supplier Minimums - Fields and Description
| Fields | Description |
|---|---|
|
Purge Orders Failing Minimum checkbox |
Select the checkbox to create POs that meet the supplier minimum. |
|
Minimum Level |
Select the minimum order quantity at which the supplier accepts orders. |
|
Conjunction |
When you define two minimum order requirements, select the relationship between the requirements in the Conjunction field. |
|
Minimum 1: |
In the Minimum 1 column, complete the following fields. |
|
Type |
Select the type for the first minimum order requirement. |
|
UOM |
If you select Mass or Volume as the first minimum order requirement type, enter, select or search for the unit of measure |
|
Currency |
If you select Amount as the first minimum order requirement type, the currency code is displayed in this field. |
|
Value |
Enter the value of the first minimum order requirement for the supplier. |
|
Minimum 2: |
In the Minimum 2 column, complete the following fields. |
|
Type |
Select the second type for the minimum order requirement. |
|
UOM |
If you select Mass or Volume as the first minimum order requirement type, enter, select or search for the unit of measure. |
|
Currency |
If you select Amount as the first minimum order requirement type, the currency code is displayed in this field. |
|
Value |
Enter the value of the first minimum order requirement of the supplier. |
The Truck Splitting section contains the following fields.
Table 2-165 Truck Splitting - Fields and Description
| Fields | Description |
|---|---|
|
Split Orders into Truckloads checkbox |
Select the checkbox to enable the truck splitting constraints. |
|
Auto Approve LTL Orders checkbox |
Select the checkbox to allow Less than a Truckload (LTL) orders. |
|
Truck Split Method |
Select the method of truck splitting used with this supplier. |
|
Constraint 1: |
In the Constraint 1 column, complete the following fields. |
|
Type |
Select the primary type of constraint to use when splitting orders into truckloads. |
|
UOM |
If you select Mass or Volume as the primary type, enter, select or search for the unit of measure. |
|
Value |
Enter the value of the constraint. |
|
Tolerance |
Enter the percentage tolerance for the maximum value of the constraint. |
|
Constraint 2: |
In the Constraint 2 column, complete the following fields. |
|
Type |
Select the secondary type of constraint to use when splitting orders into truckloads. The second constraint type cannot be the same as the first constraint type. |
|
UOM |
If you select Mass or Volume as the secondary type, enter, select or search for the unit of measure. |
|
Value |
Enter the value of the constraint. |
|
Tolerance |
Enter the percentage tolerance for the maximum value of the constraint. |
The Bracket Constraints section contains the following fields.
Table 2-166 Bracket Constraints - Fields and Description
| Fields | Description |
|---|---|
|
Threshold % |
Enter the percentage of the bracket value that the order must meet in order to be rounded up to that bracket. |
|
Primary: |
In the Primary column, complete the following fields. |
|
Type |
Select the type of the primary bracket costing constraint. |
|
UOM |
If you select Mass or Volume as the primary type, enter, select or search for the unit of measure. |
|
Secondary: |
In the Secondary column, complete the following fields. |
|
Type |
Select the type of secondary bracket costing constraints. |
|
UOM |
If you select Mass or Volume as the secondary type, enter, select or search for the unit of measure. |
The Other Attributes section contains the following fields.
Table 2-167 Other Attributes - Fields and Description
| Fields | Description |
|---|---|
|
Pooled Supplier |
Enter, select or search for the supplier ID. |
|
Pooled Supplier Site |
Enter, select or search for the supplier site ID. |
|
Purchase Type |
Select the purchase order type from the list. |
|
Pickup Location |
Only enabled, if you select pick-up as purchase type. Enter the pickup location. |
The toolbar contains the following icons and buttons.
Table 2-168 Supplier Inventory Management Toolbar - Icons/Buttons and Description
| Icons/Buttons | Description |
|---|---|
|
Help icon |
You can access the online help for a particular page by clicking the Help icon. |
|
Expand and Collapse icons |
You can view all the sections and collapse all the sections in the window by clicking the Expand and Collapse icons. |
|
Refresh icon |
You can refresh the window by clicking the Refresh icon. All entries are reset and not saved. |
|
Delete icon |
Use the Delete icon to delete the inventory management record of the current supplier site. |
|
More Actions |
Click More Actions to see a list of additional actions that can be performed in the Warehouse window.
|
|
Save and Close |
Click Save and Close to save the entered records and close the window. |
|
Save and Create Another |
Click Save and Create Another to save the entered records and add additional entries. This option is only available, if you create a new inventory management record for a supplier site. |
|
Save and Edit Another |
Click Save and Edit Another to save the entered records and edit additional entries. This option is only available in edit mode. |
|
Cancel |
Click Cancel to reject all entries and close the window. |
|
Done |
If you open the window in view mode, the Done button is displayed. Click Done to close the window. |
In the Supplier Brackets window, you can add, edit, delete and view primary and secondary bracket values. You can also specify default brackets, or delete the entire bracket structure.
The Supplier Brackets window contains the following sections.
Header
The header displays the following information.
Supplier ID and name
Pickup checkbox
Select the checkbox to indicate that the bracket pricing uses pickup prices.
The pickup price is the price of the goods without shipping costs, as if the goods were picked up at the supplier's location.
Threshold amount in percent
In the table you can add, edit, delete and view primary as well as secondary brackets. Additionally you can also set default bracket values.
Use the Actions Menu and icons to apply actions to the table. You can perform the actions listed below.
Table 2-169 Supplier Brackets Table - Actions Menu/Icons and Description
| Actions Menu/Icons | Description |
|---|---|
|
Add and Add icon |
You can add new bracket values by selecting Actions > Add or by using the Add icon. For more information about how to add bracket values, see the Adding Bracket Values section. |
|
Delete and Delete icon |
You can delete bracket values:
|
|
Edit and Edit icon |
Select Actions > Edit or use the Edit icon to edit the selected bracket value. For more information about how to edit a bracket value, see the Editing Bracket Values section. |
|
Export to Excel and Export to Excel icon |
You can export the records in the table to a Microsoft Excel spreadsheet by selecting Actions > Export to Excel or by using the Export to Excel icon. |
You can customize the view of the table by using the options in the View Menu.
Table 2-170 Supplier Brackets Table - View Menu/Icons and Description
| View Menu/Icons | Description |
|---|---|
|
Columns |
You can manage which of the columns will be shown in the table by clicking the Show All and Manage Columns options. |
|
Detach and Detach icon |
You can view the tables in the application in a separate window by clicking Detach or by using the Detach icon. |
|
Sort |
You can sort columns by the following options:
|
|
Reorder Columns |
You can reorder columns by clicking the Reorder Columns option. |
|
Query by Example and Query by Example icon |
You can filter the items by one or multiple column values by clicking the Query by Example option or by using the Query by Example icon. |
The toolbar contains the following icons and buttons.
Table 2-171 Supplier Brackets Toolbar - Icons/Buttons and Description
| Icons/Buttons | Description |
|---|---|
|
Help icon |
You can access the online help for a particular page by clicking the Help icon. |
|
Delete icon |
Use the Delete icon to delete the entire bracket structure. |
|
Save and Close |
Click Save and Close to save the entered records and close the window. |
|
Save and Create Another |
Click Save and Create Another to save the entered records and add additional entries. This option is only available, if you create a bracket structure for a supplier site. |
|
Save and Edit Another |
Click Save and Edit Another to save the entered records and edit additional entries. This option is only available in edit mode. |
|
Cancel |
Click Cancel to reject all entries and close the window. |
|
Done |
If you open the window in view mode, the Done button is displayed. Click Done to close the window. |
To add bracket values for a supplier site, follow the steps below.
From the Tasks menu, select Foundation Data > Suppliers and Partners > Manage Supplier. The Supplier Search window appears.
Restrict your search to suppliers with enabled Bracket Costing.
Click Search. The suppliers that match the search criteria are displayed in the Results section.
In the Supplier Site column, click the supplier site ID link, or mark a record and select Actions > Edit, or use the Edit icon. The Supplier Site window appears.
Select More Actions > Inventory Management. The Supplier Inventory Management window appears.
Select More Actions > Bracket Costing. The Supplier Brackets window appears.
|
Note: The Bracket Costing checkbox must be selected in the Supplier/Supplier Site window in order to access the Supplier Brackets window. |
Select Actions > Add, or use the Add icon. The Add Bracket window appears.
In the Primary Bracket Value field, enter the lower value of the primary bracket. This field is a required field.
In the Secondary Bracket Value field, enter the lower value of the secondary bracket, if applicable.
Select the Default checkbox to indicate that the bracket value is a default value for this bracket structure.
Select the Pickup checkbox to indicate that the bracket pricing uses pickup prices. The pickup price is the price of the goods without shipping costs, as if the goods were picked up at the supplier's location.
Then select one of the following options.
Click OK to add the bracket value and close the window.
Click OK and Add Another to add additional bracket values.
Click Cancel to reject all entries and close the window.
To edit bracket values for a supplier site, follow the steps below.
From the Tasks menu, select Foundation Data > Suppliers and Partners > Manage Supplier. The Supplier Search window appears.
Restrict your search to suppliers with enabled Bracket Costing.
Click Search. The suppliers that match the search criteria are displayed in the Results section.
In the Supplier Site column, click the supplier site ID link, or mark a record and select Actions > Edit, or use the Edit icon. The Supplier Site window appears.
Select More Actions > Inventory Management. The Supplier Inventory Management window appears.
Select More Actions > Bracket Costing. The Supplier Brackets window appears.
|
Note: The Bracket Costing checkbox must be selected in the Supplier/Supplier Site window in order to access the Supplier Brackets window. |
Select a record in the table.
Then select Actions > Edit, or use the Edit icon. The Edit Bracket window appears.
In the Primary Bracket Value and Secondary Bracket Value field, edit the values as necessary.
Select/deselect the Default checkbox to indicate that the bracket value is a default value for this bracket structure.
Select/deselect the Pickup checkbox to indicate that the bracket pricing uses pickup prices.
Then choose one of the following options.
Click OK to save your changes value and close the window.
Click Cancel to reject all entries and close the window.
In the Supplier Org Unit window you can add, edit, delete and view organizational unit information for the selected supplier site.
The Supplier Org Unit window contains the following sections.
Header
The header displays the supplier ID and name.
In the table you can add, edit, delete and view organizational units for the selected supplier site or partner.
Use the Actions Menu and icons to apply actions to the table. You can perform the actions listed below.
Table 2-172 Supplier Org Unit Table - Actions Menu/Icons and Description
| Actions Menu/Icons | Description |
|---|---|
|
Add and Add icon |
You can add new organizational units by selecting Actions > Add or by using the Add icon. For more information about how to add org units, see the Adding Organizational Unit Information for Suppliers section. |
|
Delete and Delete icon |
You can delete org units:
|
|
Edit and Edit icon |
Select Actions > Edit or use the Edit icon to edit the selected org unit. For more information about how to edit an org unit, see the Editing Organizational Unit Information for Suppliers section. |
|
Export to Excel and Export to Excel icon |
You can export the records in the table to a Microsoft Excel spreadsheet by selecting Actions > Export to Excel or by using the Export to Excel icon. |
You can customize the view of the table by using the options in the View Menu.
Table 2-173 Supplier Org Unit - View Menu/Icons and Description
| View Menu/Icons | Description |
|---|---|
|
Columns |
You can manage which of the columns will be shown in the table by clicking the Show All and Manage Columns options. |
|
Detach and Detach icon |
You can view the tables in the application in a separate window by clicking Detach or by using the Detach icon. |
|
Sort |
You can sort columns by the following options:
|
|
Reorder Columns |
You can reorder columns by clicking the Reorder Columns option. |
|
Query by Example and Query by Example icon |
You can filter the items by one or multiple column values by clicking the Query by Example option or by using the Query by Example icon. |
The toolbar contains the following icons and buttons.
Table 2-174 Supplier Org Unit Toolbar - Icons/Buttons and Description
| Icons/Buttons | Description |
|---|---|
|
Help icon |
You can access the online help for a particular page by clicking the Help icon. |
|
Save |
Click Save to save the entered records. |
|
Save and Close |
Click Save and Close to save the entered records and close the window. |
|
Cancel |
Click Cancel to reject all entries and close the window. |
|
Done |
If you open the window in view mode, the Done button is displayed. Click Done to close the window. |
To add organizational unit information for a supplier, follow the steps below.
From the Tasks menu, select Foundation Data > Suppliers and Partners > Manage Supplier. The Supplier Search window appears.
Enter or select search criteria as desired to make the search more restrictive.
Click Search. The suppliers that match the search criteria are displayed in the Results section.
In the Supplier Site column, click the supplier site ID link, or mark a record and select Actions > Edit, or use the Edit icon. The Supplier Site window appears.
Select More Actions > Org Unit. The Supplier Org Unit window appears.
Then select Actions > Add, or use the Add icon. The Add Org Unit ID window appears.
In the Org Unit field, enter select or search for the appropriate unit. This field is a required field.
Select the Primary Pay Site to indicate that the current org unit is the primary pay site.
Then choose one of the following options.
Click OK to add the org unit and close the window.
Click OK and Add Another to add additional org units.
Click Cancel to reject all entries and close the window.
To edit organizational unit information for suppliers, follow the steps below.
From the Tasks menu, select Foundation Data > Suppliers and Partners > Manage Supplier. The Supplier Search window appears.
Enter or select search criteria as desired to make the search more restrictive.
Click Search. The suppliers that match the search criteria are displayed in the Results section.
In the Supplier Site column, click the supplier site ID link, or mark a record and select Actions > Edit, or use the Edit icon. The Supplier Site window appears.
Select More Actions > Org Unit. The Supplier Org Unit window appears.
Then select Actions > Edit, or use the Edit icon. The Edit Ord Unit ID window appears.
In the Org Unit field, change the org unit, if necessary.
Select/deselect the Primary Pay Site to indicate that the current org unit is the primary pay site.
Then choose one of the following options.
Click OK to save your changes and close the window.
Click Cancel to reject all entries and close the window.
The Supplier Traits window allows you to add, delete and view supplier traits. After you create supplier traits, you can then associate suppliers with a trait or associate traits with a supplier.
You can also use traits to indicate which of your suppliers have a master supplier. A master supplier is an outside source that provides merchandise to one or more of your suppliers, such as a manufacturer or distributor. You can enter an external ID for the master supplier as well.
The Supplier Traits window contains the following sections.
Header
The header displays the supplier ID and name.
In the table you can add, delete and view supplier traits.
Use the Actions Menu and icons to apply actions to the table. You can perform the actions listed below.
Table 2-175 Supplier Traits Table- Actions Menu/Icons and Description
| Actions Menu/Icons | Description |
|---|---|
|
Add and Add icon |
You can add new supplier traits by selecting Actions > Add or by using the Add icon. For more information about how to add supplier traits, see the Adding Supplier Traits section. |
|
Delete and Delete icon |
You can delete supplier traits:
|
|
Export to Excel and Export to Excel icon |
You can export the records in the table to a Microsoft Excel spreadsheet by selecting Actions > Export to Excel or by using the Export to Excel icon. |
You can customize the view of the table by using the options in the View Menu.
Table 2-176 Supplier Traits - View Menu/Icons and Description
| View Menu/Icons | Description |
|---|---|
|
Columns |
You can manage which of the columns will be shown in the table by clicking the Show All and Manage Columns options. |
|
Detach and Detach icon |
You can view the tables in the application in a separate window by clicking Detach or by using the Detach icon. |
|
Sort |
You can sort columns by the following options:
|
|
Reorder Columns |
You can reorder columns by clicking the Reorder Columns option. |
|
Query by Example and Query by Example icon |
You can filter the items by one or multiple column values by clicking the Query by Example option or by using the Query by Example icon. |
The toolbar contains the following icons and buttons.
Table 2-177 Supplier Traits Toolbar - Icons/Buttons and Description
| Icons/Buttons | Description |
|---|---|
|
Help icon |
You can access the online help for a particular page by clicking the Help icon. |
|
Save |
Click Save to save the entered records. |
|
Save and Close |
Click Save and Close to save the entered records and close the window. |
|
Cancel |
Click Cancel to reject all entries and close the window. |
|
Done |
If you open the window in view mode, the Done button is displayed. Click Done to close the window. |
To add supplier traits, follow the steps below.
From the Tasks menu, select Foundation Data > Suppliers and Partners > Manage Supplier. The Supplier Search window appears.
Enter or select search criteria as desired to make the search more restrictive.
Click Search. The suppliers that match the search criteria are displayed in the Results section.
In the Supplier Site column, click the supplier site ID link, or mark a record and select Actions > Edit, or use the Edit icon. The Supplier Site window appears.
Select More Actions > Supplier Traits. The Supplier Traits window appears.
Then select Actions > Add, or use the Add icon. The Add Supplier Traits window appears.
In the Supplier Trait field, enter, select or search for the supplier trait you want to associate with the supplier.
Select the Master Supplier checkbox to indicate that the current trait is a master supplier trait.
Then choose:
Click OK to add the supplier trait and close the window.
Click OK and Add Another to add additional supplier traits.
Click Cancel to reject all entries and close the window.
The Manage Suppliers option opens the Supplier Search window. In this window you can perform the following actions.
Search for suppliers by various search criteria
View the search results
View supplier information
Create supplier information
Edit supplier information
Edit supplier sites
View supplier sites
You can access the Supplier Search window from the Task menu, select Foundation Data > Suppliers and Partners > Manage Suppliers. The Supplier Search window appears.
The Supplier Search window contains the following sections.
Search
For more information about how to search for a supplier, see the Searching for a Supplier section.
To search for a supplier:
From the Task menu, select Foundation Data > Suppliers and Partners > Manage Suppliers. The Supplier Search window appears.
You can search for a supplier by using basic or advanced search criteria, depending on the requirement. The basic mode is the default search mode.
Click Advanced to access the search section in advanced mode.
Click Basic to return to basic mode.
To search for a supplier by using basic search criteria:
Enter, select or search for one or all of the following basic search criteria.
Table 2-178 Supplier Search - Basic Search Criteria and Description
| Fields | Description |
|---|---|
|
Match option |
Check radio button All or Any. All - only suppliers matching all entered search criteria are shown. Any - suppliers matching any of the entered search criteria are shown. |
|
Supplier |
Enter the supplier ID. |
|
Supplier Name |
Enter the supplier name. |
|
Supplier Site |
Enter the supplier site ID. |
|
Supplier Site Name |
Enter the supplier site name. |
|
Status |
Select the status of the supplier. |
|
Item |
Enter, select or search for the supplier's items. |
|
Order |
Enter, select or search for the supplier's orders. |
Click the Saved Search list to select one of the saved search criteria. Selecting a saved search populates the search section with the saved search criteria. If the run automatically function is enabled for the search, the search is executed immediately.
You can also personalize your saved searches by selecting Personalize. The Personalized Saved Searches window appears.
For more information about the Personalized Saved Search, see the Common User Interface Controls chapter, section "Personalize Saved Search".
Click Search. The suppliers that match the search criteria are displayed in the Results section.
Click Reset to clear the search section and results.
Click Save As... to save the current search criteria. The Create Saved Search window appears.
For more information about how to save your search criteria, see the Common User Interface Controls chapter, section "Create Saved Search".
Click Done to close the window.
To search for a supplier by using advanced search criteria:
To search by using advanced search criteria, enter or select one or all of the advanced search criteria.
Table 2-179 Supplier Search - Advanced Search Criteria and Description
| Fields | Description |
|---|---|
|
Match option |
Check radio button All or Any. All - only suppliers matching all entered search criteria are shown. Any - suppliers matching any of the entered search criteria are shown. |
|
Supplier |
Enter the supplier ID. |
|
Supplier Name |
Enter the supplier name. |
|
Supplier Site |
Enter the supplier site ID. |
|
Supplier Site Name |
Enter the supplier site name. |
|
Status |
Select the status of the supplier. |
|
Division |
Enter, select or search for the division. |
|
Group |
Enter, select or search for the group. |
|
Department |
Enter, select or search for the department. |
|
Class |
Enter, select or search for the class. |
|
Subclass |
Enter, select or search for the subclass. |
|
Item |
Enter, select or search for the supplier's items. |
|
Order No. |
Enter, select or search for the order number. |
To narrow down the search, use the list next to the search fields. For example, determine if the entered value should be equal or not equal to the search result.
Click the Saved Search list to select one of the saved search criteria. Selecting a saved search populates the search section with the saved search criteria. If the run automatically function is enabled for the search, the search is executed immediately.
You can also personalize your saved searches by selecting Personalize. The Personalized Saved Searches window appears.
For more information about the Personalized Saved Search, see the Common User Interface Controls chapter, section "Personalize Saved Search".
Click Search. The suppliers that match the search criteria are displayed in the Results section.
Click Reset to clear the search section and results.
Click Save As... to save the current search criteria. The Create Saved Search window appears.
For more information about how to save your search criteria, see the Common User Interface Controls chapter, section "Create Saved Search".
Click Add Fields to add more fields for the advanced search. To remove the field from the search, click the x right next to the field.
Click Reorder to change the order of the available search fields. The Reorder Search Fields window appears.
Select the desired search field and use the up and down arrows to rearrange the order of the fields.
Click OK to confirm the new order of the fields and close window.
Click Cancel to reject any changes and close the window.
Click Done to close the window.
The Results section lists the retrieved suppliers and supplier sites.
Use the Actions Menu and icons to apply actions to the table. You can perform the actions listed below.
Table 2-180 Results - Actions Menu/Icons and Description
| Actions Menu/Icons | Description |
|---|---|
|
Create Supplier and Create Supplier icon |
Select Actions > Create Supplier, or use the Create Supplier icon to create a new supplier/supplier site. For more details about how to create a supplier/supplier site, see the Creating a Supplier/Supplier Site section. |
|
Edit Supplier and Edit Supplier icon |
Select Actions > Edit Supplier, use the Edit Supplier icon, or click on the supplier link to edit the selected supplier. For more information about how to edit a supplier, see the Editing a Supplier section. |
|
View Supplier and View Supplier icon |
To view a supplier:
|
|
Export to Excel and Export to Excel icon |
You can export the records in the table to a Microsoft Excel spreadsheet by selecting Actions > Export to Excel or by using the Export to Excel icon. |
|
Edit Supplier Site |
The Supplier Site window appears. You can also click on the supplier site link in the table, to open the Supplier Site window in edit mode. For more information about how to edit a supplier site, see the Editing a Supplier Site section. This option is only available, if you select a supplier site in the Results section. |
|
View Supplier Site |
To view a supplier site:
This section is only available, if you select a supplier site in the Results section. |
You can customize the view of the table by using the options in the View Menu.
Table 2-181 Results - View Menu/Icons and Description
| View Menu/Icons | Description |
|---|---|
|
Columns |
You can manage which of the columns will be shown in the table by clicking the Show All and Manage Columns options. |
|
Detach and Detach icon |
You can view the tables in the application in a separate window by clicking Detach or by using the Detach icon. |
|
Sort |
You can sort columns by the following options:
|
|
Reorder Columns |
You can reorder columns by clicking the Reorder Columns option. |
|
Query by Example and Query by Example icon |
You can filter the items by one or multiple column values by clicking Query by Example or by using the Query by Example icon. |
The toolbar contains the following icons and buttons.
To create a supplier or supplier site in the Supplier Search window, follow the steps below.
From the Tasks menu, select Foundation Data > Suppliers and Partners > Manage Suppliers. The Supplier Search window appears.
Enter or select search criteria as desired to make the search more restrictive.
Click Search. The suppliers/supplier sites that match the search criteria are displayed in the Results section.
Then select Actions > Create Supplier, or use the Create Supplier icon. The Create Supplier window appears.
In the Supplier Level field, select supplier or supplier site from the list. This field is a required field.
In the Supplier field, enter, select or search for the supplier you want to create the site for. If you selected supplier as the supplier level, this field is disabled.
Click OK. The Supplier/Supplier Site window appears.
Enter the necessary information in the individual sections.
For more information about the available sections of the Supplier/Supplier Site window, see the Supplier/Supplier Site Window section.
Then choose one of the following options.
Click Save to save the supplier/supplier site.
Click Save and Close to save the supplier/supplier site and close the window.
Click Save and Create Another to save the current supplier/supplier site and create additional entries.
Click Cancel to reject all entries and close the window.
To edit a supplier, follow the steps below.
From the Tasks menu, select Foundation Data > Suppliers and Partners > Manage Suppliers. The Supplier Search window appears.
Enter or select search criteria as desired to make the search more restrictive.
Click Search. The suppliers that match the search criteria are displayed in the Results section.
Select a supplier in the Results section.
Then select Actions > Edit Supplier, use the Edit Supplier icon, or click on the supplier link. The Supplier window appears.
Edit the information in the individual sections.
For more information about the available sections of the Supplier/Supplier Site window, see the Supplier/Supplier Site Window section.
Then choose one of the following options.
Click Save to save your changes.
Click Save and Close to save your changes and close the window.
Click Save and Edit Another to your changes and edit additional suppliers.
Click Cancel to reject all entries and close the window.
To edit a supplier site, follow the steps below.
From the Tasks menu, select Foundation Data > Suppliers and Partners > Manage Suppliers. The Supplier Search window appears.
Enter or select search criteria as desired to make the search more restrictive.
Click Search. The suppliers that match the search criteria are displayed in the Results section.
Select a supplier site in the Results section.
Then select Actions > Edit Supplier Site, or click on the supplier site link. The Supplier Site window appears.
Edit the information in the individual sections.
For more information about the available sections of the Supplier Site window, see the Supplier/Supplier Site Window section.
Then choose one of the following options.
Click Save to save your changes.
Click Save and Close to save your changes and close the window.
Click Save and Edit Another to your changes and edit additional supplier sites
Click Cancel to reject all entries and close the window.
The Partner window allows you to create, edit, and view a partner. Partner status may be active or inactive. You can enter the currency, language, status, and primary contact information. Use this window to track the following information for specific types of partners:
Bank partners: Track a line of credit.
Import authority partners: Indicate whether they are the primary import authority for the principal country.
All partners except banks: Track manufacturer ID, principal country, Tax ID, and terms.
In some countries, inventory maintained with a third party must be controlled by the retailer. A retailer may send goods to the external finisher or supplier for finishing the work (such as printing, dyeing, and embroidery) or repair (in case of damaged goods). After the job is done, the finisher or the supplier returns the goods back to the same or a different location. All such movements must be accompanied by a Nota Fiscal.
Auto Receive Stock Indicator: Available only if the partner type is an external finisher.
This flag is used in the two-legged transfer process to indicate, when the warehouse/store ships the stock for the first leg, the system should automatically update the stock at the external finisher. The system will not wait for confirmation from the external finisher, regardless of whether it has received the merchandise or not. If this indicator is unchecked, when the first leg of the transfer is shipped, the system should not update the stock at the external finisher until the external finisher sends across a message that it has received the merchandise.
At the system level, you can determine if partner IDs are unique to all partners or unique to a partner type. If IDs are unique to a partner type, partners with different partner types may have the same ID.
The Partner window contains the following sections.
The header section contains the following fields.
Table 2-183 Header - Fields and Description
| Fields | Description |
|---|---|
|
Partner Type |
The Partner Type field is labeled according to the created partner, for example, Bank. The partner ID is generated automatically. Enter the name of the partner. This field is a required field. |
|
Secondary Name |
Enter a secondary name for the partner, if available. |
|
Principal Country |
Enter, select or search for the principal country code of the partner. This field is a required field. |
|
Currency |
Enter, select or search for the partner's currency code. This field is a required field. |
|
Status |
Select the status of the partner from the list. This field is a required field. |
|
Terms |
Enter, select or search for the payment terms. This field is a required field. |
|
Language |
Select the partner's language from the list. |
|
Auto Receive Stock checkbox |
Select this checkbox to indicate that the system updates the stock for the external finisher when the 1st leg of the transfer is shipped. |
|
Line of Credit: |
|
|
Line of Credit |
Enter the credit limit. This field is a required field. |
|
Outstanding |
Contains the total amount of credit that the company has used or has charged against in the partner's currency. |
|
Open |
Displays the open credit amount. |
|
YTD Line of Credit Placed |
Contains the total amount of credit the company has used this year to this date in the partner's currency. |
|
YTD Drawdowns |
Contains the year to date payments the bank has made on behalf of the company in the partner's currency. |
|
Contact: |
|
|
Name |
Enter the name of the primary contact at the partner's site. This field is a required field. |
|
Phone |
Enter the phone number of the primary contact. This field is a required field. |
|
Email/Fax/Telex |
Enter additional contact information in the appropriate fields. |
In the Comments section you can enter any comments relevant for the partner, if necessary.
The toolbar contains the following icons and buttons.
Table 2-184 Partner Toolbar - Icons/Buttons and Description
| Icons/Buttons | Description |
|---|---|
|
Help icon |
You can access the online help for a particular page by clicking the Help icon. |
|
Delete icon |
Use the Delete icon to delete the current partner information. |
|
More Actions |
Click More Actions to see a list of additional actions that can be performed in the Partner window.
|
|
Save and Close |
Click Save and Close to save the entered records and close the window. |
|
Save and Create Another |
Click Save and Create Another to save the entered records and add additional entries. This option is only available, if you create a new partner. |
|
Save and Edit Another |
Click Save and Edit Another to save the entered records and edit additional entries. This option is only available, if you are in edit mode. |
|
Cancel |
Click Cancel to reject all entries and close the window. |
|
Done |
If you open the window in view mode, the Done button is displayed. Click Done to close the window. |
To create a partner, follow the steps below.
From the Tasks menu, select Foundation Data > Items > Suppliers and Partners > Create Partner. The Create Partner window appears.
In the Partner Type field, select the type of partner you want to create.
Click OK. The Partner window appears. The partner ID is generated automatically.
Enter the necessary partner information in the available sections.
For more information about the available sections of the Partner window, see the Partners Window section.
Then choose one of the following options.
Click Save to save the partner information.
Click Save and Close to save the partner and close the window.
Click Save and Create Another to create additional partners.
Click Cancel to reject all entries and close the window.
To edit a partner, follow the steps below.
From the Tasks menu, select Foundation Data > Items > Supplier and Partners > Manage Partners. The Partner Search window appears.
Enter or select search criteria as desired to make the search more restrictive.
Click Search. The partners that match the search criteria are displayed in the Results section.
In the Partner column, click the partner link, or mark a record and select Actions > Edit, or use the Edit icon. The Partner window appears.
Edit the fields as, necessary.
Then choose one of the following options.
Click Save to save the partner information.
Click Save and Close to save the partner and close the window.
Click Save and Edit Another to edit additional partners.
Click Cancel to reject all entries and close the window.
The Invoicing Attribute window allows you to specify how invoices from the partner are handled. You can indicate where an invoice is received and where an invoice is paid. You can also indicate that the stores must confirm that the service was performed before the invoice from the partner is approved. You can select invoicing attributes for a partner if the Oracle Retail Invoice Matching product is installed.
To specify invoicing attributes for a partner, follow the steps below.
From the Tasks menu, select Foundation Data > Supplier and Partners > Manage Partner. The Partner Search window appears.
Enter or select search criteria as desired to make the search more restrictive.
Click Search. The partners that match the search criteria are displayed in the Results section.
In the Partner column, click the partner link, or mark a record and select Actions > Edit, or use the Edit icon. The Partner window appears.
Select More Actions > Invoicing Attributes. The Invoicing Attribute window appears.
In the Receive Invoice, field, select where the invoice is received.
In the Pay Invoice field, select where the invoice is paid.
Select the Confirmation Required for Services Performed checkbox, to indicate that the stores must confirm that the service was performed before the invoice from the partner is approved.
Then choose:
Click OK to save the invoicing attributes and close the window.
Click Cancel to reject all entries and close the window.
The Manage Partners option opens the Partner Search window. In this window you can perform the following actions.
Search for partners by various search criteria
View the search results
View partner information
Create partner information
Edit partner information
You can access the Partner Search window from the Task menu, select Foundation Data > Suppliers and Partners > Manage Partners. The Partner Search window appears.
The Partner Search window contains the following sections.
Search
For more information about how to search for a partner, see the Searching for a Partner section.
To search for a partner:
From the Task menu, select Foundation Data > Suppliers and Partners > Manage Partners. The Partner Search window appears.
You can search for a partner by using basic or advanced search criteria, depending on the requirement. The basic mode is the default search mode.
Click Advanced to access the search section in advanced mode.
Click Basic to return to basic mode.
To search for a partner by using basic search criteria:
Enter, select or search for one or all of the following basic search criteria.
Table 2-185 Partner Search - Basic Search Criteria and Description
| Fields | Description |
|---|---|
|
Match option |
Check radio button All or Any. All - only partners matching all entered search criteria are shown. Any - partners matching any of the entered search criteria are shown. |
|
Partner Type |
Select the partner type from the list. |
|
Partner |
Enter, select or search for the partner ID. |
|
Description |
Enter, select or search for the partner description. |
|
Status |
Select the status of the supplier. |
|
Currency |
Enter, select or search for the currency. |
|
Principal Country |
Enter, select or search for the principal country. |
|
Manufacturer ID |
Enter, select or search for the manufacturer ID. |
|
Language |
Enter, select or search for the language. |
Click the Saved Search list to select one of the saved search criteria. Selecting a saved search populates the search section with the saved search criteria. If the run automatically function is enabled for the search, the search is executed immediately.
You can also personalize your saved searches by selecting Personalize. The Personalized Saved Searches window appears.
For more information about the Personalized Saved Search, see the Common User Interface Controls chapter, section "Personalize Saved Search".
Click Search. The partners that match the search criteria are displayed in the Results section.
Click Reset to clear the search section and results.
Click Save As... to save the current search criteria. The Create Saved Search window appears.
For more information about how to save your search criteria, see the Common User Interface Controls chapter, section "Create Saved Search".
Click Done to close the window.
To search for a partner by using advanced search criteria:
To search by using advanced search criteria, enter or select one or all of the advanced search criteria.
To narrow down the search, use the list next to the search fields. For example, determine if the entered value should be equal or not equal to the search result.
Click the Saved Search list to select one of the saved search criteria. Selecting a saved search populates the search section with the saved search criteria. If the run automatically function is enabled for the search, the search is executed immediately.
You can also personalize your saved searches by selecting Personalize. The Personalized Saved Searches window appears.
For more information about the Personalized Saved Search, see the Common User Interface Controls chapter, section "Personalize Saved Search".
Click Search. The partners that match the search criteria are displayed in the Results section.
Click Reset to clear the search section and results.
Click Save As... to save the current search criteria. The Create Saved Search window appears.
For more information about how to save your search criteria, see the Common User Interface Controls chapter, section "Create Saved Search".
Click Add Fields to add more fields for the advanced search. To remove the field from the search, click the x right next to the field.
Click Reorder to change the order of the available search fields. The Reorder Search Fields window appears.
Select the desired search field and use the up and down arrows to rearrange the order of the fields.
Click OK to confirm the new order of the fields and close the window.
Click Cancel to reject any changes and close the window.
Click Done to close the window.
The Results section lists the retrieved partners.
Use the Actions Menu and icons to apply actions to the table. You can perform the actions listed below.
Table 2-186 Results - Actions Menu/Icons and Description
| Actions Menu/Icons | Description |
|---|---|
|
Create and Create icon |
Select Actions > Create or use the Create icon to create a new partner. The Create Partner window appears. For more details about how to create a partner, see the Creating a Partner section. |
|
Edit and Edit icon |
Select Actions > Edit or use the Edit icon to edit the selected partner. For more information about how to edit a partner, see the Editing a Partner section. |
|
View and View icon |
To view a partner:
|
|
Export to Excel and Export to Excel icon |
You can export the records in the table to a Microsoft Excel spreadsheet by selecting Actions > Export to Excel or by using the Export to Excel icon. |
You can customize the view of the table by using the options in the View Menu.
Table 2-187 Results - View Menu/Icons and Description
| View Menu/Icons | Description |
|---|---|
|
Columns |
You can manage which of the columns will be shown in the table by clicking the Show All and Manage Columns options. |
|
Detach and Detach icon |
You can view the tables in the application in a separate window by clicking Detach or by using the Detach icon. |
|
Sort |
You can sort columns by the following options:
|
|
Reorder Columns |
You can reorder columns by clicking the Reorder Columns option. |
|
Query by Example and Query by Example icon |
You can filter the items by one or multiple column values by clicking Query by Example or by using the Query by Example icon. |
Expense Profiles can be defined for suppliers, partners, and/or countries of sourcing. Supplier and country profiles default to items. Partner expense profiles default to PO/items when an item is added to an order.
You can divide supplier and partner expense profiles into Country or Zone level.
Country level profiles are for expenses incurred when moving goods from a country of sourcing to the discharge port in the country of import.
Zone level profiles are for expenses incurred when moving goods from a discharge port in the country of import to a final destination cost zone.
For a given supplier you may utilize one basic route from the supplier's country to the discharge port, but may have many different routes when moving the goods from the discharge port to the destination.
Additionally, you can change the rate on a cost component in expense profiles and automatically update item expenses and/or PO/item expenses on a designated date.
The Expense Profiles window contains the following sections.
The header section varies depending on, if you create or edit expense profiles for a supplier, partner or a country of sourcing.
Supplier Expense Profiles
The header displays the supplier site ID and name.
In the Profile Type field, select the type.
Select Zone to make changes to the expense profile at the supplier/cost zone level.
Select Country to make changes to the expense profile at the supplier/country of sourcing level.
Partner Expense Profiles
The header displays the partner type, ID and name.
In the Profile Type field, select, the type.
Select Zone to make changes to the expense profile at the partner/cost zone level.
Select Country to make changes to the expense profile at the partner/country of sourcing level.
Country Expense Profiles
The header displays the profile type country by default.
In the Country field, select the country you want to create the expense profiles for.
In the Shipping Routes section you can add, delete and view shipping routes. Additionally, you can define a shipping route as the default expense profile in this section.
Use the Actions Menu and icons to apply actions to the table. You can perform the actions listed below.
Table 2-189 Shipping Routes - Actions Menu/Icons and Description
| Actions Menu/Icons | Description |
|---|---|
|
Add and Add icon |
You can add new shipping routes by selecting Actions > Add or by using the Add icon. For more information about how to add shipping routes, see the following sections. |
|
Delete and Delete icon |
You can delete shipping routes:
|
|
Export to Excel and Export to Excel icon |
You can export the records in the table to a Microsoft Excel spreadsheet by selecting Actions > Export to Excel or by using the Export to Excel icon. |
You can customize the view of the table by using the options in the View Menu.
Table 2-190 Shipping Routes/Expenses/Rate Updates - View Menu/Icons and Description
| View Menu/Icons | Description |
|---|---|
|
Columns |
You can manage which of the columns will be shown in the table by clicking the Show All and Manage Columns options. |
|
Detach and Detach icon |
You can view the tables in the application in a separate window by clicking Detach or by using the Detach icon. |
|
Sort |
You can sort columns by the following options:
|
|
Reorder Columns |
You can reorder columns by clicking the Reorder Columns option. |
|
Query by Example and Query by Example icon |
You can filter the items by one or multiple column values by clicking the Query by Example option or by using the Query by Example icon. |
In this section you can add, edit, delete and view expenses for the supplier, partner or a country.
Use the Actions Menu and icons to apply actions to the table. You can perform the actions listed below.
Table 2-191 Expenses - Actions Menu/Icons and Description
| Actions Menu/Icons | Description |
|---|---|
|
Add and Add icon |
You can add new expenses by selecting Actions > Add or by using the Add icon. For more information about how to add expenses, see the Adding Expenses section. |
|
Edit and Edit icon |
Select Actions > Edit or use the Edit icon to edit the selected expense component. For more information about how to edit an expense component, see the Editing Expenses section. |
|
Delete and Delete icon |
You can delete expenses:
|
|
Export to Excel and Export to Excel icon |
You can export the records in the table to a Microsoft Excel spreadsheet by selecting Actions > Export to Excel or by using the Export to Excel icon. |
You can customize the view of the table by using the options in the View Menu.
For more information about the View Menu, see Table 2-190, "Shipping Routes/Expenses/Rate Updates - View Menu/Icons and Description".
In the Rate Updates section you can apply rate updates to items and orders.
Use the Actions Menu and icons to apply actions to the table. You can perform the actions listed below.
Table 2-192 Rate Updates - Actions Menu/Icons and Description
| Actions Menu/Icons | Description |
|---|---|
|
Add and Add icon |
You can add new rate updates by selecting Actions > Add or by using the Add icon. For more information about how to add rate updates, see the Adding Rate Updates section. |
|
Edit and Edit icon |
Select Actions > Edit or use the Edit icon to edit the selected rate update. For more information about how to edit a rate update, see the Editing Rate Updates section. |
|
Delete and Delete icon |
You can delete rate updates:
|
|
Export to Excel and Export to Excel icon |
You can export the records in the table to a Microsoft Excel spreadsheet by selecting Actions > Export to Excel or by using the Export to Excel icon. |
You can customize the view of the table by using the options in the View Menu.
For more information about the View Menu, see Table 2-190, "Shipping Routes/Expenses/Rate Updates - View Menu/Icons and Description".
The toolbar contains the following icons and buttons.
Table 2-193 Expense Profile Toolbar - Icons/Buttons and Description
| Icons/Buttons | Description |
|---|---|
|
Help icon |
You can access the online help for a particular page by clicking the Help icon. |
|
Refresh icon |
You can refresh the window by clicking the Refresh icon. All entries are reset and not saved. |
|
Save |
Click Save to save the entered records. |
|
Save and Close |
Click Save and Close to save the entered records and close the window. |
|
Save and Create Another |
Click Save and Create Another to save the entered records and add additional entries. This option is only available, if you create a new expense profile. |
|
Save and Edit Another |
Click Save and Edit Another to save the entered records and edit additional entries. This option is only available in edit mode. |
|
Cancel |
Click Cancel to reject all entries and close the window. |
|
Done |
If you open the window in view mode, the Done button is displayed. Click Done to close the window. |
To add a new shipping route to an expense profile at the country level, follow the steps below.
In the Profile Type field, select Country from the list.
In the Shipping Routes section, select Actions > Add, or use the Add icon. The Add Shipping Route window appears.
In the Origin Country field, enter, select or search for the appropriate country. This field is a required field.
In the Lading Port field, enter, select or search for the lading port.
In the Discharge Port field, enter, select or search for the discharge port.
Select the Base Profile checkbox to indicate that you want to use this shipping route as the default.
Then choose one of the following options.
Click OK to add the shipping route and close the window.
Click OK and Add Another to add additional shipping routes.
Click Cancel to reject all entries and close the window.
To add new shipping routes to an expense profile at the zone level, follow the steps below.
In the Profile Type field, select Zone from the list.
In the Shipping Routes section, select Actions > Add, or use the Add icon. The Add Shipping Route window appears.
In the Discharge Port field, enter, select or search for the discharge port. This field is a required field.
In the Zone Group field, enter, select or search for the zone group.
In the Cost Zone field, enter, select or search for the cost zone.
Select the Base Profile checkbox to indicate that you want to use this shipping route as the default.
Then choose one of the following options.
Click OK to add the shipping route and close the window.
Click OK and Add Another to add additional shipping routes.
Click Cancel to reject all entries and close the window.
To add a new shipping route to a country expense profile, follow the steps below.
In the Shipping Routes section, select Actions > Add, or use the Add icon. The Add Shipping Route window appears.
In the Lading Port field, enter, select or search for the lading port.
In the Discharge Port field, enter, select or search for the discharge port. This field is a required field.
Select the Base Profile checkbox to indicate that you want to use this shipping route as the default.
Then choose one of the following options.
Click OK to add the shipping route and close the window.
Click OK and Add Another to add additional shipping routes.
Click Cancel to reject all entries and close the window.
To add expenses to the profile follow the steps below.
In the Expense section, select Actions > Add, or use the Add icon. The Add Expense window appears.
In the Component field, enter, select or search for the expense component. This field is a required field.
In the Component Rate field, enter the component rate. This field is a required field.
In the Computation Value Base, enter, select or search for computation value base.
The Calculation Basis field, displays the calculation basis for the expense.
In the Per Count field, enter, select or search for the per count number.
In the Per Count UOM field, enter, select or search for the per count unit of measure. This field is a required field.
In the Component Currency field, enter, select or search for the currency ID. This field is a required field.
In the Component Nomination section, select the status of the expense in relation to the other components.
Select N/A if the expense is not included in the calculation.
Select + (plus sign) to add the expense.
Select - (minus sign) to subtract the expense.
Then choose one of the following options.
Click OK to add the expense and close the window.
Click OK and Add Another to add additional expenses.
Click Cancel to reject all entries and close the window.
To edit expenses to the profile follow the steps below.
In the Expense section, select a record in the table.
Then select Actions > Edit, or use the Edit icon. The Edit Expense window appears. The values of the selected expense are displayed.
Edit the fields, as necessary.
Then choose one of the following options.
Click OK to save your changes and close the window.
Click Cancel to reject all entries and close the window.
To add rate updates for items and/or orders, follow the steps below.
In the Rate Updates section, select Actions > Add, or use the Add icon. The Add Rates window appears.
In the Effective Date field, enter the effective date or use the Calendar icon to select a date. This field is a required field.
In the Comp Rate field, enter the component rate. This field is a required field.
In the Component Currency field, enter, select or search for the component currency code.
Select the Item checkbox to apply the rate updates to items.
Select the Order checkbox to apply the rate updates to orders.
Then choose one of the following options.
Click OK to add the rate updates and close the window.
Click OK and Add Another to add additional rate updates.
Click Cancel to reject all entries and close the window.
To edit rate updates for items and/or orders, follow the steps below.
In the Rate Updates section, select a record in the table.
Then select Actions > Edit, or use the Edit icon. The Edit Rates window appears. The values of the selected rate update are displayed.
Then choose one of the following options.
Click OK to save your changes and close the window.
Click Cancel to reject all entries and close the window.
The Data Loading Status window allows you to view the status of the upload and download processes happening in RMS, so that you can rectify the issues associated with the upload/download process.
The window allows you to drill down to the errors or warnings associated with a selected upload/download request.
You can access the Data Loading Status window from the Task menu, select Foundation Data > Data Loading > Review Status. The Data Loading Status window appears.
The Data Loading Status window contains the following sections.
The table displays the process, process description, file name, template category and type, destination, action date and time, status and the user, who initiated the process.
Use the Actions Menu and icons to apply actions to the table. You can perform the actions listed below.
Table 2-194 Data Loading Status Table - Actions Menu/Icons and Description
| Actions Menu/Icons | Description |
|---|---|
|
Delete and Delete icon |
You can delete a process by using the following steps:
|
|
Export to Excel and Export to Excel icon |
You can export the records in the table to a Microsoft Excel spreadsheet by selecting Actions > Export to Excel or by using the Export to Excel icon |
|
View Issues and View Issues button |
To view the warnings and errors associated with a selected upload/download request:
|
|
Upload to RMS |
With this option you can upload the selected process from Staging to RMS. This option is only enabled for records which have Staging Tables as a destination and do not hold the status ”Processed with Errors”. Additionally, this option is only enabled for Item induction, Cost Change induction and Order induction records. |
|
Download Staged |
This option allows you to download the staged records of a process to a spreadsheet.
This option is only enabled for Item induction, Cost Change induction and Order induction records. |
You can customize the view of the table by using the options in the View Menu.
Table 2-195 Table Data Loading Status - View Menu/Icons and Description
| View Menu/Icons | Description |
|---|---|
|
Columns |
You can manage which of the columns will be shown in the table by clicking the Show All and Manage Columns options. |
|
Detach and Detach icon |
You can view the table in the application in a separate window by clicking Detach or by using the Detach icon |
|
Sort |
You can sort columns by the following options:
|
|
Reorder Columns |
You can reorder columns by clicking the Reorder Columns option. |
|
Query by Example and Query by Example icon |
You can filter the items by one or multiple column values by clicking the Query by Example option or by using the Query by Example icon |
The toolbar contains the following icons and buttons.
Table 2-196 Data Loading Status Toolbar - Icons/Buttons and Description
| Icons/Buttons | Description |
|---|---|
|
Help icon |
You can access the online help for a particular page by clicking the Help icon |
|
Refresh icon |
You can refresh the window by clicking the Refresh icon. All entries are reset and not saved. |
|
Save |
Click Save to save the entered records. |
|
Save and Close |
Click Save and Close to save the entered records and close the window. |
|
Cancel |
Click Cancel to reject all entries and close the window. |
|
Done |
If you open the window in view mode, the Done button is displayed. Click Done to close the window. |