| Oracle® Retail Fiscal Management User Guide Release 14.1.2.1 E70530-01 |
|

 Previous |
 Next |
The Oracle Retail Merchandising System records each transaction (such as PO, Transfers, and RTV) in a transaction table. Each transaction may post one or more transaction codes into the transaction table. ORFM offers option to map these transaction codes with the accounts payable or the general ledger accounts.
The Account Payables (AP) interface has been designed to accept data that will be used to create Payment Vouchers and initiate a payment to a vendor. NFs for Purchase Orders, RTVs, and complementary NFs related to purchases as well as any for non-merchandise costs must be posted to the AP Interface. However, any NFs that are not intended to pay an outside party must be posted to General Ledger (GL) interface. For example, these would include NFs for Transfers and Inventory Adjustments.
In ORFM, the postings to AP and GL modules of Enterprise Business Suite (EBS) could depend on attributes like utilization code, Tax Code, Cost Component, and Reason Code on the NF based on the transaction. For example, for purchases, different AP accounts may be impacted based on the utilization code on the NF. Also, the recoverable and non-recoverable taxes could be maintained in separate accounts depending on the Tax Code.
In addition, new documents like Return NF and the Correction Letter that are generated during the discrepancy resolution process, will also have to be interfaced with AP.
The ORFM application uses predefined parameters to pass the relevant values to the accounts of AP.
To enable financial integration, store the data in a specified format in ORFM.
This chapter covers the following section:
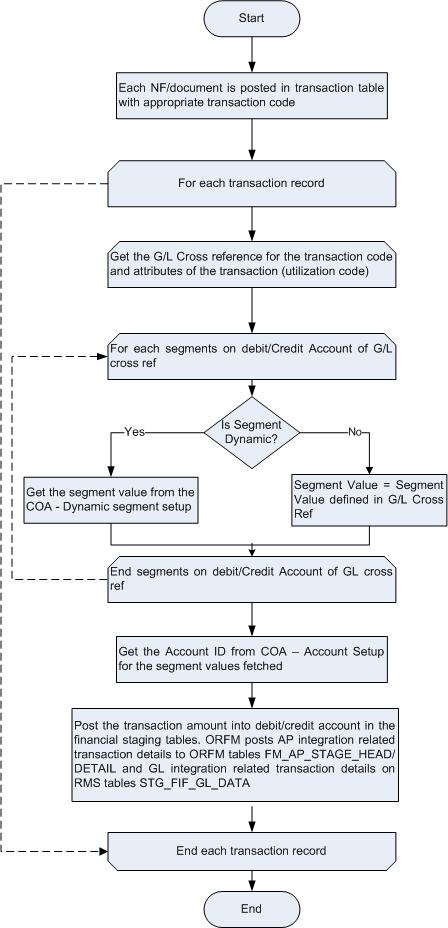
The business flow for how ORFM does the transaction data posting is given below:
The overall process is divided into the following two sub-processes:
Define Transaction Codes—The ORFM application provides a table with the list of predefined transaction codes used for transaction data posting. For each transaction, the transaction code, and the information that is posted vary. For different transaction type, the postings are as given below:
For PO Receiving the merchandise cost exclusive of taxes, recoverable taxes, non-recoverable taxes, and the non-merchandise cost exclusive of taxes are posted as a part of transaction data.
For Transfers, only the recoverable, and non-recoverable taxes are posted.
For rural producers, only the corrected NF is posted to the transaction table. The original NF is not posted.
For triangulation NF, the original NF along with the ICMS/ICMS-ST details based on the complementary NF are posted.
|
Note: For the different transaction codes, refer to the RMS Implementation Guide. |
Transaction Data Posting—The ORFM application provides a batch program to post all the approved NFs in the transaction table.
The process is divided into the following two broad areas:
Account Setup
Financial Posting
Figure 9-2 displays the process flow for Account Setup.
Figure 9-3 displays the process flow for Financial Posting.
The Dynamic Segment Setup form is used to dynamically determine the account code by using data from the transaction level and using the same to derive the segment values for individual entity IDs.
To edit or view the Dynamic Segment Configuration, do the following:
Choose the RMS Start Menu.
Select Fiscal Management > Finance.
In the Contents of Finance, select Dynamic Segment Setup.
In the Contents of Dynamic Segment Setup, click Edit/View.
The Dynamic Segment Configuration window appears.
Table 9-1 Dynamic Segment Configuration Fields and Description
| Field | Description |
|---|---|
|
Chart of Account |
Enter the Chart of Account ID or select from the List of Chart Accounts. |
|
Financial System |
Select the Financial System list to setup the following dynamic mappings:
|
|
Search |
ORFM will search for the existing dynamic mapping records for the specified Chart of Accounts ID. |
|
Entity Type |
You can select the Entity Type for which the dynamic segment values are required from the list of Entity Type. Following are the values displayed in the list of Entity Type:
|
|
Entity ID |
The Entity ID is populated based on the Entity Type selected. You can also select the Entity ID for which the segment value needs to be defined from the List of Values. |
|
Segment No |
The Segment No is populated based on the segment number in the COA that holds the dynamic values based on the entity types. You can also select the Segment Number from List of Segment Numbers. |
|
Segment Value |
The Segment Value is populated from the account setup based on the segment number selected. |
Click OK to exit.
The Contents of Dynamic Segment Configuration Setup appears.
Click Refresh to add new COA setup.
Click Add to add an Entity Type from the Entity Type list.
To delete the record, select the record from the multi-record block, and click Delete.
The following message appears. 
Click Yes to delete the record or, click NO to retain the record.
Click Cancel to undo the changes you specified in the multi-record block.
ORFM maps transactions to appropriate accounts in GL and AP system.
To create the General Ledger Cross Reference, do the following:
Choose the RMS Start Menu.
Select Fiscal Management > Finance.
In the Contents of Finance, select GL Cross Reference.
The General Ledger Search window appears.
In the Action field, select New.
The Set Of Books (SOB) field is enabled.
|
Note: The Financial System field is editable only to search an existing cross reference setup. The Financial System field is not applicable for New option. |
Enter the Set Of Books ID, or select from the List of Set of Books.
Click OK.
The GL Cross Reference window appears.
Table 9-2 GL Cross Reference Fields and Description
| Field | Description |
|---|---|
|
Sequence No. |
It is an identifier for selecting a particular cross reference setup. |
|
Financial System |
It is used to select the Financial System for which cross reference is defined. Valid values for Financial System are Accounts Payable or General Ledger. |
|
Set Of Books |
Displays the SOB ID. |
|
Transaction Code |
It is an unique identifier for the TYPE of transaction. The Transaction Code description is displayed when you enter a Transaction Code. The LOV can also be used to select a Transaction Code. |
|
Utilization |
Utilization is displayed based on the Transaction Code selected. The description of Utilization is displayed by default. You can also select Utilization from the List of Utilizations. |
|
Tax Code |
The Tax Code is displayed based on the Transaction Code selected. The description of Tax Code is displayed by default. You can also select Tax Code from the List of Tax Codes. |
|
Reason Code |
The Reason Code is displayed based on the Transaction Code selected. The description of Reason Code is displayed by default. You can also select Reason Code from the List of Reason Codes. |
|
Cost Component |
Select the Cost Component from the following list:
|
|
Credit Account Section |
|
|
Segment |
The following fields are displayed in the Segment column:
|
|
Dynamic Indicator |
Select the check box. This signifies whether the segment is dynamic or generic. |
|
Dynamic Attribute |
This field is enabled if Dynamic Indicator is selected as Y. |
|
Value |
This field is enabled if Dynamic Indicator is selected as N. |
|
Debit Account Section |
|
|
Segment |
The following fields are displayed in the Segment column:
|
|
Dynamic Indicator |
Select the check box. This signifies whether the segment is dynamic or generic. |
|
Dynamic Attribute |
This field is enabled if Dynamic Indicator is selected as Y. |
|
Value |
This field is enabled if Dynamic Indicator is selected as N. |
Click OK.
The General Ledger Search window appears.
Click Ok+Repeat.
Clears all the fields to configure a new segment setup with the dynamic attributes for a new selected SOB.
To delete the record, select the record from the action block, and click Delete. The Delete field is available to the user in Edit mode.
The following message is displayed.
Click Cancel to undo the changes you specified in the multi-record block.
|
Note: Only the fields that are setup in FM_TRAN_CODES table in the REF_NO fields are enabled as shown in Figure 9-5. That is, if tran_code 100 has REF_NO_1 field set as T - Only Tax code field is enabled. Other possible configurable values include, CC for Cost components, R for Reason Codes, U for Utilization Code. |
Chart of Accounts (COAs) is the grouping of data elements that define how the company's financial statements are structured and managed. Some of the elements in the COAs include Natural Account (Assets, Liabilities, and so on), Cost Center, Company, Affiliate, Ledger, and so on. The structure of the General Ledger (GL) is based on the financial COAs.
For more information on set up of Chart of Accounts, see Oracle Retail Fiscal Management/RMS Brazil Localization Implementation Guide.