| Oracle® Retail Store Inventory Management User Guide Release 14.1 E53429-01 |
|


 Previous |
 Next |
| Oracle® Retail Store Inventory Management User Guide Release 14.1 E53429-01 |
|
Previous |
Next |
Using the Price Change functions, you can request price changes for items at your store. Price changes are set in the pricing system. The pricing system might be Oracle Retail Price Management (RPM) or another application.
You can request price changes only for items for which you can control prices. This is controlled by an indicator at the store (location) level. Your price change requests are submitted to the pricing system, where they may be approved or rejected. After a price change is approved in the pricing system, a price change event is sent from the pricing system to SIM.
A price change request that is approved in the pricing system creates a pricing event that is sent back to SIM. For an approved price change, you can print labels and tickets for the re-priced items.
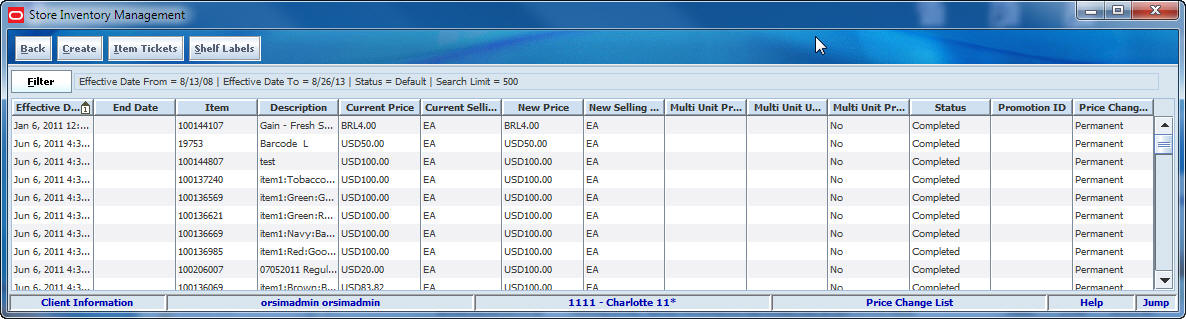
Price Change List Window
Navigate: Main Menu > Inventory Mgmt > Price Change. The Price Change Filter window opens.
Enter search criteria to limit the price change requests that you want displayed, and click Apply. (See ”Filter the Price Change List” for more information.)
The Price Change List window opens.
From the Price Change List window, you can do the following:
From the Price Change List window, click Back to return to the Inventory Management menu.
The Price Change Filter window opens each time you click Price Change on the Inventory Management menu. At any time while the Price Change List window is open, you can also change how the list is filtered.
Current filtering is displayed next to the Filter button on the Price Change List window. If no filtering is displayed, all items are currently selected and listed.

To filter the price changes listed in the Price Change List window, follow these steps:
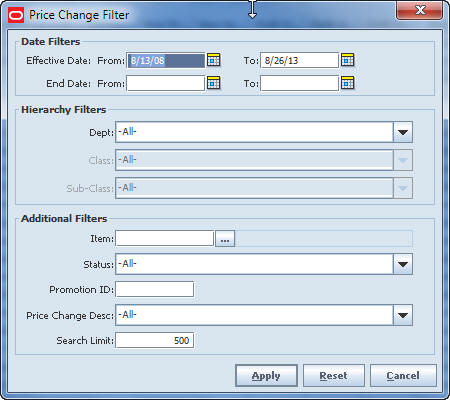
From the Price Change List window, click Filter. The Price Change Filter window opens.
If you want to reset all filtering criteria to default values, click Reset.
Enter or select filtering criteria as needed to select just the price changes you want to list. All criteria are optional. If you leave a field blank or select All, all values will be included in your filtering selection.
Date Filters – Enter or select dates to select only those price changes that have an Effective Date or End Date within a range that you specify.
Hierarchy Filters – Select Department, Class, and Sub-Class to select only those tickets for a hierarchy that you specify.
Item – Enter or select an item ID to select only those tickets for a particular item.
Status – Select Active, Completed, Pending, Ticket List, or All. The default value is Active.
Promotion ID – Enter a promotion ID to select only the tickets for which a promotion ID has been specified.
Price Change Desc – Select Clearance, Permanent, Promotional, or All.
In the Search Limit field, enter the maximum number of records you want to find and list. The default value is 999.
Click Apply. The price changes you have specified are listed in the Price Change List window.
You can request price changes for those items for which you are allowed to make pricing changes at the store (location) level. For these items, you can request changes to retail, promotion, or clearance pricing.
The request is sent to the pricing system, where it may be approved or rejected. Your price change requests are checked for possible conflicts. You cannot request price changes for items involved in complex promotions (such as buy one, get one free). You cannot request multiple price changes on the same day. Your request may be rejected if it conflicts with any other pricing events.
Navigate: Main Menu > Inventory Mgmt > Price Change. The Price Change Filter window opens.
Enter search criteria to limit the price change requests that you want displayed, and click Apply. (See ”Filter the Price Change List” for more information.)
The Price Change List window opens.
To create a price change request, follow these steps:
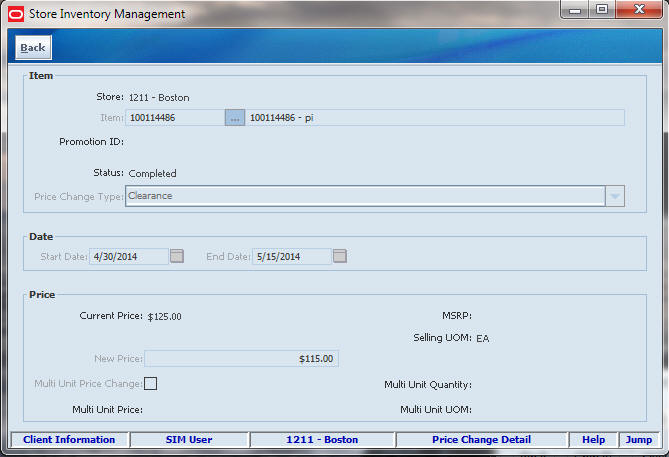
Click Create. The Price Change Detail window opens.
Enter or select values for these fields:
Item – Enter the item number or click the Ellipsis button to look up the item.
Price Change Type – Select Clearance, Promotional, or Permanent.
Enter or select the Start Date. (A default date is filled in.)
If you are entering a clearance or promotional price, enter or select an End Date.
Enter the new price for the item in the New Price field.
|
Note: The Price On Effective Date and UOM On Effective Date take into account already-scheduled price and UOM changes. Check these dates to verify that you are not duplicating or altering a price change. |
Click Save.
You receive the following message: ”Are you sure you want to request this price change?”
Click Yes. You return to the Price Change List window, where the price change is added with a status of Pending.
To create item tickets, follow these steps:
Select the items for which you want to create item tickets.
Click Item Tickets. A message is displayed: ”Are you sure you want to create item tickets for the selected items?”
Click Yes.
To create shelf labels, follow these steps:
Select the items for which you want to create shelf labels.
Click Shelf Labels. A message is displayed: ”Are you sure you want to create shelf labels for the selected items?”
Click Yes.
You can edit price changes to change dates and prices.
Navigate: Main Menu > Inventory Mgmt > Price Change. The Price Change Filter window opens.
Enter search criteria to limit the price change requests that you want displayed, and click Apply. (See ”Filter the Price Change List” for more information.)
The Price Change List window opens.
To edit a price change, follow these steps:
Double-click on the price change you want to edit. The Price Change Detail window opens.
Make changes as necessary to Start Date, End Date, and New Price fields.
Click Save to return to the Price Change List window.