| Oracle® Retail Store Inventory Management User Guide Release 14.1 E53429-01 |
|


 Previous |
 Next |
| Oracle® Retail Store Inventory Management User Guide Release 14.1 E53429-01 |
|
Previous |
Next |
The following topics describe how to navigate the SIM user interface and use some of its standard features. These topics are included:
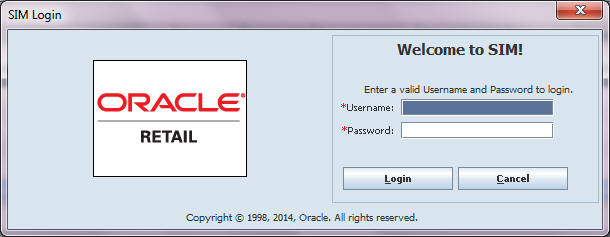
The way that you start SIM depends on how SIM is set up at your location. Contact your system administrator for instructions. After you have started SIM, the SIM Login window opens.
Enter your user ID.
Enter your password.
Click Login. The main menu opens.
|
Note: If your login ID and password are authorized for more than one store, see ”Select a SIM Store." |
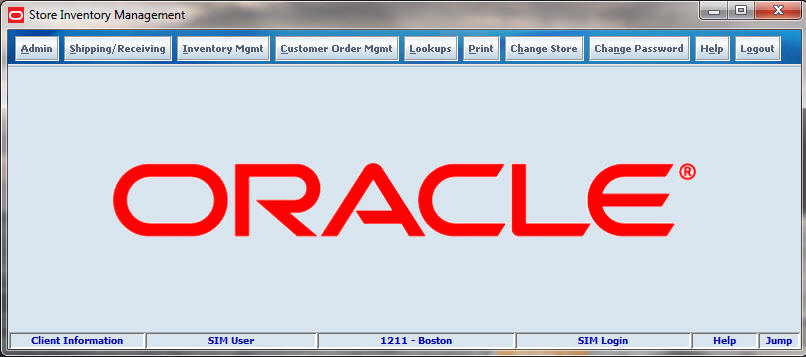
If your SIM role allows you to work with more than one SIM store, the main menu includes the Change Store button. The current SIM store is displayed in the status display area.
Use the Change Store window at any time during your SIM session to select the store you want.
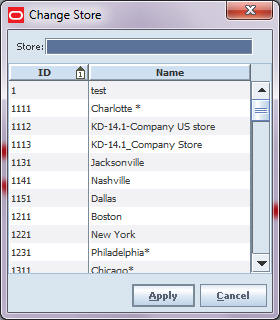
On the Main Menu, click Change Store. The Change Store popup window opens.
Enter the ID or store in the Store entry field, or select the ID/Store from the scroll list.
Click Apply to change the store to the selected option. The highlighted store will become the new store in which the user is logged in to.
| Field | Description |
|---|---|
| Store | Store ID or Store name entry field used for searching. |
| ID | Store identification. |
| Name | Store name associated with the store ID. |
|
Note: Depending on how SIM security is configured, the Change Password function may not be available. |
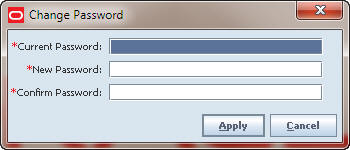
You can change your SIM password at any time. If you are a new SIM user, you may be required to change your password the first time that you log in to SIM. You should also change your password before it expires. If your password has expired, you will need the help of a system administrator to help you change your password and obtain access to SIM.
|
Note: SIM passwords are case-sensitive. Depending on how SIM is configured, there may be rules for minimum and maximum length. A valid password may also need to contain specific characters, such as a capital letter or a special character (for example, # or &). |
To change your SIM password, follow these steps:
On the Main Menu, click Change Password. The Change Password window opens.
In the Current Password field, enter the password that you are currently using.
In the New Password field, enter the new password that you want to use.
In the Confirm Password field, enter your new password again.
Click OK.
This section describes some of the standard features and controls of the SIM interface. You use a standard set of controls, such as buttons and lists, to select, enter, and edit data in any functional area of the SIM interface.
The status bar at the bottom of every window provides status information, access to online help, and access to detailed user information.
Double-click the Client Information panel to display the Client Information window. Through the Client Information window, you can select a display theme to customize the appearance of the SIM interface. The Client Information tabs also display many details about the software version, user PC, and network connections. For more information, see these sections in this chapter:
The second panel shows the identity of the user who is currently logged in.
The third panel shows the store number.
The fourth panel shows the name of the current window.
Double-click the HELP panel to display SIM online help in your Web browser. See ”Access Online Help."
Double-click the JUMP panel to jump to a different functional area of SIM. See ”Jump to Another Functional Area Using Quick Jump."
Some fields can accept values only from a predefined list of options. For example, a Product Type field might allow only a limited number of valid product types. A field that requires a value contained in a list has a down arrow button at the right side of the field.

To select an item from a drop-down list:
Click the down arrow button. A drop-down list of options is displayed.
Select a value from the drop-down list. The selected option is entered in the field.
If you type a value into a field with a drop-down list, SIM automatically positions to the first item in the drop-down list that begins with the characters you enter. For example, if you type 'stock' in a field with a drop-down list, SIM automatically positions to the first list item that begins with 'stock'.
Selections in drop-down lists are sorted in alphanumeric order, character-by-character. The sort sequence follows this pattern:
0
1
...
10
11
...
2
...
A
...
For some fields, you can select more than one value from a list of values.
Select a Sequence of Values
To select a sequence of adjoining items from a list, follow these steps:
Select the first item in the sequence to highlight it.
Hold down the Shift key, scroll to the last item you want to include, and select it. All sequential items are selected.
Select Multiple Nonsequential Values
You can also select items randomly from a list. To do this, follow these steps:
Select the first item in the sequence to highlight it.
Hold down the Ctrl key and select each item in the drop-down list that you want to include.
When you have selected all the items you want, click OK.
The following are buttons that appear in SIM windows and have special meanings and uses. These buttons are used in many different windows.
Calendar
![]()
Click the Calendar button to open a Calendar window in which you can select a date value. For more information, see ”Use the Calendar to Select a Date."
Ellipsis

Click the Ellipsis button to open another window that displays additional information or provides additional functions. For example, an Ellipsis button might give you the option to look up an item or supplier while you are performing another task.
Text Editing

Click the Text Editing button to open a text editing window. This button is available for fields that allow longer text values, such as description fields. For more information, see ”Edit Text for Long Text Fields."
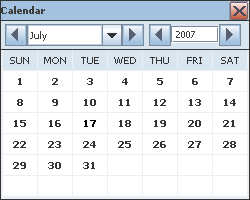
The calendar allows you to view a monthly calendar and select a date. For a date field, the Calendar button is displayed to the right of the field.
When you select a date from the calendar, SIM enters the date for you in the correct format.
To select a date, follow these steps:
Click the Calendar button. The Calendar window displays the current month and year.
Select the month and year:
To select a previous date, click the left arrow next to the month or year.
To select a future date, click the right arrow next to the month or year.
Select the date you want on the calendar. The selected date is entered in the date field.
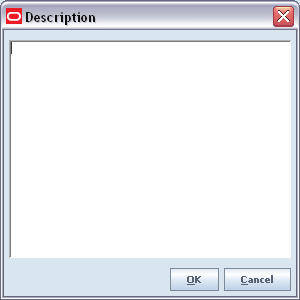
For some fields that allow longer text values, such as a comment or description, it is sometimes difficult to see all the text you are entering. For some fields, a Text Editing button with a balloon graphic is displayed next to the field, as in the following example.

Click the Text Editing (balloon) button to open a text editing window. The title of the window is the title of the field.
Enter the text for the field.
Click OK to close the text editing window and return. The text you entered is displayed in the field.
|
Note: If you enter a carriage return in the text editing field and click OK, the description or comments field becomes disabled. The text editing window retains the carriage return (for example, in an address). If you remove the carriage return and click OK, the description or comments field becomes editable again. |
Instead of clicking with the mouse, you can use SIM navigation and shortcut keystrokes on the keyboard. These keystrokes are similar to those you find in other PC applications. They are options that you can use to save time and motion as you work in the SIM user interface. In particular, the field navigation keys make it easier to enter and update data.
To navigate through fields in SIM windows, you can use the following shortcut keys.
| Function | Key |
|---|---|
| Next field | Tab |
| Previous field | Shift+Tab |
Button shortcut keys are keys or key combinations that you can press, instead of clicking the mouse on window buttons. There are two kinds of shortcut keys in SIM:
Alt+ key combinations
The function keys F1, F2, and so on
|
Note: Alt+ key combinations depend on the language you are using with SIM. These key combinations do not work if your keyboard has no Roman characters. The standard function keys F1, F2, and so on are supported for all languages as button shortcuts. |
Alt+ Key Combinations
An Alt+ shortcut key option is indicated by an underlined letter on a button, as in the following figure.

In the figure, Alt+D performs the same action as clicking Done, Alt+A the same action as clicking Add Item, and so on.
To use a shortcut key instead of a mouse click, press Alt along with the key for the underlined letter.
Function Keys
You can use the function keys F1, F2, and so on, as shortcut keys for screen buttons. For each screen button, SIM assigns the function keys in order to the buttons from left to right. F1 is a shortcut key for the first button, F2 for the second button, and so on, as illustrated in the following figure.

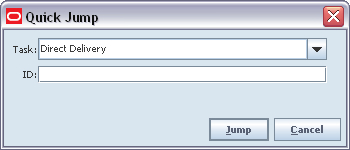
The SIM user interface provides a jump feature that allows you to switch quickly to another functional area, without navigating through a series of menus.
Using the jump feature, you can switch quickly among these major functional areas:
Shipping and Receiving
Inventory Management
Administration
Lookups
The SIM status bar includes a JUMP panel in the lower right corner of the window.

To jump to another functional area, follow these steps:
Double-click the JUMP panel (or press the F12 key).
The Quick Jump window opens.
From the Task drop-down list, select the functional area to which you want to jump.
(Optional) If you know the specific identifying number, enter that information in the ID field. The following are ID values you can enter.
| Task | Optional ID |
|---|---|
| Customer Order Pick | Pick ID |
| Transaction History | Not applicable |
| Customer Order | Customer Order ID |
| Direct Delivery | Delivery ID or Purchase Order Number |
| Inventory Adjustment | Adjustment Number |
| Item Lookup | Item ID |
| Product Group | Product Group ID |
| Returns | Return ID |
| Stock Count | Stock Count ID |
| Transfers | Transfer ID |
| Warehouse Delivery | Container ID or ASN number |
Click Jump.
If you entered an ID value, you jump to the transaction or detail window for that ID.
If you did not enter an ID value, you jump to the list or lookup window for the selected functional area, where you can select the specific record you want.
For example, if you select Item Lookup and enter an item ID, you jump to the Item Detail window for that item. If you select Item without entering an ID, you jump to the Item Lookup window, where you can search for the item you want.
When you exit an item lookup, you return to the task you were doing before the jump.
For other jumps, when you exit the functional area to which you jumped, you return to the SIM main menu.
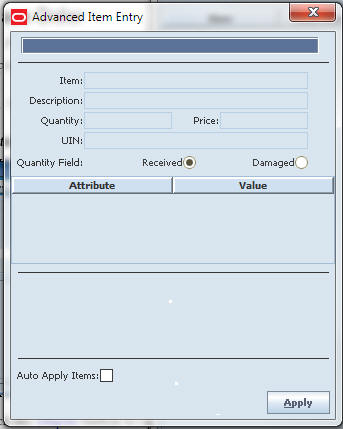
The Scanner will accept entry or scanning ms and barcodes the item entry field accepts, such as item number, UPC, Type 2. Once an item or barcode is entered, the system retrieves the item information and the item and description will display.
To add an item to various screens within SIM:
Click Scanner. The Advanced Item Entry window opens.
|
Note: The scanner may automatically open on the screen, if configured as such. |
Scan the item. The fields populate with the item information.
|
Note: The Advanced Item Entry window fields may vary, depending upon the function being accessed and the items being scanned. |
Select Auto Apply Items to bypass the next step on a continual basis.
Click Apply. The window closes and the item is populated.
The SIM online help contains all of the same information as the Oracle Retail Store Inventory Management User Guide. You can open online help from any window where the HELP panel is displayed in the SIM status display bar (lower right of the window).

To open SIM online help, double-click the HELP panel. The table of contents of the SIM online help opens in your default Web browser.
You can also open online help by clicking Help on the SIM main menu.
You can leave online help open while you work in the SIM user interface. To close online help, close the Web browser window or tab.
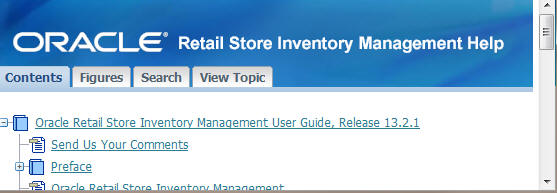
SIM online help is displayed in the same format as the help for many other Oracle software products. The Contents tab opens first.
The SIM online help has the following tabs:
Contents
Use the Contents tab to locate and open a topic in the table of contents.
Figures
In the Figures tab, you can select any listed figure to open the help topic that contains that figure.
View Topic
The View Topic tab is open when you are viewing a help topic.
If you want to print the topic that is currently displayed, click Printable Page.
If you want to locate the current topic in the table of contents, click Locate in Contents.
For each PC on which SIM is installed, the user can set some preferences for how the SIM interface works. This section describes how to customize your own installation of the SIM client interface through these available options:
Many SIM windows contain sorted tables. The tables are lists of items, containers, suppliers, transfers, or other information that applies to the task you are performing. The Warehouse Delivery List window is an example of a SIM table:
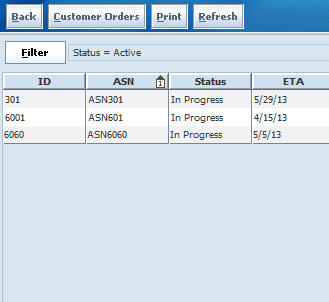
If you want a different view of a table, you can set options to control how that table is displayed to you. You can change the display of tables as follows:
You can change view options anytime you want. Your view options are saved on the PC where you set the options, so you do not need to set them again.
|
Note: The view options you set apply only to the table that is displayed when you set the options. You can have different view options for different tables. View options apply only to the user (login ID) who sets the options, and only on the PC where the options were set. |
To set view options, right-click anywhere in the table. A pop-up menu is displayed.
To make the text larger or smaller, select from the pop-up menu the text size you prefer:

Table rows are shaded so that they are easier to read. You can also choose whether the table has vertical lines, horizontal lines, both, or neither. To set which gridlines to display, select from the pop-up menu.
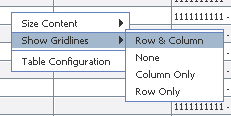
To view or change the current text size or gridlines settings, follow these steps:
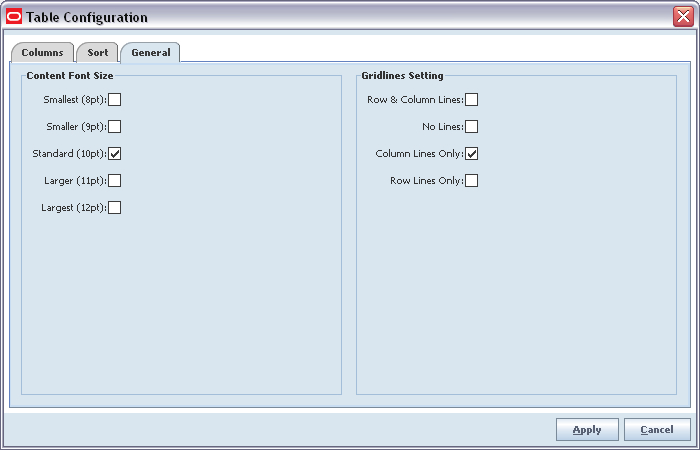
Select Table Configuration from the pop-up menu. The Table Configuration window opens.
Select the General tab.
If you want to change the Content Font Size or Gridlines Setting values, follow these steps:
Select the check boxes for the settings you prefer.
Click Apply.
SIM tables are designed to display the information that is helpful to most users. If you do not need to see certain table columns, you can turn off display of those columns. You can also control the order in which columns appear in the table.
To remove or restore the display of a table column, follow these steps:
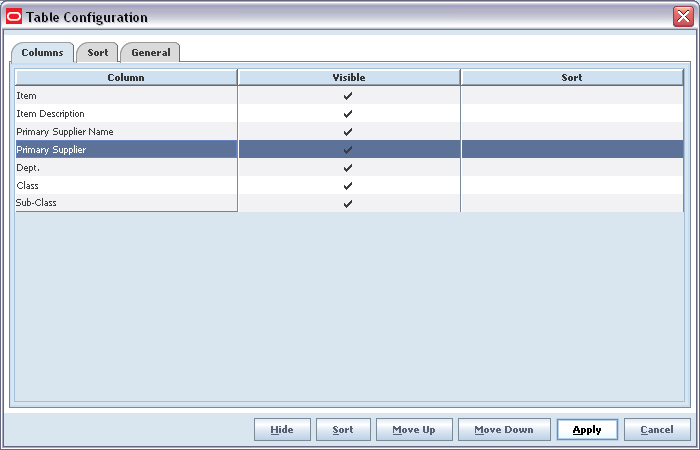
Select Table Configuration from the pop-up menu. The Table Configuration window opens.
Select the Columns tab. The table columns are listed in the order in which they are displayed, from left (top) to right (bottom).
To control whether a column is visible or hidden, select the row that contains the column name:
To hide the column so that it is not displayed, click Hide.
To make a hidden column visible again, click Visible.
To control the order in which columns are displayed in the table, select a row that contains a column name that you want to move:
To move the column left, click Move Up.
To move the column right, click Move Down.
Click Apply to apply your changes and close the Table Configuration window.
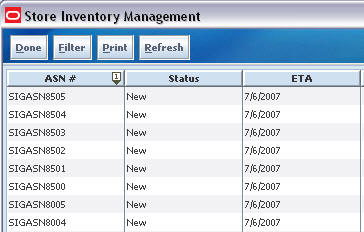
You can sort a table according to the values of a column by clicking the column heading for that column. For example, the following figure shows that the table is sorted in ascending order by ASN#.
Click the column heading again to sort in descending order, as shown in the following figure.
You can also sort a table using more than one column (sort key). For example, you may prefer that a table is sorted by Class, then by Sub-Class, then by Item.
To specify the columns used to sort the rows (records) in a table, follow these steps:
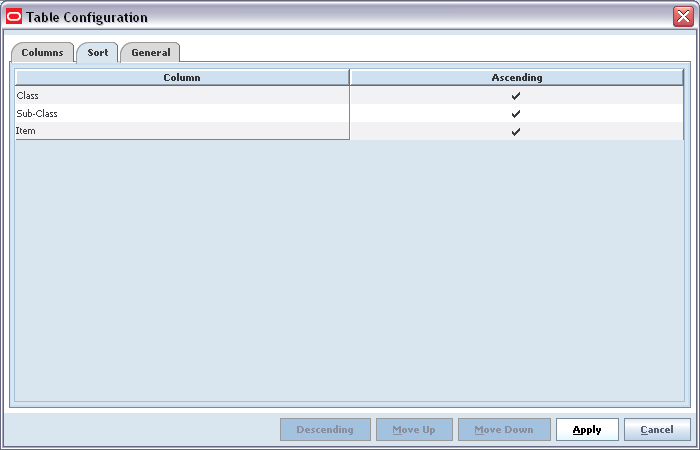
Select Table Configuration from the pop-up menu. The Table Configuration window opens.
Select the Columns tab.
To specify whether a column is to be used for sorting:
Select the row that contains the column name.
Click Sort to use the column as a sort key, or click No Sort if you no longer want to use that column as a sort key.
Repeat Steps a and b as needed until you have selected the columns you want to use for sorting.
Select the Sort tab. The columns you selected as sort keys are listed.
Arrange the list so that the primary (most important) sort key is listed first, and the least important sort key is listed last:
Select the column you want to use as the primary sort key and click Move Up until it is at the top of the list.
Use the Move Up and Move Down buttons to arrange the other sort keys in the order you want.
If you want to sort in descending order for any sort key, select that key and click Descending.
For example, if you want to sort by Class, then Sub-Class (within Class), then by Item (within Sub-Class), the sort keys must be listed in that order.
Click Apply to apply your sort order and return to the table.
A theme controls how the user interface appears. In addition to the standard SIM theme, you can have customized themes that use your company logo, different colors, different fonts, and different icons. Through the Client Information window, you can select a theme from those available for your use.
To select a theme, follow these steps:
In any SIM window, double-click the Client Information panel in the bottom left corner of the window.

The Client Information window opens.
Click the Look & Feel tab.
On the list of themes, click the theme you want to use.
Click Apply. Your selected theme is applied.
Click Done to close the Client Information window.
SIM reports and other output can be customized to use many different output devices and formats. When you request a report, or output such as labels or tags, the output depends on how SIM is configured at your site.
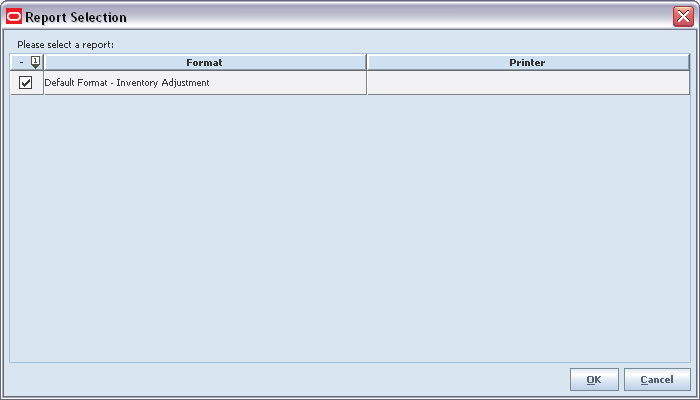
When you request a report or other output from the Main Menu > Print, the Print Menu window opens. From here you can select various items to print. Click Reports to open the Reports Selection window.
To view or print the output, follow these steps:
In the first column, select the check box for the report you want, if more than one is listed.
In the Printer column, select the name of the printer (or other output device) that you want to use.
Click OK. The output is processed, and you receive a confirmation message.
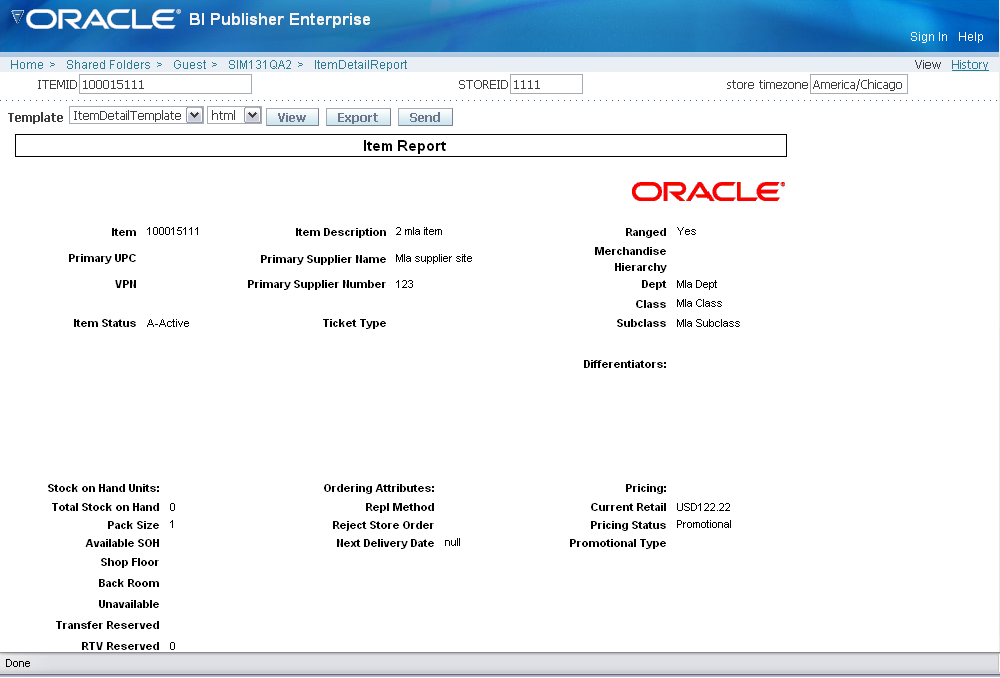
Some of your reports may be produced in Oracle BI Publisher. In this case, the report is displayed in your Web browser.
The following figure is an example of an Oracle BI Publisher report.
For information about using Oracle BI Publisher, see the Oracle Business Intelligence Publisher User's Guide.
The Oracle Retail Store Inventory Management Implementation Guide provides more information about reports for SIM system implementers and administrators.
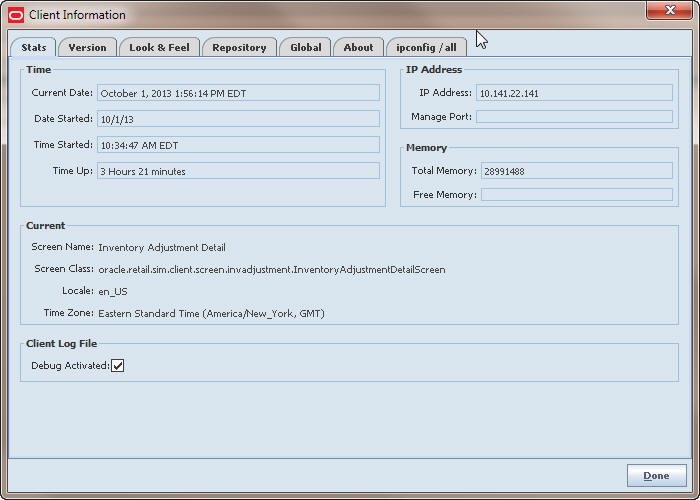
The Client Information window displays many details about the configuration of the PC that you are currently using. This information can be useful when it is necessary to check the current configuration or solve operating problems that may be related to the PC. There are no SIM operating procedures in the Client Information window. Except for the Debug Activated check box (see Configure Client Logging), you cannot change any of the information that is displayed; these settings are maintained through other procedures not available in the SIM user interface.
The Client Information link is available on many SIM windows, including menus, lists, and detail windows. You can access client information from any of these windows.
To view client information, follow these steps.
Double-click the Client Information panel in any window where it is displayed.
The Client Information window opens.
View client information on the Client Information window tabs.
Click Done to close the Client Information window.
The Client Information window includes a check box option to turn on client logging. When the Debug Activated check box is selected, logs are written to log files on the PC to record SIM events. This information is useful only in rare cases when your systems personnel need to study an operating problem that may be related to your PC.
|
Note: Turn on client logging only as directed by your systems personnel. Client logging slows down SIM performance and can create very large files that waste disk space on the PC. Always keep client logging turned off when it is not needed. |
To enable or disable client debug logging, follow these steps:
Double-click the Client Information panel in any window where it is displayed. The Client Information window opens.
Enable or disable client logging as follows:
Select the Debug Activated check box to enable client logging.
Deselect the Debug Activated check box to disable client logging.
Click Done to close the Client Information window.
|
Note: After you disable client logging, be sure that your systems personnel locate and delete any logging files from your PC. These files are not needed for SIM operations, and they waste disk space. |