| Oracle® Retail Store Inventory Management User Guide Release 14.1 E53429-01 |
|


 Previous |
 Next |
| Oracle® Retail Store Inventory Management User Guide Release 14.1 E53429-01 |
|
Previous |
Next |
A product group is a collection of departments, classes, subclasses, or items that are grouped together for a common purpose. Product groups are used throughout SIM for these purposes:
To schedule and perform different types of stock counts (Problem Line, Unit, and Unit and Amount product groups)
To request items for a store (Item Request product groups)
To create shelf replenishment lists to replenish store shelves (shelf replenishment product groups)
To adjust inventory automatically for wastage (Wastage product groups)
Product Group List Window
Navigate: Main Menu > Admin > Product Group. The Product Group List window opens.
From the Product Group List window, you can do the following:
From the Product Group List window, click Back to return to the Admin menu.
Reference Topics
The following topics provide background information about setup of SIM product groups. Review these topics as needed as you are setting up different types of product groups:
This topic describes all of the different types of SIM product groups and the reasons for using the different types.
Counting Methods for Stock Counts
This topic describes the counting options that apply to Unit, Unit and Amount, and Problem Line stock count product groups.
This topic describes how SIM automatically divides large product groups into smaller child groups, so that they are easier to manage when you are using the SIM user interface.
The following are the types of product groups you can create in SIM.
Also see the The Oracle Retail Store Inventory Management Implementation Guide, Volume 1– Configuration for additional information about product group functionality and process flows.
Auto Ticket Print
An auto ticket print product group is used to setup a group of items that can be automatically printed by the batch. Ticket batches may be created internally or externally.
You can schedule when a product group batch process is run. The auto ticket print product group may be scheduled to run daily, weekly, monthly or yearly. If the product group is scheduled for the same day, the user may print the ticket batch immediately.
The product group may be configured to refresh the ticket quantity based on the current stock on hand of the item prior to printing the ticket.
Item Request Product Groups
The Item Request product group type facilitates requests for items that use store order replenishment. You can add individual items, as well as entire sections of the merchandise hierarchy, to an Item Request product group.
When the Item Request product group is scheduled for review, SIM automatically generates a blank item request and adds all items within the specified merchandise hierarchies with Store Order replenishment type to the item request, along with any individual items specified as part of the Item Request product group. You can then enter the actual quantities of the items needed and submit the request.
You can also add items that do not have Store Order replenishment type to an Item Request product group, but only on an item-by-item basis.
Shelf Replenishment Product Groups
You can create a within-day or an end-of-day shelf replenishment list from within the Product Group functional area. The two different types of shelf replenishment lists have store level configurations for the fill level. Typically, an end-of-day shelf replenishment list has a higher fill level than a within-day shelf replenishment list, because there is more time to stock the shelves at the end of the day.
When you create a shelf replenishment list, SIM runs a replenishment calculation that checks for those items that belong to shelf replenishment list product groups. The replenishment calculation compares the capacities of those items to their shop floor stock on hand. SIM then generates a shelf replenishment list ordered by the items that need replenishment the most. For within-day shelf replenishment lists, SIM stops when the amount to replenish is equal to the amount suggested by the system. For end-of-day shelf replenishment lists, SIM continues until all items that need replenishment are picked.Shelf replenishment lists can be created on the PC or the handheld and can be fulfilled on either device.
Problem Line Stock Count Product Groups
Problem Line stock count product groups use predefined criteria to identify problem items. For example, you might decide to count all of the items that have negative stock on hand values. Individual items and item hierarchies are associated into a single problem line product group for a stock count. One or more stores can be assigned to the scheduled stock count.
After criteria are established, based on problem areas, a batch process finds all items that meet the criteria. The items found are added to the scheduled stock count. Problem line items are counted in the same way as in a scheduled unit stock count. Problem line stock counts can only be scheduled daily.
Users with proper security are prompted about any discrepancies outside of set tolerances, and SIM can automatically force a recount if the discrepancies are too high. The system uses discrepancy thresholds (established in product group setup) based on a percentage or standard unit of measure by the item class in the merchandise hierarchy.
Unit Stock Count Product Groups
For unit-only stock counts, you can set up Unit type stock count product groups. You can include individual items and item hierarchies.
A Unit product group can be scheduled for a stock count on a specified day or at scheduled intervals such as daily, weekly, monthly, or annually. One or more stores can be assigned to the scheduled stock count. When the stock count is extracted, a stock count item list is generated at the store level through a batch process.
When the stock count is performed, users with proper security are prompted about any discrepancies outside set tolerances, and SIM can automatically force a recount if the discrepancies are too high. SIM uses discrepancy thresholds, established in a separate setup process, that are based on a percentage or standard unit of measure for the item class in the merchandise hierarchy.
You can authorize stock counts with items that are discrepant, based on percentage or standard unit of measure thresholds. When authorized item quantities that are entered differ from the stock on hand, SIM creates inventory adjustments.
Unit and Amount Stock Count Product Groups
A Unit and Amount product group can be scheduled on a specified day and is restricted to Merchandise Hierarchy setup. One or more stores can be assigned to the scheduled stock count. A stock count is generated at the store level through a batch process that runs daily.
When the stock count is performed, users with proper security are notified about any discrepancies outside of set tolerances, and SIM can automatically force a recount if the discrepancies are too high.
Wastage Product Groups
Wastage is the process through which inventory is lost over time. Spoilage of fresh produce is an example of wastage, another example is the evaporation of water in meat held in cool storage. You can create wastage product groups to maintain more accurate inventory. Individual items or item hierarchies can be included in a wastage product group.
A wastage product group can use a variance percentage or standard unit of measure amount. You can schedule when a wastage product group batch process is run. Inventory adjustments are made automatically, based on the variances set up in the product group.
|
Note: If a wastage product group includes any items with unique identification numbers (UIN), those items are not processed by the wastage product group batch process.A second type of wastage exists that reduces inventory based on sales, for example deli ham where fat is trimmed off of the ham before the slices are sold. This is calculated during the sales process update in SIM. |
For stock count product groups, you can specify the counting methods that you use. Counting methods include third-party counts (count data imported from another system), and guided or unguided counts. See Oracle Retail Store Inventory Management Stock Counts Overview white paper Note 1541449.1 in My Oracle Support for more information.
Third-Party Counts
For a Problem Line, Unit, or Unit and Amount stock count product group. This method requires a system different than SIM to perform the count. The count result data is imported into SIM for comparison against SIM inventory levels.
Third-party counts can include inconsistencies that can be resolved within SIM. Items might be counted that are not currently recorded in SIM inventory. Some counted items might not be currently ranged to the store and are not expected to appear in the count. You can assign item IDs to items not on file, and you can include nonranged items in the stock count.
Some items counted in a third-party stock count might be items that are not included in the stock count product group and should not have been counted. Counts for these items are flagged as rejected not on count items, and they cannot be assigned SIM item IDs. No action can be taken with these items.
Third-party counts can also automatically take a snapshot and be approved, depending respectively on input parameters and configuration settings.
Guided Counts
A guided count requires that your store has sequenced at least one item in a location. If you use sequencing, a guided stock count product group organizes the count by location. If you use sequencing, you have the option to perform a guided or unguided count, except for third-party counts. Guided counting improves the efficiency of the count by guiding your personnel from one item to the next within a selected location using the sequence you have defined. The guided/unguided choice does not apply to third-party counts.
|
Note: If any items are not assigned to locations, they are categorized as No Locations items, and you will be prompted in order of ascending item ID when counting those items. |
See Chapter 14, "Sequencing" for more information.
Unguided Counts
In an unguided count, items at a location can be counted and the count results entered in any order. If you do not use sequencing or third-party counting, the stock count must be an unguided count. (For third-party counts, the guide/unguided choice does not apply, because the count is conducted using a third-party system.)
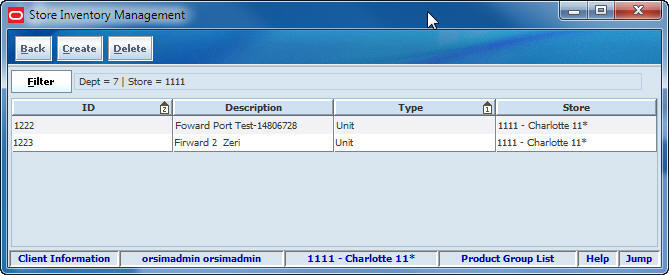
The Product Group List window displays records that have been created for the store with which the user is associated, including those created for all stores. The product groups are listed by type, then by ID.
At any time while the Product Group List window is open, you can change how the list is filtered. Current filtering is displayed next to the Filter button on the Product Group List window. If no filtering is displayed, all product groups are currently selected and listed.

To filter the product groups listed in the Product Group List window, follow these steps:
Navigate: Main Menu > Admin > Product Group. The Product Group List window opens.
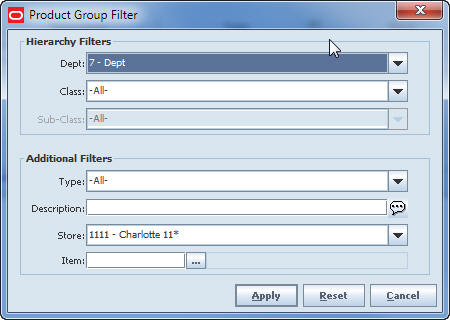
Click Filter. The Product Group Filter window opens.
Enter or select search values as needed to specify the product groups that you want to list. All values are optional. If you leave a field blank or select All, all values are included in the search.
Hierarchy Filters – Select Dept, Class, and Sub-Class values as needed to limit the product groups to list. By default, all departments, classes, and subclasses will be selected.
Additional Filters – Enter or select values for these fields:
Type – Select the type of product group, or All (default).
Description – Enter the description of the product group. The search will find all product groups for which the description contains the value you enter.
Store – Select the store for which you want to list the product groups. You can select any store for which you have permissions.
Select All Stores to view product groups that apply to all stores.
Item – If you specify an item, product groups that contain that item will be listed. Enter the item number or click the Ellipsis button to look up the item.
Click Apply. You return to the Product Group List window, where your filter has been applied.
Follow this procedure to define the attribute and components of any type of product group.
Review the following topics before you begin to create product groups:
Navigate: Main Menu > Admin > Product Group. The Product Group List window opens.
Procedure
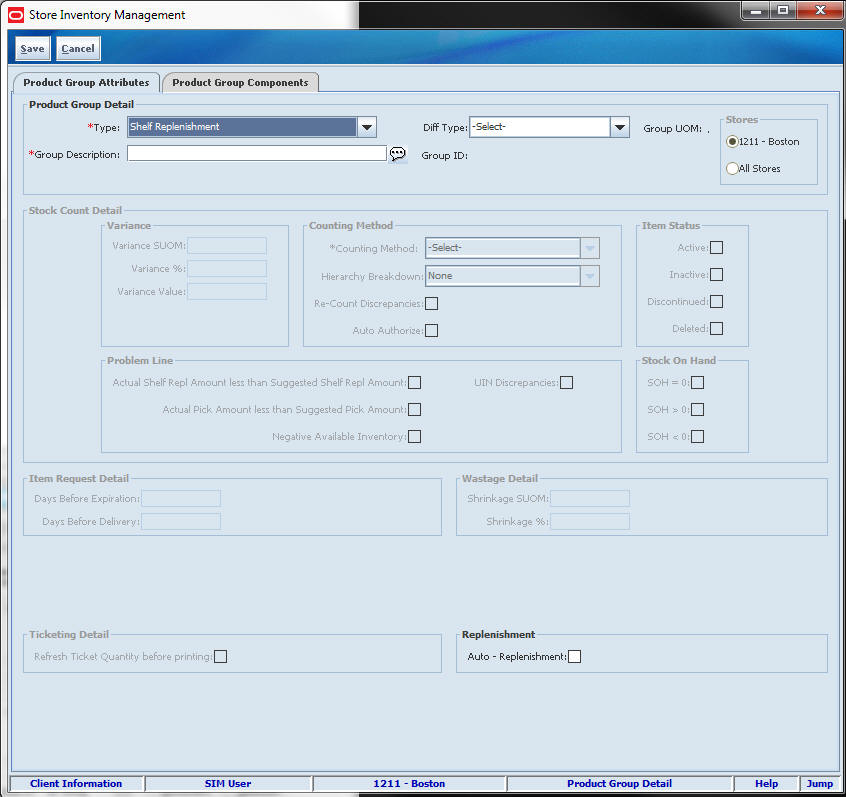
Creating any type of product group is a three-part procedure. You must complete all parts of the procedure to save the new product group.
The Product Group Detail section of the Product Group Detail window includes the product group type, description, and other attributes that must be completed for any type of product group.
Enter product group attributes specific to the type of product group you are creating:
For any type of product group, SIM enables only the fields that apply to that type.
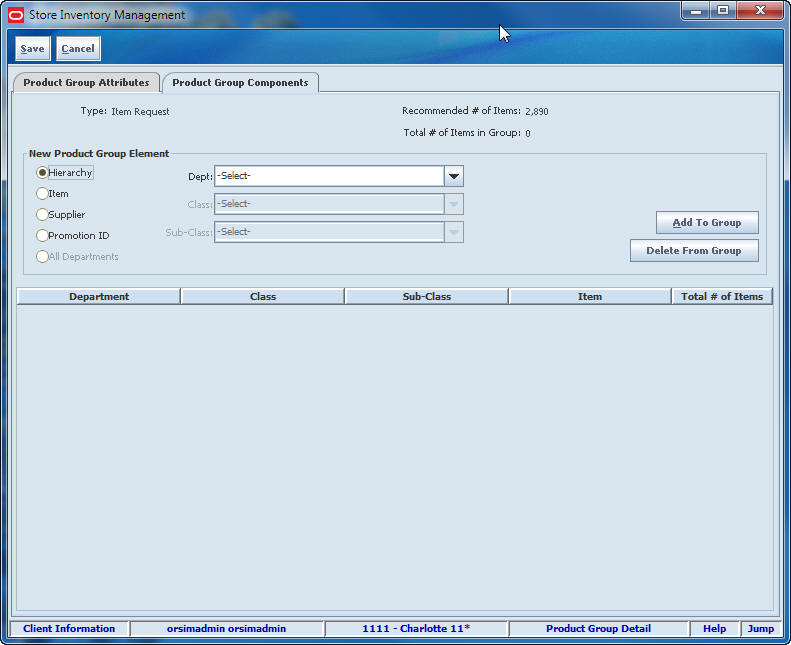
Define Product Group Components
For all product group types, select the components that are included in the product group by merchandise hierarchy, item, supplier, or promotion.
After you have created a product group, you create a schedule for the product group to specify how often it is processed. See Chapter 4, "Product Group Scheduler."
For any type of new product group, first complete the fields in the Product Group Detail section:
Click Create. The Product Group Detail window opens to the Product Group Attributes tab.
Select the type of product group from the Type drop-down list (see ”Product Group Types” for more information):
Auto Ticket Print – To create a product group to generate an automatic printing of tickets.
Item Request – To create a product group to generate item request lists for ordering inventory.
Problem Line – To count items that have been flagged as having a defined inventory position problem.
Shelf Replenishment – To create a product group to generate shelf replenishment items.
Unit – To create a unit-only stock count product group.
Unit and Amount – To create a unit and amount (value) stock count product group.
Wastage – To create a wastage only product group.
In the Diff Type drop-down list, select a type.
In the Group Description field, enter a brief explanation of the product group.
If you want the product group to apply to other stores, select the All Stores radio button in the Stores section. This will allow you to schedule the product group for more than one store.
By default, a new product group includes only the store for which you are currently logged in.
After you have completed the Product Group Detail section, continue to enter the attributes of the type of product group you are creating:
For an Auto Ticket Print product group only, select the Refresh Ticket Quantity before Printing check box in the Ticketing Detail section, if applicable.
When you have completed the Ticketing Detail section, proceed to Define Product Group Components.
| Field | Description |
|---|---|
| Refresh Ticket Quantity before printing | Refreshes the ticket quantities with the current stock on hand for the item tickets and populate label quantities in sequencing for the shelf edge labels. |
For an Item Request product group only, enter values for the following fields in the Item Request Detail section.
When you have completed these fields, proceed to Define Product Group Components.
| Field | Description |
|---|---|
| Days Before Expiration | The number of days in which the items must be requested. If the items have not been requested in this period, the item requests will be cancelled. This value is not required. |
| Days Before Delivery | The number of days in which the requester wants the items delivered. This value is not required. |
For shelf replenishment product group only, select the Auto-Replenishment checkbox in the Replenishment Detail section if you want the system to automatically calculate the quantity to replenish on the sales floor.
When you have completed this field, proceed to ”Define Product Group Components."
| Field | Description |
|---|---|
| Auto-Replenishment | Adjusts the shop floor quantity during the nightly batch, to the item shelf capacity (if setup in sequencing) or the available inventory, whichever is less. |
For a Wastage product group only, enter a value in at least one of these fields in the Wastage Detail section.
You can schedule when the Wastage product group batch is run. When the batch runs, SIM generates inventory adjustments based on the shrinkage units or shrinkage percent entered for the product group.
When you have completed these fields, proceed to ”Define Product Group Components."
| Field | Description |
|---|---|
| Shrinkage SUOM | Number of units that will be written off if the available stock on hand is greater than zero. SIM will generate an inventory adjustment for this number of units. |
| Shrinkage % | The quantity percent that will decrease the inventory each time this product group is scheduled. SIM will generate an inventory adjustment for this quantity. |
For a Unit, Unit and Amount, or Problem Line product group, enter the attributes that apply to the type of stock count group you are creating. The following table defines the fields and indicates which fields apply to different stock count types.
When you have completed these fields, proceed to ”Define Product Group Components."
| Field | Description | Problem Line | Unit | Unit and Amount |
|---|---|---|---|---|
| Variance | ||||
| Variance SUOM | Maximum allowable number of units, expressed in the standard unit of measure (SUOM), that the count can vary from the system stock on hand level before it is considered a discrepancy. If the variance units are equal to or greater than the Variance SUOM set, plus or minus, the stock count is discrepant. | X | X | X |
| Variance % | Maximum allowable percentage of units counted that the count can vary from the system stock on hand level before it is considered a discrepancy. If the variance percent is equal to or greater than the Variance % set, plus or minus, the stock count is discrepant.
For example, if the Variance % is set to 10, and stock on hand is 20, a stock count of 18 is discrepant because 2/20 = 10 percent. A stock count of 19 is not discrepant, because the variance is less than 10 percent. |
X | X | X |
| Variance Value | A money amount that will be compared to the number of discrepant units times the current unit retail of the goods. (SIM uses current retail from item lookup, not an extracted promotion or clearance price.) If the variance money amount is equal to or greater than the Variance Value set, plus or minus, the stock count is discrepant. | X | ||
| Counting Method | Select Third-party, Guided, or Unguided.
For more information, see Counting Methods for Stock Counts. |
X | X | X |
| Hierarchy Breakdown | Select None (default), Location, Department, Class, or Subclass.
Note: Guided counts are always by location. |
X | X | X |
| Re-Count Discrepancies | If this check box is selected, a stock recount record is created if there are any discrepant items in a stock count. The recount must be completed before the stock count can move to the authorization process. A new snapshot cannot be taken during the recount process for a unit and amount stock count. During a unit and problem line count, the user has the ability to take a new snapshot.
Note: This feature is not available for third-party count method. |
X | X | X |
| Auto Authorize | If this check box is selected, the stock count is automatically authorized by SIM when the count or recount is completed.
For third-party counts, the count is automatically authorized when the count data is imported into SIM. |
X | X | X |
| Item Status | ||||
| Item Status | For Unit count product groups only, you must select at least one status of items to include when the stock count is extracted. Select all that apply to the group you are creating.
|
X | ||
| Problem Line | ||||
| Actual Shelf Repl Amount Less Than Suggested Shelf Repl Amount | If this check box is selected, SIM adds an item to the problem line stock count if the amount entered for the item on the shelf replenishment list was less than the suggested shelf replenishment amount. | X | ||
| Actual Pick Amount Less Than Suggested Pick Amount | If this check box is selected (default), SIM adds an item to the problem line count if the actual pick amount entered for the item on the pick list was less than the suggested system pick amount for the customer order pick list. | X | ||
| Negative Available Inventory | If this check box is selected (default), SIM adds an item to the problem line stock count if the item has negative available inventory. | X | ||
| UIN Discrepancies | If this check box is selected (default), the product group requires counting of all unique identification number (UIN) discrepancies for the product group components. UIN discrepancies are differences between the stock on hand and the UINs registered at the store. UIN discrepancies can result from shipping or selling items with incorrect serial numbers, or manually changing the status of a serial number. See Chapter 5, "Unique Identification Numbers (UIN)" for information about UINs. | X | ||
| Stock on Hand | ||||
| Stock on Hand | For Problem Line and Unit stock count groups, select values for the check boxes that are enabled in the Stock on Hand section:
|
X | X |
For any type of product group, follow these steps to define what is included in the product group:
Click the Product Group Components tab.
In the New Product Group Element section, select a radio button to specify how you will select components for the product group. The following table shows the options available for different product group types.
| Product Group Type | Hierarchy | Item | Supplier | Promotion ID | All Departments |
|---|---|---|---|---|---|
| Auto Ticket Print | X | X | X | X | |
| Item Request | X | X | X | X | |
| Problem Line | X | X | X | X | X |
| Shelf Replenishment | X | X | X | X | |
| Unit | X | X | X | X | X |
| Unit and Amount | X | X | |||
| Wastage | X | X | X | X |
For each component you want to add to the group, follow these steps:
Select the product component as follows, depending on the radio button you have selected.
Hierarchy – Select a hierarchy from the drop-down lists in the Department, Class, and Sub-Class fields.
Item – In the Item field, enter the item number, or click the Ellipsis button to look up the item. In the Item Lookup window, locate and select the item you want. Click Apply to return to the Product Group Detail window. See Item Lookup in Chapter 21 for more information.
Supplier – In the Supplier field, enter the supplier ID, or click the Ellipsis button to look up the supplier. In the Supplier Lookup window, locate and select the supplier you want. Click Apply to return to the Product Group Detail window. See Supplier Lookup in Chapter 21 for more information.
Promotion ID – Enter the promotion ID in the Promotion ID field.
All Departments – No additional selection steps are needed.
Click Add to Group. The selection is added to the group.
|
Note: On the Product Group Components tab, Recommended # of Items shows the recommended total number of items for a product group, and Total # of Items in Group shows the number of items currently in the group. See Product Group Size Limits for more information. |
If you want to remove a component that you have added, follow these steps:
Select the component from the list.
Click Delete From Group. The selection is deleted from the group.
Click Save to save the new product group and return to the Product Group List window.
Edit a product group to change its attributes or components.
Navigate: Main Menu > Admin > Product Group. The Product Group List window opens.
To edit a product group, follow these steps:
Double-click on the group that you want to edit. The Product Group Detail window opens.
Update attributes as needed, or add and remove components. See Create a Product Group for more information.
Click Save. You return to the Product Group List window.
|
Note: You can delete only those product groups that are not assigned to a schedule. |
Navigate: Main Menu > Admin > Product Groups. The Product Group List window opens.
To delete product groups, follow these steps:
Select the product groups that you want to delete.
Click Delete. A message is displayed: ”Are you sure you want to delete the selected product group?”
Click Yes.
Product groups can contain thousands of line items. SIM can handle product groups that contain very large numbers of line items, but they can be difficult for a user to manage. Because of this, SIM automatically breaks down large product groups into multiple smaller records.
The system administrator can set system options to control the maximum number of line items included in different types of product groups. If these options are not set, the SIM system default limit is used.
If the number of line items in a product group exceeds the maximum line item limit, SIM breaks down the product groups into smaller sections. See the Oracle Retail Store Inventory Management Implementation Guide for information about the system options that control size and breakdown of large product groups.
For Unit, Unit and Amount, and Problem Line stock count groups, SIM breaks down the stock count first by department, then by class, then by subclass:
If the number of line item records for a department exceeds the maximum line limit value, then SIM breaks down the department into smaller sections starting with class.
If a single class has more line items than the user interface limit, SIM breaks down the class to the subclass level.
It is possible for a department to have some counts at the class level and others at the subclass level, depending on how many line items there are at each level.
For Unit and Amount counts, SIM does not break down the count lower than the subclass level. A further breakdown could have an adverse effect on company financials. If a single subclass exceeds the maximum line item limit, the subclass is extracted as its own child stock count transaction.
For guided counts, SIM breaks the count into child counts by location.
For Unit and Problem Line counts, if a subclass exceeds the limit, it is further broken down into groups that contain no more than the maximum number of line items allowed. The breakdown of the subclass is based on ascending item ID.
Later in this section, an example shows how SIM breaks down a large stock count.
For any product group that exceeds the limit, SIM creates multiple child records and appends ”(x/y)" to the description. This indicates that more than one child record is associated with the original master product group, where:
x is a the sequence number of the child record
y is the total number of child records into which the product group is divided
For example, for a Batteries stock count broken down into six separate child stock count records, the description of the first stock count record of the group would be shown as follows:
On the PC: Batteries (1/6)
On the handheld: (1/6) Batteries
On the PC, multiple records associated with the same master product group are sorted based on ascending Department/Class/Subclass order, with (x/y) appended after the count description. For example, a large stock count might be broken down as follows, with the following child count records as listed:
Stock Count Record Breakdown
| Batteries (1/6) | Contains Dept A items |
| Batteries (2/6) | Contains Dept B Class 1 |
| Batteries (3/6) | Contains Dept B Class 2 |
| Batteries (4/6) | Contains Dept B Class 3, 4 |
| Batteries (5/6) | Contains Dept B Class 5 Subclass 1 |
| Batteries (6/6) | Contains Dept C |
On the handheld, multiple records associated with the same master product group are sorted based on ascending Department/Class/Subclass order, with (x/y) appearing before the count description (because of display space limits on the handheld). For example, the same records would be displayed on the handheld as follows:
1-(1/6) Batteries
2-(2/6) Batteries
3-(3/6) Batteries
4-(4/6) Batteries
5-(5/6) Batteries
6-(6/6) Batteries
|
Note: Child stock counts on the handheld are not always grouped together on the stock count list screen, because the numbers appear before the description and affect how the records are sorted. |
The following figure shows how SIM automatically breaks down a large stock count. In this example:
The maximum number of line items is 10,000
The total number of items in the product group is 40,000
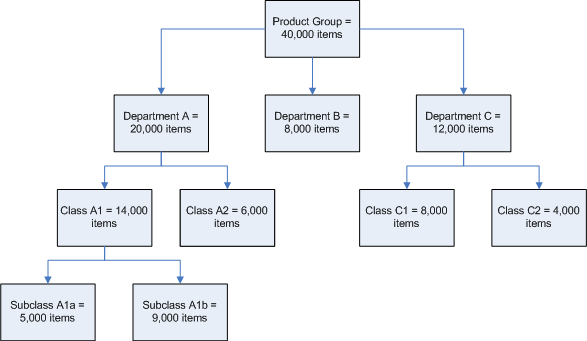
In this example, the product group exceeds the maximum limit of 10,000 line items and must be broken down into smaller sections:
SIM first breaks down the count by department. If a department has 10,000 or fewer line items (like Department B in the example), the department does not need to be broken down. It is extracted into its own child count record.
If a single department exceeds the 10,000 line items limit, SIM breaks down the count further to the class level. If none of the classes exceed the maximum line items limit (like Class C1 and Class C2 in the example), SIM extracts each class as a single child count record.
If a class exceeds the maximum line limit (like Class A1 in the example), SIM breaks down that class to the subclass level.