| Oracle® Retail Store Inventory Management User Guide Release 14.1 E53429-01 |
|


 Previous |
 Next |
| Oracle® Retail Store Inventory Management User Guide Release 14.1 E53429-01 |
|
Previous |
Next |
Retailers who sell items such as electronics, cell phones, firearms, and limited edition items often have to track unique numbers for a single item or group of items. These identifiers might be serial numbers, unique identification numbers, FCC IDs, International Mobile Equipment Identity (IMEI) numbers, or other kinds of identifiers. Unique identification numbers aid the retailer in tracking expensive or controlled items, or items that may be subject to manufacturer recalls or investigations by legal authorities.
SIM provides the capability to track items by unique identification numbers (UIN). SIM system configuration options control whether UIN capabilities are available in your SIM system.
If you use unique identification numbers, these numbers are displayed and tracked in a number of functional areas in SIM, including deliveries, transfers, returns, and stock counts. You can also look up items by UIN.
If UINs are required for an item, the UINs must be scanned, entered, or automatically generated when stock is received. When you are generating UINs for tracking items, you can print labels with the generated UINs. UINs must also be recorded when stock counts are performed, when inventory adjustments are done, or when items are shipped.
Set Up UIN Attributes
If an external system is not managing the UIN attributes, you can set up UIN attributes at the class level in SIM. The attributes are assigned to each item/location for all items within the class for a specific store.
UINs can be of these types:
Serial number
Serial numbers are unique identifiers for individual instances of an item, typically attached to items by the manufacturer. During receiving, the serial numbers must be scanned and associated with items.
Auto Generate SN (AGSN)
AGSNs are serial numbers generated by SIM that you can use to identify each instance of an item. SIM can also print item labels that contain the unique AGSNs.
UIN Resolution List
SIM identifies discrepancies in UINs such as the return of a UIN still in stock, items received that are already at another location, or other problems. When irregularities are detected, SIM creates UIN exception records.
The UIN Resolution List allows you to view the audit records for UIN exceptions. You can identify the UINs for which resolution actions are required. A resolution action might be an inventory adjustment, transfer, or other action that resolves the exception. In some cases, a status change might resolve the exception.
Resolving UIN exceptions is a manual process. You must research the reasons for the errors and determine the appropriate actions to take.
See UIN Resolution List.
Updating UINs
While you are performing some SIM tasks, you might need to update UINs for the items involved in the task (such as receiving, transfers, and stock counts). If your SIM system uses UINs, there are additional fields and windows in which UINs and counts are displayed, and in which you can add and correct UINs.
See Updating UINs.
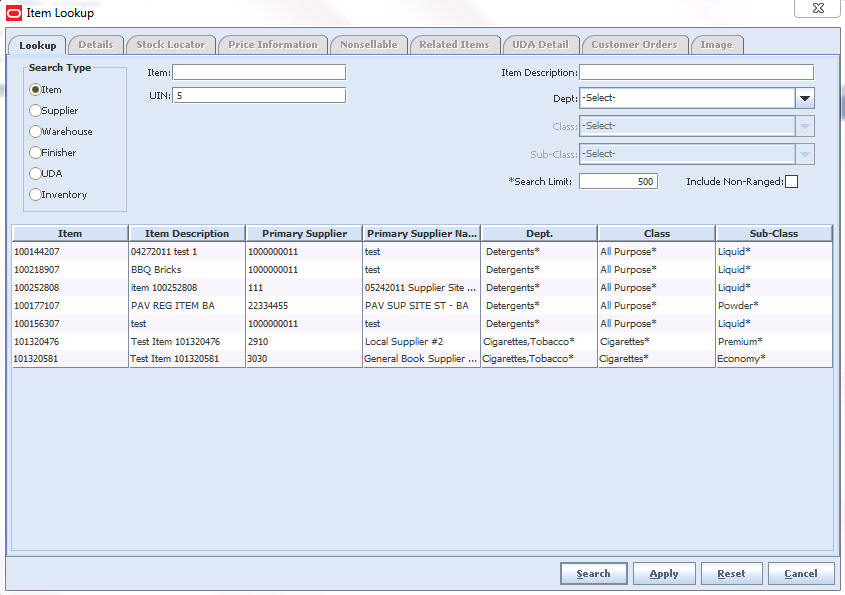
Item Lookup by UIN
In the Item Lookup function, you can look up an item by entering its UIN in the UIN field. Likewise, in the Container Lookup function, you can search for a container based on a UIN value.
In other SIM functions that allow item lookup, you can enter a UIN instead of a SIM item ID in the item identifier field, to find all items with that UIN.
See Item Lookup by UIN.
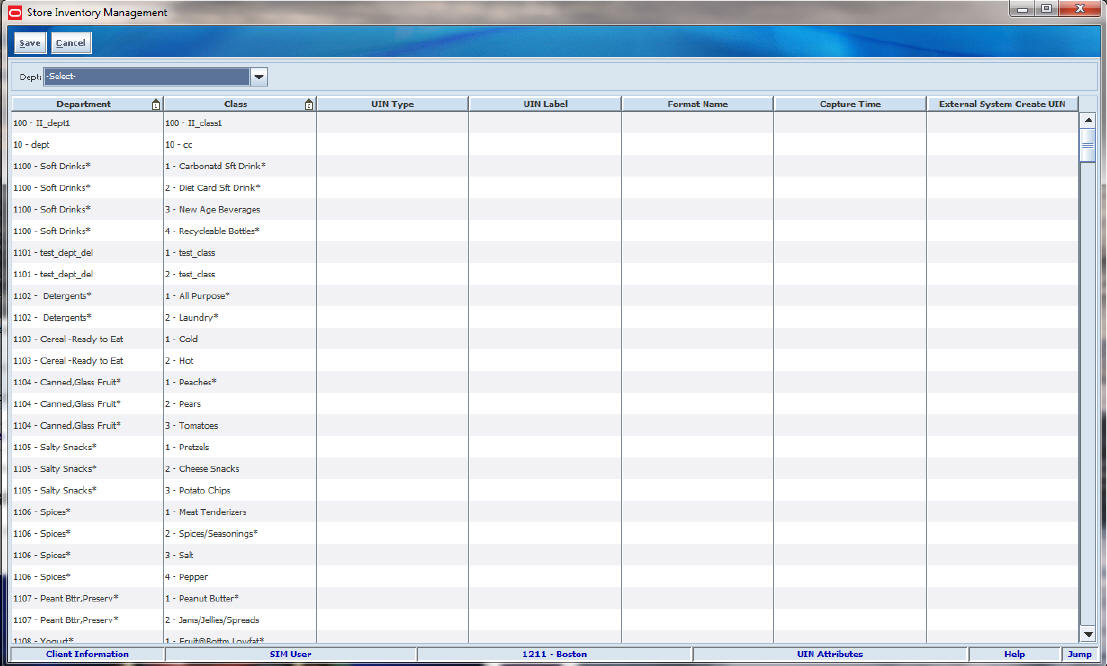
Use the UIN Attributes setup function to set up UIN attributes at class level in the merchandise hierarchy. The attributes are assigned to each item/location for all items within the class.
Navigate: Main Menu > Admin > Setup > UIN Attributes. The UIN Attributes window opens.
To set up UIN attributes, follow these steps:
To list only the classes for one department, select a department from the Department drop-down list.
For each class for which you want to set up UIN attributes, follow these steps:
In the UIN Type field, select the type of UIN that applies to this class. The types available are Serial Number and AGSN.
In the UIN Label field, select the label that applies to this UIN.
The UIN Label value is displayed whenever a description of the UIN is needed for an item. The UIN Label value is also used as a label to identify some fields in the user interface in which UINs are entered or displayed.
|
Note: The specific UIN labels in your SIM system are user-defined for your organization during SIM installation and setup. The UIN Label drop-down list provides all of the valid labels for your SIM system. Each of the valid labels represents a UIN of either serial number or AGSN type. |
In the Format Name field, if UIN Type is Auto Generate SN, select the ticket format to use when generating labels for this UIN.
In the Capture Time field, select the first time that the UIN will be captured in SIM:
Sale – UINs are captured when individual items are sold. UINs for these items will not be tracked in SIM.
Store Receiving – UINs are captured or generated when stock is received from a warehouse or supplier. These UINs are tracked in SIM for any inventory transaction.
In the External System Create UIN? field, select True or False to indicate whether an external system (such as a point-of-sale system) can create an UIN in SIM if the UIN does not exist. If Capture Time is Sale, this field is set to False and cannot be changed. When this field is set to True, a check mark appears in the field.
Click Save to save your changes and return to the Setup menu.
Use the UIN Resolution List and its functions to view and update the UIN exception records that require your attention and resolution.
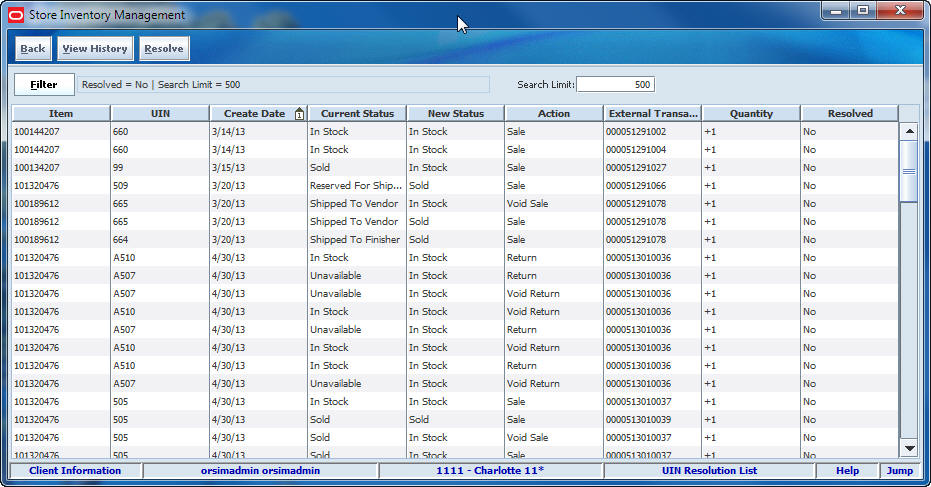
UIN Resolution List Window
Navigate: Main Menu > Admin > UIN Resolution. The UIN Resolution List window opens.
You can use the Search Limit field to set the maximum number of results that you want returned. You can enter an integer from 1 to 999; the default is 500.
The UIN Resolution List window displays the following information about UIN exceptions:
| Field | Description |
|---|---|
| Item | The item for which the conflict occurs. |
| UIN | UIN of the item for which the conflict occurs. |
| Create Date | Date the exception was created in SIM. |
| Current Status | Status of the UIN at the time the exception was raised. This could be different from the current SIM status. For example, the UIN could have been in In Receiving status when the update process tried to process it, but the receipt has been completed, so now the UIN is in In Stock status. |
| New Status | Proposed new status that SIM tried to apply to the UIN. |
| Action | Action within the UIN Update Status Web Service. This value can also be RUA for exceptions generated from receiver unit adjustments. |
| External Transaction ID | Unique identifier of the transaction that links back to an external system. |
| Quantity | For RUAs, the adjustment quantity. The value is prefaced with either + (increase) or - (decrease). |
| Resolved | Yes or No to indicate whether the UIN has been resolved. |
From the UIN Resolution List window, you can do the following:
From the UIN Resolution List window, click Back to return to the Admin menu.
At any time while the UIN Resolution List window is open, you can click Filter to change how the list is filtered.
Current filtering is displayed next to the Filter button on the UIN Resolution List window. If no filtering is displayed, all unresolved UIN exceptions are currently listed.
To change how the list is filtered, follow these steps:
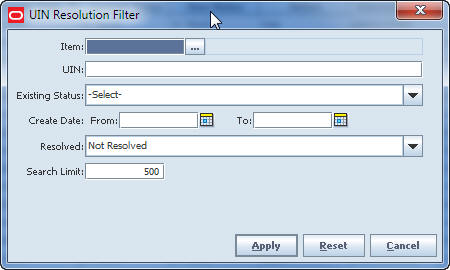
Click Filter. The UIN Resolution Filter window opens.
Enter or select values for the search criteria to find only those UIN exceptions that meet all criteria you specify. You can search by any of the following criteria:
Item – Specific item identifier. Enter the item number, or click the Ellipsis button to look up the item.
In the Item Lookup window, enter search criteria as needed to find the item you want. (See Item Lookup for more information about item lookup criteria.) Select the item you want and click Apply to return to the UIN Resolution Filter window.
UIN – Enter a specific UIN.
Existing Status – Select the UIN status for the item when the resolution record was written.
Create Dates: From and To – Enter or select dates to find only those UIN exception records in a particular date range.
Resolved – Select All, Resolved, or Not Resolved.
Search Limit – You can use this field to set the maximum number of records that you want returned. You can enter an integer value from 1 to 999; the default is 500.
Click Apply. The UIN exceptions that meet your search criteria are listed in the UIN Resolution List window.
|
Note: You must have separate permissions to view UIN history or update UIN status. |
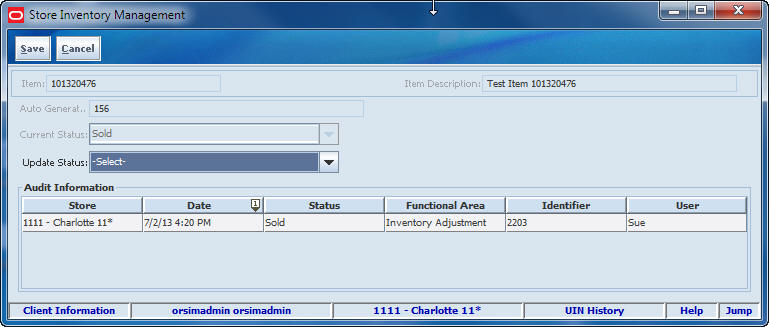
To view the history of a UIN, and optionally update the status of a UIN exception, follow these steps:
In the UIN Resolution List window, select a UIN.
Click View History. The UIN History window opens.
The Audit Information displays the following audit trail information about the UIN:
| Field | Description |
|---|---|
| Store | Store for which the audit information was captured |
| Date | Date the status change occurred |
| Status | Status of the UIN on the date shown |
| Functional Area | Functional area of SIM that generated the status change (for example, Warehouse Delivery, Stock Count, Sale, Update Status UI) |
| Identifier | Identifier of the transaction from the functional area that generated the status change |
| User | User who performed the action that generated the status change |
(Optional) In the Update Status field, select the new status of the UIN.
Click Save to return to the UIN Resolution List window.
After you have resolved a UIN exception, you can mark the exception record as resolved.
|
Note: Marking the exception as resolved does not resolve a UIN exception. It removes the exception from the list of unresolved exceptions, and it also marks the record for later deletion during normal SIM processing. |
To mark UIN exception records as resolved, follow these steps:
Select the UIN exception records that you want to mark as resolved.
Click Resolve. You receive a prompt: ”Do you really want to confirm the selected records?”
Click Yes. The Resolved fields for the selected records are marked ”Yes.”
While you are performing SIM tasks such as transfers, receiving, adjustments, and stock counts, you can add and update information about UINs. Numerous SIM functions require an accurate accounting of all UINs involved. The SIM interface has some standard fields and forms that work in a similar manner, regardless of the specific task.
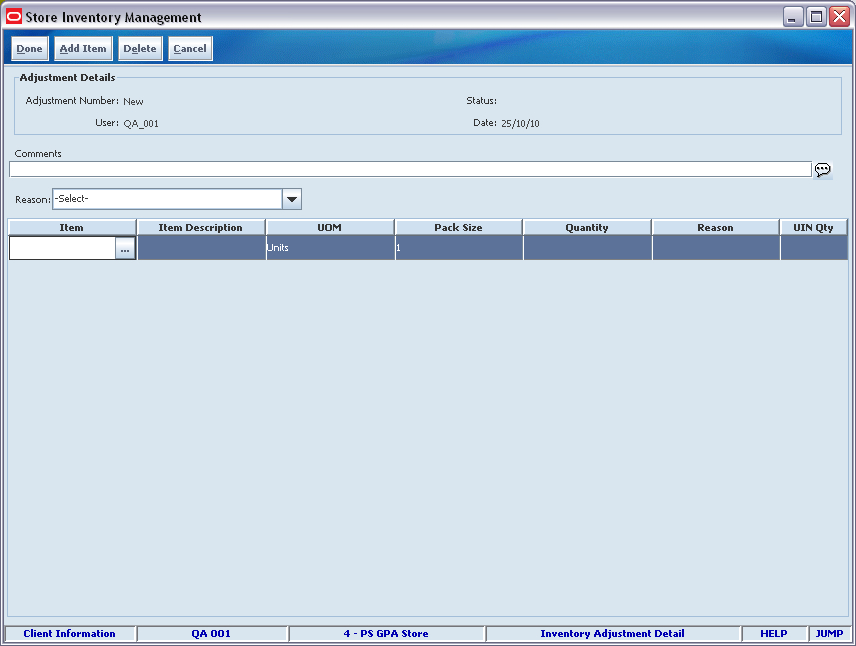
For example, if you create an inventory adjustment for an item that requires a serial number type UIN, the Inventory Adjustment Detail form includes a UIN Qty field. This field shows the number of UINs included in the inventory adjustment. For an adjustment, you are required to enter all of the UINs that apply.
|
Note: A UIN Qty field appears in numerous SIM windows; this is just one example. When the UIN Qty field appears, entering, and updating UINs works in a similar manner throughout the SIM user interface. |
When you double-click the UIN Qty field, the UIN window opens, in which you can enter the UINs that apply. In some cases, the UINs will already be listed if they have been identified by a third party system.
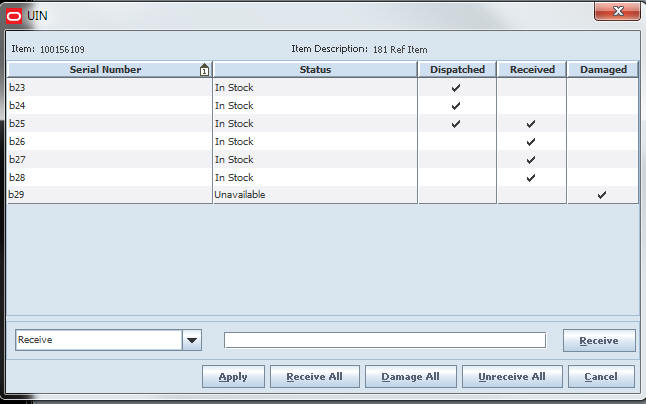
The UIN window contains the following fields:
| Field | Description |
|---|---|
| Serial Number | Unique identification number of the item. For items that require Serial numbers, all serial numbers are listed, regardless of whether they were counted or recounted. |
| Status | Indicates the status of the item, such as Shipped to Store. |
| Dispatched | Indicates when the UIN has been moved to a Shipped to Store status by either a store to store transfer, or if included on an ASN. |
| Received | Indicates when UINs have been identified to receive in the system. |
| Damaged | Indicates when the UINs have been identified to received as damaged in the system. |
| Action | Drop down to indicate Receive, Un-Receive, Damaged. |
| Text Box | Used to type in the UIN the user wants to work with. |
Select an action from the drop-down list:
Receive to mark a UIN to be received.
Un-receive to remove the received item.
Damage to mark the item as damaged.
Enter the UIN number in the text box.
Press Enter, or click the button at the end of the text box, to assign the action to the item. The action will be populated in the fields above.
Click Apply to save changes made on the UIN window, or:
Click Receive All to receive all items on the UIN window.
Click Damage All to mark all items as damaged on the UIN window.
Click Un-Receive All to mark all items on the UIN window as un-received.
|
Notes:
|
As you perform many SIM tasks, you can use UINs to search for items and containers. Both Item Lookup and Container Lookup provide a UIN field that you can use to enter a UIN value as a search parameter. The UIN is used as a method for searching for an item. It does not add the UIN to the transaction.
When using the Item Lookup method, the results will display on the Item Lookup screen allowing the user to select and Apply the item to the transaction. From the list, select the item you want to use and click Apply.
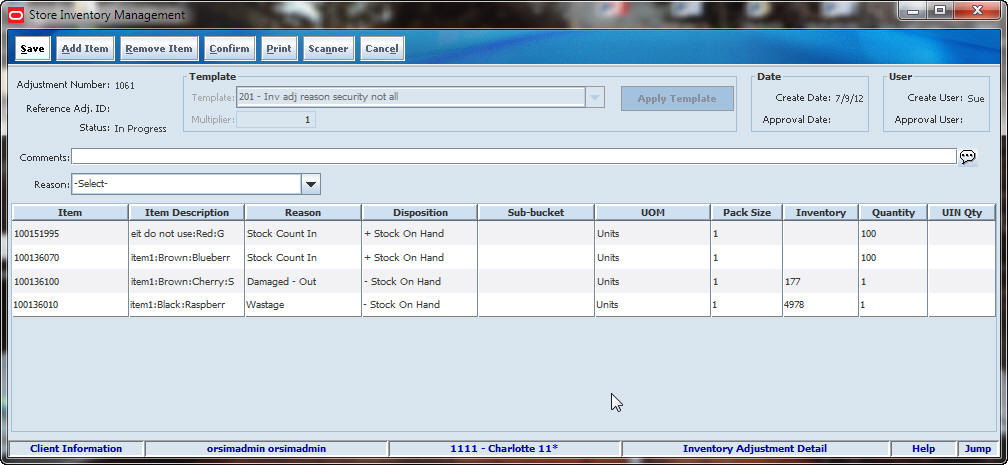
For other SIM tasks, you can enter a UIN instead of an item ID in any field that requires an item identifier (fields typically labeled Item). This capability applies to all functional areas of the SIM user interface in which item IDs are required.
For example, if you are creating a new inventory adjustment, you can enter a UIN in the Item field in place of the item ID. This method requires you to type the UIN directly on the inventory adjustment screen instead of clicking the Ellipsis button.
When you leave the Item field (by pressing Tab or moving the pointer), SIM searches for the UIN you entered.
If a single item matches the UIN you entered, that item is selected and the necessary fields are filled in automatically.
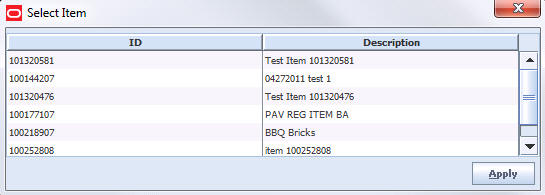
If there are multiple items that have the UIN value you entered, the Select Item window opens.
From the list, select the item you want to use and click Apply.
If the value you entered in the Item field does not match either a SIM item ID or a UIN, an error message informs you that it is an invalid value.
|
Note: In Item Lookup, if multiple items have the same UIN, all of the items found are listed in the Item Lookup window so that you can select the item to use. The Select Item window is not displayed. |