| Oracle® Retail Store Inventory Management User Guide Release 14.1 E53429-01 |
|


 Previous |
 Next |
| Oracle® Retail Store Inventory Management User Guide Release 14.1 E53429-01 |
|
Previous |
Next |
SIM uses role-based security. Each individual SIM system user is assigned one or more roles, and specific permissions are assigned to each role. Permissions assigned to a role allow a user in that role to perform many different SIM tasks. For example, only certain roles have permission to perform tasks such as approving orders and stock counts or changing the SIM user interface. Roles are typically designed and assigned according to the job duties of people in an organization. SIM roles can be tailored as needed to fit different levels and areas of responsibility.
Role permissions control access to SIM menu options, forms (windows), and buttons and fields on those forms. You can access any of the SIM functions for which your assigned role has the necessary permissions. Depending on your role, certain buttons and menus may not even appear in the SIM user interface.
SIM roles and permissions are designed and assigned by a system user, probably a system administrator, whose role has the necessary permissions to create and modify SIM roles and assign permissions. The Security functions are used to configure roles and permissions. If your role does not have the necessary permissions, you cannot access the Security functions.
In addition to role maintenance, SIM also allows users and user/role assignments to be created and edited. You can change the roles assigned to any user to allow access to more or fewer SIM functions. Users can also be assigned to one or more stores.
The system administrator can also configure the requirements for user passwords to enforce more robust password security.
Maintaining users and user/role assignments in SIM depends on how SIM security is configured. For more information about configuring SIM security, particularly system options, see the Oracle Retail Store Inventory Management Implementation Guide.
The functions available on the Security menu are as follows:
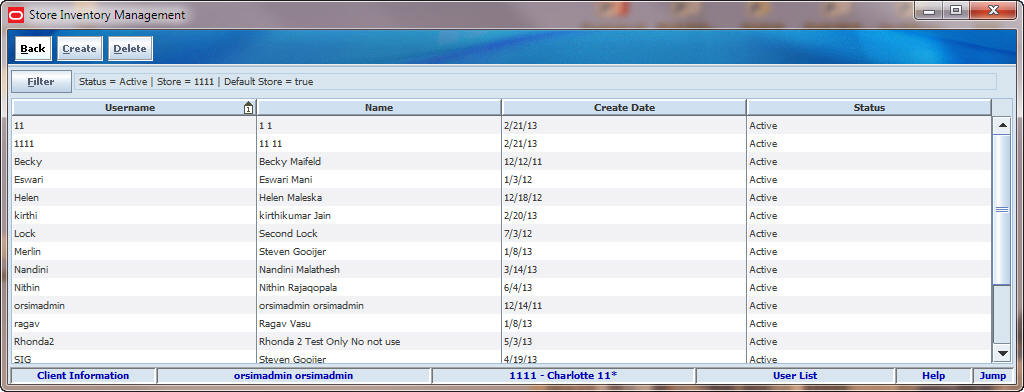
Use the User Maintenance functions to establish and update records for all SIM users.
Navigate: Main Menu > Admin > Security > User Maintenance. The User List window opens.
The User List window displays the following information about SIM users:
| Field | Description |
|---|---|
| Username | Unique name assigned to the user for login to SIM |
| Name | User's first and last name |
| Create Date | The date the user record was created |
| Status | Active or Inactive |
From the User List window, you can do the following:
Click Back to return to the Security menu.
At any time while the User List window is open, you can click Filter to change how the list is filtered.
Current filtering is displayed next to the Filter button on the User List window. If no filtering is displayed, all items are currently selected and listed.

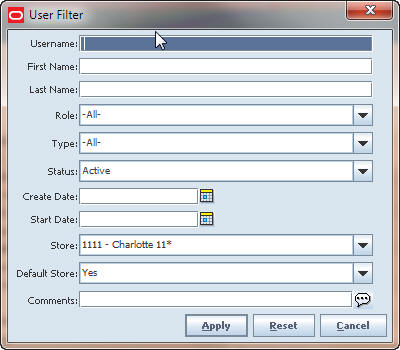
To change how the list is filtered, follow these steps:
Click Filter. The User Filter window opens.
If you want to reset all filtering criteria to default values, click Reset.
Enter or select filtering criteria as needed to select just the users you want to list. All criteria are optional. If you leave a field blank or select All, all values will be included in your filtering selection.
Username – Enter a character string that is contained in the Username of the user records you want.
First Name – Enter a character string that is contained in the First Name of the user records you want.
Last Name – Enter a character string that is contained in the Last Name of the user records you want.
Role – Select a role to list all users who are assigned that role.
Type – Select a user type to list all users of that type.
Status – Select a status to list all users in that status.
Create Date – Enter or select a date to list all users for whom records were created on that date.
Start Date – Enter or select a date to list all users whose start date is that date.
Store – Select a store to list all users for that store.
Default Store – If you selected a store, this field is enabled. If you want to list all users for the store, select All. If you want to list only those users for whom the selected store is their default store, select Yes. If you want to list those users for whom the selected store is not their default store, select No.
Comments – If you want to search the Comments field in user records, enter a character string contained in the Comments field of the user records you want to list.
Click Apply. Results that match your search criteria are displayed in the User List window.
To add a new user to SIM, follow these steps:
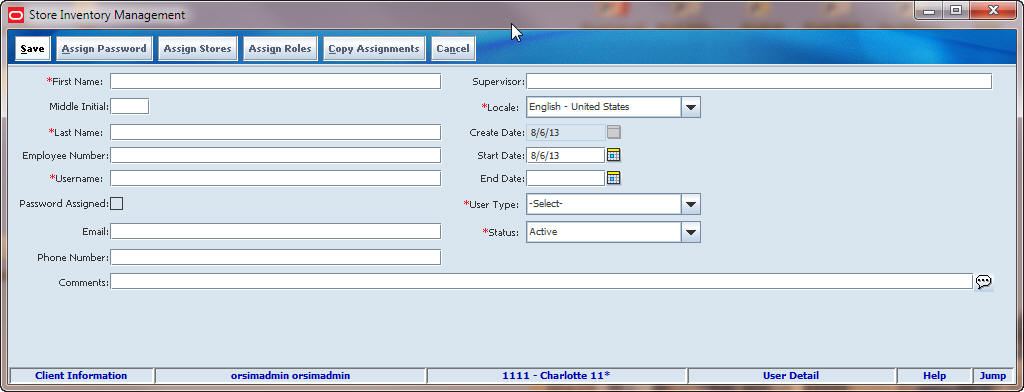
Click Create. The User Detail window opens.
Enter values for the fields. The following fields are required:
First Name – The user's first name.
Last Name – The user's last name.
Username – A unique name by which the user will be known when logged in to SIM. A suggested user name is provided, based on the user's last and first names; you can change this value to any other you prefer.
Locale – Select the locale for language and currency.
User Type – Select one of these types:
Store User – This status applies to most users. A store user can have access to multiple stores, but does not require access to all SIM stores.
Superuser – A superuser has access to all stores in SIM.
Temporary User – This status can be used to set up new users temporarily until their accounts are established in a corporate security system. Temporary users are known only to SIM, and each temporary user must have an End Date value assigned.
Status – Select a status of Active or Inactive.
The other fields are optional and can be used as preferred in your organization.
To complete setup of the new user, these additional steps are required:
Assign an initial password to the user. See ”Assign a User Password."
Assign stores to the user. See ”Assign Stores to a User."
Assign roles to the user. See ”Assign Roles to a User."
You can copy store and role assignments from an existing user. See ”Copy Assignments from Another User."
Click Save to save the user record and return to the User List window.
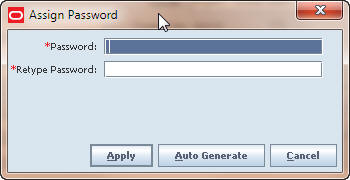
To assign an initial user password, follow these steps:
Click Assign Password. The Assign Password window opens.
Generate a password or enter a password manually:
To generate a password value automatically, click Auto Generate. Both fields are completed with a random string value generated by SIM.
To assign a specific password, enter the password value in both the Password and Retype Password fields.
Click Apply to assign the password and return to the User Detail window. The Password Assigned check box indicates that you have assigned a password to this user.
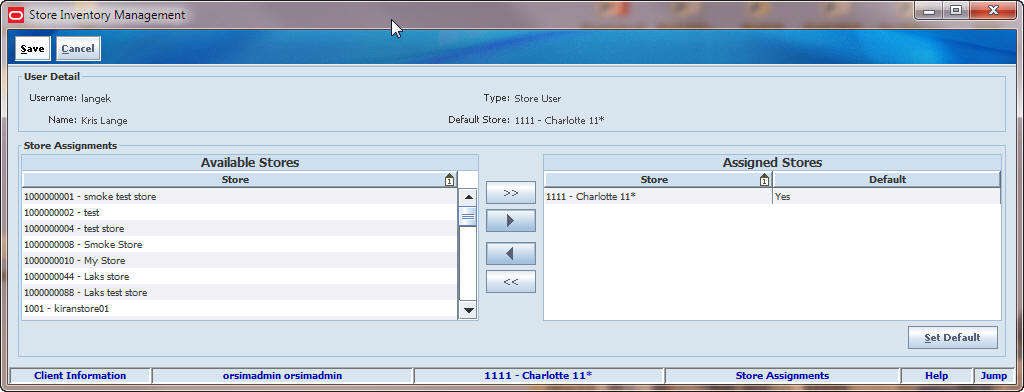
To assign stores to a user, follow these steps:
Click Assign Stores. The Store Assignments window opens.
To assign stores, follow these steps:
In the Available Stores list, select the stores you want to assign to the user.
Click the right-arrow button to move the selected stores to the Assigned Stores list.
To assign all stores, click the double-right-arrow button.
|
Note: The stores that you can assign to a user are limited to those stores to which you have access. Other stores are not listed. |
To remove store assignments, follow these steps:
In the Assigned Stores list, select the stores you want to remove.
Click the left-arrow button to move the selected stores to the Available Stores list.
To remove all stores, click the double-left-arrow button.
To assign the user's default store, follow these steps:
In the Assigned Stores list, select the user's default store at login.
Click Set Default. The Default column for the selected store is marked ”Yes.”
|
Note: You must select at least one default store. |
Click Save to save your changes and return to the User List window.
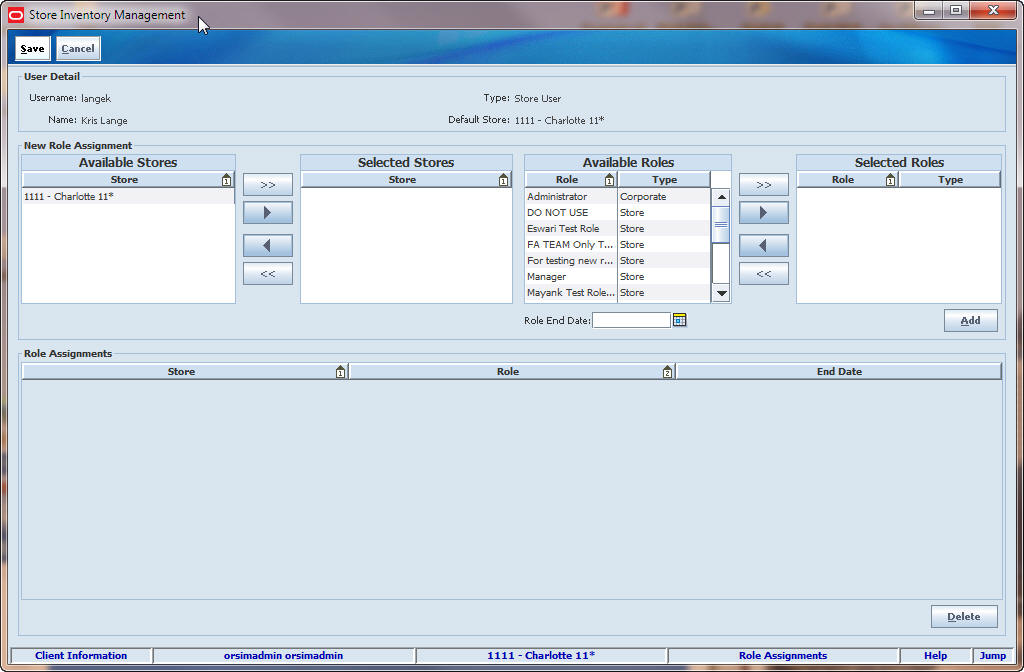
To assign roles to a user, follow these steps:
Click Assign Roles. The Role Assignments window opens.
In the Available Stores list, select one or more stores to which the selected roles will apply.
Click the right-arrow button to move the stores to the Selected Stores list. (To select all stores at once, click the double-right-arrow button.)
To remove stores, select the assigned stores and click the left-arrow button.
In the Available Roles list, select one or more roles that you want to assign to the user.
Click the right-arrow button to move the roles to the Selected Roles list. (To select all roles at once, click the double-right-arrow button.)
To remove roles, select the assigned roles and click the left-arrow button.
Click Add. The Role Assignments window lists the stores and related roles assigned to the user.
To remove a store/role combination, select the role assignment and click Delete.
Click Save to save your changes and return to the User List window.
|
Note: The Copy Assignments button is only available when you are setting up a new user. You can assign only store/role combinations that you have yourself. |
It can be easier to copy the store and role assignments of a user that is already set up. If you copy store and role assignments, you can still make additional changes to the assignments for the new user you are setting up.
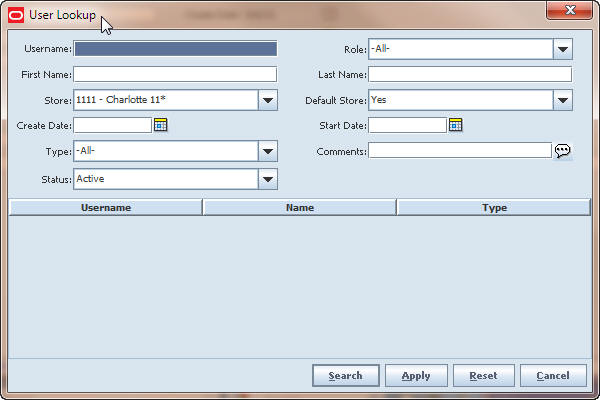
To copy the store and role assignments from another user, follow these steps:
Click Copy Assignments. The User Lookup window opens.
Enter or select values for the User Lookup fields to specify the existing users that you want to find.
Click Search. The users that match your search criteria are listed.
Select the user whose assignments you want to copy for the new user you are setting up.
Click Apply. You return to the User Detail window.
To view and change the new user's store and role assignments as needed, use the Assign Stores and Assign Roles functions. See ”Assign Stores to a User” and ”Assign Roles to a User."
Click Save to save the new user and return to the User List window. The new user has been added to the list of users, with the stores and privileges of the selected user.
You can update a user's personal information (such as name, supervisor, employee number) or assignments at any time.
|
Note: You can only update records for internal users (that is, users who were created in SIM and not an external security system). |
To update a user's information or assignments, follow these steps:
If you want to filter the users listed, click Filter. See ”Filter the User List."
Double-click on the user whose information you want to change. The User Detail window opens.
Make any updates required:
Change or add values as needed in fields of the User Detail window. See ”Create a New User” for information about field values.
To assign a new password, click Assign Password. The Assign Password window opens. See ”Assign a User Password."
To update store assignments, click Assign Stores. The Store Assignments window opens. See ”Assign Stores to a User."
To update role assignments, click Assign Roles. The Role Assignments window opens. See ”Assign Roles to a User."
Click Save to save any changes and return to the User List window.
Delete the records of users that are no longer needed.
|
Note: You cannot delete users who were set up in an external security system. You can only delete users who were set up in SIM. |
To delete one or more users, follow these steps:
If you want to filter the users listed, click Filter. See ”Filter the User List."
Select the users you want to delete.
Click Delete. A message is displayed to verify that you want to delete the users you have selected.
Click Yes. The selected users are deleted and you return to the User List window.
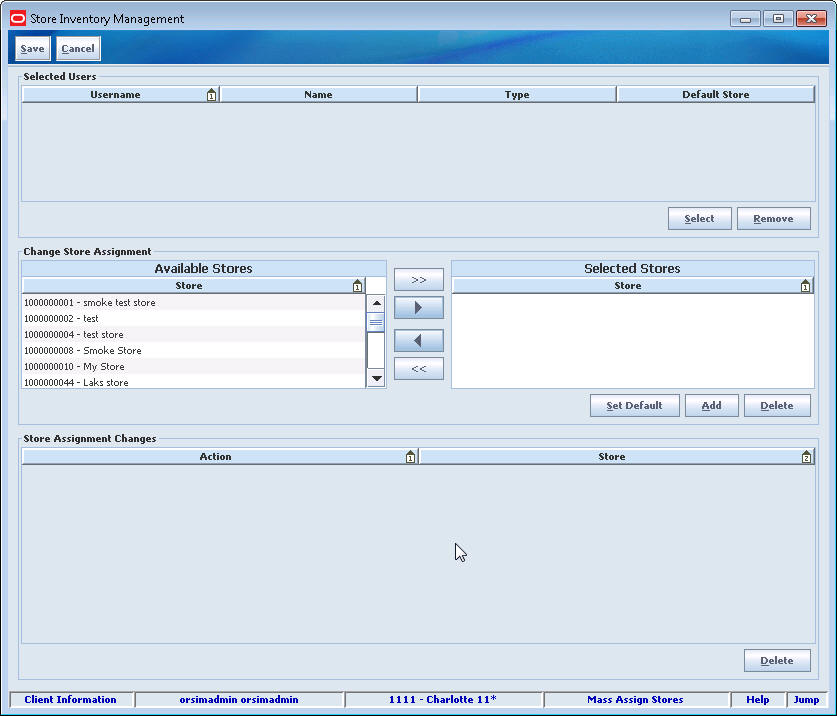
Use the Mass Assign Stores functions to assign one or more stores to one or more SIM users.
Navigate: Main Menu > Admin > Security > Mass Assign Stores. The Mass Assign Stores window opens.
To assign stores to users, follow these steps:
To add users to the list, follow these steps:
Click Select. The User Lookup window opens.
Enter or select values for the User Lookup fields to specify the existing users that you want to find.
Click Apply. The users that match your search criteria are listed.
Select one or more users to whom you want to assign stores. You return to the Mass Assign Stores window.
To remove users from the list, select the users and click Remove.
To assign stores, follow these steps:
In the Available Stores list, select the stores you want to assign to all the selected users.
Click the right-arrow button to move the selected stores to the Assigned Stores list.
To assign all stores, click the double-right-arrow button.
|
Note: The stores that you can assign to a user are limited to those stores to which you have access. Other stores are not listed. |
To assign a default store for all the selected users, follow these steps:
In the Assigned Stores list, select the default store.
Click Set Default.
To add the store assignments for the selected users, click Add. The store assignments are listed in the Store Assignment Changes list.
To remove store assignments from the Store Assignment Changes list, select the stores and click Delete.
Click Save to save your changes and return to the Security menu.
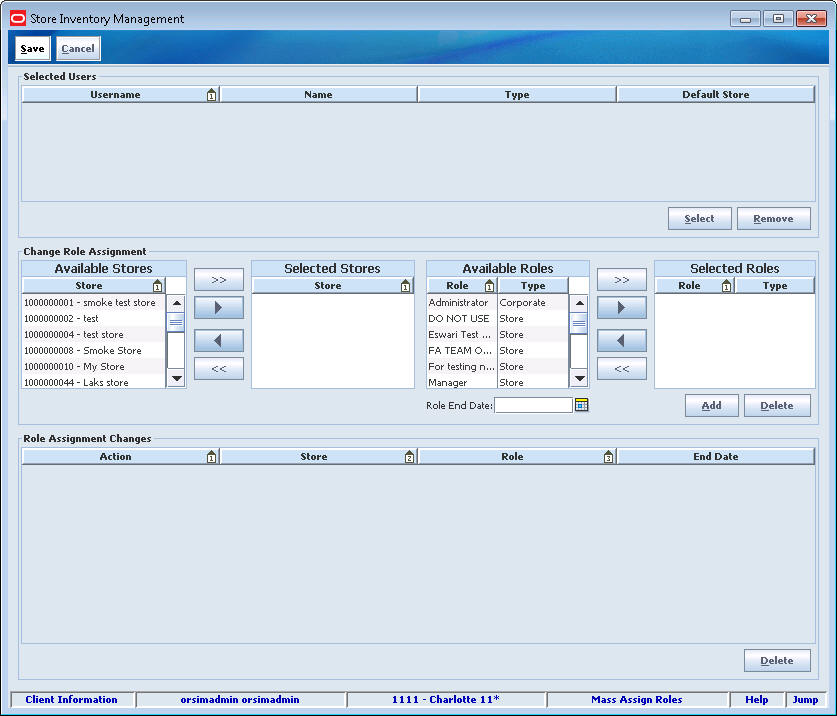
Use the Mass Assign Stores functions to assign one or more roles to one or more SIM users.
Navigate: Main Menu > Admin > Security > Mass Assign Stores. The Mass Assign Roles window opens.
To assign roles to users, follow these steps:
To add users to the list, follow these steps:
Click Select. The User Lookup window opens.
Enter or select values for the User Lookup fields to specify the existing users that you want to find.
Click Search. The users that match your search criteria are listed.
Select one or more users to whom you want to assign roles.
Click Apply. You return to the Mass Assign Roles window.
To remove users from the list, select the users and click Remove.
To select the stores for which the assigned roles will apply, follow these steps:
In the Available Stores list, select the stores.
Click the right-arrow button to move the selected stores to the Selected Stores list.
To select all stores, click the double-right-arrow button.
To remove stores from the Selected Stores list, select the stores and click the left-arrow button.
To select the roles that the users will have for the selected stores, follow these steps:
In the Available Roles list, select the roles you want to assign.
Click the right-arrow button to move the selected roles to the Selected Roles list.
To select all roles, click the double-right-arrow button.
To remove roles from the Selected Roles list, select the roles and click the left-arrow button.
In the Role End Date field, select or enter the end date for the selected roles for the selected users.
Click Add. The role assignments are listed in the Role Assignment Changes list.
To remove role assignments from the Role Assignment Changes list, select the roles and click Delete.
Click Save to save your changes and return to the Security menu.
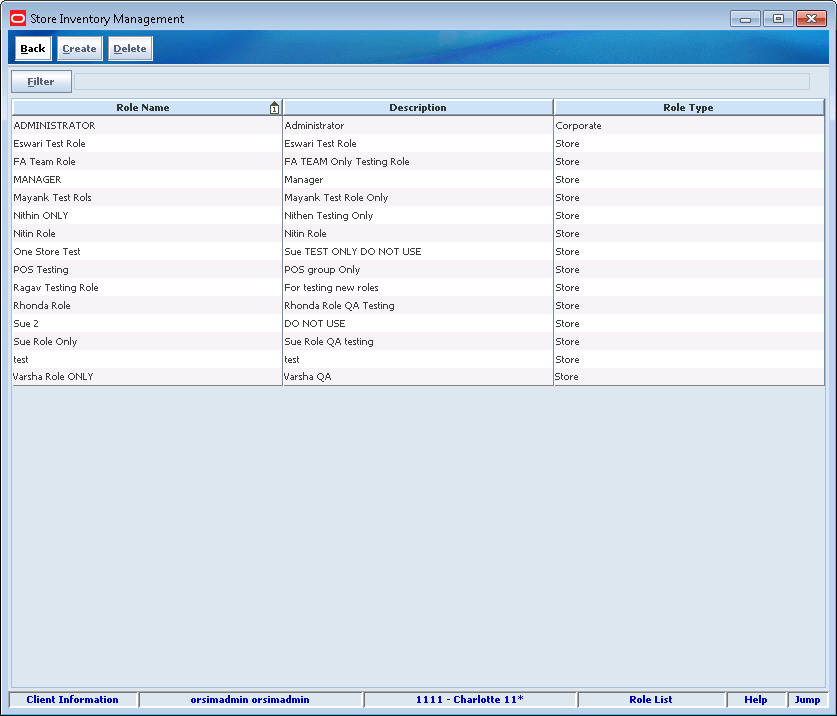
Use the Role Maintenance functions to create and modify roles and assign permissions to roles.
Navigate: Main Menu > Admin > Security > Role Maintenance. The Role List window opens.
The Role List window displays the following information about SIM roles:
| Field | Description |
|---|---|
| Role Name | Name assigned to the role. This name corresponds to the role assigned in the external security system. |
| Description | Brief description of the role. |
| Role Type | Store or Corporate, used for filtering in SIM. |
From the Role List window, you can do the following:
From the Role List window, click Back to return to the Security menu.
Whenever the Role List window is displayed, you can filter the list to limit the roles listed. If the list is currently filtered, the filtering is shown next to the Filter button.

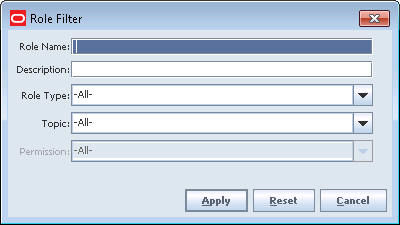
To filter the list of roles or to change the current filtering, follow these steps:
In the Role List window, click Filter. The Role Filter window opens.
Enter or select search values as needed to specify the roles that you want to list. All values are optional. If you leave a field blank or do not make a selection, all values are included in the search.
Role Name – Enter all or part of the role name. All role names that contain the value you enter will be returned from the search.
Description – Enter all or part of the role description. All role descriptions that contain the value you enter will be returned from the search.
Role Type – Select Corporate or Store.
Topic – Select a topic to return all roles that have permissions related to that topic.
Permission – If you select a topic, you can also specify a specific permission related to that topic. Only roles with that specific permission will be returned from the search.
Click Apply. You return to the Role List window, where your filter has been applied.
To create a new SIM user role, you must assign to that role all the permissions required by that role to perform the role's assigned duties. There are two levels of permissions:
Permissions for functional areas of the SIM application
Data permissions, for access to data that the user can update
Also see the Oracle Retail Store Inventory Management Implementation Guide, Volume 1–Configuration for information about how to coordinate SIM user roles with roles defined in an external security system.
Navigate: Main Menu > Admin > Security > Role Maintenance. The Role List window opens.
To create a new role, follow these steps:
Click Create. The Role Detail window opens.
Complete the following fields to identify the new role:
Role Name – Enter the system name for the role. This name is used as a system key to identify the role and cannot be changed after you have created a new role.
Role Description – Enter the description of the role.
Role Type – Select Corporate or Store. See the Oracle Retail Store Inventory Management Implementation Guide for more information about role types.
End Date Required – Select this check box if this role requires an end date. When the role is assigned to a user, an end date will be required.
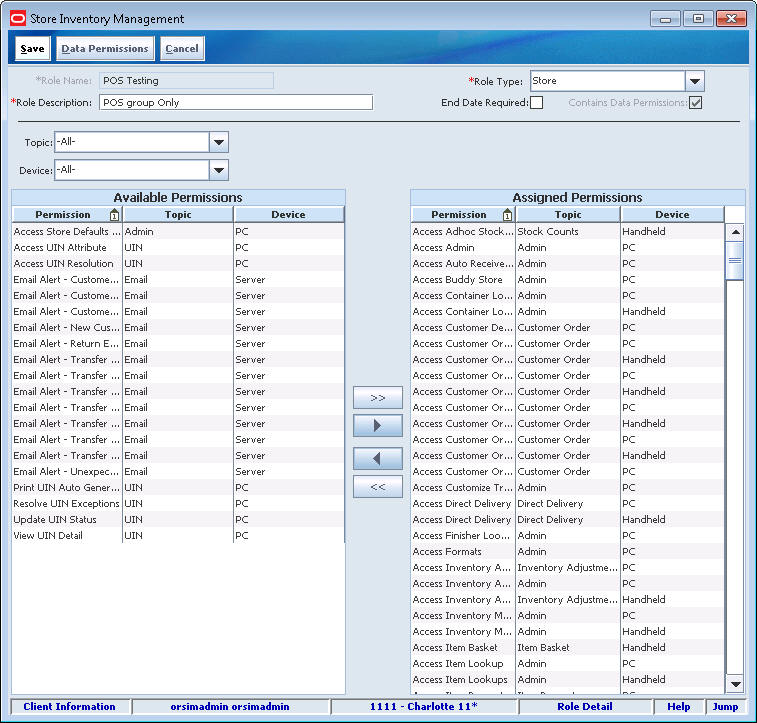
By default, all possible permissions for SIM functions on the PC and handheld are listed in the Available Permissions list. You can use the Topic and Device fields to limit the permissions displayed at one time. Filter the Available Permissions list as follows:
In the Topic field, select a topical area for which you want to assign permissions (for example, Admin, Item Requests, Returns). Only the permissions available for that topic will be listed.
In the Device field, select Handheld or PC to list only the permissions available for that type of device.
Assign functional permissions to the role by moving permissions from the Available Permissions list to the Assigned Permissions list, as follows:
Select one or more permissions from the Available Permissions list.
Click the right-arrow button to assign the selected permissions to the role.
|
Note: To assign all permissions listed to the role, click the double-right-arrow button. |
Repeat Steps 3 and 4 as needed to assign functional permissions for different topic areas.
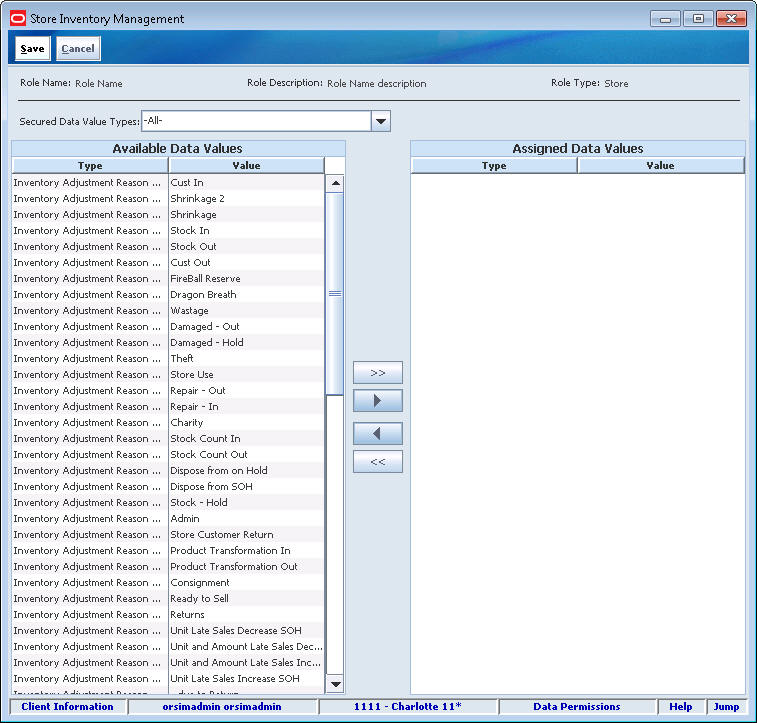
Assign data permissions to the new role as follows:
Click Data Permissions. The Data Permissions window opens.
By default, all secured SIM data permissions are listed in the Available Data Values list. You can use the Secured Data Value Types field to limit the data permissions displayed at one time.
In the Secured Data Value Types field, select a data value type to limit the data values listed in the Available Data Values list (for example, Inventory Adjustment Reason or Return Source.
Select one or more data values from the Available Data Values list.
Click the right-arrow button to assign the selected data values to the role.
|
Note: To assign all data values listed to the role, click the double-right-arrow button. |
Repeat Steps b through d to assign all data values needed by the role.
Click Save to return to the Role Detail window.
Click Save to save the new role and return to the Role List window.
You can view details about an existing role and change role permissions as needed.
Navigate: Main Menu > Admin > Security > Role Maintenance. The Role List window opens.
To view or edit an existing role, follow these steps:
If you want to filter the roles listed, click Filter. See ”Filter the Role List."
Double-click on the role you want to edit or view. The Role Detail window opens.
Assign or remove permissions for the role. See ”Create a New Role” for details about assigning permissions.
|
Note: To remove permissions, click the left-arrow buttons. To remove all permissions, click the double-left-arrow buttons. |
Click Save to save the changes to the role and return to the Role List window.
Delete roles that are no longer needed and are not being used.
|
Caution: Deleting a role immediately prevents all users of that role from using the features assigned to that role in SIM. If you want to view the details of a particular role before you decide to delete it, see ”Edit or View an Existing Role." |
Navigate: Main Menu > Admin > Security > Role Maintenance. The Role List window opens.
To delete one or more roles, follow these steps:
If you want to filter the roles listed, click Filter. See ”Filter the Role List."
Select the roles you want to delete.
Click Delete. A message is displayed to verify that you are sure that you want to delete the roles you have selected.
Click Yes. The selected roles are deleted and you return to the Role List window.
|
Note: If SIM is configured to use passwords from an external security system, this function is not available. |
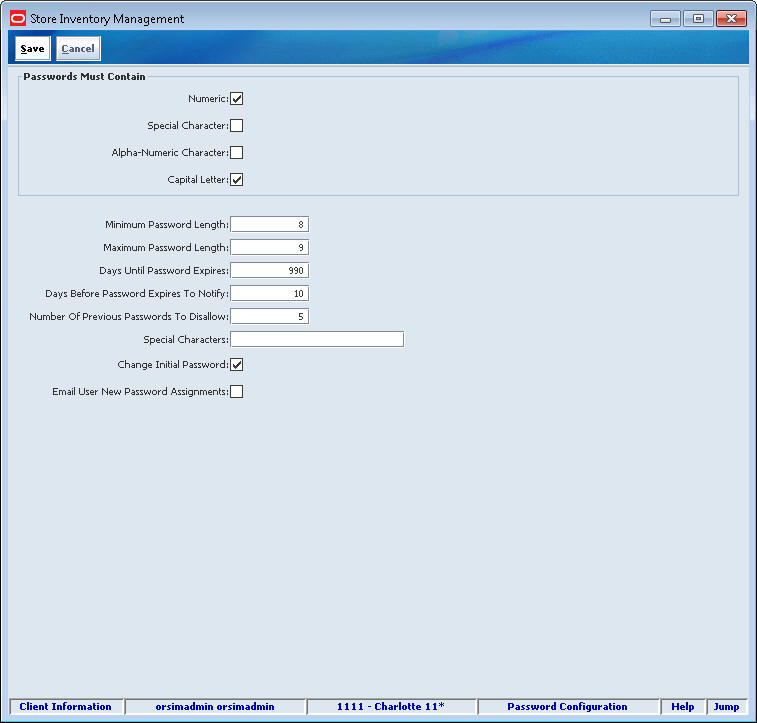
Use the Password Configuration function to set requirements for SIM user passwords. You can set requirements such as minimum and maximum length, how often passwords must be changed, and the kinds of characters that are required in password values. The rules you set are applied when users change their passwords.
You can change the password rules whenever it is necessary. Default values are set when SIM is installed.
Navigate: Main Menu > Admin > Security > Password Configuration. The Password Configuration window opens.
To change requirements for passwords, follow these steps:
For the check boxes under Passwords Must Contain, select the check box to specify that every password must contain at least one character of the type specified:
Numeric (selected by default)
Special Character (not selected by default)
Alpha-Numeric Character (selected by default)
Capital Letter (selected by default)
If you deselect (uncheck) any check box, characters of that type are allowed but not required in SIM password values.
Set the values of all of the following:
Minimum Password Length – The minimum required length of a password. The value can be an integer from 1 to 20 (default 8).
Maximum Password Length – The maximum allowed length of a password. The value can be an integer from 2 to 20 (default 8). This value must be equal to or greater than the Minimum Password Length value.
Days Until Password Expires – The maximum number of days that a password remains valid. If a user logs in to SIM and the user's password has not been changed for this number of days (or more), the user is prompted to enter a new password. This value can be an integer from 0 to 999 (default 90). A value of 0 means that passwords never expire.
Days Before Password Expires to Notify – The number of days before expiration when a user is first notified about upcoming password expiration. When a user logs in to SIM and the user's password will expire in this number of days (or less), the user is notified about the number of days remaining before a new password is required. This value can be an integer from 0 to 999 (default 14). A value of 0 means that users are not notified about upcoming password expiration.
Number of Previous Passwords to Disallow – The number of most recent previous passwords for a user that cannot be reused when a password change is entered. This value can be an integer from 0 to 999 (default 5).
Special Characters – A list of the special characters that are allowed in user passwords. Enter all special characters allowed, separated by single spaces between the characters. If the check box Special Character is selected (meaning that a special character is required in every password), this field must contain at least one special character.
Change Initial Password – If this check box is selected (default), a new user is required to change passwords the first time that the new user logs in to SIM. If this check box is not selected, the new user can continue to use the password that was assigned when the user was created in SIM.
Email User New Password Assignments – If this check box is selected, SIM is allowed to send an e-mail containing the user's password to each new user, at the time that the new user is created in SIM. If this check box is not selected, SIM does not e-mail passwords to new users.
Click Save to save your changes and return to the Security menu.