| Oracle® Retail Store Inventory Management User Guide Release 14.1 E53429-01 |
|


 Previous |
 Next |
| Oracle® Retail Store Inventory Management User Guide Release 14.1 E53429-01 |
|
Previous |
Next |
Technical maintenance tasks are those that control various aspects of SIM configuration and performance. Tasks range from tuning performance of polling timers to modifying the appearance and content of the SIM application.
|
Note: Only a system administrator or other user with the necessary security privileges can access the Technical Maintenance functions. |
The Technical Maintenance functions are as follows:
The UI Configuration button gives you access to functions you can use to modify the appearance of the SIM user interface. You can also modify and add translated strings to the interface.
Modify the Application Appearance (Customize Themes)
You can configure the SIM user interface to customize its appearance and wording. You can modify existing themes or create new ones. Each theme can use a selected ”look and feel” (general style) that you select, along with fonts and colors that you specify. You can substitute your own icons, such as your company icon, to replace some of those supplied with SIM. You can also modify translations and wording used in the user interface.
To modify the appearance and behavior of the user interface, you may want to experiment with different settings for look and feel, as well as different fonts, colors, and icons. There is no limit to the number of times you can make changes to a theme; however, new changes may not appear until the user restarts SIM.
You can activate your new or modified themes to make them available to all SIM users. You can also deactivate themes that you do not want to use.
To modify the application appearance, the following functions are available:
Modify or Add Translated Strings (Customize Translations)
You can modify messages in the translation database, to substitute or add wording that you prefer to translated message strings. You can also create new translated strings that can be accessed by custom code using a key (name) that you specify. Each translation record consists of the following:
A unique key (name) in English-language characters
A translated message
Optional comments
To modify or add translated strings, the following functions are available:
|
Note: The currency symbol display depends on the country associated to the location.Adding another non-supported language requires the creation of a new language in the database. For more information, see the applicable Software Localization Tool Kit for SIM on My Oracle Support. |
Use this procedure to create a new theme that you can customize to change the appearance of the SIM application.
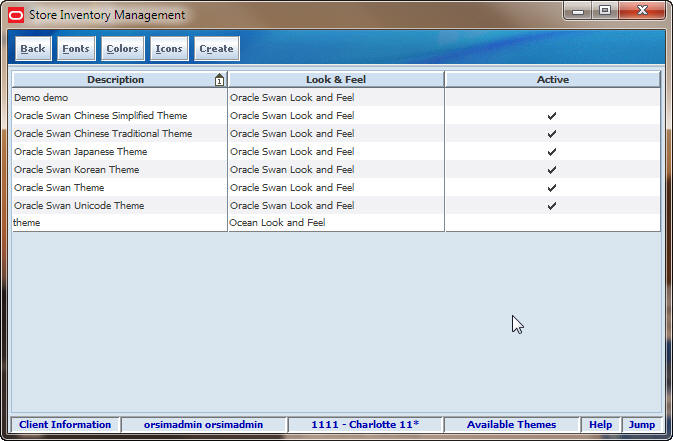
Navigate: Main Menu > Admin > Technical Maintenance > UI Configuration > Customize Themes. The Available Themes window opens.
To create a new theme, follow these steps:
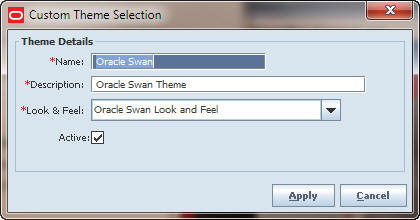
Click Create. The Custom Theme Selection window opens.
Enter a unique name for the new theme in the Name field. The name must be a name that is not currently used for a theme. A value is required in this field, and it can be up to 40 characters in length.
Enter a description of the theme in the Description field. A value is required in this field, and it can be up to 750 characters in length.
From the Look & Feel drop-down list, select one of the available values.
Click Apply to create the theme and close the Custom Theme Selection window.
Click Back to return to the UI Config menu.
After you have created the theme, you can modify the theme as you want to change colors, fonts, icons, and the look and feel of the theme. You can do the following:
When you are ready to make the theme available to SIM users, activate the theme. See ”Activate or Deactivate a Theme."
To customize the fonts used in the interface, you can do any of the following:
Use the following procedure to set the font for one application widget (interface element), or for a selected set of widgets. To apply the same font family to all SIM application widgets, see ”Apply a Universal Font Setting."
Navigate: Main Menu > Admin > Technical Maintenance > UI Configuration > Customize Themes. The Available Themes window opens.
To change fonts for one or more application widgets, follow these steps:
Click on the theme that you want to modify.
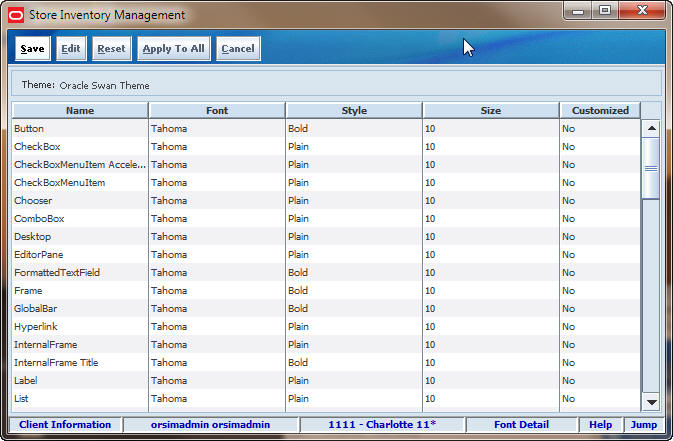
Click Fonts. The Font Detail window opens. The Font Detail window lists all of the SIM application widgets (interface elements) that have a font that you can change.
Select one or more widgets (rows) from the list. (If you select multiple rows, select widgets that you want to use the same font.)
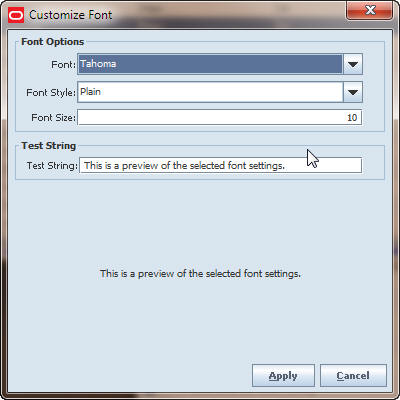
Click Edit. The Customize Font window opens.
From the Font drop-down list, select the font (font family) that you want to use for the selected widgets. The default font is Tahoma.
|
Note: The fonts available are those that are installed on the PC that you are currently using. Be sure to select a font that other SIM users will also have installed on their own PCs. |
From the Font Style drop-down list, select the style of the font (Bold, Italic, Italic-Bold, or Plain). The default is Plain.
In the Font Size field, enter the integer value of the size of the characters in points. Values that include fractions (such as .5) are not allowed. The default size is 10.
|
Note: A font size that is too large can cause incorrect display of labels and other text in the widgets for which you are setting the font size. If you increase the font size from the default size, be sure to test and verify that text is still displayed correctly. |
Click Apply to save your changes and close the Customize Font window.
When you are finished changing fonts, click Done to return to the Available Themes window.
Click Save to return to the UI Config menu.
|
Note: Resetting fonts restores default font settings when SIM was installed. Any changes you have made to fonts for the selected widgets will be lost. |
To reset the user interface fonts, follow these steps:
Click on the theme that you want to modify.
Click Fonts. The Font Detail window opens.
From the list, select all of the widgets (rows) that you want to reset to their original fonts.
Click Reset.
When you are finished, click Save to return to the Available Themes window.
Click Back to return to the UI Config menu.
Use this procedure if you want to apply a single font (font family) to all SIM application widgets (for example, if you want to use Arial font throughout the SIM application). To set the font for a single widget or a group, see ”Change Fonts."
Navigate: Main Menu > Admin > UI Configuration > Customize Themes. The Available Themes window opens.
To apply a universal font setting, follow these steps:
Click on the theme that you want to modify.
Click Fonts. The Font Detail window opens. The Font Detail window lists all of the SIM application widgets (interface elements) that have a font that you can change.
From the list, select one widget (row) that uses the font that you want to apply to this theme, to be used throughout the SIM user interface.
|
Note: The same font family (for example, Arial) will be applied to all widgets; however, the font size and style of the selected widget (for example, 12-point Bold) will not be applied. Applying the same font size and style throughout the application could cause many display problems. |
Click Apply to All.
Click Save to return to the Available Themes window.
Click Back to return to the UI Config menu.
To customize the colors of the user interface, you can do the following:
Use this procedure to apply color changes to one or more application widgets (interface elements).
Navigate: Main Menu > Admin > Technical Maintenance > UI Configuration > Customize Themes. The Available Themes window opens.
To change colors, follow these steps:
Click on the theme that you want to modify.
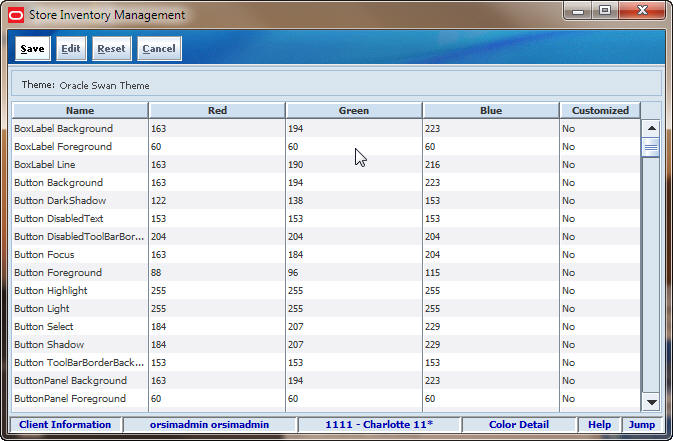
Click Colors. The Color Detail window opens. The Color Detail window lists all of the SIM application widgets that have a color property that you can change.
Select one or more widgets (rows) from the list. (If you select multiple rows, select widgets that you want to set to the same color.)
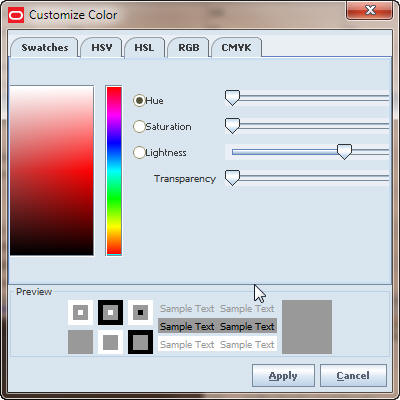
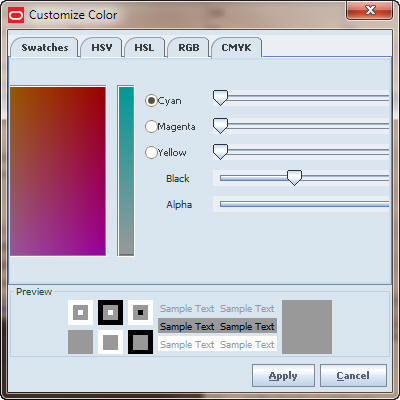
Click Edit. The Customize Color window opens.
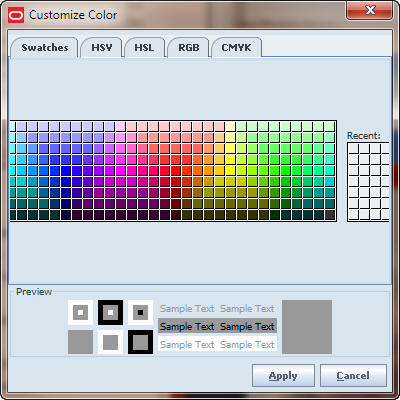
Use any of the three tabs of the Customize Color window to select the color and view the settings for the color you have selected.
The Swatches tab shows an array of color swatches (samples). Click on any swatch to select that color.
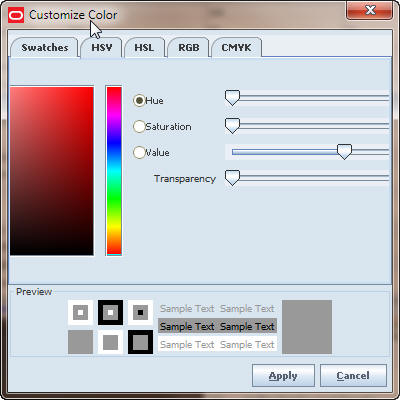
The HSV tab shows the hue, saturation, and value settings for the selected color. You can use the radio buttons and other controls to set the HSV numeric values.
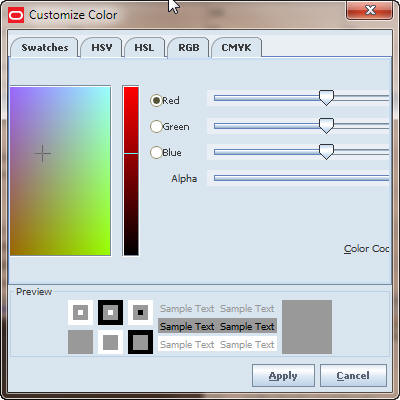
The RGB tab shows the red, green, and blue values for the selected color. You can use the controls to set the RGB numeric values.
The HSL tab shows the shows the hue, saturation, and lightness settings for the selected color. You can use the radio buttons and other controls to set the HSL numeric values.
The CMYK tab shows the cyan, magenta, yellow, and key (black) settings for the selected color. You can use the radio buttons and other controls to set the CMYK numeric values.
Click Apply to set the color for the selected widgets and close the Color Detail window.
When you are finished changing colors, click Save to return to the Available Themes window.
|
Note: Resetting colors restores default color settings when SIM was installed. Any changes you have made to colors of the selected widgets will be lost. |
Click on the theme that you want to modify.
Click Colors. The Color Detail window opens.
From the list, select all of the widgets (rows) that you want to reset to their original colors.
Click Reset.
When you are finished, click Save to return to the Available Themes window.
Click Back to return to the UI Config menu.
To customize the icons in the user interface, you can do the following:
Navigate: Main Menu > Admin > UI Configuration > Customize Themes. The Available Themes window opens.
To change icons for one or more widgets (interface elements), follow these steps:
Click on the theme that you want to modify.
Click Icons. The Icon Detail window opens. The Icon Detail window lists all of the SIM application widgets that have an icon that you can change. The Customized column indicates whether an icon has been customized (Yes or No).
Select one widget from the list.
Click Edit. The Customize Icon window opens.
In the Icon Path field, enter the full path and file name where the icon is located. An icon file should be a GIF or JPEG file; GIF files load more quickly.
The full pathname must be in the deployed classpath of the client JVM. This means that it will probably not be on any local file system or network drive path. The practical way to accomplish this is to create a customicon.jar file at the client site that contains all of the icons. This .jar file should then be deployed as part of the Web Start deployment.
Click Apply to save your change and return to the Icon Detail window.
When you are finished, click Save to return to the Available Themes window.
Click Back to return to the UI Config menu.
|
Note: Resetting icons restores default icon settings when SIM was installed. Any changes you have made to icons for the selected widgets will be lost. |
To reset the application icons, follow these steps:
Click on the theme that you want to modify.
Click Icons. The Icon Detail window opens.
From the list, select all of the widgets (rows) that you want to reset to use their original icons.
Click Reset.
When you are finished, click Save to return to the Available Themes window.
Click Back to return to the UI Config menu.
Activating a theme makes it available to other SIM users. Deactivating a theme removes that theme from the list of themes available to SIM users.
Navigate: Main Menu > Admin > UI Configuration > Customize Themes. The Available Themes window opens.
Double-click on the theme that you want to activate or deactivate. The Custom Theme Selection window opens.
Activate or deactivate the theme:
Select the Active check box to activate the theme.
Deselect the Active check box to deactivate the theme.
Click Apply to save your changes and close the Custom Theme Selection window.
Click Back to return to the UI Config menu.
|
Note: For any translation, if you have not selected a theme that can display the language, the translations may not be displayed correctly. |
Navigate: Main Menu > Admin > UI Configuration > Customize Translations. The Translation Details window opens.
To modify translated strings, follow these steps:
From the Language drop-down list, select the language for which you want to modify one or more translated strings.
Depending on the selected language, there may be translations that are specific to a country.
A country name is appended to a language name if the language translation varies based on geographical location. For example, a traditional form of Chinese is spoken in China, but in Taiwan there is a different Chinese language. In the Language list, there are entries for ”Chinese - China” and ”Chinese - Taiwan.”
Search for all translated strings or narrow your search:
If you want to see all translated strings for the selected language, click Search.
If you want to narrow your search, follow these steps:
Enter a search value in the Translation field. For example, if the selected language is French, you might want to search for the French string ”retours.”
Click Search.
The search results are displayed in the Translation Details window. Records are sorted by Key value.
|
Note: The records returned by the search are those that contain your specified search string in the Translation column. If there are no translated strings for the selected language that contain the search string you entered in the Translation field, no records are returned. |
To change a translated string:
Double-click on the row that contains the translation you want to change. The Translation Detail window opens.
In the Translation field, change the translation as you want.
In the Comments field, enter any optional comments about the string and your translation.
Click Apply to save your changes and close the Translation Detail window.
When you are finished making changes, click Back in the Translation Details window. You return to the UI Config menu.
|
Note: Translation changes are available to users the next time they start SIM. |
You can also define new translated strings for the SIM interface.
|
Note: For any translation, if you have not selected a theme that can display the language, the translations may not be displayed correctly. |
Navigate: Main Menu > Admin > UI Configuration > Customize Translations. The Translation Details window opens.
From the Language drop-down list, select the language for which you want to add translations.
|
Note: The translation key and comments are created for all languages. |
Click Create. The Translation Detail window opens.
In the Key field, enter a character string, using English-language characters, that uniquely names the new translation record. The key is required, and it cannot be the same value as any existing key in the translations database.
In the Translation field, enter the translated message or string to associate with the new key. (If you leave this field blank, its value defaults to the Key value.)
In the Comments field, enter any optional comments you want about the key properties and your translation.
Click Apply to save your new translation record and close the Translation Detail window.
When you are finished adding translations, click Back in the Translation Details window. You return to the UI Config menu.
Inbound and outbound SIM messages are stored in a message staging table. Messages of different types are processed by polling the staging table to retrieve and send. Polling timers control polling behavior for each message type. Through the SIM client, you can view the current status of all polling timers, and start and stop timers.
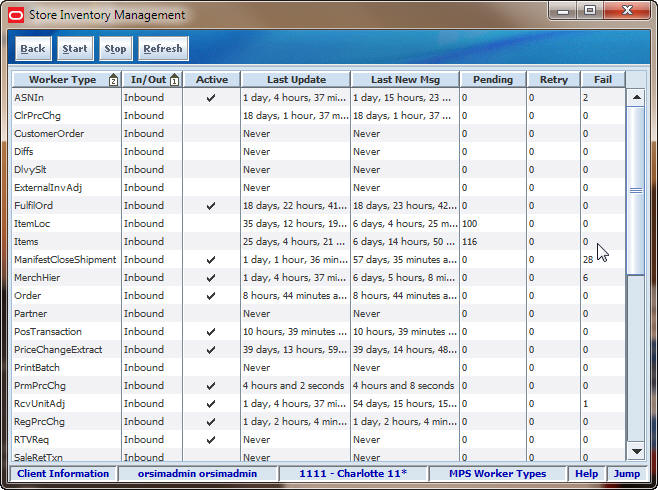
MSP Working Types Window
Navigate: Main Menu > Admin > Technical Maintenance > Message Processing System (MPS) Worker Types. The MPS Working Types window opens.
The MPS Working Types table lists the following information about the MPS working types.
| Column | Description |
|---|---|
| Worker Type | Name of the working type. |
| In/Out | Whether messages are inbound or outbound. |
| Active | Whether the working type is active (started and running) or inactive (stopped). A check mark in this column indicates that the working type is active. |
| Last Update | Last time this working type was actively processing messages. |
| Last New Msg | Last time a new message arrived at the staging table for this family. |
| Pending | Number of messages in pending status for the worker type. |
| Retry | Number of messages/records in retry status for the worker type. |
| Fail | Number of messages/records in failed status for the working type. |
From the MPS Worker Types window, you can do the following:
From the MPS Worker Types window, click Back to return to the Technical Maintenance menu.
To start or stop working types, follow these steps:
In the working types list, select one or more of the working types that you want to start or stop.
Click Stop to stop the selected working types, or click Start to start them.
Click Refresh to refresh the working types status display.
Inbound and outbound SIM MPS system messages are stored in a message staging table. Through polling, messages are retrieved and processed by SIM or by external applications that are integrated with SIM.
Messages remain in the staging table until they are retrieved and processed successfully. The status of each staged message is one of the following:
Pending – The message is new and waiting to be retrieved.
Retry – One or more attempts were not successful, and the message will be retried again.
Fail – The message has been retried the maximum number of times and has not been processed successfully.
Messages can fail because of errors in content or for other reasons. You can handle staged messages in the following ways:
Edit the content of a message and retry the corrected message
Reset the retry counter for the message so that it will be retried
Delete the message
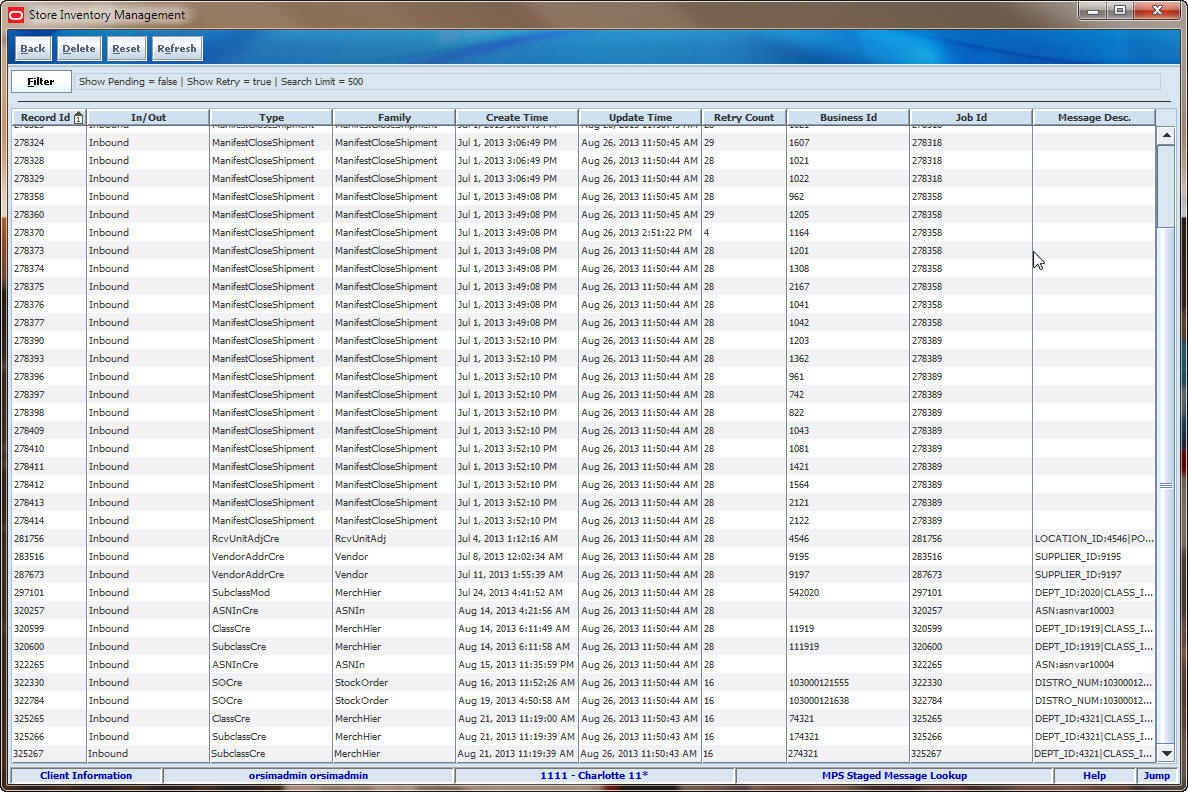
MPS Staged Message Lookup Window
Navigate: Main Menu > Admin > Technical Maintenance > MSP Staged Messages. The MSP Staged Message Lookup window opens.
The MPS Staged Messages Lookup window displays the following information about staged messages:
| Field | Description |
|---|---|
| Record ID | Unique record ID for the message |
| In/Out | Whether the message is inbound or outbound |
| Type | Type of message (similar to type used in the Oracle Retail Integration Bus) |
| Family | Staging table to which the message belongs |
| Create Time | Time the message was created |
| Update Time | Last time the message was updated |
| Retry Count | Number of times the message has been retried |
| Business ID | Unique ID of the transaction, used to group messages that need to be processed in order and atomically |
| Job ID | The identification number for the job |
| Message Desc | Message description (human-readable hints of message contents) |
From the MPS Staged Message Lookup window, you can do the following:
From the MPS Staged Messages Lookup window, click Back to return to the Technical Maintenance menu.
Whenever the MSP Staged Message Lookup window is displayed, you can filter the list of MPS staged messages to limit the requests listed. If the list is currently filtered, the filtering is shown next to the Filter button.

To filter the list of MPS staged messages or to change the current filtering, follow these steps:
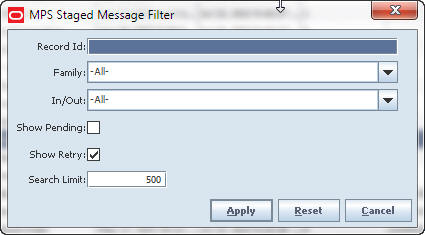
In the MPS Staged Message Lookup window, click Filter. The MPS Staged Message Filter window opens.
If you want to reset all filtering criteria to default values, click Reset.
Enter or select search values as needed to specify the MPS staged messages that you want to list. All values are optional. If you leave a field blank or select All, all values are included in the search.
Record ID – If you know the Record ID of the MPS staged message you want to view, enter the value.
Family – The default value is All.
In/Out – The default value is All.
Show Pending – Select this check box if you want to include messages in pending status.
Show Retry – Select this check box if you want to include messages in retry status.
If you want to change the limit of the number of messages listed, enter an integer value in the Search Limit field. The default value is 500.
Click Apply. You return to the MPS Staged Messages Lookup window, where your filter has been applied.
You can view the content of any listed message. You can also edit the XML message contents if you want to correct an error and retry the corrected message.
To view or edit a MPS staged message, follow these steps:
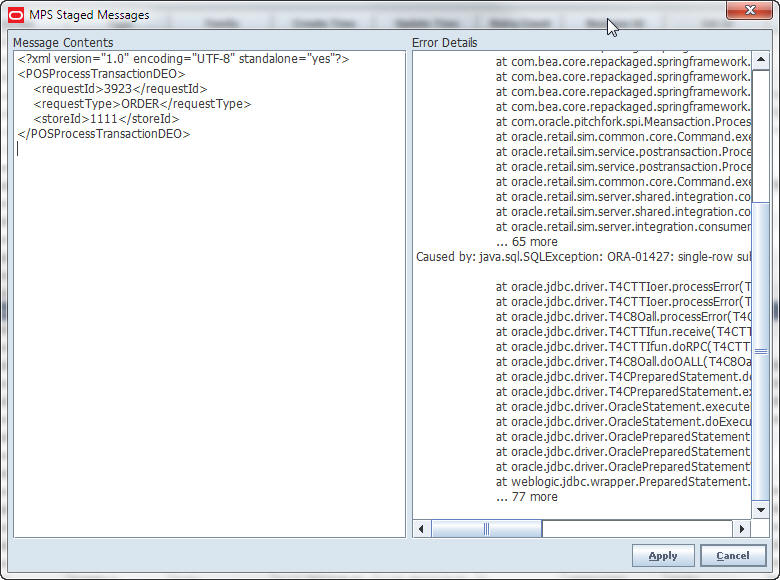
In the MPS Staged Messages Lookup window, double-click on the message you want to view or edit. The MPS Staged Messages window opens.
If you want to edit the content of the message, change the content as needed in the Message Contents pane.
|
Note: You receive an error message if you attempt to save a changed message that contains invalid XML code. |
Click Apply to save changes, or click Cancel to leave the message unchanged. You return to the MPS Staged Message Lookup window.
You can delete any listed MPS staged message. To delete one or more MPS staged messages, follow these steps:
Select the messages that you want to delete.
Click Delete.
You received the following messages: ”Are you sure you want to delete the selected items now?”
Click Yes to delete the selected messages.
Click Refresh to refresh the MPS Staged Message Lookup list display.
You can reset the retry count for any listed message, so that the message is retried again the maximum number of times. To reset one or more MPS staged messages, follow these steps:
Select the messages that you want to reset.
Click Reset. The Retry Count values for the selected messages are reset to zero.