| Oracle® Retail Store Inventory Management User Guide Release 14.1 E53429-01 |
|


 Previous |
 Next |
| Oracle® Retail Store Inventory Management User Guide Release 14.1 E53429-01 |
|
Previous |
Next |
Store ordering gives you the ability to view, create, modify, and approve orders to a supplier or transfer requests from a warehouse. Use store-level ordering to order items that are not set up for automatic replenishment, when items run short or demand increases.
|
Note: Depending on your system configuration, store orders may be limited to certain items that have a ”store order” replenishment type. You can request all other items using item requests (see Chapter 20, "Store Orders"). |
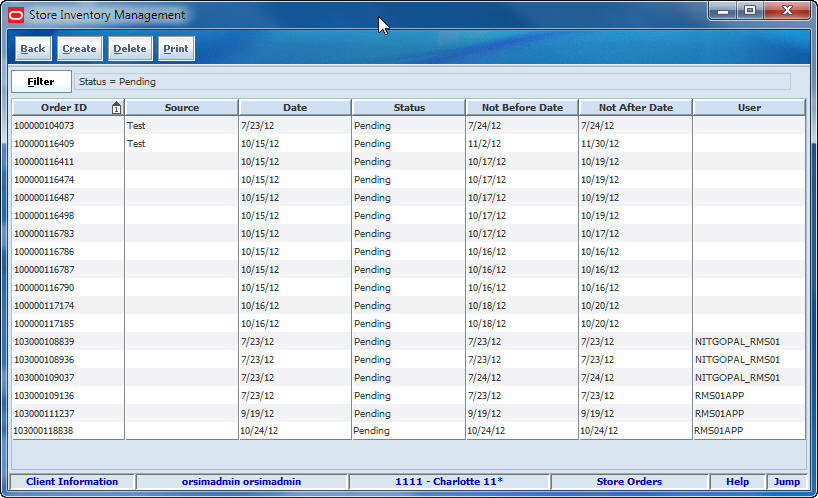
Store Orders Window
Navigate: Main Menu > Inventory Mgmt > Store Orders. The Store Orders window opens.
From the Store Orders window, you can do the following:
From the Store Orders window, click Back to return to the Inventory Management menu.
At any time while the Store Orders window is open, you can also change how the list is filtered.
Current filtering is displayed next to the Filter button on the Store Orders window. If no filtering is displayed, all items are currently selected and listed.

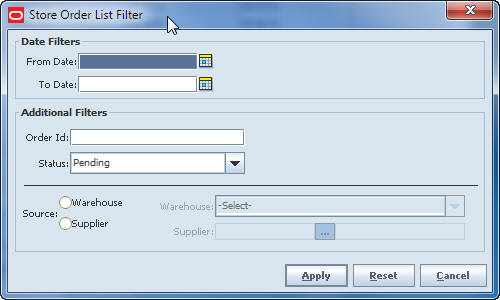
To filter the store orders listed in the Store Orders window, follow these steps:
Click Filter. The Store Order List Filter window opens.
Enter or select search values as needed to specify the store orders that you want to list. All values are optional. If you leave a field blank or select All, all values are included in the search.
Date Filters – Enter or select From Date and To Date values to limit the date range.
Order ID – Enter the Order ID.
Status – Select Approved, Closed, Pending, or All.
Warehouse or Supplier – Select either the Warehouse or Supplier radio button. For a warehouse, select the warehouse from the drop-down list. For a supplier, enter the supplier or click the Ellipsis button to look up the supplier. See ”Supplier Lookup” in Chapter 21 for more information.
Click Apply. You return to the Store Orders window, where your filter has been applied.
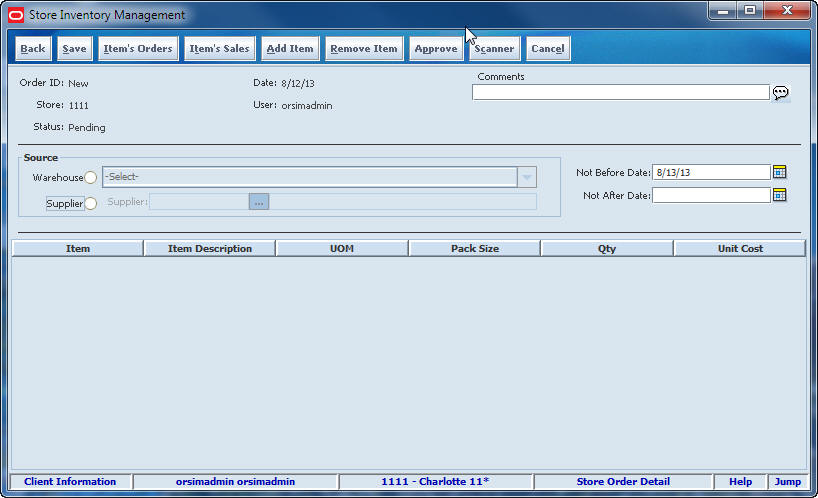
Create store orders to replenish items for which you have the authority to place orders from the store.
Navigate: Main Menu > Inventory Mgmt > Store Orders. The Store Orders window opens.
To create a store order, follow these steps:
Click Create Order. The Store Order Detail window opens.
|
Note: While the Store Order Detail window is open, you can also view details about items on the order. See ”View Item Details." |
Select the source of the item:
Supplier – Enter a supplier ID or click the Ellipsis button to look up a supplier.
In the Supplier Lookup window, locate and select the supplier you want. Click Apply to return to the Store Order Detail window.
Warehouse – Select a warehouse from the drop–down list.
Specify a delivery date range:
In the Not Before Date field, enter a date or click the Calendar button to select the date.
In the Not After Date field, enter or select a date.
|
Note: For warehouse orders, the Not After Date field is disabled. |
Enter item information:
Click Add Item. A new blank line is added to the store order list, or click Scanner to scan the item. See ”Scan an Item (Scanner Button)” in Chapter 2 for more information.
In the Item field, enter the item number, or click the Ellipsis button to look up the item.
In the Item Lookup window, locate and select the item you want. Click Apply to return to the Store Order Detail window. See ”Item Lookup” in Chapter 21 for more information.
Edit item information. Change values as needed in the following fields:
UOM – From the drop-down list, select the appropriate unit of measure.
Qty – If the displayed quantity is not correct, double-click and enter the correct quantity.
Repeat Steps a through c to add more items to the store order.
Click Save. Your order is saved and you return to the Store Orders window. Your order appears in Pending status.
From the Store Order Detail window, you can look up details about items on the order. You can do the following:
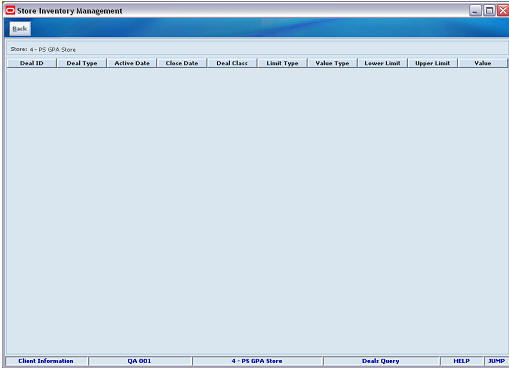
Deals may affect the order quantity for an item you order. To look up any deals that apply to an item on your order, follow these steps:
In the Store Order Detail window, select an item on your order.
Click Deals Query. The Deals Query window opens and displays available deals from the supplier of the selected item.
Click Back to return to the Store Order Detail window.
If needed, adjust your order quantities to comply with the deal.
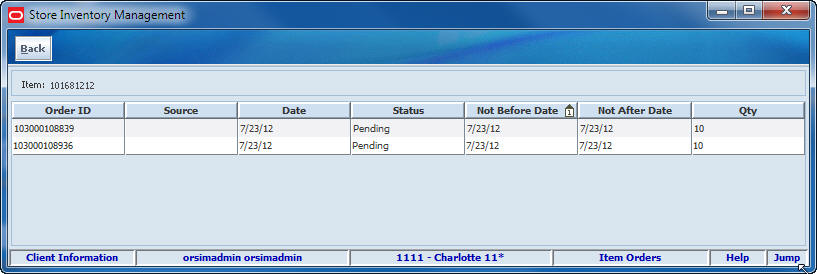
To view any other store orders for an item, follow these steps:
From the Store Order Detail window, select an item on your order.
Click Item's Orders. The Item Orders window opens and displays existing store orders for the selected item.
Click Back to return to the Store Order Detail window.
Adjust your order if needed.
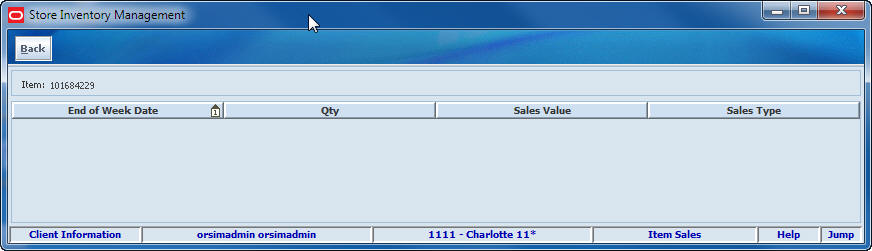
To view sales information about an item on your order, follow these steps:
From the Store Order Detail window, select an item on your order.
Click Item's Sales. The Item Sales window opens with store level sales information for the selected item.
Click Back to return to the Store Order Detail window.
Adjust your order if needed.
Use this procedure to view details of a store order or update an order.
Navigate: Main Menu > Inventory Mgmt > Store Orders. The Store Orders window opens.
To view or make changes to an existing store order, follow these steps:
If you want to filter the orders listed, click Filter. See ”Filter the Store Orders List."
Double-click the pending store order that you want to edit. The Store Order Detail window opens.
|
Note: While the Store Order Detail window is open, you can also view details about items on the order. See ”View Item Details." |
Update the store order as needed.
Change the Delivery Date
To change the delivery date, enter the date in the Request Delivery Date field or click Calendar to select the date.
Add Items to the Order
To add items to the order, follow these steps:
Click Add Item. A new blank line is added to the store order list.
In the Item field, enter the item number, or click the Ellipsis button to look up the item.
In the Item Lookup window, locate and select the item you want. Click Apply to return to the Store Order Detail window. See ”Item Lookup” in Chapter 21 for more information. Or click Scanner to scan the item. See ”Scan an Item (Scanner Button)” in Chapter 2 for more information.
Edit Item Information
Change any of the following fields as needed:
UOM – From the drop-down list, select the unit of measure.
Pack Size – If the displayed pack size is not correct, enter the correct pack size.
Qty – If the displayed quantity is not correct, enter the correct quantity.
Remove Items from the Order
To remove items from the order, follow these steps:
Select the line item that you want to remove.
Click Remove Item. A message is displayed: ”The selected line item(s) will be deleted. Do you want to continue?”
Click Yes. The item is removed from the list.
|
Note: If the order was previously sent to the Oracle Retail Merchandising System, the quantity ordered is set to 0, but the item reappears on the order when the order is opened. |
Click Save to return to the Store Orders window.
Use this procedure to approve a store order, if you have the necessary permission to approve store orders.
Navigate: Main Menu > Inventory Mgmt > Store Orders. The Store Orders window opens.
To approve a store order, follow these steps:
If you want to filter the orders listed, click Filter. See ”Filter the Store Orders List."
Double-click the pending store order that you want to approve. The Store Order Detail window opens.
|
Note: While the Store Order Detail window is open, you can also view details about items on the order. See ”View Item Details." |
Click Approve. The order is approved and you return to the Store Orders window.
Navigate: Main Menu > Inventory Mgmt > Store Orders. The Store Orders window opens.
|
Note: You can cancel only pending store orders. |
To cancel a store order, follow these steps:
If you want to filter the orders listed, click Filter. See ”Filter the Store Orders List."
Select the pending store orders that you want to cancel.
Click Delete. A message is displayed: ”Are you sure you want to delete the selected Store Orders now?”
Click Yes. The selected orders are deleted. You are returned to the Store Orders window.
Use this procedure to produce a report for a store order.
Navigate: Main Menu > Inventory Mgmt > Store Orders. The Store Orders window opens.
|
Note: SIM reports can be customized, and they may be printed or displayed on the screen, depending on how your SIM system is set up. See ”Print or View SIM Reports and Other Output” in Chapter 2 for more information. |
To produce a store order report, follow these steps:
If you want to filter the orders listed, click Filter. See ”Filter the Store Orders List."
Select the store order for which you want a report.
Click Print. The Report Selection window opens.
In the Printer field, select the printer or other output device that you want to use.
Click OK. The report is printed.