| Oracle® Retail Store Inventory Management Implementation Guide, Volume 5 - Tablet Release 15.0 E65536-01 |
|

 Previous |
 Next |
| Oracle® Retail Store Inventory Management Implementation Guide, Volume 5 - Tablet Release 15.0 E65536-01 |
|
Previous |
Next |
This chapter describes the method by which you start the application, log in, and log out. It also describes the User Interface (UI) controls in more detail.
To log in to the application:
On the tablet, tap the SIM icon. The Welcome screen appears.
On the Welcome screen, enter your user name in the User Name field.
Enter your password in the Password field.
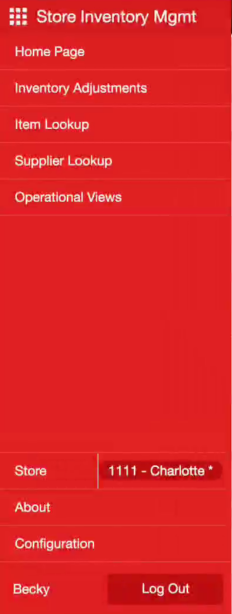
Tap Sign In to log in to the application. After you are successfully logged in, the Drawer/Menu appears:
For more information, see "Drawer/Menu."
To log out of the application, tap Log Out from the Drawer/Menu. The Welcome screen appears. See Figure 2-1.
Locale support means tailoring the information displayed on a screen and accepting user entered data in a format that meets the conventions of the locale, or geographic region, where the application is being used. The application can be internationalized. For more information on localization, see "Internationalization".
This section describes the functionality that you can access from the Drawer/Menu.
From this menu, you can access the following SIM functionality. For more information on the following options, see the appropriate section:
The Store List screen lists the available stores to which the user has permission. It enables the user to select and log in to a new store.
To access the store list, tap Store. The Store List screen appears. The Store List is accessible from within the Drawer/Menu as well as from the Home Page.
To change the store, enter the store name or ID or tap the entry. Enter the user name and password to log in to that store.
This section describes the parts of the tablet UI that is used in multiple areas of the SIM application.
The navigation toolbar appears at the top of the navigation list. The toolbar buttons enable you to perform functions described in Table 2-1.
Table 2-1 Icons
| Icon | Type | Description |
|---|---|---|
|
|
Drawer |
Tap this icon to display the Drawer/Menu. |
|
|
Search Criteria |
Tap this icon to enter search criteria. A text box appears under the search criteria. |
|
|
Remove |
Tap this icon to remove the entry. |
|
|
Restore |
Tap this icon to restore an previously removed UIN. |
|
|
Scan Mode - Increase |
This icon represents a Scan Mode of increase. |
|
|
Scan Mode - Reduce |
This icon represents a Scan Mode of reduce. |
|
|
Scan Mode - Review |
This icon represents a Scan Mode of review. |
|
|
Scan Type - Auto |
This icon represents a Scan Type of Auto, allowing for items of item, UPS, GS1, Type2, UIN, and son to be entered. The system will find the item number associated. |
|
|
Scan Type - UIN |
This icon represents a Scan Type of UIN. |
|
|
UOM - case |
This icon represents a unit of measure in cases. |
|
|
UOM - Standard Unit of Measure |
This icon represents a unit of measure in the standard unit of measure. |
|
|
UOM - Transaction Unit of Measure |
This icon represents a unit of measure in the transaction unit of measure. |
|
|
Extended Attributes |
Tap this icon to access the extended attributes for a line item. This icon only appears if extended attributes are defined for the line item. |
|
|
UIN |
Tap this icon to access the UINs for a line item. This icon only appears if UINs exist for the line item. |
Table 2-2 lists the message icons used in SIM.
Table 2-2 Message Icons
| Icon | Type | Description |
|---|---|---|
|
|
Error |
The error messages identify problems related to data input, validation, or application functionality. |
|
|
Warning |
The warning messages inform about pending actions or situations that may need attention. |
|
|
Confirmation |
This confirms an action has completed successfully. Typically used to convey that an action took place. |
|
|
Information |
Information messages inform the user about changes in the application that are not errors, warnings, or confirmations. |
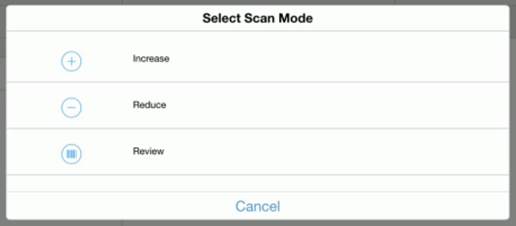
You can select the scan mode that is used from that point on for all item/barcodes being scanned in the current session.
To select the scan type:
Tap the Scan Type icon. The Select Scan Type screen appears.
Tap your selection or tap Cancel to not make a selection. The following values are available for scan type:
Auto - you can scan any allowable item/barcode (item, UPCS, type 2, UIN, GS1, and so on) in the scan bar. SIM uses its barcode algorithm to find the item numbers associated with what was scanned.
UIN - You enter/scan a UIN in the scan bar. SIM assumes that a UIN was scanned and finds the associated items.
The scan mode is used to determine how the quantity from an item/barcode scan/entry (in the scan bar) should be applied to the transaction. You can select the scan mode that is used from that point on for all items and transactions being scanned in the current session.
To select the scan mode:
Tap the Scan Mode icon. The Select Scan Mode screen appears.
Tap your selection or tap Cancel to not make a selection. The following values are available for scan mode:
Increase - the quantity from the scan is added to the quantity in the transaction. If there is a UIN, SIM attempts to add it to the transaction.
Reduce - the quantity from the scan is subtracted from the quantity in the transaction. If there is a UIN, SIM attempts to remove it from the transaction.
Review - the quantity from the scan does not change the quantity in the transaction. The quantity is kept the same for the purpose of review. If there is a UIN, SIM does not do anything with it. The UIN should already be in the transaction. The item must already be in the transaction for Review mode to work.
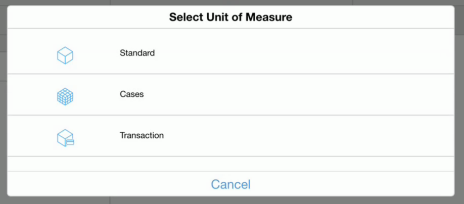
The UOM determines what UOM is being used and displayed during that session. This value is initially defaulted to the System Admin setting Default UOM. Switching the UOM changes the UOM for all items on the transaction; conversions of quantities may occur (that is, Switching from cases to standard unit of measure).
You can select the UOM that is used from that point on for all items in the current session.
To select the UOM:
Tap the UOM icon. The Select Unit of Measure screen appears.
Tap your selection or tap Cancel to not make a selection. The following values are available for UOM:
Standard - All items are set to the Standard Unit of Measure (units, Kg, LBs, and so on).
Cases - All items are set to cases.
Transaction - All items are set to the Transaction Unit of Measure.
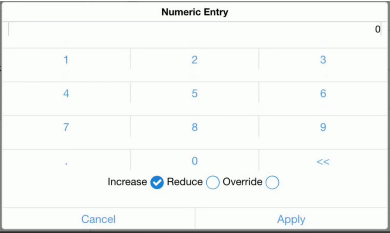
This popup displays anytime you click an editable number field, for example, the Quantity or Pack Size fields.
To update a numeric value:
For the quantity you want to enter, tap the numbers in the key pad.
Select the mode for the quantity change:
To take the entered number and add it to the numeric field, select Increase.
To take the entered number and subtract if from the numeric field, select Reduce.
To take the entered number and replace the existing number in the numeric field, select Override.
To take the quantity entered and apply it to the numeric field, tap Apply. To return to the previous screen with no quantity applied, tap Cancel.
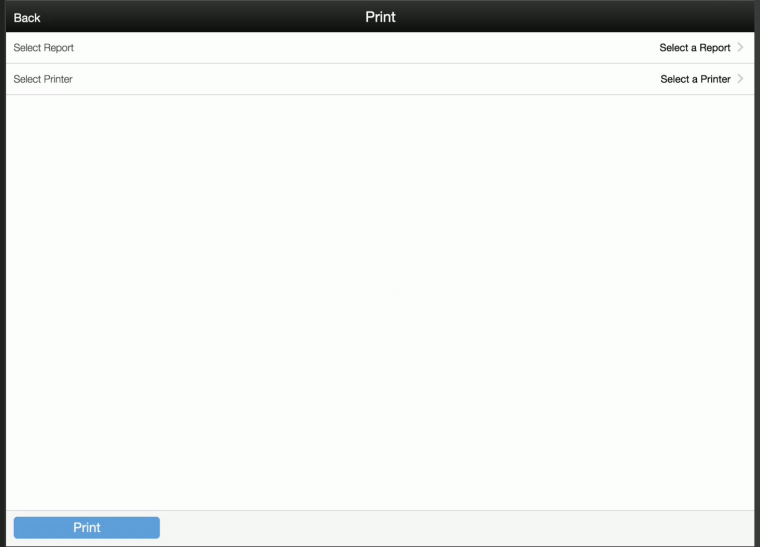
This screen enables you to print a report.
To print a report:
Tap the Print icon. The Print screen appears.
To select a report, tap Select Report. A list of available reports for the store appears. Tap the report you want to select.
To select a printer, tap Select Printer. A list of available printers appears. The default printer is set based on the selected report. If you want to change the printer, tap the printer you want to use.
To print the report, tap Print. The reports prints at the selected printer.
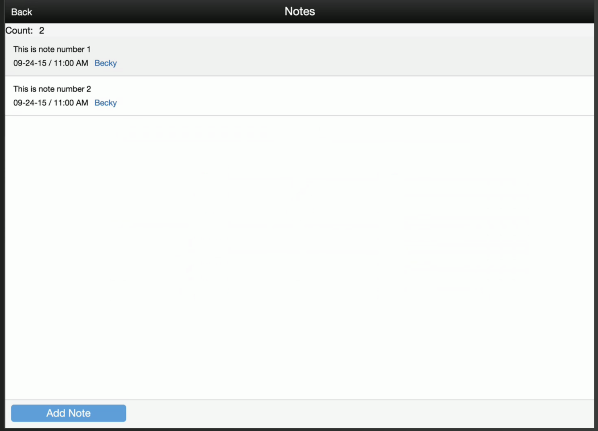
Notes can be added to a transaction. Multiple notes can be added to a transaction, giving a history trail of notes.
To view or add notes:
Tap the Notes icon. The Notes screen appears.
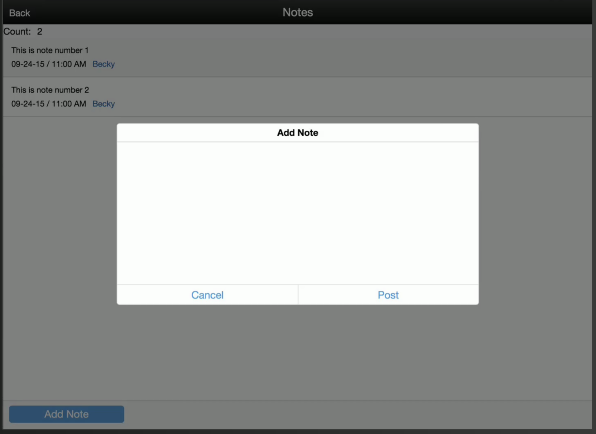
To add a note, tap Add Note. The Add Note screen appears.
Enter the note. To add the note to the transaction, tap Post. To not add the note, tap Cancel.