| Oracle® Retail Store Inventory Management Implementation Guide, Volume 5 - Tablet Release 15.0 E65536-01 |
|

 Previous |
 Next |
| Oracle® Retail Store Inventory Management Implementation Guide, Volume 5 - Tablet Release 15.0 E65536-01 |
|
Previous |
Next |
The workbench-oriented User Interface (UI) focuses on the manager who wants to understand what is going on in their store and use a tablet. This UI is based on Oracle Mobile Application Framework (MAF) technology and shows item images where available. The tablet gives access to the most important SIM features, as well as, provides several business intelligence and operational features.
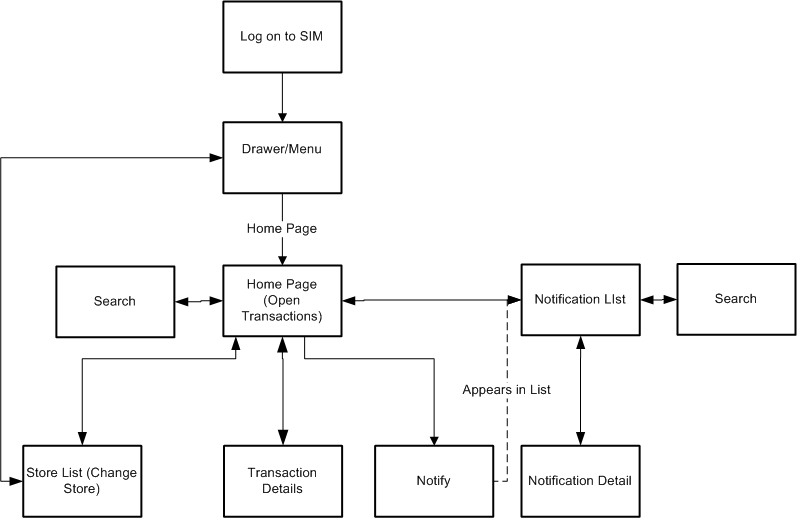
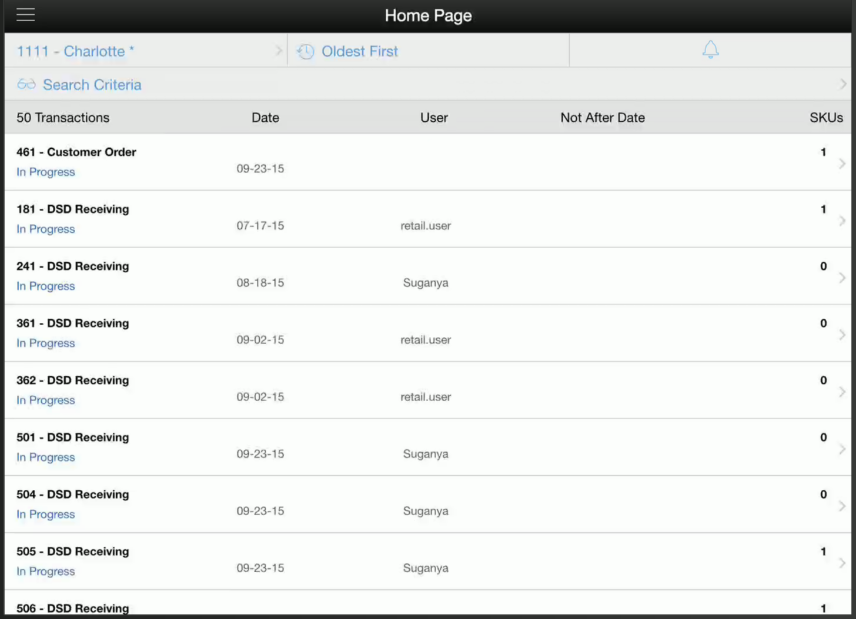
The Home Page appears upon selecting it from the Drawer/Menu. All of the open transactions for the user's store are displayed.
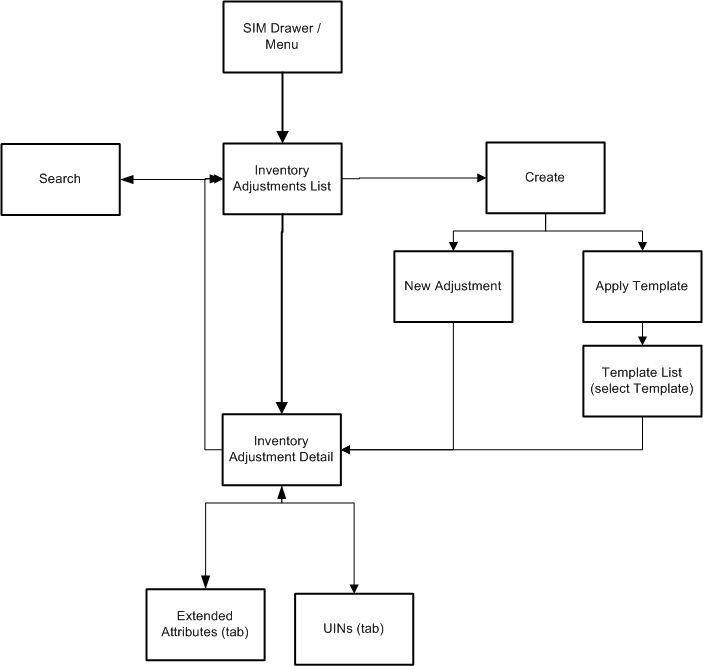
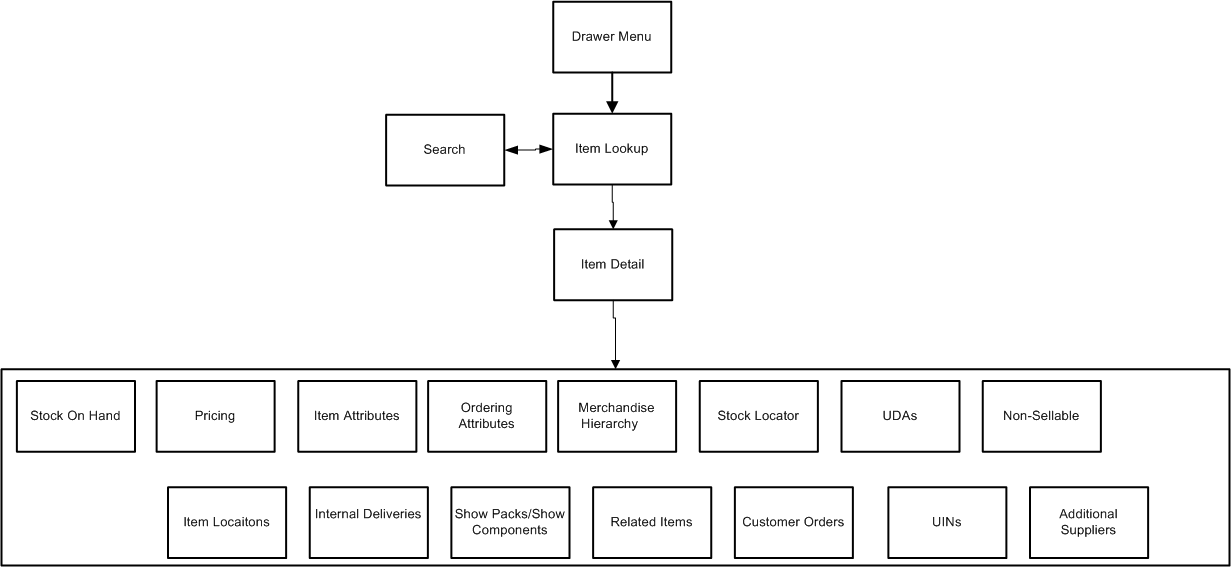
Figure 3-1 shows the flow of the screens from the Home Page.
From the Home Page, you can do the following:
Access notifications. For more information, see "Notifications."
To filter the list of open transactions:
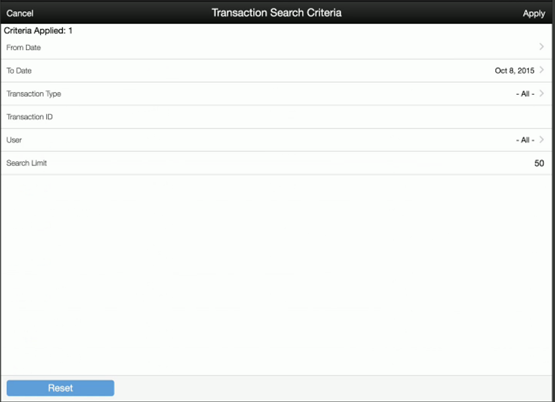
Tap Search Criteria. The Transaction Search Criteria screen opens.
To select any of the criteria, tap that entry:
From Date and To Date: Select the date range for the search.
Transaction Type: Select a specific transaction type.
Transaction ID: Enter a specific transaction ID.
User: Select a specific user. This is the user who created or last updated the transaction.
Search Limit: Select the maximum number of transactions to be returned.
To filter the list, tap Apply. The list of transactions on the Home Page is updated to reflect the search criteria.
To view the details of an open transaction, tap the entry. The Transaction Details screen opens. Currently, only inventory adjustments can be viewed.
To notify a user and create an ad-hoc notification:
Swipe a transaction and tap the Notify button. The list of users to select from opens in a popup.
Enter the user or partial user to notify.
Select the user from the list and tap Notify. A notification is generated for the selected user. The notification appears in the notification list for the user that was notified.
Two types of Notifications exist:
Ad-hoc which are created from open transactions on the home page.
System generated which are email notifications generated by the system.
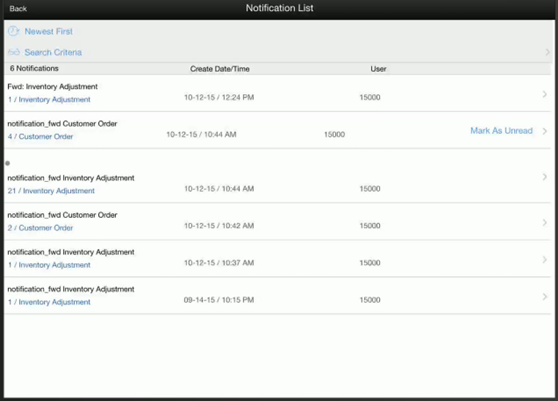
The Notification List displays all notifications for a user at the user's store, ad-hoc and system generated. The unread notifications have a dot in front of them. You can read the detail for each notification as well as search and filter the list of notifications.
To see the notifications:
Tap Notifications on the Home screen. The Notification List screen opens.
To filter the list of notifications, tap Search Criteria. The Notification Search screen opens.
To select that criteria, tap the entry:
From Date and To Date: Select the date range for the search.
Status: Select a specific notification status.
Notification ID: Enter a specific notification ID.
Transaction Type: Select a specific transaction type.
Transaction ID: Enter a specific transaction ID.
User: Select a specific user. This is the user who created or last updated the transaction.
Search Limit: Select the maximum number of transactions to be returned.
Tap Apply. The Notification List screen is updated based on the selected criteria.
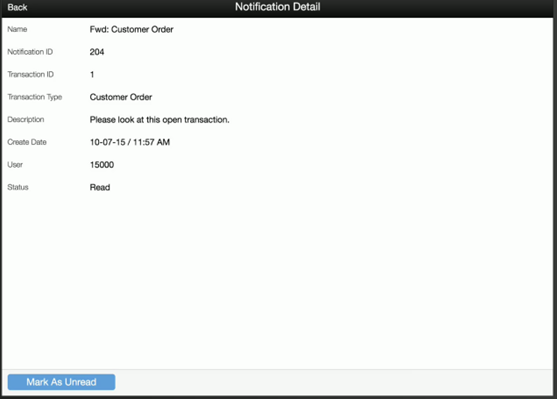
To see the details for a notification, tap the notification. The Notification Detail screen opens.
The following information is shown:
| Field | Description |
|---|---|
| Name | Name associated to the notification. For ad-hoc notifications, this is Fwd: <transaction type>. |
| Notification ID | ID associated to the notification. |
| Transaction ID | Transaction ID of the transaction associated to the notification. |
| Transaction type | Type of transaction associated to the notification. |
| Description | Details of the notification. |
| Create Date | Date the notification was created. |
| User | User who created the notification. |
| Status | Status of the notification, read or unread. |
To mark the notification as unread, tap Mark as Unread. To return to the Notification List screen, tap Back.
Inventory adjustments that you enter in SIM are supplied to the merchandising system to adjust stock levels and maintain perpetual inventory. Inventory adjustments increment or decrement inventory levels, such as stock on hand and unavailable inventory.
Each inventory adjustment contains a reason code that determines the disposition of the inventory being adjusted. For example, inventory removed for repair adds to unavailable inventory and decreases the stock on hand.
Inventory Adjustments are accessed on the tablet through the Inventory Adjustment menu within the drawer. Selecting the menu option takes the user to the Inventory Adjustment List screen. On this screen, the user has the option to search for adjustment records which are presented on the Inventory Adjustment List screen. The user has the option to create an inventory adjustment, apply a template, or edit/view one on the Inventory Adjustment Detail screen. On the Detail screen, there are tabs for UINs as well as Extended Attributes.
To create an inventory adjustment:
Tap Inventory Adjustments from the Drawer/Menu. The Inventory Adjustments List screen opens.
Click Create. You are prompted to choose whether this is a new adjustment or if it is created from a template.
For a new adjustment, select New. Tap Apply.
To create from a template, select Template. The Select Template screen opens for you to select the template. Select the template and tap Apply.
The Inventory Adjustment Detail screen opens. On this screen, you can enter the details for the adjustment. For more information on this screen, see "Edit an Inventory Adjustment."
To edit an inventory adjustment:
Tap Inventory Adjustments from the Drawer/Menu. The Inventory Adjustments List screen opens.
Scan or enter an item number which is on an inventory adjustment.you want to look up. To filter the list of items, tap Search Criteria. The Inventory Adjustment Search Criteria screen opens.
Select the search criteria and tap Apply. The Inventory Adjustments List screen is updated based on the criteria.
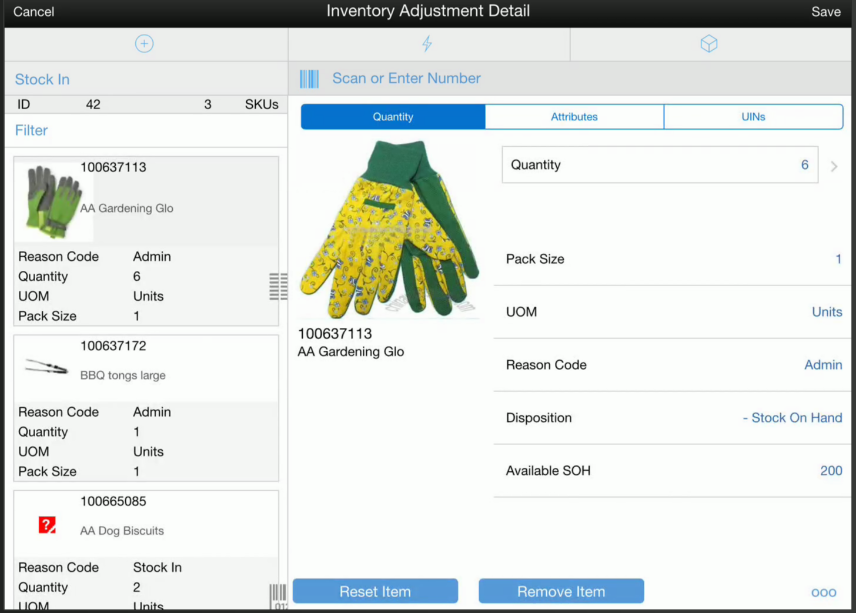
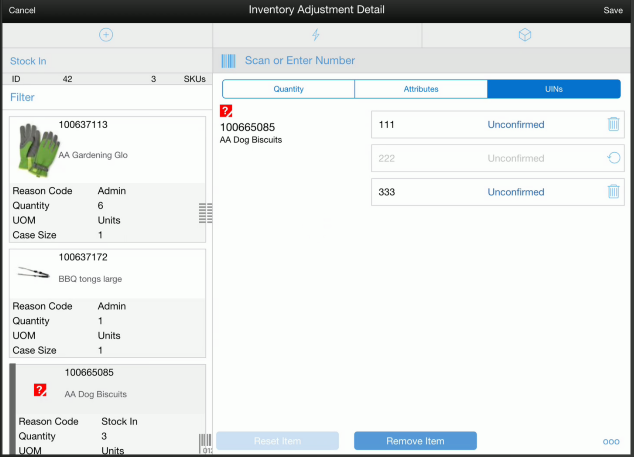
Tap an entry in the list. The Inventory Adjustment Detail screen opens. There are three tabs available on this screen. The following buttons are available on each tab:
Reset Item - Take all changes that have been made during the session and undo them back to the way the item was prior to entering the inventory adjustment session.
Remove Item - Flag the item for removal.
Restore Item - Restore an item that has been marked for removal and enable it for editing.
To adjust the quantity, tap the Quantity tab. This is the default tab for the item when making an inventory adjustment.
The following information is displayed for the Quantity tab:
| Field | Description |
|---|---|
| Quantity | Quantity to be adjusted. Quantity is validated against the appropriate inventory bucket based upon the disposition associated with the reason code. |
| Pack Size | Pack size associated with the item. This field is editable when the unit of measure is set to cases. |
| UOM | Item's unit of measure. This field is set based upon the unit of measure field in the header. |
| Reason Code | Description for the currently selected reason code. Modifying the reason code will apply to all newly added items to the inventory adjustment. |
| Disposition | Specifies how inventory adjustments with this reason code affect SIM inventory counts. A plus (+) value specifies that stock on hand, unavailable, or customer order reserve inventory is increased by the adjustment. A minus (-) sign specifies that the inventory is decreased. |
| Inventory | Amount of stock for the item and store based upon the disposition of the reason code. |
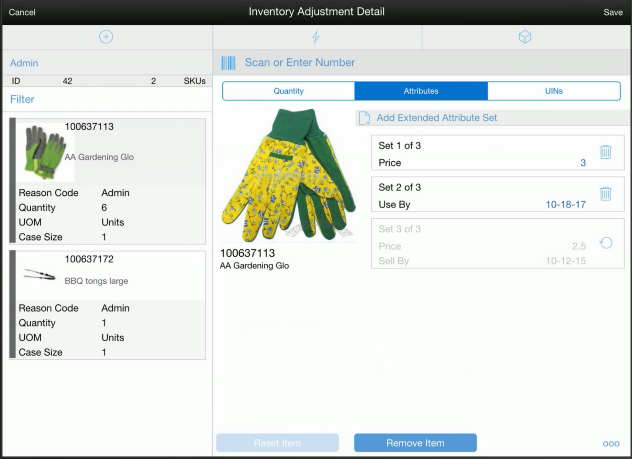
To adjust the attributes, tap the Attributes tab.
|
Note: The system/store must be configured to capture extended attributes or the tab will not be available. The item must also be configured for capturing extended attributes otherwise the attributes panel will be blank. |
The sets of extended attributes defined for the item are shown.
To add a set of extended attributes, tap Add Extended Attribute Set. The Add Extended Attributes Set window opens so you add the attributes. When you have added the attributes, tap Apply.
To remove a set of extended attributes, tap the Remove icon.
To adjust the UINs, tap the UINs tab.
|
Note: The system must be configured for UINs or the UIN tab will not be available. The item must also be a UIN item, otherwise the UIN panel will be empty. |
The UINs that are defined for the item are shown. To add a UIN, enter or scan the UIN into the scan bar of the header. To remove a UIN, tap the Remove icon. To restore a UIN, tap the Undo icon.
When you have completed the adjustments, tap Save. You are returned to the Inventory Adjustments screen.
You can look up all details about an item by selecting Item Lookup from the Drawer/Menu.
To look up an item:
Tap Item Lookup from the Drawer/Menu. The Item Lookup screen opens.
Scan or enter the item number you want to look up. To filter the list of items, tap Search Criteria. The Item Lookup Search Criteria screen opens.
Select the search criteria and tap Apply. The Item Lookup screen is updated based on the criteria.
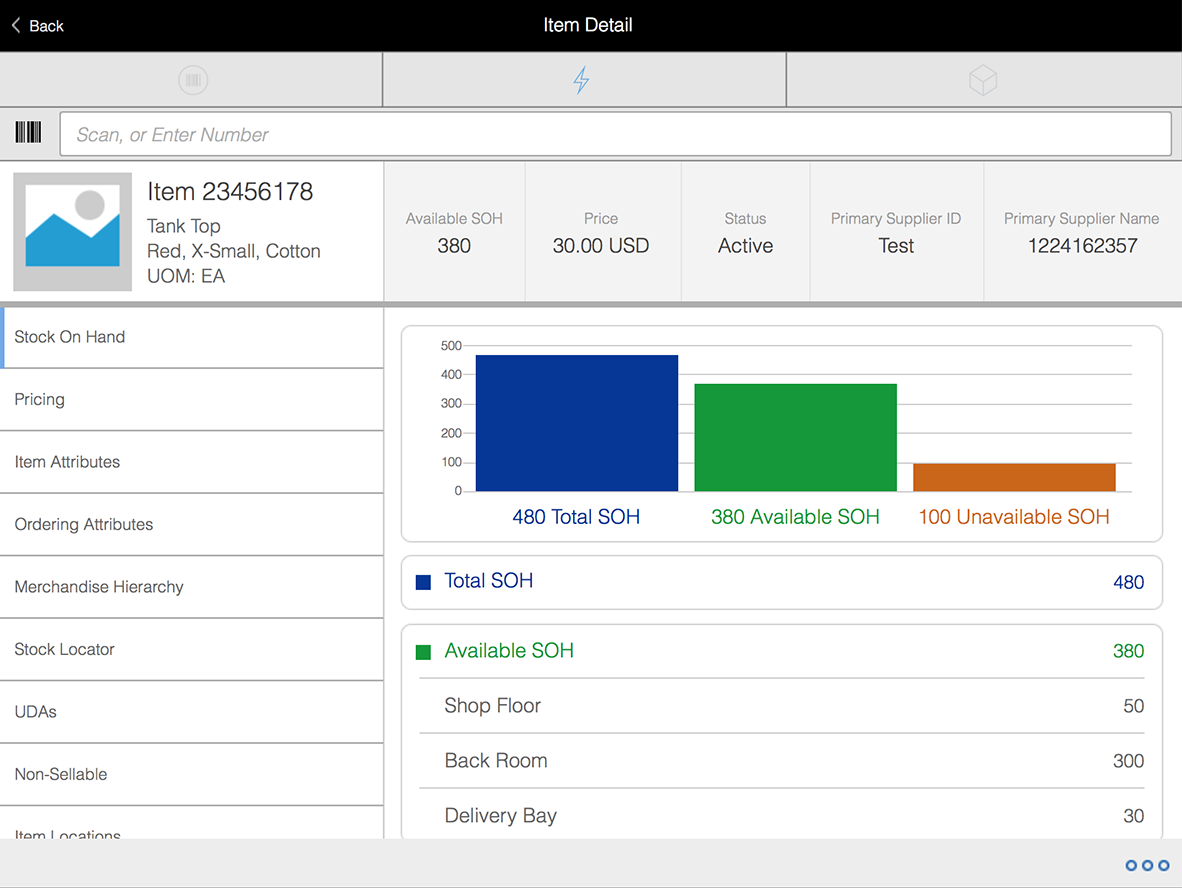
Tap an entry in from the list. The Item Detail screen opens with the stock on hand details displayed.
The following tables show the tabs that are displayed on this screen. The details contain the same information shown on the PC.
| Field | Description |
|---|---|
| Item Detail | The following details are shown for the item:
|
| Available SOH | Available stock on hand for the item. |
| Price | Price of the item. |
| Status | Status of the item. |
| Primary Supplier ID | ID of the item's primary supplier. |
| Primary Supplier Name | Name of the item's primary supplier. |
| Field | Description |
|---|---|
| Stock On Hand | Displays the item's stock information. If the display sequenced fields configuration setting in SIM is turned on, detailed stock information buckets are shown. |
| Pricing | Displays the item price history information. |
| Item Attributes | Displays the item's attributes. |
| Order Attributes | Displays the item's order attributes. |
| Merchandise Hierarchy | Displays the item's merchandise hierarchy and differentiator information. |
| Stock Locator | Displays item stock information in other stores. |
| UDA | Displays this item's user defined attribute information. |
| Non-Sellable | Displays this item's non-sellable inventory information. This tab will not be present if non-sellable types are turned off in the system. |
| Item Locations | Displays this item's sequenced locations. This tab will not be present if sequencing is turned off. |
| Incoming Deliveries | Displays any incoming deliveries of this item. |
| Show Packs | Displays any pack items that contain this item. |
| Show Components | Displays all component items of this item. This tab will not be present if this item is not a pack item. |
| Related Items | Displays all items related to this item. The user can select any related item in this list and be taken to the details of that related item. |
| Customer Orders | Displays customer order information for orders containing this item. |
| UINs | Displays unique identification number information about this item. This tab will not be present if this item is not a UIN item or if UINs have been turned off in the system. |
| Additional Suppliers | Displays additional (non-primary) suppliers for this item. |
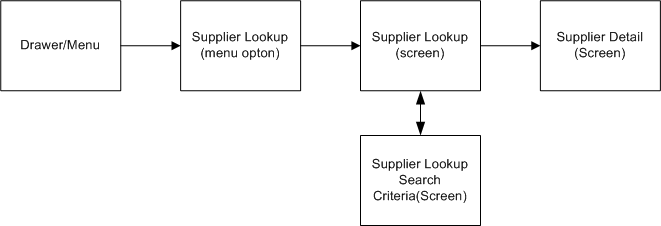
You can look up all details about any supplier, either as an inquiry or as part of another SIM task.
To look up a supplier:
Tap Supplier Lookup from the Drawer/Menu. The Supplier Lookup screen opens.
Scan or enter the item ID for the supplier you want to look up. To filter the list of suppliers, tap Search Criteria. The Supplier Lookup Search Criteria window opens.
Select the search criteria and tap Apply. The Supplier Lookup screen is updated based on the criteria.
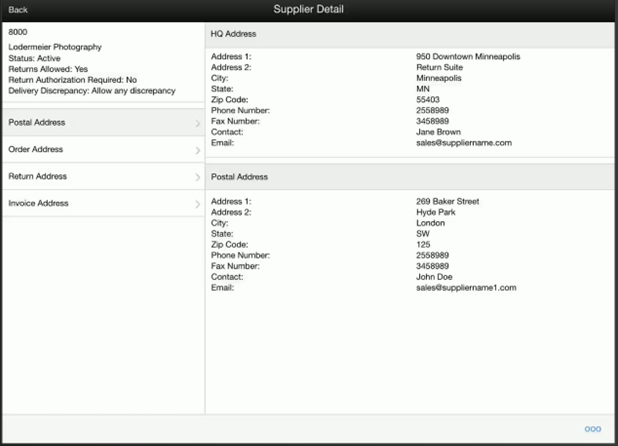
Tap an entry in the list. The Supplier Detail screen opens.
The following information is displayed for the supplier:
| Field | Description |
|---|---|
| Supplier ID | ID of the supplier. |
| Supplier Name | Supplier name that corresponds to the supplier ID. |
| Status | Status of the supplier. |
| Returns Allowed | Indicates whether the supplier allows returns. |
| Return Authorization Required | Indicates whether the supplier requires an authorization number when creating an RTV. |
| Deliver Discrepancy | Indicates whether the DSD delivery can be discrepant for the supplier. Possible values:
|
| HQ Address | Address of the supplier's headquarters. |
| Address Tabs | Tabs available to display various address information available for the supplier. The available tabs are dependent on the addresses available for the supplier. Some examples of addresses include the following:
|
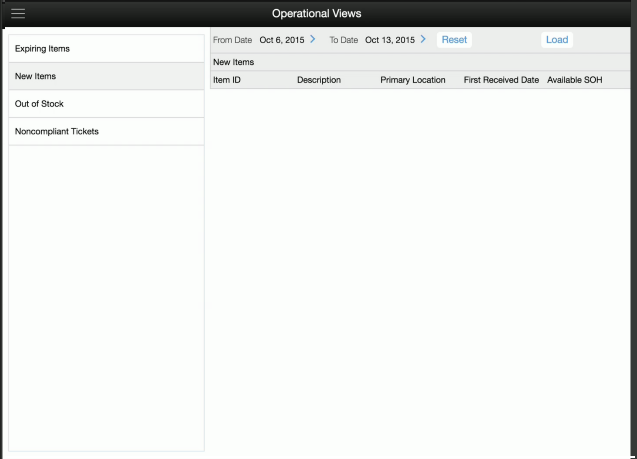
Operational views allow the user to review business exceptions or events taking place.
The following operational views are available:
To access a view, select the view from the menu.
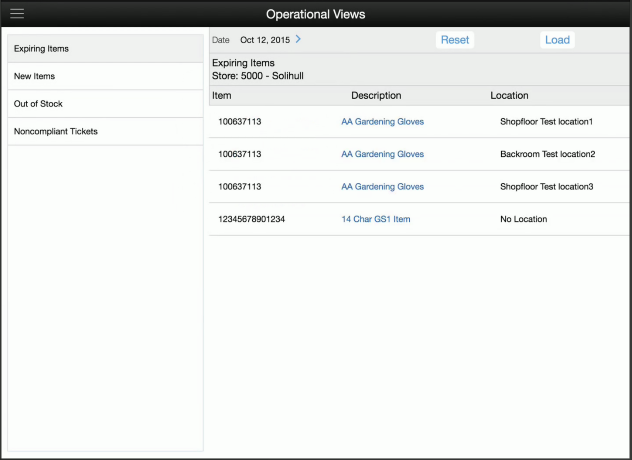
The Expiring Items view takes in an expiration date and returns the list of items that have an expiration date that meets the selected date. All transactions where the Sell By or Use By dates are captured are considered when creating the list.
The following information is shown in this view:
| Field | Description |
|---|---|
| Store | Store ID and name. |
| Expiration Date | Selected expiration date. |
| Item | Item ID. |
| Description | Item description. |
| Location | Macro location for the item if sequencing is used. |
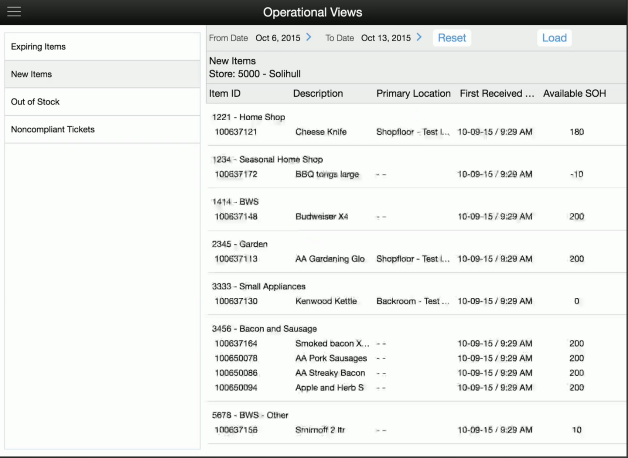
The New Items view displays items received for the first time items within a range of dates. This view is oriented towards the retailer that wants to ensure that new assortments of items have made it to the shop floor and are not forgotten on the receiving dock.
The following information is shown in this view:
| Field | Description |
|---|---|
| Store | Store ID and name. |
| From Date
To Date |
Date range covered in the view. |
| Dept | Sub-header with the department ID and name is shown for each department. All items for the same department are grouped/listed under that sub-header. |
| Item | Item ID. |
| Description | Item description. |
| Primary Location | Primary macro location for the item if sequencing is used. |
| First Received Date | Date/time the item was first received. |
| Avail. SOH | Available stock on hand for the item |
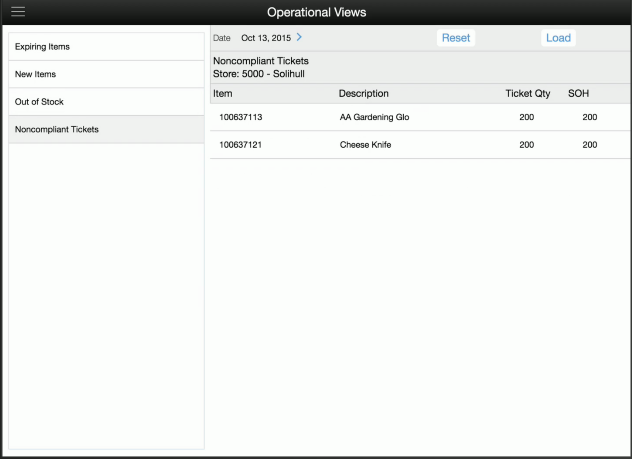
The Noncompliant Tickets view reviews regular price changes going into effect for a specific date and compares them against tickets and labels generated for that date. Any discrepancies likely will be due to not labeling correctly.
The following information is shown in this view:
| Field | Description |
|---|---|
| Store | Store ID and name. |
| Date | Date selected for the view. |
| Item | Item ID. |
| Description | Item description. |
| Ticket Qty | Total quantity of tickets that need to be printed for the item. |
| SOH | Total stock on hand for the item. |
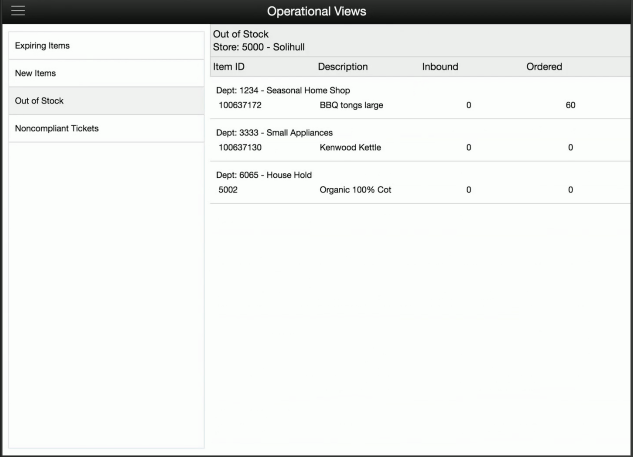
The Out of Stock view provides a list of active items with no available stock, that is, the available stock on hand is less than or equal to zero.
The following information is shown in this view:
| Field | Description |
|---|---|
| Store | Store ID and name. |
| Dept | Sub-header with the department ID and name is shown for each department. All items for the same department are grouped/listed under that sub-header. |
| Item | Item ID. |
| Description | Item description. |
| Inbound | Inbound quantity for the item. |
| Ordered | Ordered quantity for the item. |