| Oracle® Retail Store Inventory Management User Guide Release 15.0 E64567-01 |
|

 Previous |
 Next |
Setup functions include a variety of administrative functions to configure SIM. These functions are primarily system settings that affect all SIM users at a single store or throughout the enterprise.
|
Note: Most Setup functions are available only to system administrators or other users with the necessary permissions. |
The functions available on the Setup menu are as follows:
UIN Attributes
See Chapter 5, "Unique Identification Numbers (UIN)," for information about universal identification numbers and their setup and maintenance
Tolerances
Extended Attributes Setup
The Print functions allow administrators or other authorized personnel to add, change, or remove printers used for SIM reports, tags, and labels. The functions available on the Print Setup menu are as follows:
Print Formats
Hierarchy Format
The SIM Stores functions allow you to set operating parameters for stores managed with SIM. The functions are as follows:
You can set up buddy stores within the transfer zone in SIM to which you normally transfer items. This shortens the list of values from which you must select when you create a transfer.
You can set up auto-receive stores from which you want to receive transfers automatically. The stock on hand of the receiving store is adjusted automatically when an auto-receive store dispatches a transfer.
You can add or remove stores that are managed using SIM.
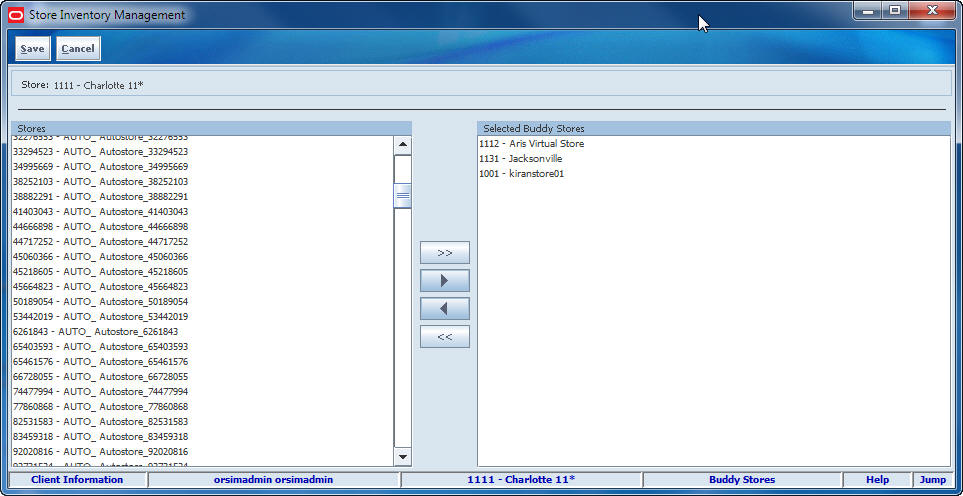
Buddy stores are stores within the same transfer zone that frequently transfer items between stores. You can set up buddy stores to make the frequent transfers between these stores more convenient. You can transfer items between any stores within the transfer zone, regardless of whether they are set up as buddy stores.
Navigate: Main Menu > Admin > Setup > SIM Stores > Buddy Stores. The Buddy Stores window opens.
To add or remove buddy stores, follow these steps to change which stores are included in the Selected Buddy Stores list.
Add buddy stores:
In the Stores list, select the stores you want to set up as buddy stores.
Click the right-arrow button. The selected stores are moved to the Selected Buddy Stores list.
To add all stores from the Stores list, click the double-right-arrow button.
Remove buddy stores:
In the Selected Buddy Stores list, select the stores you want to remove from the list.
Click the left-arrow button. The selected stores are moved to the Stores list and removed from the Selected Buddy Stores list.
To remove all stores from the Selected Buddy Stores list, click the double-left-arrow button.
Click Save to return to the Store Admin menu.
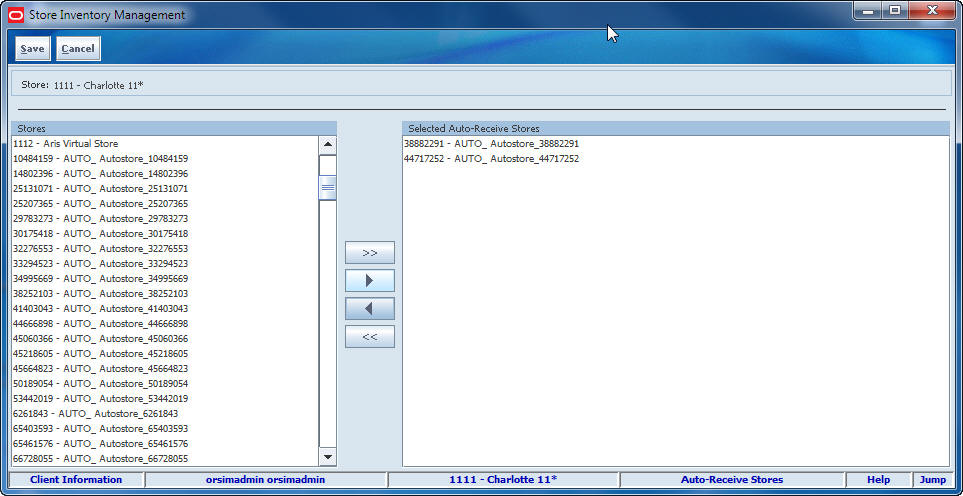
Auto-receive stores are stores from which you want to receive transfers automatically. The stock on hand at the receiving store is adjusted automatically by SIM when a transfer is dispatched from an auto-receive store.
SIM will validate the quantity matches. When a match occurs, the UINs will be moved into in stock and the receipt completed. The UINs will be set to In Stock.
Navigate: Main Menu > Admin > Setup > SIM Stores> Auto-Receive Stores. The Auto-Receive Stores window opens.
To add or remove auto-receive stores, follow these steps to change which stores are included in the Selected Auto-Receive Stores list.
Add auto-receive stores:
In the Stores list, select the stores you want to set up as auto-receive stores.
Click the right-arrow button. The selected stores are moved to the Selected Auto-Receive Stores list.
To add all stores from the Stores list, click the double-right-arrow button.
Remove auto-receive stores:
In the Selected Auto-Receive Stores list, select the stores you want to remove from the list.
Click the left-arrow button. The selected stores are moved to the Stores list and removed from the Selected Auto-Receive Stores list.
To remove all stores from the Selected Auto-Receive Stores list, click the double-left-arrow button.
Click Save to return to the Store Admin menu.
|
Note: To auto receive the store administration options need to be configured appropriately. See the administration guide store administration option for more information. |
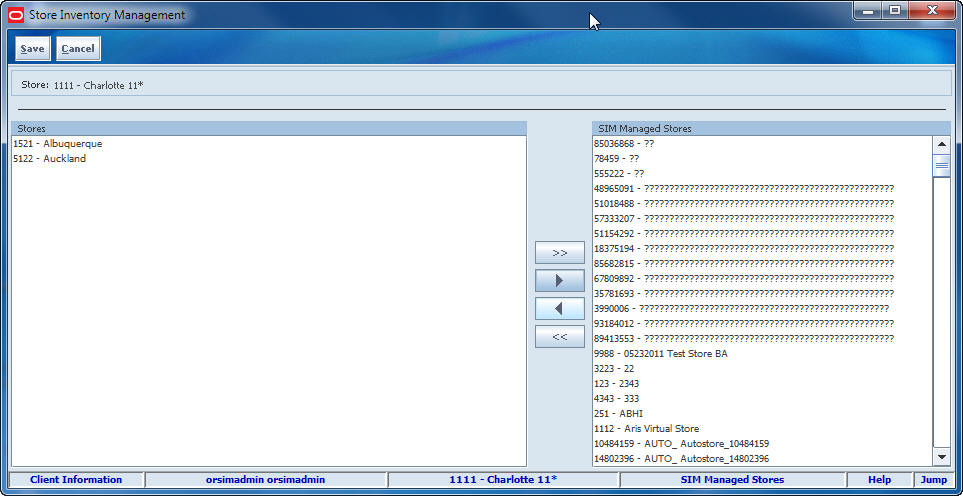
SIM managed stores are stores that use the SIM application. When a store is listed as a SIM managed store, SIM does not send receiving integration messages when auto-receiving. This allows you to move stores into the SIM database, while still using a legacy system to manage some stores, with shipped transfers closed properly in SIM.
Navigate: Main Menu > Admin > Setup > SIM Stores > SIM Managed Stores. The SIM Managed Stores window opens.
To add or remove SIM stores, follow these steps to change which stores are included in the SIM Managed Stores list.
Add SIM stores:
In the Stores list, select the stores you want to list as SIM managed stores.
Click the right-arrow button. The selected stores are moved to the SIM Managed Stores list.
To add all stores from the Stores list, click the double-right-arrow button.
Remove SIM stores:
In the SIM Managed Stores list, select the stores you want to remove from the list.
Click the left-arrow button. The selected stores are moved to the Stores list and removed from the SIM Managed Stores list.
To remove all stores from the SIM Managed Stores list, click the double-left-arrow button.
Click Save to return to the Store Admin menu.
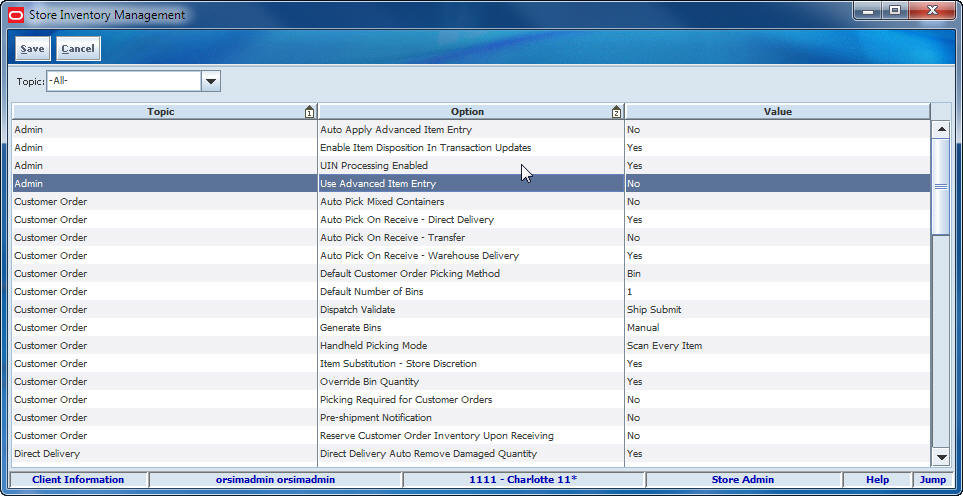
Through the Store Admin window, the administrator can set values for options that control a variety of SIM behaviors. The values of these options apply only to the location at which you are currently logged in.
See the Store Inventory Management Implementation Guide for information about the store administration options.
Navigate: Main Menu > Admin > Setup > Store Admin. The Store Admin window opens.
To edit store administration options, follow these steps:
If you want to limit the options listed, select a topic from the Topic field. (The complete list of options is grouped into smaller topics, each related to a functional area of SIM.)
Select the option that you want to modify.
Double-click the Value field and set the option value in either of these ways:
Select a value from the drop-down list.
Enter a value in the field.
Click Save to save your changes and return to the Setup menu.
The store defaults administration function allows the system administrator to set default values for options that control a variety of SIM behaviors. The values of these store defaults are applied to all new locations that are added.
See the Store Inventory Management Implementation Guide for information about the system default options.
Navigate: Main Menu > Admin > Setup > Store Defaults Admin. The Store Defaults Admin window opens.
To setup store defaults, follow these steps:
If you want to limit the options listed, select a topic from the Topic field. (The complete list of options is grouped into smaller topics, each related to a functional area of SIM.)
Select the option that you want to modify.
Double-click the Value field and set the option value in either of these ways:
Select a value from the drop-down list.
Enter a value in the field.
Click Save to save your changes and return to the Store Defaults Admin menu.
The system administration function allows the system administrator to set values for options that control a variety of SIM behaviors. The values of these system options are applied to all locations.
See the Store Inventory Management Implementation Guide for information about the system administration options.
Navigate: Main Menu > Admin > Setup > System Admin. The System Admin window opens.
To edit system options, follow these steps:
If you want to limit the options listed, select a topic from the Topic field. (The complete list of options is grouped into smaller topics, each related to a functional area of SIM.)
Select the option that you want to modify.
Double-click the Value field and set the option value in either of these ways:
Select a value from the drop-down list.
Enter a value in the field.
Click Save to save your changes and return to the Setup menu.
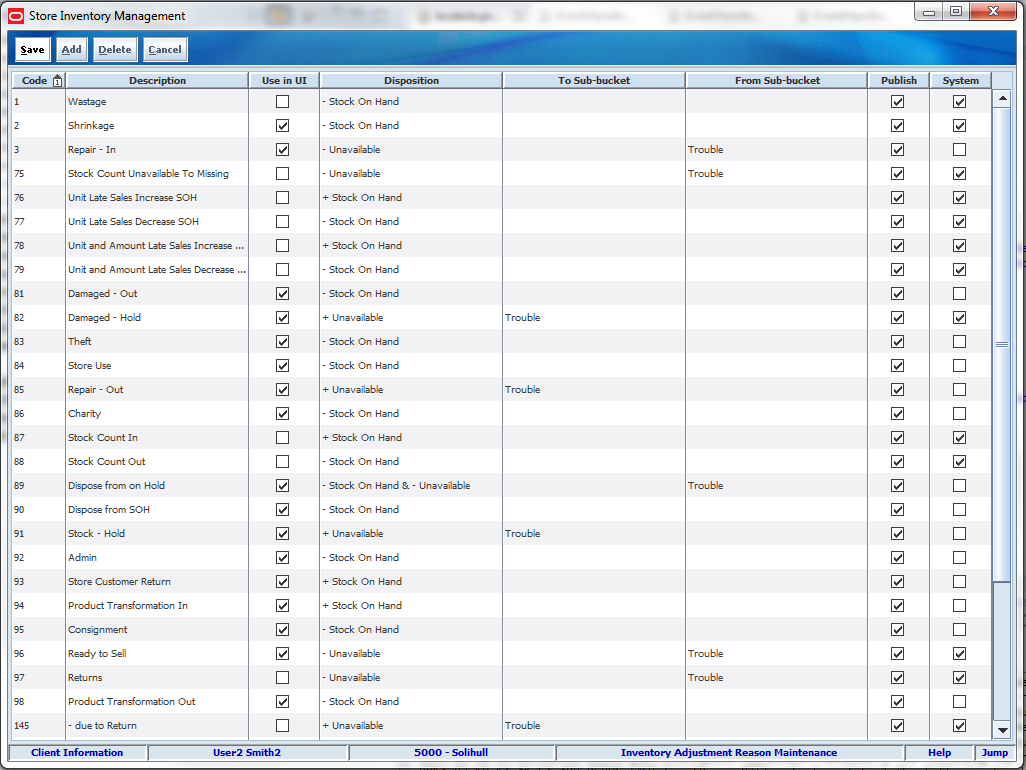
You can add, change, and delete reason codes used for inventory adjustments. In addition to showing the reasons for inventory adjustments, reason codes also specify how inventory adjustments affect stock on hand, unavailable inventory, or customer order reserve inventory.
|
Note: Only users with the required permissions can add, change, or delete reason codes. |
Navigate: Main Menu > Admin > Setup > Inv. Adj. Reason. The Inventory Adjustment Reason Maintenance window opens.
From the Inventory Adjustment Reason Maintenance window, you can do the following:
From the Inventory Adjustment Reason window, click Save to return to the Setup menu.
Navigate: Main Menu > Admin > Setup > Inv. Adj. Reason. The Inventory Adjustment Reason Maintenance window opens.
To add an inventory adjustment reason, follow these steps:
Click Add.
A new blank row is inserted at the end of the list of inventory adjustment reasons.
Complete the fields for the new inventory adjustment reason as follows.
|
Note: The Code and Description values for the reason code must match the values used in the Oracle Retail Merchandising System (RMS). |
Code – Enter a new unique identifier of the inventory adjustment reason. If you enter a duplicate value, an error message is displayed.
Description – Enter a description of the inventory adjustment reason code.
Use In UI – Select this check b ox if you want the reason code to be available in the SIM user interface for SIM users to select. If you do not want this reason code to be available to SIM users, do not select this check box.
Disposition – From the drop-down list, select a Disposition value that specifies how inventory adjustments with this reason code affect SIM inventory counts. A plus (+) value specifies that stock on hand, unavailable, or customer order reserve inventory is increased by the adjustment. A minus (-) sign specifies that the inventory is decreased.
These Disposition values are available:
- Stock On Hand
+ Unavailable
+ Stock On Hand
- Unavailable
+ Customer Order Reserve
- Customer Order Reserve
- Stock On Hand & - Unavailable
-Unavailable & + Unavailable
|
Note: Use dispositions that affect Customer Order Reserve carefully, because these dispositions can affect how much inventory is allocated to orders created outside of SIM. Customer Order Reserve is normally updated through customer orders generated in external systems. If you made adjustments to Customer Order Reserve in SIM, there could be inventory imbalances when the orders generated in external systems are fulfilled. |
To and from Sub-bucket - Sub-buckets – Allows you to segregate the unavailable inventory bucket into various slots for specific reasons. Sub-buckets will be configurable, so that you can choose whether or not to use them.
The To Sub-Bucket is the destination and From Sub-Bucket is the source of the transfer, for example, move stock from the Display Window sub-bucket to the damaged sub-bucket.
System – Select this check box if this inventory adjustment reason code is system required. A system required reason code cannot be edited or deleted through the SIM user interface. After you save the new reason code, you cannot change it.
Publish – Select this box if you want all inventory adjustments associated with the reason code to be published to external system. If you do not want the adjustments to be published, do not select this check box.
Click Save to save the new reason code.
Your new reason code is added to the list. (Reason codes in the list are sorted by their Code values.)
You can change some values for an existing inventory adjustment reason code that is not specified as system required.
|
Note: You cannot change any values an inventory adjustment reason specified as system required, and you cannot delete system required reason codes. |
Navigate: Main Menu > Admin > Setup > Inv. Adj. Reason. The Inventory Adjustment Reason Maintenance window opens.
To edit an existing inventory adjustment reason, follow these steps:
Locate the row of the reason code you want to edit.
Double-click in any of the following fields to change their values.
Description – Enter a description of the inventory adjustment reason code.
Use in UI – Select this check b ox if you want the reason code to be available in the SIM user interface for SIM users to select. If you do not want this reason code to be available to SIM users, do not select this check box.
Publish – Select this box if you want all inventory adjustments associated with the reason code to be published to external system. If you do not want the adjustments to be published, do not select this check box.
|
Note: Reason codes will be available in the filter screen, even if the Use in UI indicator is not checked. This is to ensure a user can filter and find the adjustments the internal or external system made as well as find historical records. |
Click Save to return to the Setup menu.
For more information about these fields, see ”Add an Inventory Adjustment Reason Code."
|
Note: You cannot change or delete an inventory adjustment reason code specified as system required. You cannot delete an inventory adjustment reason code that is currently in use. |
Navigate: Main Menu > Admin > Setup > Inv. Adj. Reason. The Inventory Adjustment Reason window opens.
To delete inventory adjustment reason codes, follow these steps:
Select the reason codes you want to delete.
Click Delete. A message is displayed: ”The selected line item(s) will be deleted. Do you want to continue?”
Click Yes to delete the codes.
Click Save to return to the Setup menu.
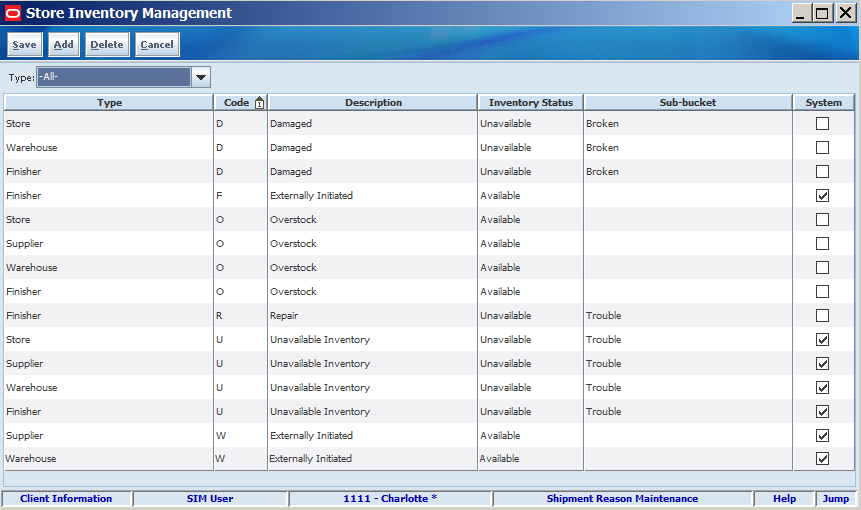
You can add, change, and delete reason codes used for shipments. In addition to showing the reasons for shipments, reason codes also specify how shipments affect stock on hand, unavailable inventory, or customer order reserve inventory.
Navigate: Main Menu > Admin > Setup > Shipment Reasons. The Shipment Reason Maintenance window opens.
Use this procedure to add a shipment reason code.
Navigate: Main Menu > Admin > Setup > Shipment Reasons. The Shipment Reason Maintenance window opens.
To add a return reason, follow these steps:
Click Add. A new blank row is inserted at the end of the list of shipment reasons.
Complete the fields for the new shipment reason as follows.
|
Note: The Code and Description values for the reason code must match the values used in the Oracle Retail Merchandising System (RMS). |
Type – Select a type from the drop-down list. Values include: Supplier, Warehouse, Finisher, and Store.
Code – Enter a new unique identifier of the shipment reason. If you enter a duplicate value, an error message is displayed.
Description – Enter a description of the shipment reason code.
Inventory Status – Determines if the type is available or unavailable in the inventory.
Sub-bucket – Allows you to segregate the unavailable inventory bucket into various slots for specific reasons. Sub-buckets will be configurable, so that you can choose whether or not to use them.
Click Save to save the new reason code. Your new reason code is added to the list. (Reason codes in the list are sorted by their Code values.)
You can change some values for an existing Shipment reason code that is not specified as system required.
|
Note: You cannot change any values a shipment reason specified as system required, and you cannot delete system required reason codes. |
Navigate: Main Menu > Admin > Setup > Shipment Reasons. The Shipment Reason Maintenance window opens.
To edit an existing shipment reason, follow these steps:
Enter a description of the Shipment reason code.
Click Save to return to the Setup windows.
For more information about these fields, see ”Add an Inventory Adjustment Reason Code."
|
Note: You cannot change or delete a shipment reason code specified as system required. You cannot delete a shipment reason code that is currently in use. |
Navigate: Main Menu > Admin > Setup > Shipment Reason. The Shipment Reason Maintenance window opens.
To delete shipment reason codes, follow these steps:
Select the reason codes you want to delete.
Click Delete. A message is displayed: ”The selected line item(s) will be deleted. Do you want to continue?”
Click Yes to delete the codes.
Click Save to return to the Setup menu.
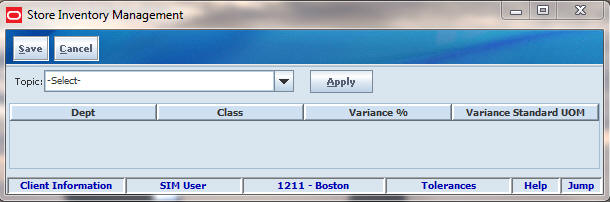
SIM allows the setup of tolerances for ad hoc (unplanned) stock counts and customer order picking.
|
Note: Only a system administrator or other user with the necessary security permissions can set ad hoc stock count or customer order picking variances. |
A specific variance can be set for each item class. (By default, allowable variances for all item classes for ad hoc stock counts are set at zero.) The allowable variance can be set to either one of the following types:
Variance percent
The variance can be set as a percentage variance between the counted stock and the SIM stock inventory level, based on the standard unit of measure for each item. If an item count varies from the SIM inventory level by this percentage or more, the item count is discrepant.
For example, if the variance is set at 3 percent, an item count variance of less than 3 percent (plus or minus) is allowable, but an item count of 3 percent or greater variance is discrepant.
Variance number of units
The allowable variance can be set as an amount variance between the counted stock and the SIM stock inventory level, based on the standard unit of measure for each item. If an item count varies from the SIM inventory level by this number of standard units of measure or more, the item count is discrepant.
For example, if the variance is set at 10 standard units of measure, an item count variance of fewer than 10 units (plus or minus) is allowable, but an item count that varies by 10 units or more is discrepant.
These tolerances are for customer order picking (by default, allowable variances for all item classes are set at zero) for customer orders. The tolerances are used to define how much over the order amount a user can pick for an item that is not an Each item:
Variance % – The percent threshold for a class to determine how much the order quantity can be exceeded in picking.
Variance Standard UOM – The unit threshold for an item to determine how much the order quantity can be exceeded in picking.
Both unit and percentage variances will be applied and need to be valid for the user to not be restricted.
Navigate: Main Menu > Admin > Setup > Tolerances. The Tolerances window opens.
To set variances for item classes, follow these steps:
Select a Topic from the drop down list.
Click Apply.
Select the row with the item class you want to set or change.
Enter an integer (whole number) value in one of the following fields:
Variance % – Enter the threshold percentage of variance, based on the standard unit of measure for each item in the class.
Variance Standard UOM – Enter the threshold number of units of variance, based on the standard unit of measure for each item in the class.
To enter a value, follow these steps:
Double-click in the field.
Enter the value.
Press Enter.
Repeat Steps 2 and 3 as needed to set variances for other item classes.
Click Save to return to the Setup menu.
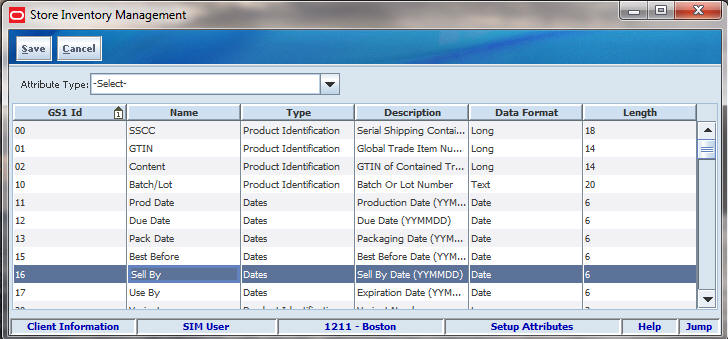
This screen is used to manage extended attributes that capture additional information about an item, including the global international standard which defined a specific type of data that may exist in a scannable barcode.
Navigate: Main Menu > Admin > Setup > Ext Attributes. The Extended Attributes window opens.
The Setup Attributes window contains the following fields:
| Field | Description |
|---|---|
| Attribute Type | A filter used to group the attributes in order to display specific types of attributes. |
| GS1 ID | A unique ID defined by the global international standard which defines a specific type of data that may exist in a scannable barcode. |
| Name | Name for the extended attribute which describes the purpose of the attribute. |
| Type | Groups the attributes for purposes of filtering on the setup screen and other areas where extended attributes are assigned or data entered. |
| Description | Describes the purpose of the extended attribute. |
| Data Format | Defines the values in the configuration record. |
| Length | Length of the field and determines how many characters to display or allow the user to enter. |
To setup attributes:
Click Setup Attributes. The Setup Attributes window opens.
Select the Attribute Type. The dialog box populates with your selection.
Click Save to return to the Extended Attributes menu.
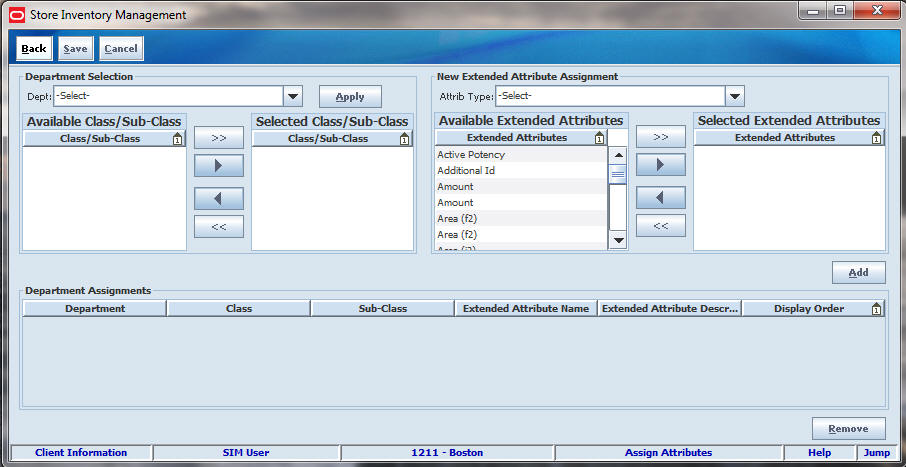
The Assign Attributes window contains the following fields:
| Field | Description |
|---|---|
| Department Selector | Pre-defined list of departments from the merchandise hierarchy used to assign the extended attributes. |
| Attrib Type Selector | Pre-defined list of types of attributes loaded using a data seeding script. |
| Available Class/Sub-Class | Pre-defined list of Class/Sub-Class combinations from the merchandise hierarchy available to select for extended attribute assignment. |
| Selected Class/Sub-Class | Pre-defined list of Class/Sub-Class combinations from the merchandise hierarchy selected for extended attribute assignment. |
| Available Extended Attributes | Pre-defined list of GS1 data elements based on GS1 General Specification standards used as extended attributes and all are available for department assignment. |
| Selected Extended Attributes | Custom pre-defined list of extended attributes selected for department assignment. |
| Department | Pre-defined list of departments from the merchandise hierarchy assigned to the extended attributes. |
| Class | Pre-defined list of Class/Sub-Class combinations from the merchandise hierarchy available to select for extended attribute assignment. |
| Sub-Class | Pre-defined list of Class/Sub-Class combinations from the merchandise hierarchy available to select for extended attribute assignment. |
| Extended Attribute Name | Custom pre-defined list of extended attributes available for department assignment. |
| Extended Attribute Description | Custom pre-defined list of extended attributes available for department assignment. |
| Display Order | Used to define the order the fields should appear on the data entry screen. |
To assign the extended attributes to a department/class/sub-class and identify the order they are displayed:
Click Assign to Dept. The Assign Attributes window opens.
Select the Department.
Click Apply.
Move items from the Available Class/Sub-Class to the Selected Class/Sub-Class, or visa versa, by either double-clicking the selection or using the arrow button.
Select an Attribute Type from the New Extended Attribute Assignment box.
Move items from the Available Extended Attributes to the Selected Extended Attributes, or visa versa, by either double-clicking the selection or using the arrow button.
Click Add. The Department Assignments box is populated.
Click Save to save your assignments.
The Print functions allow administrators or other authorized personnel to add, change, or remove printers used for SIM reports, tags, and labels.
|
Note: Only users with the required permissions can set up printers. |
Navigate: Main Menu > Admin > Print Setup. The Print Setup window opens.
From the Printer Setup window, you can do the following:
From the Printer Setup window, click Back to return to the Print Setup menu.
You can change the properties of a configured printer. This might be needed if the network address of a printer changes, or if you want to change the description or type of the printer. (You can also delete the printer and add it again.)
To change the properties of a configured printer, follow these steps:
Select the printer from the list.
Change the printer properties as required. See ”Add a Printer” for information about the required fields.
Click Save to save the changes and return to the Setup menu.
|
Note: You cannot delete a printer that is used as a SIM default printer. |
To delete a printer, follow these steps:
Select the printer from the list.
Click Delete.
You receive a prompt to confirm that you want to delete the printer.
Click Yes to delete the printer and return to the Setup menu.
Formats apply to the following SIM report types (outputs):
Child Stock Count List
Customer Order
Customer Order Bin Labels
Customer Order Delivery BOL
Customer Order Delivery
Customer Order Pick Detail
Customer Order Pick Discrepancy
Customer Order Reverse Pick
Direct Store Delivery Discrepant
Direct Store Delivery
Inventory Adjustment
Item
Item Basket
Item Request
Manifest
Pre-Shipment
RTV Shipment Bill of Lading
RTV Shipment
RTV Shipment Container
Shelf Adjustment
Shelf Replenishment
Stock Count Detail
Stock Count Export
Stock Count Rejected Item
Store Order
Transfer
Transfer Bill of Lading
Transfer Delivery
Transfer Delivery Exception
Transfer Shipment
Transfer Shipment Bill of Lading
Transfer Shipment Container
For each of these outputs, a default format is defined. SIM supports multiple formats for any of these outputs. All formats can be customized at the store level.
Formats are set up in the output tools or devices used to produce them. An output tool could be a printer or a software tool such as Oracle Business Intelligence Publisher. The Formats window is the interface to add output formats to SIM and specify the output devices or locations.
Formats apply to the following SIM ticketing types:
Auto Generate SN
Item Ticket
Shelf Label
Formats apply to the following SIM Shipping Format types:
RTV Shipping Label
Transfer Shipping Label
For more information about SIM formats and reports, see the Oracle Retail Store Inventory Management Implementation Guide.
Navigate: Main Menu > Admin > Print Setup > Print Format. The Print Format window opens.
To add a format, follow these steps:
If you want to filter the Formats table, select a format category and format type from the Formats Type section.
Click Apply. The formats are populated.
Click Add. A line is added to the bottom of the Formats table.
Complete the fields that define the format, as follows:
Format Name – Enter a unique name for the format.
Format Type – Select the output type from the drop-down list.
Default Format – Select the check box if this is the default format for the output type. Only one format for each Type can be the default.
Default Printer – Select the printer name from the drop-down list.
URL Location – Enter the network path of the output device.
Click Save to save your changes and return to the Print Setup menu.
Navigate: Main Menu > Admin > Print Setup > Print Format. The Print Format window opens.
To add one or more formats, follow these steps:
If you want to filter the Formats table, select a format category and format type from the Formats Type section.
Click Apply. The formats are populated.
Double-click the format you want to change.
Enter the updated information for Format Name, Default Printer, URL Location, and Default Format, if applicable.
Click Save to return to the Print Setup menu.
Navigate: Main Menu > Admin > Print Setup > Print Format. The Print Format window opens.
To delete one or more formats, follow these steps:
If you want to filter the Formats table, select a format category and format type from the Formats Type section.
Click Apply. The formats are populated.
Select the formats you want to delete.
Click Delete. A message is displayed: ”Are you sure you want to delete the selected report type formats?”
Click Yes to delete the formats.
Click Save to return to the Print Setup menu.
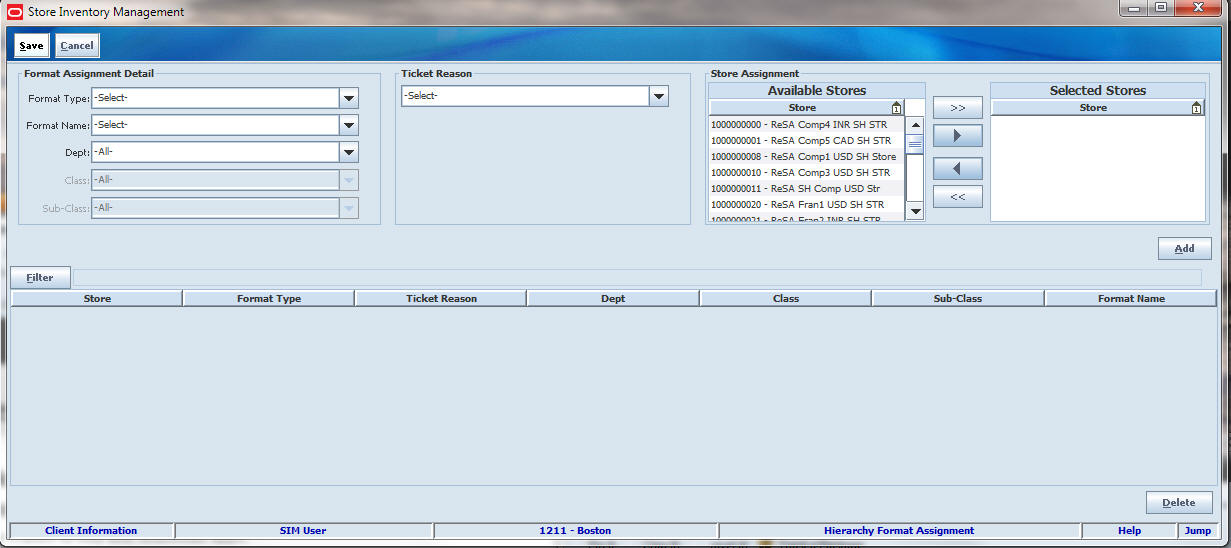
This screen is used to assign the ticket formats based on the event and ticket type. Formats can be assigned at department/class or sub class level and can also assign it for multiple stores.
Navigate: Main Menu > Admin > Print Setup > Hierarchy Format. The Hierarchy Format Assignment window opens.
Select a Format Type from the drop down list.
|
Note: Auto Generated SN is not included as a type since the purpose of the screen is to handle price changes and AGSN tickets are not generated for a price change event. |
Select a Format Name from the drop down list.
Select a Department from the drop down list.
Select a Class from the drop down list.
Select a Sub-Class from the drop down list.
Select a Ticket Reason which indicates the different price events. There are three ticket reasons to select from: Regular Price Change, Promotion, Clearance.
Choose selected stores assignment from the list of available stores.
Click the arrow button to move the stores to the Selected Stores.
Click Add to add the selected details to the fields list.
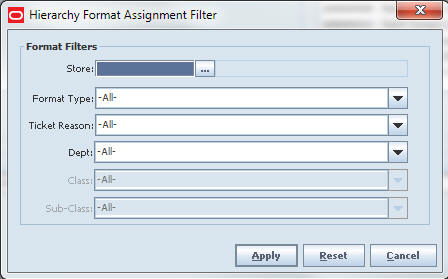
Click Filter at any time to populate the screen with items that match the search criteria. The Hierarchy Format Filter window opens.
Enter Store.
Select Format Type from the drop down list.
Select Ticket Reason from the drop down list.
Select Department from the drop down list.
Select Class from the drop down list.
Select Sub-Class from the drop down list.
Click Apply. The transactions matching the search criteria are listed in the Hierarchy Format Assignment window.
Click Save to save your changes and return to the Print Setup window.
To add a hierarchy format assignment, follow these steps:
Follow Steps 1-9 above.
A warning message displays, ”Format is already assigned for the selected combination and it will be overridden.”
Select OK.
Click Save to save your changes and return to the Print Setup window.
In order to change the hierarchy format assignment, delete the format assignment, and then add the new format assignment.
To delete the hierarchy format assignment, follow the steps:
Navigate: Main Menu > Admin > Print Setup > Hierarchy Format. The Hierarchy Format Assignment window opens.
Click Filter at any time to populate the screen with items that match the search criteria. The Hierarchy Format Assignment Filter window opens.
Enter Store.
Select Format Type from the drop down list.
Select Ticket Reason from the drop down list.
Select Department from the drop down list.
Select Class from the drop down list.
Select Sub-Class from the drop down list.
Click Apply. The transactions matching the search criteria are listed in the Hierarchy Format Assignment window.
Click Apply. The Hierarchy Format Assignment window populates with the store.
Select one or more stores to delete.
Click Delete.
A Hierarchy Formats Delete Confirmation window displays. Click Yes.
Click Save to save your changes and return to the Print Setup window.
SIM can automatically generate tickets and labels for items when user-defined attribute (UDA) values change. The UDA Print Setup function allows you to define whether new tickets or labels, or both, should be printed automatically when particular UDA values change.
|
Note: These print settings affect all stores, because user-defined attributes are not specific to stores. This function is only available to users with the required SIM permissions. |
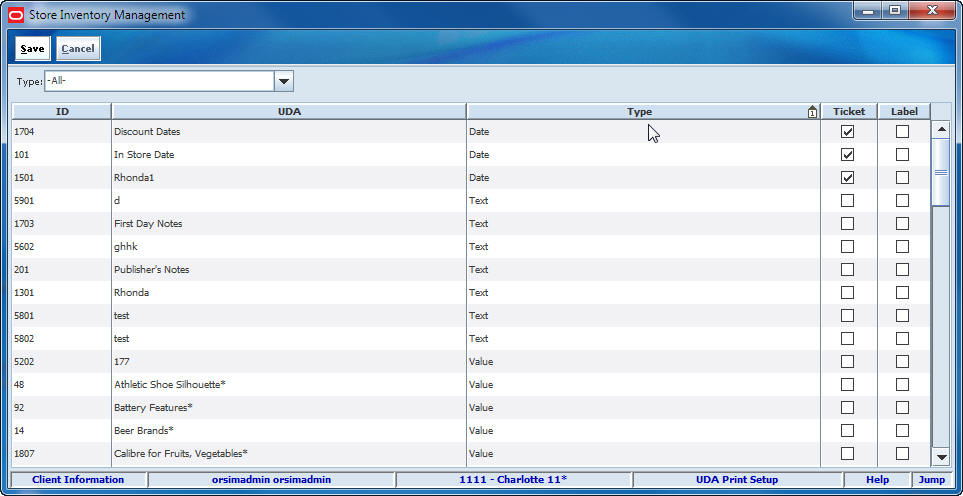
Navigate: Main Menu > Admin > Print Setup > UDA Print Setup. The UDA Print Setup window opens.
Select a value from the Type drop-down list to select which UDAs to display in the list:
All – Display all UDAs of all types (default).
Date – Display only UDAs for which the values are dates.
Text – Display only UDAs for which the values are free-form text.
Value – Display only UDAs for which the values are specific values from a list.
To control whether tickets or labels are printed automatically when a UDA changes, follow these steps:
For each UDA for which you want to turn ticket or label printing on or off, follow these steps:
Locate the UDA in the UDA Print Setup list.
To specify automatic printing of item tickets when this UDA changes, select (check) the Ticket check box for the UDA.
To turn off automatic ticket printing for this UDA, deselect (clear) the Ticket check box.
To specify automatic printing of shelf labels when this UDA changes, select (check) the Label check box for the UDA.
To turn off automatic label printing for this UDA, deselect (clear) the Label check box.
Click Save to return to the Print Setup menu.
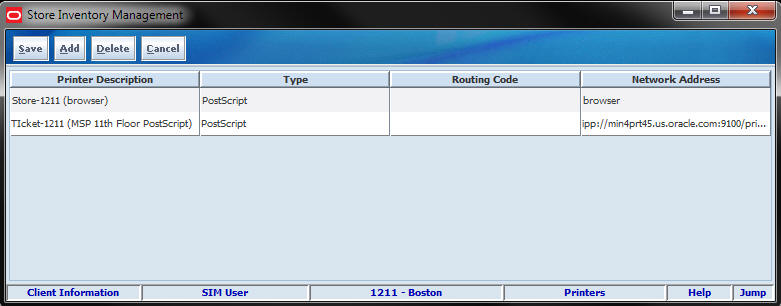
To add a new SIM printer, follow these steps:
Navigate: Main Menu > Admin > Print Setup > Printers. The Print Setup window opens.
Click Add.
Complete the following required fields for the new printer:
Printer Description – Enter a description by which you can identify the printer within your organization.
Type – Select the type of printer.
Routing Code – Enter the code for the method to route a ticket, label, or report.
Network Address – Enter the IP address of the printer.
Click Save to add the printer and return to the Print Setup menu.