| Oracle® Retail Store Inventory Management Store User Guide Release 16.0 E76179-08 |
|

 Previous |
 Next |
| Oracle® Retail Store Inventory Management Store User Guide Release 16.0 E76179-08 |
|
Previous |
Next |
This chapter covers sequencing. The following topics are covered:
Overview: Introduction to sequencing.
Functionality: Description of the functionality to sequence locations, sequence items, and re-sequence a location.
Technical: Integration with Oracle Retail Integration Bus (RIB), web services, batch, and the database structure.
Sequencing functionality provides users the ability to know the relative location of an item in a store. Sequencing a store improves store processes and reduces the time that employees spend looking for items. The retailer can sequence all items in the store and create unique locations to hold the items.
Sequencing defines how many items can be stored in a particular location, and allows the definition of a capacity for that item location combination. The capacity is used for in-store replenishment when generating the shelf replenishment pick list. Sequencing is used within Stock Counts, Customer Order Picking, Transfer Request, and Shelf Replenishment to aid the user in proceeding to the next item during the transaction for efficiency. Lastly, the Sequencing Primary Location is displayed to the user on the Item Detail screen.
Sequencing functionality within SIM can be accomplished on a PC-based deployment, on a wireless handheld device, or on a combination of the two deployment methods.
The following features are available:
Add, remove, and rearrange macro locations in Shop floor and Backroom. (Delivery Bay is not a sequenced location)
Apply class list to create macro locations.
Add, remove, and rearrange items in a macro location (micro sequencing).
Apply item list to add items to macro locations.
Add locations to an item including primary and secondary locations.
Re-sequence an entire macro location (handheld only).
Define capacity for items in a location.
Define and print shelf edge labels and quantities.
A grocery retailer originally has a rack with personal care products. Now the Plan-o-gram has changed and this rack will now have oral care products. The user can make updates to the macro location with the items of oral care by using the sequencing dialog on the handheld (sequence location).
Sequencing is used to define the capacity for an item in a location which is in turn used for determining shelf replenishment needs.
This section covers parameters.
Search Limit Default for Sequencing
Valid Values: 1-999
Default: 500
Topic: UI
Editable: Yes
This parameter indicates the default search limit for the No Location List screen filter.
Display Sequence Fields
Values: Yes and No
Default: No
Topic: Sequencing
Editable: Yes
Indicates whether or not sequencing fields are displayed in the Item Lookup screen.
Assign Shelf Edge Labels
Values: Yes and No
Default: No
Topic: Sequencing
Editable: Yes
If the value of this option is Yes, users are required to assign shelf edge labels for sequencing.
Security Permissions exists for access, add, delete, and edit for sequencing. Permissions also exist for applying class and Item list for locations, arranging sequencing locations and items within locations. For the handheld, permissions exist for accessing, sequencing, and sequence item within a location.
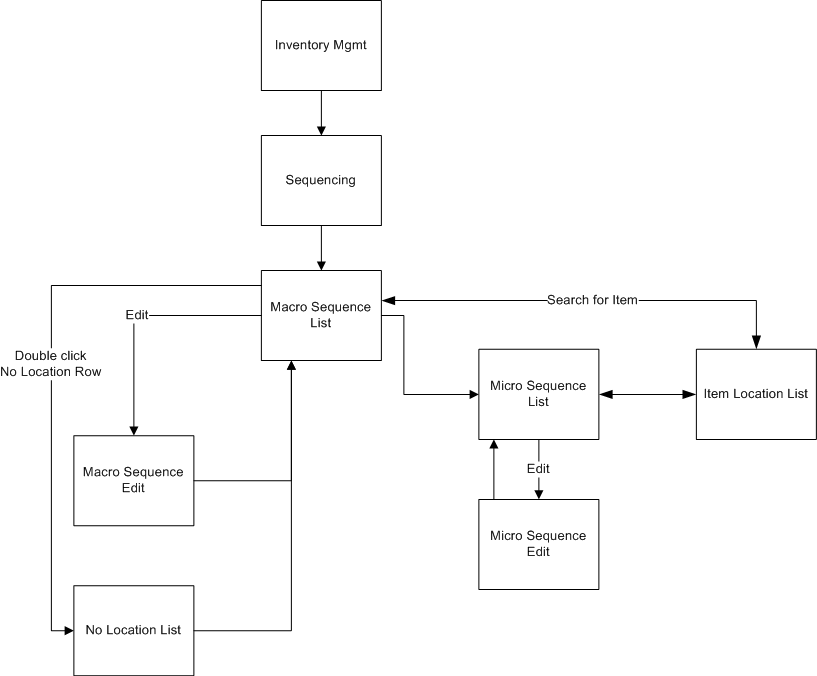
This section describes the screens available for sequencing.
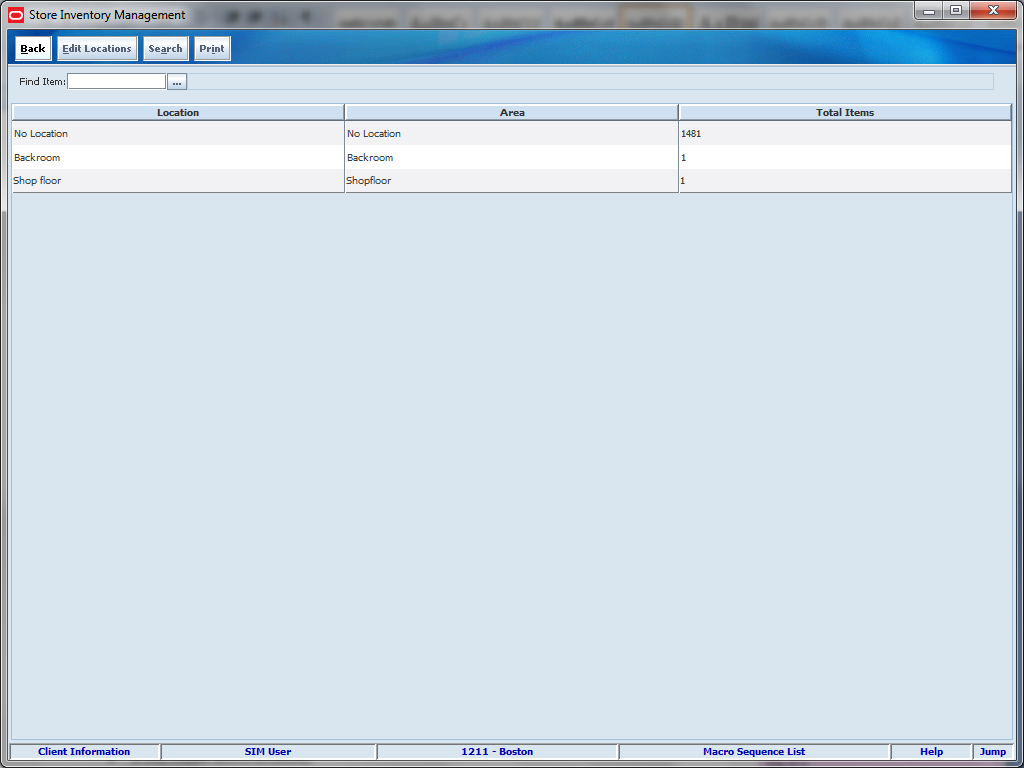
This figure shows the Macro Sequence List screen. This screen displays all the macro locations of the store with the number of items in it. The user can choose to edit locations from here. From this screen, the user can search on an item and the system will provide an Item Location List screen with all locations for that item. If a location is double clicked, the user navigates to the Micro Sequence List for that location. The Macro Sequence List screen is mainly informational listing out all of the macro locations in order.
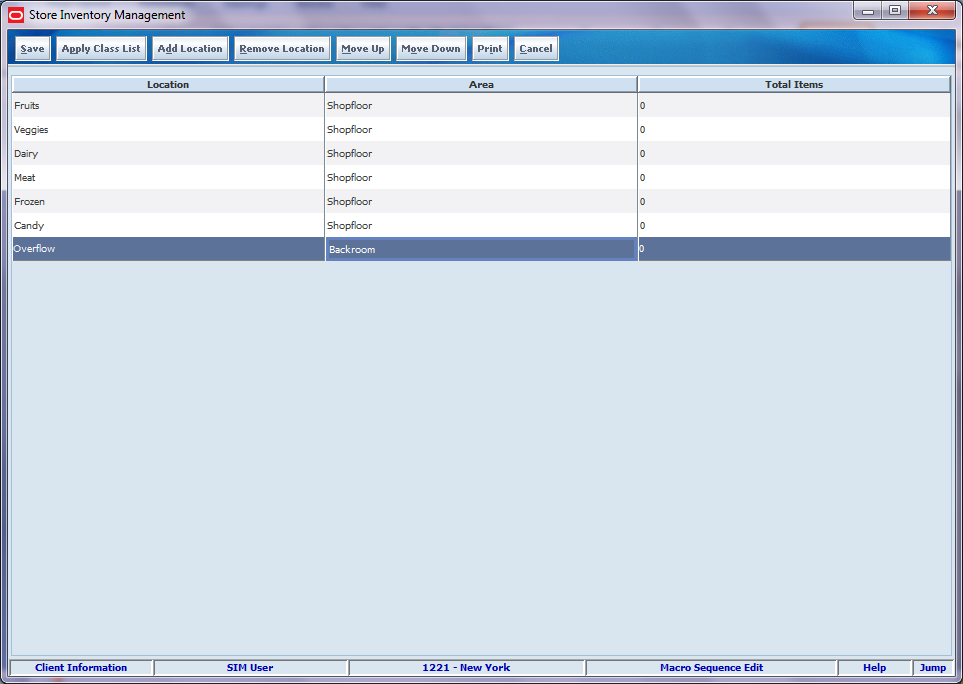
This figure shows the Macro Sequence Edit screen. From the Macro Sequence List, if the user selects the Edit option, the Micro Sequence Edit screen is displayed. This screen allows the user to edit the location description and change the area (Backroom or Shop floor) for locations. In addition, the user can move a location up or down, which will change the relative position of that location to another. If needed, the user can add new locations and remove existing locations. For some retailers, the locations may be based off of the merchandise hierarchy class. If this is the case, the Apply Class List button automatically creates macro locations for each of the classes in the system. The print feature prints out shelf edge labels for all items in the macro sequence location.
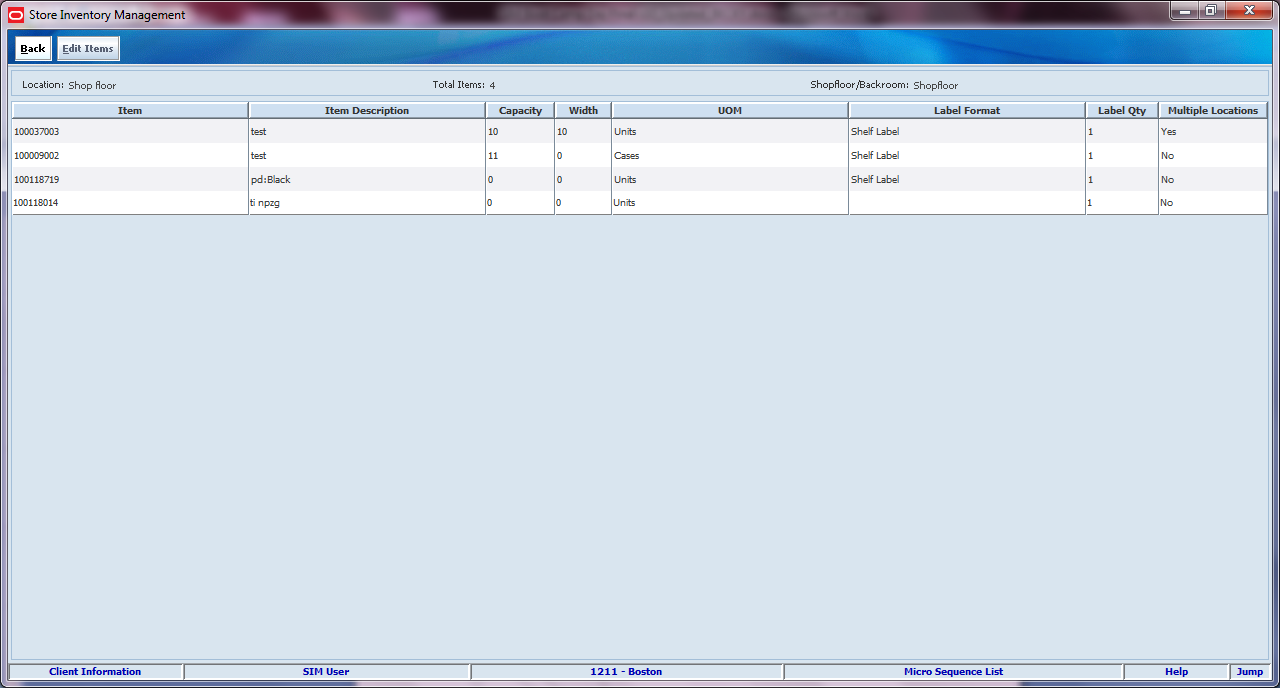
This figure shows the Micro Sequence List screen. If the user double clicks any location on the Macro Sequence List screen, this screen is displayed. The screen displays the information of the items in the location and their various features.
If the item exists in more than one location, this is indicated. The user can click on an item on the screen and direct to the Item Location List screen to view all of the locations for the item.
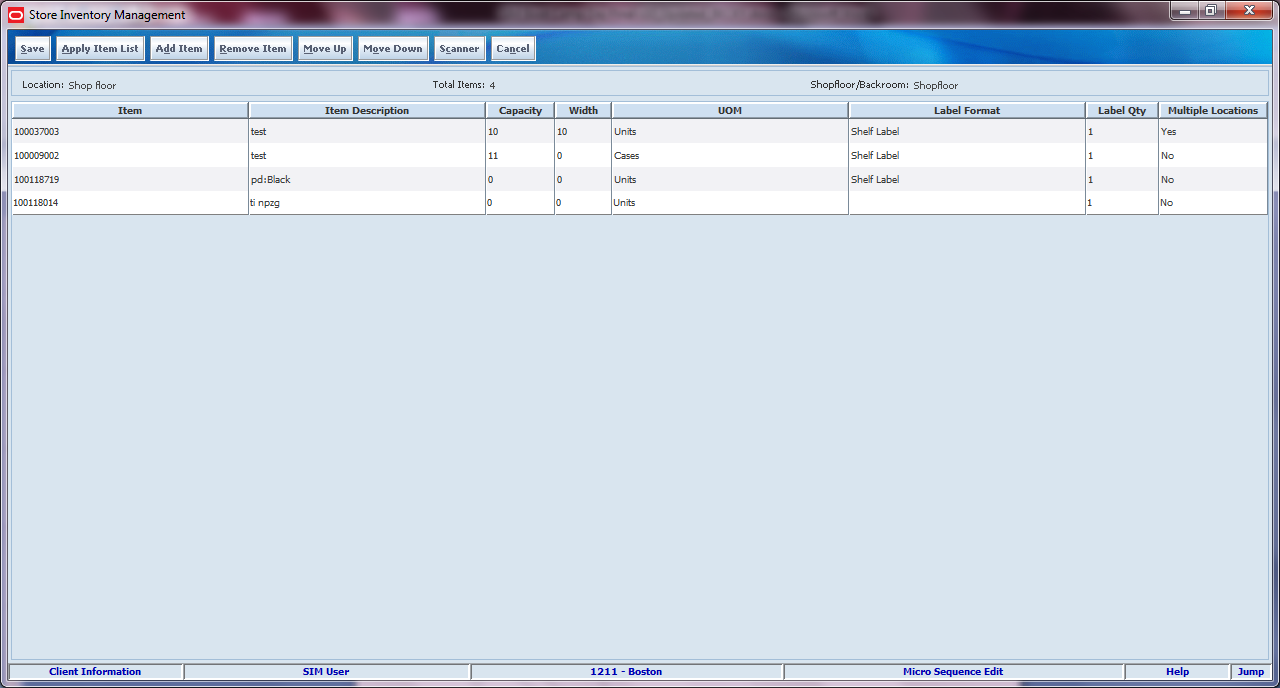
The Micro Sequence Edit Screen displays all the items in sequence order in the location they are assigned. The items can be added and removed from the location. The order of the items is considered the micro sequence order; this order can be modified by selecting an item and moving it up and down. If the macro location is a class, the Apply Item List function allows the user to apply all items that are part of the merchandise hierarchy class to the macro location.
The Capacity column is used in shelf replenishment to determine the limit of items on the location. Similarly, Label format allows the user to select the type of ticket the user wants to print which can be printed from ticketing. A user can double click the item and be taken to the Item Locations List Screen.
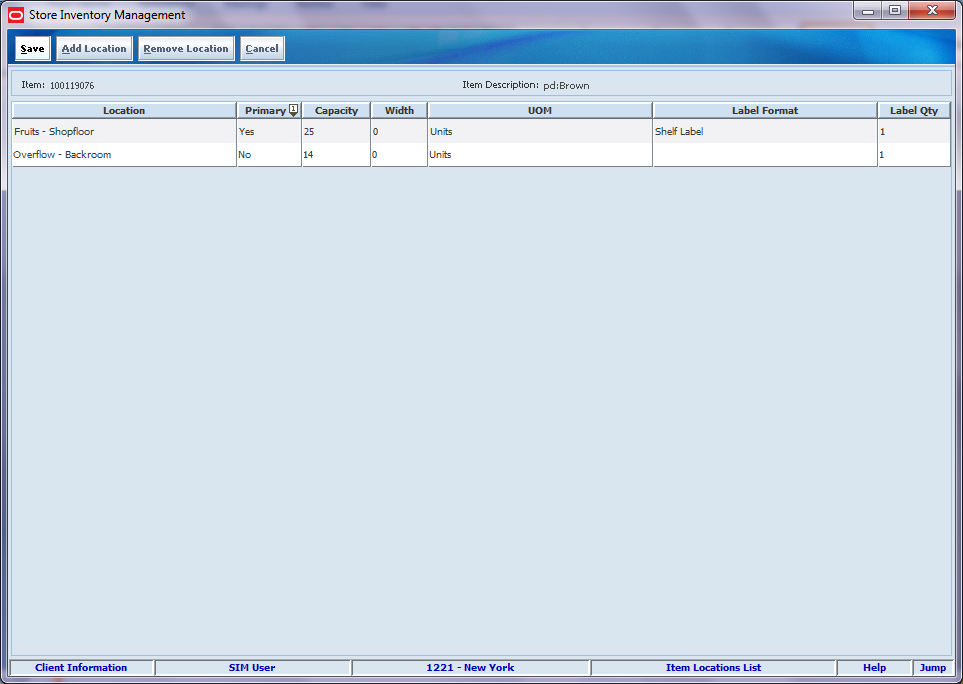
The Item Locations List screen shows the user all the store locations for the item. This screen appears when the user double clicks an item from the Micro Sequence List screen. Existing locations can be added and removed for the item. If the user adds a location to an item, the item will be added at the end of the micro sequence within that location. An item can have only one location as its primary location.
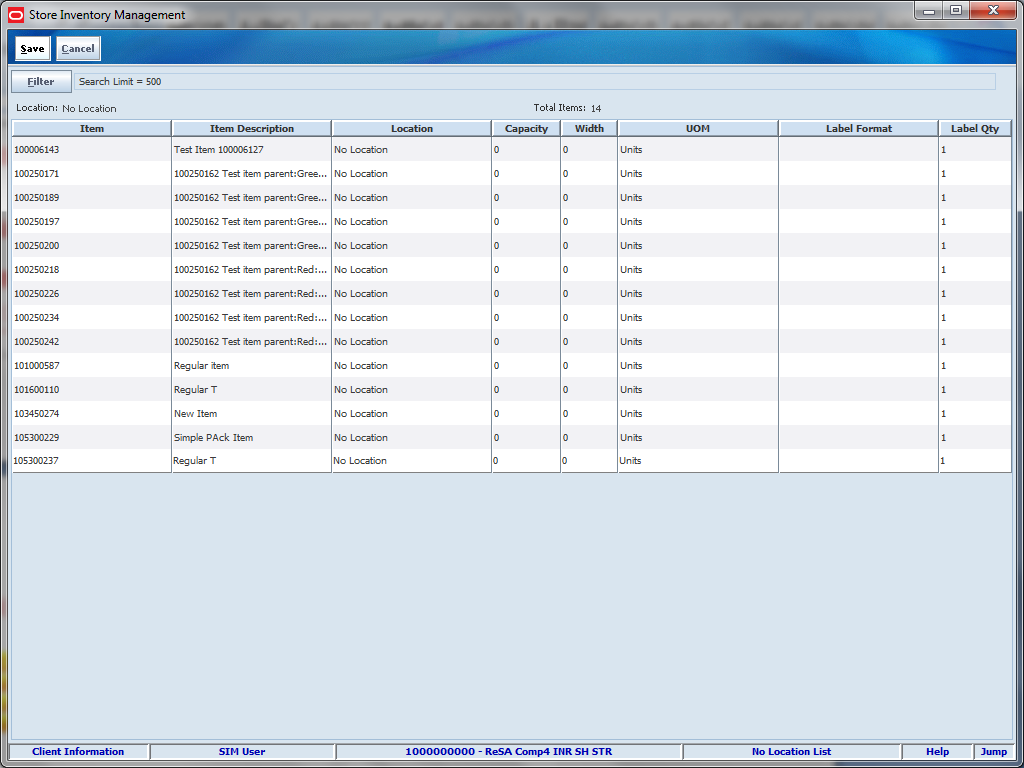
The No Locations List screen allows users to add a primary location, label format, and quantity to an item that does not exist at another store location. The screen displays all the items with no location associated to them. Once the item is added to a location, it will be micro sequenced as the last item in the location. Non-sellable items are not displayed on this screen.
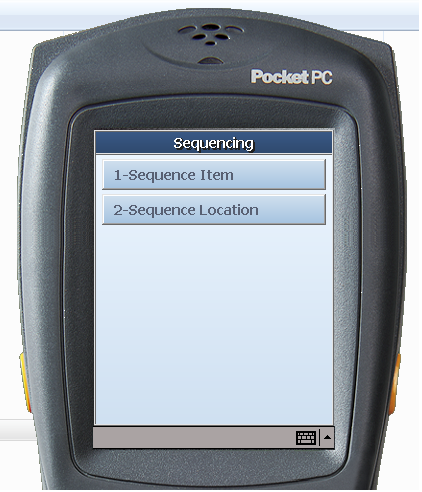
This screen is reached by selecting the Sequencing option under the Inventory Management menu. The handheld allows for sequencing an item, which means adding and removing locations for an item as well as moving the item within an existing location. The Sequence Location option enables the user to take an existing location and remove all the items in it and re-sequence that location by adding all new items into that location. The handheld does not allow the creation of macro locations.
A sequence is a location in a store. Using sequencing functionality, a retailer can divide the store area into multiple sequences and map items to them.
By default, all the items are mapped to a no-location sequence. As the retailer creates sequences and map items to them, the items are moved from a no-location sequence to their corresponding sequence and the mapping records are created in SIM data models.
|
Note: The no-location sequence should not be deleted. |
Business objects are used within the application code for all business processing. The following business objects are used for sequencing:
| Business Object | Description |
|---|---|
| StoreSequenceArea | Contains information about the store area that contains sequence items. |
| StoreSequenceItem | Contains information about an item within a store sequence area. |
This section provides information on the integration of sequencing.