| Oracle® Retail Store Inventory Management Store User Guide Release 16.0 E76179-08 |
|

 Previous |
 Next |
| Oracle® Retail Store Inventory Management Store User Guide Release 16.0 E76179-08 |
|
Previous |
Next |
This chapter describes the common components of shipping and receiving. The following topics are covered:
Overview: Overview of shipping and receiving.
Functionality: Description of screens available for shipping and receiving.
Technical: Business objects, database structure, and manifesting setup.
The shipping and receiving functions in SIM have several common components. The following functional areas are included: Customer Order Deliveries, Return to Vendor Shipments, and Transfer Shipping/Receiving for store, warehouse, and external finisher. They include tasks usually performed by shipping or receiving associates. This also includes integrating to a third-party manifesting system for rate shopping to find the least expensive delivery method.
Following are the features of shipping and receiving:
Manifest web services for rate shopping
Maintenance of shipment reason codes
Print shipping documents (Bill of Lading, Manifest, and Pre-Shipment Notice)
Print container labels
Manifesting systems help retailers create manifest documents, Bill of Lading (BOL), shipping container labels for shipments, and reduce cost through rate shopping by finding the least expensive delivery method for the given shipping criteria.
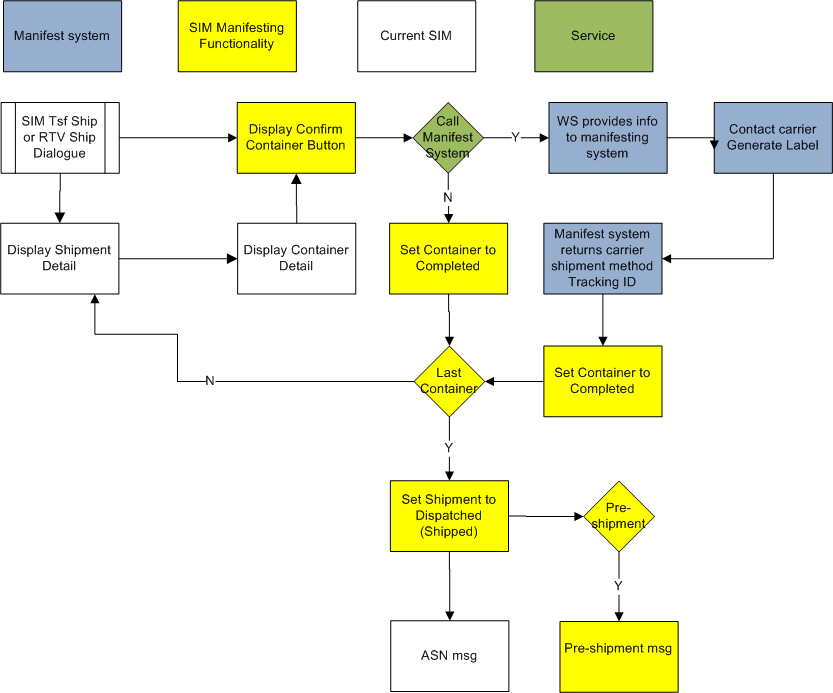
For larger shipments, multiple containers may exist and each container requires a separate tracking ID. For RTV Shipment and Transfer Shipment, the manifesting service will be called when confirming each container. The carrier and service are required to be the same for all containers within the same shipment. The container and shipment are all inclusive for Customer Order Deliveries.
If a manifesting system is not integrated, the system provides a method for tracking the shipments and containers as well as allows printing of container labels using various user-defined label designs.
A user creates a shipment (store, warehouse, finisher, customer order delivery, or return to vendor) and enters in the package type of "Small" and Weight of 2.3 lbs. The Manifesting system will do the rate shopping for the carrier and service and automatically print out a label for the package.
The above flow shows the confirmation of a container and how a call is made to the manifest system. The flow is highlighted in different colors to help identify different integration points.
When the user confirms each container for an RTV or Transfer shipment, the system can invoke the web service to provide the required shipment details to the manifesting system and subsequently return a tracking ID for each container.
After all containers have received their tracking ID, the user is able to ship the shipment, or an external system indicates to SIM that the shipment is dispatched.
|
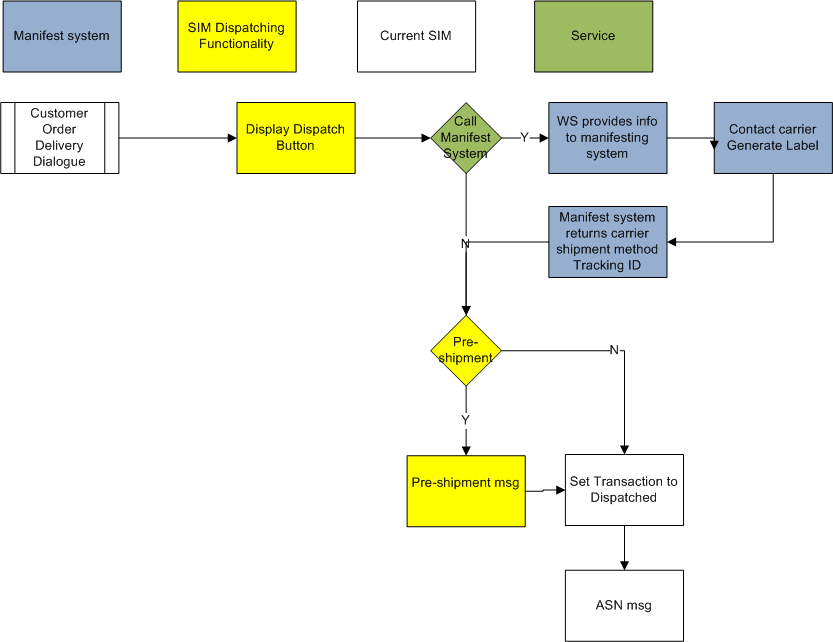
Note: Customer Order Deliveries only use the web service at submit or dispatch since the shipment will always be a single container. |
If SIM is configured to publish a pre-shipment, it sends the pre-shipment notice to the pre-shipment system.
If the carrier must be changed for the shipment with transfer shipment or RTV shipment, the user is required to adjust the carrier, which will cause all containers to move back to "In Progress." Once the shipment has been dispatched, the user will no longer be able to adjust the carrier.
The above flow represents when a Customer Order Delivery is dispatched and a call is made to the manifest system. The flow is highlighted in different colors to help identify different integration points.
This section covers parameters and security.
Dispatch Validate
Values: Ship Direct / Ship Submit
Default: Ship Direct
Topic: Customer Order Delivery
Editable: Yes
Ship Direct: SIM controls all processes. The user will be able to go from create/edit directly to dispatch.
Ship Submit: This option requires the user to press the submit button, and specifically press the dispatch button. An additional option is available to have an external system generate a dispatch message through a standard web service.
Transfer Shipment Dispatch Validate
Values: Ship Direct / Ship Submit
Default: Ship Direct
Topic: Transfer Shipment
Editable: Yes
Ship Direct: SIM controls all processes. The user will be able to go from create/edit directly to dispatch.
Ship Submit: This option requires the user to press the submit button, and specifically press the dispatch button. An additional option is available to have an external system generate a dispatch message through a standard web service.
RTV Shipment Dispatch Validate
Values: Ship Direct / Ship Submit
Default: Ship Direct
Topic: RTV Shipment
Editable: Yes
Ship Direct: SIM controls all processes. The user will be able to go from create/edit directly to dispatch.
Ship Submit: This option requires the user to press the submit button, and specifically press the dispatch button. An additional option is available to have an external system generate a dispatch message through a standard web service.
Ship To Store Carrier Default
Values: Sender / Receiver / Third Party
Default: Third Party
Topic: Transfer Shipment
Editable: Yes
Sender: Sender will be selected for Carrier Type on BOL Detail screen.
Receiver: Receiver will be selected for the Carrier type on BOL Detail screen.
Third Party: Third Party will be selected for the Carrier type on the BOL Detail screen. The Carrier name (drop down) will be defaulted to "Other."
Ship To Warehouse Carrier Default
Values: Sender / Receiver / Third Party
Default: Third Party
Topic: Transfer Shipment
Editable: Yes
Sender: Sender will be selected for Carrier Type on BOL Detail screen.
Receiver: Receiver will be selected for the Carrier type on BOL Detail screen.
Third Party: Third Party will be selected for the Carrier type on the BOL Detail screen. The Carrier name (drop down) will be defaulted to "Other."
Ship To Finisher Carrier Default
Values: Sender / Receiver / Third Party
Default: Third Party
Topic: Transfer Shipment
Editable: Yes
Sender: Sender will be selected for Carrier Type on BOL Detail screen.
Receiver: Receiver will be selected for the Carrier type on BOL Detail screen.
Third Party: Third Party will be selected for the Carrier type on the BOL Detail screen. The Carrier name (drop down) will be defaulted to "Other."
RTV Shipment Carrier Default
Values: Sender / Receiver / Third Party
Default: Third Party
Topic: RTV Shipment
Editable: Yes
Sender: Sender will be selected for Carrier Type on BOL Detail screen.
Receiver: Receiver will be selected for the Carrier type on BOL Detail screen.
Third Party: Third Party will be selected for the Carrier type on the BOL Detail screen. The Carrier name (drop down) will be defaulted to "Other."
Manifest Transfer to Finisher
Values: Yes/No
Default: No
Topic: Web Service Enablement
Editable: No
Yes: The Manifesting system will be called for Transfer to Finisher.
No: The Manifesting system will not be called.
Manifest Transfer to Warehouse
Values: Yes/No
Default: No
Topic: Web Service Enablement
Editable: No
Yes: The Manifesting system will be called for Transfer to Warehouse.
No: The Manifesting system will not be called.
Manifest RTV to Supplier
Values: Yes/No
Default: No
Topic: Web Service Enablement
Editable: No
Yes: The Manifesting system will be called for Return to Vendor.
No: The Manifesting system will not be called.
Manifest Transfer to Store
Values: Yes/No
Default: No
Topic: Web Service Enablement
Editable: No
Yes: The Manifesting system will be called for Transfer to Store.
No: The Manifesting system will not be called.
Manifest Customer Order Deliveries
Values: Yes/No
Default: No
Topic: Web Service Enablement
Editable: No
Yes: The Manifesting system will be called for Customer Order Deliveries.
No: The Manifesting system will not be called.
Manifest Weight UOM
Values: List of UOMs from the Weight UOM table.
Default: Default UOM from Weight UOM table.
Topic: Admin
Editable: Yes
The UOM selected for this store admin will be used as the Weight UOM for the weight on the BOL in transfer shipment, customer order deliveries, and RTV shipment.
Pre-Shipment Notification
Values: Yes/No
Default: No
Topics: RTV Shipment/Transfer Shipment/Customer Orders
Editable: Yes
Yes: SIM will publish a pre-shipment message.
No: SIM will not publish a pre-shipment message.
|
Note: This store parameter exists for each of the functional areas: RTV Shipment/Transfer Shipment/Customer Order Delivery. |
SSCC Shipping Label ID Generation
Values: Automatic / Manual
Default: Automatic
Topic: Admin
Editable: Yes
Automatic: When Automatic is selected, the system will generate an identifier for printing on the shipping label.
Manual: When Manual is selected, the user will need to enter an identifier for printing on the shipping label.
This store parameter is used for RTV Shipment and Transfer Shipment.
Security permissions exist for:
Accessing, creating, editing, and deleting Shipment Reason Codes.
Accessing, creating, editing, and deleting Print Formats.
Accessing Session Printer.
Accessing and editing Shipment Information and BOL Details.
Accessing and editing Container Information Details.
All permissions exist on the PC, handheld, and MAF applications where applicable.
Data permissions exist for:
A user must have the proper permissions for a RTV Shipment Reason Code and/or Transfer Shipment Reason Code to proceed with creating, editing, or deleting an item for a particular reason code.
|
Note: A very common problem is that a new reason code is created, but is not associated to the role the user is granted. If that does happen, the user will not be able to use the new reason code. |
This section describes the screens available for shipping and receiving.
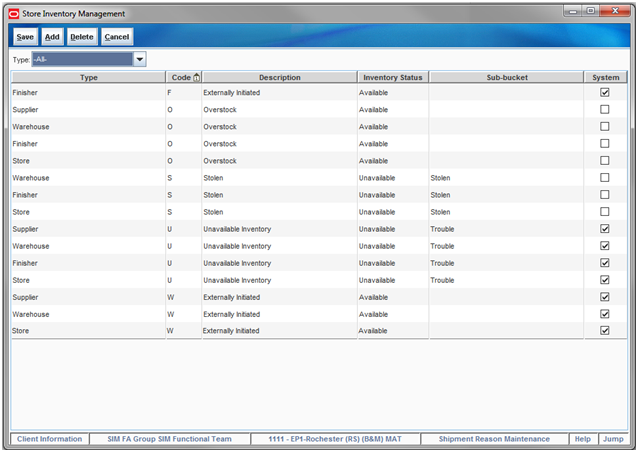
The Shipment Reason Maintenance screen is an administrative screen on the PC application for creation and maintenance of Shipment reason codes. The reason codes are used within Transfer Documents, RTV Documents, Transfer Shipments, and RTV Shipments. Upon initial install, a list of default shipment reason codes will be available. The reason codes defined in SIM need to match that of the merchandising system.
The following table provides the list of SIM Shipment reason codes:
| Type | Type ID | Code | Description | Use Available | Nonsellable | System |
|---|---|---|---|---|---|---|
| Finisher | 4 | F | Externally Initiated | Yes | Yes | |
| Store | 1 | O | Overstock | Yes | No | |
| Warehouse | 3 | O | Overstock | Yes | No | |
| Finisher | 4 | O | Overstock | Yes | No | |
| Supplier | 2 | O | Overstock | Yes | No | |
| Finisher | 4 | U | Unavailable Inventory | No | Trouble | Yes |
| Store | 1 | U | Unavailable Inventory | No | Trouble | Yes |
| Warehouse | 3 | U | Unavailable Inventory | No | Trouble | Yes |
| Supplier | 2 | U | Unavailable Inventory | No | Trouble | Yes |
| Store | 1 | W | Externally Initiated | Yes | Yes | |
| Supplier | 2 | W | Externally Initiated | Yes | Yes | |
| Warehouse | 3 | W | Externally Initiated | Yes | Yes |
All reason codes have an inventory status associated to them. The inventory status is used to define the inventory bucket which will be relieved when the shipment is dispatched.
Those reason codes that are for the type of Store, Warehouse, or Finisher appear as reason codes in the Transfer dialog. The reason codes that are for the type of Supplier appear as reason codes in the RTV dialog.
System Reason codes cannot be edited or removed. System reason codes are required to be available in SIM. These values are populated through a data seeding script and the system check box is only checked during that process. For those non-system reason codes, once the reason code is saved, only the description can be edited.
If the system is configured to use sub-buckets, then the sub-buckets are enabled. Sub-buckets are linked with the shipment reason codes to make it easy for users to move inventory to, from, and between sub-buckets when adjusting unavailable stock. Some examples of these are stock reserved for display or demo purposes versus stock that is unavailable because it needs to be repaired. The sub-buckets are a pre-populated list which is defined in the data base.
If using sub-buckets, all reason codes that have an inventory status of unavailable will require a sub-bucket to be selected.
|
Note: Before a reason can be accessed by a user, it is important to associate that reason code to a role that the user has the privileges to use in that store. |
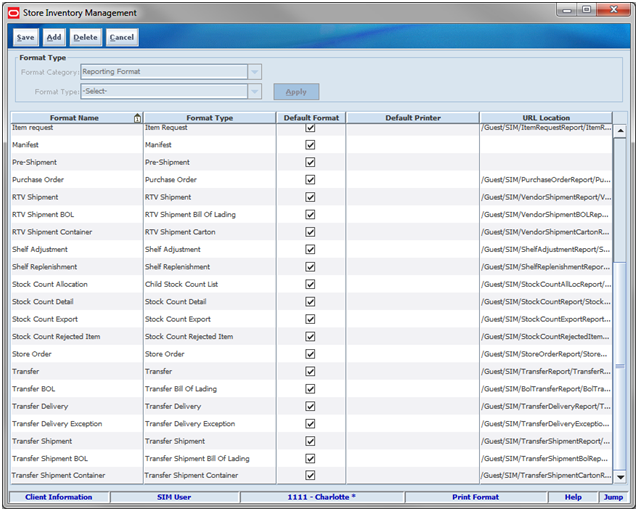
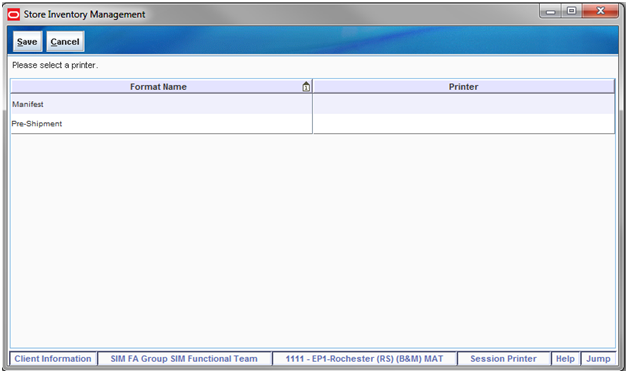
The Print Format screen is an administrative screen used to set up reports, item tickets, shelf labels, and container labels to support various functions within SIM. This screen is accessed from Admin > Print Setup. This screen is also covered in the Printing Chapter for formats used in printing item tickets and shelf labels. This screen is only available on the PC.
To support the Shipping and Receiving processes, the Manifest report, Pre-Shipment Notice, and labels are setup in the Print Format screen. This includes both a format that SIM will print, as well as the default printer to be used for both internal and external systems to perform printing.
There is not an actual report created in SIM for pre-shipment and manifesting. If printing is needed, the user has to configure those reports. Since these two reports are generated through an automated process, the system only allows one format per format type of "Pre-shipment" and "Manifest."
Shipping labels can be printed and placed on the container in the following functional areas: Transfer Shipping, RTV Shipping, and Transfer Receiving. Customer Order Deliveries are only printed through an external manifesting system.
Container labels can differ across countries or regions. SIM allows the client to add as many different formats as they require for label printing within SIM. These formats will be assigned to one of the following format types: RTV Shipping Label, Transfer Shipping Label, and Transfer Receiving Label.
The container label formats can be displayed by selecting the Format Category "Shipping Format." One of the formats must be selected as the default for each type. A default template is provided out of the box for each functional area.
The Format Type is specific to the functional area and only those formats display from the respective dialogs. Example: Format Type of "Transfer Shipping Label" will only display in the Transfer Shipment dialog.
A barcode is printed on the label and the SSCC Shipping Label ID Generation store parameter is used for creating the identification used for linking the barcode to the container in the system. For additional details, see "Label Configuration."
The Session Printer screen is used to set the printer to be used for printing the Manifest and Pre-Shipment documents. Since these documents are automatically printed during the manifesting process, a printer must be defined ahead of time. This printer information is sent to the external system. The external system uses this to print documents.
The printer can be set up in either the Print Format screen (as the default printer) or defined as the session printer. This in turn will be sent as the printer to use from the external system.
|
Note: The manifesting process is called from the "Submit" or "Dispatch" function in a transfer shipment, RTV shipment, or customer order delivery. |
The pre-shipment and manifest messages follow the following default logic:
Use printer setup for Session Printer.
If a default printer is defined from the Print Format screen (PC only) and a session printer is defined from Session Printer screen (PC, handheld, MAF), the session printer will be used.
Use printer setup as Default Printer from Print format screen (PC only).
Default printer is defined and no session printer is defined, then the default printer will be used.
No printer is set up, then no value is published.
If no default printer is defined from the Print Format screen (PC only) and no session printer is defined from Session Printer screen (PC, HH, MAF), the value will not be published for printing.
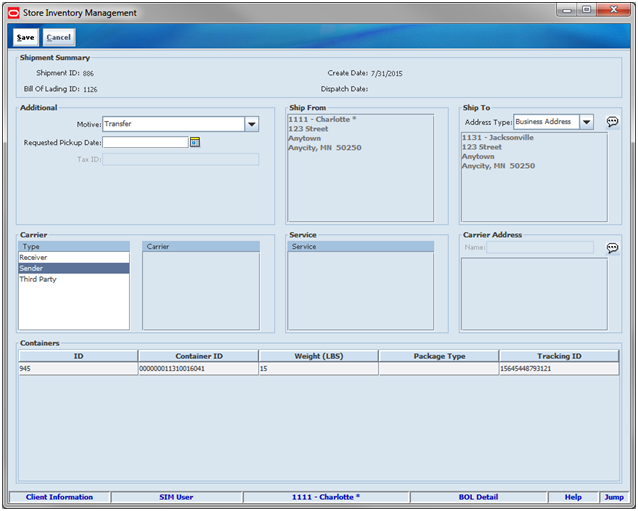
The BOL Detail screen is used to enter the shipping details for an outgoing shipment. The following figures shows a transfer shipment. The BOL dialog is used in all shipments (RTV Shipment, Transfer Shipment, and Customer Order Deliveries) and is fairly constant in all of these functionalities.
Transfer Shipment and RTV shipment may have several containers for a shipment. For Customer Order Deliveries the container and shipment are all inclusive; therefore there is only one tracking ID, weight, and package type for the shipment. Since Transfer Shipments and RTV Shipments may contain several containers, each container requires a unique tracking ID and is used when recording the shipment information. The carrier must be the same for all containers within the same shipment. The weight, package type, and tracking ID are entered on the BOL screen for customer orders and on the Container Info screen for RTV Shipment and Transfer Shipment. For additional details for Customer Order Deliveries, see Chapter 20, "Customer Order Management."
The motive for the shipment is based on the functional area and sequence number. The code with the sequence of 1 will be displayed by default. These values will be included in the data seeding script. Additional codes may be added by the client.
| Code_type | Code | Description | Required | Sequence |
|---|---|---|---|---|
| BOLR | RTV | Return To Vender | Y | 1 |
| BOLR | CHY | Charity | Y | 2 |
| BOLT | TSF | Transfer | Y | 1 |
| BOLT | ADM | Administrative | Y | 2 |
| BOLT | RAL | Re-Allocation | Y | 3 |
| BOLF | COF | Customer Order Delivery | Y | 1 |
| BOLF | V2B | B2B | Y | 2 |
The carrier defaults based on the store parameter <XYZ> Carrier Default set up by transaction (store, finisher, warehouse, and RTV). Customer Order Delivery defaults to "Third Party" if the customer has identified a carrier to use on the customer order. If no carrier is identified on the customer order, "Sender" is defaulted for orders with a delivery type of "Ship To Customer." If the delivery type is "Pick Up," the carrier is defaulted to "Receiver."
If the carrier type is "Third Party," the Carrier is available for selection. This field may be overwritten by the manifesting system when used. The user may select "Other" from the list of carriers. If "Other" carrier is selected, the Carrier Name and Address will be enabled.
When a carrier is selected, a list of services available for the carrier will be selectable. This field may be overwritten by the manifesting system when used in addition to the Carrier. The manifesting service call made can include checking for the best rate and will override what was selected by the user.
Data setup scripts will be required to populate the Shipment Carriers, Shipment Carrier Services, Shipment Weight UOM, and Shipment Package Sizes.
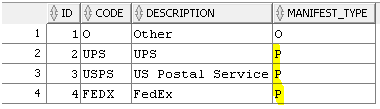
Each Carrier will have one of three manifest types: (P) Parcel, (H) Home Fleet, and (O) Other. Only carriers with a manifest type of (P) Parcel will be used with the manifesting integration service. Depending on the carrier service, weight and package size may be required. The system will alert the user when the information is missing.
When the container is confirmed (transfer shipment and RTV shipment), the manifesting system is called and the tracking id is returned for the container. A label is printed at this time and placed on the container. The label may be automatically printed from the manifesting system or can be printed from the Container Info screen if configured.
The BOL Detail screen is frozen once the first container is confirmed and cannot be changed without moving all the containers for the shipment back to an In Progress state. This is done by using the Adjust Carrier feature. The BOL Details can be adjusted until the shipment is dispatched. If the user has the appropriate permissions. Once the user selects Adjust Carrier, a new carrier may be selected and each container will need to be reconfirmed to manifest again.
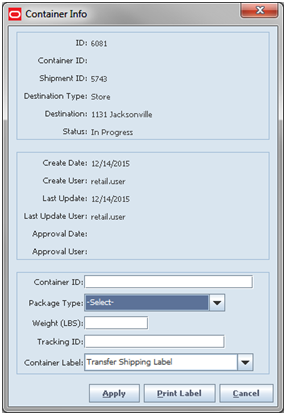
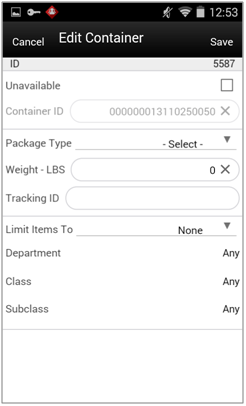
The Container Info screen is accessed by pressing the Info button on the Container Details screen, from the appropriate dialog. The Container Info screen is used to enter the Container ID, package type, weight, and tracking ID of the container. Additionally, the user can also print a label to place on the container from this screen. If manifesting is used, the manifesting service will return the tracking ID and may be configured to print the container label. The Container Info screen is accessed from the Transfer Shipment Container Detail, RTV Shipment Container Detail, and Transfer Receiving Container Detail screens. Since the BOL Detail screen defines the entire shipment, the Container Info screen is used to identify the package type, weight, and tracking ID for each individual container.
The customer order feature does not use this screen. For customer order deliveries, the package type weight and tracking ID are entered directly on the BOL Detail screen. Container Labels are only printed externally.
The Transfer Receiving dialog also uses this screen to print a new container label. When a container was unexpected or intended for another store, a new container ID is created and the user can print a new label. The tracking ID may also be captured on this screen.
The validations listed below apply to Transfer Shipments, RTV Shipments, and Customer Order Deliveries. The validations for Transfer Shipments and RTV Shipments are performed at the time of confirming the container, while Customer Order Deliveries performs the validations upon submit or dispatch of the shipment.
The Tracking ID will contain a single ID for tracking the package; it can be entered by the user, come from the manifesting system or come from the shipping ASN. It may get overwritten/updated by an external manifesting system. The tracking ID entered within the Transfer Receiving dialog is for informational purposes, and can be leveraged to find a container.
The weight field is used to enter in the weight of the package. The weight will be entered in the unit of measure based on the store admin Manifest weight UOM.
The package type is used to define the dimensions of package such as Large Envelope, Small Box, Medium Box, and so on. The package type will be selected from a defined list of packaged types in the Carton Dimension table.
Depending on the carrier/service selected for the shipment, the package type and weight may be required (this is only validated when the manifesting system is called). The Shipment Carrier Service table identifies when the weight and package type is required. This table is populated from a data script.
Since BOLs are not accessible on the handheld device, if required per the carrier service, the weight and package type will be prompted for when creating the container.
Note that when creating a transfer shipment container or RTV shipment container on the handheld, the carrier is defaulted based upon a store setting, Carrier Default. When the setting is "Third Party," the carrier is "Other" and the service is blank. Therefore, the user is not prompted for the weight and/or package type unless the carrier /service had been set as something different through the BOL on the PC requiring one.
All validations and rules for shipping and manifesting on MAF is existing functionality on the PC application. Shipping and Manifesting exists in a small form factor on MAF.
Features:
Enter Carrier BOL Information
Enter Container ID, Weight, Package Type, and Tracking ID
View Carrier BOL Information
Set External Printer
Print Container Label
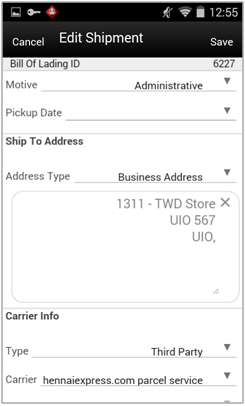
The user has the ability to enter the carrier details for both Transfer Shipments and Customer Order Deliveries. RTV Shipments are not currently available on MAF. The user can access the Edit Shipment screen by navigating to the Shipment and selecting Edit Shipment from the footer menu.
For Transfer Shipments, if the shipment is for sending items to a warehouse or finisher, the user has the option to enter an Authorization Number. This is not applicable to Transfer to Store or Customer Order Deliveries. Security permissions exist for the user to enter an Authorization Number.
In order to prepare the shipment for manifesting, the user is required to enter the carrier information on this screen. When the carrier Type is Third Party and the Carrier Service is a (P) parcel service, the manifesting service is called when the user confirms the container. Security permissions exist for the user to edit the Carrier BOL information.
For Transfer Shipments, once the first container is confirmed, the Adjust Carrier button is available to move any manifested containers back to "In Progress." The user will then have the ability to edit the carrier information. Security permissions exist for the Adjust Carrier button to display.
For Customer Order Deliveries, the user also enters the package type, weight, and tracking ID from this screen.
For additional rules and validation, see "BOL Detail."
The Edit Container screen is only applicable to Transfer Shipments, since Customer Order Deliveries shipment and container is all inclusive. The user will enter the package type, weight, and other container details from this screen. Security permissions exist for the user to edit this screen. For additional details, see "Container Info.".
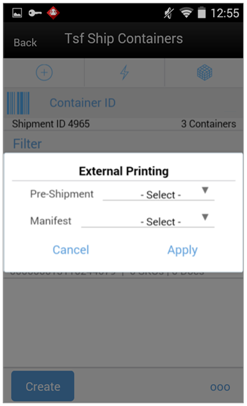
This screen can be accessed within the Shipment by selecting "External Printing" from the footer menu. The external printer can be defined for the pre-shipment and manifest documents. These settings will remain until the user logs out of the application. This setting is applicable across all functional areas within SIM that use the Pre-Shipment and Manifest documents. If the printer is selected for Transfer Shipment, the same printers will be set for Customer Order Deliveries dialog and vice versa. For additional details, see "Printer Setup - Session Printer."
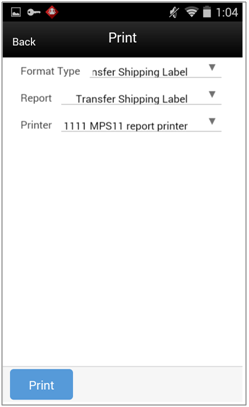
The Print screen is used for printing reports and also for printing labels. This screen can be accessed within the Shipment by selecting "Print" from the footer menu. For Transfer Shipments, to print a label, the user selects the format type of "Transfer Shipping Label." All formats that exist for that format type display in the dropdown list for the user to select from. If a default printer exists for the label, the printer is displayed. This is not applicable to Customer Order Deliveries since that dialog only prints labels from an external manifesting service.
The container barcode generator feature is designed for printing shipping labels and tracking of the container from beginning to end. When the barcode is scanned at the destination location for a store to store transfer, the system will automatically be able to identify all the items in the container.
This can be used to generate a unique identifier that will be affixed to a label on the container. This barcode is SSCC-18 compliant. The store configuration allows the client to use the automatic barcode generator or to turn the feature off.
Separate shipping labels exist for the following functional areas: Transfer Shipping, RTV Shipping, and Transfer Receiving. Customer Order Deliveries only print labels externally. For additional details on label setup, see "Print Format."
Barcode Generation Store Parameter
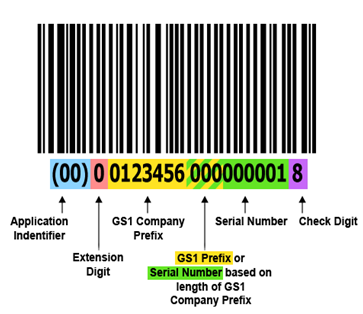
The standardized SSCC-18 Barcode is used for generating the container ID.
The store parameter, <SSCC Shipping Label ID Generation> will need to be set to Automatic or Manual. This configuration is used when creating the container and is used when printing a container label.
If the feature is set to manual, the user will need to enter a container ID from the Container Info screen before printing a container label.
When set to automatic, the Container ID will automatically generate. No user intervention is required. This parameter is configured to automatically generate.
SSCC-18 Barcode Generation Field Definitions
The following are the required fields that make up the SSCC-18 barcode:
Application Identifier: The AI "00" indicates the SSCC-18 data structure will follow. No changes allowed.
Extension Digit: The Extension Digit has no defined logic and is used to increase the capacity of the Serial Reference. Can be modified with a script.
GS1 Company Prefix: GS1 Company Prefixes are 7 to 10 digits. Serial Reference Numbers are 6 to 9 digits. Set to use 10 digits. When field is null in the database, Destination ID will be used when barcode is generated. Can be modified with a script.
Serial Number: The Serial Reference number is assigned by the holder of the GS1 Company Prefix to uniquely identify a shipping container (logistic unit). The combined length of the GS1 Company Prefix and Serial Reference is always 16 digits. Set to 6 digits.
Check Digit - Calculated using the Modulo 10 algorithm.
The Application Identifier indicates the SSCC-18 data structure will follow. No changes are allowed. The Extension Digit can be modified and used to increase the capacity of the serial reference. Some companies use this to specify the package type. This will be set to zero and can be modified with a script.
The GS1 Company Prefix represents where the shipment is going to. It is set to use the Destination ID and occupy 10 digits.
The Serial Number is assigned by the client to uniquely identify a shipping container (logistic unit). This is generated within SIM when the SSCC Shipping Label parameter is configured to Automatic. This field is set to 6 digits.
The check digit is calculated using the Modulo 10 algorithm.
Label Format Template
The carton label will follow standard GS1/EAN SSCC-18 common label formats and all the barcodes on this label are GS1-128 symbologies.
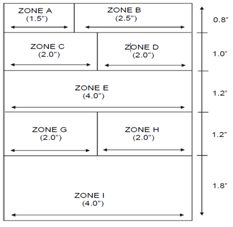
The bottom zone is used to host the SSCC-18 (Serial Shipping Container Code) barcode, which contains the transfer contents information.
The label is formatted into several information zones. Zones include both human readable information and GS1/EAN-128 information. Standard font.
Titles should be placed in the upper left-hand corner of the zone in 8 pt. text.
Zones A, B, C, G, I should be 8 pt. text.
Zones D, E, F, H should be 30 pt. bold text.
Zone E department name field, use "Mixed" if multiple departments are in transfer.
Zone F list all department numbers if multiple departments are in transfer. If too many, truncate.
This is a sample template that is included for Transfer Shipment. Additionally, RTV Shipment and Transfer Receiving will also have a label format out of the box. The fields on each template are listed in the table on the right.
Multiple label formats may be set up for each of the format types and a default format to use for each type. For additional details, see "Print Format."
The Bill of Lading screens allow for editing on the PC and MAF Small.
Setting the session printer exists on the PC, handheld, and MAF Small.
Label Format creating, editing, and deleting only exists on the PC.
Label Printing exists on the PC, handheld, and MAF Small.
Shipment Reason Code Maintenance only exists on the PC.
Business objects are used within the application code for all business processing.
| Business Object | Description |
|---|---|
| BarcodeAdmin | Contains the admin configuration values to generate a barcode for a particular store. |
| GenerateShipCartonBarcodeHandler | Severe business logic handler that generates the actual container identifier. |
The GenerateShipCartonBarcodeHandler can be replaced with a customized version using the service provider. This allows the customer to determine the exact container ID generation if desired.
Barcode Customization
The client can customize the value in the Extension Digit and the GS1 Company Prefix (use two fields) with a script on table (BARCODE_CARTON_ADMIN). The following fields can be modified:
STORE_ID: These settings must be defined for each store generating container barcodes.
EXT_DIGIT: Some companies use the Extension Digit to specify the Package Type. This can be a number from 0 to 5. SIM uses 0.
ORG_SIZE: Since the GS1 Company prefix can be between 7 and 10 digits, this dbfield can be changed to identify the size of the field:
Changing the org size will affect the Serial Number size. The combination of the two fields must equal 16.
The GS1 Company prefix will be set to 10 digits and the Serial Number will be 6 unless changed with a script.
ORG_NUMBER: This holds the organization number.
If null, the destination ID will be used. When the destination ID is used, the
ORG_SIZE should remain at 10 since the destination ID must use 10 digits.
The following database tables are used by SIM:
| Table Name | Description |
|---|---|
| BARCODE_CARTON_ADMIN | Contains store configuration information on how to generate container barcodes. |
| SHIPMENT_BOL | Contains shipment information that includes all handling information for a transaction. |
| SHIPMENT_CARRIER | Contains information about a carrier that handles shipments. |
| SHIPMENT_CARRIER_SERVICE | Contains information about various handling services each carrier offers. |
| SHIPMENT_CARTON_DIM | Contains information about various shipment containers. |
| SHIPMENT_WEIGHT_UOM | Information on various units of measure to specify shipment weight. |
Manifesting Requirements
Carrier Type is Third Party
Carrier Service (Manifest Type) is Parcel (P)
Configuration is enabled (Transfer to Store |Finisher | Warehouse | Return to Vendor | Customer Order Delivery)
Manifest Type "O" and "H"
Carrier/Service with Manifest Type of "O" (Other) and "H" (Home fleet) does not go through the manifesting system. When Manifest Type is "O," SIM prompts the user to enter the carrier address where the shipment is to be sent for fulfillment. Manifest Type of "H" is within the company and therefore, does not prompt the user for an address.
Weight and Dimension Requirements
Some carriers require weight, dimension, or both values to be sent in the manifest payload. If so, the carrier's service should have either the WEIGHT_IND or
CARTON_DIM_IND flag set to Y (or both) in the SHIPMENT_CARRIER_SERVICE table.
Web Service
SIM supplies an outbound and inbound Shipment Manifest SOAP web service. The following are supported service operations:
A web service is used to send all the shipment information to the external manifesting system and also to receive close shipment requests from external systems.
A web service accepts requests from external systems to close shipments. It is used to find those "Submitted" shipments for the provided tracking ID, carrier, service and date, and dispatch those shipments.
|
Note: SIM supplies a WSDL and XSD that defines the web service, operation, and data content. This web service will need to be implemented either for the manifesting system or a plug-in set up. Alternatively, SIM's standard customization pattern allows for replacing the outgoing call entirely. |
OUTBOUND: ShipmentManifestService
| Service Operation | Description |
|---|---|
| createManifest | Requests the external manifesting system to create a new parcel manifest for an input transaction. |
INBOUND: StoreShipmentManifestService
| Service Operation | Description |
|---|---|
| closeManifest | Instructs SIM that submitted shipments meeting the input criteria have been picked up by the handler. |