| Oracle® Retail Warehouse Management System UI User Guide Release 14.1 E58327-01 |
|


 Previous |
 Next |
| Oracle® Retail Warehouse Management System UI User Guide Release 14.1 E58327-01 |
|
Previous |
Next |
Receiving is the process of accepting the inbound merchandise from external entities such as, vendors or stores/DCs into the warehouse facility. Many of the receiving operations are performed using a hand-held, radio frequency (RF) device. The RF device can be used to open appointments, receive merchandise, perform quality checks, assign trouble codes if necessary, reconcile appointments, and close appointments. The GUI Receiving menu provides tools to print receiving labels, perform receipt adjustments post RF receiving, record any vendor non-conformance to expected standards as well as provide a holistic view of the expected and received inventory information.
The process of receiving goods within a warehouse starts with opening an appointment and then using RF devices to receive the physical merchandise. Based on the appointment type being received, you may need to print receiving labels or you may use generic labels.
Prior to receiving merchandise for each receiving type, you must determine if you are going to use formatted labels (includes PO, Item and destination details) or generic labels. To create formatted labels, the Labeled flag on the GUI Create Appointment screen must be checked. Below is the decision process for each Receiving Type:
For FPR with Detail, FPR without Details, and Blind appointments:
If the Labeled flag is checked, you must apply generic labels initially and when the pallets are confirmed for receipt the system runs pre-distribution logic and generate formatted labels as required.
If the Labeled flag is not checked, you must apply generic labels and when the pallets are confirmed for receipt, the system runs pre-distribution logic and ask additional generic labels to be applied if a single pallet is going to multiple destinations.
For PO Appointments:
If the Labeled flag is checked, you must run the receiving label program which runs pre-distribution logic and generates formatted labels.
If the Labeled flag is not checked, you must run the receiving label program which runs pre-distribution logic and generates a report. Generic labels are then applied to the containers.
For ASN Appointments, the Labeled flag is not considered but you must run the receiving label program so the pre-distribution logic can determine destinations for each container.
For NSC and ASN/NSC appointments, the Labeled flag is not considered and generic labels are applied to each case. Pre-distribution logic is run for each case received.
For PO appointment where the Labeled flag is checked, you can null any unused labels.
It is critical to understand the inventory status of containers as they flow throughout the warehouse. The status of a container is tracked from Receiving all the way to shipping in the system. The following is a summary of supported RWMS statuses:
Appointed (A): The container is associated with an inbound appointment; it is not yet received.
Distributed (D): The container is received and the contents of the container are allocated to a store or customer.
Inventory (I): The container is received and is not allocated to a store or customer at this time.
Manifested (M): The container is loaded on an outbound trailer.
Non-saleable (N): The container contains returned merchandise that is marked as not resalable.
Pick (P): The container is associated with a pick package.
Return to vendor (R): The container contains merchandise that is marked for return to the vendor.
Shipped (S): The container is released from the distribution center and in transit to a ship-to destination.
Troubled (T): The container contains merchandise that is marked with one or more trouble codes that must be resolved.
Expired (X): The container contains merchandise that has passed the designated pick not-after date and is no longer valid.
This chapter contains the following topics:
One of the appointment types supported by RWMS is ASN Receiving and it is important to understand the structure and benefits of ASNs. ASN (Advanced Ship Notice) has shipment details (PO, Items, and Container IDs) from suppliers. ASNs are sent by a supplier before the goods actually reach the warehouse. Once the ASN is transmitted to the warehouse, the ASNs can be attached to an appointment and scheduled for receipt.
A typical ASN has information about contents of a shipment of goods as well as additional information relating to the shipment, such as order information, product description, physical characteristics, type of packaging, marking, carrier information, and configuration of goods. ASN enables the sender to describe the contents and configuration of a shipment in various levels of detail and provides an ordered flexibility to convey information.
Most ASNs are transmitted to RWMS, but an ASN Entry function is provided that allows direct entry into the system with a standard web browser and Internet or an intranet connection. This feature offers low cost and global access to an existing Internet infrastructure. After ASNs are entered, inbound freight scheduling can be handled in the standard way.
The ASN Entry Editor allows you to create the ASN Header record for a new ASN. This consists of the ASN Number, ASN Type, Carrier, and Number of Containers on the entire ASN. Once the ASN header is created, the system allows you to create the container and item detail for the ASN by pressing the associated links.
Vendors can log in to the system and access their own ASN information. RWMS users can access details of ASNs associated with all vendors.
The ASN may be one of the following types:
Container type ASN: Merchandise comes to the warehouse in pre-labeled containers (UCC128 labels). Typically, these labels are provided by the vendor. Container type ASNs can have generic labels also.
Purchase order (PO) type ASN: A PO type ASN does not have containers - only items and quantities. Merchandise does not come pre-labeled.
Tare type ASN: Merchandise is received on pallets with unlabeled child containers. The pallet may have mixed items (but single sku cases). If the pallet is destined to a predefined location, it is immediately cross docked; otherwise, the pallet is put away to storage. Tare type ASNs are downloaded.
Business Process
You begin adding an ASN by entering header details. Before continuing, you must indicate whether the ASN is a PO type ASN or a container type ASN. If the ASN is a PO type ASN, you can add all line items on a selected PO or add line items individually from one or multiple POs.
Details are added at a container level for a container type ASN. To begin with, pre-generated/generic container IDs are linked to the ASNs through the ASN Container Entry screen, as well as the PO specified on the container. A container may contain line items from a single purchase order only.
You can add containers and items to container type ASNs:
Copy: You can add a container and its contents to an ASN by copying an existing container from the same ASN. The container thus created has the same PO, line item, and unit quantity per case.
Replicate: You can add multiple containers by providing the details once and entering the number of containers that share those same details. Only manually entered ASNs may be edited in RWMS. ASNs received from the host system or via electronic data interchange (EDI) cannot be edited.
Once an ASN is entered into the system, an appointment is scheduled in the system to receive the merchandise in the warehouse.
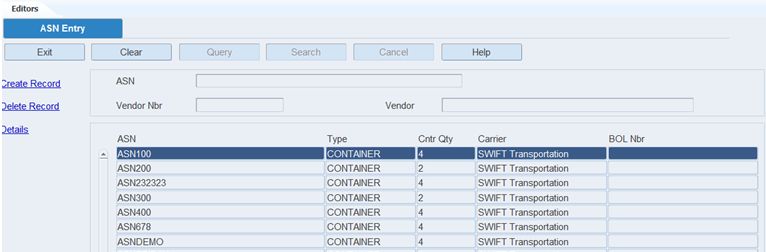
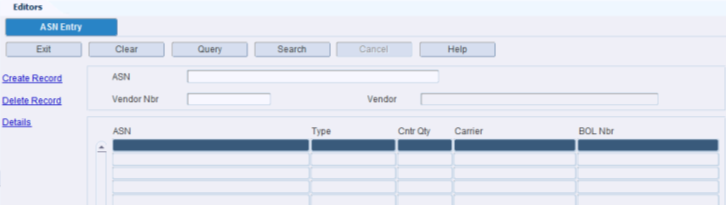
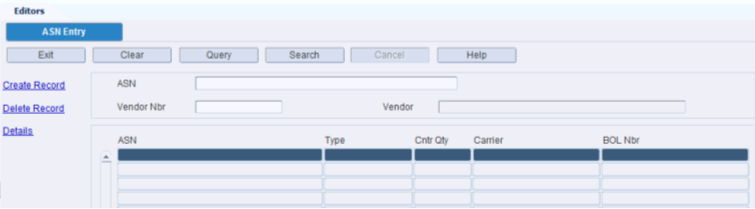
From the main menu, select Receiving > ASN Entry. The ASN Entry screen is displayed in the Editors pane.
Add an ASN
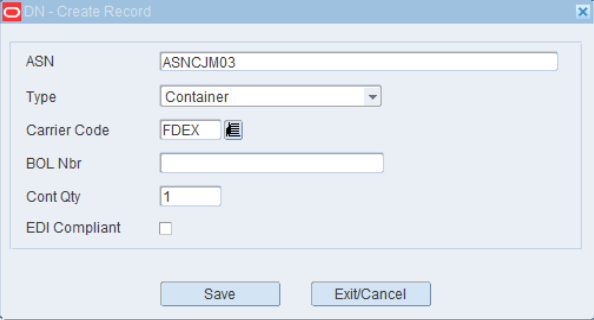
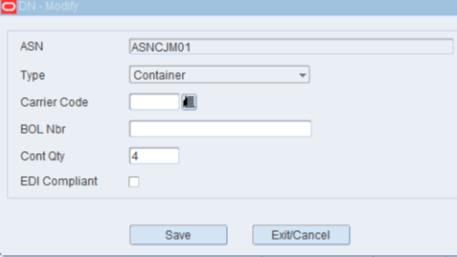
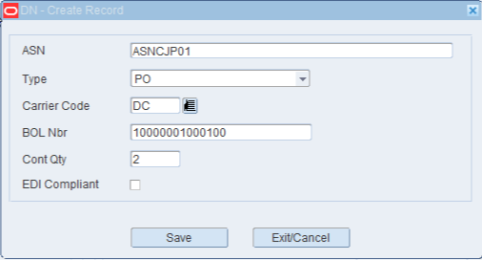
On the left-hand side of the ASN Entry tab, click the Create Record link. The Create Record window opens.
In the ASN field, enter the ASN number.
In the Type field, select Container from the drop-down list.
In the Carrier Code field, an optional field, enter the code for the carrier, or click the LOV button and select the carrier.
In the BOL Nbr field, an optional field, enter the bill of lading number.
In the Cont Qty field, enter the number of inbound containers that are expected.
Click Save to save the changes and close the Create Record window.
Add a Container to the ASN
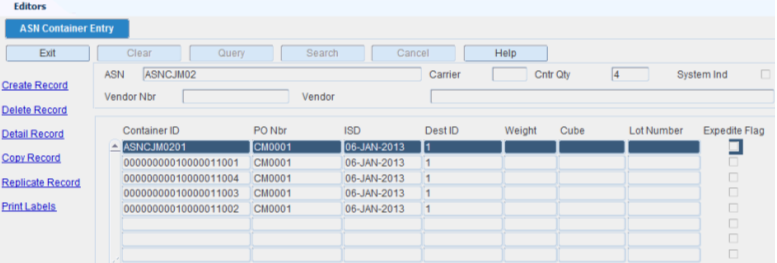
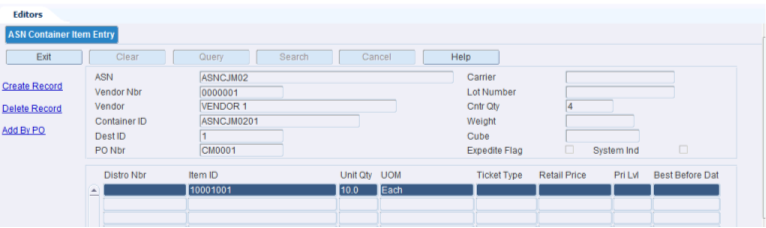
The ASN Container Entry Editor allows you to enter or scan Container IDs onto an ASN. For each container entered, the system requires the PO Number and Destination.
|
Note: Use the add procedure to add containers to an ASN one-by-one. |
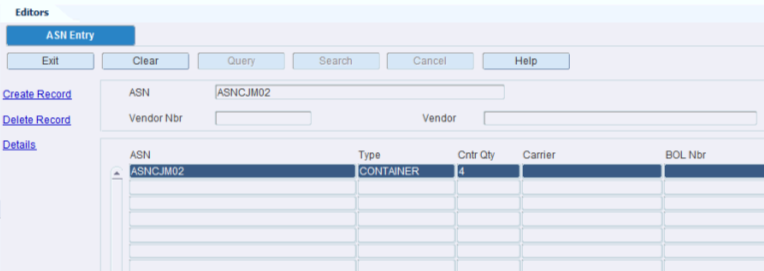
On the ASN Entry tab, click Query to search for a container type ASN that you want to edit. An LOV is enabled next to the ASN field.
Enter the ASN number in the ASN field or search for the required ASN using the LOV.
Press the Enter key on your keyboard or Tab-out. The ASN details are displayed in the table below.
Click the Details link. The ASN Container Entry tab opens. This window has a list of links on the left:
Create Record: Allows you to create a new container record for the ASN.
Delete Record: Allows you to delete a record.
Detail Record: Allows you to access the details of a record.
Copy Record: Allows you to add another container that contains same quantities and items as an existing container.
Replicate Record: Allows you to add multiple records with the same details.
Print Labels: Allows you to print labels.
Click Create Record.
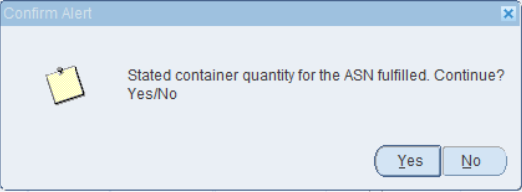
If you attempt to create more containers than the number mentioned on the ASN Entry screen for the ASN, you get an alert stating the following: "Stated container quantity for the ASN fulfilled. Continue? Yes / No". Click Yes. The Create Record window opens.
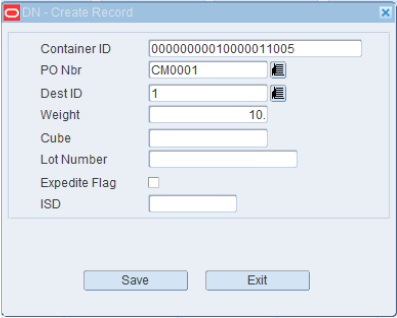
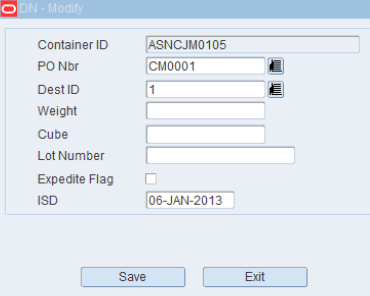
In the Container ID field, enter the ID of the container.
In the PO Nbr field, enter the number of the purchase order, or click the LOV button and select the purchase order.
In the Dest ID field, enter the ID of the destination, or click the LOV button and select the destination. The Destination ID number pre-marks a merchandize to an external entity like a store or another warehouse. If the ASN's final destination is the receiving warehouse, the Destination ID of the receiving warehouse must be mentioned.
Enter any additional details as necessary:
Weight
Cube
Lot Number
Expedite Flag
ISD
Click Save to save the changes and close the Create Record window.
Add Items to a Container
The ASN Container Item Entry Editor allows you to enter or scan item IDs into specific container IDs found on an ASN. For each item entered, the system requires the Unit Quantity.
|
Note: If a container was not copied or replicated, it remains empty until you define the contents. |
On the ASN Container Entry tab, select the container that you want to edit.
Click Detail Record. The ASN Container Item Entry tab opens.
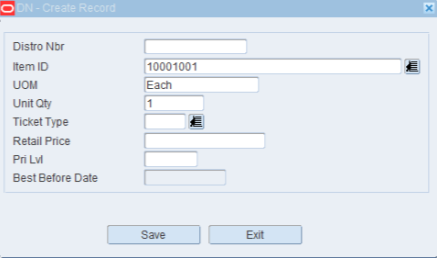
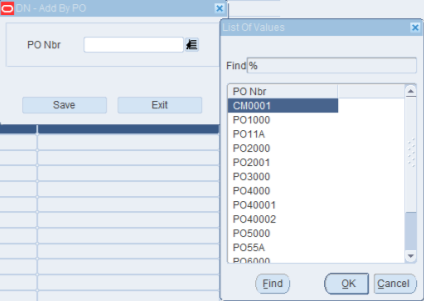
To add all the unappointed or unreceived items from the current purchase order, click Add by PO. The items appear on the table. To add selective items from the current purchase order, click Create Record. The Create Record window opens.
|
Note: If the PO already exists for an ASN, you will get an error stating the following: ”This PO is already on the ASN - cannot add by PO.” |
In the Item ID field, enter the ID of the inbound item, or click the LOV and select the item. The UOM field is automatically populated.
In the Unit Qty field, enter the number of inbound units.
Enter any additional details as necessary. The additional details include: Distro Nbr, Ticket Type, Retail Price, and Pri Lvi (Privilege level). Best Before Date is applicable for perishable items and this field is enabled only for those items. It is disabled for non-perishable items.
Click Save to save the changes and close the Create Record window.
|
Note: To edit the record, double-click the entry you want to modify. The Modify window opens. Follow steps 1-4 given for the Create Record procedure to edit the entries. |
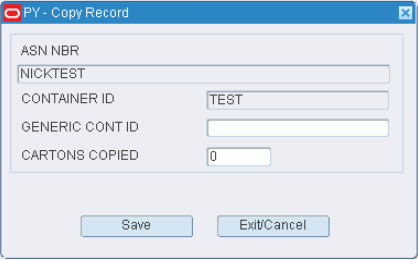
Copy a Container
|
Note: Use the copy procedure to add another container that contains the same items and quantities as an existing container. |
On the ASN Entry tab, select the container type ASN that you want to edit.
Click Details. The ASN Container Entry tab opens.
Select the container that you want to copy.
Click Copy Record. The Copy Record window opens.
In the Generic Cont ID field, enter the ID of the new container. Generic Container IDs are pre-existing labels that can be applied to cartons/pallets. They have been pre-printed, but the system recognizes the label and associated information only when they have been applied to a container.
Click Save.
If you attempt to create more containers than the number mentioned on the ASN Entry screen for the ASN, you get an alert stating the following: "Stated container quantity for the ASN fulfilled. Continue? Yes / No". Click Yes. The number in the Cartons Copied field is increased by 1.
To make another copy of the container, enter another container ID in the Generic Cont ID field and click Save.
When you are done copying the container, click Exit.
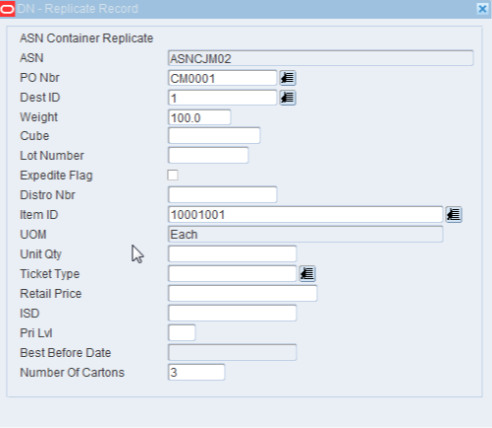
Add Multiple Containers
|
Note: Use the replicate procedure to add multiple containers with the same details. |
On the ASN Entry tab, select the container type ASN that you want to edit.
Click Details. The ASN Container Entry tab opens.
Click Replicate Record. The Replicate Record window opens.
In the PO Nbr field, enter the purchase order number, or click the LOV button and select the purchase order.
Enter additional details as necessary.
ASN
Dest ID
Weight
Cube
Lot Number
Expedite Flag
Distro Nbr
Item ID
UOM
Unit Qty
Ticket Type
Retail Price
ISD
Pri Lvl
Best Before Date
In the Number of Cartons field, enter the number of containers that you want to add to the ASN.
Click Save to add the containers and close the Replicate window.
Exit the ASN Entry Windows
Click the Exit button to close each window.
From the main menu, select ASN Entry. The ASN Entry tab opens.
Display Header Details for All ASNs
In the ASN Entry tab, click Search to view all available ASNs.
Display Header Details for one ASN
If any ASNs are currently displayed, click the Clear button.
Click the Query button. An LOV is displayed next to the ASN field.
In the ASN field, enter the ID of the ASN, or click the LOV button and select the ASN.
Press the Enter key on your keyboard or tab out. The header details for the selected ASN appear.
Edit Header Details for an ASN
On the ASN Entry tab, double-click the container type ASN that you want to edit. The Modify window opens.
Edit the enabled fields as necessary.
Click Save to save the changes and close the Modify window.
Delete an ASN
|
Note: An ASN may be deleted if it is not assigned to an appointment or if the status of the appointment is Received. |
On the ASN Entry window, select the container type ASN that you want to delete.
Click Delete Record.
When prompted to delete the record, click Yes.
Edit Containers on an ASN
|
Note: A container may not be edited if it is assigned to an appointment that is not yet received. |
On the ASN Entry window, select the container type ASN that you want to edit.
Click Details. The ASN Container Entry tab opens.
Double-click the container that you want to edit. The Modify window opens.
Edit the enabled fields as necessary.
Click Save to save the changes and close the Modify window.
Delete a Container from an ASN
|
Note: A container may not be deleted if it is already received |
On the ASN Entry window, select the container type ASN that you want to edit.
Click Details. The ASN Container Entry window opens.
Select the container that you want to delete.
Click Delete Record.
When prompted to delete the record, click Yes.
Edit Line Items on an ASN
On the ASN Container Entry window, select the container that you want to edit.
Click Detail Record. The ASN Container Item Entry window opens.
Double-click the line item that you want to edit. The Modify window opens.
Edit the enabled fields as necessary.
Click Save to save the changes and close the Modify window.
Delete a Line Item from an ASN
|
Note: Since the line items are associated with containers, the update on them is not allowed if the ASN is associated to any appointment which is in pending, open or unreconciled status. Also, a container once received cannot be modified. However, any unreceived containers on an ASN can be updated - provided there is no appointment in pending or open status for that ASN. |
On the ASN Container Entry window, select the container that you want to edit.
Click Detail Record. The ASN Container Item Entry window opens.
Select the line item that you want to delete.
Click Delete Record.
When prompted to delete the record, click Yes.
Exit the ASN Entry Windows
Click the Exit button to close each window.
From the main menu, select Receiving > ASN Entry. The ASN Entry tab opens.
Add an ASN
On the ASN Entry tab, click Create Record. The Create Record window opens.
In the ASN field, enter the ASN number.
In the Type field, select Purchase Order from the drop down list. The choices are Container and Purchase Order.
In the Carrier Code field, an optional field, enter the code for the carrier, or click the LOV button and select the carrier.
In the BOL Nbr field, an optional field, enter the bill of lading number.
In the Cont Qty field, enter the number of inbound containers that are expected.
Click Save to save the changes and close the Create Record window.
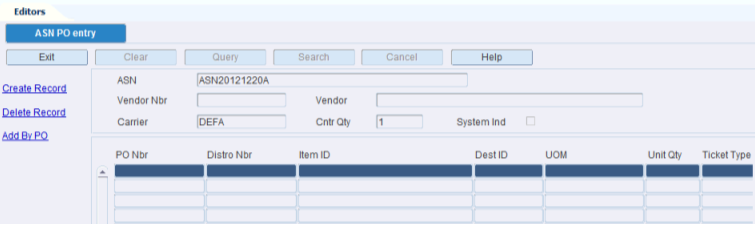
Add PO/Items to the ASN
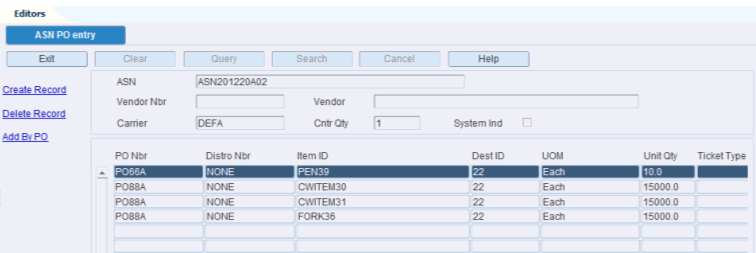
The ASN PO Entry Editor allows you to assign POs to a PO type ASN. This editor is displayed when you create a PO type ASN and press the Details link.
|
Note: Step 2 explains how to add all items from a selected PO. Step 3 explains how to add a single line item from a selected PO. |
On the ASN Entry window, query and select the PO type ASN that you want to edit. Click Details. The ASN PO Entry window opens.
To add all items on a purchase order:
Click Add by PO. The Add by PO window opens. If the PO already exists for an ASN, you will get an error stating the following: ”This PO is already on the ASN - cannot add by PO.”
In the PO Nbr field, enter the purchase order number, or click the LOV button and select the purchase order.
To add a line item from a purchase order:
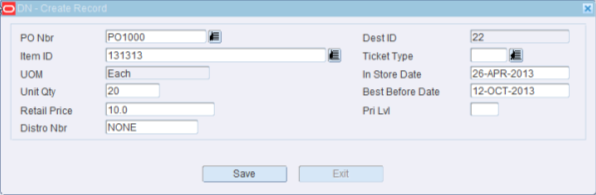
Click Create Record. The Create Record window opens.
In the PO Nbr field, enter the purchase order number, or click the LOV button and select the purchase order.
In the Item ID field, enter the ID of the inbound item, or click the LOV and select the item. The UOM field is automatically populated.
In the Unit Qty field, enter the number of inbound units.
In the Dest ID field, enter the ID of the destination, or click the LOV and select the destination.
For perishable items, enter the expiry date in the DD-MON-YYYY format in the Best Before Date field. Example: 12-OCT-2013.
Enter any additional details as necessary.
Click Save to save the changes and close the Create Record window.
Exit the ASN Entry Windows
Click the Exit button to close each window.
From the Main Menu > Receiving > select ASN Entry. The ASN Entry tab opens.
|
Note: If you log on as a vendor, all ASNs associated with your user ID and vendor number are automatically displayed. Only ASNs that were manually entered into RWMS may be edited. ASNs received from the host system or via EDI cannot be edited. |
Display Header Details for All ASNs
In the ASN Entry tab, click Search to view all available ASNs.
Display Header Details for One ASN
If any ASNs are currently displayed, click the Clear button.
Click the Query button. An LOV is displayed next to the ASN field.
In the ASN query field, enter the ID of the ASN, or click the LOV button and select the ASN.
Press the Enter key on your keyboard or tab out. The header details for the selected ASN appear.
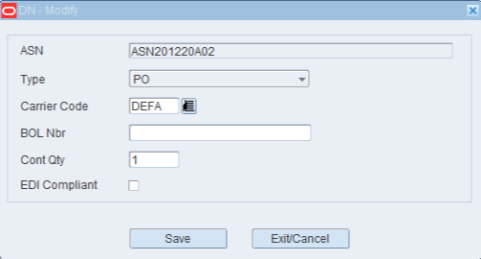
Edit Header Details on an ASN
On the ASN Entry tab, double-click the PO type ASN that you want to edit. The Modify window opens.
Edit the enabled fields as necessary.
Click Save to save the changes and close the Modify window.
Delete an ASN
|
Note: An ASN may be deleted if it is not assigned to an appointment or if the status of the appointment is Received. |
On the ASN Entry window, select the PO type ASN that you want to delete.
Click Delete Record.
When prompted to delete the record, click Yes.
Edit Line Items on an ASN
|
Note: Line items may not be edited if the ASN is assigned to an appointment. |
On the ASN Entry window, select the PO type ASN that you want to edit.
Click Details. The ASN PO Entry window opens.
Double-click the line item that you want to edit. The Modify window opens.
Edit the enabled fields as necessary.
Click Save to save the changes and close the Modify window.
Delete a Line Item from an ASN
|
Note: A line item may not be deleted if it is assigned to an appointment with a status of Open, Pending, Received, or Unreconciled. |
On the ASN Entry window, select the PO type ASN that you want to edit.
Click Details. The ASN PO Entry window opens.
Select the line item that you want to delete.
Click Delete Record.
When prompted to delete the record, click Yes.
Exit the ASN Entry Windows
Click the Exit button to close each window.
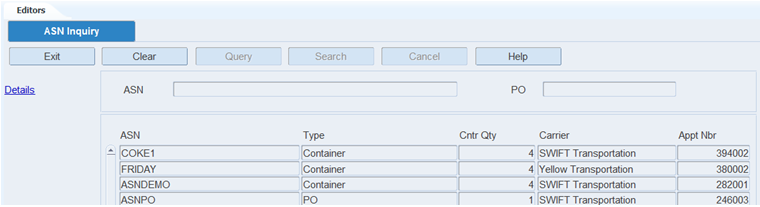
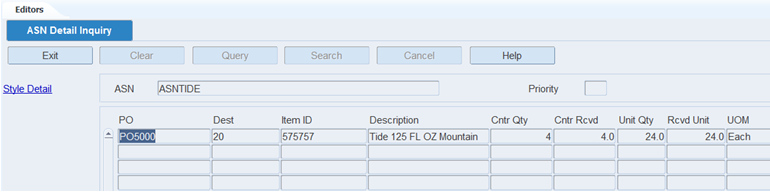
The ASN Inquiry allows you to view the header information for advanced shipment notices (ASN). You can access the ASN Detail Inquiry Editor in order to view the PO/line items and destinations on an ASN.
From the main menu, select Appointments > ASN Inquiry. The ASN Inquiry window opens.
Display ASNs
If any ASNs are currently displayed, click the Clear button.
Click the Query button.
Enter criteria in one or both of the query fields.
Click the Search button. The ASNs that match the criteria appear.
View the Details of an ASN
On the ASN Inquiry window, select the ASN that you want to view in detail.
Click Details. The PO/line items appear in the ASN Detail Inquiry window.
|
Note: You can also access this window from the Appointment ASN window. |
To view details at the style level:
Click Style Detail. The details appear in the Style Detail window.
Click the Exit button to close the Style Detail window.
Click the Exit button to close the ASN Detail Inquiry window.
Exit the ASN Inquiry Window
Click the Exit button to close the window.
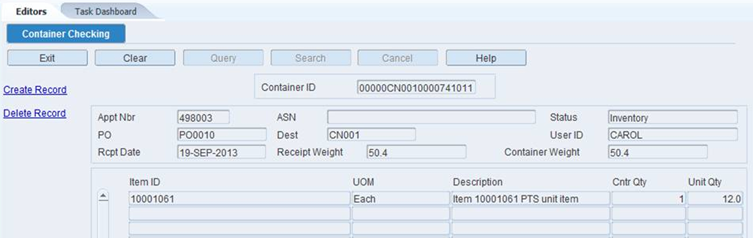
The Container Checking Editor allows you to view, add, or delete the items in a container. The modifications to container quantities are only allowed for a specific amount of time based on the SCP Receipt_Adjustment_Number_Hours. If you received this carton 9 hours ago and the SCP is set to 8 hours, the system prevents any container unit adjustments. Also, when the container is putaway into a storage location, the system prevents any container checking edits.
To access the Container Checking screen, navigate to Receiving -> Container Checking. The Container Checking window opens.
|
Note: You can also access this window from the Quality Assurance and Carton Process window. |
Display the Details of a Container
If any details are currently displayed, click the Clear button.
In the Container ID query field, enter a container ID, or click the LOV button and select the container.
Click the Search button. The details for the specified container are displayed.
Edit an Item in a Container
On the Container Checking window, double-click the item that you want to edit. The Modify window opens.
Edit the container quantity and unit quantity as necessary.
|
Note: You can make receipt adjustments for a container only if the difference between the current time and receipt time is less than or equal to the value set in the scp parameter receipt_adj_nbr_hrs. |
Click Save to save any changes and close the Modify window.
Add an Item to a Container
|
Note: The container must have a status of Inventory (I) or Distributed (D). |
On the Container Checking window, click Create Record. The Create Record window opens.
In the Item ID field, enter the ID of the item.
In the Cntr Qty field, enter the number of containers.
In the Unit Qty field, enter the total number of units. The number of units must divide evenly into the number of containers.
Click Save to save the changes and close the Create Record window.
Delete an Item from a Container
On the Container Checking window, select the item that you want to delete.
Click Delete Record.
When prompted to delete the record, click Yes.
Exit the Container Checking Window
Click the Exit button to close the window.
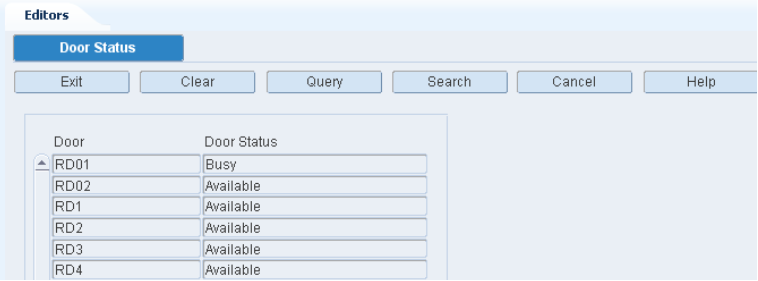
The Door Status allows you to view the status of all receiving and shipping doors. The status may be Available or Busy.
To view the door statuses, navigate to Receiving -> Door Status. The status of each receiving and shipping door opens in the Door Status window.
Displaying a Specific Door
Press the Query button.
Enter the specific door in the Door column.
Press the Search button.
Exit the Door Status Window
Click the Exit button to close the window.
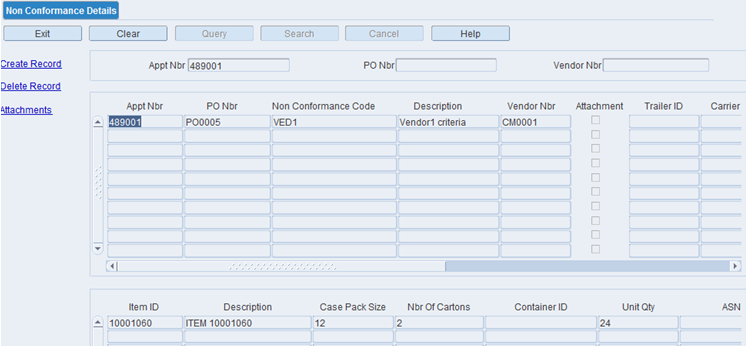
The Non Conformance Details screen allows you to capture non conformance issues during the receiving process that can be traced to a vendor. You can capture these codes at PO/Item level. You can also add pictures of the issues as attachments to the details and send them to the host management system.
To access the Non Conformance Details screen, navigate to Receiving -> Non Conformance Details. The Non Conformance Details window opens.
Display Vendor Non Conformance Code for PO/Item
If any appointments are currently displayed, click the Clear button.
Enter, or select from the list of values, the appointment number in the Appt Nbr field, or the PO number in the PO Nbr field, or the vendor number in the Vendor Nbr field.
Click the Search button.
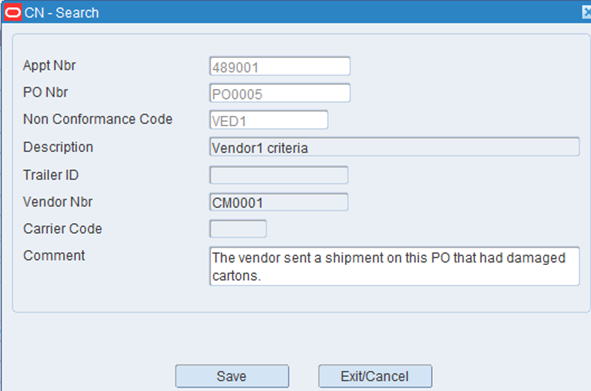
Edit Vendor Non Conformance Code for PO/Item
On the Non Conformance Details window, double-click the row you want to edit in either of the two blocks. The Modify window opens.
If you double-click a row in the first (top) block, the following Modify window opens.
If you double-click a row in the second (bottom) block, the following Modify window opens.
Edit the different fields as necessary.
Click Save to save any changes and close the Modify window.
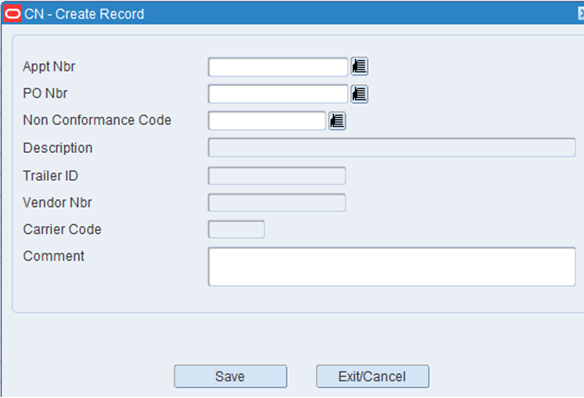
Add Vendor Non Conformance Code for PO/Item
On the Non Conformance Details window, click the Create Record. The Create Record window opens
In the Appt Nbr field, enter the appointment number, or click the LOV button and select the appointment.
In the PO Nbr field, enter the PO number, or click the LOV button and select the PO.
In the Non Conformance Code field, enter the non conformance code, or click the LOV button and select the code.
In the Comment field, enter your comment if necessary.
Click Save. The vendor non conformance code is added to the PO/Item.
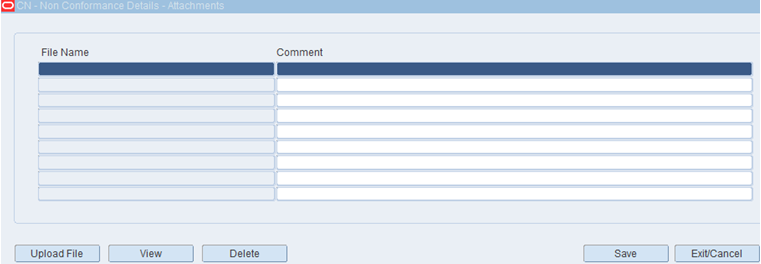
Add an Attachment for a PO/Item
On the Non Conformance Details window, select the appointment and click Attachments. The attachments window opens.
Click Upload File button. From the browser, select the file on your local disk and click OK.
Enter any comments in the Comment field as necessary.
Click Save to save any changes.
View an Attachment for a PO/item
On the Non Conformance Details window, select the appointment and click Attachments. The attachments window opens.
Click View to view the file.
Delete an Attachment for a PO/Item
On the Non Conformance Details window, select the appointment and click Attachments. The attachments window opens.
Select the file you want to delete and click Delete.
When prompted to delete the record, click Yes.
Click Save on the attachments window to save the changes.
Delete Vendor Non Conformance Code for PO/Item
On the Non Conformance Details window, select the appointment and click Delete Record.
When prompted to delete the record, click Yes.
Exit the Non Conformance Details Window
Click the Exit button to close the window.
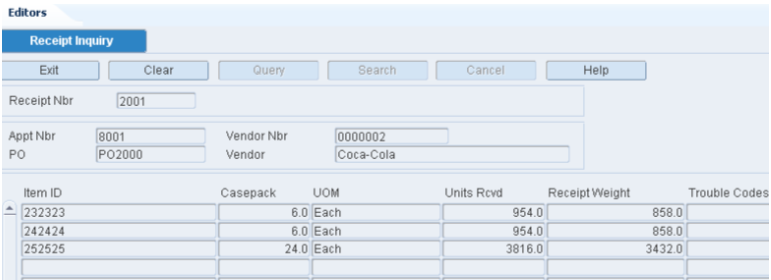
The Receipt Inquiry allows you to view items received by receipt number.
To access the Receipt Inquiry navigate to Receiving -> Receipt Inquiry. The Receipt Inquiry window opens.
Display the Details of a Receipt
If the details of a receipt are currently displayed, click the Clear button.
Click the Query button.
In the Receipt Nbr field, enter a receipt number, or click the LOV button and select the receipt.
Click the Search button. The details of the selected receipt appear.
Exit the Receipt Inquiry Window
Click the Exit button to close the window.
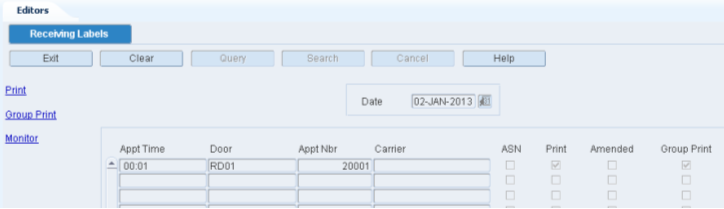
The Receiving Labels screen allows you to print receiving packages for one or multiple appointments. When choosing to print receiving packages for a group of appointments, you are prompted to enter a time range for the selected date. Labels are printed for all appointments within the time range that have been marked for group printing.
You get the following results depending on system parameters and the type of appointment.
| If | Then |
|---|---|
| The system is set up for labeled receiving | Receiving labels and the Receiving Package Audit List report are generated for non-ASN/non-NSC (non-specified casepack) type appointments. |
| The system is not set up for labeled receiving | The Receiving Package Audit List report is generated for non-ASN/non-NSC (non-specified casepack) type appointments. The system assumes that generic labels are to be used for receiving. |
| The appointment is based on container type ASNs | The ASN Receiving Package Audit report is generated, but labels are not. Merchandise is received prelabeled. |
You can access the Receiving Package Monitor window in order to view the status of receiving packages that are generated for non-ASN type appointments.
To generate receiving labels, navigate to Receiving -> Receiving Labels. The Receiving Labels window opens in the Editors pane. The Receiving Labels process must be run for PO and ASN type appointments only.
|
Note: For Brazilian Installations, RWMS prevents printing receiving labels for any appointment without a Schedule Number. |
Display Appointments by Date
If any appointments are currently displayed, click the Clear button.
In the Date field, enter a date or click the calendar button and select the date.
Click the Query button. The appointments for the selected date appear.
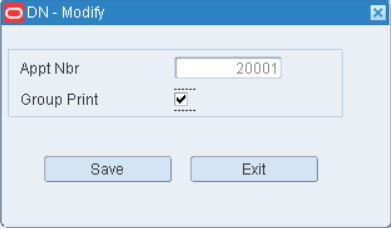
Edit the Group Print Status of Appointments
On the Receiving Labels window, double-click the appointment that you want to edit. The Modify window opens.
Select or clear the Group Print check box if necessary.
Click Save to save any change and close the window.
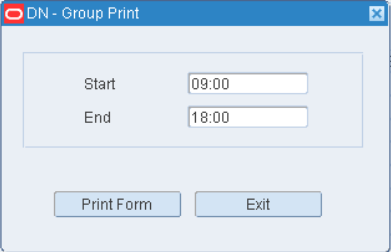
Print Receiving Packages for Multiple Appointments
On the Receiving Labels window, click Group Print. The Group Print window opens.
In the Start field, enter the start time for the range of appointments.
In the End field, enter the end time for the range of appointments.
Click Print Form. The Select Printer window opens.
Click the LOV button and select the Printer Queue.
Click Save. The labels and reports for the appointments within the selected time range are sent to the selected destinations.
Print a Receiving Package for One Appointment
On the Receiving Labels window, select the appointment for which you want to print labels and a report.
Click Print.
When prompted to confirm your request, click Yes.
Click the LOV button and select the Printer Queue.
Click Save. The labels are sent to the selected destination.
Click the Exit button to close each window.
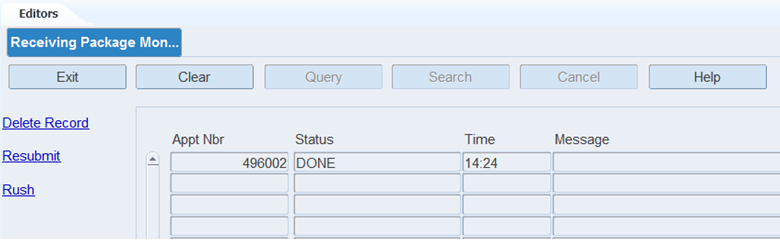
The Receiving Package Monitor allows you to monitor the print requests for receiving packages. In addition to viewing the status of a print request, you can resubmit a request that is in Failed or Done status. You might resubmit a request for a receiving package that is in Done status if the appointment was modified.
You can mark a print request that is in Submitted status as a rush job. The system changes the time to that of the earliest print request in Submitted status.
If you no longer want to monitor a print request that is in Submitted, Done, or Failed status, you can delete it from the monitor.
To monitor print requests, navigate to Receiving -> Receiving Package Monitor. The Receiving Package Monitor window opens in the Editors pane.
Delete a Receiving Package from the Monitor
|
Note: Only receiving package records with a status of Submitted, Done, or Failed may be deleted from the monitor. |
On the Receiving Package Monitor window, select the receiving package that you want to delete.
Click Delete Record.
When prompted to delete the record, click Yes.
Reprint a Receiving Package
|
Note: Receiving packages with a status of Failed or Done may be reprinted. |
On the Receiving Package Monitor window, select the receiving package that you want to reprint.
Click Resubmit.
Click the LOV button and select the Printer Queue.
Click Save. The labels are sent to the selected destination.
Rush a Request for a Receiving Package
On the Receiving Package Monitor window, select the receiving package that you want to rush.
Click Rush. The Message field is updated to indicate that the request is a rush job. The Time field is changed to show that the request is now the earliest request in Submitted status.
Exit the Receiving Package Monitor Window
Click the Exit button to close the window.