| Oracle® Retail Warehouse Management System Security Guide Release 15.0 E68107-01 |
|

 Previous |
 Next |
| Oracle® Retail Warehouse Management System Security Guide Release 15.0 E68107-01 |
|
Previous |
Next |
This chapter describes the post installation steps for secured setup of Oracle Retail infrastructure in WebLogic.
The following topics are covered in this chapter:
See the following sections for steps to improve security after an Oracle Retail Application has been installed.
Java batch programs communicate with Java applications deployed in WebLogic. For example, Oracle Retail Price Management (RPM) and Oracle Store Inventory Management (SIM). The communication needs to have SSL handshake with the deployed application. You need to import the SSL Certificates into the JAVA_HOME/jdk/jre/lib/security/cacerts keystore for successful running of the application batches.
Example 3-1 Importing certificates into JDK keystore
/u00/webadmin/product/jdk/jre/lib/security> cp -rp cacerts cacerts_ORIG

/u00/webadmin/product/jdk/jre/lib/security> keytool -import -trustcacerts -alias  verisignclass3g3ca -file ~/ssl/Primary.pem -keystore cacerts

/u00/webadmin/product/jdk/jre/lib/security> keytool -import -trustcacerts -alias  oracleclass3g3ca -file ~/ssl/Secondary.pem -keystore cacerts

/u00/webadmin/product/jdk/jre/lib/security> keytool -import -trustcacerts -alias  hostname -file ~/ssl/cert.cer -keystore cacerts
|
Note: The default password of JDK keystore is changeit. |
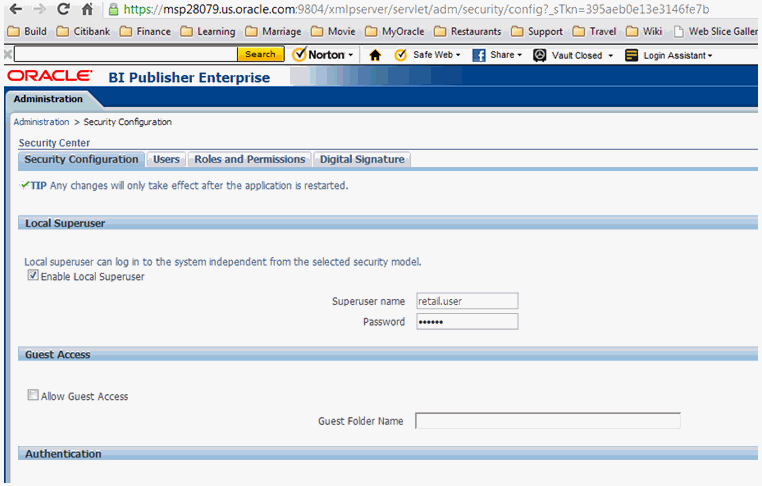
The guest account in Oracle Business Intelligence (BI) publisher is used for public facing reports that anyone can see. Disabling this account forces all users to supply their credentials before accessing any information. Disabling guest user enhances security of BI Publisher. However, application which requires guest user will have reporting feature which may cease to function after making this change. For example, RWMS reports.
Perform the following steps to disable the guest user:
Log in to BI Publisher with user having Administrator privileges.
Navigate to Administration > Security Configuration.
Deselect Allow Guest Access.
Save and restart the BI Publisher instance.
Oracle Forms can be configured to timeout based on user idle time.
You need to set the following parameters:
FORMS_TIMEOUT - This parameter is set RWMS/RWMS env file created at <DOMAIN_HOME>/config/fmwconfig/servers/WLS_FORMS/applications/formsapp_11.1.2/config directory
The default value for forms timeout is 15 and Valid Values range from 3 to 1440 (1 day).
This parameter specifies the amount of time in elapsed minutes before the Form Services process is terminated when there is no client communication with the Form Services. Client communication can come from the user doing some work, or from the Forms Client heartbeat if the user is not actively using the form.
HeartBeat - This parameter is set in formsweb.cfg file located in DOMAIN_HOME>/config/fmwconfig/servers/WLS_FORMS/applications/formsapp_11.1.1/config directory.
The default value for HeartBeat is 2 and Valid Values range from 1 to 1440 (1 day).
Example:
[rwmsFqa3]
envfile=./develop/rwmsFqa3.env
width=950
height=685
separateFrame=true
form=rtkstrt.fmx
lookAndFeel=Oracle
colorScheme=swan
archive=frmall.jar,icons.jar
imageBase=codebase
heartbeat=12
|
Note: For more information on the above parameters and additional options, see the Oracle Support Note: Description List For Parameters Affect Timeout In Webforms [ID 549735.1]. |
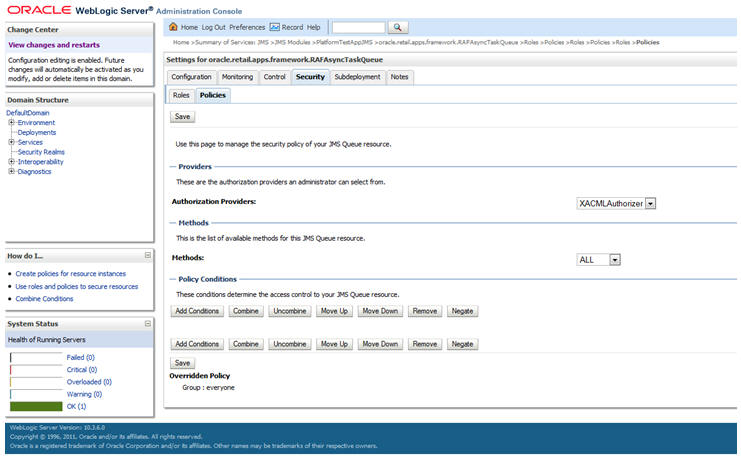
This section describes the steps for adding security to the asynchronous task JMS queue. Securing the queue will allow only recognized users of the Retail Application to publish tasks to the JMS queue.
Securing the JMS async task queue requires a special enterprise role and a special user to exist in the retailer's Oracle Internet Directory (OID) instance.
The RETAIL_ASYNC_TASK_JOB is an enterprise role that will be used to group users who will have access to the asynchronous task queue.
The RETAIL _ASYNC_TASK_USER is a special user Retail Applications can use as a principal for executing their message-driven-bean-based consumer processes. This user is a member of the RETAIL_ASYNC_TASK_JOB.
The RETAIL_ASYNC_TASK_JOB and RETAIL_ASYNC_TASK_USER are included as part of the Retail Default Security Reference Implementation installed as part of the Retail Application.
Verify the existence of the job and user in the OID instance. You need to create them if they do not exist.
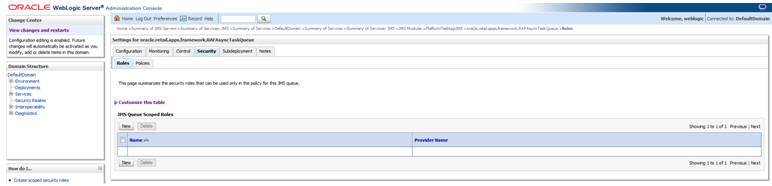
Securing the queue can be done through the Weblogic Administration Console by adding a JMS Queue Scoped role.
Log into the WebLogic Administration Console.
Navigate to the JMS Module where the asynchronous task queue belongs to and go to the module's Security tab.
Under the Roles section, add a new JMS Queue Scoped Roles.
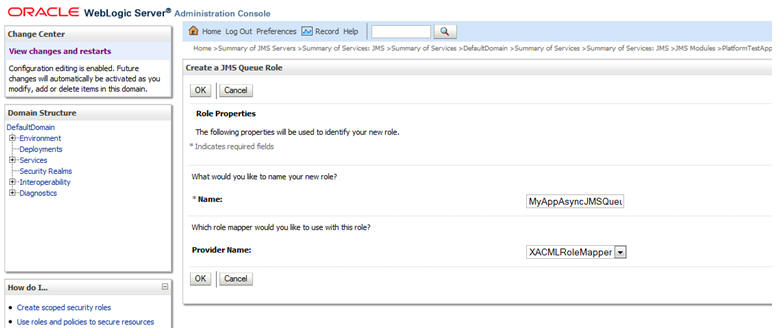
Specify a name for the JMS Queue Scoped Role. The suggested naming convention is [AppCode]AsyncJMSQueueAccessRole]. For example, AllocAsyncJMSQueueAccessRole. The JMS Queue Scoped Role will be created.
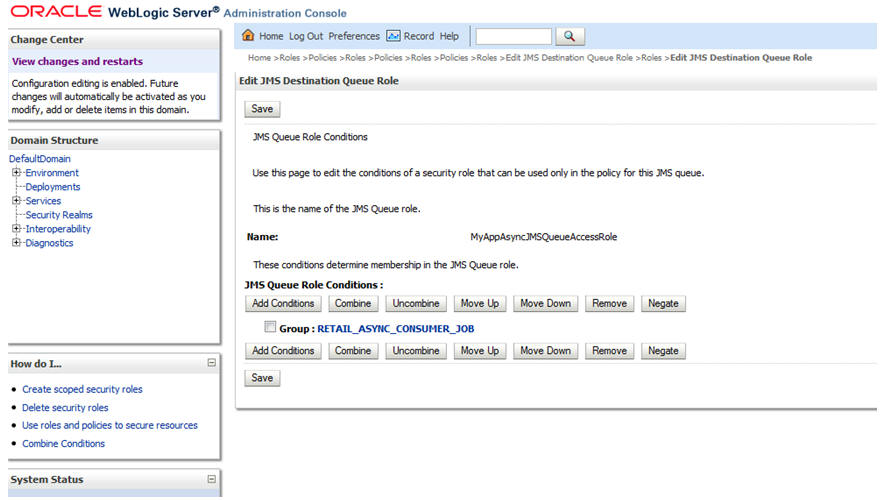
Navigate back to the JMS Module's Security tab.
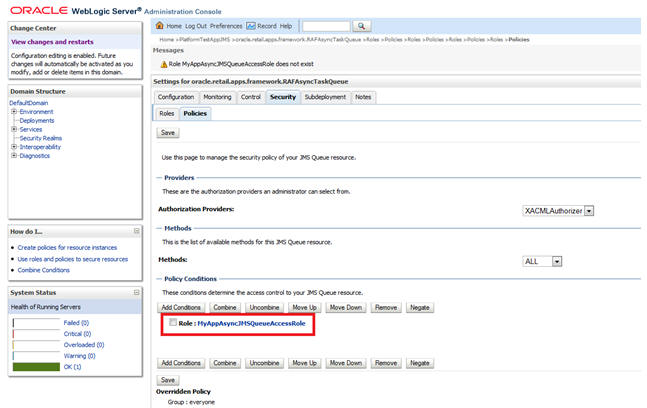
Click the JMS Queue Scoped role that was created and add a Group condition for RETAIL_ASYNC_TASK_JOB.
Navigate back to the JMS Module's Security tab.
Go to the Policies section.
Add a new Role based condition specifying the JMS Queue Role created in the previous step.
Save the changes. The queue is now secured.
Proceed to the next section to allow the Retail Web Application to publish tasks to the queue.
Once the Asynchronous Task Queue has been secured with a JMS Queue Scoped Role as described in the previous section, further configuration is required to allow users of the Retail web application to publish tasks to the queue.
The JMS Queue Scoped Role was created to include an enterprise role, RETAIL_ASYNC_TASK_JOB. Any users belonging to this enterprise role will be given access to publish tasks to the queue.
Instead of assigning users directly to the RETAIL_ASYNC_TASK_JOB, it is recommended that applications should identify specific enterprise job roles in their system whose users will be allowed to perform asynchronous processing. Those job roles should be configured to extend from the RETAIL_ASYNC_TASK_JOB group.
See the Oracle Internet Directory documentation for details on how to extend one group to another.