| Oracle® Retail Warehouse Management System Security Guide Release 15.0 E68107-01 |
|

 Previous |
 Next |
| Oracle® Retail Warehouse Management System Security Guide Release 15.0 E68107-01 |
|
Previous |
Next |
Oracle Retail applications are primarily deployed in Oracle WebLogic server as Middleware tier. Java and forms based applications rely upon Middleware infrastructure for complete security apart from application specific security features.
This chapter describes the pre-installation steps for secured setup of Oracle Retail infrastructure in WebLogic.
The following topics are covered in this chapter:
Pre-installation - Steps for Secured Setup of Oracle Retail Infrastructure in WebLogic
Enabling Access to Secured Database from Forms Oracle Home - Optional
Secured Sockets Layer (SSL) protocol allows client-server applications to communicate across a network in a secured channel. Client and server should both decide to use SSL to communicate secured information like user credentials or any other secured information.
WebLogic Server supports SSL on a dedicated listen port. Oracle Forms are configured to use SSL as well. To establish an SSL connection, a Web browser connects to WebLogic Server by supplying the SSL port and the Hypertext Transfer Protocol (HTTPs) protocol in the connection URL.
For example: https://myserver:7002
Retail Warehouse Management System (RWMS) setup is supported in WebLogic in secured mode. For enterprise deployment, it is recommended to use SSL certificates signed by certificate authorities.
|
Note: You need to obtain a separate signed SSL certificates for each host where application is being deployed. |
The Security Guide focuses on securing Oracle Retail Applications in single node setup and not on applications deployed on clusters.
Certificate Authority or Certification Authority (CA) is an organization which provides digital certificates to entities and acts as trusted third party. Certificates issued by the commercial CAs are automatically trusted by most of the web browsers, devices, and applications. It is recommended to have certificates obtained from a trusted CA or commercial CAs to ensure better security.
|
Note: SSL certificates are used to contain public keys. With each public key there is an associated private key. It is critically important to protect access to the private key. Otherwise, the SSL messages may be decrypted by anyone intercepting the communications. |
Perform the following steps to obtain an SSL certificate and setting up a keystore:
Obtain an identity (private key and digital certificates) and trust (certificates of trusted certificate authorities) for WebLogic Server.
Use the digital certificates, private keys, and trusted CA certificates provided by the WebLogic Server kit, the CertGen utility, Sun Microsystem's keytool utility, or a reputed vendor such as Entrust or Verisign to perform the following steps:
Set appropriate JAVA_HOME and PATH to java, as shown in the following example:
export JAVA_HOME=/u00/webadmin/product/jdk
export PATH=$JAVA_HOME/bin:$PATH
Create a new keystore.
keytool -genkey -keyalg RSA -keysize 2048 -keystore <keystore> -alias <alias>
For example:
keytool -genkey -keyalg RSA -keysize 2048 -keystore hostname.keystore -alias hostname
Generate the signing request.
keytool -certreq -keyalg RSA -file <certificate request file> -keystore <keystore> -alias <alias>
For example:
keytool -certreq -keyalg RSA -file hostname.csr -keystore hostname.keystore -alias hostname
Submit the certificate request to CA.
Store the identity and trust.
Private keys and trusted CA certificates which specify identity and trust are stored in a keystore.
In the following examples the same keystore to store all certificates are used:
Import the root certificate into the keystore as shown in the following example:
keytool -import -trustcacerts -alias verisignclass3g3ca -file Primary.pem -keystore hostname.keystore
A root certificate is either an unsigned public key certificate or a self-signed certificate that identifies the Root CA.
Import the intermediary certificate (if required) into the keystore as shown in the following example:
keytool -import -trustcacerts -alias oracleclass3g3ca -file Secondary.pem -keystore hostname.keystore
Import the received signed certificate for this request into the keystore as shown in the following example:
keytool -import -trustcacerts -alias hostname -file cert.cer -keystore hostname.keystore
WebLogic domain is created for Oracle Retail Applications as part of the installation. Different domains are created in different hosts for different applications in situations where applications are being managed by different users or deployed on different hosts. Once the domains are created, you need to enable the SSL ports if not done already.
Perform the following steps to enable the SSL:
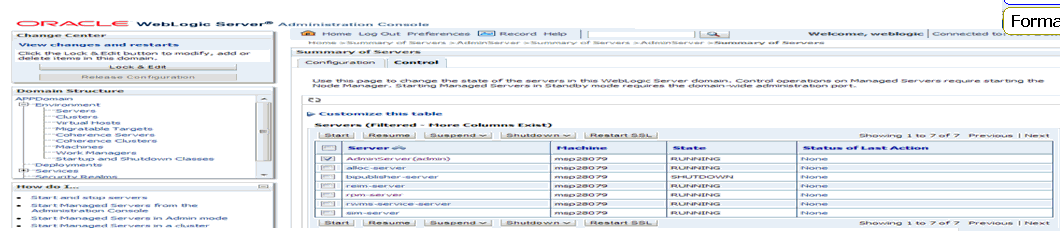
Log in to WebLogic console using Administrator user. For example, weblogic.
Navigate to <Domain> > Environment > Servers > < Servername> > Configuration > General tab.
Click Lock & Edit.
Select SSL Listen Port Enabled and assign the port number.
Click Save and Activate Changes.
Restart SSL to enable the changes.
Perform the following steps to configure the Application Server for SSL:
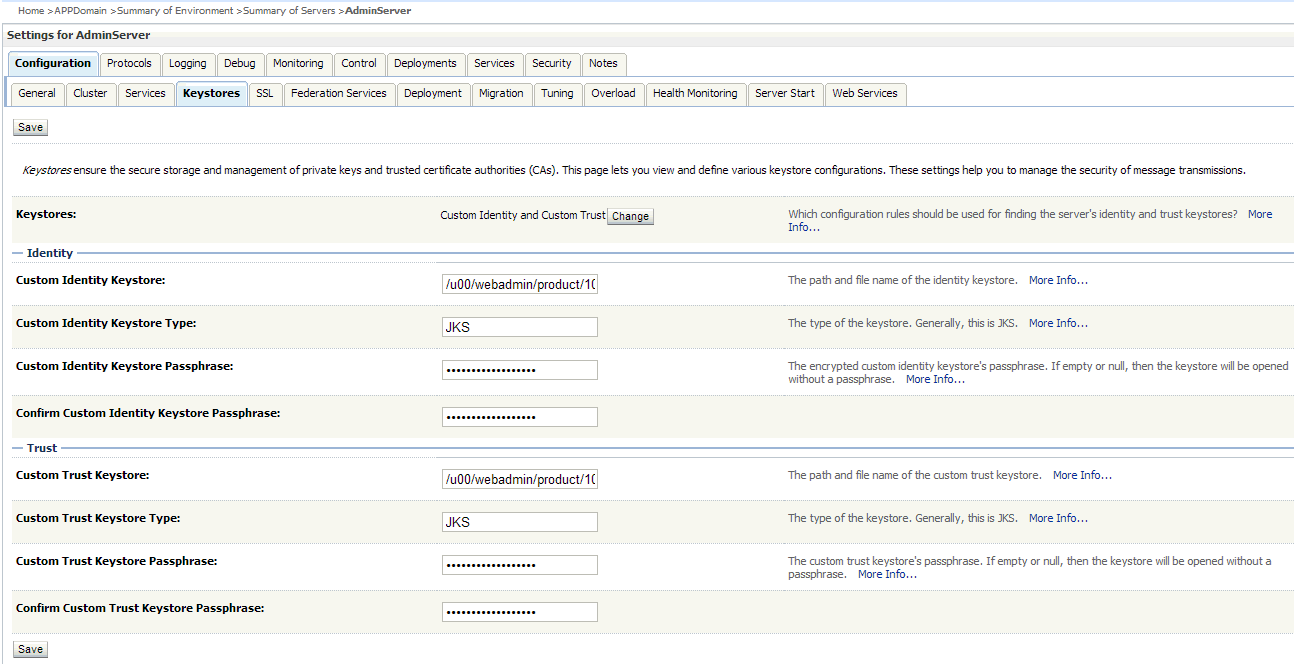
Configure the identity and trust keystores for WebLogic Server in the WebLogic Server Administration Console.
In the Change Center of the Administration Console, click Lock & Edit.
In the left pane of the Console, expand Environment and select Servers.
Click the name of the server for which you want to configure the identity and trust keystores as shown in the following example:
WLS_FORMS is for Forms server
Select Configuration, then select Keystores.
In the Keystores field, select the method for storing and managing private keys/digital certificate pairs and trusted CA certificates.
The following options are available:
- Demo Identity and Demo Trust - The demonstration identity and trust keystores, located in the BEA_HOME\server\lib directory and the Java Development Kit (JDK) cacerts keystore, are configured by default. You need to use for development purpose only.
- Custom Identity and Java Standard Trust - A keystore you create and the trusted CAs defined in the cacerts file in the JAVA_HOME\jre\lib\security directory.
- Custom Identity and Custom Trust [Recommended] - An Identity and trust keystores you create.
- Custom Identity and Command Line Trust: An identity keystore you create and command-line arguments that specify the location of the trust keystore.
Select Custom Identity and Custom Trust.
In the Identity section, define the following attributes for the identity keystore:
- Custom Identity Keystore - This is the fully qualified path to the identity keystore.
- Custom Identity Keystore Type - This is the type of the keystore. Generally, this attribute is Java KeyStore (JKS); if it is left blank, it defaults to JKS.
- Custom Identity Keystore Passphrase - This is the password you must enter when reading or writing to the keystore. This attribute is optional or required depending on the type of keystore. All keystores require the passphrase in order to write to the keystore. However, some keystores do not require the passphrase to read from the keystore. WebLogic Server only reads from the keystore so whether or not you define this property depends on the requirements of the keystore.
In the Trust section, define properties for the trust keystore.
If you choose Java Standard Trust as your keystore, specify the password defined when creating the keystore.
Confirm the password.
If you choose Custom Trust [Recommended] define the following attributes:
- Custom Trust Keystore - This is the fully qualified path to the trust keystore.
- Custom Trust Keystore Type - This is the type of the keystore. Generally, this attribute is JKS; if it is left blank, it defaults to JKS.
- Custom Trust Keystore Passphrase - This is the password that you need to enter when reading or writing to the keystore. This attribute is optional or required depending on the type of keystore. All keystores require the passphrase in order to write to the keystore. However, some keystores do not require the passphrase to read from the keystore. WebLogic Server only reads from the keystore, so whether or not you define this property depends on the requirements of the keystore.
Click Save.
To activate these changes, in the Change Center of the Administration Console, click Activate Changes.
|
Note: Not all changes take effect immediately, some require a restart. |
Figure 1-2 shows how to configure the Application Server for SSL.
For more information on configuring Keystores, see the Administration Console Online Help.
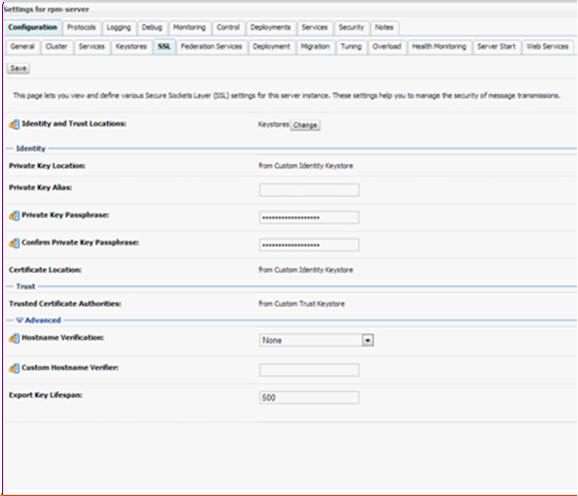
Set SSL configuration options for the private key alias and password in the WebLogic Server Administration Console.
In the Change Center of the Administration Console, click Lock & Edit.
In the left pane of the Console, expand Environment and select Servers.
Click the name of the server for which you want to configure the identity and trust keystores.
Select Configuration, then select SSL.
In the Identity and Trust Locations, the Keystore is displayed by default.
In the Private Key Alias, type the string alias that is used to store and retrieve the server's private key.
In the Private Key Passphrase, provide the keystore attribute that defines the passphrase used to retrieve the server's private key.
Save the changes.
Click Advanced section of SSL tab.
In the Hostname Verification, select None.
This specifies to ignore the installed implementation of the WebLogic.security.SSL.HostnameVerifier interface (this interface is generally used when this server is acting as a client to another application server).
Save the changes.
For more information on configuring SSL, see the section Configure SSL in the Administration Console Online Help.
All the server SSL attributes are dynamic; when modified through the Console. They cause the corresponding SSL server or channel SSL server to restart and use the new settings for new connections. Old connections will continue to run with the old configuration. You must reboot WebLogic Server to ensure that all the SSL connections exist according to the specified configuration.
Use the Restart SSL button on the Control: Start/Stop page to restart the SSL server when changes are made to the keystore files. You have to apply the same for subsequent connections without rebooting WebLogic Server.
Upon restart you can see the following similar entries in the log:
<Mar 11, 2013 5:18:27 AM CDT> <Notice> <WebLogicServer> <BEA-000365> <Server state changed to RESUMING>
<Mar 11, 2013 5:18:27 AM CDT> <Notice> <Server> <BEA-002613> <Channel "DefaultSecure" is now ing on 10.141.15.214:57002 for protocols iiops, t3s, ldaps, https.>
<Mar 11, 2013 5:18:27 AM CDT> <Notice> <Server> <BEA-002613> <Channel "DefaultSecure[1]" is now ing on 127.0.0.1:57002 for protocols iiops, t3s, ldaps, https.>
<Mar 11, 2013 5:18:27 AM CDT> <Notice> <WebLogicServer> <BEA-000329> <Started WebLogic Admin Server "AdminServer" for domain "APPDomain" running in Production Mode>
<Mar 11, 2013 5:18:27 AM CDT> <Notice> <WebLogicServer> <BEA-000365> <Server state changed to RUNNING>
<Mar 11, 2013 5:18:27 AM CDT> <Notice> <WebLogicServer> <BEA-000360> <Server started in RUNNING mode>
|
Note: For complete security of the WebLogic Server, it is recommended to secure both Administration as well the Managed Server where application is being deployed. You can choose to disable the non-SSL ports (HTTP). It is recommended to secure the Node Manager. |
The steps to secure Node Manager is provided in the following section.
Perform the following steps to configure the WebLogic scripts if Admin Server is secured:
Update the WebLogic startup/shutdown scripts with secured port and protocol to start/stop services.
Backup and update the following files in <DOMAIN_HOME>/bin with correct Admin server urls:
startManagedWebLogic.sh: echo "$1 managedserver1 http://apphost1:7001"
stopManagedWebLogic.sh: echo "ADMIN_URL defaults to t3://apphost1:7001 if not set as an environment variable or the second command-line parameter."
stopManagedWebLogic.sh: echo "$1 managedserver1 t3://apphost1:7001 WebLogic
stopManagedWebLogic.sh: ADMIN_URL="t3://apphost1:7001"
stopWebLogic.sh: ADMIN_URL="t3://apphost1:7001"
Change the URLs as follows:
t3s://apphost1:7002
https://apphost1:7002
Perform the following steps for WebLogic forms:
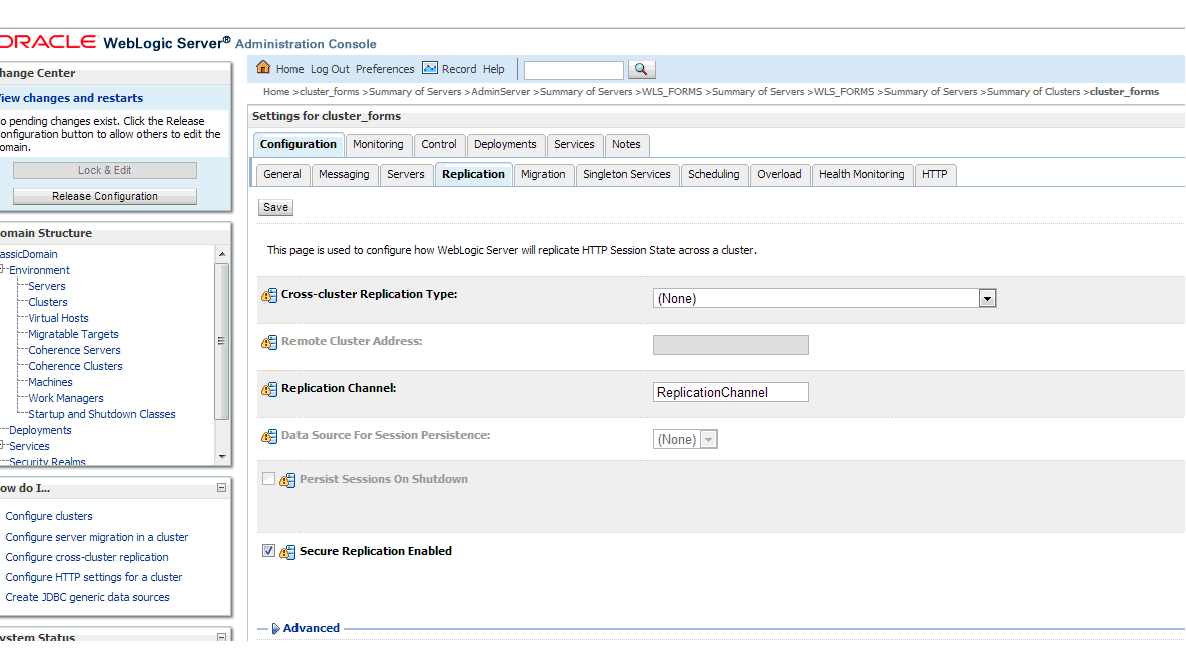
Log in to WebLogic Console. Select Environment > Clusters > cluster_forms, then select Configuration > Replication.
Select Secure Replication Enabled.
Start the WLS_FORMS Managed server.
You will need the Oracle Retail Application installer to run Java. In situations where Administration Server is secured using signed certificate, the Java keystore through which the installer is launched must have the certificate installed.
In case the installer is being run using JDK deployed at location /u00/webadmin/product/jdk, follow the steps as shown in Example 1-1.
Example 1-1 Adding certificate to the JDK keystore for Installer
apphost1:[10.3.6_apps] /u00/webadmin/ssl> keytool -import -trustcacerts -alias apphost1 -file /u00/webadmin/ssl/apphost1.cer -keystore /u00/webadmin/product/jdk/jre/lib/security/cacerts
Enter keystore password:
Certificate was added to keystore
apphost1:[10.3.6_apps] /u00/webadmin/ssl>
It is recommended to use a stronger encryption protocol in your production environment.
See the following sections to enable the latest SSL and cipher suites.
In a production environment, Oracle recommends Transport Layer Security (TLS) Version 1.1, or higher for sending and receiving messages in an SSL connection.
To control the minimum versions of SSL Version 3.0 and TLS Version 1 that are enabled for SSL connections, do the following:
Set the WebLogic.security.SSL.minimumProtocolVersion=protocol system property as an option in the command line that starts WebLogic Server.
This system property accepts one of the following values for protocol:
Set the following property in startup parameters in WebLogic Managed server for enabling the higher protocol:
DWebLogic.security.SSL.minimumProtocolVersion=TLSv1.1
|
Note: In case protocol is set for Managed servers, the same should be set for Administration server. Ensure that all the managed servers are down when making changes to the Administration server for setting up the protocol. It is recommended to set the properties in Administration server and then the Managed server. |
You need to install the unlimited encryption Java Cryptography Extension (JCE) policy, if you want to use the strongest Cipher suite (256 bit encryption) AES_256 (TLS_RSA_WITH_AES_256_CBC_SHA). It is dependent on the Java Development Kit (JDK) version.
Using the following URL, download and install the JCE Unlimited Strength Jurisdiction Policy Files that correspond to the version of your JDK:
http://www.oracle.com/technetwork/java/javase/downloads/index.html
For JDK 7, download from the following URL:
http://www.oracle.com/technetwork/java/javase/downloads/jce-7-download-432124.html and replace the files in JDK/jre/lib/security directory
|
Note: Restart the entire WebLogic instance using the JDK to enable changes to take effect once the JCE has been installed. |
Configure the <ciphersuite> element in the <ssl> element in the <DOMAIN_HOME>\server\config\config.xml file in order to enable the specific Cipher Suite to use as follows:
|
Note: You need to ensure that the tag <ciphersuite> is added immediately after tab <enabled>. |
<ssl>
<name>examplesServer</name>
<enabled>true</enabled>
<ciphersuite>TLS_RSA_WITH_AES_256_CBC_SHA</ciphersuite>
<-port>17002</-port>
...
</ssl>
|
Note: The above can be done using wlst script.For more information, go to http://docs.oracle.com/cd/E24329_01/web.1211/e24422/ssl.htm#BABDAJJG. It is advisable to bring down the managed server prior to making the changes. |
Perform the following steps for securing the Nodemanager with SSL certificates:
Navigate to <BEA_HOME>/wlserver_10.3/common/nodemanager and take a backup of nodemanager.properties.
Add the following similar entries to nodemanager.properties:
KeyStores=CustomIdentityAndCustomTrust
CustomIdentityKeyStoreFileName=/u00/webadmin/ssl/hostname.keystore
CustomIdentityKeyStorePassPhrase=[password to keystore, this will get encrypted]
CustomIdentityAlias=hostname
CustomIdentityPrivateKeyPassPhrase=[password to keystore, this will get encrypted]
CustomTrustKeyStoreFileName=/u00/webadmin/ssl/hostname.keystore
SecureListener=true
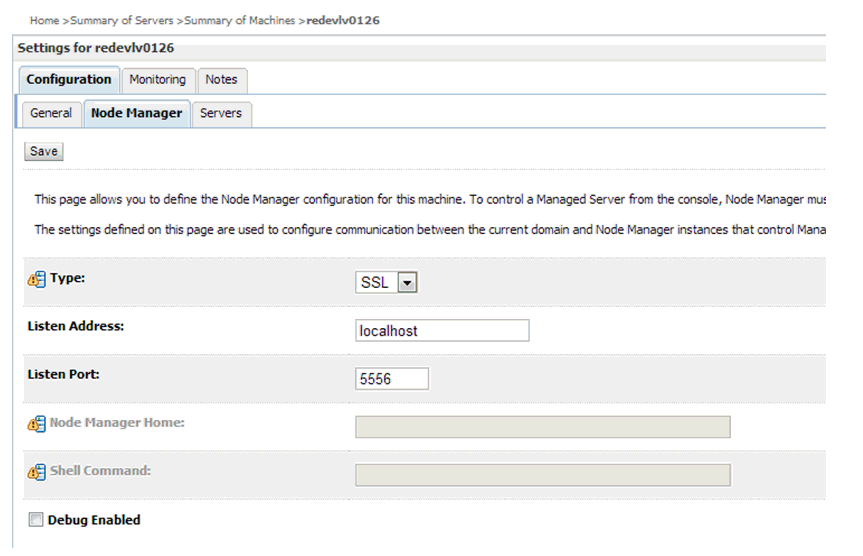
Log in to WebLogic console, navigate to Environment, and then Machines.
Select the nodemanager created already and navigate to Node Manager tab.
In the Change Center, click Lock & Edit.
In the Type field, select SSL from the list.
Click Save and Activate.
You need to bounce the entire WebLogic Domain for changes to take effect, after activating the changes.
You need to verify if the nodemanager is reachable in Monitoring tab after restart.
The Application can communicate with LDAP server on a secured port. It is recommended to use the secured LDAP server to protect user names and passwords from being sent in clear text on the network.
For information on Configuring Secure Sockets Layer (SSL), see the Oracle Fusion Middleware Administration Guide.
It is important to import the certificates used in LDAP server into the Java Runtime Environment (JRE) of the WebLogic server for SSL handshake, in case the secure LDAP is used for authentication.
For example:
Set JAVA_HOME and PATH to the JDK being used by WebLogic Domain.
Backup the JAVA_HOME/jre/lib/security/cacerts
/u00/webadmin/product/jdk/jre/lib/security> cp -rp cacerts cacerts_ORIG
Import the Root and Intermediary (if required) certificates into the java keystore.
/u00/webadmin/product/jdk/jre/lib/security> keytool -import -trustcacerts -alias verisignclass3g3ca -file ~/ssl/Primary.pem -keystore cacerts
/u00/webadmin/product/jdk/jre/lib/security> keytool -import -trustcacerts -alias oracleclass3g3ca -file ~/ssl/Secondary.pem -keystore cacerts
Import the User certificate from LDAP server into the java keystore.
/u00/webadmin/product/jdk/jre/lib/security> keytool -import -trustcacerts -alias hostname -file ~/ssl/cert.cer -keystore cacerts
|
Note: The default password of JDK keystore is changeit. |
The deployed application should be able to communicate with LDAP on SSL port after successful SSL Handshake.
Oracle Retail Merchandising System (RMS) and RWMS connect to the database using the Transparent Network Substrate (TNS) Alias as setup in tnsnames.ora file available in the location mentioned in RMS or RWMS environment file created during installation. Example 1-2 refers to an RMS Forms environment file, but the same steps apply to RWMS.
Example 1-2 Identify TNS_ADMIN setting in environment file created during installation
$ grep TNS_ADMIN <WLS_HOME> /user_projects/domains/ClassicDomain/config/fmwconfig/servers/WLS_FORMS/applications/formsapp_11.1.2/config/develop/rmsFqa3.env
TNS_ADMIN=/u00/webadmin/product/10.3.X_FORMS/WLS/asinst_1/config
For secured setup, the TNS Alias inside tnsnames.ora should refer to the TCPS port for Secured Listener of the database.
You need to perform the following additional setup to connect to Oracle database on secured port (TCPs) from Forms Oracle Home:
Create wallet using orapki.
|
Note: A wallet is created using either orapki or mkstore utility. Forms installation provides orapki utility to create the wallet and is used for creation of wallet. |
$ mkdir /u00/webadmin/product/10.3.X_FORMS/WLS/Oracle_FRHome1/network/wallet
$ cd /u00/webadmin/product/10.3.X_FORMS/WLS/Oracle_FRHome1/network/wallet

$  export JAVA_HOME=/u00/webadmin/product/jdk
$  export PATH=$JAVA_HOME/bin:$PATH

$  export ORACLE_HOME=/u00/webadmin/product/10.3.X_FORMS/WLS/Oracle_FRHome1
$  export PATH=$ORACLE_HOME/bin:$PATH
$  export PATH=/u00/webadmin/product/10.3.X_FORMS/WLS/oracle_common/bin:$PATH
$  orapki wallet create -wallet
/u00/webadmin/product/10.3.X_FORMS/WLS/Oracle_FRHome1/network/wallet/secured -auto_login -pwd <wallet-pwd>
Oracle PKI Tool: Version 11.1.1.5.0
Copyright (c) 2004, 2011, Oracle and/or its affiliates. All rights reserved.
$  ls
cwallet.sso  ewallet.p12
Import the Signed certificates into the wallet.
Example 1-4 Importing all certificates into the wallet
$ orapki wallet jks_to_pkcs12 -wallet
/u00/webadmin/product/10.3.X_FORMS/WLS/Oracle_FRHome1/network/wallet/secured -pwd <wallet-pwd> -keystore
/u00/webadmin/product/10.3.X_APPS/WLS/wlserver_10.3/server/lib/apphost1.keystore -jkspwd <keystore-pwd>
Oracle PKI Tool: Version 11.1.1.5.0
Copyright (c) 2004, 2011, Oracle and/or its affiliates. All rights reserved.
For information on Oracle Wallet Manager and orapki, see the Fusion Middleware Administrator's Guide.
Provide the wallet details in sqlnet.ora file.
|
Note: You need to create a sqlnet.ora file with details of the wallet in $ORACLE_HOME/network/admin directory, if the file is not available. |
Connect using sqlplus.
$ export ORACLE_HOME=/u00/webadmin/product/10.3.X_FORMS/WLS/Oracle_FRHome1
$ export PATH=$ORACLE_HOME/bin:$PATH

$ sqlplus rms01app@<DB_NAME>_secure
SQL*Plus: Release 12.1.0.1.0 Production on Tue Aug 5 02:15:22 2014
Copyright (c) 1982, 2013, Oracle.  All rights reserved.
Connected to:
Oracle Database 12c Enterprise Edition Release 12.1.0.1.0 - 64bit Production
With the Partitioning, OLAP, Data Mining and Real Application Testing options

SQL>
You need to configure the user credentials and other security related information at the service consumer and the app service provider layers, in order to provide end to end security between Web service consumer and provider.
The security policies certified by Oracle Retail are as follows:
Username Token over HTTPS - This security configuration is referred as Policy A in this document. This policy provides confidentiality due to the use of SSL, however it does not provide non-repudiation as nothing is signed.
Wssp1.2-2007-Https-UsernameToken-Plain.xml
Message Protection - This security configuration is referred as Policy B in this document. This policy encrypts the messages itself, so SSL is not used. The sender also signs the messages, which provides non-repudiation of the messages. However, this policy is more complex to implement.
Wssp1.2-2007-Wss1.1-UsernameToken-Plain-EncryptedKey-Basic128
Wssp1.2-2007-EncryptBody
Wssp1.2-2007-SignBody
|
Note:
|
Perform the additional pre-requisites for Oracle Retail Service Backbone (RSB) security policies:
Create DB schema for OSB [PolicyA][PolicyB].
Ensure that <RSB_MDS> schema is created while running Repository Creation Utility (RCU) at <rcuHome>/bin/rcu.
Extend RSB Domain with OWSM Extention [PolicyA][PolicyB].
Ensure that OSB OWSM Extension-11.1.1.6 is selected, when RSBDomain is being created.
Depending upon your security need for your production environment, infrastructure where Oracle Retail applications are deployed can be secured.
Ensure the following to secure complete protection of environment:
Securing the WebLogic Server Host
Securing Network Connections
Securing your Database
Securing the WebLogic Security Service
Securing Applications
For more information on Ensuring the Security of Your Production Environment, see Securing a Production Environment for Oracle WebLogic Server 12 C Release 1 (10.3.6) Guide.