| Oracle® Retail Warehouse Management System UI User Guide Release 15.0 E66766-01 |
|


 Previous |
 Next |
| Oracle® Retail Warehouse Management System UI User Guide Release 15.0 E66766-01 |
|
Previous |
Next |
Task Management is the process of managing all work (activities) in the warehouse. This includes managing both direct activities that are created by RWMS and indirect activities that are assigned outside RWMS. Task Management makes use of permission, priority, and proximity in conjunction to assign the most productive task to each employee at that specific moment in time.
The next best activity for an employee is assigned based on the permission of the worker, priority of the work to be done, and the physical proximity of a worker to task locations. Task Management specially increases the productivity in large warehouses as there are more tasks in such facilities. In many cases, productivity is further increased by changing the layout and flow of the warehouse.
Permission
Some workers are not trained to perform certain activities, not permitted in certain areas of a warehouse, or not allowed to operate specific types of equipment. RWMS checks if the worker has the necessary permissions to perform the activity before assigning the activity.
Priority
Priority indicates the importance of an activity. A default priority is set when an activity is created in RWMS. At regular intervals (either automatically or manually), a new routine is run to re-evaluate each activity based on a predetermined set of rules. If any rule is true, the priority of that activity is updated.
For example, a replenishment activity has a default priority of 10 at creation, but upon re-evaluation, RWMS determines that the forward pick face has reached its reorder point. The priority of this activity is then changed to 1 for immediate assignment.
Proximity
In situations where more than one task is at the same priority level, RWMS breaks the tie by looking for the next task closest to their current location in the warehouse. RWMS utilizes X, Y, Z coordinates to determine the actual distance to each task.
Business Process
To enable Task Management, configure the following editors:
Define Working Days
Define the working days and appointment intervals for your facility using the Working Days Editor found in Setup Administration in Chapter 4 Support Functions.
Define Work Shifts
Define the operational work shifts for the distribution center. Each shift is identified by a Shift ID, Description, Start Time, and End Time. Each shift can be associated with one or more breaks for the shift. Each break is identified by a Break ID, Description, Start Time, End Time, and Break Type. The Shift Definition Editor is found in Setup DC in Chapter 4 Support Functions.
Define Locations
Create all the locations in your facility. Define the X, Y, Z coordinates to use both priority and proximity during task assignment. To use only priority, do not define the X, Y, Z coordinates. Configure the following editors in Chapter 4 Setup Locations: Location Type Editor, Location Editor, Reference Point Editor and Reference Point Map Editor.
Define Equipment/Zones
Define the equipment classes used in your facility. Include both vehicles (like forklifts, turret trucks, and so on) and devices (like RF handheld, RF wrist, and so on) during this stage.
Identify and define the characteristics of each vehicle and device. The characteristics downloaded from the Equipment Class Editor window can be edited so they reflect the actual characteristics of the vehicle or device.
Create all the specific zones in your facility using the Zone Editor.
Configure the following editors in Chapter 4 Setup Equipment/Zone: Equipment Class Editor, Equipment Editor, Zone Editor, and Equipment Zone Restriction Editor.
Define Activities
Configure the activities that will be task managed and then identify the equipment that can be used for each activity. To enable interleaving, create Activity Groups.
Configure the following editors in Chapter 4 Setup Activity: Activity Editor, Activity Equipment Editor, and Activity Group Editor.
Create Users
Create all the users in your facility. Indicate the default shift, privilege, language, and so on using the User Editor.
Configure the following editors in Chapter 4 Setup User: User Editor, User Equipment Class Editor, and User Activity Group Editor.
This chapter contains the following topics:
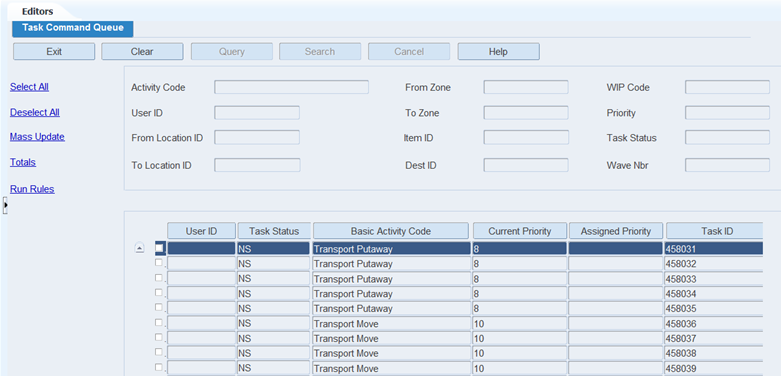
The Task Command Queue allows you to view all outstanding activities that are task enabled and reassign their assigned user and or priority if desired. The command queue shows activities not started and in progress at the time the query is executed. All completed activities are removed from the task queue when the query is re-executed.
From the main menu, select Task Management > Task Command Queue. The Task Command Queue window opens.
Display all Tasks (outstanding Activities)
Click Search.
Display Specific Information
Click Query.
Enter or select from the List of Values any of the selection criterion fields.
Click Search. The tasks that match the search criteria displays.
Update a Task
On the Task Command Queue window, select the tasks that you want to update. You can select task records in the following ways:
Select each individual check box next to the task record and then click Mass Update.
Click Select All which selects each displayed record and then click Mass Update.
If you have selected the wrong tasks and want to clear all simply click Deselect All and all of the check marks are removed. If you want to only clear some records, then select the check box next to the record and the check mark is cleared.
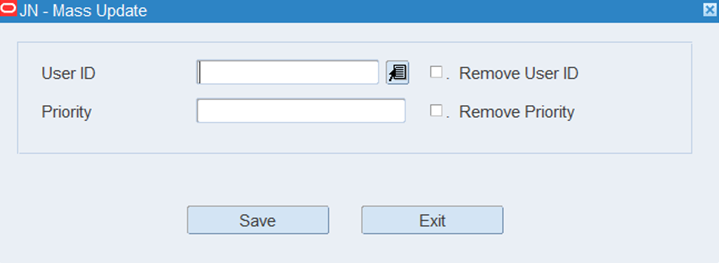
Click Mass Update and the Mass Update window opens.
In the User ID field, enter or select the User ID you want to assign to the task that is not started (activity). If you want to remove an assigned User ID from a task that is not started, select the Remove User ID check box.
In the Priority field, enter Priority you want to assign to the task that is not started (activity). If you want to remove the Priority from a task that is not started, select the Remove Priority check box. When a Priority is assigned in this window, it overrides the both the default and rules priority.
Click Save to make updates.
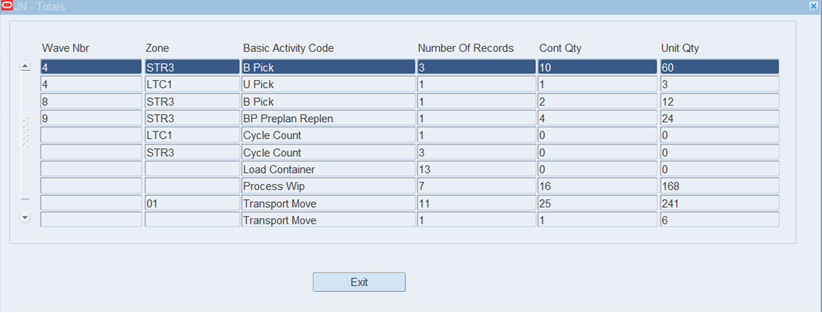
Viewing Totals
The Totals link allows a user to view summary data of the tasks (activities) selected in the Task Command Queue. If you enter the Task Command Queue and immediately click Search the queue shows you all tasks that are not started and tasks that are in progress in your facility for activities that are task managed. If you then click the Totals link it provides summary data on those tasks selected. If you use any of the filtering criteria the totals only reflect the summary data related to the filters applied.
Run Rules
The Run Rules link when clicked runs a background procedure that checks to see if any of the rules applied to the activities in the Activity Priority Rules Editor are true and if so changes the Default Priority to the Priority defined within the actual rule.
Exit the Task Command Queue Window
Click Exit to close the window.
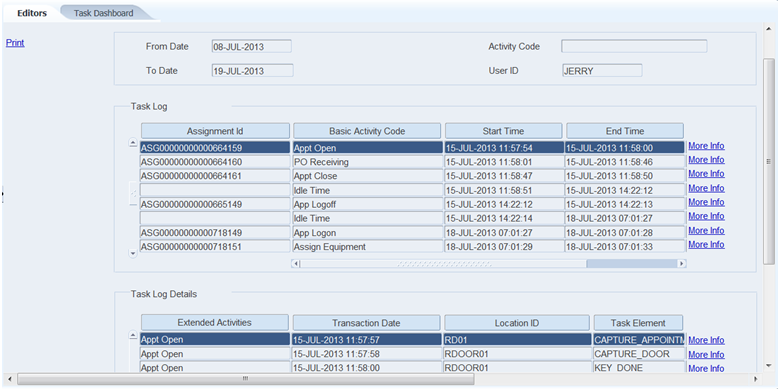
The Task History by User window provides management with the ability to view all of the tasks completed by a user over a specified range of dates. The online report captures the user logon time, breaks, lunch, all direct activities, all indirect tasks, idle time, and logoff time. In order to generate the online report, RWMS requires the entry of a From Date, To Date, and a User ID. The online report can be printed to paper by clicking the Print link and specifying your printer.
From the main menu, select Task Management > Task History by User. The Task History by User window opens.
Create an Online Report
Click Query.
Enter or select from the List of Values any of the selection criterion fields. You must include a From Date, To Date, and User ID to generate an online report.
Click Search. The tasks that match the search criteria displays.
Exit the Task History by User Window
Click Exit to close the window.