| Oracle® Retail Predictive Application Server Administration Guide for the Classic Client Release 14.1 E59120-01 |
|

 Previous |
 Next |
| Oracle® Retail Predictive Application Server Administration Guide for the Classic Client Release 14.1 E59120-01 |
|
Previous |
Next |
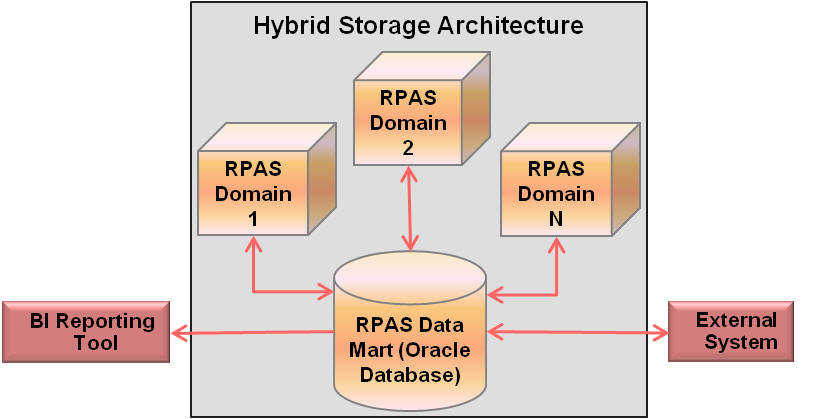
Hybrid Storage Architecture (HSA) combines the strengths of both relational and multi-dimensional data storage technologies. In an HSA environment, stored data is divided into two groups, based on their usage and integration characteristics. The majority of data is still stored in the domain, and Oracle database is leveraged for the storage of shared data across two or more applications. Multiple domains can share one Oracle database schema. The measure data in the Oracle database can be configured to be accessible by one or multiple domains. Figure 17-1 illustrates a general scenario where multiple RPAS domains, reporting tools, and non-RPAS systems access shared data stored in Oracle database.
The chief objective in an HSA deployment is to facilitate read-write access of shared data by multiple applications in near real time. Typically, the shared data is committed by an RPAS workbook and is read by another RPAS application, an external application, or a reporting tool. The use of the Oracle database mitigates RPAS data access contention issues that can occur due to the concurrent read-write operations.
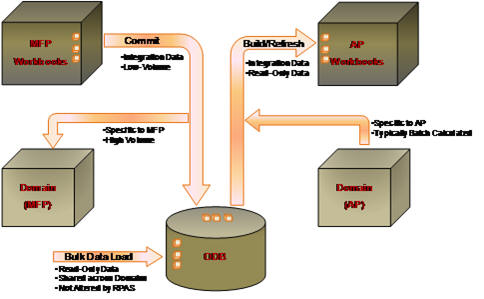
The HSA architecture does not target bulk integration. In fact, storage of large volumes of writable data in Oracle database can have severe performance implications. Read-only bulk data that is not recalculated or modified by RPAS processes can be stored in the database; however, writable data such as data that is committed by workbooks or calculated during the batch cycle may be stored in the Oracle database only if the volume is relatively small.
An HSA deployment can benefit near real-time integration scenarios because the database provides transaction protection for the data stored in the database relational tables.
Current integration between RPAS applications is typically done through text data file export and import either through RPAS command line utilities or Oracle Data Integrator (ODI). It must be done through a batch cycle. In HSA, the measures in Oracle database can be shared by multiple RPAS applications. Any updates to the shared measures by one application are visible to other applications immediately after the transaction is committed in the Oracle database.
By moving data into the common Oracle database platform, the door is opened for standard database integration through Extraction, Transformation, and Loading (ETL) methodology with non-RPAS applications. RPAS HSA provides APIs that can be used in this kind of external integration.
The data stored in the Oracle database can be accessed by other Oracle database features or applications such as auditing, backup, and reporting. This can fit well with the customer's corporate enterprise data management strategy.
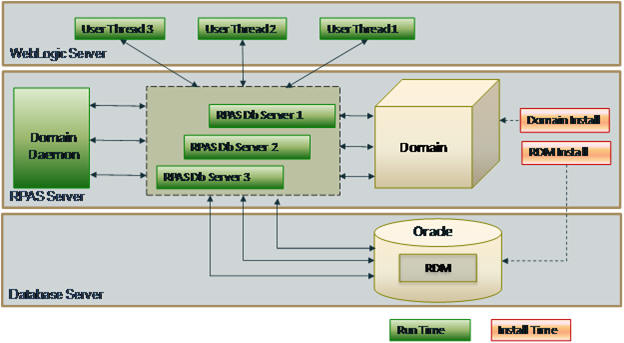
Figure 17-3 shows a physical deployment of the Hybrid Storage Architecture in a Fusion Client environment. The Oracle database server is introduced to host the RPAS Data Mart, adding a new data storage tier. The RPAS DB Server process acts as a client to the Oracle database and can access data in both the domain and the Data Mart. In a Fusion Client environment, the mid-tier WebLogic server remains unchanged. In a Classic Client environment, the WebLogic tier is not present as the Classic Client connects directly to the RPAS DB Server tier.
All RPAS HSA enhancements are implemented on the RPAS server platform and are transparent to the RPAS client and end users. While the RPAS administrator has extra responsibilities in managing RDM configurations and operations, no extra training is required for the end users.
As part of the HSA installation, the RDM is created, based on the integration and partition configuration. The RDM consists of eight schemas, one central data mart schema, and seven access schemas.
The data mart schema has the following schema objects:
Tables
RPAS Metadata tables
Dimension-based tables
Dimension tables
Translation tables
Index translation tables
Fact tables
Temporary and logging tables
Packages
The dimension and fact-based tables' definitions depend on the configuration. The dimension and fact tables are partitioned based on the partitioning configuration. The remaining objects are fixed and are explained in this chapter.
Each of the access schemas has private synonyms for most of the data mart schema objects. In addition to this, based on their functionality, some access schemas may create staging tables dynamically.
This chapter describes the following components:
Entity relationship diagram with sample dimension and fact configuration
Data Mart's table description
Data Mart's partitioning scheme
Data Mart's sequence descriptions
Data Mart's package descriptions
Access schema descriptions
Security considerations
A standard naming convention is followed for the RPAS schema objects. The RPAS table naming conventions conforms to Fusion standards by adhering to the following guidelines.
Schema object names start with the RP_ application short name.
Names are grouped by functional or business area with a one- to two-letter abbreviation. If the object is used by multiple business areas, then the 'G_' abbreviation is used to identify generic object.
Object names use [A-Z 0-9_] and no multiple consecutive underscores.
Here is the summary of all RPAS suffixes. Note that an object may have one or more suffixes applied at a given point in time.
This section provides an entity relationship diagram for the dimension and fact tables in the central data mart schema for a sample configuration.
RPAS Configuration Tools allow customers to configure dimensions, measures (facts), business rules, and workbooks. Dimensions and facts impact the schema. A sample configuration described in Figure 17-4 is used for illustration purposes in this chapter.
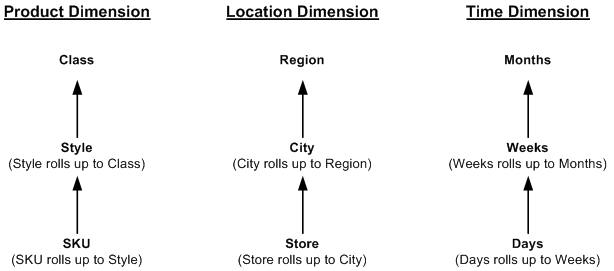
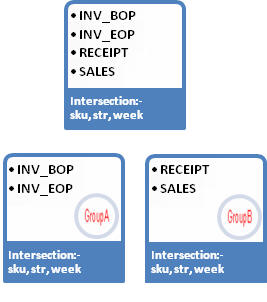
Three dimensions, product, location and time, are configured to have three levels each, as shown in Figure 17-4.
The lowest level SKU rolls up to STYL (abbreviated words are used to respect the RPAS limit of four characters), which rolls up to CLSS for the Product dimension.
The lowest level STR rolls up to CITY, which rolls up to RGN for the Region dimension.
The lowest level DAY rolls up to WEEK, which rolls up to MNTH for the Time dimension.
Two fact groups are configured to have two facts each at the same intersection of sku, store, and week. The facts INV_BOP, INV_EOP, RECIEPT, and SALES are configured in two groups so that INV_EOP and INV_EOP belong to GroupA and RECEIPT and SALES belong to GroupB.
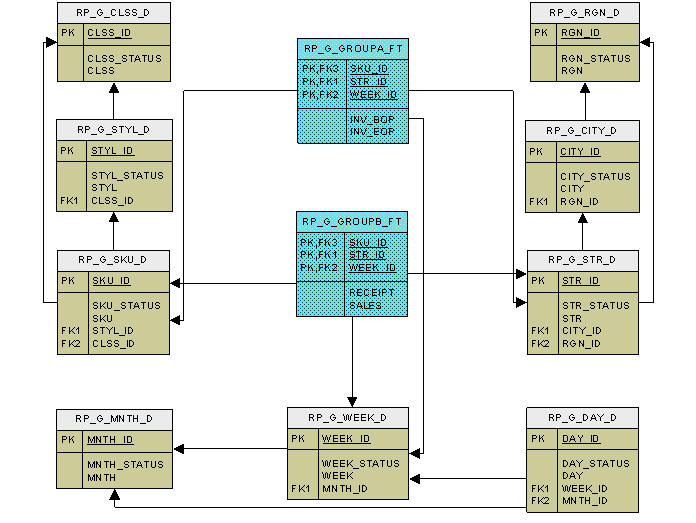
One table is created for each dimension level, and one table is created for each fact group in the central data mart schema, which is a relational representation of multi-dimensional data. The entity relationship model is termed a De-normalized Snowflake schema. The dimension tables are de-normalized so that each dimension table contains direct references not only to the immediate parent, but also to all higher level tables in the hierarchy. At the center of the snowflake are the fact tables. There can be multiple fact tables for each intersection, depending on the fact grouping configuration. Figure 17-6 shows a sample ERD with the snowflake schema for two fact tables and related dimension tables, as illustrated above.
The data mart schema tables are broadly classified into the following logical categories:
RPAS metadata tables
Dimension-based tables
Fact tables
Temporary and logging tables
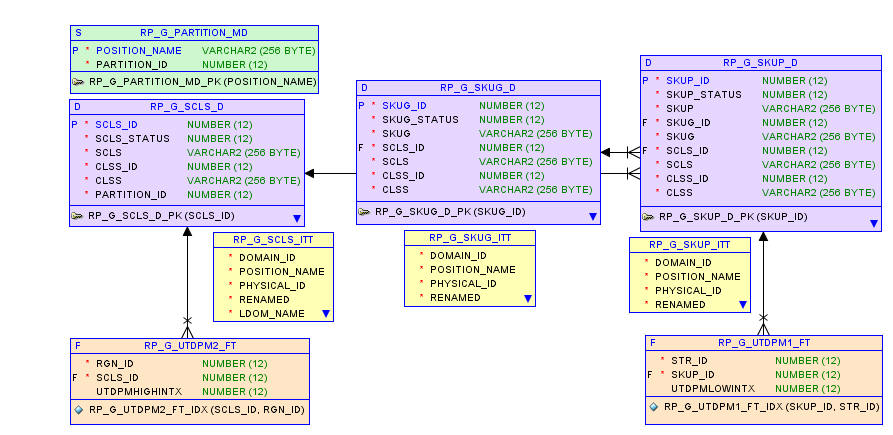
The RPAS metadata, that is, the metadata for the configured dimensions and facts and other RDM details, is stored in fixed RPAS metadata tables.
The metadata tables are named as 'RP_G_<Short_Desc>_MD'.
There are eleven RPAS metadata tables, as explained below, along with six metadata tables for the workbook commit process.
This table stores the shared dimensions with their configured order and purge age.
This table stores the ID, name, and path of the registered domains. The domain ID is generated from a sequence. The domain name is added from the integration configuration. The domain path is added only when the domain is registered.
This table stores the measure properties of shared facts as configured in the integration configuration.
Table 17-4 RP_G_Fact _Info_MD
| Name | Null | Type |
|---|---|---|
|
FACT ID |
NOT NULL |
NUMBER(12) |
|
FACT NAME |
NOT NULL |
VARCHAR2(30) |
|
FACT TYPE |
NULL Allowed |
NUMBER(12) |
|
BASE INTX |
NULL Allowed |
VARCHAR2(24) |
|
NA VALUE |
NULL Allowed |
VARCHAR2(512) |
|
DEF AGG |
NULL Allowed |
VARCHAR2(24) |
|
ALLOWED AGGS |
NULL Allowed |
VARCHAR2(128) |
|
FACT GROUP |
NULL Allowed |
VARCHAR2(24) |
|
PURGE AGE |
NULL Allowed |
NUMBER(12) |
|
HYBRID AGG SPEC |
NULL Allowed |
VARCHAR2(512) |
This table contains entries for each registered domain having the shared measure. Since measure names need not be unique in all domains, this table provides a mapping to the measures in different domains that point to the same fact. This information must be provided in the integration configuration.
This table stores the details of the shared levels of each shared dimension as configured.
In a partitioned RDM, the partition level dimension table is partitioned by list. This table stores the mapping of those partition level positions with their respective partition IDs. This table is internally used by the RDM partition manager utility.
This table stores RDM's history and versioning. It is used to record the history (creation and update) of RDM.
Table 17-9 RP_G_RDM_History_MD
| Name | Null | Type |
|---|---|---|
|
EVENT ID |
NOT NULL |
NUMBER(12) |
|
SCHEMA VERSION |
NOT NULL |
NUMBER(12) |
|
RPAS VERSION |
NOT NULL |
VARCHAR2(16) |
|
LAST DEV TAG |
NOT NULL |
VARCHAR2(10) |
|
UTILITY |
NOT NULL |
VARCHAR2(32) |
|
ACTION |
NOT NULL |
VARCHAR2(32) |
|
START TIME |
NOT NULL |
TIMESTAMP(6) |
|
COMPLETE TIME |
NOT NULL |
TIMESTAMP(6) |
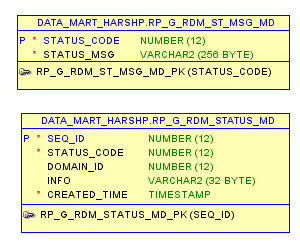
In an integrated environment, interdependent utilities on different registered domains update the RDM status messages in this table. This is needed for better coordination among the interdependent utilities.
This is the parent table to the previous RD_G_RDM_STATUS_MD table and stores all the RDM status codes, along with their corresponding messages.
RPAS maintains six metadata tables for the workbook commit process.
Table 17-13 Commit Metadata Tables
| Table Name | Description |
|---|---|
|
RP_G_COMMIT_DIMS_MD |
This table stores the dimensions and levels and partitions that the workbook corresponds to for current commit (identified by commit ID). Used internally by the commit process. |
|
RP_G_COMMIT_HISTORY_MD |
This table maintains the history of state and start time for each commit. |
|
RP_G_COMMIT_MASKS_MD |
This table stores the conditional commit details: commit masks and the measures each mask applies to. Used internally by the commit process. |
|
RP_G_COMMIT_MEASURES_MD |
This table stores the measure names being committed along with their corresponding staging table. Used internally by the commit process. |
|
RP_G_COMMIT_STATUS_MD |
This table stores the states of the currently running commit process with various details like the workbook owner and template. |
|
RP_G_COMMIT_STG_TBLS_MD |
This table pairs the fact table/partition and the corresponding staging tables.The commit_measures table stores measure names in each staging table. |
For each shared level of the shared dimensions configured, RPAS creates one table for each of the following categories.
A dimension table is created for each dimension level named as 'RP_G_<level_Name>_D'.
The level tables are de-normalized so that the each level table has the reference to each higher level, so that the lowest level has reference to all higher level tables. Refer to Figure 17-4.
The RPAS dimension tables have a position ID and business identifier for every level in the dimension. The position ID is an integer generated from a sequence, and the business identifier is an alpha-numeric public identifier, known as the external name in RPAS terminology.
Rollup dimension or shrunken dimension refers to taking a conformed subset of the dimension table to support aggregate data at higher fact grains. This design has the benefit of providing workbook build lookups with fewer rows.
Hierarchies and rollup paths may not be obvious to the design user simply by viewing the dimension tables if there are many alternate hierarchies. Metadata tables must be referenced for this that clearly define the hierarchies and levels for both the application and report users.
Each position of the dimension levels is assigned a surrogate key, which is a 32-bit integer and internally used as a unique identifier of the position. The records of fact tables are identified by combinations of the position IDs instead of positions. The position IDs are necessary for efficient data storage and query processing.
Each position has a status column, as LEVEL_STATUS, which identifies the status of the position (that is, formal, informal, place holder, or deleted).
The dimension tables have the following structure:
Table 17-14 Dimension Table Structure
| Name | Null | Type |
|---|---|---|
|
<LEVEL1_ID PRIMARY KEY> |
NOT NULL |
NUMBER(15) |
|
<LEVEL1_STATUS> |
NOT NULL |
NUMBER(12) |
|
<LEVEL1> |
NOT NULL |
VARCHAR2(30) |
|
<LEVEL2_ID> |
NOT NULL |
NUMBER(15) |
|
<LEVEL2> |
NOT NULL |
VARCHAR2(30) |
|
<LEVEL3_ID> |
NOT NULL |
NUMBER(15) |
|
<LEVEL3> |
NOT NULL |
VARCHAR2(30) |
Here is an example for a SKU level dimension table from the sample configuration.
Table 17-15 RP_G_SKU_D (Example)
| Name | Null | Type |
|---|---|---|
|
SKU ID |
NOT NULL |
NUMBER(12) |
|
SKU STATUS |
NOT NULL |
NUMBER(12) |
|
SKU |
NOT NULL |
VARCHAR2(256) |
|
STYL ID |
NOT NULL |
NUMBER(12) |
|
STYL |
NOT NULL |
VARCHAR2(256) |
|
CLSS ID |
NOT NULL |
NUMBER(12) |
|
CLSS |
NOT NULL |
VARCHAR2(256) |
Apart from the level dimension tables, the lowest level of each dimension has an age table that is used for purging functionality.
The dimension level age table is named as 'RP_G_<level_name>_AGE_D' and has following structure.
Table 17-16 RP_G_<level_name>_AGE_D
| Name | Null | Type |
|---|---|---|
|
<LEVEL_ID PRIMARY KEY> |
NOT NULL |
NUMBER(12) |
|
STALE DATE |
NULL Allowed |
TIMESTAMP(6) |
Here is an example for SKU level age table from the sample configuration.
The translation tables provide multi-language support. The translation table for each dimension level has the primary key and translated columns from the original dimension table and two special columns, LANGUAGE and SOURCE_LANG. Both LANGUAGE and SOURCE_LANG columns contain a value from the LANG column of the language reference table, RP_G_LANG_D.
LANGUAGE indicates the defined language of the row's translated columns. For example, when querying values for French, a program selects rows from the TL table where LANGUAGE = French in the RP_G_LANG_D.
The translation table stores translations. The column SOURCE_LANG stores the language code of the original language, and the LANG_CODE column stores the language code of the language of the translation. For example, if the label "Men's shirt" in English has a Chinese translation, then there is a record in the translation table for this Chinese translation, with SOURCE_LANG='English' and LANG_CODE='Chinese'.
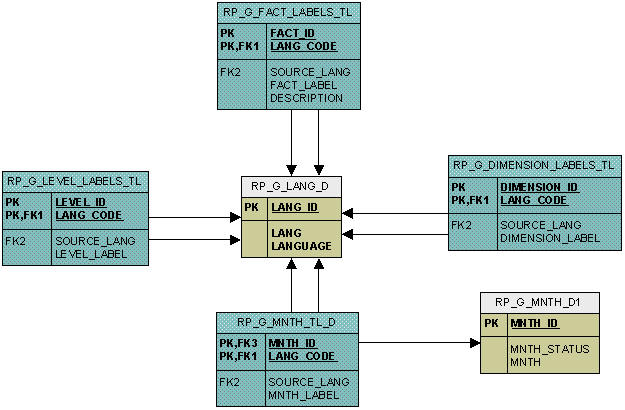
Apart from one table for each dimension level, there is a table to store translations for each level label itself (RP_G_LEVEL_LABELS_TL); a table to store translations for each dimension label (RP_G_DIMENSION_LABELS_TL); and a table to store facts for each fact label. See Figure 17-7 for the translation tables.
The translation table for each dimension level table is named as 'RP_G_<level_name>_TL_D' and has following structure:
Table 17-18 RP_G_<level_name>_TL_D
| Name | Null | Type |
|---|---|---|
|
<LEVEL_ID PRIMARY KEY> |
NOT NULL |
NUMBER(15) |
|
LANG_CODE PRIMARY KEY |
NOT NULL |
VARCHAR2(20) |
|
SOURCE_LANG |
NULL Allowed |
VARCHAR2(20) |
|
<LEVEL_LABEL> |
NULL Allowed |
VARCHAR2(1000) |
Here is an example of a SKU level translation table from the sample configuration.
The Index Translation Tables (ITT) maintains the mapping between the position IDs and the RPAS integer indexes (also referred to as Physical ID) for all dimension level positions between the data mart and the RPAS domains. This mapping is important for efficient fact storage and optimal data transfer between the Data Mart and the RPAS domains.
Each table is partitioned by domain_id for faster access. Each level position has each domain's physical ID stored in the table. The column RENAMED is used internally by the renamePositions utility to communicate the information to other integrated domains.
ITT tables are named as 'RP_G_<level_name>_ITT' and have following structure:
Table 17-20 RP_G_<level_name>_ITT
| Name | Null | Type |
|---|---|---|
|
DOMAIN_ID |
NOT NULL |
NUMBER(12) |
|
POSITION_NAME |
NOT NULL |
VARCHAR2(256) |
|
PHYSICAL_ID |
NOT NULL |
NUMBER(12) |
|
RENAMED |
NOT NULL |
NUMBER(12) |
In addition to the ITT table, a materialized view is also provided for faster mapping, which provides direct mapping between the dimension level position ID and its physical ID.
The materialized view for a dimension level is named as 'RP_G_<level_name>_ITT_MV' and has following structure:
Multiple facts at the same base intersection can be configured to belong to the same fact group. One fact table is created for one fact group. A fact table consists of the position IDs of intersection dimension levels and the facts belonging to the corresponding fact group. See Figure 17-4.
N/A values are converted to NULL in the fact table to reduce data size.
Fact tables are named as 'RP_G_<fact_group>_FT' and have following structure:
Table 17-22 RP_G_<fact_group>_FT
| Name | Null | Type |
|---|---|---|
|
<LEVEL1_ID> |
NULL Allowed |
NUMBER(15) |
|
<LEVEL2_ ID> |
NULL Allowed |
NUMBER(15) |
|
<LEVEL3_ ID> |
NULL Allowed |
NUMBER(15) |
|
<FACT1> |
NULL Allowed |
NUMBER(15) |
|
<FACT2> |
NULL Allowed |
VARCHAR2(30) |
Here is an example for the fact group GroupB from the sample configuration.
The dimension and fact tables of RDM are partitioned based on the partition configuration provided at installation time. The ITT tables are partitioned based on the number of domains registered to the RDM.
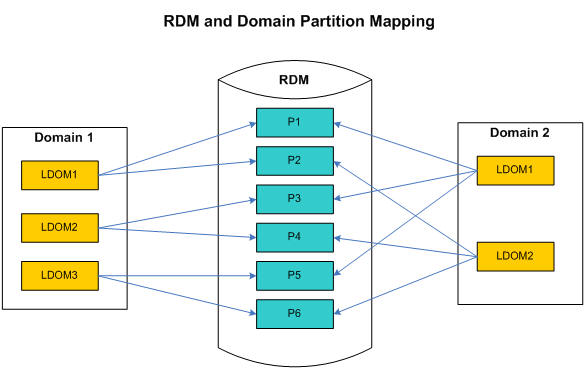
The user data (dimensions and facts) is partitioned using the same logic as the RPAS domains: first, a partitioning level is chosen, then the positions on this level are grouped into partitions, and all levels lower and all facts at this level or lower inherit the same partitioning through the hierarchical roll-up relationships. The RDM schema partitioning cannot always be the same as that of the RPAS domains, especially when the domains are partitioned at different dimension levels or the partitioning positions are different. However, the proper mapping and alignment between the domains' partitions and the data mart's happens in such a way as to ensure that any local domain (of the multiple integrated domains) always maps to one or more data mart partitions, and any data mart partition is completely contained in one or zero local domain of any integrated domain. This partition mapping is essential for optimal performance in workbook operations, and RPAS batch processes that need to access the data mart because each data access (read or write) will have a well defined data source or destination.
In the data mart schema, the selected partition level dimension table is partitioned by list, and all its child dimension and fact tables are partitioned by reference.
A master metadata table RP_G_PARTITION_MD, as explained in the metadata tables in Table 17-7, stores the mapping of the partition level positions and their corresponding partition IDs.
The partition level dimension table has an extra column for PARTITION_ID, corresponding to the same column in the RP_G_PARTITION_MD table. The RP_G_PARTITION_MD is provided to help with partition management. With this table, the partition level dimension table need not to be partitioned by the list of positions but is partitioned by the list of partition IDs.
The Index Translation Tables are also partitioned by each integrated domain. In other words, each domain has its own partition of the ITT, so that each process initiated from any domain only needs to access one partition, which is a small portion of the entire table. Also, fast data updating and refreshing are performed at the partition level.
Sequences follow the naming convention of 'RP_G_<short_description or table_name>_S.
Table 17-24 lists all the sequences used by the data mart schema, along with their descriptions.
Table 17-24 Data Mart Schema Sequences
| Sequence Name | Description |
|---|---|
|
RP_G_<level_name>_D_S |
Each dimension level table has a corresponding sequence to automatically generate the position ID. |
|
RP_G_DOMAININFO_MD_S |
This sequence is used to generate the domain ID for the RP_G_DOMAININFO_MD table. |
|
RP_G_DPMP_S |
This sequence is used for the DPM process to generate a unique sequence ID. |
|
RP_G_DPMPH_S |
This sequence is used to generate a placeholder position ID for the DPM process. |
|
RP_G_ETL_S |
This sequence is used by the ETL process to create the staging tables. |
|
RP_G_RDM_STATUS_S |
This is used to generate SEQ_ID in the RP_G_RDM_STATUS_MD table. |
|
RP_G_STAGING_S |
This sequence is used to generate unique staging table names internally by loadFactData and transferFactData utilities. |
The PL/SQL packages are stored in the data mart schema and are named as 'RP_<functional_description>_PKG'.
The packages are described in Table 17-25.
Table 17-25 Data Mart Schema Package Descriptions
| Package Name | Description |
|---|---|
|
RP_ETL_PKG |
This package is used for the external data integration of non-RPAS applications with the RPAS application. |
|
RP_G_DATALOAD_API_PKG |
This package has the common APIs used for data load functionalities, such as loadFactData, transferFactData and external integration. |
|
RP_GLOBAL_PKG |
This is a common package that has some static definitions and procedures that are used globally. |
|
RP_GUTS_PKG |
This package is used by SE diagnostic tool's checkRDM validations. |
|
RP_HIERMGR_PKG |
This package handles the hierarchy operations such as DPM, copy, and rename positions. |
|
RP_LOAD_DIMENSION_PKG |
This is the package used by loadDimData utility. |
|
RP_LOAD_FACT_PKG |
This package is used by loadFactData utility. |
|
RP_PARTITIONMGR_PKG |
This is the package used by rmPartitionMgr utility. |
|
RP_PATCH_RDM_PKG |
This is the package used by the patchRDM utility. |
|
RP_SCHEMA_INFO_PKG |
This is a common package that has procedures to provide some information about the data mart schema and is used by various other packages internally. |
|
RP_STATUS_PKG |
This package is used by various interdependent utilities to maintain RDM status. |
|
RP_TRUNCATE_TABLE_PKG |
This package is used internally by loadHier and reconfigGlobalDomainPartitions. |
|
RP_WORKBOOK_COMMIT_PKG |
This package is used by the workbook commit process. |
RPAS Data Mart consists of a central data mart schema and seven access schemas. The access schemas are based on different RPAS functionality. Basically, a group of functionalities are performed through an access schema.
The access schema names and properties are configured by the installer. But RPAS refers to them with a fixed alias. The seven aliases, along with their functionality, are summarized in Table 17-26.
Table 17-26 Data Mart Schema Access Schemas
| Access Schema | Functionality |
|---|---|
|
rpas_patch_user |
RDM patch |
|
rpas_batch_user |
Batch processing |
|
rpas_dimload_user |
Loading dimension data |
|
rpas_factload_user |
Loading fact data |
|
rpas_hiermgr_user |
Hierarchy operations such as DPM |
|
rpas_wkbk_user |
Workbook operations such as workbook build and commit |
|
rpas_etl_user |
External data integration between RPAS and non-RPAS applications |
Each access schema contains private synonyms for all the Data Mart schema objects it needs access to. Each schema is granted a minimum set of privileges through roles. Only required data mart schema objects are visible, and only required operations are allowed from each access schema. RPAS processes internally use the right access schema based on the functionality.
Some access schemas such as rpas_dimload_user or wpas_wkbk_user create temporary staging tables in their own schemas for the duration of the RPAS process.
RPAS Data Mart's security uses a role-based security model. The seven access schemas have defined privileges granted through pre-defined roles by the RPAS code. The access schemas with their corresponding roles are summarized in Table 17-27.
Table 17-27 Data Mart Access Schemas
| Access Schema | Role |
|---|---|
|
rpas_patch_user |
rpas_patch_role |
|
rpas_batch_user |
rpas_batch_role |
|
rpas_dimload_user |
rpas_dimload_role |
|
rpas_factload_user |
rpas_factload_role |
|
rpas_hiermgr_user |
rpas_hiermgr_role |
|
rpas_wkbk_user |
rpas_wkbk_role |
|
rpas_etl_user |
rpas_etl_role |
For additional details on the security model, see the Oracle Retail Predictive Application Server and Applications Security Guide.
This section describes the process of data integration from non-RPAS application to RDM.
RPAS provides PL/SQL procedures to create staging tables/global temporary tables and merge staged data into the fact tables. As a onetime setup process, all staging tables or GTTs can be created together. The staging tables are created in the user schema (ETL schema) from where the RPAS API is called.
As part of the execution step, the staging tables/global temporary tables are loaded with data and merged into RDM fact tables using RPAS API. The loading and merging can be repeated as and when required.
Run RPAS API to create staging table or global temporary tables in the user schema with the list of all fact names to be integrated. The API creates one table per fact group for optimal merge performance and returns the list of table names. It is recommended to provide all the fact names in one run, so that the API can optimally group them into tables.
Global temporary tables are always created with position names and fact columns.
The staging tables can be created in two ways.
Staging table with position names and fact values
Staging table with mapped position IDs and fact values
| Staging With Position Names | Staging With Position IDS | |
|---|---|---|
| Position Name-ID Mapping | Done by RPAS procedures | Done by integrator |
| Performance | Overall performance gets affected | Complete process performs better |
| Table Properties | No constraints
No partitioning |
Reference-partitioned just like the target fact table in the RDM |
The staging tables thus created are owned by the integrator who can script the integration process using the fixed staging table names.
Integrator loads data in the staging table or global temporary tables and then calls the RPAS API to merge staged data with the input list of staging and/or temporary table names.
The staged data can be merged in two ways.
SQL Merge
Partition Exchange
| SQL Merge | Partition Exchange | |
|---|---|---|
| Transaction Protection | Transaction protected
No contention |
Transaction not protected |
| Recommended When | Low volume data | High volume bulk data |
The procedures to create staging tables and merge staged data are provided in the rp_etl_pkg package. The details are as follows.
Table 17-28 Staging Table Procedures
| Procedure | Description |
|---|---|
|
Function create_staging_tables( fact_list _in IN varchar2_table, by_name_in IN integer, stg_table_list_out OUT varchar2_table) Return number; |
|
|
Function create_global_temp_tables( fact_list_in IN varchar2_table, gtt_list_out OUT varchar2_table) Return number; |
|
|
Function merge_staged_data( table_list_in IN varchar2_table, merge_method_in IN integer) Return number; |
|
varchar2_table is created as
create or replace type varchar2_table force is table of varchar2(40);
|
Note: Note the following:
|
This section provides details about configuring the RPAS Data Mart.
The RDM repository is a directory on the file system used to store the RDM configuration, input files, log files, and metadata. Its directory structure is very similar to that of an RPAS domain, except that no dimension or measure data is stored there.
The RDM repository is created by rdmMgr when the RDM is built as part of the pre-installation process, and it is updated when the RDM is patched. It is a centralized location for RDM properties, Oracle database credential wallets, and network configuration files. In every integrated domain, the property called "rdm_path" contains the path to this repository. Figure 17-10 shows the relationship between the domain and RDM repository.
The location to create the RDM repository is specified when running the RDM schemas preparation script during the pre-installation process.
Figure 17-11 shows the directory structure of the RDM repository.
Table 17-29 RDM Repository Directory Structure
| Directory | Contents | Populated By | Processed By |
|---|---|---|---|
|
config |
Schema information file and integration and partition configuration files |
rdmMgr copies the schema information file from the user-specified location to this location with a fixed name after creating the RDM repository. rpasInstall copies the configuration files from user-specified locations to this location with fixed names. |
rdmMgr uses the files from here. |
|
input |
Shared hierarchies and measures data input files |
The input dimension input files must be manually copied to the dimdata folder beneath and fact data files in the factdata folder. |
loadDimData (using dimdata subdirectory) and loadFactData (using factdata subdirectory) loads data from here and moves to a processed folder beneath |
|
data/admin.db |
properties.ary to store the data mart and user schema names |
rpasInstall/rdmMgr |
Any operation connecting to the database |
|
scripts |
Any script output of RDM manager. |
RDM Manager |
DBA |
|
plsql |
Plsql packages and procedures |
rpasInstall/buildSchema |
rpasInstall/loadSqlPackages.ksh |
|
output |
RDM log files |
RDM utilities |
|
|
wallet |
Oracle database credential and SSL wallet |
prepareRDM.ksh |
Any operation connecting to the database |
|
tns_admin |
Oracle database network configuration (tnsnames.ora and sqlnet.ora) |
RDM Manager |
Any operation connecting to the database |
In an integrated domain, all RDM-related properties are encapsulated in an array called rdm_properties.ary. Figure 17-12 shows the RDM-related entities in a domain.
In order to implement RDM schema security, the DBA and the RPAS administrator need to work together and set up a multi-schema environment.
Table 17-31 lists all schemas and their corresponding roles.
|
Note: The schema names can be changed, but the role names and database aliases (DB connect strings) are constants. |
Table 17-31 Schemas and Roles
| Schema | Schema ID | Recommended Name | Role | DB Connect String | Notes |
|---|---|---|---|---|---|
|
RDM Admin Schema |
rpas_data_mart |
rpas_data_mart |
N/A |
rpas_data_mart_conn |
The main schema for all persistent data |
|
RDM Patch User |
rpas_patch_user |
rpas_patch_user |
rpas_patch_role |
rpas_patch_conn |
|
|
RPAS Batch Us-er |
rpas_batch_user |
rpas_batch_user |
rpas_batch_role |
rpas_batch_conn |
|
|
RDM Dim Loader |
rpas_dimload_user |
rpas_dimload_user |
rpas_dimload_role |
rpas_dimload_conn |
|
|
RDM Fact Loader |
rpas_factload_user |
rpas_factload_user |
rpas_factload_role |
rpas_factload_conn |
Requires space for staging tables |
|
RPAS Hier Manager |
rpas_hiermgr_user |
rpas_hiermgr_user |
rpas_hiermgr_role |
rpas_hiermgr_conn |
|
|
RPAS Workbook User |
rpas_wkbk_user |
rpas_wkbk_user |
rpas_wkbk_role |
rpas_wkbk_conn |
Requires space for staging tables |
|
RPAS ETL Schema |
rpas_etl_user |
rpas_etl_user |
rpas_etl_role |
rpas_etl_conn |
Requires space for staging tables |
The schema names and Oracle database network configuration can be configured in the schemaInfo.xml file that is passed to the RDM schemas preparation script.
The format of the schemaInfo xml is as follows:
<?xml version="1.0" encoding="UTF-8" ?>
<rdm_configuration>
   <schema_set>
      <schema id="rpas_data_mart">
          <name>rpas_data_mart</name>
         <tablespace>
             <name></name>
             <space_quota></space_quota>
          </tablespace>
      </schema>
      <schema id="rpas_patch_user">
          <name>rpas_patch_user</name>
         <tablespace>
             <name></name>
             <space_quota></space_quota>
          </tablespace>
      </schema>
      <schema id="rpas_batch_user">
          <name>rpas_batch_user</name>
         <tablespace>
             <name></name>
             <space_quota></space_quota>
          </tablespace>
      </schema>
      <schema id="rpas_dimload_user">
          <name>rpas_dimload_user</name>
         <tablespace>
             <name></name>
             <space_quota></space_quota>
          </tablespace>
      </schema>
      <schema id="rpas_factload_user">
          <name>rpas_factload_user</name>
         <tablespace>
             <name></name>
             <space_quota></space_quota>
          </tablespace>
      </schema>
      <schema id="rpas_hiermgr_user">
          <name>rpas_hiermgr_user</name>
         <tablespace>
             <name></name>
             <space_quota></space_quota>
          </tablespace>
      </schema>
      <schema id="rpas_wkbk_user">
          <name>rpas_wkbk_user</name>
         <tablespace>
             <name></name>
             <space_quota></space_quota>
          </tablespace>
      </schema>
      <schema id="rpas_etl_user">
          <name>rpas_etl_user</name>
         <tablespace>
             <name></name>
             <space_quota></space_quota>
          </tablespace>
      </schema>
   </schema_set>
   <tns_parameters>
      <protocol>tcp</protocol>
      <host>burrg41002v.us.oracle.com</host>
      <port>1521</port>
      <server>dedicated</server>
      <service_name>rpasodb.us.oracle.com</service_name>
      <sid></sid>
   </tns_parameters>
</rdm_configuration>
The schema IDs must not be changed. The names can be changed. The tablespace properties, name and space_quota, are optional. If no tablespace is provided, a default tablespace of the database is used. If no space_quota is provided, no table space quota will be granted to the user. The space_quota must be accompanied by the table space name. However, the prepareSchemas.sql can be modified manually before executing.
Note that <service_name> or <sid> must be present and only one can be present.
This file must be provided while creating the RDM repository described in RDM Repository.
An integration tool within RPAS ConfigTools creates the integration configuration from user inputs and one or more domain configurations. A name is specified for the integration configuration, which is saved as the name attribute of the highest level XML element. It is also used in the file name of the integration configuration. The example described in this section shows an integration configuration with a name specified as "RDM".
The language attribute is used to specify the language of all the labels in the integration configuration. It is used as the source language in the translation tables for those labels. It can be any of the 18 languages supported by RPAS.
Integration configuration consists of four sections.
The shared hierarchy section defines the hierarchical structure of the RDM, and it follows a similar XML structure to that of the hierarchy.xml in a domain, but much simplified.
This section consists of multiple hierarchies, each forming a dimension graph. Each hierarchy has a name, a label, and an order number that is used to define the order of multiple dimensions in an intersection. Each dimension has a name and a label, and the parent-child relationship of the XML structure defines the aggregation and spread relationship of the dimensions.
A fact in RDM is the corresponding data entity of a measure in a domain. The properties for a fact are name, label, base intersection, type, fact table, NA value, description, and purge age.
If a fact is shared by the RDM, a fact group name must be specified. Otherwise, the fact is shared by domains only.
This section defines the domain and configuration map. Each domain is mapped to a domain configuration. The domain name is configured here and is by default the same as the configuration name. This section is used internally by the integration tool of the Config Tools.
Here is a simple example (RDM.xml) of the integration.xml file that shows all the XML elements discussed in the above sections.
<?xml version="1.0" encoding="UTF-8" ?>
<rpas_hsa_configuration name="RDM" language="English">
<shared_hierarchy_set>
   <hierarchy name="CLND">
      <label>Calendar</label>
      <order>9990</order>
      <dimension name="day">
         <label>Day</label>
         <position_format>d%Y%m%d</position_format>
         <dimension name="week">
             <label>Week</label>
                <dimension name="mnth">
                    <label>Fiscal Month</label>
                       <dimension name="qrtr">
                        <label>Fiscal Quarter</label>
                           <dimension name="year">
                                <label>Fiscal Year</label>
                           </dimension>
                        </dimension>
             </dimension>
         </dimension>
      </dimension>
   </hierarchy>
   <hierarchy name="PROD">
      <label>Product</label>
      <order>9980</order>
      <dimension name="sku">
         <label>Sku</label>
         <dimension name="clss">
            <label>Class</label>
               <dimension name="dept">
                   <label>Department</label>
                </dimension>
            </dimension>
          </dimension>
   </hierarchy>
</shared_hierarchy_set>
<shared_fact_set>
   <fact name="P">
      <label>P Fact</label>
      <baseint>sku_week</baseint>
      <type>2</type>
      <fact_group>r_g_sku_week_ft</fact_group>
      <navalue>0</navalue>
      <description>PPP Fact</description>
      <purgeage>1000</purgeage>
   </fact>
   <fact name="Q">
      <label>Q Fact</label>
      <baseint>sku_week</baseint>
      <type>4</type>
      <fact_group>r_g_sku_week_ft</fact_group>
      <navalue>0</navalue>
      <description>QQQ Fact</description>
      <purgeage>1000</purgeage>
   </fact>
</shared_fact_set>
<integration_map>
   <entry>
      <domain>d1</domain>
      <measure>a</measure>
      <fact>P</fact>
   </entry>
   <entry>
      <domain>d2</domain>
      <measure>a</measure>
      <fact>P</fact>
   </entry>
   <entry>
      <domain>d1</domain>
      <measure>c</measure>
      <fact>Q</fact>
   </entry>
</integration_map>
<domain_set>
   <domain name="d1">
      <config_path>...</config_path>
   </domain>
   <domain name="d2">
      <config_path>...</config_path>
   </domain>
   <domain name="d3">
      <config_path>...</config_path>
   </domain>
</domain_set>
</rpas_hsa_configuration>
The RDM partition information XML file is modeled after the global domain configuration. It contains the partition dimension name and multiple partition definitions, each with a partition name and its corresponding list of positions.
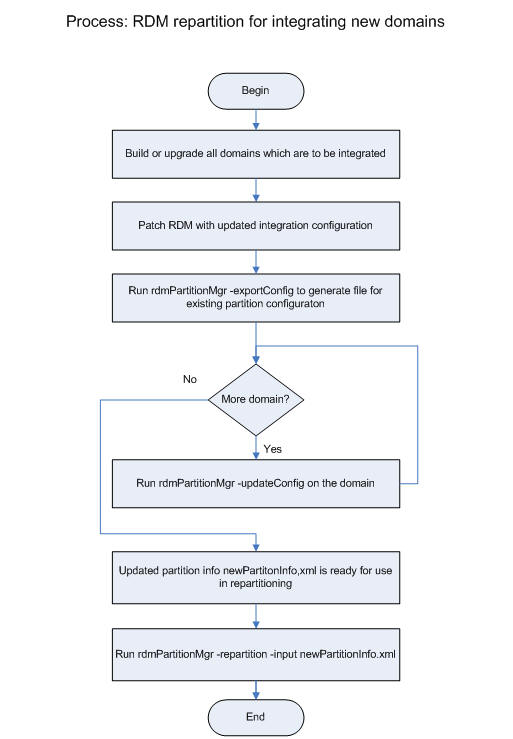
This XML file is generated by the RDM Partition Manager from the domains. See RDM Partitioning and RDM Partition Manager for more information.
For best security practices in the connection between the RPAS Server utilities and the Oracle Database, we recommend enabling the optional SSL feature. The Oracle Database server natively supports SSL connections from clients, and the feature needs only to be enabled and configured for use with RPAS. Note that only one-way SSL is covered in this document. For two-way SSL setup, see the Oracle Database Security Guide at the following URL:
http://docs.oracle.com/database/121/DBSEG/asossl.htm
The following diagram shows the components of the SSL configuration for RDM. The client/server connection will be protected by one-way SSL, which only authenticates the server on the client side. As a result, only the Oracle server wallet is required to have a private key. The client wallet will only need to contain the server CA (Certificate Authority) certificate.
The CA certificate can be either self-signed or issued by a third-party CA. In the case of third-party CA, more than one certificate may need to be imported into the client wallet (usually called CA certificate chain).
The server side configuration is mostly done manually by the DBA. A script is provided to create the wallet if self-signed certificate is used.
The client side configuration is done through scripts by the RPAS admin.
This section contains information on setting up SSL on the Oracle server side. This should be done by a DBA who has the permission to modify the configuration files of the Oracle server.
The Oracle server wallet can be created the same way as is the RPAS server wallet for one-way SSL. The process has been documented in great detail in the Oracle Retail Predictive Application Server Administration Guide for the Classic Client "SSL" chapter. On UNIX, the wallet must be created by the user account which starts the Oracle database processes and for security reason the wallet is only accessible by its creator.
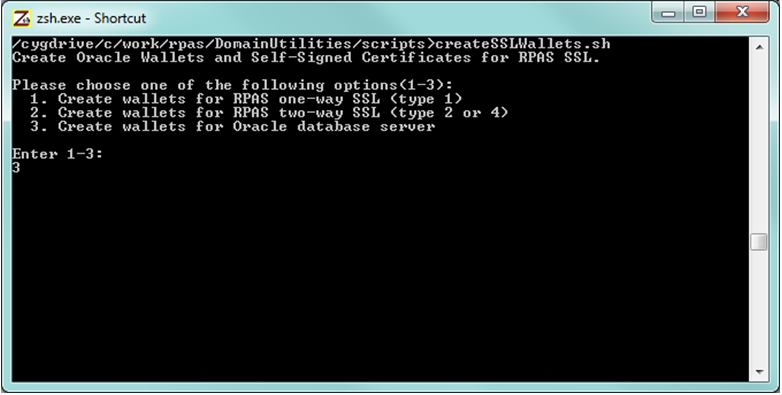
If self-signed CA certificate is used, the shell script createSSLWallets.sh provided by RPAS can be used to create the root and server wallets, private keys and all related certificates.
When running the script createSSLWallets.sh, choose option 3 to create wallets for Oracle database server, as shown in the following figure:
The script asks for the root directory where the wallets will be created, your organization name (any name such as "QA"), and passwords for the root and server wallets. In the end of a successful run, the wallet location and the path to the CA certificate file will be displayed to the user (see Figure 17-15).
The CA certificate file can be copied to a common location and must be imported into the Oracle client wallet later on.
The network configuration file sqlnet.ora normally resides in $ORACLE_HOME/network/admin directory.
The following table lists the required settings for SSL.
| Required SSL Settings in sqlnet.ora on Oracle server |
|---|
| SSL_CLIENT_AUTHENTICATION = FALSE
WALLET_LOCATION = (SOURCE = (METHOD = FILE) (METHOD_DATA = (DIRECTORY = wallet_location) ) ) |
The SSL client authentication parameter must be set to FALSE for one-way SSL. The wallet_location is the absolute path to the Oracle server wallet as discussed in the previous section.
The following table lists the optional settings for SSL.
| Optional SSL Settings in sqlnet.ora on Oracle server |
|---|
| SSL_CIPHER_SUITES= (SSL_cipher_suite1 [,SSL_cipher_suite2])
SSL_VERSION=3.0 |
For more information regarding these settings, refer to Oracle Database Security Guide at the following URL:
The listener configuration file listener.ora normally resides in $ORACLE_HOME/network/admin directory. After modification, the Oracle listener must be restarted for the changes to take effect.
The following table shows the changes in bold.
| Required SSL Settings in listener.ora on Oracle server |
|---|
| SSL_CLIENT_AUTHENTICATION = FALSE
WALLET_LOCATION = (SOURCE = (METHOD = FILE) (METHOD_DATA = (DIRECTORY = wallet_location) ) ) LISTENER = (DESCRIPTION_LIST = (DESCRIPTION = (ADDRESS = (PROTOCOL = IPC)(KEY = EXTPROC1521)) ) (DESCRIPTION = (ADDRESS = (PROTOCOL = TCP)(HOST = odbserver-host)(PORT = 1521)) ) (DESCRIPTION = (ADDRESS = (PROTOCOL = TCPS)(HOST = odbserver-host)(PORT = 2484)) ) ) |
The wallet location and SSL settings are the same as that in the network configuration file (must be in both files). A new listener endpoint with protocol TCPS must be added to the LISTENER setting. Port number 2484 is the typical port for TCPS but other number can also be used.
This section contains information on setting up SSL on the Oracle client side for use by RPAS or RDM processes.
The schema info configuration must have matching endpoint parameters to the Oracle listener. The protocol must be tcps and the port number must be the same as specified in the listener configuration.
| TNS Parameters in schemaInfo.xml |
|---|
| <tns_parameters>
<protocol>tcps</protocol> <host>odbserver-host</host> <port>2484</port> <server>dedicated</server> <service_name>myservice</service_name> <sid></sid> </tns_parameters> |
To import the server CA certificate:
The prepareRDM.ksh script in the RDM build process already creates an Oracle wallet to hold the login credentials for RDM. The same wallet should be used to hold the Oracle server CA certificate. If protocol tcps is specified in the schema info, this same script will ask for the path to the CA certificate file and import it into the wallet automatically.
The following figure shows the importing of CA certificate by the prepareRDM.ksh script.
If third-party CA is used and there is more than one file in the CA certificate chain, the user must specify the top certificate for the script to import and manually import the rest in the order of the chain using the following command. The client wallet location is the wallet subdirectory under the RDM repository.
orapki wallet add -wallet {client_wallet_directory} -trusted_cert -cert {ca_cert_chain_file} -pwd {client_wallet_password}
Example:
orapki wallet add -wallet C:/wallets/client -trusted_cert -cert C:/wallets/ca_chain2.txt -pwd clientpass1
The network configuration file sqlnet.ora used by RPAS processes is created automatically by the RDM Manager during the RDM build process. This file resides under the tns_admin subdirectory of the RDM repository.
The following SSL settings are required.
| Required SSL Settings in sqlnet.ora on Oracle Client |
|---|
| SSL_CLIENT_AUTHENTICATION = TRUE
WALLET_LOCATION = (SOURCE = (METHOD = FILE) (METHOD_DATA = (DIRECTORY = wallet_location) ) ) |
The SSL client authentication parameter must be set to TRUE for one way SSL. The wallet_location is the wallet subdirectory of the RDM repository.
The Oracle Net Service Names configuration file tnsnames.ora is created automatically by the RDM Manager during the RDM build process under the tns_admin subdirectory of the RDM repository. All entries use the endpoint parameters specified by the schema info configuration.
| Net Service Names using SSL in tnsnames.ora on Oracle Client |
|---|
| rpas_data_mart_conn =
(DESCRIPTION = (ADDRESS_LIST = (ADDRESS = (PROTOCOL = tcps)(HOST = odbserver-host)(PORT = 2484)) ) (CONNECT_DATA = (SERVER = dedicated) (SERVICE_NAME = myservice) ) ) . . . |
After SSL configuration is done on both Oracle server and client and the Oracle listener has been restarted, the user can use RDM Manager to verify the connection. (There are a small delay, sometimes a few minutes, between the listener is restarted and the SSL connection is up.)
rdmMgr -rdm rdmPath -testConnection
The RPAS HSA build process can be broken into three major steps: pre-installation, installation, and post-installation.
Pre-installation is required because the DBA's intervention is necessary to create schemas and roles. Unlike any other traditional installer, database schemas are created as part of the RPAS HSA installation process. The pre-installation process prepares the RDM repository, Oracle wallet, and SQL script to create database schemas and roles. The SQL script has to be manually executed by the DBA.
The installation process builds schema objects in the database schemas and grants privileges to each role.
The post-installation process initializes the data synchronization and registers compatible domains.
This section covers the main RPAS installer and all helper utilities and scripts.
A shell script is created to configure the RDM before building the database schemas. The script is interactive but can be made silent if all parameters are specified by environment variables.
|
Note: Note that if SSL is to be used for the RDM database connection, it must be configured first before running the script. |
Script
prepareRDM.ksh [rdmPath] [schemaInfoFile]
Functions
Create RDM file system repository.
Call rdmMgr -create in order to create the RDM repository.
Generate RDM pre-build scripts and network configuration files.
Call rdmMgr -genPreBuildScript in order to create pre-installation script and network configuration files.
The resulted files are put in the RDM repository:
prepareSchemas.sql under scripts. You are prompted for a password when executing this sql file.
tnsnames.ora and sqlnet.ora under tns_admin
Create Oracle wallet for RDM.
Create an Oracle wallet rdmPath/wallet.
Add all RDM user credentials in the wallet.
You are prompted for a password for these schema logins.
The password for each schema in the wallet must match that of the corresponding schema created in the database.
The existing rpasInstall program supports building an HSA system.
Command Line Syntax
rpasInstall {command} {options}
rpasInstall
rpasInstall -buildRDM -genScript -integrationCfg <integration_config> {-partitionInfo <partitionInfo_file> | -noPartition} -log <log_file> -rdm <rdm_path>
rpasInstall -buildRDM -integrationCfg <integration_config> {-partitionInfo <partitionInfo_file> | -noPartition} -rdm <rdm_path> -log <log_file>
rpasInstall -buildRDM -fromScript -rdm <rdm_path> -log <log_file>
rpasInstall -rebuildRDM -integrationCfg <integration_config> {-partitionInfo <partitionInfo_file> | -noPartition} -rdm <rdm_path> -in <input_directory> -log <log_file>
rpasInstall -rebuildRDM -fromScript -rdm <rdm_path> -log <log_file>
Command Values
-buildRDM | -rebuildRDM: the type of installation to be performed for integration deployment
Option Values
Table 17-32 Option Values
| Option | Description |
|---|---|
|
-integrationCfg <config_file> |
Option for the integration configure file |
|
-partitionInfo <partitionInfo_file> |
Option for the partition information input file |
|
-noPartition |
Option if no partition information is provided |
|
-rdm <path> |
Option for the RDM repository path |
|
-genScript |
Only generates the SQL script with RDM schema definitions, but does not deploy it. Two script files named buildDataMart.sql and buildUserSchemas.sql are generated under the RDM repository subdirectory scripts. One file script creates the Data Mart schema's schema objects and other is for the other users' schema objects. |
|
-fromScript |
Builds or patches RDM using the scripts buildDataMart.sql and buildUserSchemas.sql under the RDM repository subdirectory scripts. This option lets the database administrator customize the RDM creation statements and build. |
|
-log <log_file> |
For logging. All logging output from subprocesses must be redirected to this file. At the end of the rpasInstall run, a copy of this file must be copied to {rdm_repository}/output/rpasInstall with timestamp in the file name. |
|
-verbose |
Results in more detailed log information. |
The RDM Manager is a command line utility that manages operations of the RPAS Data Mart (RDM). It creates the RDM repository directory structure and the RDM database schema from an integration configuration and optional partitioning information. It also manages domain registration and provides some other useful tools to the RDM in an integrated environment.
Note that the integration configuration file and partition information file are not specified on the command lines. They must be pre-staged under the config directory of the RDM repository, usually by the rpasInstall utility. The scripts and network configuration files generated by the RDM manager all have pre-defined output directories and names.
Pre-staged Configuration Files
Integration configuration
Copy to rdmPath/config/integrationCfg.xml in advance.
Partition Information
Copy to rdmPath/config/partitionInfo.xml in advance.
Script Output Files
All output scripts go to rdmPath/scripts/
The scripts have fixed names.
Pre-build script: prepareSchemas.sql: Sql script to create users and corresponding roles with few basic privileges.
Build scripts: buildDataMart.sql: Sql script to create all data mart schema objects and buildUserSchemas.sql: Sql script to create private synonyms. This script must be run for each schema other than the data mart.
Build script: grantPrivileges.sql: Sql script to grant all required privileges to each access schema. This must be re-executed only when the schema objects are created for the first time or when existing schema objects are recreated.
Oracle Database Network Configuration Files
The following files go under rdmPath/tns_admin
tnsnames.ora
sqlnet.ora
Generic command syntax
rdmMgr -rdm {rdmPath} {command} [options]
Commands used by the RDM preparation script
rdmMgr -rdm rdmPath -create -schemaInfo f1
rdmMgr -rdm rdmPath -genPreBuildScript
Commands used by the RPAS Installer
rdmMgr -rdm rdmPath -clearSchema
rdmMgr -rdm rdmPath -buildSchema
rdmMgr -rdm rdmPath -genBuildScript
rdmMgr -rdmPath -buildFromScript
Commands that can be used by the RPAS Administrator
rdmMgr -rdm rdmPath -listProperties
rdmMgr -rdm rdmPath -testConnection
rdmMgr -rdm rdmPath -register -d domainPath -name domainName
rdmMgr -rdm rdmPath -unregister -name domainName
rdmMgr -rdm rdmPath -listDomains
rdmMgr -rdm rdmPath -listHistory
rdmMgr -rdm rdmPath -purgeDeletedData
rdmMgr -rdm rdmPath -updateRegistration -d domainPath -name domainName
rdmMgr -rdm rdmPath -move -dest destRdmPath
Commands
Table 17-33 Commands
| Command Name | Description |
|---|---|
|
-create |
Creates the RDM directory structure and copies the schemaInfo file to the config directory beneath. |
|
-listProperties |
Lists the RDM properties. |
|
-testConnection |
Tests all schema connections. |
|
-clearSchema |
Drops any existing RDM schema objects in all schemas. |
|
-buildSchema |
Builds the RDM schema objects in all schemas and grant privileges to the roles created initially. Assumes integrationCfg.xml and partitionInfo.xml are present under the config directory of the RDM repository. |
|
-genPreBuildScript |
Generates the SQL script that can be used to create schemas and roles. The generated script prepareSchemas.sql is put under the scripts directory of the RDM repository. |
|
-genBuildScript |
Generates the SQL script that can be used to create the schema objects, populate some metadata, and grant privileges to the roles initially created. Assumes integrationCfg.xml and partitionInfo.xml are present under the config directory of the RDM repository. The generated scripts buildDataMart.sql, buildUserSchemas.sql, and grantPrivileges.sql are put under the scripts directory of the RDM repository. |
|
-buildFromScript |
Builds the RDM schema objects and grant privileges using the sql scripts buildDataMart.sql,buildUserSchemas.sql and grantPrivileges.sql generated by genBuildScript. |
|
-register |
Registers the Rpas domain with RDM. |
|
-unregister |
Unregisters the Rpas domain from RDM. |
|
-listDomains |
Lists the current domains and status. |
|
-listHistory |
Lists the RDM schema and RDM Repository history. |
|
-purgeDeletedData |
Physically purges all dimension data that is marked for deletion, along with all associated fact data. |
|
-updateRegistration |
Updates the existing registration of a domain. Depending on what has changed or has become out of sync, it updates domain path, RDM path or ITT tables. |
|
-move |
Moves the RDM repository to a new location and updates all domains with the new RDM path. If any of the domains cannot be updated, a warning message will be displayed. The user can run the -updateRegistration command to update the RDM path in the domain separately. |
Parameters
Table 17-34 Parameters
| Parameter Name | Description |
|---|---|
|
-d |
Path to the domain. |
|
-rdm |
Path to RDM. |
|
-schemaInfo |
Path to the schema information file (this file is copied to the config directory under RDM repository afterwards for future reference). |
|
-name |
The domain name as defined in the integration configuration. |
|
-dest |
The destination path for moving the RDM repository. |
The following is completed during this process:
The RDM Repository directory structure is created.
The schema names in the schemaInfo.xml are saved as RDM properties.
The following RDM objects are created:
Dimension tables
Fact tables
Metadata Tables
Data flow table
Index Translation Tables (ITT)
Commit, logging, and dimension staging tables
Other ODB objects (such as sequences, views, indexes, types, and pl/sql packages)
Along with these, private synonyms for each schema user are also created.
The connections to all ODB schemas are tested via the rdmMgr -testConnection command.
The rdmMgr utility registers a domain at a time. The prerequisites to register a domain are:
The domain to be registered with the RDM must have compatible hierarchies.
The domain's all informal positions must be formalized or removed.
The following must be done during the registration process:
Validate the domain hierarchy's compatibility with the RDM.
A new RDM property, domain_name, is added and assigned in the domain.
The domain name is registered with RDM in a domain table. An integer domain ID is created, which is used internally in the RDM.
The ITT tables in the RDM are updated with the domain's positions.
The rdmMgr utility un-registers a domain at a time. The following is done when a domain is unregistered.
The domain name is removed from the domain table in the RDM.
All RDM properties created during registration are removed from the departing domain.
All entries in the ITT tables that belong to the departing domain are removed.
The informal positions of the departing domain are formalized to keep the measure data.
To preserve the departing domain data, it is recommended that shared measure data belonging to the domain be transferred before unregistering the domain. It can be transferred to the domain via transferFactdata utility.
The output of rdmMgr -listDomains is as follows. There are two header lines. Two blank lines indicate the end of the output.
Domain Name Path
---------------------------------------------
RPAS_UT /vol.nas/rpas_se/RPAS_UT
<two blank lines>
rdmMgr ran successfully
Output of rdmMgr -listProperties is as followed. There are two header lines. Two blank lines indicate the end of output.
Property Name Value
---------------------------------------------
rpas_data_mart: rpas1
rpas_wkbk_user: whatever
…
<two blank lines>
rdmMgr ran successfully
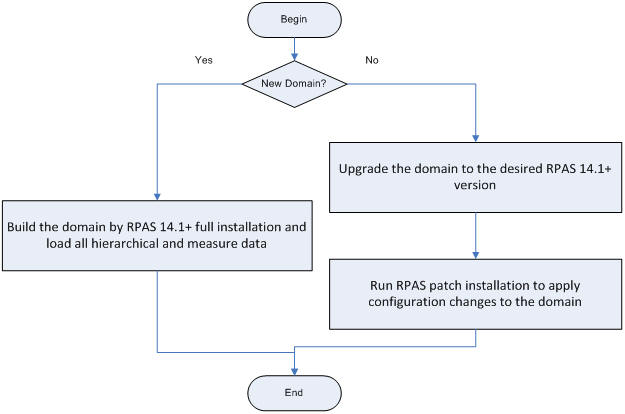
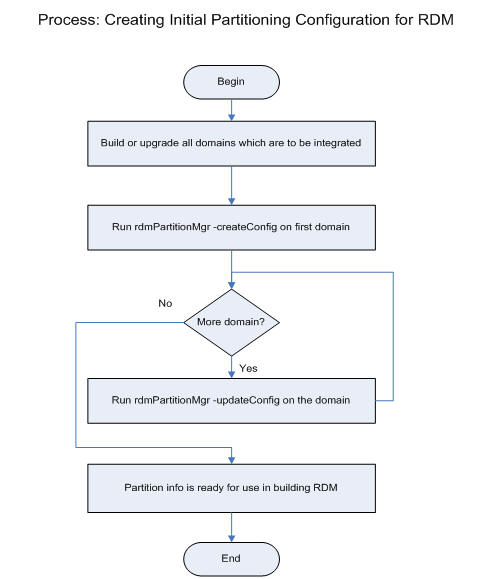
Figure 17-17 and Figure 17-18 show the pre-installation process flow and domain preparation. Since the HSA integration is a pluggable feature of RPAS, the existing processes for building and patching individual domains must not be changed. However, in order to integrate the domains, they must be upgraded and patched to RPAS 14.1or a later version.
The RDM Admin Schema must be granted privileges using the provided script. All other schemas must be granted the corresponding roles. At this point, the roles have the privilege to create private synonyms only. They are granted other required privileges during the post-installation process.
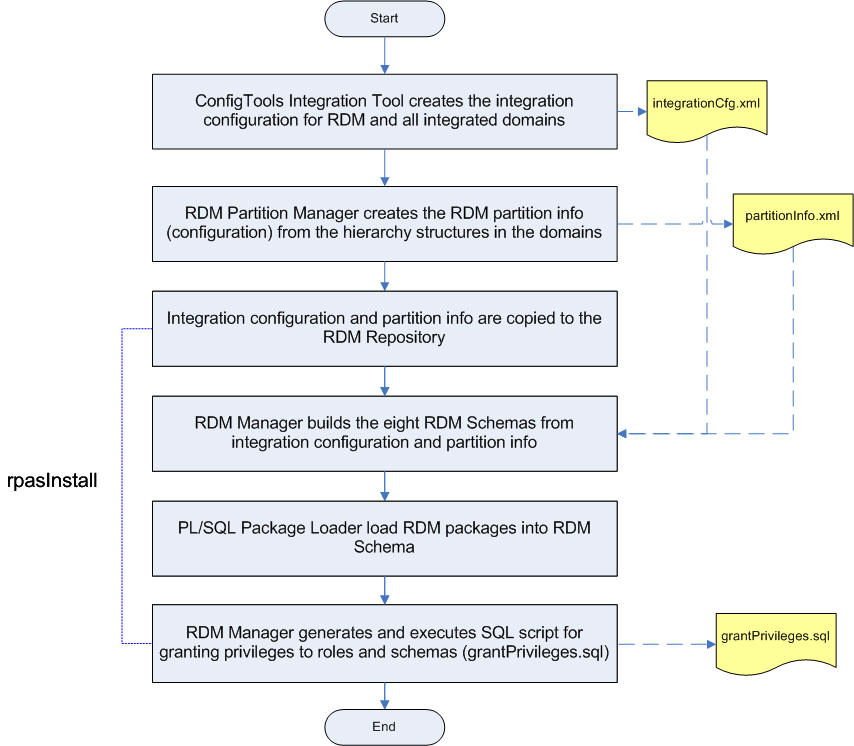
The RDM is built and populated from integration configuration and partition information by the rpasInstall utility. The schema users that have been created in the pre-installation step are populated by the schema objects and metadata.
Figure 17-19 shows the process of building the RDM schemas. The RDM manager can directly build the schemas in the database, or an alternative process can be used if so preferred.
All schema objects along with the PL/SQL packages are created in the data mart schema.
Private synonyms pointing to the data mart schema objects are created in each user schema.
All required privileges are granted to the roles.
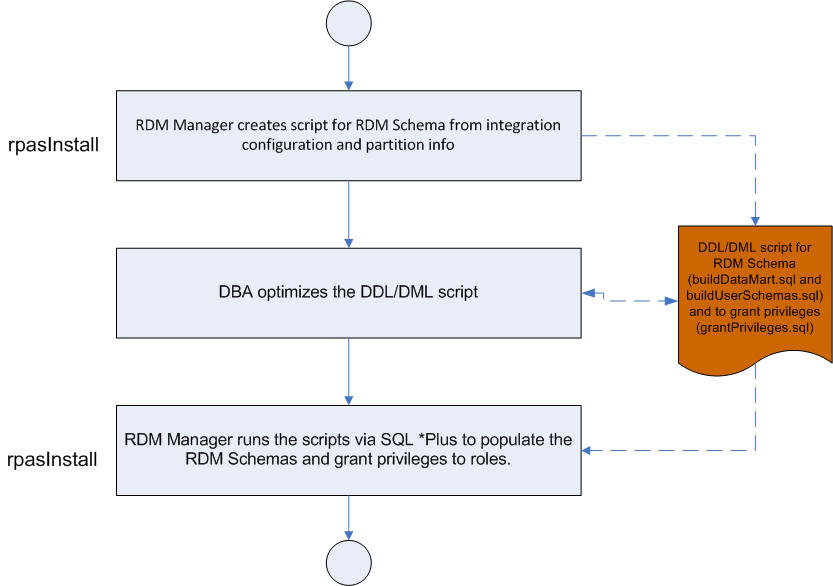
An alternative process for building the RDM schema is showed below. Two DDL/DML SQL script can be generated first, one for the data mart schema and one for other schema users. After optimization by the DBA or database performance expert, it can then be used to populate the schema.
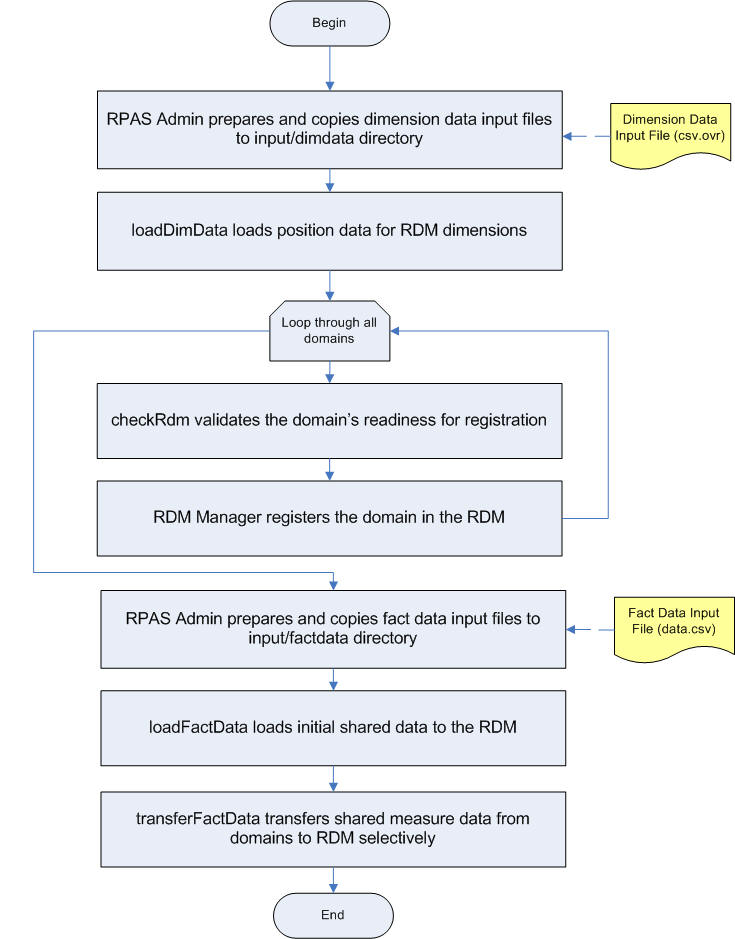
After the HSA system is built, the dimension data must be loaded, the participating domains must be registered, and the shared fact data must be loaded.
Note that the dimension data input files must be copied to the input/dimdata directory under the RDM repository prior to running loadDimData. This can be done manually or through a wrapper script.
A domain can be registered any time after the RDM has been built, as long as its configuration has been included in the integration configuration. This allows for the incremental integration of multiple domains.
If a domain has not been included in the integration configuration, it will require a patching process to bring the domain into the HSA system. The patching process is discussed in Patching RDM and Integrating One or More New Domains.
Only a valid domain can be registered. The validity of a domain is checked by its conformity with the RDM at the partition, position, and ITT level. These checks are performed by rdmMgr during registering. The checkRDM utility also has the ability to verify a domain's validity.
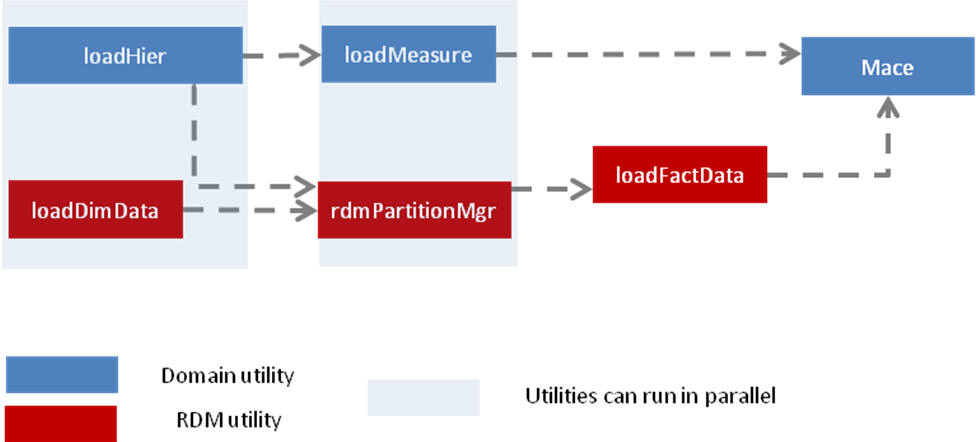
There are two ways to populate the shared data in RDM. The loadFactData utility can load fresh data from flat input files. The transferFactData utility can transfer existing data in the domains to RDM selectively according to user input. The flow chart in Figure 17-21 shows all the post-installation steps in the correct order.
This section describes the utilities used to maintain the RPAS Data Mart.
|
Note: Note that the RDM Manager can perform maintenance functions in addition to building the RDM. It usage is described in RPAS Installation Utilities. |
upgradeRDM is used to upgrade the version of the RPAS Data Mart
patchRDM is used to modify the content of the RPAS Data Mart
loadDimData is used to update the hierarchy data contained in the RPAS Data Mart
loadFactData is used to update the measure data contained in the RPAS Data Mart
transferFactData is used to move data between the RPAS Data Mart and a domain
checkRDM is used to verify the integrity of the RPAS Data Mart
The upgrading of RDM is a batch side operation like domain upgrading, where the shared RDM schema or repository of the existing RDM is upgraded by either modifying, adding, or removing the existing RDM that was originally built through the RpasInstall binary using the integration configuration XML file created through Configuration Tools.
The upgrading of RDM is handled by a dedicated binary called upgradeRdm, which works in a similar way to upgradeDomain, which is used to upgrade the domain.
upgradeRdm -rdm rdmPath -upgrade [Options]
upgradeRdm -rdm rdmPath -dryRun [Options]
upgradeRdm -rdm rdmPath -status
upgradeRdm -rdm rdmPath -listAllModules
upgradeRdm -rdm rdmPath -listUpgradeModules
Commands
Table 17-35 upgradeRDM Commands
| Command | Description |
|---|---|
|
-upgrade |
Upgrades the RDM schema and repository to the current version of RPAS. |
|
-dryRun |
Reports the upgrades that are applied to the RDM Schema and Repository after this utility is run with the -upgrade command. |
|
-status |
Displays what actions the RDM repository or databases need in order to be updated to the current version of RPAS utilities and libraries. |
|
-listAllModules |
Lists all the upgrade modules contained in the upgrade library. |
|
-listUpgradeModules |
Lists the upgrade modules contained in the upgrade library that can be executed during the -upgrade command. |
Options
Table 17-36 upgradeRDM Options
| Option | Description |
|---|---|
|
-verbose |
Shows details about each upgrade change to be applied. |
Notes
Note the following:
Before running the upgradeRdm utility, back up the existing RDM databases. The upgrade process is not reversible.
If only the RPAS_HOME version has changed and the RDM schema version has not changed, then running the upgradeRdm will only update the following two tables:
rp_g_rdm_history_md (RDM upgrade history table)
rp_g_upgrade_module_md
A domain running one version of RPAS can connect to an RDM running another version of RPAS. However, each works only with the appropriate version of RPAS. For example, a domain built on or upgraded to RPAS 14.1.1 can integrate with a RDM on version 14.1.2. However, only the RDM utilities from RPAS version 14.1.2 can work with the RDM and only domain utilities from RPAS version 14.1.1 can work with the domain.
In an integrated environment with multiple domains and a single RPAS_HOME, it is required to upgrade all the domains at the same time.
The history table contains the RDM schema version and the RPAS version.
| EVENT_ID | SCHEMA_VERSION | RPAS_VERSION | LAST_DEV_TAG | UTILITY | ACTION | START_TIME | COMPLETE_TIME |
| 0 | 1 | 14.1.1 | 2014052101 | rdmMgr | Create | 20-JUN-14 10.52.29 AM | 20-JUN-14 10.52.29 AM |
If the RDM schema version is 1 and built with an RPAS version of 14.1.1, then if you run the upgradeRdm binary built with RPAS version 14.1.2 on the above RDM, then it will only update the RDM history table to reflect the RPAS version 14.1.2. Once the history table has been updated, only the version 14.1.2 RDM utilities can be run on the RDM.
The patching of RDM is a batch-side operation like domain patching, in which the shared RDM hierarchy, fact, and integration data are patched by either modifying, adding, or removing from the existing RDM that was originally built by the RpasInstall binary using the integration configuration XML file created through Configuration Tools.
The following operations on the integration configuration are supported by the patchRDM utility:
Add New Hierarchy
Modify Hierarchy Label
Modify Dimension Label
Add new Fact
Remove Fact
Modify Fact Label
Modify Fact Group of a Fact
Modify Fact Description
Modify Fact Purge Age
Reassign Fact in Integration Map
Modify Domain Identifier in Integration Map
Modify Measure Name in Integration Map
Add Fact Mapping to Integration Map
Delete Fact Mapping from Integration Map
The RDM patching is handled by a dedicated binary called patchRDM, which works in a similar way to RpasInstall, which is used to patch the domain.
patchRDM -rdm <RDM Path> -config <Path to the modified integration config XML file>
Commands
Table 17-37 patchRDM Commands
| Command | Description |
|---|---|
|
-config |
Path to modified integration config XML file. |
Options
Table 17-38 patchRDM Options
| Option | Description |
|---|---|
|
-log <location for the default log file> |
Directory location where the log file needs to be stored. The default name of the log file is patchRdmLog.<timestamp>. When the -log option is not used, a default log file is generated under the current working directory. |
|
-dryRun <location for the default report file> |
Generates an easy-to-read formatted report showing the differences between the old and the new integration configurations. The default name of the report is configDiffReport.<timestamp>. |
This option does not trigger any patching actions on RDM. It only generates a report about the differences between the old and new integration configurations. This option helps the user to run a check before patching to confirm the changes that are to be made to the integration configuration. The output is a formatted text file named 'configDiffReport.<timestamp>'.
Sample configDiffReport.<timestamp>
Patch Hierarchy Label
     Hierarchy: clnd     New Label: Calendar_patch     Current Label: Calendar
     Hierarchy: prod     New Label: Product_patch      Current Label: Product
Add New Hierarchy
Hierarchy: clnd_new      Label:  Calendar_new          Order: 999
     Add new dimensions to new Hierarchy: Calendar_new:
     Dimension: day_new  Label:  Day_new
     Dimension: mnth_new Label:  Month_new
     Dimension: qrtr_new Label:  Quarter_new
     Dimension: ssn_new  Label:  Half_new
     Dimension: week_new Label:  Week_new
     Dimension: woy_new  Label:  Week of Year_new
     Dimension: year_new Label:  Year_new
Remove Fact
     Fact: utdysrc01u
PatchFactDescription
     Fact Name: buwpslsclru
Current Fact Description: BUWpSlsClrU Description  New Fact Description    : BUWpSlsClrU Description Patch
The loadDimData utility is used to load hierarchy information into the RPAS Data Mart. It is similar to the loadhier utility used to load hierarchy information into an RPAS domain.
The utility only supports input data files in a CSV (comma separated values) format with a header line with an added extension of .dat. When multiple input files per dimension are to be loaded, all files must contain the exact same header line. Here is a sample data file format (with header line) for a product dimension with two levels of sku and styl:
sku,sku_label,styl,styl_label0000060404,a16: black: m_none,0000023199,dk shr satin ess ton0000060405,a17: red: m_none,0000023188,nude toeless ct spri
All position names are converted to lower case before loading into the RDM.
The loadDimData staging process loads only shared levels from the input file. However, if the lower levels in the input file are not shared, multiple duplicate records may be loaded in the staging tables.
Before the staged data is merged to the target dimension tables, the following validations are performed:
|
Note: If any of the validation fails, the user is instructed to review the error logging table and then fix and reload the input data if necessary. |
No empty position names in the input file: This is automatically enforced by NOT NULL constraints on all name columns of the staging tables. Records with this violation are rejected and logged in the .bad file. This validation occurs at staging time.
Completeness of the input data: The input file must contain all shared levels of the dimension. Records with missing fields are not loaded.
Uniqueness of records: If multiple records have the same base position name, only one record is loaded in the database. Other duplicate records are ignored with a warning message. Users should check the error table for ignored records.
No space in position names: Records with spaces in the position names are discarded and logged.
Rollup relationship consistency: All staged records are checked for rollup relationship consistency. This check identifies the records that have multi-parent conflicts. A position rolls up to a parent position in one record, but rolls up to a different parent position in another record. When such conflict is found, the process stops and no records are loaded into the database. The following example illustrates such a conflict:
Sku1, sku1_label, styl1, styl1_label, clss1, clss1_label
Sku2, sku2_label, styl1, styl1_label, clss2, clss2_label
Conflict in position labels: Records with this conflict are rejected silently. The following example illustrates such conflict:
Sku1, sku1_label, styl1, styl1_label, clss1, clss1_label
Sku2, sku2_label, styl1, another_label, clss1, clss1_label
Rollup relationship conflict between input and existing data: If -forceInputRollups is specified, the utility overwrites the existing rollups with the data from the input file; otherwise, the input is rejected.
For calendar dimension, the dates (or hours) defined in the input file must be consecutive, in general. However, the utility does not check for gaps and the user has the flexibility to leave gaps in the input data.
loadDimData {ARGUMENTS}{COMMANDS}[INPUT][OPTIONS]
loadDimData -rdm <rdm_path> {-load <dim_name>|-loadAll} [-file <file_path>|-dir <dir_path>] [-retain] [-cleanStage] [-lang <language>] [- forceInputRollups] [-purgeAge <purgeAge>]
loadDimData -rdm <rdm_path> {-load <dim_name>|-loadAll} [-file <file_path>|-dir <dir_path>] [-retain] -stageOnly [-cleanStage]
loadDimData -rdm <rdm_path> {-load <dim_name>|-loadAll} [-retain] -applyStagedData [-lang <language>] [- forceInputRollups] [-purgeAge <purgeAge>]
Arguments
Table 17-39 loadDimData Argument
| Argument | Description |
|---|---|
|
-rdm <rdm_path> |
Path to the RDM repository where input files are placed in the input/dimdata subdirectory and has database logon credentials. |
Commands
Table 17-40 loadDimData Commands
| Command | Description |
|---|---|
|
-load <dimName> |
Loads and refreshes the specified dimension. |
|
-loadAll |
Loads all dimensions with .csv.dat files present INPUT: (Optional) If it is not specified, the input file is expected to be in the default directory $RDM_HOME/input/dimdata. |
|
-dir <inputDirectory> |
Processes all applicable files under inputDirectory. Input files are expected to have format: [hierName].csv.dat[.extension]. |
|
-file inputFile |
Processes an inputFile only. |
Options
These are optional.
Table 17-41 loadDimData Options
| Option | Description |
|---|---|
|
-retain |
Does not move input files to the processed subdirectory. |
|
-lang <language> |
Language for the labels; default is English. |
|
-stageOnly |
Appends the data in the staging table only. The staged data can be validated and merged to the target tables later. This option cannot be combined with any other option, except retain and cleanStage. |
|
-cleanStage |
Purges the staged data before adding new data to the staging tables. |
|
-applyStagedLoad |
Validates and then merges the staged data from the staging tables to their respective target dimension tables.No input file is needed. |
|
-forecInputRollups |
Enforces new hierarchy roll-up changes so that they dominate existing hierarchy roll-ups in case they conflict with the roll-ups specified in the input file. |
|
-purgeAge <purgeAge> |
Specifies the purgeage during loadDimData. If the purgeage specified is 0, it purges existing positions that are not in the input. If not specified, loadDimData obtains purgeage from dimension information. |
The loadFactData utility is used to load measure data into the RPAS Data Mart. Once present in the RPAS Data Mart, this data is available to any domain that shares that measure through the RDM.
The flat file must have a header line that defines the columns in the rest of the file. The header line contains dimension level names and fact names. The combination of the level names defines the base intersection of all the facts specified in the header line. Only CSV files are supported.
Sample Input File
sku, str, week, fact_1, fact_2,fact_3
sku_1, str_1,w01_2010, 55, Some string value, true
The first line in the above sample is the header line that defines three facts (fact_1, fact_2, and fact_3) and their base intersection: sku_strweek. The types of the three facts are numeric, string, and Boolean, respectively.
All input files for fact data must be located in the input/factdata directory under the RDM root directory, which is specified by a command line parameter -rdm of the loadFactData utility.
At the end of the successful loading, the utility moves the input files into the processed directory.
No restrictions apply to the naming of the input files, except for the file name extension: All file names must have extension .ovr or .rpl, which defines the loading behavior. The .ovr extension means overlaying the existing data with the input data; the .rpl extension means replacing the existing data with the input for the facts being loaded.
The loadFactData utility first validates the header line:
The dimension level names and fact names are validated against the RDM.
The utility also validates that all the facts have the same base intersection defined by the combination of the dimension level names. The utility ignores the facts that cannot be found in the RDM.
All position names are validated against the corresponding dimension tables in the RDM. Data records containing invalid position names are ignored and logged. Records that cannot be parsed to the specification of the header line and fact data types are also ignored and logged.
The loadFactData catches the duplicate keys (combination of the position names) in each input file. When the input file contains duplicate keys, only one record for each duplicated key is loaded. The duplicate keys are returned to the user so that the user can verify if the correct data was loaded. If not, the user can prepare a new input file with the correct data and re-load it.
The loadFactData utility can run in two different modes:
Batch Mode: In this mode, the utility is used to load large volume of data, and it needs to run within the batch window. In batch mode, the process usually runs in multiple database transactions, which means data can be partially loaded in the case of a failure.
Trickle Feed Mode: In this mode, the utility is used to load small amount of data. It can run during intra-day, and each load is a single database transaction.
In both modes, when there is a failure, the cause of the failure must be resolved and the same loading process must be re-run to ensure that all desired input is loaded into the database.
The loadFactData utility supports the same logging as all other RPAS utilities. Specifically, the utility logs the following messages:
Warning
Skipped input files with file name extensions other than .ovr or .rpl.
Skipped records that could not be parsed.
Duplicate keys found.
Message that indicates bad records are logged in the RDM.
Additional Logging in RDM
Records with invalid position names are logged in a bad records table in the user's schema. The table is named records_ignored_xxxxxx, where xxxxxx is a six-digit sequence number. The user is expected to review the records in the table and drop the table when it is no longer needed.
loadFactData -rdm <path to rdm directory> [-facts <list of facts to load>] [-file <list of input file>] [-tf] [-maxProcesses max] [-retain]
Table 17-42 loadFactData
| Option | Description |
|---|---|
|
-rdm <path to rdm directory> |
Required. Must be a valid path. |
|
-facts <list of facts to load> |
Optional. When present, only specified facts will be loaded from the input files; when not present, all facts in the input files will be loaded. |
|
-file <list of input files> |
Optional. When present, only specified files will be loaded; when not present, all files in the input/factdata ddirectory are loaded. |
|
-tf |
Optional. When specified, the utility runs in Trickle Feed mode. The default mode of the utility is batch. |
|
-maxProcesses max |
When specified, the utility creates at most max processes to run some step in parallel. The -tf option does not support parallel processing. |
|
-retain |
Optional. When specified, the utility does not clean input files and metadata used after load. |
This utility is used to transfer data between the RDM and a domain. To transfer data from multiple domains to the RDM, this utility must be executed multiple times, based on the number of domains involved. The transferFactData utility only transfers the shared measure data that is specified by the user in the command. Data can be transferred in either direction: domain to RDM or RDM to domain. The primary uses for transferFactData are in the creation of the RPAS Data Mart and as a part of a batch process within a domain.
transferFactData -d domainPath {command} {parameter} [options]
Command
One of the following two commands must be present to transfer data from the domain to RDM or RDM to the domain.
-toRDM
-fromRDM
After the command, a list of shared measures that must be transferred must be explicitly specified. Note that data transfer from the domain to RDM clears the shared measure data in the domain after the transfer. The data transferred from RDM to the domain is copied into the shared measure array in the domain.
Parameters
Table 17-43 Parameters
| Parameter | Description |
|---|---|
|
-measureList measures |
The measureList parameter is a list of measure names separated with a comma and no additional spaces unless the entire list is quoted. |
|
-measureListFile path |
The measureListFile parameter is a file path to a text file containing any number of lines of comma separated measure names. |
|
-allMeasures |
Transfer all shared measures contained in the domain. |
Options
Table 17-44 transferFactData Options
| Option | Description |
|---|---|
|
-replicate |
This option retains the domain copy of the measure data after the transfer from the domain to RDM. By default, transfer from the domain to RDM clears the shared measure data from the domain. |
|
-processes N |
Number of processes to run in parallel. The default is 1 (single process). If specified, transferFactData is executed in parallel on each local domain. Non-HBI measures can take advantage of this parallelization. |
Example:
transferFactData -d <domainPath> -toRDM -measureList measure1,measure2 -processes 4
transferFactData -d <domainPath> -toRDM -measureListFile saleMeasures.txt -replicate
transferFactData -d <domainPath> -fromRDM -allMeasures -processes 4
HSA involves complex inter-communication between the RPAS domains and the RPAS data mart called RDM. Both the domain side arrays and RDM side tables are affected as part of the routine operations performed by other domain and RDM utilities.
Users may encounter issues while processing the domain or RDM and need to obtain diagnostic information to understand and fix the issues. The diagnostic information can help the user to detect any asynchronous data between the domain and the RDM.
The checkRdm binary can be used to obtain diagnostic information from both the RDM and the domain, either independently or when they are integrated.
checkRdm {-rdm rdmPath | -d domPath} {commands} [options]
Arguments
Table 17-45 checkRdm Arguments
| Argument | Description |
|---|---|
|
-d |
Path to a domain. |
|
-rdm |
Path to RDM repository. |
|
-dim |
Shared dimension name. |
|
-hier |
Hierarchy name. |
|
-name |
Domain integration name. |
Commands
Table 17-46 checkRdm Commands
| Command | Description |
|---|---|
|
-checkParents |
Checks the rollups of all the positions. |
|
-listNonsharedDims |
Lists all non-shared dimensions of a shared hierarchy. |
|
-listSharedHiers |
Lists all sharing hierarchies between the domain and RDM. |
|
-listSharedMeasures |
Lists measures of the domain that are sharing with RDM. |
|
-preRegValidation |
Performs pre-registration validation to ensure the domain can be registered to RDM. Integration name is optional; if present, it ensures that the name can be used for registration. |
|
-printHier |
Prints the dimension tree of a hierarchy (domain or RDM). |
|
-validateHier |
Runs validation checks on the specified hierarchy to make sure the domain is integrated correctly. Dimension name is optional; if present, only the specified dimension is validated. |
|
-validatePartitioning |
Validates the partitioning between RDM and domain. |
|
-validateRdm |
Validates the sanity of the RDM. |
Options
Table 17-47 checkRdm Options
| Option | Description |
|---|---|
|
-all |
Checks all the dim arrays/tables from the specified dim to the leaf dim. Can only be used with the -dim option. |
|
-listDims |
Optionally lists dimensions on both the domain and RDM. |
Examples
Table 17-48 provides examples of the checkRdm utility on the mfprtl domain.
Table 17-48 checkRdm Examples
| Command | Result/Output |
|---|---|
|
checkrdm -d $dompath -listNonSharedDims -hier prod |
Non-shared dimensions in hierarchy 'prod': pl1, pl2 |
|
checkrdm -d $dompath -listSharedHiers |
Shared Hierarchies: clnd, prod, loc |
|
checkrdm -d $dompath -listSharedHiers -listDims |
Dimensions of all shared hierarchies Hier Dim Domain RDM (only PROD is shown) prod skup X X skug X X scls X X clss X X dept X X pgrp X X dvsn X X cmpp X X pl1 X pl2 X |
|
checkrdm -d $dompath -listSharedMeasures |
Measure Fact Name Fact Group ------------------------------------------------------------------- buwpmiscinr buwpmiscinr chnlsclsweek buwpmiscoutr buwpmiscoutr chnlsclsweek utdylfd03u utdylfd03u utlfd1 |
|
checkrdm -rdm $rdmpath -d $dompath -preRegValidation (domain not integrated) |
PreRegValidation successful |
|
checkrdm -rdm $rdmpath -d $dompath -preRegValidation (domain integrated) |
checkrdm: Domain is expected to be a non-integrated domain. |
|
checkrdm -rdm $rdmpath -printHier -hier prod |
Dimension graph of hierarchy 'prod' in RDM: skup --> skug --> scls --> clss --> dept --> pgrp --> dvsn --> cmpp |
|
checkrdm -d $dompath -printHier -hier prod |
Dimension graph of hierarchy 'prod' in domain: skup --> skug --> scls --> clss --> dept --> pgrp --> dvsn --> cmpp \-> pl1 \-> pl2 Dimension graph of hierarchy 'prod' in RDM: skup --> skug --> scls --> clss --> dept --> pgrp --> dvsn --> cmpp |
|
checkrdm -d $dompath -validateHier -hier prod |
ValidateHier successful |
|
checkrdm -d $dompath -validateHier -hier prod -dim clss |
ValidateHier successful |
|
checkrdm -d $dompath -validatePartitioning |
Repartition is not needed. Check status flag ... VALID |
|
checkrdm -rdm $RDMHOME -validateRdm |
Connected to data_mart_<RDM_USER> Connected to patch_<RDM_USER> Connected to batch_<RDM_USER> Connected to dimload_<RDM_USER> Connected to factload_<RDM_USER> Connected to hiermgr_<RDM_USER> Connected to wkbk_<RDM_USER> Connected to etl_<RDM_USER> The RDM sanity test passed! checkrdm completed successfully |
RPAS global domains are typically divided into local domains at a certain partition level according to some business requirements such that different business units can operate on their local domains separately. RDM partitioning, however, is solely for performance purposes. The data inside RDM is shared by multiple integrated domains, and multiple RPAS processes need to access the shared data simultaneously. Proper partitioning of RDM is vital to the overall performance of an HSA system. If performance is not an issue or the amount of data in the RDM is very small, RDM partitioning can be optional.
In order to support partitioning in RDM, all integrated domains are required to be partitioned on the same branch of a hierarchy (for example, the product hierarchy).
When all domains are partitioned at the same level, the RDM should be partitioned at the same level as well.
When the domains are partitioned at different levels, the RDM should be partitioned at the highest common level that is lower than or equal to the lowest domain partition level.
In the example shown in Figure 17-22, domain 1 is partitioned at PGRP and domain 2 at DEPT. But since domain 1 does not have DEPT level, the RDM partition level is assigned to SCLS, which is the highest common level below all domain partition levels.
Note that the RDM partition level determined by the above method is the recommended level that keeps the number of positions in each partition to a minimum. The user can choose another level lower than that as long as it is shared by all domains and RDM for other reasons, such as anticipating a future domain partitioned on that level.
Many, if not most, domain operations, such as workbook build and commit, are conducted inside the individual local domain. If shared data from RDM is needed for those operations, that data will be transferred to the workbook or local domain. When the data is committed, it then will be transferred back to RDM.
Reading data from RDM is relatively fast. However, writing data back to RDM can be a performance bottleneck since the database needs to maintain transaction logs to keep track of all the changes in case a rollback is needed.
A technique called partition exchange can be used to speed up this database write-back operation. A temporary data set can be prepared with updated partitioned data, and the partitions can then be swapped very quickly as a whole instead of going through each individual record.
To support partition exchange, local domains must be mapped to the RDM partition in a one-to-many relationship. In other words, one local domain can be mapped to one or multiple RDM partitions, but two local domains cannot be mapped to the same RDM partition. Ideally, each local domain is mapped to only one RDM partition, but this is sometimes impossible when multiple integrated global domains have different partition levels or partition configurations. As long as one RDM partition is mapped to only one local domain and not shared by different local domains, the partitioning benefits can be achieved.
Figure 17-23 shows the relationship between local domains and RDM partitions.
The partition mapping is configured initially by the RDM Partition Manager and maintained by the same utility through the repartitioning process, when the mapping is broken.
A few tables in the RDM contain information to support the partitioning. The concept of partition ID is introduced to help organize the partitions. The ID value starts at 0 and is incremented by 1 sequentially. The partition level dimension table has a PARTITION_ID column and is partitioned by a list of partition ID value(s). Only one value per list is supported. In other words, each partition ID is mapped to one partition. In fact, the required name of the partition is constructed by using this pattern: "P" + {Partition ID}, such as "P0","P1", and so on. Partition P0 is designated as the default partition (see The Format of RDM Partition Configuration).
The rest of the child dimension tables below the partition level and the fact tables that have a foreign key relationship to any of the partitioned dimension tables are all partitioned by reference.
The partition mapping metadata table RP_G_PARTITION_MD contains the mappings from partition level positions to the partition ID. The partition level ITT (index translation table) table contains additional information about local domain mapping that is useful in the repartitioning operation.
A utility called RDM Partition Manager is used to manage partition configuration and carry out the repartitioning operation for the RDM. The use of this utility is described below.
This utility is used to manage Oracle database partitions for the RPAS Data Mart (RDM). It can create, update, and export partition configurations and carry out the repartitioning operation for RDM.
rdmPartitionMgr -createConfig -d domPath -name domIntName -partitionDim dimName -output output.xml
rdmPartitionMgr -updateConfig -d domPath -name domIntName -input input.xml -output output.xml
rdmPartitionMgr -exportConfig -rdm rdmPath -output output.xml
rdmPartitionMgr -repartition -rdm rdmPath [-input input.xml]
rdmPartitionMgr -report -rdm rdmPath
Commands
Table 17-49 RDM Partition Manager Commands
| Command | Description |
|---|---|
|
-createConfig |
Create an initial partition configuration based on the first domain. The XML file is marked to use full update mode in subsequent updates. |
|
-updateConfig |
Update an existing configuration with information from an additional domain. |
|
-exportConfig |
Export the current RDM partition configuration to an XML file. The XML file is marked to be updated incrementally. |
|
-repartition |
Repartition the RDM. If an input file is provided, it will repartition RDM to match the partition configuration in the file. Otherwise, it will repartition RDM based on internal dimension tracking information. |
|
-report |
Print out a report on the current RDM partition configuration. |
Parameters
Table 17-50 RDM Partition Manager Parameters
| Parameter | Description |
|---|---|
|
-d |
Path to the domain. |
|
-rdm |
Path to the RDM repository. |
|
-partitionDim |
RDM partition level. |
|
-input |
Input XML file path. |
|
-output |
Output XML file path. |
|
-name |
Integration name of the domain. |
Note the following:
Full update mode regroups positions based on the domain partitioning of all domains. It generates a smaller number of partitions but may shuffle positions into different groups for every update. It removes all empty partitions from the list except the default partition. It also removes positions that do not belong to any domains. Full update mode is best used for initial partitioning.
Incremental update mode maintains existing position locations as long as it is possible. It does not remove empty partitions or positions not used in any current domains. Incremental update mode can reduce the time for repartitioning and is best used for adding a new domain to an existing integration environment.
The partition configuration file is generally referred to as partition info XML file since it is in XML format. It contains the following four sections:
<partitiondim>: the partition level
<update-mode>: full or incremental
<domains>: record keeping for all the domains that have been analyzed by the RDM Partition Manager. It is used internally only by the RDM Partition Manager.
<rdm-partitions>: definitions of partitions in RDM. Each partition has a partition ID and a list of assigned positions. Note that there is an empty partition with ID 0. It is the default partition that should not contain any positions initially and is used during RDM hierarchy operations later on to temporarily hold positions for which a proper partition has not yet been determined.
Sample RDM Partition Configuration partitionInfo.xml
<?xml version="1.0" ?>
<rpas>
    <partitiondim>scls</partitiondim>
    <update-mode>full</update-mode>
    <domains>
        <domain name="mfprtl">
            <subdomain name="ldom01">30000, 30001, 30002, 30003, 30004, 30005, 30006, 30007, 30008, 30009, 30048, 30049, 30050, 30051, 30052, 30053, 30054, 30055, 30056, 30057, 30058, 30059, 30082</subdomain>
            <subdomain name="ldom02">30010, 30011, 30012, 30013, 30014, 30015, 30016, 30017, 30060, 30061, 30062, 30063, 30064, 30065</subdomain>
            <subdomain name="ldom03">30018, 30019, 30020, 30021, 30022, 30033, 30034, 30035, 30036, 30037, 30038, 30066, 30067, 30068, 30069, 30070, 30071, 30072, 30073, 30074, 30075, 30076</subdomain>
            <subdomain name="ldom04">30039, 30040, 30041, 30042, 30043, 30044, 30045, 30046, 30047, 30077, 30078, 30079, 30080, 30081</subdomain>
        </domain>
        <domain name="mfprtl_ut">
            <subdomain name="ldom01">30003, 30004, 30005, 30006, 30007, 30008, 30009, 30013, 30014, 30015, 30016, 30017, 30056, 30057, 30058, 30059</subdomain>
            <subdomain name="ldom02">30010, 30011, 30012, 30060, 30061, 30062, 30063, 30064, 30065</subdomain>
            <subdomain name="ldom03">30018, 30019, 30020, 30021, 30022, 30033, 30034, 30035, 30036, 30037, 30038, 30071, 30072, 30073, 30074, 30075, 30076</subdomain>
            <subdomain name="ldom04">30039, 30040, 30041, 30042, 30043, 30044, 30045, 30046, 30047</subdomain>
            <subdomain name="ldom05">30000, 30001, 30002, 30048, 30049, 30050, 30051, 30052, 30053, 30054, 30055, 30082</subdomain>
        </domain>
    </domains>
    <rdm-partitions>
        <partition id="0"></partition>
        <partition id="1">30003, 30004, 30005, 30006, 30007, 30008, 30009, 30056, 30057, 30058, 30059</partition>
        <partition id="2">30000, 30001, 30002, 30048, 30049, 30050, 30051, 30052, 30053, 30054, 30055, 30082</partition>
        <partition id="3">30013, 30014, 30015, 30016, 30017</partition>
        <partition id="4">30010, 30011, 30012, 30060, 30061, 30062, 30063, 30064,
30065</partition>
        <partition id="5">30066, 30067, 30068, 30069, 30070</partition>
        <partition id="6">30018, 30019, 30020, 30021, 30022, 30033, 30034, 30035, 30036, 30037, 30038, 30071, 30072, 30073, 30074, 30075, 30076</partition>
        <partition id="7">30077, 30078, 30079, 30080, 30081</partition>
        <partition id="8">30039, 30040, 30041, 30042, 30043, 30044, 30045, 30046, 30047</partition>
    </rdm-partitions>
Initial RDM Partitioning
</rpas>
If it is determined that RDM partitioning is not needed, the RPAS installation process (rpasInstall) can take the -noPartition option and no other information is needed. Otherwise, an initial RDM partition info XML file is required in order to build an RDM with partitioning. The partition configuration for a domain is usually created manually. For RDM, this file should be generated by the RDM Partition Manager. It is difficult to create the RDM partition configuration manually since it is required to maintain the one-to-many relationship from all local domains in all integrated domains to the RDM partitions.
All domains that are to be integrated must be built or upgraded first. The RDM Partition Manager then goes through all the domains one by one, gathering and analyzing local domain information and calculating the optimal RDM partition configuration conformant to all domains.
Figure 17-25 shows the process of creating the initial partition configuration for RDM.
When one or more domains are added to an existing HSA system with RDM partitioning, it is generally required to repartition the RDM so that its partitions are compatible with the local domains of the new domains. RDM Partition Manager should export existing partition configuration from the RDM and then update it by going though each of the new domains. After the new partition configuration is finalized, the RDM Partition Manager can repartition the RDM accordingly.
Figure 17-26 shows the repartitioning process for adding new domains. This must be done before registering any of the new domains.
Any hierarchy operations on the RDM partition level in the RDM or any of the integrated domains may alter the one-to-many mapping of local domains to RDM partitions. When that happens, repartition is needed to make the mapping conformant.
The operations affecting RDM partitioning include: adding new positions on the RDM partition level and moving positions from one local domain to another (reclass). Deleting or renaming positions on the RDM partition level only causes them to be removed from the partition mapping table and, as a result, no repartition is needed.
When loadDimData loads new dimension data in the RDM that brings in new partition level positions, it should load them into appropriate partitions. These are determined by analyzing the local domain mappings in the ITT tables. However, if loadHier has not been run in any of the domains and, as a result, those new positions do not yet have corresponding entries in the ITT table, loadDimData cannot determine which partitions to put the new partition positions. In that case, it will put them into the default partition P0.
When loadHier loads new dimension data in the domain that affects the RDM partition (new partition level positions or reclass), it should set the Repartition recommended status flag (see Coordinating RDM Partitioning Using the RDM Status Table). The user needs to manually run the repartitioning operation through the RDM Partition Manager to move the corresponding data in the RDM to appropriate partitions.
Domain reclassification, as a result of following utilities, should be followed by RDM repartitioning.
loadHier
reconfigGlobalDomainPartitions
These utilities set the Repartition recommended flag after a reclass operation. The repartitioning process for RDM must be started manually.
Dynamic Position Maintenance (DPM) operations, including both online DPM and batch DPM (informalPositionMgr), are carried out from local domains and no reclass is involved. DPM can determine which RDM partitions to put into the new informal positions when they are created. No repartitioning is needed.
In the RPAS HSA, hierarchy data is stored in RDM and all integrated domains. The positions in RDM for a given dimension must be a superset of the positions in any of the integrated domains. Since hierarchy data is loaded and updated by separate processes for RDM and domains, it is possible that they can become out of sync, either temporarily or accidentally.
Shared measures are stored in the RDM only. When the domain has more positions than the RDM, operations on the shared measures can cause data loss since the data slices for those extra positions cannot be saved to RDM. This is a serious problem for HSA during day-to-day operations. In order to prevent this from happening, a method must be devised to maintain the hierarchy consistency across RDM and domains.
One more reason to have this is that the database should not do repartitioning when some other process is running on the database and vice versa. This is not needed when operating on only one domain. However, in an HSA integration environment, multiple domains can exist in different time zones and on different servers, and multiple utility processes running on them can impact the RDM at the same time. A method is required to coordinate these processes when they make changes to the RDM.
The RDM Status Table can be used to help control various RPAS/RDM processes. The processes can set, unset, or check flags in the table so as to coordinate their operations.
Table 17-51 RDM Status Table: RP_G_RDM_STATUS_MD
| SEQ_ID | STATUS_CODE | DOMAIN_ID | INFO | CREATED_TIME |
|---|---|---|---|---|
|
2 |
2002 |
0 |
PROD |
|
|
3 |
1001 |
1 |
LOC |
|
|
4 |
1002 |
NULL |
PROD |
|
|
6 |
1004 |
0 |
SCLS |
Table 17-52 RDM Status Message Table: RP_G_STATUS_MSG_MD
| STATUS_CODE | STATUS_MSG |
|---|---|
|
1001 |
loadHier in progress |
|
1002 |
loadDimData in progress |
|
1003 |
reconfigGlobalDomainPartitions in progress |
|
1004 |
Repartition in progress |
|
2002 |
Repartition recommended |
When loadHier is in progress, repartitioning is not allowed, since the positions in the domain can still be removed, added, or moved.
| RDM Status | loadHier in Progress |
| Set By | loadHier |
| Resolved By | loadHier |
| Restricted Utilities | rdmPartitionMgr |
Similar to loadHier, when reconfgGlobalDomainPartitions is in progress, repartitioning is not allowed, since the positions in the domain can still be removed, added, or moved across local domains.
| RDM Status | reconfigGlobalDomainPartitions in Progress |
| Set By | reconfigGlobalDomainPartitions |
| Resolved By | reconfigGlobalDomainPartitions |
| Restricted Utilities | rdmPartitionMgr |
Database changes should not occur when a data load is in progress.
| RDM Status | loadDimData in Progress |
| Set By | loadDimData |
| Resolved By | loadDimData |
| Restricted Utilities | rdmPartitionMgr
Patch and Upgrade |
The loadHier utility updates the ITT table with local domain mapping. This information is used to calculate the correct partitions for repartitioning. Because of this, local domain mapping changes must not be allowed while repartitioning is going on.
Any RDM utility must be restricted, since there could be errors of the table being locked during its redefinition. In addition, this can cause inconsistent results.
| RDM Status | Repartition in Progress |
| Set By | rdmPartitionMgr |
| Resolved By | rdmPartitionMgr |
| Restricted Utilities | loadHier
loadDimData renamePositions reconfigGDP Mace loadFactData transferFactData workbook operations – wbbatch and rpasWbServer Patch and Upgrade |
With this flag on, the RDM is not optimally partitioned. As a result, performance can be affected. However, it does not prevent any utility from executing. This flag can be reset by rdmPartitionMgr after repartitioning or by loadHier/reconfigGDP when the related positions have been modified in the domain and repartitioning is no longer needed in RDM.
| RDM Status | Repartition recommended |
| Set By | loadHier
reconfigGDP |
| Resolved By | rdmPartitionMgr
loShIER RECONFIGgdp |
| Restricted Utilities | N/A |
In an integrated environment, HSA can have multiple domains registered. Though registered with RDM, one domain may not be aware of what process is running in any other domain, since multiple domains can exist in different time zones and on different servers. Apart from RDM utilities, some domain utilities can have an impact on the RDM as well and thus an indirect impact on all other registered domains. Hence, it becomes important to sequence the domain and RDM utilities in the right manner.
HSA recommends sequencing for batch execution of domain and RDM utilities. Interdependent utilities must follow the sequence. However, there are some utilities that can be executed in parallel.
Apart from recommendations, HSA also provides a way to store current RDM status that is used by interdependent utilities to coordinate better between and among themselves. The status is stored in a RDM table, and a utility is provided to view them.
As with non-HSA RPAS, batch processes follow a sequence in which hierarchies are loaded before measure data and measure data is loaded before mace is executed. Similarly, in an HSA environment, the sequence consists of loading the hierarchy and dimension data, followed by loading measure and fact data, and eventually followed by mace. But now the sequencing is much more important because of multiple domains.
A typical execution of batch processes is illustrated in Figure 17-27.
The above sequence should be the best sequence with respect to integrity and performance for most of the cases. However, some variations in the above sequence are also acceptable. For example, loadHier can complete first and then loadDimData start next in parallel to loadMeasure. In this way, rdmPartitionMgr execution is not necessary because loadDimData manages loading the positions in right partitions because loadHier has already recorded local domain mappings for each position through loadHier.
Similarly, the execution of batch processes can vary slightly from the above diagram only if they follow the matrix explained in Parallel Execution of Processes. This matrix documents the utilities that can and cannot be executed together even if they are executed in different domains.
Table 17-53 lists the interdependent utilities. The cross signifies that these utilities cannot be executed together, even on different domains. Note that rdmMgr is only for domain registration and un-registration here.
Table 17-53 Interdependent Utilities
| loadHier | reconfigGDP | Mace | Patch/Upgrade | Rename Positions | loadDimData | loadTranslation | loadFactData | TransferFactData | rdmMgr* | rpasWbServer | rdmPartitionMgr | |
|---|---|---|---|---|---|---|---|---|---|---|---|---|
|
loadHier |
X |
X |
X |
|||||||||
|
reconfigGDP |
X |
X |
X |
|||||||||
|
Mace |
X |
X |
||||||||||
|
Patch/Upgrade |
X |
X |
X |
X |
X |
X |
X |
X |
X |
X |
X |
X |
|
Rename Positions |
X |
|||||||||||
|
loadDimData |
X |
X |
X |
|||||||||
|
loadTranslation |
X |
X |
X |
|||||||||
|
loadFactData |
X |
X |
||||||||||
|
transferFactData |
X |
X |
X |
|||||||||
|
rdmMgr* |
X |
X |
X |
X |
X |
X |
X |
X |
X |
X |
X |
|
|
rpasWbServer |
||||||||||||
|
rdmPartitionMgr |
X |
X |
X |
X |
X |
X |
X |
X |
X |
X |
X |
The intersections for the utilities that do not have a cross can be executed in parallel.
A domain utility must not be re-executed on the same domain while its one instance is already in progress. However, RDM utilities may have different behavior, as explained in Table 17-54.
Table 17-54 RDM Utilities
| Utility | Second Instance When One is Already in Progress |
|---|---|
|
loadDimData |
Allowed |
|
loadTranslation |
Allowed |
|
loadFactData |
Allowed only if mutually exclusive fact groups are loaded in different calls. |
|
transferFactData |
Transfer from domain to RDM is allowed only for mutually exclusive fact groups. Transfer of RDM to domain is allowed. |
|
rdmMgr |
Not allowed. Domain registration and un-registration locks the whole domain. |
|
rdmPartitionMgr |
Not allowed |
Two tables in the RDM schema are available for RDM status.
RP_G_RDM_ST_MSG_MD is a static table with status codes and their corresponding messages. This table is populated at the installation time with a fixed number of codes and messages.
RP_G_RDM_STATUS_MD is the table that is created at the installation time but populated at the runtime by various utilities. The utilities set and clear status messages in this table. Each status is identified by a unique sequence ID. The domain utility's status has a domain ID recorded. Sometimes, additional information is provided by the 'Info' column, such as the dimension name that loadDimData is currently loading.
HSA provides twelve RDM status messages. Out of these, ten are in progress status messages and the other two are information status messages. Based on each status message, some of the utilities may be restricted. The details are presented in Table 17-55.
While in progress messages are provided to ensure that a restricted utility is not executed when an interdependent utility is already in progress, the information status messages are provided to avoid data corruption and poor performance.
Table 17-55 RDM Status Messages
| RDM Status | Set By | Resolved By | Restricted Utilities | Comments |
|---|---|---|---|---|
|
loadHier in Progress |
loadHier |
loadHier |
rdmPartitionMgr rdmPatch rdmUpgrade |
loadHier updates the ITT tables. |
|
reconfigGDP in Progress |
reconfigGDP |
reconfigGDP |
rdmPartitionMgr rdmPatch rdmUpgrade |
reconfigGDP may update the ITT tables. |
|
Mace in Progress |
Mace (Begin Batch) |
Mace (End or Abort Batch) |
rdmPartitionMgr rdmPatch rdmUpgrade loadFactData |
|
|
loadDimData in Progress |
loadDimData |
loadDimData |
rdmPartitionMgr rdmPatch rdmUpgrade Mace |
|
|
loadTranslation in Progress |
loadTranslation |
loadTranslation |
rdmPartitionMgr rdmPatch rdmUpgrade |
|
|
Domain Registration in Progress |
rdmMgr |
rdmMgr |
rdmPartitionMgr rdmPatch rdmUpgrade |
|
|
Domain Un-registration in Progress |
rdmMgr |
rdmMgr |
rdmPartitionMgr rdmPatch rdmUpgrade |
|
|
loadFactData in Progress |
loadFactData |
loadFactData |
rdmPartitionMgr rdmPatch rdmUpgrade mace |
|
|
transferFactData in progress |
transferFactData |
transferFactData |
rdmPartitionMgr rdmPatch rdmUpgrade |
|
|
Repartition in Progress |
rdmPartitionMgr |
rdmPartitionMgr |
rdmPartitionMgr rdmPatch rdmUpgrade loadHier loadDimData renamePositions Mace loadFactData transferFactData workbook opera-tions loadTranslation |
Any RDM utility or domain utility that involves database write operations must be restricted since errors may exist that the table is locked during its redefinition. Otherwise, there could be inconsistent results. |
|
RDM is missing positions* |
loadHier reconfigGDP |
loadHier loadDimData reconfigGDP |
rdmPartitionMgr Mace loadFactData transferFactData (for respective domain) workbook operations (for respective domain) |
Domain utilities on only those domains for which positions are missing in the RDM are restricted. The status table has a domain ID for which RDM is missing positions. More details are explained below. |
|
Repartition Recommended* |
loadHier reconfigGDP |
rdmPartitionMgr |
NA |
The RDM is not optimally partitioned. Hence, performance can be affected. But, it does not stop any utility from executing. The utilities log a warning message saying since the RDM needs re-partitioning, performance may be affected. More details are explained below. |
Hierarchy data is stored in RDM as well as in all integrated domains. The positions in RDM for a given dimension must be a superset of the positions in any of the integrated domains. Since hierarchy data is loaded and updated by separate processes for RDM and domains, it is possible that they can become out of sync either temporarily or accidentally.
Shared measures are stored in the RDM only. When the domain has more positions than the RDM, operations on the shared measures can cause data loss since the data slices for those extra positions cannot be saved to RDM. This is a problem for HSA during day-to-day operations. "RDM is missing positions" status message is the way to solve this problem.
For optimal database performance, a domain's sub-domains must maintain a one-to-many mapping to RDM partitions. However, due to various operations, this mapping may be disturbed. At such times, this status message will be set. This is a warning status that RDM must be re-partitioned as soon as possible to avoid poor performance.
A utility is provided to view and clear the RDM status messages. The utility can display:
All current RDM messages.
All static status codes and corresponding messages.
A specific status code, if it is currently active.
The utility can also clear a specific code, which can be identified by its unique sequence ID. This is not recommended unless there is an unrecoverable erroneous scenario (for example, a core dump).
rdmStatus -rdm rdmPath -list [-listFormat]
rdmStatus -rdm rdmPath -listCodes
rdmStatus -rdm rdmPath -checkStatus code [-listFormat]
rdmStatus -rdm rdmPath -clearStatus seq_id
Commands
Table 17-56 Commands
| Command Name | Description |
|---|---|
|
-list |
Lists all current RDM status. |
|
-listCodes |
Lists all available RDM status codes and corresponding messages. |
|
-checkStatus |
Checks the status for the specified code. The code is displayed by the listCodes command. |
|
-clearStatus seq_id |
Clear the status specified by the sequence ID. The sequence ID is displayed by -list command. |
Options
The RDM stores shared hierarchies (dimensions and levels in database terms) and shared measures (facts in database terms) which can be accessed by database reporting tools. To support internationalization of these reports, the translations for the following items are also stored in the RDM:
Dimension labels
Level labels
Fact labels and descriptions
Position labels
The RDM supports translations for the 18 languages as listed in the Internationalization chapter. The source files are generated by the RPAS Installer in csv format for dimension and level labels, and fact labels and descriptions and put under the input directory of the RDM repository during the RDM build process. The sources file for position labels need to be provided by the customer as flat files.
A utility named loadTranslation is used to load the translations into RDM.
This section describes flat file requirements.
The file name must be dimension_labels.csv. A language extension can be optionally added when the file is sent to Translation Team, for example, the file sent to Translation Team can have name dimension_labels.csv.english.
The file must contain exactly three columns with fixed order: dimension name, language name, and label.
The file name must be level_labels.csv. A language extension can be optionally added when the file is sent to Translation Team, for example, the file sent to Translation Team can have name level_labels.csv.english.
The file must contain exactly three columns with fixed order: level name, language name, and label.
The fact labels and descriptions are in separate files, with file names fact_labels.csv and fact_descriptions.csv, respectively. Again, optional file name extensions can be added when the files are sent for translation.
The files will have three columns with fixed order: fact name, language name, and labels or descriptions.
Position label files are not generated from RPAS Install. They are generated from external sources or prepared by the dimension loaders. Since the Translation Team returns the translated file in the same base name and format as the original file, RPAS 14.1 requires the original files for RDM to have base file name <levelName>_labels and to be in csv format, for example, the label file for sku will have base name sku_labels.
The rdmMgr, invoked by the RPAS Installer, loads the labels and fact descriptions into RDM at the time it builds the schema from the integration configuration, where the "source" language is specified as a root level attribute. That attribute is used as the source language attribute for all labels and descriptions in the integration configuration. It is also saved as the language property of the RDM.
RDM utility loadTranslation is used to load the translations into RDM. The input to this utility are the csv files returned from the Translation Team.
The input files should be utf-8 encoded (this is the same as in the prior versions of RPAS).
The base name of the file must be dimension_labels. The file must contain three columns with fixed order: dimension name, language name, and dimension label. The dimension names and language names are case insensitive. The labels will be loaded exactly as provided.
The base name of the file must be level_labels. The file must contain three columns with fixed order: level name, language name, level label. The level names and language names are case insensitive.
The fact label and description translations are in separate files, with base name of the files being fact_labels and fact_descriptions, respectively. The files will have three columns with fixed order: fact name, language name, and label/description. Again, the first two columns are case insensitive. The labels/descriptions will be loaded exactly as provided. The labels will be loaded exactly as provided.
One translation file is required for each level. The base name of the file must be <levelName>_labels, for example, the translation file for SKU label must have base name sku_labels.The position label translation files will have three columns with fixed order: position name, language name, and label translation. Again, the first two columns are case insensitive, and the translation shall be loaded exactly as provided.
This section describes the loadTranslation utility.
loadTranslation -rdm <rdmRoot> [-sourceLang <langName>] [-file <fullPathOfInputFile>]
-rdm specifies the path to the root directory of the RDM repository.
-sourceLang specifies the source language of the translation, it defaults to the language property of the RDM if not provided.
-file specifies the input file to load. When this parameter is not present, the utility loads all input files in <rdmPath>/input/translation. After successfully loading the files, the utility moves them to <rdmPath>/input/translation/processed.
Input files whose file name does not meet the requirement specified in the above section are skipped.
The utility also validates each record of the input. It should log and skip invalid records. The utility validates the first two fields of each record: the first field must be a valid name - dimension name, level name, fact name, or position name, depending on the input type. The second field must be a valid language name (one of the 18 pre-loaded into RDM). The values in the first two fields are not case sensitive.