| Oracle® Retail Predictive Application Server Administration Guide for the Classic Client Release 14.1 E59120-01 |
|

 Previous |
 Next |
| Oracle® Retail Predictive Application Server Administration Guide for the Classic Client Release 14.1 E59120-01 |
|
Previous |
Next |
In-Context Launch (ICL) is an RPAS feature that provides retailers with an integrated UI planning solution that can be used to respond to events by adjusting the affected plans within the context of the changed circumstances and interacting plans. A planner's workspace can be developed in which relevant events are announced in role-specific dashboards. The planner can drill down into the event report to identify the context of the event. Appropriate planning applications can be launched to react to the event by either replanning or deriving further insight from the plans, in order to justify the event.
RPAS launches a planning application given a context, which is the template or workbook to launch and the wizard parameters that define the scope if a new workbook is to be built. Launching the planning application involves the following steps:
Start the RPAS client if it is not already running.
Log in the user, if the user is not already logged in.
Create the workbook, if a new workbook is being built.
Open the new or existing workbook, if that is what the context specified.
The following topics are covered in this chapter:
Opening a pre-built workbook.
Building a new workbook given a specification of the wizard parameters.
Issuing the open or build requests from a web application running in a Web portal.
A system integrator is responsible for creating a web-based application that can launch RPAS. Creating an application involves the following steps:
Configure the navigational pane to launch RPAS.
Create static or dynamic web reports and dashboards, including OBIEE and other Oracle Fusion technologies, to present integrated data to the end-user with links or buttons that launch RPAS in-context.
Create alerts or alert reports, using BPM, OBIEE, or other Oracle Fusion technologies, that have links or other UI mechanisms that can launch RPAS in-context.
RPAS provides the framework that system integrators can use to launch any RPAS-based workbook, independent of whether the workbook uses a standard wizard or a custom wizard.
RPAS supports launching workbooks that are built using the dynamic-template API. This includes all templates built using RPAS Configuration Tools, but does not include templates that have been coded in C++ using an API lower than the Dynamic Template.
|
Note: Successfully launching RPAS administrative templates that are not built using RPAS Configuration Tools is not guaranteed. |
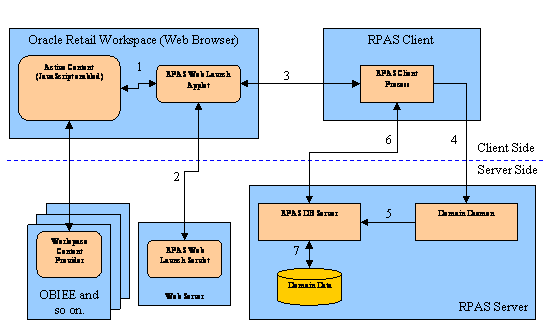
RPAS ICL is implemented as an extension of the RPAS Web Launch feature. As a prerequisite, a RPAS Web Launch Servlet and RPAS Client web installation package must be deployed to a web server and made available to system integrators. For more information, see the "RPAS Classic Client Web Deployment" chapter in the RPAS Installation Guide.
System integrators must design the report page to have a link, or other web GUI widget, that invokes client-side JavaScript code to initiate an RPAS ICL. The page embeds a Java applet from RPAS Web Launch (RWL Applet).
|
Note: Java 1.6_10 or above is required. |
The applet performs the following operations:
Finds the required RPAS client installation on the user's workstation, if it was installed by the applet in a previous web session.
Note that a standalone RPAS client installation is not recognized because the installation is tracked by a browser cookie. However, the applet can be forced to use a pre-installed client by setting a parameter for the applet.
Downloads and installs the appropriate version of the RPAS client if the required RPAS client installation cannot be found or a new build of the client is available on the web server.
Starts the RPAS client.
Routes the ICL request to the RPAS server through the RPAS client and waits for a response. The response can be a success or failure code and a corresponding message.
The applet makes a call back to a JavaScript function to return the response. It is the responsibility of the system integrators to provide code to handle the response in the JavaScript function.
System integrators can embed the applet in a web page using the regular HTML <Applet> tag. The following attributes are required in the <Applet> tag:
Table 16-1 Attributes Required in the <Applet> Tag
| Attribute | Description | Value |
|---|---|---|
|
code |
Applet class name |
com.retek.mdap.client.launch.LaunchApplet.class |
|
codebase |
URL location to download the applet archive |
The URL must point to the RPAS Web Launch Web server instance, for example, "http://mspdev43.us.oracle.com:7777/RPAS4/" |
|
archive |
Applet archive file name |
mdap.jar |
|
mayscript |
Enable JavaScript interaction |
NA |
The following parameters are used to control the behavior of the RWL Applet:
Table 16-2 Parameters Used to Control the Behavior of the RWL Applet
| Parameter | Description | Required | Example |
|---|---|---|---|
|
AutoStart |
Launch the client automatically when the applet starts. Must be set to false for ICL. |
Yes |
Must be set to false if the launch is initiated by JavaScript code. |
|
defaultInstallDir |
Default installation location for the RPAS client. The client version number is automatically appended to the end of this string. |
No |
C:\Oracle RPAS Client |
|
Debug |
Debug flag. If true, more logging information is printed in the Java Console of the web browser. |
No |
true |
|
launchPreinstalledOnly |
Launch the preinstalled RPAS client only. Do not install an RPAS client. The preinstalled path is determined by the server side setting in the configuration file clientPath.txt. For more information, refer to the RPAS Installation Guide. |
No |
false |
|
supportMultipleVersions |
Support multiple RPAS client versions on the same workstation. Must be set to true for ICL. |
Yes |
Must be set to true. |
|
WebLaunchBase |
The URL for the Web Launch Servlet. If not specified, the applet will generate a URL by appending "/web" to it's codebase property. |
No |
http://mspdev43.us.oracle.com:7777/RPAS4/web |
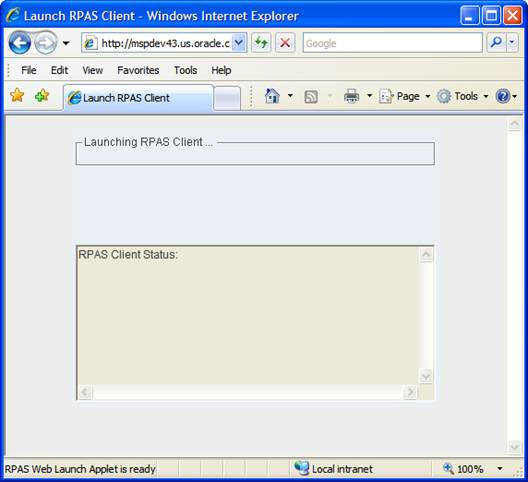
It is recommended that the applet be embedded with the height and width set to zero. When the height and width are set to non-zero values, a text area is shown that gets updated with status information from the RPAS client.
Figure 16-1 shows the applet UI if the RWL Applet is embedded in the web page with non-zero width and height. The message window in the applet is updated with status information from the RPAS client. Status information includes the success or failure of building or opening a workbook and any error messages returned by RPAS.
It is assumed that when using non-zero height and width, system integrators appropriately size the applet in order for the UI to be user-friendly. For example, a width and height of 5 is unrealistic for any user interface returning messages to the end-user.
System integrators embed the RWL Applet in an HTML web page. The launch context can be passed to the applet by the JavaScript-enabled active content of the web page. Real-time status is passed back. The communication between the applet and the active content is achieved by a JavaScript invocation of an applet method.
To launch an instance of an RPAS client, the active content makes a JavaScript call:
document.appletName.launchRPASClient(id, xmlstring [, user, password]);
where:
id: RPAS client process identifier, which can be any string.
xmlstring: launch context in XML format encoded by Base64 scheme. Base64 encoding is a popular scheme used in e-mail contents, readily available in JavaScript public domain source code.
For purposes of quick manual testing or prototyping, the MIME Tools plug-in in Notepad++ 4.8.5 and above may be used to encode any text to Base64 and back.
user and password: optional arguments. For details on ICL supported mechanisms for user authentication, see "User Authentication".
The applet notifies active content regarding the status of the RPAS client through a JavaScript callback function. The following JavaScript function may be defined if a custom callback is desired:
function RPASStatusListener(id, code, message)
{
   …
}
where
id: same RPAS client process identifier previously passed by the launchRPASClient()call.
code: status code (0 - success, 1 - failure, -1 - applet exception)
message: a descriptive status message.
If the callback function is not defined, the RWL Applet displays status messages on the status bar of the browser in the following format: "id - [OK|Error|Exception] - message".
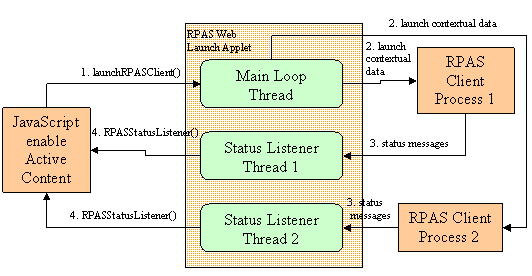
The following figure shows the interactions between the Active Content, RWL Applet and the RPAS client processes. Note that one embedded RWL applet can be invoked multiple times using JavaScript to launch multiple RPAS client processes using different context XML data. Figure 16-2 shows the case where two RPAS client processes are launched.
Since the status listener function RPASStatusListener(id, code, message) can be invoked multiple times by multiple status listener threads in the applet, the JavaScript developer should use the function ID argument to identify where the status message came from and act accordingly.
The web page must stay active to enable the communication between the RPAS client processes and RWL Applet. The web page can become inactive, for example, if the user clicks the Back button of the web browser or closes the active tab or window.
If the web page becomes inactive, the communication channel between the applet and client process is terminated and cannot be recovered. If this happens, the RPAS client process becomes orphaned and then acts like a regular RPAS client. It continues to function, but its status is not displayed on the web page.
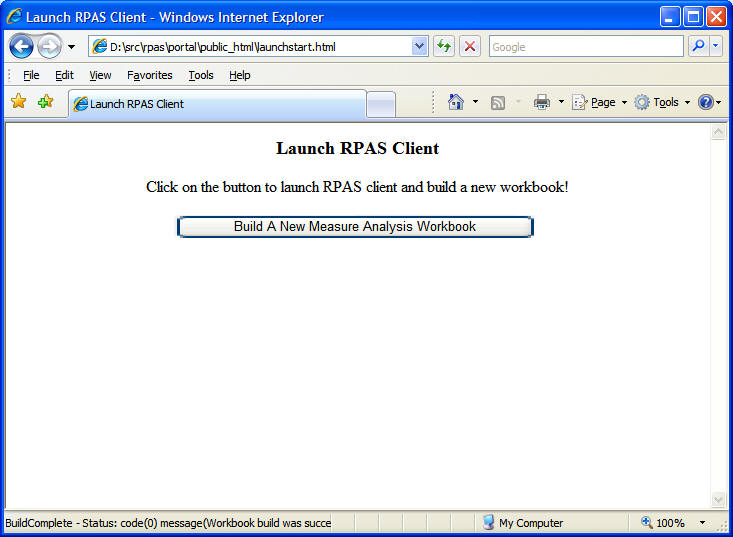
The following sample code demonstrates the integration of RWL Applet and JavaScript-enabled active content. Note that the width and height of the applet are set to zero so that the applet is hidden on the web page. The JavaScript function launchRPASClient() simply invokes the corresponding applet method. The status callback function RPASStatusListener() is implemented to display the status information in the web browser status bar that is generally at the bottom of the browser window.
<HTML>
<HEAD>
<META http-equiv=Content-Type content="text/html; charset=UTF-8">
<TITLE>Launch RPAS Client</TITLE>
</HEAD>
<SCRIPT>
var idcomplete = "BuildComplete";
var xmlcomplete = "PD94bWwgdmVyc2lvbj0iMS4wIiBlbmNvZGluZz0iVVRGLTgiID8+DQo8UlBBU0xh\
dW5jaENvbnRleHQ+ICAgDQo8U2VydmVyPg0KCTxkZXNjcmlwdGlvbj5UZXN0RG9t\
YWluPC9kZXNjcmlwdGlvbj4NCiAgICA8cHJvZmlsZT5mYWxzZTwvcHJvZmlsZT4N\
Cgk8ZGVidWc+ZmFsc2U8L2RlYnVnPg0KICAgIDxkYkRhZW1vblBvcnQ+MTIzNDg8\
L2RiRGFlbW9uUG9ydD4NCgk8ZGJTZXJ2ZXJIb3N0TmFtZT5tc3BkZXY0My51cy5v\
cmFjbGUuY29tPC9kYlNlcnZlckhvc3ROYW1lPg0KCTxkYlNlcnZlclBvcnRTdGFy\
dD4xMDI1PC9kYlNlcnZlclBvcnRTdGFydD4NCgk8ZGJTZXJ2ZXJQb3J0RW5kPjY1\
NTM1PC9kYlNlcnZlclBvcnRFbmQ+DQoJPGRlZmF1bHREYlVzZXIgLz4NCgk8ZGVm\
YXVsdERiUGFzc3dvcmQgLz4NCgk8ZG9tYWluUm9vdERpcmVjdG9yeSAvPg0KPC9T\
ZXJ2ZXI+DTxDbGllbnQ+DSAgIDx2ZXJzaW9uPjEzLjEuMDwvdmVyc2lvbj4NPC9D\
bGllbnQ+DQo8RG9tYWluPg0KCTxkZXNjcmlwdGlvbj5UZXN0RG9tYWluPC9kZXNj\
cmlwdGlvbj4NCgk8ZGlyZWN0b3J5TmFtZT4vdm9sLm5hcy9ycGFzX3NlL2h1YW5n\
bWEvZG9tYWlucy9UZXN0RG9tYWluPC9kaXJlY3RvcnlOYW1lPg0KICAgPHVzZXI+\
YWRtPC91c2VyPg0KCTxwYXNzd29yZD5hZG08L3Bhc3N3b3JkPg0KPC9Eb21haW4+\
DQo8V29ya2Jvb2s+DQoJPGJ1aWxkPg0KCQk8dGVtcGxhdGVOYW1lPk1FQVNVUkVB\
TkFMWVNJUzwvdGVtcGxhdGVOYW1lPg0KCQk8V2l6YXJkUGFnZXM+DQoJCQk8V2l6\
YXJkUGFnZSBpZD0iRXh0cmFNZWFzdXJlc1BhZ2UiIGZhbGxiYWNrPSJub25lIj4N\
CgkJCQk8TGlzdGJveCBuYW1lPSJsYjEiPg0KCQkJCQk8dmFsdWU+DQoJCQkJCQk8\
c2VsZWN0aW9uPlJfRVhfREVNT0E8L3NlbGVjdGlvbj4NCiAgICAgICAgICAgICAg\
ICAgIDxzZWxlY3Rpb24+Ul9FWF9ERU1PQjwvc2VsZWN0aW9uPg0KICAgICAgICAg\
ICAgICAgICAgPHNlbGVjdGlvbj5SX0VYX0RFTU9DPC9zZWxlY3Rpb24+DQoJCQkJ\
CTwvdmFsdWU+DQoJCQkJPC9MaXN0Ym94Pg0KCQkJPC9XaXphcmRQYWdlPg0KCQkJ\
PFdpemFyZFBhZ2UgaWQ9IkRBWSIgZmFsbGJhY2s9Im5vbmUiPg0KCQkJCTxTdXBl\
clRyZWUgbmFtZT0idHJlZTEiIGZhbGxiYWNrPSJhbGwiPg0KCQkJCQk8dmFsdWU+\
DQoJCQkJCQk8ZGltIG5hbWU9IldFRUsiPg0KCQkJCQkJCTxzZWxlY3Rpb24+VzAx\
XzE5OTc8L3NlbGVjdGlvbj4NCgkJCQkJCQk8c2VsZWN0aW9uPlcwMV8xOTk4PC9z\
ZWxlY3Rpb24+DQoJCQkJCQkJPHNlbGVjdGlvbj5XMDFfMTk5OTwvc2VsZWN0aW9u\
Pg0KCQkJCQkJCTxzZWxlY3Rpb24+VzAxXzIwMDA8L3NlbGVjdGlvbj4NCgkJCQkJ\
CTwvZGltPg0KCQkJCQkJPGRpbSBuYW1lPSJEQVkiPg0KCQkJCQkJCTxzZWxlY3Rp\
b24+MTk5NzAxMDg8L3NlbGVjdGlvbj4NCgkJCQkJCTwvZGltPg0KCQkJCQk8L3Zh\
bHVlPg0KCQkJCQk8ZGVmYXVsdD4NCgkJCQkJCTxkaW0gbmFtZT0iREFZIj4NCgkJ\
CQkJCQk8c2VsZWN0aW9uPjE5OTcwMTA4PC9zZWxlY3Rpb24+DQoJCQkJCQk8L2Rp\
bT4NCgkJCQkJPC9kZWZhdWx0Pg0KCQkJCTwvU3VwZXJUcmVlPg0KCQkJPC9XaXph\
cmRQYWdlPg0KCQkJPFdpemFyZFBhZ2UgaWQ9IlNUUiIgZmFsbGJhY2s9Im5vbmUi\
Pg0KCQkJCTxTdXBlclRyZWUgbmFtZT0idHJlZTEiPg0KCQkJCQk8dmFsdWU+DQoJ\
CQkJCQk8ZGltIG5hbWU9IlNUUiI+DQoJCQkJCQkJPHNlbGVjdGlvbj4wMTAyPC9z\
ZWxlY3Rpb24+DQoJCQkJCQkJPHNlbGVjdGlvbj4wMTQ0PC9zZWxlY3Rpb24+CQkJ\
CQkJDQoJCQkJCQkJPHNlbGVjdGlvbj4wMTUyPC9zZWxlY3Rpb24+CQkJCQkJDQoJ\
CQkJCQkJPHNlbGVjdGlvbj4wNTU3PC9zZWxlY3Rpb24+CQkJCQkJDQoJCQkJCQkJ\
PHNlbGVjdGlvbj4wNTk0PC9zZWxlY3Rpb24+CQkJCQkJDQoJCQkJCQkJPHNlbGVj\
dGlvbj4wOTU5PC9zZWxlY3Rpb24+CQkJCQkJDQoJCQkJCQk8L2RpbT4NCgkJCQkJ\
PC92YWx1ZT4NCgkJCQk8L1N1cGVyVHJlZT4NCgkJCTwvV2l6YXJkUGFnZT4NCgkJ\
CTxXaXphcmRQYWdlIGlkPSJTS1UiIGZhbGxiYWNrPSJub25lIj4NCgkJCQk8U3Vw\
ZXJUcmVlIG5hbWU9InRyZWUxIj4NCgkJCQkJPHZhbHVlPg0KCQkJCQkJPGRpbSBu\
YW1lPSJDTFNTIj4NCgkJCQkJCQk8c2VsZWN0aW9uPjAyMTwvc2VsZWN0aW9uPg0K\
CQkJCQkJPC9kaW0+DQoJCQkJCTwvdmFsdWU+DQoJCQkJPC9TdXBlclRyZWU+DQoJ\
CQk8L1dpemFyZFBhZ2U+DQoJCTwvV2l6YXJkUGFnZXM+DQoJCTxzYXZlPg0KCQkJ\
PGxhYmVsPlRlc3R3YjwvbGFiZWw+DQoJCQk8YWNjZXNzPkdyb3VwPC9hY2Nlc3M+\
DQoJCQk8Z3JvdXA+QURNSU48L2dyb3VwPg0KCQk8L3NhdmU+DQoJPC9idWlsZD4N\
CjwvV29ya2Jvb2s+DQo8L1JQQVNMYXVuY2hDb250ZXh0Pg0K";
function launchRPASClient(id, xmlstring)
{
   document.LaunchApplet.launchRPASClient(id, xmlstring);
}
function RPASStatusListener(id, code, message)
{
status = id + " - Status: code(" + code + ") message(" + message + ")";
}
</SCRIPT>
<BODY>
<CENTER>
<H3>Launch RPAS Client</H3>
Click on the button to launch RPAS client and build a new workbook!
<P>
<INPUT type="button" value="Build A New Measure Analysis Workbook"
   onClick = "launchRPASClient(idcomplete, xmlcomplete)">
<APPLET name="LaunchApplet"
code="com.retek.mdap.client.launch.LaunchApplet.class"
codebase="http://mspdev43.us.oracle.com:7777/RPAS4/"
        archive="mdap.jar"
        align="center" width="0" height="0" mayscript VIEWASTEXT>

<PARAM name="AutoStart" value="false">
<PARAM name="supportMultipleVersions" value="true">
<PARAM name="launchPreinstalledOnly" value="false">
<PARAM name="Debug" value="true">
<PARAM name="defaultInstallDir" value="C:\Oracle RPAS Client">
Your web browser is not currently Java-enabled.
</APPLET>
</CENTER>
</BODY>
</HTML>
Figure 16-3 shows this sample code rendered by a web browser. Note that the status bar shows the current status of the RPAS client.
This section describes Oracle Single Sign-On (OSSO) and non-OSSO authentication of users.
OSSO-Based Authentication
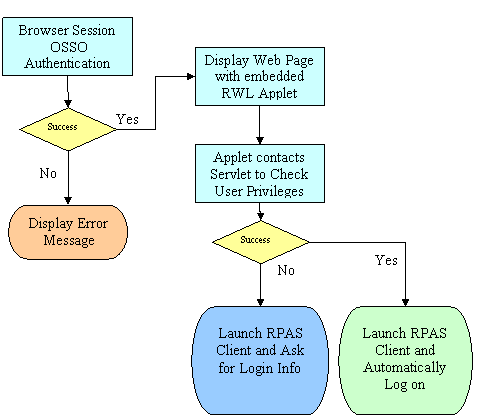
If the HTML active content is protected by OSSO, it can be assumed that the user has already been authenticated when the applet is started. However, it cannot be assumed that the user has the privileges to launch the RPAS client. The privileges can only be confirmed by the RWL Servlet. The applet, therefore, makes a query to the servlet to confirm the privileges of the user before launching the RPAS client.
When OSSO is being used, the user name and password are not needed and should not be used for the call to document.appletName.launchRPASClient(). System integrators should rely on OSSO credentials and mechanisms to authenticate the user.
Figure 16-4 shows the flow of OSSO support for ICL.
Non-OSSO Authentication
When OSSO is not used, the authentication for the RPAS client login is done by RPAS itself. There are several ways to pass user credentials, user name and password, to the RPAS client through the RWL Applet:
Directly embed the user name and password in the XML data. The domain section of launch context can contain user and password information.
|
Note: This may pose a security issue, depending on the life cycle of the launch contextual data. |
Do not pass the user name and password to the applet. The RPAS client prompts the user to log in every time the client starts. This may be inconvenient, but may be acceptable if only one RPAS session is needed.
Use JavaScript code to pass in the user name and password in the applet method call launchRPASClient(id, xmlstring, user, password). The user name and password can be obtained from the user input fields of the web page. The user only needs to enter the user name and password once for one browser session. Multiple RPAS client sessions can then be launched without entering the user name and password again.
Figure 16-5 shows how an RPAS In-Context Launch enabled application is deployed. Note that the RPAS Web Launch Servlet has to be deployed on a web server. This web server does not have to be the same as the web server that is used for any reporting, dashboard or BAM applications. In this release, RPAS ICL is able to interact with the dynamic content of the web page using mechanisms described in the previous sections. As long as system integrators can ensure that the RPAS Web Launch Servlet is available, ICL can be achieved from any web-based application.
This section describes some use cases.
Launching without Context
A system integrator may want to launch RPAS without any context. This means starting up an RPAS client and logging on automatically, but without opening or building a workbook. This type of launch is required to support a generic link in the navigation pane where an end-user can simply launch RPAS to do planning using RPAS Today. The navigation pane only serves as a launchpad for RPAS, where RPAS can be started and logged into by clicking a static link or button.
To code this type of launch, the user must either remove the <Workbook> tag from the context or ensure that the <Workbook> tag does not include an <open> or <build> request.
Launching With Context
An RPAS launch that includes more than a simple login into RPAS is considered an in-context launch. This includes launching an RPAS client to open an existing workbook or build a workbook given the template and wizard parameters.
Opening an Existing Workbook
A system integrator may want to design an application that opens a pre-built workbook. This workbook may have been built by a system integrator, the user, workbook build batch, or previous in-context launch request.
It is assumed that system integrators are aware of either the internal, unique workbook name that RPAS uses or the workbook label, and optionally, the template name and creation date and time of the workbook. These parameters can be specified in the XML context specification to have RPAS open the workbook. For information, see "Open Workbook".
To enable opening the latest workbook from a nightly auto-workbook-build batch, system integrators can provide the label and template name. ICL automatically defaults to the latest workbook of the same label.
|
Note: The last workbook that was created is opened (not the last workbook that was modified). |
Building a New Workbook
A system integrator may want to ensure that a new workbook is built for the end-user depending on what the end-user is or has been doing in the web application. The following examples illustrate this concept.
If the user clicks a link for "Merchandise Financial Planning" in the navigation pane, RPAS is launched to build a workbook for the "Merchandise Financial Planning" template. The end-user is required to make all the wizard selections.
If the user is navigating a report and drills down to identify some outliers at the SKU/Store level, RPAS is launched to automatically build a workbook for those SKU/Stores without requiring the end-user to reselect them in the wizard.
This can be achieved using the build context detailed in the "Build Workbook" section.
The launch context is described in XML format. It consists of four components: client, server, domain, and workbook.
The client component identifies the RPAS client to be launched. It is required to support multiple client versions on the same workstation.
The server component identifies the server to connect to.
The domain component identifies the domain to log in to.
The workbook component contains information for opening or building a workbook.
Table 16-3 Client Settings
| Setting | Description | Type | Required |
|---|---|---|---|
|
version |
RPAS client version number. RPAS Web Launch supports multiple client versions. This version number is used to determine which client binary will be launched. If not specified, the default client for RPAS Web Launch is used. |
String |
No |
|
allowConcurrentSessions |
Allow the same user to open multiple concurrent RPAS client sessions connecting to the same domain without prompting for confirmation. |
Boolean |
No |
|
sslWalletLocation |
The absolute path to the Oracle wallet for the Classic Client. |
String |
No |
Table 16-4 Server Settings
| Setting | Description | Type | Required |
|---|---|---|---|
|
description |
Descriptive name for this server configuration. |
String |
No |
|
profile |
Enable profiling for the RPAS client. |
Boolean |
No |
|
debug |
Enable debug logging for the RPAS client. |
Boolean |
No |
|
dbDaemonPort |
The port number of DomainDaemon. |
Integer |
Yes |
|
dbServerHostName |
The host name where DomainDaemon is running. |
Integer |
Yes |
|
dbServerPortStart |
The starting port number of the RpasDbServer listening port range. |
Integer |
No |
|
dbServerPortEnd |
The ending port number of the RpasDbServer listening port range. |
Integer |
No |
|
defaultDbUser |
The default user ID for RpasDbServer. |
String |
No |
|
defaultDbPassword |
The encrypted password for the default user ID. |
String |
No |
|
domainRootDirectory |
The root directory of RPAS domains. If specified, it is prepended to the directoryName in Domain Settings. |
String |
No |
Table 16-5 Domain Settings
| Setting | Description | Type | Required |
|---|---|---|---|
|
description |
Descriptive name for this domain configuration. It is displayed as the title of the RPAS client main window. |
String |
Yes |
|
directoryName |
The domain path. |
String |
Yes |
|
user |
The user ID used to log in. If not specified, a login dialog prompts for user input. |
String |
No |
|
password |
The encrypted password for the user ID. If not specified, a login dialog prompts for user input. |
String |
No |
The Workbook section has two options to open or build a workbook. If the options or the whole Workbook section is not specified, the RPAS client logs in to the domain without any workbook operation. For information on opening a workbook, see "Open Workbook". For information on building workbook, see "Build Workbook".
Here is the full schema for RPAS Launch Context.
<?xml version="1.0" encoding="UTF-8" ?>

<xs:schema xmlns:xs="http://www.w3.org/2001/XMLSchema">

  <xs:complexType name="BooleanDataType">
    <xs:sequence>
      <xs:element name="value" type="xs:boolean" />
      <xs:element name="default" type="xs:boolean" minOccurs="0"/>
    </xs:sequence>
    <xs:attribute name="name" type="xs:string" use="required" />
    <xs:attribute name="fallback" type="xs:string" use="optional" />
  </xs:complexType>

  <xs:complexType name="StringDataType">
    <xs:sequence>
      <xs:element name="value" type="xs:string" />
      <xs:element name="default" type="xs:string" minOccurs="0"/>
    </xs:sequence>
    <xs:attribute name="name" type="xs:string" use="required" />
    <xs:attribute name="fallback" type="xs:string" use="optional" />
  </xs:complexType>

  <xs:complexType  name="SelectionType">
    <xs:sequence>
      <xs:element name="selection" type="xs:string" maxOccurs="unbounded" />
    </xs:sequence>
  </xs:complexType>

  <xs:complexType  name="StringSetDataType">
    <xs:sequence>
      <xs:element name="value" type="SelectionType" />
      <xs:element name="default"  type="SelectionType" minOccurs="0" />
    </xs:sequence>
    <xs:attribute name="name" type="xs:string" use="required" />
    <xs:attribute name="fallback" type="xs:string" use="optional" />
  </xs:complexType>

<xs:complexType name="StringVectorDataType">
    <xs:sequence>
      <xs:element name="value" type="SelectionType" />
      <xs:element name="default"  type="SelectionType" minOccurs="0" />
    </xs:sequence>
    <xs:attribute name="name" type="xs:string" use="required" />
    <xs:attribute name="fallback" type="xs:string" use="optional" />
  </xs:complexType>

  <xs:complexType  name="DimDataType">
    <xs:sequence>
        <xs:element name="dim" maxOccurs="unbounded">
           <xs:complexType>
              <xs:complexContent>
                <xs:extension base="SelectionType">
                  <xs:attribute name="name" type="xs:string" use="required" />
                </xs:extension>
              </xs:complexContent>
           </xs:complexType>
        </xs:element>
     </xs:sequence>
 </xs:complexType>

  <xs:complexType  name="PQDDataType">
    <xs:sequence>
        <xs:element name="pqd">
           <xs:complexType>
              <xs:simpleContent>
                <xs:extension base="xs:string">
                  <xs:attribute name="type" type="xs:string" use="required" />
                </xs:extension>
              </xs:simpleContent>
           </xs:complexType>
        </xs:element>
     </xs:sequence>
 </xs:complexType>

  <xs:element name="Checkbox" type="BooleanDataType" />
  <xs:element name="RadioButton" type="BooleanDataType" />
  <xs:element name="DatePicker" type="StringDataType" />
  <xs:element name="DropDownList" type="StringDataType" />
  <xs:element name="Edit" type="StringDataType" />
  <xs:element name="Listbox" type="StringSetDataType" />
  <xs:element name="SingleHierSelect" type="StringVectorDataType" />
  <xs:element name="Tree" type="StringSetDataType" />

  <xs:element name="SuperTree">
    <xs:complexType>
      <xs:choice>
      <xs:sequence>
        <xs:element name="value" type="DimDataType"/>
        <xs:element name="default" type="DimDataType" minOccurs="0" />
      </xs:sequence>
      <xs:sequence>
        <xs:element name="value" type="PQDDataType"/>
        <xs:element name="default" type="PQDDataType" minOccurs="0" />
      </xs:sequence>
      </xs:choice>
      <xs:attribute name="name" type="xs:string" use="required" />
      <xs:attribute name="fallback" type="xs:string" use="optional" />
    </xs:complexType>
  </xs:element>

  <xs:element name="open">
    <xs:complexType>
        <xs:choice>
        <xs:element name="name" type="xs:string" />
        <xs:sequence>
            <xs:element name="label" type="xs:string"/>
            <xs:element name="templateName" type="xs:string" minOccurs="0"/>
            <xs:element name="createdTime" type="xs:string" minOccurs="0"/>
        </xs:sequence>
        </xs:choice>
    </xs:complexType>
  </xs:element>

  <xs:element name="build">
    <xs:complexType>
      <xs:sequence>
        <xs:element name="templateName" type="xs:string" />
        <xs:element name="allowManualOverride" type="xs:boolean" minOccurs="0"/>
        <xs:element name="customErrorMessage" type="xs:string" minOccurs="0"/>
        <xs:element name="customWaitMessage" type="xs:string" minOccurs="0"/>
        <xs:element réf="WizardPages" />
        <xs:element réf="save" minOccurs="0"/>
      </xs:sequence>
    </xs:complexType>
  </xs:element>

  <xs:element name="save">
    <xs:complexType>
      <xs:sequence>
        <xs:element name="label" type="xs:string" />
        <xs:element name="access" type="xs:string" minOccurs="0"/>
        <xs:element name="group" type="xs:string" minOccurs="0"/>
      </xs:sequence>
    </xs:complexType>
  </xs:element>

   <xs:element name="WizardPage">
    <xs:complexType>
      <xs:sequence>
        <xs:choice minOccurs="0" maxOccurs="unbounded">
          <xs:element ref="Checkbox" />
          <xs:element ref="DatePicker" />
          <xs:element ref="DropDownList" />
          <xs:element ref="Edit" />
          <xs:element ref="Listbox" />
          <xs:element ref="RadioButton" />
          <xs:element ref="SingleHierSelect" />
          <xs:element ref="SuperTree" />
          <xs:element ref="Tree" />
        </xs:choice>
      </xs:sequence>
      <xs:attribute name="id" type="xs:string" use="required" />
      <xs:attribute name="option" type="xs:string" use="optional" />
      <xs:attribute name="fallback" type="xs:string" use="optional" />
    </xs:complexType>
  </xs:element>

  <xs:element name="WizardPages">
    <xs:complexType>
      <xs:sequence>
        <xs:element ref="WizardPage" maxOccurs="unbounded" />
      </xs:sequence>
    </xs:complexType>
  </xs:element>

  <xs:element name="Client">
    <xs:complexType>
      <xs:sequence>
        <xs:element name="version" type="xs:string" />
        <xs:element name="allowConcurrentSessions" type="xs:boolean" minOccurs="0"/>
      </xs:sequence>
    </xs:complexType>
  </xs:element>

  <xs:element name="Server">
    <xs:complexType>
      <xs:sequence>
        <xs:element name="description" type="xs:string" />
        <xs:element name="profile" type="xs:boolean" />
        <xs:element name="debug" type="xs:boolean" />
        <xs:element name="dbDaemonPort" type="xs:integer" />
        <xs:element name="dbServerHostName" type="xs:string" />
        <xs:element name="dbServerPortStart" type="xs:integer" />
        <xs:element name="dbServerPortEnd" type="xs:integer" />
        <xs:element name="defaultDbUser" type="xs:string" />
        <xs:element name="defaultDbPassword" type="xs:string" />
        <xs:element name="domainRootDirectory" type="xs:string" />
      </xs:sequence>
    </xs:complexType>
  </xs:element>

  <xs:element name="Domain">
    <xs:complexType>
      <xs:sequence>
        <xs:element name="description" type="xs:string" />
        <xs:element name="directoryName" type="xs:string" />
        <xs:element name="user" type="xs:string" minOccurs="0"/>
        <xs:element name="password" type="xs:string" minOccurs="0"/>
      </xs:sequence>
    </xs:complexType>
  </xs:element>

  <xs:element name="Workbook">
    <xs:complexType>
      <xs:choice>
        <xs:element ref="open" />
        <xs:element ref="build" />
      </xs:choice>
    </xs:complexType>
  </xs:element>

  <xs:element name="RPASLaunchContext">
    <xs:complexType>
      <xs:sequence>
        <xs:element ref="Client" />
        <xs:element ref="Server" />
        <xs:element ref="Domain" />
        <xs:element ref="Workbook" minOccurs="0"/>
      </xs:sequence>
    </xs:complexType>
  </xs:element>
</xs:schema>
In any retail planning scenario, a particular workbook or, more likely, an auto-build workbook, may be used to plan for a specific grouping of products and locations. When an event or alert related to these products and locations ocurs, the user may need to always open a particular workbook or auto-build workbook. System integrators configuring an application can configure and code an in-context opening of the specific workbook.
System integrators can programmatically specify the parameters that RPAS needs to open a pre-built workbook. Programmatically does not imply the use of an API, but instead implies program application logic that constructs the XML specification that ICL can use to identify and open the desired workbook.
System integrators can identify the target workbook by either of the following ways:
By the RPAS name of the workbook.
By the auto-build parameters, that is, user, template name, label, and creation date. Template name and creation date are optional parameters. If template name or creation date are not specified and multiple workbooks with the same label are found, RPAS chooses the workbook that was created last and then further breaks the tie based on alphabetical ordering of the template name.
Two options can be specified when a workbook is opened.
Option 1
Table 16-6 Option 1: Workbook Specification
| Setting | Description | Type | Required |
|---|---|---|---|
|
name |
The RPAS name of the workbook, such as "t1" and "t18" which is the root directory name of the workbook) |
String |
Yes |
Option 2
Here is sample launch context for opening a workbook by RPAS name:
<?xml version="1.0" encoding="UTF-8" ?>
<RPASLaunchContext>
<Server>
    <description>TestDomain</description>
    <profile>false</profile>
    <debug>false</debug>
<dbDaemonPort>12348</dbDaemonPort>
    <dbServerHostName>mspdev43.us.oracle.com</dbServerHostName>
    <dbServerPortStart>1025</dbServerPortStart>
    <dbServerPortEnd>65535</dbServerPortEnd>
    <defaultDbUser />
    <defaultDbPassword />
    <domainRootDirectory /></Server>

<Client>        <version>13.2</version></Client>

<Domain>
    <description>TestDomain</description>
    <directoryName>/vol.nas/rpas_se/huangma/domains/TestDomain</directoryName>
    <user>adm</user>
    <password>…</password>
</Domain>

<Workbook>
    <open>
        <name>t1</name>
    </open>
</Workbook>
</RPASLaunchContext>
Here is sample launch context for opening a workbook by label and template name:
<RPASLaunchContext>
… … (Same as above, omitted here.)
<Workbook>
    <open>
        <label>wb2</label>
        <templateName>MEASUREANALYSIS</templateName>
    </open>
</Workbook>
</RPASLaunchContext>
RPAS users generally build workbooks through a manual process using RPAS Wizard Pages from workbook templates. This process is automated in ICL by specifying the contents and selections of the wizard pages in the launch context.
The automated process enables system integrators to programmatically specify the parameters that RPAS needs to build a new workbook. The integrator can program the RPAS web launch to build virtually any workbook from any workbook templates, simple or complex, by constructing an XML string according to the launch context schema and the configuration of the wizard pages.
Users can think of the XML specifications as macro definitions of what they do when they build the same workbook manually. The specifications for building workbook start from a workbook template, which contains a list of wizard pages. Each wizard page has a set of pre-defined widgets:
RadioButton
Checkbox
Edit
DropDownList
SingleHierSelect
DatePicker
Listbox
Tree
SuperTree
Each widget has its own specifications, depending on its type.
The fallback option can be specified on the widget and wizard page level. The widget level fallback option is considered first when the specifications for that widget are incomplete or incorrect. If a specification cannot be resolved on the widget level, the wizard page fallback option is used. If the fallback option on the wizard page is not specified or the option has errors, an error message is displayed to the user.
If any unrecoverable errors occur on a wizard page, the workbook build process falls back to manual mode if the allowManualOverride option is set to true. The wizard starts from the first page. All selections prior to the problematic page are preserved and the user can click Next to skip them and go to the page with errors, which is blank along with all subsequent pages.
The specifications to build a workbook consist of basic settings and a list of wizard pages. Each wizard page contains a list of widget specifications.
Table 16-8 Basic Settings
| Setting | Description | Type | Required |
|---|---|---|---|
|
templateName |
The template name for the workbook to be built. |
String |
Yes |
|
allowManualOverride |
Allow manual override in case of fatal errors in the XML data. The default is true. The wizard starts from the first page. |
Boolean |
No |
|
customErrorMessage |
Custom error message to display in case of fatal errors in the launch context data. |
String |
No |
|
customWaitMessage |
Custom wait message to display while the workbook is being built. |
String |
No |
Table 16-9 Wizard Page Specifications
| Setting | Description | Type | Required |
|---|---|---|---|
|
option (attribute) |
Wizard page handling option. Can be one of the following values: manual: forces manual selection for all widgets. This option forces manual input for this and all subsequent pages. However, the wizard still starts from the first page. skippable: this page can be skipped. Normally used for a conditional wizard page. This page only exists if some particular value is selected for some widget on the previous page. |
String |
No |
|
fallback (attribute) |
Wizard page level fall back option. Can be one of the following values: default: use values from the default settings for all widgets. cache: use selections from the cache selection file. Cache files are from last successful workbook build of the same template. |
String |
No |
Table 16-10 Wizard Widget Specifications
| RadioButton and Checkbox | |||
|---|---|---|---|
| Setting | Description | Type | Required |
|
name (attribute) |
Widget name. |
String |
Yes |
|
fallback (attribute) |
Widget level fallback option. Can be: default: use value from the default setting. |
String |
No |
|
value |
Boolean type: selected value for the widget. Value must be either false or true. |
XML section |
Yes |
|
default |
Default value for the widget. Must be a Boolean type. |
XML section |
No |
Table 16-11 Wizard Widget Specifications (2)
| Edit, DropDownList, SingleHierSelect, and DatePicker | |||
|---|---|---|---|
| Setting | Description | Type | Required |
|
name (attribute) |
Widget name. |
String |
Yes |
|
fallback (attribute) |
Widget level fallback option. Can be: default: use value from the default setting. |
String |
No |
|
value |
String type: selected value for the widget. |
XML section |
Yes |
|
default |
Default value for the widget. Must be a String type. |
XML section |
No |
Table 16-12 Wizard Widget Specifications (3)
| Listbox and Tree | |||
|---|---|---|---|
| Setting | Description | Type | Required |
|
name (attribute) |
Widget name. |
String |
Yes |
|
fallback (attribute) |
Widget level fallback option. Can be one of the following values:
|
String |
No |
|
value |
String Set type: selected value for the widget. Value is a set of selections. |
XML section |
Yes |
|
default |
Default value for the widget. Must be a String type. |
XML section |
No |
Table 16-13 Wizard Widget Specifications (4)
| SuperTree | |||
|---|---|---|---|
| Setting | Description | Type | Required |
|
name (attribute) |
Widget name. |
String |
Yes |
|
fallback (attribute) |
Widget level fallback option. Can be one of the following values:
|
String |
No |
|
value |
String to String Set Map Type/PQD File Type: selected value for the widget. Can be one of the following values:
|
XML section |
Yes |
|
default |
Default value for the widget. Must be a String to String Set Map type or PQD file type. |
XML section |
No |
Workbook Save Specifications
These save specifications are optional. If specified, the workbook is immediately saved after it is built.
Table 16-14 Workbook Save Specifications
| Setting | Description | Type | Required |
|---|---|---|---|
|
label |
Workbook label. |
String |
Yes |
|
access |
Workbook access. Must be user, group, or world. If not specified, the default is user. |
String |
No |
|
group |
Workbook group. Required when workbook access is group. There is no default. |
String |
Conditional |
|
customWaitMessage |
Custom wait message to display while the workbook is being built. |
String |
No |
The following example shows a sample launch context for building a workbook. It specifies a new Measure Analysis workbook for a simple domain (TestDomain). The domain is created by using the RPAS utility createRpasDomain with the command line option -x.
<?xml version="1.0" encoding="UTF-8" ?>
<RPASLaunchContext>
<Client>
  <version>13.2</version>
</Client>
<Server>
  <description>mspdev43-65535</description>
  <profile>false</profile>
  <debug>false</debug>
  <dbDaemonPort>12348</dbDaemonPort>
  <dbServerHostName>mspdev43.us.oracle.com</dbServerHostName>
  <dbServerPortStart>1025</dbServerPortStart>
  <dbServerPortEnd>65535</dbServerPortEnd>
  <defaultDbUser />
  <defaultDbPassword />
  <domainRootDirectory />
</Server>
<Domain>
  <description>TestDomain</description>
  <directoryName>/vol.nas/rpas_se/domains/TestDomain</directoryName>
</Domain>
<Workbook>
  <build>
    <templateName>MEASUREANALYSIS</templateName>
    <WizardPages>
      <WizardPage id="ExtraMeasuresPage" fallback="none">
        <Listbox name="lb1">
          <value>
            <selection>R_EX_DEMOA</selection>
            <selection>R_EX_DEMOB</selection>
            <selection>R_EX_DEMOC</selection>
          </value>
        </Listbox>
      </WizardPage>
      <WizardPage id="DAY" fallback="none">
        <SuperTree name="tree1" fallback="all">
          <value>
            <dim name="WEEK">
              <selection>W01_1997</selection>
              <selection>W01_1998</selection>
              <selection>W01_1999</selection>
              <selection>W01_2000</selection>
            </dim>
            <dim name="DAY">
              <selection>19970108</selection>
            </dim>
          </value>
          <default>
            <dim name="DAY">
              <selection>19970108</selection>
            </dim>
          </default>
        </SuperTree>
      </WizardPage>
      <WizardPage id="STR" fallback="none">
        <SuperTree name="tree1">
          <value>
            <dim name="STR">
              <selection>0102</selection>
              <selection>0144</selection>
              <selection>0152</selection>
              <selection>0557</selection>
              <selection>0594</selection>
              <selection>0959</selection>
            </dim>
          </value>
        </SuperTree>
      </WizardPage>
      <WizardPage id="SKU" fallback="none">
        <SuperTree name="tree1">
          <value>
            <dim name="CLSS">
              <selection>021</selection>
            </dim>
          </value>
        </SuperTree>
      </WizardPage>
    </WizardPages>
    <save>
      <label>Testwb</label>
      <access>Group</access>
      <group>ADMIN</group>
    </save>
  </build>
</Workbook>
</RPASLaunchContext>
The buildWorkbookContext utility is a server side command line utility. It runs under both global domains and local domains.
Before running this utility, you should first manually create a workbook using the workbook template you intend to use in the context. This step generates selection files. In order to capture as much information as possible in the selection files, you can choose to select all for the widgets on wizard pages. This is especially useful for list box widgets.
After the XML file is generated, you can use the data in the file directly if you want to build an identical workbook. Or, you can use it as a starting point and tailor it to meet some specific requirements.
buildWorkbookContext -d [domain_path] -user [user_name] -wbt [wbt_name] -out [output_file]
where
[domain_path]: The path to the global or local domain.
[user_name]: The username whose selection files are used. This is the user who has manually run the workbook template wizard.
[wbt_name]: The name of the workbook template for which the XML context is built. This is the internal name for the template. It can be identified by looking at the selection files under DOMAIN_PATH/users/[user]/selections. The names of the selection files are in this format: [templateName]_[wizpageID].sel.
[output_file]: Output file name for the XML context.