| Oracle® Retail Predictive Application Server Installation Guide Release 14.1.2 E70811-01 |
|

 Previous |
 Next |
| Oracle® Retail Predictive Application Server Installation Guide Release 14.1.2 E70811-01 |
|
Previous |
Next |
This appendix explains how to install and set up the Solution Plug-ins, along with the required configuration in the Fusion Client.
Solution Plug-ins are small external applications within the user interface of the Fusion Client. Such applications are termed as RPAS extensions or plug-ins. They are external in the sense that they present a user interface (UI) to interact with external systems that connect to RPAS or non-RPAS backend, not necessarily as Fusion Client Workbooks.
Assumptions
These instructions assume knowledge of application servers, databases, and application installation or administration, and are intended for system administrators and experienced IT personnel. Before carrying out any of these activities, ensure that you understand UNIX commands (including shell configuration and scripting), directory operations, and symbolic links.
In order to install the Solution Plug-in Purchase Order View (POView) along with an RPAS application like MFP, you must perform the following tasks listed in the section, Road Map Tasks.
Road Map for Installing the Solution Plug-ins
The Road Map for Installing the Solution Plug-ins details these topics:
At a high level plug-ins are integrated with the Fusion Client by performing the following steps.
The Fusion Client's installer is run.
The plug-in bundle's installer is run. This installs a shared library in the WebLogic Server.
The Fusion Client's installer is re-run with bundle property set to the plug-in name. This creates a reference to the above-mentioned shared library within the Fusion Client.
Postinstalllation, configure the Taskflow_MultiSolution.xml and MultiSolutionBundle.properties as per the Solution Plug-in requirement. For details, refer to the Oracle Retail Predictive Application Server Configuration Tools User Guide.
About POView
POView is a Solution Plug-in that can be used with RPAS applications like Merchandise Financial Planning (MFP). It provides users with an interface to look up the currently open or partially received purchase orders in RMS based on the product, location and time intersection of your selection. The selection contexts for POView are configurable through the manifest file. With this knowledge an MFP user can better plan their Open to Buy (OTB) budgeting and enhance their Merchandise plans.
POView Configuration
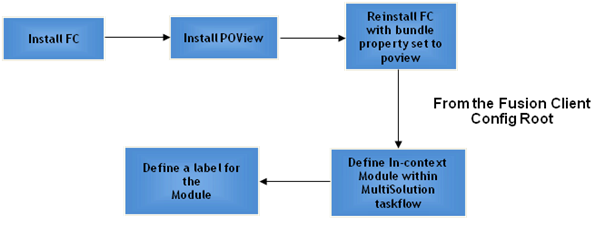
After completing the installation, the Fusion Client needs to be configured to display the POView plug-in within the proper UI context. The overall setup process is show in Figure E-2.
The POView setup process consists of the following steps.
Install Fusion Client using the instructions available in the Installation Guide. When initially installing Fusion Client make sure the input.installed.bundles property is set to blank, since POView has not been installed yet.
Install POView which works similar to Fusion Client Installer.
Re-run Fusion Client installer with the input.installed.bundles property set to poview.
Configure POView as in-context modules in Taskflow_MultiSolution.xml and MultiSolutionBundle.properties from the Fusion Client configuration root.
The POView Installation media includes an Oracle installer that you must run to install POView. The installer installs the application based on the parameters specified in an installation properties file.
You can install the application in either of these modes:
Silent Mode
Silent mode is non-interactive. In silent mode, the installer processes the values set in the properties file with no manual intervention required. Refer to Running the POView Installer—Silent Mode.
Graphical or Text Mode
In graphical or text mode, the Oracle Installer prompts you to enter or modify the value of properties specified in the installation properties file.Refer to Running the POView Installer—Graphical or Text Mode.
The following sections provide details of each step of the setup process.To install a Solution Plug-in, there are three phases and tasks within each phase as listed in Table E-1.
Table E-1 Road Map Phases and Tasks
| Phase | Task | Additional Information |
|---|---|---|
|
|
Installing the Fusion Client |
For more information, refer to Installing the Fusion Client. |
|
Set up the install.properties file |
For more information, refer to Setting Up Your Installation Properties File. |
|
|
Set the environment variables |
For more information, refer to Setting up Environment Variables. |
|
|
Create credentials in the Oracle Wallet |
For more information, refer to Creating User Credentials in an Oracle Wallet. |
|
|
|
Install POView in silent mode or text/graphical mode. |
For more information, refer to Running the POView Installer—Silent Mode and Running the POView Installer—Graphical or Text Mode. |
|
|
Installing the Fusion Client |
For more information, refer to Fusion Client Install. |
|
Set up In-context module in Multi Solution Taskflow |
For more information, refer to Configuring In-Context Module. |
|
|
Configure Manifest file |
For more information, refer to Configuring the Manifest File. |
Before starting POView for production, perform these tasks in order:
For details on Fusion Client setup refer to Chapter 5, "Installing the RPAS Fusion Client" and any Oracle Retail product specific Installation Guide for the Fusion Client.
|
Note: Edit theant.install.properties file using any text editor and set input.installed.bundles and input.installed.bundles.shared.libs properties to empty. |
Ensure that all previous pre-installation tasks are complete.
To install POview, it is recommended that you set up the installation properties file (ant.install.properties) before running the installer.
|
Note: Before installing the POView in silent mode, you must set up the installation properties file. This step is optional when installing in text or graphical mode. |
To set up your install.properties file, perform the following steps:
Navigate to the POview directory, use an unzip utility to unzip POView.zip.
Copy the ant.install.properties.sample file to the same directory, and rename it ant.install.properties.
Edit the ant.install.properties file using any text editor, specifying values as described within the file, and save it. For more information on the parameters, refer to Installation Properties File Parameter Reference.
|
Note: Ensure that the ant.install.properties file is available in the same directory with theinstall.sh/install.cmd script. |
Table E-2 describes the parameters in the ant.install.properties file that you must set up before you install the POview application in silent mode:
Table E-2 Installation Properties File Parameters
| Parameter Name | Description |
|---|---|
|
Retrieve Credentials |
|
|
input.retrieve.credentials |
This applies to GUI mode of install. For silent, you must set it to Yes. You should set the value to Yes if you have stored user credentials to retrieve them later. If you do not have user credentials stored in the secure wallet, or if you want to overwrite the existing credentials or store new credentials, set the value to No. If using the silent mode installer, then you must set |
|
Wallet Directory |
|
|
input.wallet.dir |
Specify the location of the Oracle Wallet where the user credentials are to be saved or retrieved. |
|
WebLogic Admin Server Information |
|
|
input.wls.target |
Specify the host name where the application server is running. If you need to specify a local host because one of your target managed server is on the local host (meaning that it is the same as your admin server host), enter any of the following:
If the application server is running on a different host as the installer, enter the DNS name or IP address of the host where the application server is running. |
|
input.admin.port |
Specify the port number associated with the application server. |
|
input.admin.user |
Specify the administrative user name for the application server. |
|
input.admin.username.alias |
Specify an alias name for the administrative user. Specifying an alias name for the administrative user enhances the security for the application. When left blank, the alias name will default to the administrative user name. |
|
Application Configuration Information |
|
|
input.is.multiple.hosts |
To specify that your domain contains at least one managed server machine that is different from the admin server machine, set the value to yes. If all the managed server machines are on the same machine as the admin server machine, then set the value to no. In other words, even if you have a cluster with multiple managed servers or have multiple standalone managed servers, the value should be no if all of these managed servers are on the same machine as the admin server machine. |
|
Application Server Information |
|
|
input.target.name |
Specify the cluster or managed application server names where you want to install POView. |
|
Application Deployment Details |
|
|
input.solution.id |
Specify the Solution details for POView. |
|
input.app.name.customlib |
Specify the application deployment name. |
|
Data Source Details |
|
|
input.datasource.url |
Specify the Datasource URL in the format: jdbc:oracle:thin:@[host]:[port]:[dbname] |
|
input.datasource.dsname |
Specify the Datasource name to be created in the Application Server - PoViewDBDS |
|
input.datasource.jndiname |
Specify the JNDI name jndi/PoViewDBDS |
|
input.datasource.alias |
Specify a DataSource alias name |
|
input.datasource.sid |
Specify the System ID (SID) for the Database |
|
input.run.sql |
Specify this property value to false if you do not want to run the sql script for creating POView related Database objects during installation. If this property is set to false, then post installation user needs to manually create the DB Objects on the target database. |
|
RPAS Fusion Client |
|
|
fusion.configpath |
Specify the Fusion Client Configuration Directory. The directory where Fusion Client was Installed. |
|
input.targetMachines |
Specify the hostname/IP of the machine where Fusion Client is Installed. |
Before you start the installation, ensure that the following environment variables are set in the system:
WEBLOGIC_DOMAIN_HOME
Location where the WebLogic domain is installed.
ORAINST_HOME
An absolute path to the file containing the central inventory information. This file must define the inventory_loc and inst_group variables in it. The inst_group value should be the UNIX group for the opatch utility.
|
Note: Although it is recommended that these variables be set up in relevant bash shell startup files (.bash_profile) of the system, you can also set up the variables using the EXPORT command at the UNIX prompt. For more information on setting up these variables in the startup files, refer to the Oracle Retail Advanced Inventory Planning Implementation Guide. |
Ensure that all previous pre-installation tasks are complete.
Information such as user credentials for the POView installation is encrypted and stored in a secure location in the application installation directory. This location is called the Oracle Wallet.
When the installation starts, the administrative user credentials are retrieved from the Oracle Wallet based on the alias name specified in this window.
|
Note: Before installing the POView in silent mode, you must create user credentials in an Oracle Wallet. This step is optional when installing in text or graphical mode. |
Installing the POView in silent mode requires two kinds of credentials to be stored in the wallet before it starts:
WebLogic Admin UserID and Password
Stored against the alias wlsalias (or whatever alias is configured within the ant.install.properties file against the input.admin.username.alias property).
Database UserID and Password
Stored against the alias dsAlias (or whatever alias is configured within the ant.install.properties file against the input.datasource.alias property)
|
Note: The respective passwords are prompted for by thesave_credential.sh script |
To create the user credentials, perform the following steps:
Set and export the JAVA_HOME variable.
CD to <installer>/retail-public-security-api/bin.
Run sh save_credential.sh <userNameAlias> <username> <locationOfWalletDir>.
The following table describes the field options to run the script:
| Field Option | Description |
|---|---|
| <userNameAlias> | The keyname for which the credentials need to be stored. |
| <username> | The username to be stored in a secure credential wallet for the specified userNameAlias. |
| <locationOfWalletDir> | The directory where the wallet will be created. This is an optional parameter.
If omitted, it creates the wallet under: |
|
Note: Credentials can be used in GUI mode if you select Yes to Retrieve Credentials from the wallet as shown in Figure E-4, "Retrieve Credentials? Window". |
To install the POView in silent mode, perform the following steps:
To install the POView in silent mode, perform the following steps:
Ensure that you have completed the task, Setting Up Your Installation Properties File.
|
Note: Ensure that the ant.install.properties file is available in the same directory with the install.sh script. |
Ensure that you have saved these user credentials in an Oracle Wallet:
WebLogic domain admin user credential (the entry alias is configurable)
Database user credential
The silent mode installer does not ask for user credentials. Instead it retrieves them from the Oracle Wallet.
For more information, refer to Creating User Credentials in an Oracle Wallet.
|
Note: The installation property input.retrieve.credentials must be set to Yes. |
Ensure that the WebLogic Server is running and the Database is accessible.
Navigate to the POView installation folder, enter the following command:
./install.sh silent
If you prefer to use GUI (graphical user interface), you can use the Oracle Installer in the graphical or text mode. Although this section describes how you can install POView in graphical mode, the same on-screen instructions appear as text instructions in the text mode.
|
Note: Although you do not have to set up the installation properties file when installing in graphical or text mode, it is helpful. If you set up values in the properties file, those values will be the default values in the graphical or text mode dialog.For instructions on setting up this file, refer to Setting Up Your Installation Properties File. |
To install POView in graphical mode, perform the following steps:
Ensure that the WebLogic server is running and the Database is accessible.
If you are viewing the installer from a Windows client:
On the Windows client, start an Xserver program that enables you to emulate the X terminal.
On the application server, set the display for the Windows client where you want the Oracle Installer to display as follows:
export DISPLAY=<IP address>:0.0
From your application server machine, enter the following command:
./install.sh
When the installer runs, it attempts to validate the version of WebLogic and the associated Oracle Application Development Framework that are used by the WebLogic domain. If you encounter a validation error, fix the problem and try again.
|
Note: If you want, you can skip these validations by setting and exporting SKIP_FC_VALIDATION=1 before running the installer. |
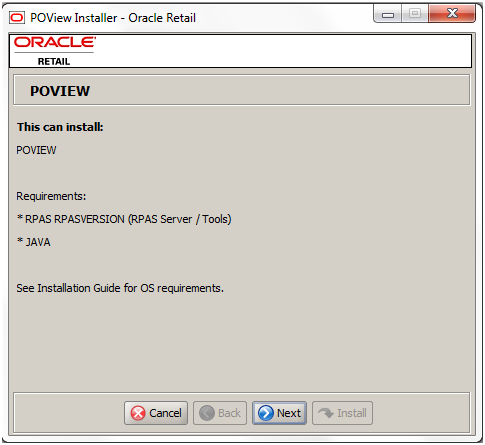
The POView Window opens. Click Next.
The Retrieve Credentials? Window opens.
In the Credentials store directory text box, specify the location of the Oracle Wallet you want to use to save or retrieve user credentials.
Select whether to retrieve user credentials from the Oracle Wallet:
| Option | Description |
|---|---|
| Yes, retrieve saved credentials | Indicates that the installer will read the user credentials from an Oracle Wallet |
| No, enter the credentials by hand | Indicates that you will enter the user credentials in the user interface. |
Click Next.
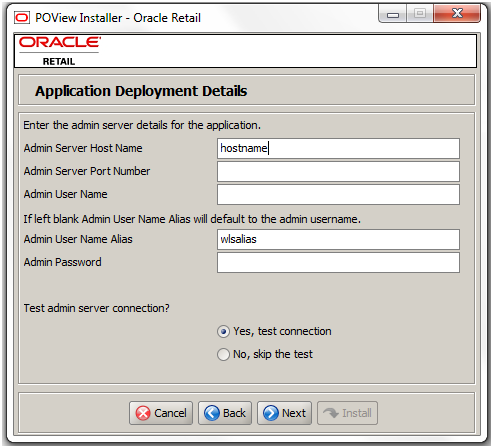
The WebLogic Admin Server Details Window opens. Enter appropriate information for the following fields and click Next:
| Field | Description |
|---|---|
| Admin Server Host Name | Specify the host name of the application server. |
| Admin Server Port Number | Specify the port number associated with the application server. |
| Admin User Name | Specify the administrative user name for the application server. |
| Admin User Name Alias | Specify an alias name for the administrative user. Specifying this name enhances the security for the application. When left blank, the alias name defaults to the administrative user name. |
| Admin Password | Specify the password associated with administrative user name. |
| Test admin server connection? | Select Yes if you want to test the connection to the admin server.
Select No if you want to advance to the next window without testing the connection. |
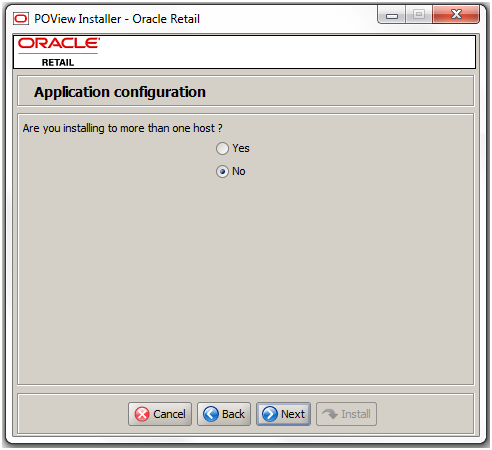
The Application Configuration Window opens.
Specify whether or not you are installing to more than one host:
| Option | Description |
|---|---|
| Yes | This indicates an installation where at least one managed server is running on a remote machine (remote to the admin server machine).
Go to Step 8. |
| No | This indicates an installation where all of the managed servers for deploying the Fusion Client are running on the same machine as the admin server machine, or if you are deploying to the admin server only.
Go to Step 9. |
If you selected Yes on the Application Configuration Window, then the SSH Credentials Window opens, otherwise continue to Step 9
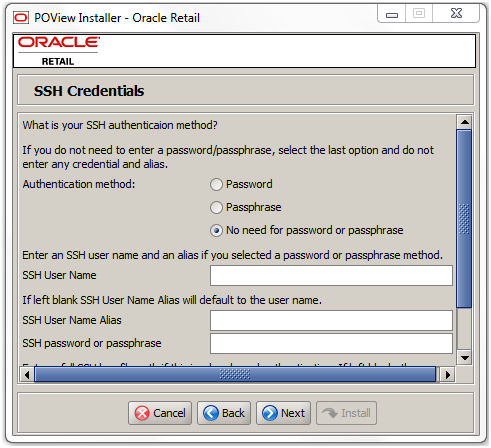
Enter the relevant information in the following fields and click Next:
| Field | Description |
|---|---|
| Authentication method | Select one of the following authentication methods:
|
| SSH User Name | Specify the SSH user name to connect to the remote hosts. |
| SSH User Name Alias | Specify the alias name associated with the SSH user name. Specifying an alias name enhances the security for the application. When left blank, the alias name will default to the administrative user name. |
| SSH password or passphrase | Based on the authentication method you selected, enter the relevant SSH password or passphrase. |
| SSH Key File Path | In case you selected the Passphrase option in the Authentication Method field, enter the location of the SSH key file.
When left blank, the installer will retrieve the file from ${user.home}/.ssh/id_dsa directory, where user.home is your home directory. To use this default location, ensure that you have the private DSA key stored at this location. |
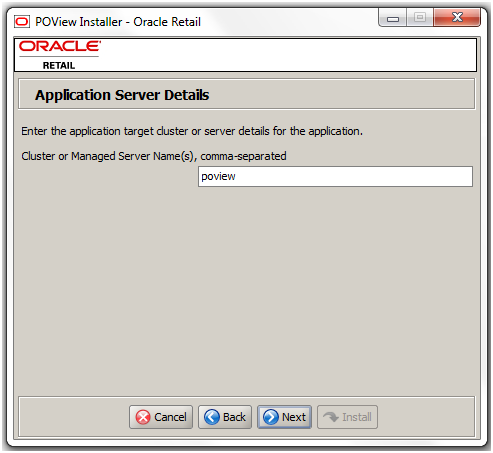
The Application Server Details Window opens. Enter relevant information for the following fields and click Next:
| Field | Description |
|---|---|
| Cluster or Managed Server Name(s), comma-separated | Enter the cluster or managed server names where you want to deploy the fusion client. |
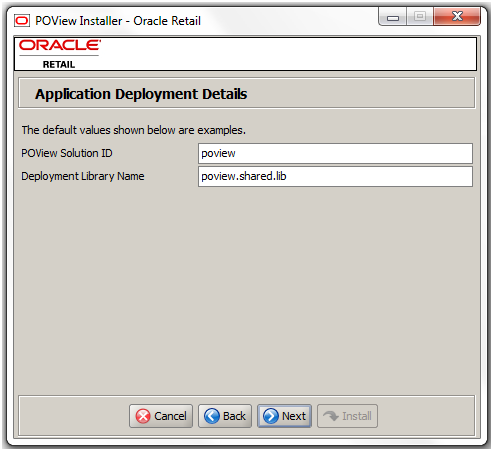
The Application Deployment Details Window opens. Enter relevant information for the following fields and click Next:
| Field | Description |
|---|---|
| POView Solution ID | Enter the solution ID for POView |
| Deployment Library Name | Enter the deployment library name:
|
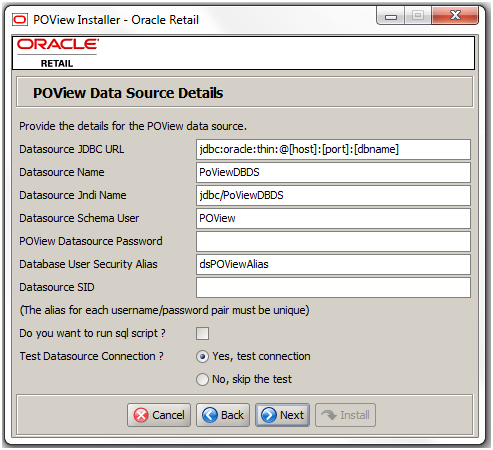
The Application Data Source Details Window opens. Enter relevant information for the following fields and click Next:
| Field | Description |
|---|---|
| Datasource JDBC URL | Enter the JDBC URL in the format:
|
| Datasource Name | Enter the name of the Datasource as:
|
| Datasource Jndi Name | Enter the JNDI name.
For example, |
| Datasource Schema user | Enter the schema user name. |
| POView Datasource Password | Enter the password for the schema. |
| Database User Security Alias | Enter the security alias for database user. |
| Datasource SID | Enter the System ID for the Database. |
| Do you want to run sql script? | Select the check box to run sql. |
| Test Datasource Connection | Select to either test the connection or skip the test |
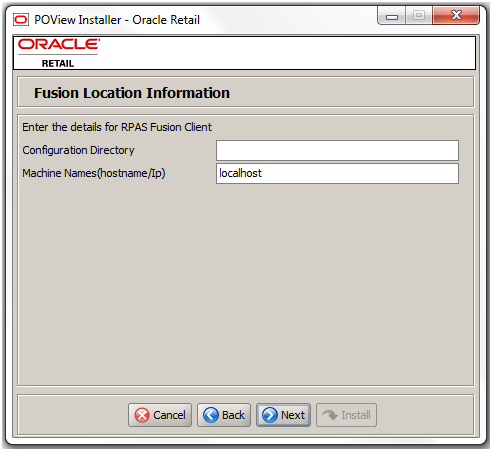
The Fusion Location Information Window opens. Enter relevant information for the following fields and click Next:
| Field | Description |
|---|---|
| Configuration Directory | Specify the location where the RPAS Fusion Client is installed. |
| Machine Names (hostname/Ip) | Enter the hostname/IP of the machine where Fusion Client is installed. |
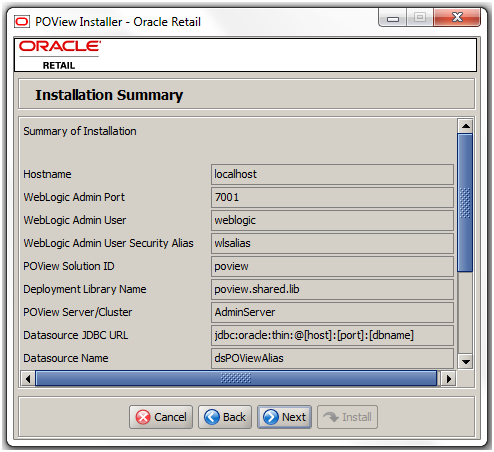
The Installation Summary Window opens. Review the installation summary and click Next.
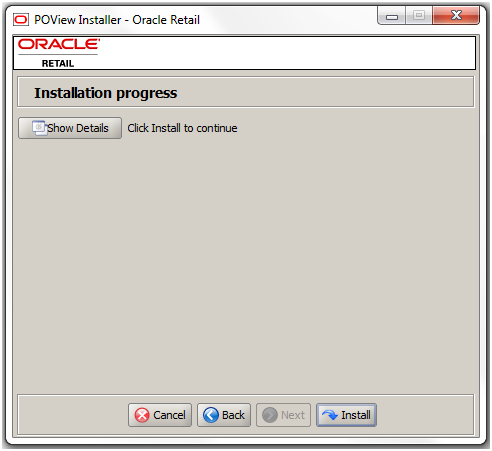
The Installation Progress Window opens. To start the installation, click Install.
After the installation is complete, click Exit to close the Installer.
After successfully completing installation, complete these post-installation tasks:
For details on Fusion Client setup refer to Chapter 5, "Installing the RPAS Fusion Client" and any Oracle Retail product specific Installation Guide for the Fusion Client.
|
Note: Edit the ant.install.properties file using any text editor and set
|
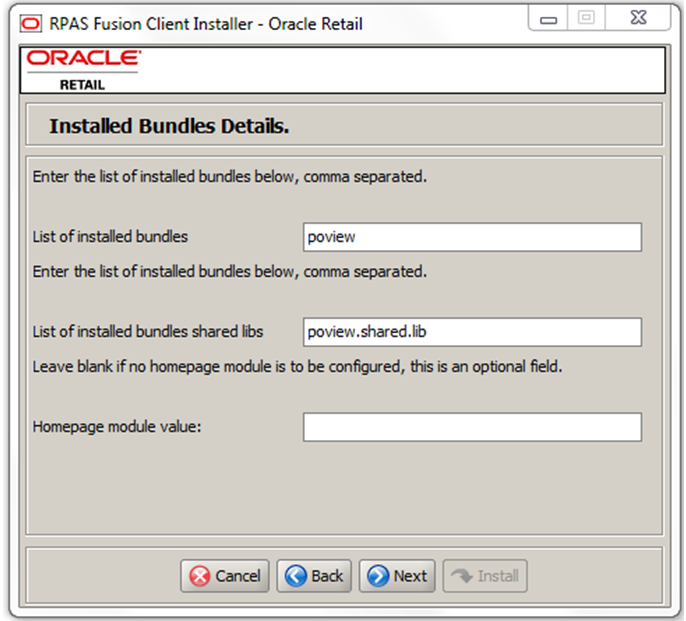
On the RPAS Fusion Client Installer —Installed Bundles Details Window, specify the:
List of bundles
List of shared libraries
To launch POView as an in-context module from a worksheet, an XML element is configured in the task flow configuration file, namely Taskflow_MultiSolution.xml. Where the element is inserted determines which worksheet's context menu makes the plug-in available for launch.
The structure of the task flow configuration file can be described briefly as follows: it is a set of activities. Each activity has a set of tasks. A task has a set of steps; a step has a set of worksheets.
The in-context launch entry can be created as a sub-element of a task, step or worksheet. The implication of each insertion point is described in the following table.
| Insertion Point | Effect |
|---|---|
| Task | The plug-in is available on every worksheet of every step under the task. |
| Step | The plug-in is available in every worksheet under the step. |
| Worksheet | The plug-in is available on that worksheet. |
Update the following items:
Add the following XML element:
<incontext_modules>
   <module name="poview" bundle="poview" label="poview.label"
resource_bundle="oracle.rgbu.ard.util.i18n.SolutionResourceBundle"/>
 </incontext_modules>
Add the following.
Snippet of POView configured for a Step in Taskflow_MultiSolution.xml.
        <step>
          <name>mfprtl.Activity1.Activity1.Task11.Step24</name>
          <description>mfprtl.Activity1.Activity1.Task11.Step24.Desc</description>
          <order_num>1</order_num>
          <instructions>mfprtl.Activity1.Activity1.Task11.Step24.Instructions</instructions>
          <worksheet>
          <incontext_modules>
              <module name="poview" bundle="poview" label="poview.label"
                                resource_bundle="oracle.rgbu.ard.util.i18n.SolutionResourceBundle"/>
          </incontext_modules>
            <name>td_initialize1</name>
          </worksheet>
          <custom_menu>91</custom_menu>
        </step>
Add the following property to {RPAS Fusion Client Install Directory}\MultiSolution\resources\MultiSolutionBundle.properties:
poview.label=POView
Edit the poview-log4jconfig.xml file under RPAS Fusion Client Install directory and change the value for the property <param name="file" value="/poview.log"/> for logging to a different directory-file:
<appender name="poviewFileAppender" class="org.apache.log4j.RollingFileAppender">
  <param name="append" value="true"/>
  <param name="file" value="/poview.log"/>
    <layout class="org.apache.log4j.PatternLayout">
      <param name="ConversionPattern" value="%d{ABSOLUTE} %-5p [%c{1}] %m%n"/>
    </layout>
</appender>
Each functional module comes with a manifest, using which the bundle configurator can configure the functionality of the bundle within the Fusion Client. The bundle manifest for POView has to have details about Datasource, Selection context and Metrics. The Installer copies the manifest to the functionalmodulebundles\poview directory under the Fusion Client install directory.
Restart the WebLogic server for manifest file changes to take effect.
The data source from which POView receives the RMS data is configured through the bundle manifest. On the WebLogic server the same Datasource has to be configured. The Data source creation on WebLogic and update of manifest with the Datasource details is updated by the POView Installer. The following entry under the bundle manifest is updated by the Installer (it should not be manually changed):
<data_sources> <data_source name="PoViewDBDS" jndi_name="jdbc/PoViewDBDS"/> </data_sources>
|
Note: The previous entry is updated by the Installer and this should not be changed manually. |
The manifest dictates the metrics that are visible in the Item Details panel. The metrics that are available for configuration are:
Quantity Ordered
Quantity Received
Quantity Cancelled
Quantity Open
Quantity Ordered Unit Cost
Quantity Received Retail
Quantity Cancelled Unit Cost
Quantity Open Unit Cost
To hide a metric column change the value to N. To show a column, configure the value to Y against the corresponding parameter in the manifest.
<param name="QUANTITY_ORDERED_RENDERED" value="Y"/> <param name="QUANTITY_RECEIVED_RENDERED" value="Y"/> <param name="QUANTITY_CANCELLED_RENDERED" value="Y"/> <param name="QUANTITY_OPEN_RENDERED" value="Y"/> <param name="QUANTITY_ORDERED_DOLLARS_RENDERED" value="Y"/> <param name="QUANTITY_RECEIVED_DOLLARS_RENDERED" value="Y"/> <param name="QUANTITY_CANCELLED_DOLLARS_RENDERED" value="Y"/> <param name="QUANTITY_OPEN_DOLLARS_RENDERED" value="Y"/>
The POView can be configured to accept different selection contexts based on its definition in the manifest. The manifest can be updated to change the selection criteria and its cardinality. On the Product Dimension the available Selection Context's are:
Departments
Classes
Subclasses
On the Location dimension the available Selection Context's are:
Company
Chains
Channels
Districts
Regions
Areas
Stores
The following entry under the manifest has to be configured.
<position_input><dimension rpas_name="clnd" module_name="Calendar" required="false"><level rpas_name="week" module_name="Week" cardinality="*"/><level rpas_name="mnth" module_name="Month" cardinality="*"/> </dimension> <dimension rpas_name="loc" module_name="Location"><level rpas_name="chnl" module_name="CHNL" cardinality="*"/> <level rpas_name="chn" module_name="CHN" cardinality="*"/><level rpas_name="area" module_name="AREA" cardinality="*"/> <level rpas_name="rgn" module_name="RGN" cardinality="*"/><level rpas_name="dstr" module_name="DSTR" cardinality="*"/> <level rpas_name="str" module_name="STR" cardinality="*"/><level rpas_name="comp" module_name="COMP" cardinality="1"/> </dimension> <dimension rpas_name="prod" module_name="Product"> <level rpas_name="scls" module_name="SCLS" cardinality="*"><parent_level rpas_name="clss" module_name="CLSS"/><parent_level rpas_name="dept" module_name="DEPT"/> </level> <level rpas_name="clss" module_name="CLSS" cardinality="*"><parent_level rpas_name="dept" module_name="DEPT"/> </level><level rpas_name="dept" module_name="DEPT" cardinality="*"/> </dimension> <date_range/> </position_input>
|
Note: The cardinality of Company level in the Location dimension has to be 1 and cannot be configured to anything else. Cardinality for other levels can be 1 or *. Cardinality provides a way to select one or more positions on a certain level. For example, if the Department level is configured with cardinality 1, on the Worksheet only one position for Department level can be selected. However, if Department is configured with cardinality as ’*' then one or more positions for Department level can be configured. |
Use Case 1: Allow Selection at only Department Level on Product Dimension
To specify a selection at the Department level alone on the Product dimension, use the following configuration:
<dimension rpas_name="prod" module_name="Product"> <level rpas_name="dept" module_name="DEPT" cardinality="*" /> </dimension>
Use Case 2: Allow Selection for only a Single Department on Product Dimension
To specify a selection for a single Department on the Product dimension, use the following configuration:
<dimension rpas_name="prod" module_name="Product"> <level rpas_name="dept" module_name="DEPT" cardinality="1" /> </dimension>
Use Case 3: Allow Selection at Department/Class Level on Product Dimension
To specify both Department and Class on the Product dimension, use the following configuration:
<dimension rpas_name="prod" module_name="Product"> <level rpas_name="clss" module_name="CLSS" cardinality="*"> <parent_level rpas_name="dept" module_name="DEPT"/> </level> <level rpas_name="dept" module_name="DEPT" cardinality="*" /> </dimension>
Use Case 4: Allow Selection at Channel and Chain Level on Location Dimension
To specify both Channel and Chain on the Location dimension, use the following configuration:
<dimension rpas_name="loc" module_name="Location"> <level rpas_name="chnl" module_name="CHNL" cardinality="*"/> <level rpas_name="chn" module_name="CHN" cardinality="*"/> </dimension>
Use Case 5: Allow Selection for a Single Chain on Location Dimension
To specify a selection for a single Chain on the Location dimension, use the following configuration:
<dimension rpas_name="loc" module_name="Location"> <level rpas_name="chn" module_name="CHN" cardinality="1"/> </dimension>
Use Case 6: Hiding the Quantity Ordered and Quantity Received Metrics
<param name="QUANTITY_ORDERED_RENDERED" value="N"/> <param name="QUANTITY_RECEIVED_RENDERED" value="N"/>