| Oracle® Retail Predictive Application Server Installation Guide Release 14.1.2 E70811-01 |
|

 Previous |
 Next |
| Oracle® Retail Predictive Application Server Installation Guide Release 14.1.2 E70811-01 |
|
Previous |
Next |
The RPAS Fusion Client is the Web-based Rich Client for the Retail Predictive Application Server (RPAS) platform developed using the latest Oracle Application Development Framework (ADF).
This chapter describes typical installations of the RPAS Fusion Client. It includes these sections:
|
Note: The RPAS Fusion Client is different from the RPAS Web Deployment. For more information, refer to Chapter 7, "RPAS Classic Client Web Deployment". |
This section explains how to install and set up the RPAS Fusion Client application, along with the required and optional software.
These instructions assume knowledge of application servers, databases, and application installation or administration, and are intended for system administrators and experienced IT personnel. Before carrying out any of these activities, ensure that you understand UNIX commands (including shell configuration and scripting), directory operations, and symbolic links.
In order to install RPAS Fusion Client for production, you must perform the following tasks listed inRoad Map Phases and Tasks.
To install the RPAS Fusion Client, there are three phases and tasks within each phase as listed in Table 5-1.
Table 5-1 Road Map Phases and Tasks
| Phase | Task | Additional Information |
|---|---|---|
|
|
Plan your environment, based on your business needs. |
For more information on the planning process and the supported configurations, refer to Chapter 2, "Getting Started" and the section, Planning. |
|
Install and set up the RPAS Infrastructure. |
For more information, refer to Chapter 3, "Installing on UNIX and Linux Environments" or Chapter 4, "Installing on a Windows Environment". |
|
|
Decision for OBIEE reports from Fusion Client |
If using the OBIEE reports feature, then also select the Oracle Enterprise Manager - 12.1.3.0 [em] check box during the WLS/ADF 12c Setup. |
|
|
Install Oracle database for WLS/ADF 12c setup |
For more information, refer to Install Oracle Database for WLS/ADF 12c Setup |
|
|
Set up the WebLogic server. |
For more information, refer to Setting Up the WebLogic Server. |
|
|
Access the RPAS Fusion Client installation software. |
For more information, refer to Accessing the Fusion Client Installation Media. |
|
|
Set up the |
For more information, refer to Setting Up Your Installation Properties File. |
|
|
Set the environment variables. |
For more information, refer to Setting Up Environment Variables. |
|
|
Optional: Validate the WebLogic and ADF versions. |
For more information, refer to Validating WebLogic and Oracle ADF Versions. |
|
|
Create credentials in the Oracle Wallet. |
For more information, refer to Creating User Credentials in an Oracle Wallet. |
|
|
|
Install Solution Plug-ins |
For more information, refer to Appendix: Installing Solution Plug-ins or the installation instructions for the specific Oracle Retail application. |
|
Install the Fusion Client in silent mode or text/graphical mode. |
For more information, refer to Installing the RPAS Fusion Client in Silent Mode or Installing the RPAS Fusion Client in Graphical or Text Mode. |
|
|
|
Clear the browser cache. |
For more information, refer to Clear the Browser Cache. |
|
Configuring External Authentication. |
For more information, refer to Configuring External Authentication. |
|
|
Setup SSL between the RPAS server and the RPAS Fusion Client. |
For more information, refer to Setup SSL. |
|
|
Review the RPAS configuration property files. |
This task is only necessary when installing the RPAS Fusion Client over an existing RPAS Fusion Client environment. For more information, refer to Review the RPAS Configuration Property Files. |
|
|
Optional: Set up SSO. |
For more information, refer to Set Up Single Sign-On (SSO). |
|
|
Optional: Set up the configuration properties file, pivot table styles, and layout and formatting. |
For more information, refer to the Oracle Retail Predictive Application Server Administration Guide for the Fusion Client. |
|
|
Install and set up the RPAS solution to work with the RPAS Fusion Client. |
For more information, refer to the Installation Guide of the relevant RPAS solution. |
The pre-installation process includes these tasks that must be performed in order:
Table 5-2 Order of Pre-Installation Tasks
| Order | Task |
|---|---|
|
1. |
|
|
2. |
Install and Set Up the RPAS Infrastructure |
|
3. |
Install Oracle Database for WLS/ADF 12c Setup |
|
4. |
Setting Up the WebLogic Server |
|
5. |
Setting Up the Domain Policy Store. Optional step for use with an OID-based policy store. |
|
6. |
Accessing the Fusion Client Installation Media |
|
7. |
Setting Up Your Installation Properties File |
|
8. |
Setting Up Environment Variables |
|
9. |
Validating WebLogic and Oracle ADF Versions |
|
10. |
Creating User Credentials in an Oracle Wallet |
This is the first pre-installation task.
Before installing the RPAS Fusion Client, you must first determine the performance and availability goals for your business, and then plan the hardware, network, and storage requirements accordingly. This section provides some basic considerations for the installation. It also includes the list of hardware and software requirements.
This section includes the following topics:
Planning your implementation prior to an installation also gives you a better understanding of the environment, and enables you to adapt faster to any future changes in the environment setup.
Use the following steps to plan and prepare the product environment:
Plan and design the infrastructure, based on your business needs, for the installation. This includes:
Meeting the hardware and associated software requirements.
Acquiring the prerequisite software (and licensing).
Determining the external authorization strategy. For more information, refer to Configuring External Authentication.
Determine if you are installing any solution plug-in. For more information, refer to Appendix: Installing Solution Plug-ins.
Setting up the load balancers and clusters. For more information, refer to Considerations for Setting Up Load Balancers.
Gathering the capacity data.
Planning the data security policies.
Designing the backup and recovery strategies.
Determine the size of the implementation.
Identify source systems. Identify the systems that will exchange data with RPAS Fusion Client.
Considerations for Setting Up Load Balancers
You can choose to implement a software load balancer or network-based load balancer hardware.
Before you start setting up a load balancer, you must consider the items listed in Table 5-3. These considerations are relevant for an external load balancer used in a multiple managed application server deployment featuring standalone authentication. If using Oracle SSO 11g, the mod_wl_ohs Web Tier plug-in performs the application server level load balancing function.
An external load balancer can still be beneficially used in an SSO deployment. This would be deployed in front of multiple web tier servers. The advantage is in avoiding single point of failure (at the web server), and optionally, providing Secure Sockets Layer (SSL) termination, compression, and static content caching at the load balancer.
Table 5-3 External Load Balancer Considerations - Non-SSO Deployment
| Item | Description |
|---|---|
|
SSL Termination at the load balancer |
This establishes a Secure Sockets Layer (SSL) protocol at the load balancer and replaces the need for the Web server to set up the SSL. To set up SSL Termination at the load balancer, ensure that it is configured with an SSL certificate (self generated or signed by a certificate authority). |
|
Load Balancing Method |
It is recommended to use a Round Robin load balancing method, coupled with session affinity. In the Round Robin method, requests are balanced across a list of available servers and servers are selected sequentially. By coupling with session affinity, subsequent requests from a specific user are redirected to the same server assigned for the previous requests from the user. Session affinity is necessary because there is no application state replication between the servers. This will avoid the excessive need for the application state to be replicated between the servers. |
|
KeepAlive |
The load balancer uses the KeepAlive feature to test the servers before directing the users to an active server. This test typically involves setting up a keepalive page (such as |
The considerations listed in Table 5-3 apply in case of non-SSO deployment. Figure 5-1 shows a load balancer for a non-SSO deployment.
Using a load balancer is recommended for scenarios where you need to use multiple servers because one server may not be able to handle the load. The RPAS Fusion Client can be installed and used without implementing a load balancer.
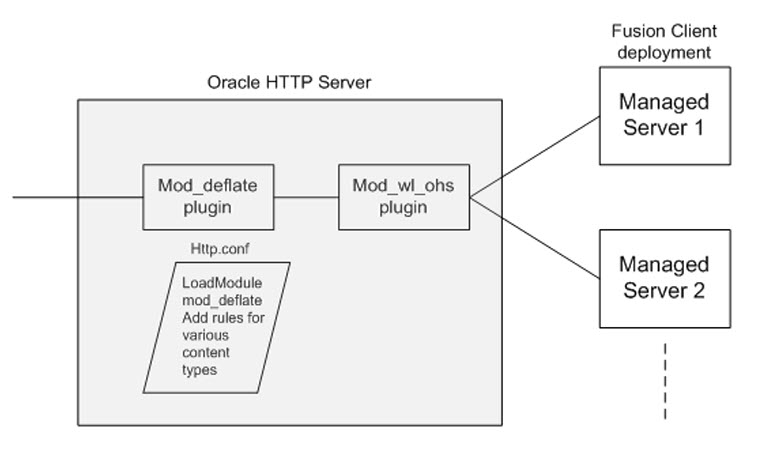
These considerations apply in case of an SSO deployment. Figure 5-2 shows a load balancer for an SSO deployment.
In a deployment that uses Oracle Single Sign On for authentication, you must use the mod_wl_ohs Oracle HTTP server module to distribute requests with session affinity across multiple WebLogic managed servers. Single Sign On is enforced by an Oracle Access Manager 11g WebGate module plugged into the Oracle HTTP server. Scalability on the application server is achieved through the use of multiple managed servers. Single point of failure can be avoided by deploying multiple Oracle HTTP servers with a load balancer in front. The load balancer can also bring in other performance benefits such as SSL termination, content compression, caching, and so on.
For more information on setting up load balancers, refer to the documentation included with the Load Balancer.
There is an important consideration when using a Web Tier with a load balancer - such as the mod_wl_ohs Web Tier plug-in - to mediate requests to multiple WebLogic managed servers. Load balancers often implement session affinity (also called sticky sessions) using the WebLogic Server session cookie. The session cookie has been renamed from the default. The new name is RPASJSESSIONID.
If using mod_wl_ohs as the load balancing Web tier plug-in, then add the following directive to the plug-in configuration:
WLCookieName RPASJSESSIONID
For more information on the software and hardware requirements, refer to Table 1-3, "RPAS Fusion Client Hardware and Software Requirements" in Chapter 1, "Introduction".
|
Note: RPAS Fusion Client is included with the RPAS installation media and requires that the RPAS Server and Configuration Tools are upgraded to Release 14.1.2. |
This is the second pre-installation task, ensure that all previous pre-installation tasks are complete.
Install and set up the RPAS Infrastructure. For more information, refer to Chapter 3, "Installing on UNIX and Linux Environments" or Chapter 4, "Installing on a Windows Environment".
This is the third pre-installation task, ensure that all previous pre-installation tasks are complete.
Perform the following steps to set up WebLogic 12c with ADF Runtime:
Install the Oracle 12c Database. Download the 12c Database from the Oracle Software Delivery Cloud: https://edelivery.oracle.com/
|
Note: AL32UTF8 should be selected as the option while installing it. Refer to Weblogic/ADF12.1.3 supported platforms documentation for other certified database versions. |
Download and Install of ADF Runtime 12.1.3. Download ADF Runtime 12.1.3 from OTN. This package is bundled with WebLogic 12c. For more information, see the chapter, Deploying ADF Applications in Oracle Fusion Middleware, Administering Oracle ADF Applications, 12c (12.1.3).
|
Note: The WebLogic Server 12c (Release 12.1.3) and ADF use Oracle Platform Security Services (OPSS); use by the Oracle 12c Database is not required of the Fusion Client application. |
This is the fourth pre-installation task, ensure that all previous pre-installation tasks are complete.
|
Note: ADF 12.1.3 is installed as a part of the WebLogic server 12.1.3 — you must apply the ADF patches separately. |
The RPAS Fusion Client is a Web-based client for RPAS. When you run the Fusion Client installer, the installer will require a domain set up over the WebLogic Server to deploy the Fusion Client as an application.
Before installing the RPAS Fusion Client, you must install the WebLogic Server and set up a domain for the Fusion Client. This chapter describes how you can set up the WebLogic Server for the Fusion Client. It includes the following sections:
|
Note: Once you set up the WebLogic server and domain, you must take note of the location where you installed the WebLogic domain. You will need to set up this location as an environment variable, WEBLOGIC_DOMAIN_HOME, before running the Fusion Client installer. |
Install the Oracle WebLogic Server and Application Development Runtime. For WebLogic Server installation instructions, refer to the Oracle WebLogic Server Documentation for guidance. For Application Development Runtime installation, refer to the Oracle Fusion Middleware Installation Guide for Application Developer.
In the following sections, the WebLogic installation directory is referred to as the <MW_HOME> directory.
|
Note: ADF12c is installed bundled with WebLogic 12c. There is no need to separately install it. |
You must apply the ADF Run Time Patches 18886249, 19473060, and 21832568 on top of
ADF 12c (12.1.3).
|
Note: When installing multiple versions of WebLogic on a system, it is recommended that you modify the base middleware directory to include a reference to the WebLogic Server version. |
To download and apply the patches:
Log on to the My Oracle Support Web site and download the patches 18886249, 19473060, and 21832568.
|
Note: After completion of the first patch installation, all steps should be repeated to download and apply the second patch. |
To download these patches:
In a Web browser, open the My Oracle Support Web at this URL:
Select a language and sign on to the Web site by clicking Sign In.
Once signed in, the My Oracle Support | Dashboard window opens.
Click the Patches & Updates tab.
On the Patch & Updates window, under Patch Search, click Patch ID or Number.
In the Patch ID or Number field, enter 18886249.
Optionally, you can also choose a platform from the Platform drop-down list.
Click Search. The Patch Search Results window opens.
In the Patch Search Results window, under Patch ID, click the relevant patch.
On the next window, click Download. It is located on the left side of the window.
|
Note: On the Patch Search Results window, you can also select the row that matches the patch description, and then click Download on the toolbar that appears under the selected row. |
Unpack the ZIP file to a temporary directory and navigate to this location.
Set the ORACLE_HOME and PATH environment variables using the following commands:
export $ORACLE_HOME=$MW_HOME/oracle_common
export PATH=$PATH:$ORACLE_HOME/OPatch
At the command prompt, run the following command to apply the patch:
opatch apply
Follow the prompts to complete the patch installation. For detailed instructions, refer to the README.txt file included in the patch directory.
You can now set up your WebLogic domain. For more information, refer to Setting Up a WebLogic Domain.
Run the Repository Creation Utility (RCU).
|
Note: RCU 12.1.3 comes with the Oracle Fusion Middleware Infrastructure (Not as separate software), $ORACLE_HOME/oracle_common/bin).For more information, see Oracle Fusion Middleware, Administering Oracle ADF Applications, 12c (12.1.3). |
The following items must be set when installing RCU:
Set ORACLE_HOME= DATABASE_INSTALL_DIR
Change the configuration of Database to opena pluggable Database
Login as sysdba--> sqlplus / as sysdba
alter pluggable database all open;
exit from SQL Prompt
Do LSNRCTL> status to find the name of the Pluggable Database. For example, pdborcl.idc.oracle.com
Set ORACLE_HOME= ADF_RUNTIME_INSTALL_DIR/oracle_common
Go to ORACLE_HOME/bin using Command Prompt and set RCU.bat as interactive
Give SID as the pdborcl.idc.oracle.com during INSTALL
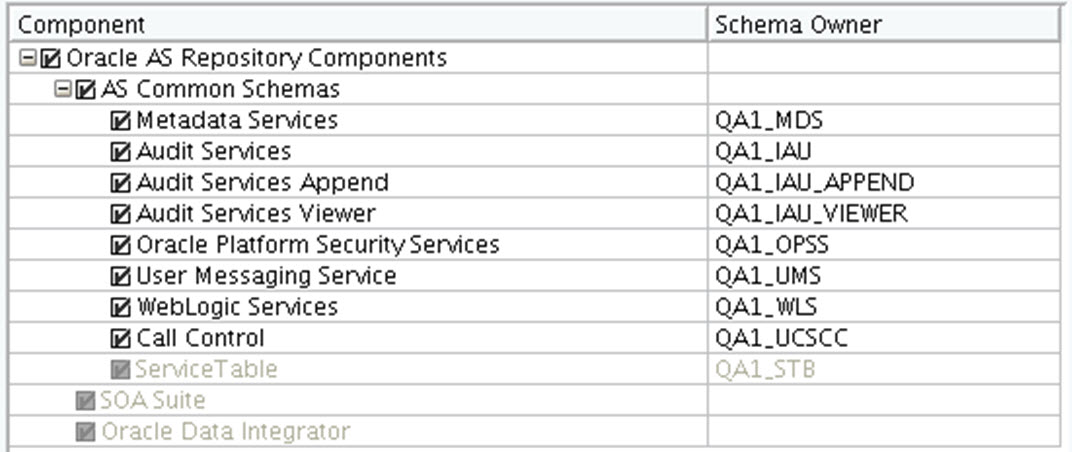
Create schemas. The following schemas must be created (where XXXX is a prefix):
XXXX_MDS
XXXX_IAU
XXXX_IAU_APPEND
XXXX_IAU_VIEWER
XXXX_OPSS
XXXX_UMS
XXXX_WLS
XXXX_UCSCC
Use the WebLogic Configuration Wizard to create and set up a domain on the WebLogic Server. This section describes how you can create and set up a domain. It also introduces the steps to configure the managed servers and clusters on the application server. For more information on the WebLogic Configuration Wizard and customizing the domain environments with managed servers, refer to the Oracle Fusion Middleware Creating Domains Using the Configuration Wizard.
|
Note: For headless installations, ensure that you set up the WebLogic Startup script with the java.awt.headless parameter. For more information, refer to Troubleshooting. |
To set up a WebLogic domain:
Navigate to the <MW_HOME>/common/bin directory, and run the following command to start the WebLogic Configuration Wizard in the graphical mode:
sh config.sh
On the WebLogic Configuration Wizard, follow the steps listed in Table 5-4:
Table 5-4 Steps to Setup a WebLogic Domain
| Step | Window | Task |
|---|---|---|
|
1. |
Welcome Window |
Click the Create a new WebLogic domain option, and then click Next. |
|
2. |
Select Domain Source Window |
Click the Generate a domain configured automatically to support the following products option, select the Oracle JRF - 12.1.3.0 [oracle_common] check box, and click Next. Notes:
|
|
3. |
Specify Domain Name and Location Window |
Enter a domain name in the Domain Name field. In the Domain location field, specify the location where you want to install the domain. This location is referred to as the WEBLOGIC_DOMAIN_HOME all through this document. |
|
4. |
Configure Administrator User Name and Password Window |
Set up an administrative user name and password. Important: Keep a note of the user name and password. You must specify this user name and password in the |
|
5. |
Configure Server Start Mode and JDK Window |
Under WebLogic Domain Startup Mode, click Production Mode. Under JDK Selection, select the relevant JDK. Click Next. |
|
6. |
Database Configuration |
Select the RCU Data default option. DBMS/Service: The database service ID (for example, orcl). Host name: The DNS name of the database machine. Port: the TNS listener port (for example, 1521). Schema Owner: The name of the service schema created by RCU. (for example ,DEV_STB) Schema Password: The password for the service schema. |
|
7. |
Select Optional Configuration Window |
Select the configurations you want to customize and click Next. Go to the Configure the Administration Server Window step or proceed directly to creating your domain by skipping the following steps and going to the Configuration Summary Window step. |
|
8. |
Configure the Administration Server Window |
Enter relevant information in the following fields:
Click Next. |
|
9. |
Configure Managed Servers Window |
Note: OPSS services need to deployed on all servers. Click Add, and then enter relevant information in the following fields:
Repeat this step to add more managed servers. Click Next. |
|
10. |
Configure Clusters Window |
This window opens, once you specify the managed servers. Click Add, and then enter relevant information in the following fields:
Repeat this step to specify more clusters. Click Next. |
|
11. |
Assign Servers to Clusters Window |
Use the arrow buttons and assign the servers to the clusters specified in the domain. Click Next. |
|
12. |
Configure Machines Window |
Click Add, and then add the machine (UNIX-based) information where the Fusion Client will be deployed. If you need to specify a local host because one of your target managed server is on the local host (meaning that it is the same as your admin server host), enter any of the following:
Do not enter an IP address of the local host because it will try to use SSH to copy files to the local host. This is not only unnecessary but may not work depending on the SSH environment and on whether you specified SSH properties. In a clustered installation involving multiple machines, this includes all the systems where the RPAS Fusion Client will be deployed. In other words, the installer looks for all machines defined in this section in order to copy files to each of them. If you do not want to install the product on a host, do not specify that host here. Note: Only define machines where you plan to run managed servers. Any additional machine definitions may unnecessarily cause the installer to copy configuration files to that machine. Click Next. |
|
13. |
Assign Servers to Machines Window |
Use the arrow buttons and assign the managed servers to the machines specified in the domain. Click Next. |
|
14. |
Target Deployments to Clusters or Servers |
In the left pane, select the clusters or servers, and then select the relevant application check boxes in the right pane to target them to the specific cluster or managed server. For each cluster and managed server, select the Library check box. The WebLogic domain must be set up in such a manner that all the clusters and the relevant managed servers include all the libraries included with the WebLogic server. |
|
15. |
Target Services to Clusters or Servers |
In the left pane, select the clusters or servers, and then select the relevant services check boxes in the right pane to target them to the specific cluster or managed server. |
|
16. |
Configuration Summary Window |
Review and confirm the configuration summary. Click Next. |
|
17. |
Creating Domain Window |
Displays the domain configuration progress. After the configuration is complete, click Done. |
After you have set up the WebLogic domain, ensure that you set up the maximum heap size for the WebLogic server. Setting a maximum heap size depends on your implementation.
For more information on heap sizing, refer to the Oracle Java documentation on Java Performance Tuning and the Oracle Fusion Middleware Performance and Tuning for Oracle WebLogic Server.
Setting up the garbage collection parameter for WebLogic server provides better performance with Fusion Client. Refer to the following links for more details.
|
Note: For information about setting Thread Counts, refer to: |
-Xgcpolicy:gencon
Requests the combined use of concurrent and generational GC to help minimize the time that is spent in any garbage collection pause.
-XX:+UseConcMarkSweepGC
http://www.oracle.com/technetwork/java/javase/gc-tuning-6-140523.html
On a Linux headless server, you should implement the two options covered in Troubleshooting if your installation hardware configuration requires them. This prevents problems when deploying or using the Fusion Client.
|
Note: This does not fall under the Garbage Collection parameter. |
When setting up a WebLogic cluster with multiple physical machines, ensure that you have completed the following tasks:
Installed WebLogic Server and the ADF Runtime libraries on identical paths on each machine. For example, the identical path could be:
/u00/webadmin/Oracle/Middleware
This path must exist on each machine's filesystem. If this is not done, the essential ADF runtime libraries will not deploy and the application will not run.
Copy the WebLogic domain structure from the Admin Server machine to all the managed server machines, ensuring identical filesystem locations. You can use the pack.sh and unpack.sh utilities to perform the copy. This process also copies the startWebLogic.sh script, which can be found in the domain directory. This script can be used to start up the managed servers.
|
Note: The previously listed considerations do not apply if the WebLogic Server and the domain are installed on a shared filesystem. |
There are two startup options for customizing managed server startup parameters: manual startup and Node Manager startup. These options are described in the following sections.
The managed servers in a WebLogic cluster can be started manually by using the startManagedWebLogic.sh script in the WebLogic domain directory. You can modify this script to customize server startup parameters such as JVM heap size, garbage collection settings, and so on.
Using NodeManager, choose one of the following options for server startup customization:
Setup custom server startup parameters for each managed server on the WebLogic Administration Console. These parameters can be accessed on the Server Start tab under Home -> Servers -> <managed-server-name>.
Specify startup parameters in the startup.properties file located in the following filesystem path:
<domain-home>/servers/<managed-server-name>/data/nodemanager
This file must exist on each server machine's filesystem.
|
Note: If a shared filesystem is in use, all thestartup.properties files must reside on that filesystem. |
Make NodeManager use a start script. The script on each server can be modified as needed, as described in Manual Startup. Use startWebLogic.sh as the base script and then modified as needed.
For more information about cluster-based installation, including information on installing a WebLogic server and setting up WebLogic clusters, refer to the Oracle Fusion Middleware Node Manager Administrator's Guide for Oracle WebLogic Server.
This is the fifth pre-installation task, ensure that all previous pre-installation tasks are complete.
|
Note: This step is optional and is for use with an OID-based policy store. |
By default, a file-based policy store is created when a WebLogic domain is created. It is supported, but be sure to set up controls to prevent unauthorized access to the policy files (located inside the domain directory).
An LDAP policy store is also supported by the Fusion Client. Currently only Oracle Internet Directory (OID) is supported. Refer to Upload Application Security Policies to OID-based Domain Policy Store for more information.
|
Note: DB-based policy store is not supported at this time. |
For guidance on setting up an OID-based policy store, refer to the chapter ”Configuring the OPSS Security Store” in the Oracle® Fusion Middleware Application Security Guide 11g Release 1 (11.1.1) Configuring the OPSS Security Store. This document is available through My Oracle Support.
This is the sixth pre-installation task, ensure that all previous pre-installation tasks are complete.
The RPAS Fusion Client installation media is included with the RPAS installation media. The installation files for the RPAS Fusion Client are available at the following location in the <RPAS_CD_IMAGE> directory:
<RPAS_CD_IMAGE>/FusionClient.zip
|
Note: The directory, <RPAS_CD_IMAGE>, is the temporary location where the RPAS installation media files were unpacked. |
This is the seventh pre-installation task, ensure that all previous pre-installation tasks are complete.
|
Note: It is recommended that you run the graphical installer the first time you are installing the RPAS Fusion Client. The installer creates a installer properties file for you.Refer to Installing the RPAS Fusion Client in Graphical or Text ModeLater on if you need to reinstall the RPAS Fusion Client, you can use this properties file (making any changes you see fit) and run the installer in silent mode. Refer to Installing the RPAS Fusion Client in Silent Mode |
To install the RPAS Fusion Client, it is recommended that you set up the installation properties file (ant.install.properties) before running the installer.
|
Note: For an installation in silent mode, you must set up the installation properties file before running the installer. For an installation in graphical or text mode, this is optional. |
To set up your ant.install.properties file:
Navigate to the RPAS Fusion Client directory, copy the ant.install.properties.template file to the same directory, and rename it ant.install.properties.
Edit the ant.install.properties file using any text editor, specifying values as described within the file, and save it. For more information on the parameters, refer to Installation Properties File Parameter Reference.
|
Note: Ensure that theant.install.properties file is available in the same directory with the install.sh script. |
Installation Use Cases
The following use cases can help you understand what to specify for various installation properties which have values that depend on how your domain is configured and whether you are installing for the first time. Your installation may be similar to one or multiple use cases. If your installation is a combination of use cases, all properties from the relevant use cases apply.
Installation on a Single Managed Server, Same Host as Admin Server
Installation on a single managed server located on the same physical host as the admin server:
Set input.appserver.host to either:
localhost
127.0.0.1.
Since the managed server is on the same physical host as the admin server, set input.is.multiple.hosts to No.
Any property that begins with input.ssh (SSH-related properties) is inconsequential and can be set to either Yes or No.
Installation on the Admin Server
Use the same guidelines as described in Installation Use Case 1.
Installation on a Single Managed Server, Different Host from Admin Server
Installation on a single managed server that is located on a different physical host as the admin server host:
Set input.is.multiple.hosts to Yes.
If using silent install, then you must set input.retrieve.credentials to Yes and prepare the wallet with WebLogic and SSH credentials, before install. Set it to No if you do not have SSH credentials stored in the wallet and need to specify the credentials yourself.
|
Note: Settinginput.retrieve.credentials to Yes implies that you have also saved the WebLogic admin credentials in the wallet. Either all user credentials are to be retrieved from the wallet (for WebLogic and SSH) or they are to be entered manually by the user in the installer UI.
If using the silent mode installer, then you must set |
All other SSH-related properties that begin with input.ssh must be set or ignored appropriately, so that files can be copied to the managed server host from the current host which is the admin server host.
|
Note: It is required that all machines have the same SSH UserID and password.Because the installer uses SCP to migrate files to remote hosts, you should ensure that you can copy files from the installation host to the target server using SCP and the specified parameters. If you cannot, the installer will fail. |
Installation on a Cluster of Managed Servers, Same Host as Admin Server
Installation of a cluster of managed servers, where all managed servers are located on the same physical host as the admin server:
Use the same guidelines as described in Installation Use Case 1.
Installation on a Cluster of Managed Servers, Different Host as Admin Server
Installation onto a cluster of managed servers, where at least one of the managed servers is located on a different physical host as the admin server host:
Use the same guidelines as described in Installation Use Case 3
Installation on Multiple Standalone Managed Servers, Same Host as Admin Server
Installation on multiple standalone managed servers that are not part of a cluster, where all managed servers are on the same physical host as the admin server host:
Use the same guidelines as described in Installation Use Case 1
Installation on Multiple Standalone Managed Servers, Different Host as Admin Server
Installation on multiple standalone managed servers that are not part of a cluster, where at least one managed server is located on a different physical host as the admin server host:
Use the same guidelines as described in Installation Use Case 3.
Table 5-5 describes the parameters in the ant.install.properties file that you must set up before you install the RPAS Fusion Client application:
|
Note: When the installation starts, values set for all the user credentials will be encrypted and stored in the Oracle Wallet, and then cleared from theant.install.properties file. Therefore, you will have to change the installation parameters to retrieve the credentials before attempting to re-install. |
Table 5-5 Installation Properties File Parameter Reference
| Parameter Name | Description |
|---|---|
|
Retrieve Credentials |
|
|
input.retrieve.credentials |
As mentioned previously, this applies to GUI mode of install. For silent, you must set it to Yes. You should set the value to Yes if you have stored user credentials to retrieve them later. If you do not have user credentials stored in the secure wallet, or if you want to overwrite the existing credentials or store new credentials, set the value to No. If using the silent mode installer, then you must set |
|
Target Installation Directory |
|
|
input.install.target.dir |
Specify the location where you want to install the RPAS Fusion Client. |
|
Logs and Temporary Directories |
|
|
input.wallet.dir |
Specify the location of the Oracle Wallet where the user credentials are to be saved or retrieved. This cannot be in or under the same temporary directory indicated by input.install.tmp.dir. |
|
input.app.log.dir |
Specify the location for the application log files. |
|
input.install.log.dir |
Specify the location for the installation log files. |
|
input.install.tmp.dir |
Specify the location for the temporary file directory used during installation. |
|
WebLogic Admin Server Information |
|
|
input.appserver.host |
Specify the host name where the application server is running. If the application server is running on the same host as the installer. If you need to specify a local host because one of your target managed server is on the local host (meaning that it is the same as your admin server host), enter any of the following:
If the application server is running on a different host as the installer, enter the DNS name or IP address of the host where the application server is running. You must also specify values for appropriate parameters starting with input.ssh. |
|
input.admin.server.port |
Specify the port number associated with the application server. |
|
input.admin.username |
Specify the administrative user name for the application server. |
|
input.admin.username.alias |
Specify an alias name for the administrative user. Specifying an alias name for the administrative user enhances the security for the application. When left blank, the alias name will default to the administrative user name. |
|
Application Configuration Information |
|
|
input.is.multiple.hosts |
To specify that your domain contains at least one managed server machine that is different from the admin server machine, set the value to yes. If all the managed server machines are on the same machine as the admin server machine, then set the value to no. In other words, even if you have a cluster with multiple managed servers or have multiple standalone managed servers, the value should be no if all of these managed servers are on the same machine as the admin server machine. |
|
input.sso.enabled |
Specify whether you want to install the application to be SSO enabled (set the value to yes). To install the application without configuring SSO, set the value to no. For more information on setting up SSO, refer to the Oracle Retail Application Server Administration Guide for the Fusion Client. |
|
SSH Credentials |
Applies to cluster-based installations only. |
|
input.ssh.authentication.mode |
Specify one of the following authentication methods:
This is only applicable if you are copying files to a remote host (meaning that at least one managed server is on a different physical host than the admin server host). |
|
input.ssh.username |
Specify the SSH user name to connect to the remote hosts. This is only applicable if you are copying files to a remote host (meaning that at least one managed server is on a different physical host than the admin server host). |
|
input.ssh.username.alias |
Specify the alias name associated with the SSH user name. This is used to store or retrieve the SSH credentials (SSH username, and either SSH password or passphrase) to and from the Oracle Wallet. This is only applicable if you are copying files to a remote host (meaning that at least one managed server is on a different physical host than the admin server host). |
|
input.ssh.keyfile |
Enter the location of the SSH key file. When left blank, the installer retrieves the file from ${user.home}/.ssh/id_dsa directory, where user.home is your home directory. To use this default location, ensure that you have the private DSA key stored at this location. This is only applicable if you are copying files to a remote host (meaning that at least one managed server is on a different physical host than the admin server host). |
|
Application Server Information |
|
|
input.target.server.name |
Specify the cluster or managed application server names where you want to install the RPAS Fusion Client. |
|
User Information |
|
|
input.security.user= [user1,user2,user3, and so on.] input.security.group= [group1,group2,group3, and so on.] |
Enter enterprise users or groups for SSO, LDAP/WebLogic (supported), and WebLogic attached (for demos/development) authentication. These users and groups refer to the User IDs and user groups that are created in the ID store. The users (user or group names) you list here inform the installer which users and user groups are allowed to access the Fusion Client. The users listed in the SSO ID store must be users of the RPAS solution deployed on the RPAS Fusion Client. To support SSO, the Web deployment descriptors need to be configured to allow access pages to SSO-authenticated requests. During the application installation, the names entered here are added to the Web deployment descriptor file ( Note: Using group names is preferred over user names as it allows you to add new users to the group without making changes to the deployment descriptor. The RPAS Fusion Client application roles are mapped to the enterprise roles or groups in this deployment descriptor file. For more information on setting up SSO, refer to the Appendix: Oracle Single Sign-On (SSO). |
|
Application Deplormation |
|
|
input.app.name |
Specify an application name. The RPAS Fusion Client will be deployed over the WebLogic Server with this name. |
|
input.app.context.root |
Specify the context root for the application. Once deployed, the RPAS Fusion Client will be available on the Web browser using this context path. For example, in case you set the context root to rav, you can access the application using the URL: |
|
input.app.image.repository |
Specify the location or a network path where the images used in the application are located. A directory named repository must be created under the path specified for the input.app.image.repository. The images reside in the repository directory. Without the repository directory under the path specified in input.app.image.repository you will be unable to add/view repository images. You may create sub-directories under the repository directory, to store the images. In the Fusion Client and in the measure, the File Path starts at repository. For example, you may enter |
|
RPAS Information |
|
|
input.rpas.solution.details.known |
Specify whether you know the details of the RPAS solution infrastructure and domain. |
|
input.rpas.solution.id |
The RPAS Solution ID for your RPAS application. |
|
input.rpas.solution.desc |
Specify the RPAS solution description which is displayed in the fusion client to let you select the solution. |
|
input.rpas.server.name |
Specifies the host name of the DomainDaemon from the RPAS Server installation. |
|
input.rpas.server.port |
Specifies the port number of the DomainDaemon from the RPAS Server installation. |
|
input.rpas.domain.path |
Specify the location where the RPAS domain is installed. |
|
Automatic creation of SSL certificates |
|
|
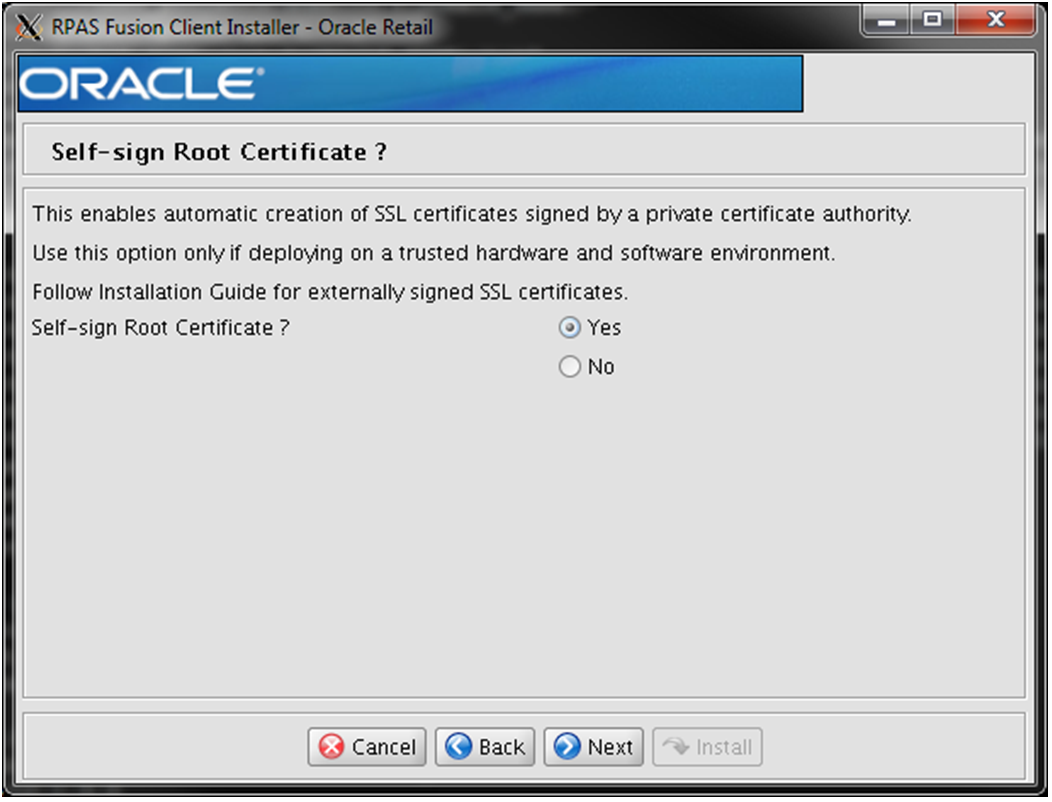
input.useSelfSignedRootCertificate |
The process of creating and configuring SSL certificates can be automated in order to cater to the common case where all the deployed RPAS components are under the customer's control. This property (when set to Yes) triggers automatic creation of SSL certificates signed by a private certificate authority. At the end of the process, the customer only has to copy the server wallet directory to its correct destinations. Use this option only if deploying to a trusted hardware and software environment that is under the control of a single business entity. Where the RPAS client or the server is not in the customer's control, externally signed SSL certificates are recommended. For additional information, refer to the section, Setup SSL. |
|
Plug-ins (optional) |
|
|
input.homepage.module |
The plug-in module shown on the Fusion Client UI home page. Module name needs to be prefixed by the name of the bundle that it belongs to: input.homepage.module=<bundlename>:<module Name> For example: input.homepage.module=aip:dashboard |
|
input.installed.bundles |
The comma-separated list of names of plug-in bundles that need to be associated with the Fusion Client (the bundles are expected to have been previously installed). This information needs to be obtained from the bundle packages: input.installed.bundles=<list> For example: input.installed.bundles=aip,poview |
|
input.installed.bundles.shared.libs |
List of names of the WebLogic shared libraries that the bundles will be deployed as, on the WebLogic server The order of entries of the installed bundles and installed shared libraries is important. A bundle in a particular position in the former property will receive the library name that it is in the same position in the latter property. When selecting names for installed bundles and installed shared libraries, consider naming them after the bundle name (for ease of remembering which bundle a particular shared library corresponds to). For example: input.installed.bundles.shared.libs = aipdashboard.shared.lib, poview.shared.lib |
|
BI Reports/MDS |
|
|
input.mds.isConfigured |
Whether to use an existing MDS repository or have the installer create a new one |
|
input.mds.repository.type |
The repository type. Use either File or DB. File is the default. |
|
input.mds.repository.name |
The name of the MDS repository. |
|
input.mds.partition.name |
The partition name . The default is |
|
input.mds.repository.path |
The file system path of the repository, applies to File-based type. The JNDI name of the repository if DB-based. If File-based: If DB-based: |
|
input.mds.dbvendor |
The type of DB. Makes sense only for DB-based repository. Note: Only Oracle DBs are supported. |
|
input.mds.hostname |
The host name of the DB server. |
|
input.mds.port |
TNS listener port number for the host name. |
|
input.mds.dbname |
The database service name. |
|
input.mds.user.alias |
The database user alias. Enter the DB user and password in the installer's credential store wallet prior to installation. |
This is the eighth pre-installation task, ensure that all previous pre-installation tasks are complete.
Before you start the installation, ensure that the following environment variables are set in the system:
WEBLOGIC_DOMAIN_HOME – Location where the WebLogic domain is installed. For more information, refer to Setting Up the WebLogic Server.
MIDDLEWARE_HOME – Location where the WebLogic server is installed. For more information, refer to Setting Up the WebLogic Server. This environmental variable is mandatory.
ORAINST_HOME – An absolute path to the file containing the central inventory information. This file must define the inventory_loc and inst_group variables in it. The inst_group value should be the UNIX group for the OPatch utility.
For example:
inventory_loc=/home/weblogic/oraInventoryinst_group=users
|
Note: You do not need to set JAVA_HOME or ORACLE_HOME. Regardless of your JAVA_HOME, JAVA_HOME is set by the installer to the one used by the WebLogic domain pointed by WEBLOGIC_DOMAIN_HOME. The same is true for ORACLE_HOME, which is set by the installer to the value needed during installation. |
Although it is recommended that these variables be set up in relevant bash shell startup files (.bash_profile) of the system, you can also set up the variables using the EXPORT command at the UNIX prompt. For more information on setting up these variables in the startup files, refer to the operating system documentation.
To set up the environment variables for the current session, at the UNIX prompt type the following commands in sequence:
export WEBLOGIC_DOMAIN_HOME=<path where the WebLogic domain is installed>
For example, /u01/app/oracle/middleware/user_projects/domains/base_domain
This is the ninth pre-installation task, ensure that all previous pre-installation tasks are complete.
The OPatch path must be included in the PATH variable for the validation to run. This export is mandatory:
export PATH=<ORACLE_HOME>/OPatch:$PATH
When you launch the installer, it attempts to validate the version of WebLogic and the associated Oracle Application Development Framework (ADF) version for this release. You may want to run these validations without launching the installer in a standalone fashion prior to running the installer. There are two shell scripts that you can run to do this. In the <installer>/common directory, there are two files:
validateWls.sh for validating the WebLogic version
validateAdf.sh for validating the Oracle ADF version
You can run each of these scripts independently without any argument:
sh validateWls.sh
sh validateAdf.sh
If the validation is successful, the scripts print a success message: Found supported version of WebLogic Server x.x.x. Or, it exits with an error message that describes the issue. After addressing the issue, you may want to run the scripts again.
This is the tenth and final pre-installation task, ensure that all previous pre-installation tasks are complete.
|
Note: This step is only required when Installing the RPAS Fusion Client in Silent Mode. If Installing the RPAS Fusion Client in Graphical or Text Mode, you can enter the credentials in the GUI. |
Information such as user credentials for the RPAS Fusion Client is encrypted and stored in a secure location in the application installation directory. This location is called the Oracle Wallet.
When the installation starts, the administrative user credentials are retrieved from the Oracle Wallet based on the alias name specified in this window.
|
Note: Before installing the RPAS Fusion Client in silent mode, you must create user credentials in an Oracle Wallet. This step is optional when installing in text or graphical mode. |
There are two kinds of credentials that the silent-mode installer demands to be stored in the wallet before it starts:
WebLogic admin userid and password: Stored against the alias wlAdmin (or whatever alias is configured within the ant.install.properties file against the input.admin.username.alias property. username: WebLogic admin user name.
Client-side SSL keystore access password: The userNameAlias must be fckey, however, the username can be anything as it is ignored. At runtime, this password is accessed from the WebLogic domain credential store and used to read the SSL key stores deployed on the Fusion Client.
The respective passwords are prompted for by the save_credential.sh script
The following steps describe how to create the user credentials:
Set and export the JAVA_HOME variable.
Cd to <installer>/retail-public-security-api/bin.
Run sh save_credential.sh <userNameAlias> <username> <locationOfWalletDir>.
The following table describes the field options to run the script in Step 3.
|
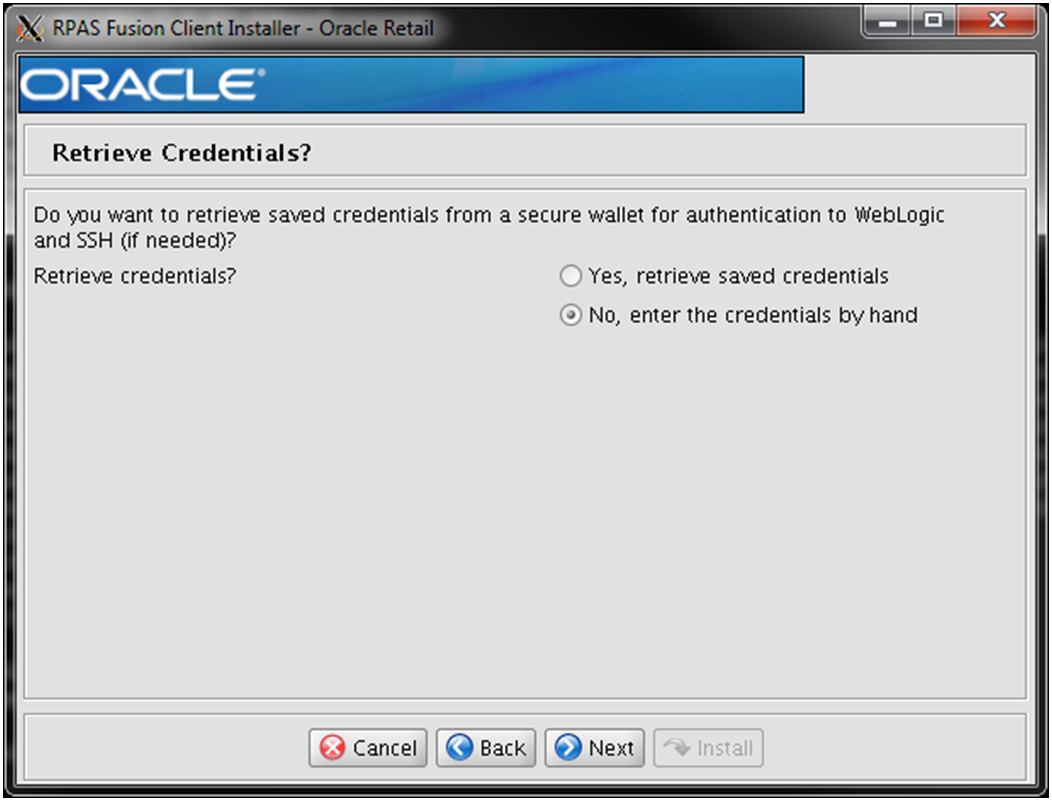
Note: Credentials can be used in GUI mode if you select Yes to Retrieve Credentials from the wallet as shown in Figure 5-5, "Retrieve Credentials? Window". |
| Field Option | Description |
|---|---|
| <userNameAlias> | The keyname for which the credentials need to be stored. |
<username> |
The username to be stored in a secure credential wallet for the specified userNameAlias. |
<locationOfWalletDir> |
The directory where the wallet will be created. This is an optional parameter. If omitted, it creates the wallet under: <installer>/retail-public-security-api/secure-credential-wallet. |
After you have completed the steps in the Pre-Installation Tasks section, you can start installing the RPAS Fusion Client.
|
Note: Install any Solution Plug-ins first. For more information, refer to Appendix: Installing Solution Plug-ins or the installation instructions for the specific Oracle Retail application. |
The RPAS Fusion Client Installation media includes an Oracle installer that you must run to install the RPAS Fusion Client. The installer installs the application based on the parameters specified in an installation properties file.
You can install the application in either of these modes:
Installing the RPAS Fusion Client in Silent Mode - In silent mode, the installer processes the values set in the properties file with no manual intervention required.
Installing the RPAS Fusion Client in Graphical or Text Mode- In graphical or text mode, the Oracle Installer will prompt you to enter or modify the value of properties specified in the installation properties file.
This section describes how to install RPAS Fusion Client in silent mode. Silent mode is non-interactive.
|
Note: If you are reinstalling the Fusion Client after installing an RPAS application, you must backup thergbu_planning_home/Help/ohwconfig.xml file and restore it after the installation. Otherwise, access to the application's help files is lost. |
To install RPAS Fusion Client in silent mode:
Ensure that you have completed Setting Up Your Installation Properties File.For more information on the parameters, refer to "Installation Properties File Parameter Reference.".
|
Note: Ensure that theant.install.properties file is available in the same directory with the install.sh script. |
|
Note: This product's installer includes Ant.If Ant is already installed on your system and is version 1.6.5 or earlier, then you must rununset ANT_HOME on the command line to ensure that the installer uses the included version. The unset ANT_HOME command must be run before ./install.sh. |
Ensure that you have saved these user credentials in an Oracle Wallet:
WebLogic domain admin user credential (the entry alias is configurable)
Client-side SSL keystore credential (the entry alias is fckey and it is not configurable)
The silent mode installer does not ask for user credentials. Instead it retrieves them from the Oracle Wallet.
For more information, refer to Creating User Credentials in an Oracle Wallet.
|
Note: The installation propertyinput.retrieve.credentials must be Yes. |
Ensure that the RPAS Domain and WebLogic Server are running.
Navigate to the RPAS Fusion Client installation folder, enter the following command:
./install.sh silent
The install.sh command enables you to install RPAS Fusion Client.
Use any arguments listed as needed:
| Argument | Description |
|---|---|
| a. | Argument |
| b. | Description |
| c. | <mode name> |
| d. | Use this argument to specify the installation mode. You can specify the following:
|
If you prefer to use a guided user interface (GUI), you can use the Oracle Installer in the graphical or text mode. Although this section describes how you can install the RPAS Fusion Client in graphical mode, the same on-screen instructions appear as text instructions in the text mode.
|
Note: Although you do not have to set up the installation properties file when installing in graphical or text mode, it is helpful. If you set up values in the properties file, those values will be the default values in the graphical or text mode dialog.For instructions on setting up this file, refer to Setting Up Your Installation Properties File. If you are reinstalling the Fusion Client after installing an RPAS application, you must backup the |
|
Note: This product's installer includes Ant.If Ant is already installed on your system and is version 1.6.5 or earlier, then you must rununset ANT_HOME on the command line to ensure that the installer uses the included version. The unset ANT_HOME command must be run before ./install.sh. |
To install RPAS Fusion Client using the GUI:
Ensure that the RPAS Domain and WebLogic server are running.
If you are viewing the installer from a Windows client:
On the Windows client, start an Xserver program that enables you to emulate the X terminal.
On the application server, set the display for the Windows client where you want the Oracle Installer to display as follows:
export DISPLAY=<IP address>:0.0
From your application server machine, enter the following command:
./install.sh
When the installer runs, it attempts to validate the version of WebLogic and the associated Oracle ADF that are used by the WebLogic domain. If you encounter a validation error, fix the problem and try again.
|
Note: If you want, you can skip these validations by setting and exportingSKIP_FC_VALIDATION=1 before running the installer. |
For more information about the install.sh command refer to the section, Installing the RPAS Fusion Client in Silent Mode.
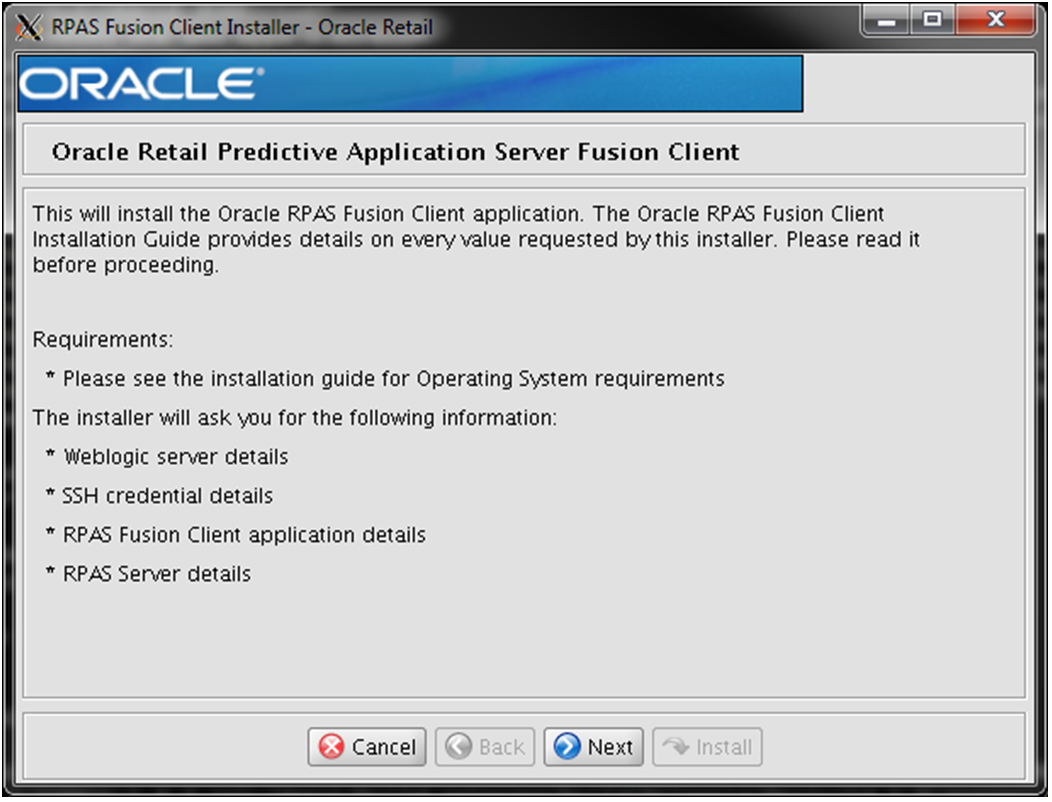
The Oracle Retail Predictive Application Server Fusion Client Window opens. Click Next.
The Retrieve Credentials? Window opens.
Select whether to retrieve user credentials from the Oracle Wallet:
Select Yes to indicate that the installer will read the user credentials from an Oracle Wallet
Select No to indicate that you will enter the user credentials in the user interface.
Click Next.
The Target Install Directory Details Window opens.
In the Installation Target Directory field, specify the location where you want to install the RPAS Fusion Client. Click Next.
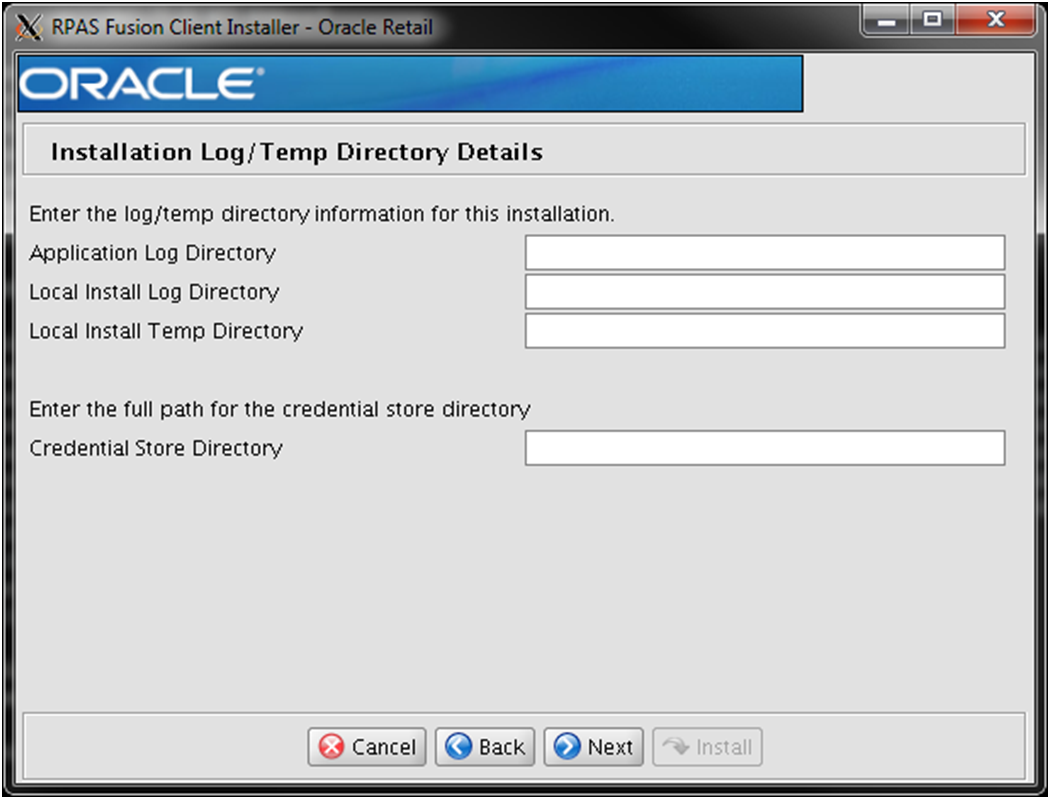
The Installation Log/Temp Directory Details Window opens.
Enter the relevant information in the following fields and click Next:
| Field | Description |
|---|---|
| Application Log Directory | Specify the location for the application log files. |
| Local Install Log Directory | Specify the location for the installation log files. |
| Local Install Temp Directory | Specify the location for the temporary file directory used during installation. |
| Credential Store Directory | Specify the location of the Oracle Wallet you want to use to save or retrieve user credentials. This cannot be in or under the same temporary directory named in the Local Install Temp Directory field. |
|
Note: By default, all fields (except Credential Store Directory) are pre-populated based on the installation directory you specified in the Target Install Directory Details Window. |
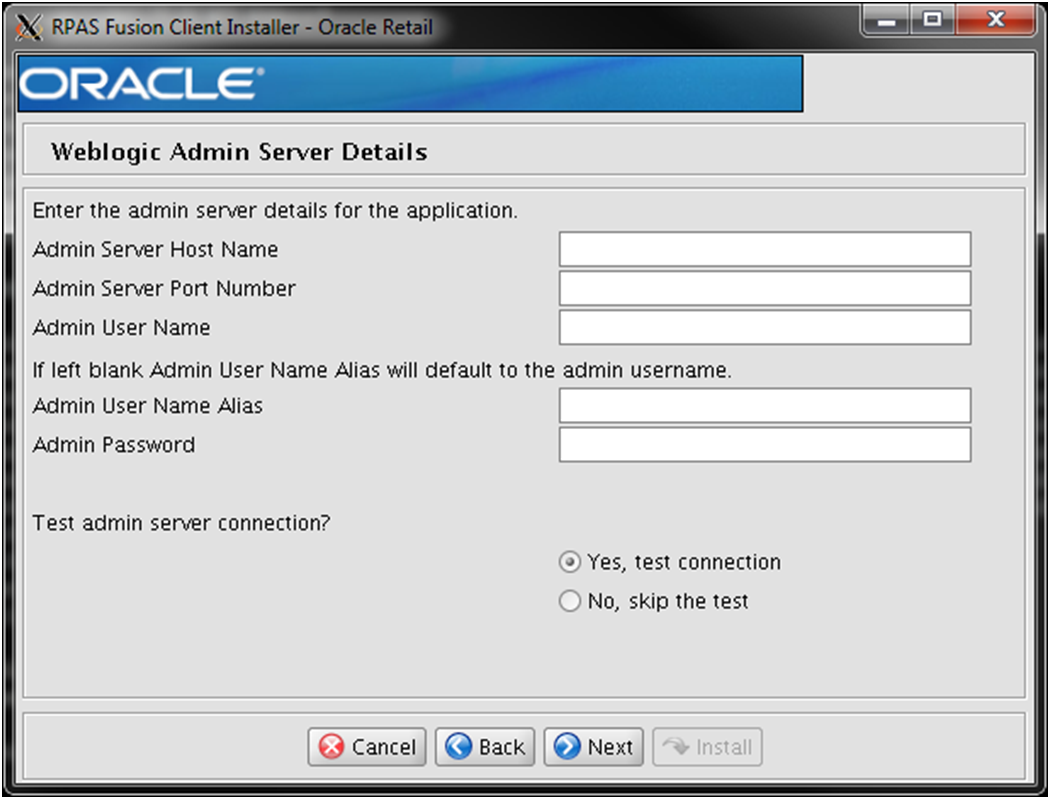
The WebLogic Admin Server Details Window opens.
Enter appropriate information for the following fields and click Next:
| Field | Description |
|---|---|
| Admin Server Host Name | Specify the host name of the application server. |
| Admin Server Port Number | Specify the port number associated with the application server. |
| Admin User Name | Specify the administrative user name for the application server. |
| Admin User Name Alias | Specify an alias name for the administrative user. Specifying this name enhances the security for the application. When left blank, the alias name defaults to the administrative user name.
Refer to the note following this table. |
| Admin Password | Specify the password associated with administrative user name. |
| Test admin server connection? | Select Yes if you want to test the connection to the admin server.
Select No if you want to advance to the next window without testing the connection |
|
Note: Information such as user credentials for the RPAS Fusion Client is encrypted and stored in a secure location in the application installation directory. This location is called the Oracle Wallet.When the installation starts, the administrative user credentials are retrieved from the Oracle Wallet based on the alias name specified in this window. |
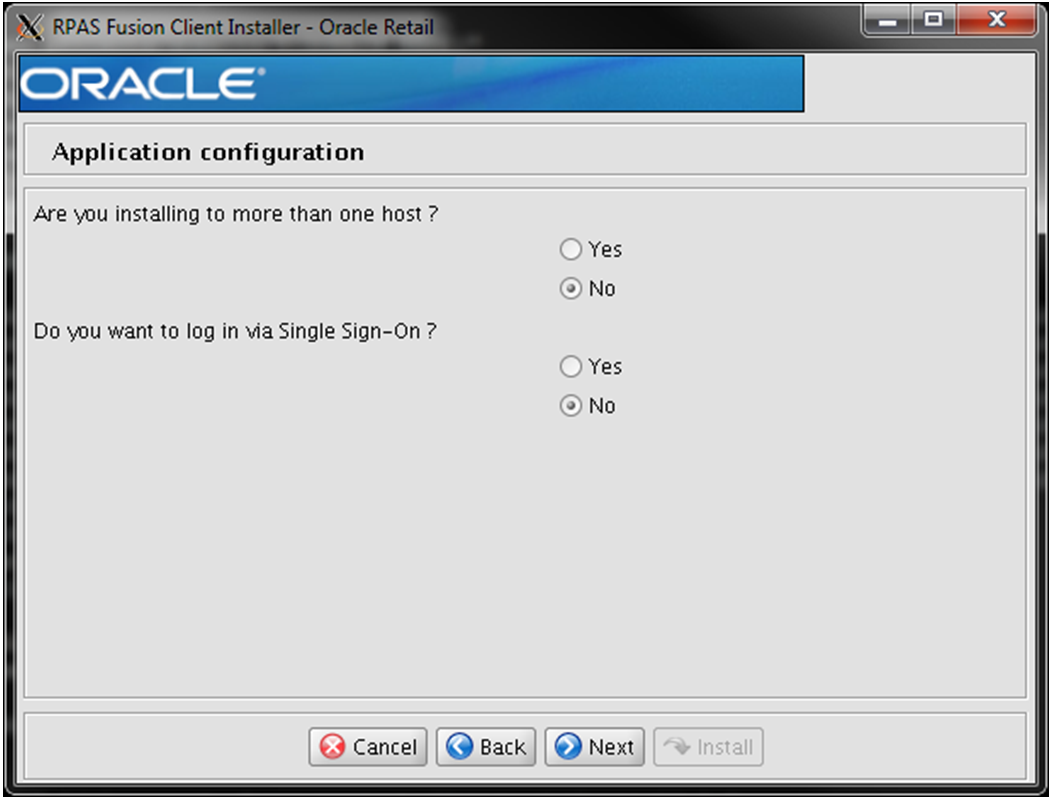
The Application Configuration Window opens.
Are you installing to more than one host?
| Option | Description |
|---|---|
| Yes | This indicates an installation where at least one managed server is running on a remote machine (remote to the admin server machine).
Go to Step 10. |
| No | This indicate an installation where all of the managed servers for deploying the Fusion Client are running on the same machine as the admin server machine, or if you are deploying to the admin server only.
Go to Step 11. |
Do you want to log in via Single Sign-On?
Select Yes to indicate that you want use this feature. Go to Step 16.
Click Next.
|
Note: For more information on the setting up SSO, refer to the section, Set Up Single Sign-On (SSO). |
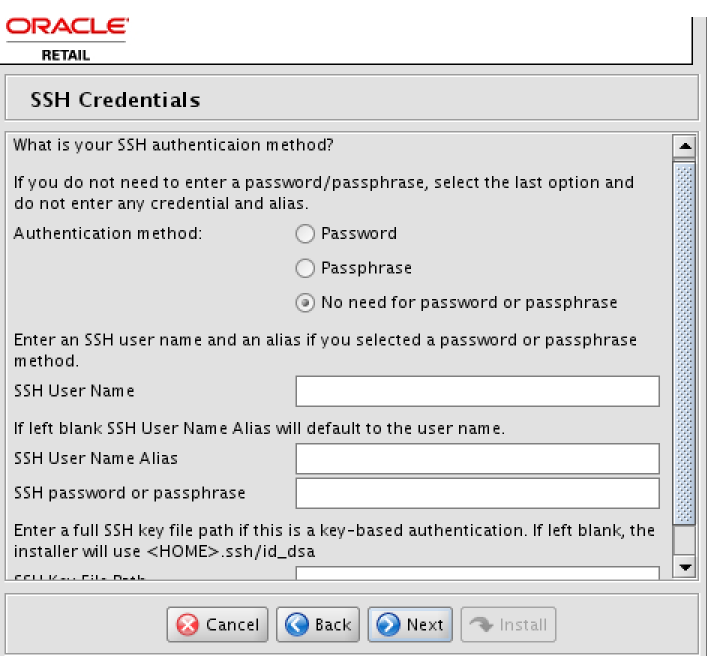
The SSH Credentials Window opens if you selected Yes on the Application Configuration Window, otherwise continue to Step 11
Enter the relevant information in the following fields and click Next:
| Field | Description |
|---|---|
| Authentication method | Select one of the following authentication methods:
|
| SSH User Name | Specify the SSH user name to connect to the remote hosts. |
| SSH User Name Alias | Specify the alias name associated with the SSH user name. Specifying an alias name enhances the security for the application. When left blank, the alias name will default to the administrative user name.
Refer to the first note following this table. |
| SSH password or passphrase | Based on the authentication method you selected, enter the relevant SSH password or passphrase. |
| SSH Key File Path | In case you selected the Passphrase option in the Authentication Method field, enter the location of the SSH key file.
When left blank, the installer will retrieve the file from ${user.home}/.ssh/id_dsa directory, where user.home is your home directory. To use this default location, ensure that you have the private DSA key stored at this location. Refer to the second note following this table. |
|
Note: Information such as user credentials for the RPAS Fusion Client is encrypted and stored in a secure location in the application installation directory. This location is called the Oracle Wallet.When the installation starts, the administrative user credentials are retrieved from the Oracle Wallet based on the alias name specified in this window. |
|
Note: The SSH User Name and SSH password or passphrase fields do not appear when you choose to retrieve the existing SSH credentials (the Yes, retrieve saved credentials option in the Retrieve Credentials? Window).The existing SSH user credentials will be retrieved based on the alias name for the SSH user. |
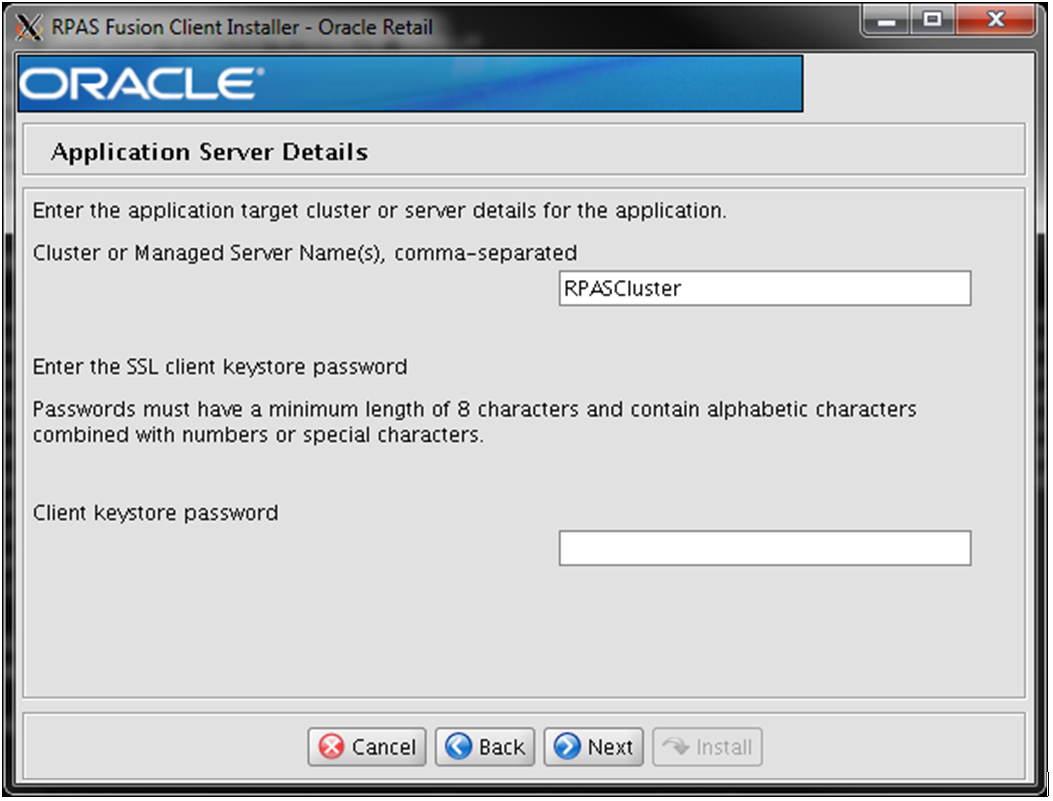
The Application Server Details Window opens.
Enter relevant information for the following fields and click Next:.
| Field | Description |
|---|---|
| Cluster or Managed Server Names, comma-separated | Enter the cluster or managed server names where you want to deploy the fusion client. |
| Client keystore password | Enter the client keystore password which will be used for client authentication.
For additional information about the client keystore password, refer to Setting Up a Trust Store in the JKS Format. |
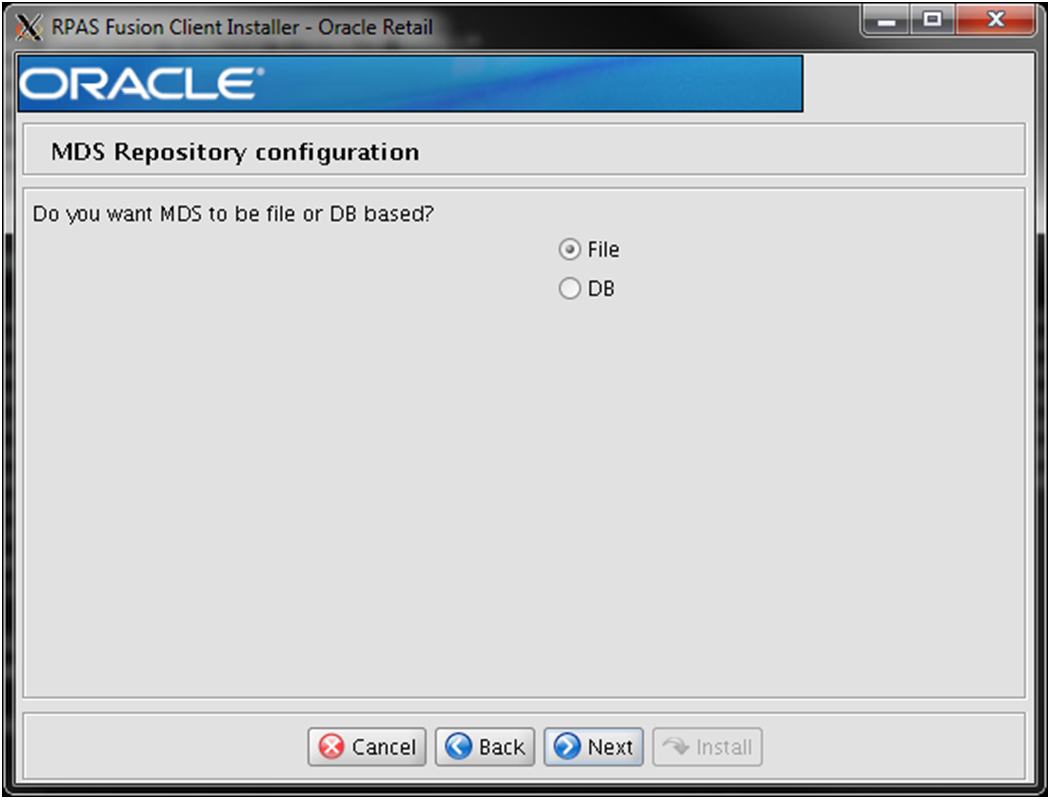
The MDS Repository Configuration Window opens.
Select one of the following options and click Next:
|
Note: It is strongly recommended to let the RPAS installer create an MDS repository using the default values as it greatly simplifies the process of installation. |
The 2nd MDS Repository Configuration Window opens.
Select one of the following options and click Next:
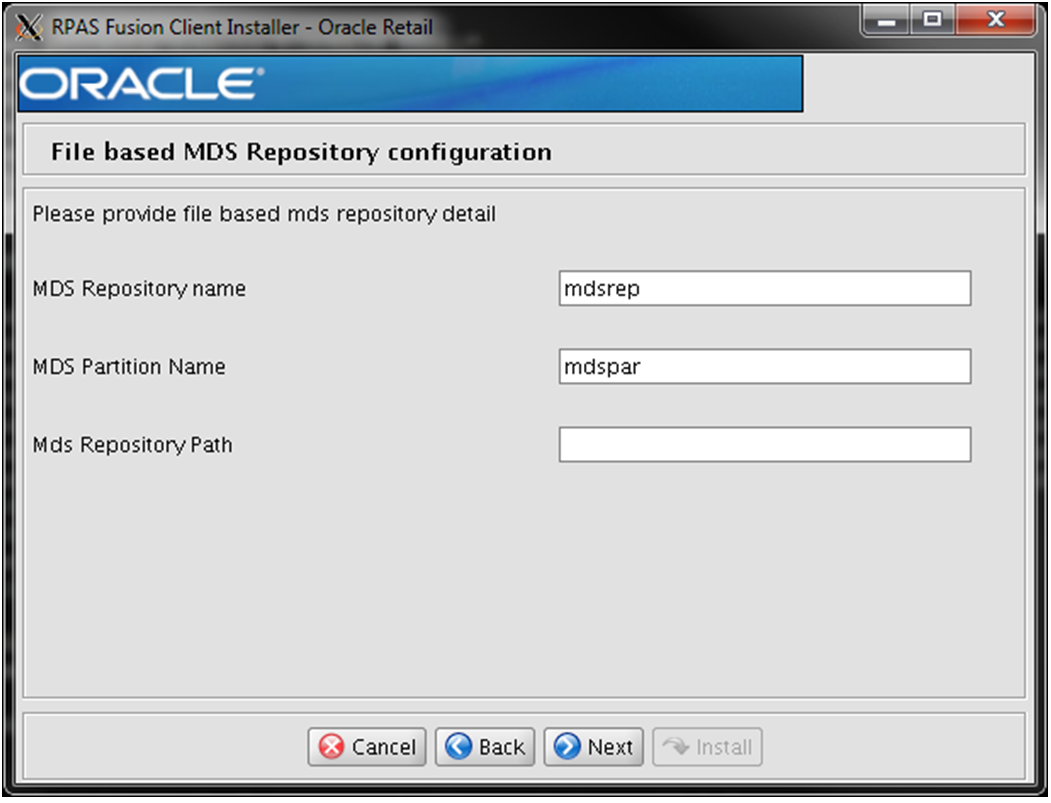
Either an existing file based repository is used, or a new one has to be created.The File Based MDS Repository Configuration Window opens.
Enter relevant information for the following fields and click Next:
| Field | Default Value |
|---|---|
| MDS Repository Name | mdsrep |
| MDS Partition Name | mdspar |
| MDS Repository Path | <install-dir>/mdsrep |
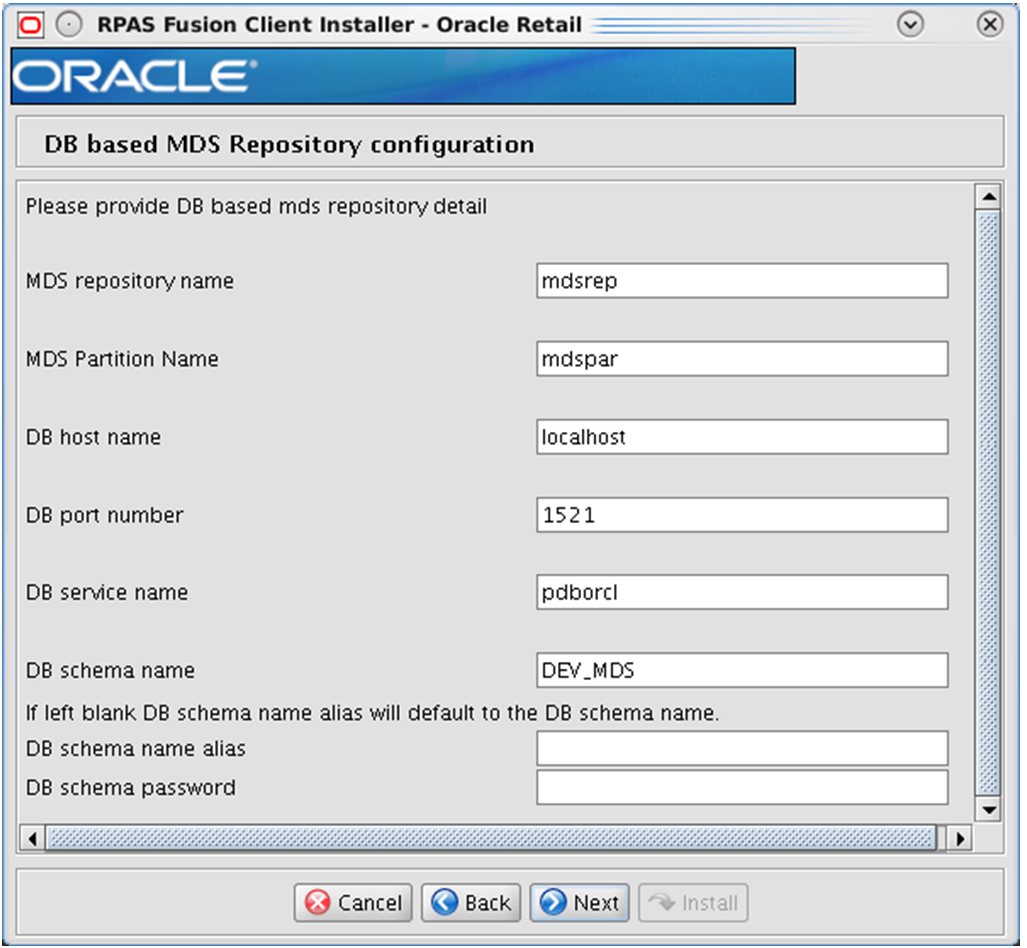
Either an existing DB based repository is used, or a new one has to be created.The DB Based MDS Repository Configuration Window opens.
|
Note: A DB schema must be created beforehand using the RCU as described in the sections "Running the RCU" and "Creating Schemas." Ensure that the option for Metadata Services is selected in the RCU. |
To create a new DB based MDS Repository, enter relevant information for the following fields and click Next:
| Field | Default Value |
|---|---|
| MDS Repository Name | mdsrep |
| MDS Partition Name | mdspar |
| DB Host name | localhost |
| DB Port Number | |
| DB Service Name | |
| DB Schema Name | DEV_MDS |
| DB Schema Name Alias | If left blank, it defaults to the DB schema name |
| DB Schema Password |
To update an existing DB based MDS Repository, only enter information for the following fields and click Next.
|
Note: The MDS Repository Name is as specified while creating the repository, but without the "mds-" prefix that gets automatically added while creating it. For example, suppose you created an MDS repository called "mdsrep2" using the Enterprise Manager tool. Enterprise Manager automatically generates the repository name as "mds-mdsrep2". Here you enter the value as "mdsrep2", that is to say you skip the prefix. |
| Field | Default Value |
|---|---|
| MDS Repository Name | mdsrep |
| MDS Partition Name | mdspar |
| MDS repository JNDI name | jdbc/mds/mdsrep
Note: This has to match the JNDI name that was assigned to the MDS repository. |
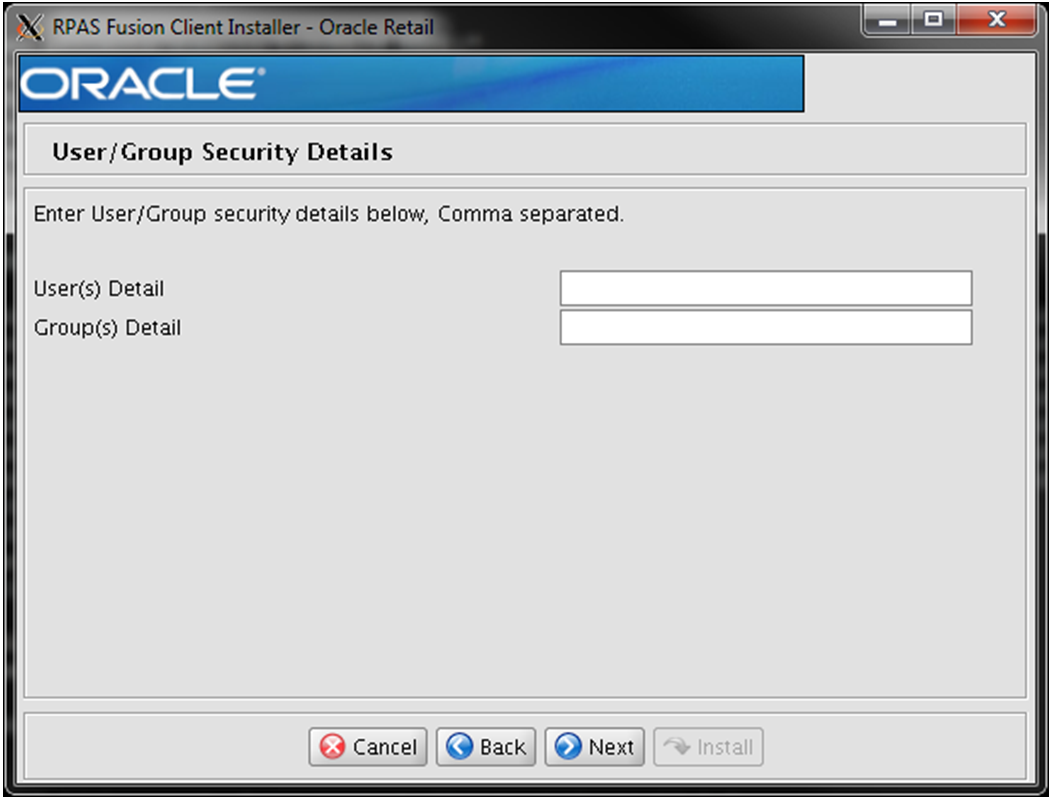
The User/Group Security Details Window opens.
Enter relevant information for the following fields and click Next:
|
Note: Users and Groups are processed by the installer only if using a file-based policy store.For guidance on setting up an OID-based policy store, refer to the chapter ”Configuring the OPSS Security Store” in the Oracle® Fusion Middleware Application Security Guide 11g Release 1 (11.1.1) Configuring the OPSS Security Store. This document is available through My Oracle Support. If using an OID-based policy store, then user/group information entered here is not used. See Upload Application Security Policies to OID-based Domain Policy Store for instructions. |
| Field | Description |
|---|---|
| User(s) Detail | Enter all user names; each separated by a comma.
input.security.user= [user1,user2,user3, and so on.] |
| Group(s) Detail | Enter all user group names; each separated by a comma.
input.security.group= [group1,group2,group3, and so on.] |
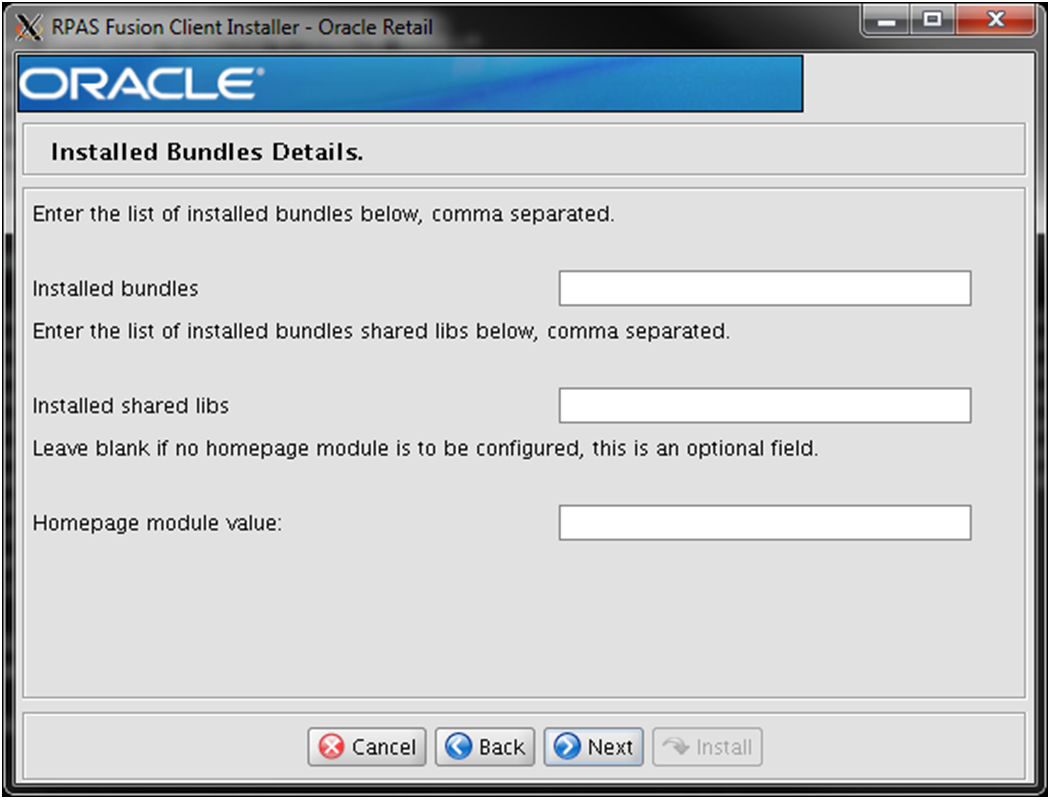
The Installed Bundles Details Window opens.
|
Note: The order of entries of the installed bundles (also known as solution plug-ins or functional modules) and installed shared libraries is important. A bundle in a particular position in the former property will receive the library name that it is in the same position in the latter property.When selecting names for installed bundles and installed shared libraries, consider naming them after the bundle name (for ease of remembering which bundle a particular shared library corresponds to). For example: input.installed.bundles.shared.libs = aipdashboard.shared.lib, poview.shared.lib |
Enter relevant information for the following fields and click Next:
| Field | Description |
|---|---|
| Installed bundles | Enter the list of installed bundles (also known as solution plug-ins or functional modules); each separated by a comma.
For example:aip,poview |
| Installed shared libs | Enter the list of installed shared libraries each separated by a comma.
For example: aipdashboard.shared.lib, poview.shared.lib |
| Homepage Module value | Enter any homepage modules
For example: aip:dashboard |
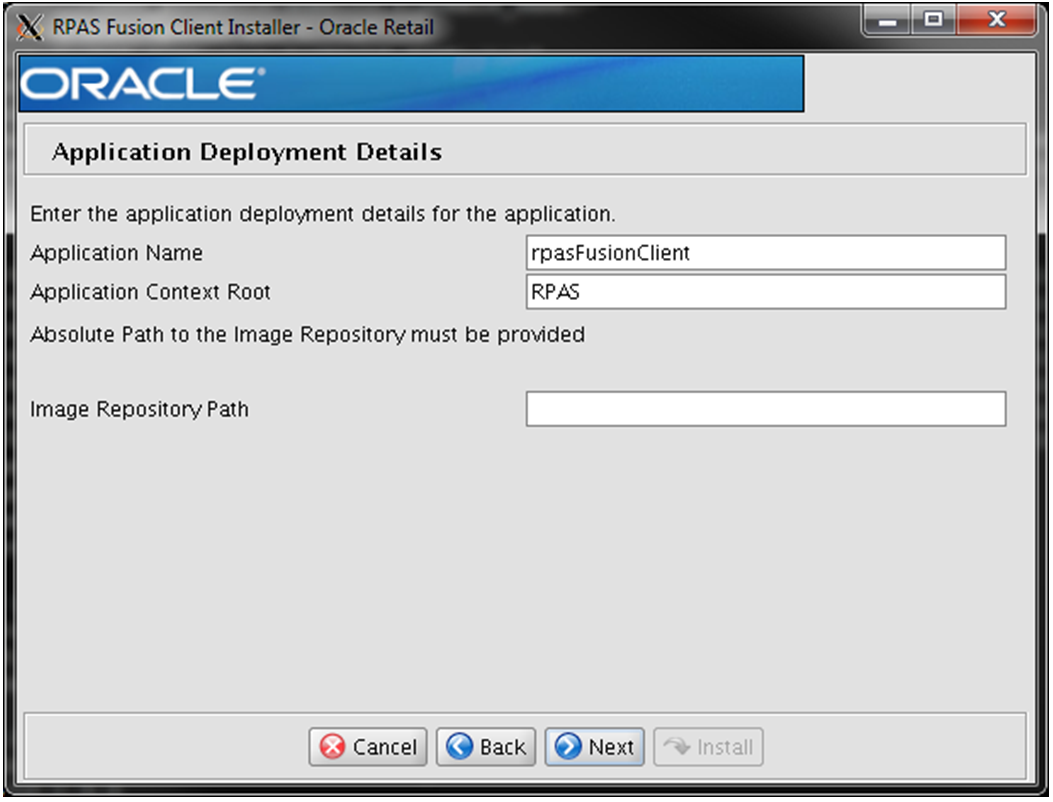
The Application Deployment Details Window opens.
Enter relevant information for the following fields and click Next:
| Field | Description |
|---|---|
| Application Name | Specify an application name. The RPAS Fusion Client will be deployed over the WebLogic Server with this name. |
| Application Context Root | Specify the context root for the application. Once deployed, the RPAS Fusion Client will be available on the Web browser using this context path. For example, if you set the context root to rav, you can access the application using the URL: http://<hostname>:<port>/rav. |
| Absolute Path to the Image Repository | Specify the location or a network path where the images used in the application are located. Images should be located in the repository folder under the specified path. |
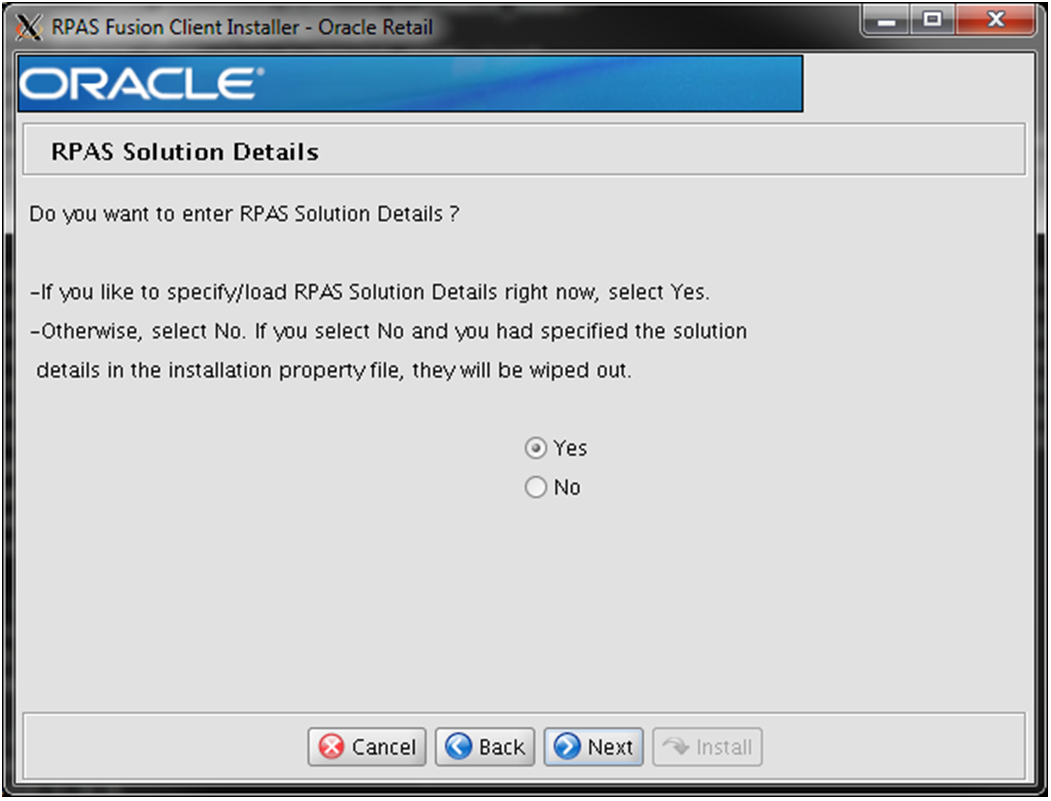
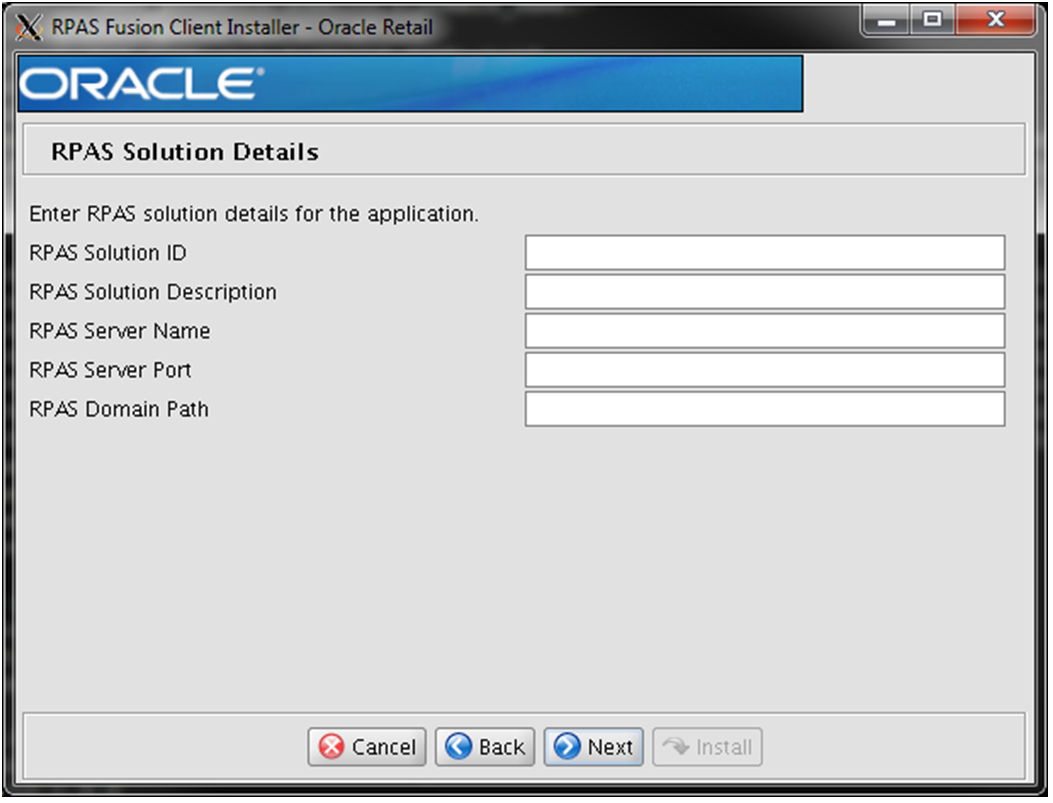
The RPAS Solution Details Window opens.
Select one of the following options and click Next:
Select Yes to enter RPAS Server and Domain details in the Installer. During the installation, the relevant RPAS Fusion Client configuration files will be updated based on the information you enter here. Go to Step 20.
Select No to skip adding the RPAS Server and Domain details and add them later manually. For more information on adding this configuration manually, refer to the Oracle Retail Predictive Application Server Administration Guide for the Fusion Client. Go to Step 22.
The RPAS Solution Details (2) Window opens with fields to collect RPAS Solution information.
Enter relevant information for the following fields and click Next.
| Field | Description |
|---|---|
| RPAS Solution ID | Specify the RPAS Solution ID for your RPAS application. |
| RPAS Solution Description | Specify the RPAS Solution Description which is displayed within the RPAS Fusion Client. |
| RPAS Server Name | Specify the host name where the RPAS infrastructure is installed. |
| RPAS Server Port | Specify the post associated with the RPAS installation. |
| RPAS Domain Path | Specify the location where the RPAS domain is installed.
Note: This must be a simple domain or a global domain. You should not specify a local domain within a global domain environment. |
The Self-sign Root Certificate? Window opens.
Select one of the following options and click Next:
If set to Yes, this property triggers automatic creation of SSL certificates signed by a private certificate authority and stores them in wallets. At the end of the process, copy the server wallet directory to its correct destinations.
If set to No, you will need to manually create and configure SSL certificates and store them in wallets before or after the installation.
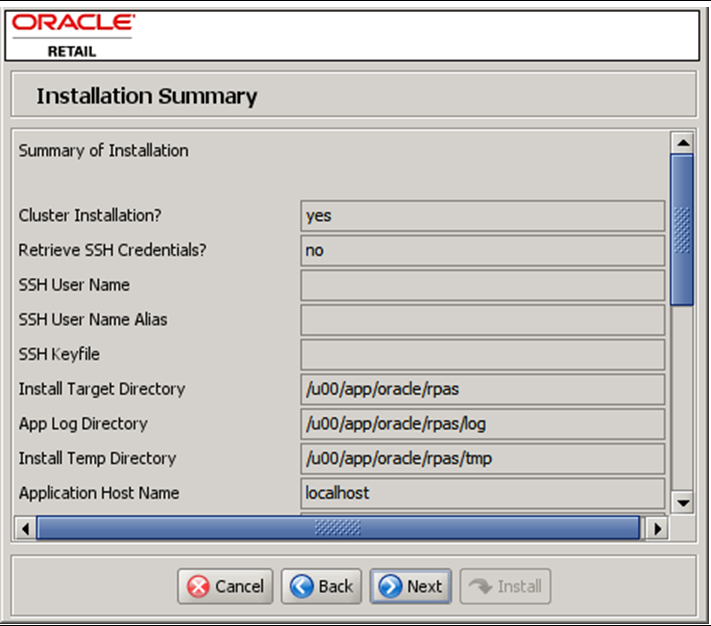
The Installation Summary Window opens. Review the installation summary and click Next.
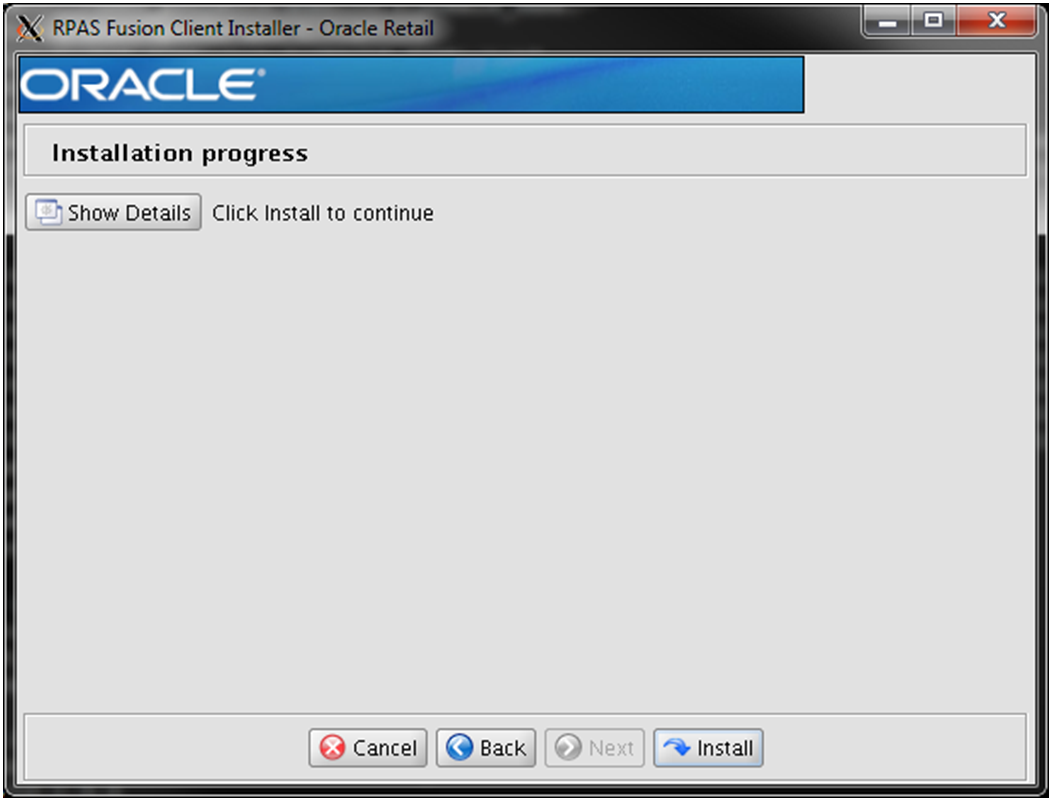
The Installation Progress Window opens. Click Install to start the installation.
After the installation is complete, click Exit to close the Installer.
Restart the WebLogic server, and then verify that the application is accessible over the network. In a Web browser, enter the following URL in the Address bar, and press Enter:
http://<hostname>:<portnumber>/<contextroot>
|
Note: In the previously listed URL,<hostname>, <portnumber>, and <contextroot> represent the host name, port, and context root you set up for the application during the installation. You must specify the relevant values in the Address bar. |
Before you log on to the application, you must set up the Fusion Client based on your business need. This includes the following tasks:
Review the RPAS Configuration Property Files (optional)
Set Up Single Sign-On (SSO) (optional)
Upload Application Security Policies to OID-based Domain Policy Store
Review any Troubleshooting issues
Set up the configuration properties file, pivot table styles, and layout and formatting. For more information, refer to the Oracle Retail Predictive Application Server Administration Guide for the Fusion Client.
Set up the RPAS solution to work with the RPAS Fusion Client. For more information, refer to the installation guide of the relevant RPAS solution.
The RPAS Fusion Client provides a flexible approach for you to access RPAS workbooks using a Multi-solution taskflow. The taskflow allows administrators to better describe and model their business practices within the client. Administrators can create custom taskflow elements (activity groups, activities, tasks, and steps) for workbook configuration. These taskflow elements then provide a more intuitive and business practice-oriented view of the structural elements of the RPAS domain. The taskflow is created as part of the RPAS Configuration, using the RPAS Configuration Tool and can be modified as needed. The files,taskflow.xml and taskflowBundle.properties, then get generated as part of the RPAS domain creation.
One of the key configuration and setup steps postinstallation is to create the Taskflow_MultiSolution.xml file and its resource properties using the taskflow.xml and taskflowBundle.properties files.
|
Note: For information about how to setup and configure the Multi-solution Taskflow, refer to the section, ”Postinstallation Configuration” in the Oracle Retail Predictive Application Server Administration Guide for the Fusion Client.For information about the Multi-solution Taskflow elements, refer to the chapter, ”Creating a Multi-solution Taskflow” in the Oracle Retail Predictive Application Server Configuration Tools User Guide. This is one of the key configuration steps to use the RPAS Fusion Client. |
There are three types of external authentication, one that supports SSO and the other is standalone authentication (non-SSO). The WebLogic Server can be attached to a standalone user management system such as Oracle Internet Directory (OID), or it can be configured to use an SSO system.
The third type of external authentication also has WebLogic attached and is not used for production, but is useful for development and demonstration purposes.
The RPAS Fusion Client is certified for perimeter authentication using Oracle SSO 11g
Users and groups can be set up in a user management system such as OID or even WebLogic's embedded LDAP server. The corresponding authentication provider needs to be configured within the WebLogic Server default security realm called myrealm.
WebLogic has out of the box support for several LDAP-based authentication systems including OID. The configuration of the authentication provider can be conveniently done within the WebLogic Admin Console. This configuration provides WebLogic with information about the user management system. For example, in the case of OID one must specify its host name and port, userid, and password needed to access it, and the root location in the LDAP directory tree where users and groups can be found. When users access the application for the first time, WebLogic redirects the user to a login page. The entered User ID and Password are validated by the authentication provider within WebLogic against the user management system.
The enterprise users and groups specified during the Fusion Client installation need to be created within the user management system.
|
Note: For more information, refer to the WebLogic documentation for details on configuring authentication providers. |
The following table provides high level process steps for configuring external authentication and whether or not it applies to SSO, non-SSO, or both.
| Process Steps | Authentication Type |
|---|---|
| Create an 11g WebGate definition in Oracle Access Manager. Specify the base URL that points to the Oracle HTTP Server (OHS) instance that has the WebGate module plugged in. Ensure that certain application URLs are excluded from authorization as listed in "URL Protection Rules".
Note: For performance and high availability reasons it may be necessary to deploy multiple OHS instances with a load balancer in front. In this case specify the base URLs for all the OHS instances in the WebGate definition. |
SSO |
Configure the mod_wl_ohs module on the OHS instance to tunnel requests to the application servers on which the Fusion Client is deployed. (Do it on each of the OHS instances, if using multiples.) |
SSO |
| Configure the OAM identity asserter and the OID authentication provider on the default security realm on the application servers to communicate with the OID instance. | SSO |
| Create the same users in the Oracle Identity Management (IdM) as in RPAS domain. These are referred to as enterprise users. | SSO and non-SSO |
| Define an RPAS specific enterprise role or group. This assists in providing all your enterprise users with RPAS access at one go (since the user principal mapping done during the install becomes much simpler). Make all the users members of this role or group. | SSO and non-SSO |
| Configure an authentication provider in WebLogic. Specify sufficient as the control flag value. This provider should be of a type that is capable of interacting with the IdM. WebLogic comes with out of the box support for several IdM types, for example OID. | Non-SSO |
By default the following URLs are protected:
| Protected URLs |
|---|
| / |
| /.../* |
Exclude the following URLs:
| URLs to Excude |
|---|
| /.../*.gif |
| /.../*.png |
| /.../images/* |
| /.../rpas_exit.jsp |
| /.../*.js |
| /.../*.css |
| /.../*.html |
This section describes two-way SSL configuration on the RPAS server.
Secure Sockets Layer (SSL) in a widely used cryptographic protocol designed to provide communications security over a computer network. RPAS uses SSL to protect communications between the RPAS client and server. In 14.1RPAS, SSL protocol version SSLv3 is used prior to 14.1.0.5. From 14.1.0.5, SSL protocol version TLSv1.2 is used.
RPAS supports all SSL configurations which include:
One-way SSL
SSL without authentication
|
Note: The Fusion Client only supports two-way SSL. |
One-way and two-way SSL require key store, trust store, or both to manage certificates. A key store contains a private key and its corresponding public certificate chain. A trust store contains trusted public certificates and certificate chains.
The RPAS server uses Oracle Wallet for its key store and trust store. The same wallet is used for both the Key Store and Trust Store. Oracle Wallet is managed by a command line utility called orapki which is included in the RPAS installation.
The Fusion Client uses a Java Key Store (JKS) to act as its Key Store and Trust Store. The Certificate Store and Trust Store may be stored in separate JKS files. JKSs are managed by the keytool utility which is included in the standard JDK.
Oracle Wallet and JKS stores cannot be used interchangeably, though the orapki tool can be used to convert between them.
To enable SSL in RPAS, two command line options are provided for the Domain Daemon. One is for the SSL type and the other is for the Oracle Wallet location which is optional for some SSL types. When the RPAS Classic Client or the mid-tier process of the Fusion Client connects to the Domain Daemon, it detects the type of SSL for the connection and automatically chooses the appropriate handshake protocol. The client may need to configure its own certificate store in advance. RPAS DB Server inherits the SSL setup from the Domain Daemon and no additional configuration is needed.
This section describes two-way SSL as illustrated in Figure 5-24.
Two-way SSL authenticates both the server and the client. Both sides must have a key store and a trust store. RPAS server uses one Oracle Wallet for both stores. Two-way SSL is not supported in the Classic Client. For Fusion client mid-tier, both the trust store and the key store are in the JKS format.
The trust store must contain the CA certificate or self-signed root certificate for the other side so as to enable mutual authentication. In addition, the trust store of the server must contain the client certificate so that it can recognize and authorize that particular client.
|
Note: For additional information on SSL, refer to the Oracle Retail Predictive Application Server Administration Guide for the Fusion Client. |
Perform the following steps to create a self-sign root certificate. The same root certificate can be used to generate both server and client certificates.
|
Note: Under Cygwin environments on Windows, the path of the wallet must be in Windows format and not Cygwin format. For example, it must be:
|
Create an Oracle wallet using this format: orapki wallet create -wallet {root_wallet_directory} -pwd {root_wallet_password}
Generate a private key and a self-signed root certificate using this format: orapki wallet add -wallet {root_wallet_directory} -keysize {key_len} -dn {root_dn} -self_signed -validity {validity_days} -pwd {root_wallet_password}-addext_ski
|
Note: Oracle OSSA requires that the minimum key size is 2048. |
Export the root certificate chain to a file for later use using this format: orapki wallet export_trust_chain -wallet {root_wallet_directory} -certchain {root_cert_chain_file} -dn {root_dn} -pwd {root_wallet_password}
The process of two-way SSL configuration on the RPAS server is described in the following table.
| Step | Process | Reference |
|---|---|---|
| 1. | Set up a server key store.
One Oracle wallet can act as both key and trust stores. |
Setting Up a Server Key Store |
| 2. | Import certificates. | Import Certificates |
| 3. | Start the Domain Daemon with the appropriate options. | Start Domain Daemon with Two-way SSL Options |
| 4. | Set up a client key store.
One Oracle wallet can act as both key and trust stores. |
Setting Up a Client Key Store |
| 5. | Set up a trust store in the JKS format. | Setting Up a Trust Store in the JKS Format |
Use the following instructions to set up a server key store.
Create an Oracle Wallet with Auto Login using this format: orapki wallet create -wallet {server_wallet_directory} –auto_login -pwd {server_wallet_password}
Auto-login means that the wallet can be read without a password. It is generally protected by file system permission. The default file permission of the wallet is 0300 which means that it is only accessible by the owner.
|
Note: Oracle OSSA requires that the minimum key size is 2048. |
Generate a private key using this format: orapki wallet add -wallet {server_wallet_directory} -keysize {key_len} -dn {server_dn} -pwd {server_wallet_password}
|
Note: Oracle OSSA requires that the minimum key size is 2048. |
Export a certificate request using this format: orapki wallet export -wallet {server_wallet_directory} -dn {server_dn} -request {server_cert_req_file} -pwd {server_wallet_password}
Create the server certificate.
If a third-party Certificate Authority (CA) is used, send the server certificate request file ({server_cert_req_file}) to the CA. The CA sends back a certificate for the server (referred to as {server_certificate_file}) along with the public certificate of the CA (referred to as {root_cert_chain_file}).
If the self-signed root certificate is used, run the following command:
orapki cert create -wallet {root_wallet_directory} -request {server_cert_req_file} -cert {server_certificate_file} -validity {validity_days} -pwd {root_wallet_password}
Import the CA or self-signed certificate into the wallet using this format: orapki wallet add -wallet {server_wallet_directory} -trusted_cert -cert {root_cert_chain_file} -pwd {server_wallet_password}
Example 5-9 Import Certificate
orapki wallet add -wallet C:/wallets/server -trusted_cert -cert C:/wallets/root_chain.txt -pwd serverpass1
|
Note: For third-party CA, the public certificate chain may contain more than one certificate. These certificates need to be imported one by one starting from the top of the chain. |
Import the server certificate into the wallet using this format: orapki wallet add -wallet {server_wallet_directory} -user_cert -cert {server_certificate_file} -pwd {server_wallet_password}
Now the key store is ready for the server.
For every client connecting to the RPAS server using two-way SSL, their certificates must be imported into the server wallet as trusted certificates. Use the following command:
orapki wallet add -wallet {server_wallet_directory} -trusted_cert -cert {client_cert_file} -pwd {server_wallet_password}
|
Note: If the client certificates are from different CA other than the ones already in the server wallet, the CA certificates must be imported first. |
To start the Domain Daemon with two-way SSL support, use the following command line options:
DomainDaemon -port portNum -ssl 2 -wallet file:<walletLocation> -start
Where the <walletLocation> is the absolute path to the directory of the Oracle Wallet. It cannot be a relative path.
Example 5-11 Domain Daemon with Two-way SSL Support
DomainDaemon -port 12348 -ssl 2 -wallet file:C:/wallets/server start
|
Note: There is an-ssl 4 option, whereby the SSL certificates are used only for mutual authentication but no encryption of data is done. This is an option provided for customers who have deployed all the applications behind a firewall and are not concerned about unauthorized interception of the data exchanged between the Fusion Client and the RPAS Server.
The syntax for starting up DomainDaemon is the same; replace For additional information on SSL options, refer to SSL Options. |
Use the following instructions to set up a client key store.
Create an Oracle Wallet with Auto Login using this format: orapki wallet create -wallet {client_wallet_directory} –auto_login -pwd {client_wallet_password}
Generate a private key using this format: orapki wallet add -wallet {client_wallet_directory} -keysize {key_len} -dn {client_dn} -pwd {client_wallet_password}
|
Note: Oracle OSSA requires that the minimum key size is 2048. |
Export a certificate request using this format: orapki wallet export -wallet {client_wallet_directory} -dn {client_dn} -request {client_cert_req_file} -pwd {client_wallet_password}
Create the client certificate.
If a third-party Certificate Authority (CA) is used, send the client certificate request file ({client_cert_req_file}) to the CA. The CA sends back a certificate for the client (referred to as {client_certificate_file}) along with the public certificate of the CA (referred to as {root_cert_chain_file}).
If the self-signed root certificate is used, run the following command:
orapki cert create -wallet {root_wallet_directory} -request {client_cert_req_file} -cert {client_certificate_file} -validity {validity_days} -pwd {root_wallet_password}
Import the CA or self-signed certificate into the wallet using this format: orapki wallet add -wallet {client_wallet_directory} -trusted_cert -cert {root_cert_chain_file} -pwd {client_wallet_password}
Example 5-16 Import Certificate
orapki wallet add -wallet C:/wallets/client -trusted_cert -cert C:/wallets/root_chain.txt -pwd clientpass1
|
Note: For third-party CA, the public certificate chain may contain more than one certificate. These certificates need to be imported one by one starting from the top of the chain. |
Import the client certificate into the wallet using this format: orapki wallet add -wallet {client_wallet_directory} -user_cert -cert {client_certificate_file} -pwd {client_wallet_password}
A trust store in the JKS format must be created. Then the CA or self-signed root certificate of the server certificate should be imported into the trust store.
Use the following instructions to set up a a trust store in the JKS format.
Import the CA or self-signed certificate for the server certificate into the wallet using this format: orapki wallet add -wallet {client_wallet_directory} -trusted_cert -cert {root_cert_chain_file_for_the_server} -pwd {client_wallet_password}
|
Note: This step can be skipped if both client and server certificates are issued by the same CA or generated from the same self-signed root certificate. |
Convert the Oracle Wallet to JKS format using this format: orapki wallet pkcs12_to_jks -wallet {client_wallet_directory} -pwd {client_wallet_password} -jksKeyStoreLoc {key_store_file} -jksKeyStorepwd {key_store_password} -jksTrustStoreLoc {trust_store_file} -jksKeyStorepwd {trust_store_password}
|
Note: The password,jksKeyStorepwd, must be the same as what was entered into the WebLogic domain credential store using the credential entry alias fckey. |
Finally, copy the files testkey.jks and testtrust.jks as fckey.jks and fctrust.jks into the idstores directory under the Fusion Client installation.
|
Note: Thefckey.jks password is the client keystore password as requested in Figure 5-11, "Application Server Details Window". |
Now the client key store setup is complete.
If the BI module is installed, proceed with the OBIEE report configuration tasks and setup as documented in the Oracle Retail Predictive Application Server Administration Guide for the Fusion Client
After the Fusion Client has been upgraded, ensure that all users clear their browser cache.
If you install the RPAS Fusion Client over an existing RPAS Fusion Client environment, the installer updates the existing config/config.properties and config/rpas/rpasConfig.properties files. If you modified any property values in these files, they are overwritten by the files found in the installer. However, the installer backs up the existing files and creates a report on the changed property values and any new properties added that did not exist in the previous version.
Example 5-20 RPAS Configuration Property Files
Following is an example of the config.properties.
-rw-r--r--  1 build users  375 Jun  7 17:18 config.properties
-rw-r--r--  1 build users  401 Jun  7 16:44 config.properties.201106071642
-rw-r--r--  1 build users  258 Jun  7 16:44 config.properties.201106071642.mergeReport
This example has the following components:
config.properties is the new file
config.properties.201106071642 is the backup of the previous version of config.properties
config.properties.201106071642.mergeReport contains what was added, updated, or removed between config.properties.201106071642 and config.properties.
You can review the changes and restore any property value if needed.
RPAS can be set up on an Oracle SSO infrastructure that enables users who are already connected and authenticated to the Oracle SSO to directly access the RPAS Fusion Client or RPAS Classic Client Web Deployment. For more information about SSO, refer to .
To set up SSO, perform the following steps:
Set up the Identity Management Infrastructure for SSO. Install the following components:
Oracle Identity Management (OID) LDAP server. For more information, refer to the Oracle Fusion Middleware Installation Guide for Oracle Identity Management 11g Release 1 (11.1.1).
|
Note: To avoid authentication issues with SSO users, select the Use Retrieved User Name as Principal check box and then restart your WebLogic server. This option is available in the OID provider on the Provider Specific tab in the Users section. |
An Oracle Internet Directory repository configured to be used by the LDAP server. (OID uses an Oracle Database as the back end.) Ensure that you have a WebLogic domain extended with the JRF template. This was already done before you installed the RPAS Fusion Client. For more information, refer to Setting Up the WebLogic Server.
Skip this step if you are setting up SSO for RPAS Classic Client Web Deployment.
During the RPAS Fusion Client installation, specify that you want to use the SSO feature to log on to the application and specify the SSO users or groups. For more information, refer to the Installation Properties File Parameter Reference section or see Steps 16, 23, and 24 in the section, Installing the RPAS Fusion Client in Graphical or Text Mode.
Install the Oracle Fusion Middleware 11g Web Tier Utilities referring to the Oracle Fusion Middleware Installation Guide for Oracle Web Tier guide.
If you are setting up an SSO environment, continue to Setting Up an SSO Environment.
For additional information, refer to and specifically, Figure D-1, "Single Sign-On Topology".
Perform the following steps if you are setting up an SSO environment:
Register the Oracle HTTP server (Web Tier) with the Oracle Access Manager server by configuring a Webgate plug-in. To do this, perform the following steps:
From the Webgate installation, copy certain essential files over to the Web Tier installation. For more information, refer to the instructions at this address: http://download.oracle.com/docs/cd/E14571_01/install.1111/e12002/webgate004.htm.
|
Note: Webgate needs operating system specific Gnu C Compiler (GCC) libraries to be available on the library load path. For Linux and Solaris you can obtain the library fromhttp://gcc.gnu.org/. More details on this requirement can be found at the following address: http://docs.oracle.com/cd/E14571_01/install.1111/e12002/webgate002.htm#CACGIGBB. |
Create a Webgate definition using the Oracle Access Manager console (http://<host-ip-addr>:<OAM-domain-port>/oamconsole). The Webgate's base URL must point to the Web Tier server. This creates files under <OAM Domain dir>/output directory (cwallet.sso and ObAccessClient.xml).
Copy those files from the web tier to: Oracle_WT1/instances/instance1/config/OHS/ohs1/webgate/config.
From the Oracle SSO server administrator, obtain the OID information, such as the TCP/IP address and port, whether SSL is used as a transport mechanism, and the realm name. In addition, obtain an administrative login and password, such as the one used by the orcladmin user.
Configure authentication providers in your WebLogic domain for SSO, by performing the following steps:
If not already present, then copy oamAuthnProvider.jar from the $MW_HOME/oracle_common/modules/oracle.oamprovider_11.1.1 directory to the /u00/webadmin/Oracle/Middleware/wlserver_10.3/server/lib/mbeantypes directory.
Configure the OAM identity asserter using the instructions at the following address: http://docs.oracle.com/cd/E14571_01/core.1111/e10043/osso.htm#CHDCDAIC. Specifically, refer to the section ”9.3.5.2.4 - Setting up providers for identity assertion.”
Configure an OID authenticator so that all the roles are retrieved from OID for the user logged in through SSO. Following are the key parameters you need to enter in the provider-specific configuration tab:
| Parameter | Enter: |
|---|---|
| Group Search Base | cn=Groups, dc=us,dc=yrcmpny,dc=com |
| User Search Base | cn=Users, dc=us,dc=yrcmpny,dc=com |
| User name attribute | uid |
| location | ipaddress:portnumber, for example 10.10.10.10:2345 |
| bind dn | cn=<LDAP admin user name> |
| password | <LDAP admin user's password> |
|
Note: Where yrcmpny is your company's name. |
Ensure the three asserters are configured in the following order:
– OAM Identity Asserter: OPTIONAL
– OID Authenticator: SUFFICIENT
– DefaultAuthenticator: SUFFICIENT
Save and activate the changes.
Restart the WebLogic server.
Update the mod_wl_ohs.conf file to send requests to the WebLogic server. To update the mod_wl_ohs.conf file, perform the following steps:
Navigate to the location where the mod_wl_ohs_conf file exists and open it for editing. For example,
$ORACLE_INSTANCE/ config/ <COMPONENT_TYPE>/ <COMPONENT_NAME>
Update the file based on Example 5-21 and Example 5-22.
Example 5-21 Single WebLogic Instance
For a single WebLogic instance, specify:
<Location /console>
   SetHandler weblogic-handler
   WebLogicHost server1
   WebLogicPort 7001
</Location>
This forwards /console from the HTTP server to /console on the WebLogic Server with the host name and port number, server1:7001.
Example 5-22 WebLogic Instances in a Cluster
For WebLogic instances in a cluster, specify:
<Location /myServerURL>
   SetHandler weblogic-handler
   WebLogicCluster server1:7010,server2:7010
   WLCookieName RPASJSESSIONID
</Location>
This forwards /myServerURL from the HTTP server to /myServerURL on the WebLogic Clusters with the host names and port numbers, server1:7010 and server2:7010.
|
Note: In Example 5-21 and Example 5-22, server1 and server 2 are the host names used for illustrative purposes. Ensure that you use relevant host names, port numbers, and context roots based on your implementation. |
There is a known issue with the JDK running on an Oracle Linux server with Intel x86 processors. For the steps to avoid this error, refer to StringIndexOutOfBoundsException in Oracle Linux on x86 Architecture.
Before using the Fusion Client, users and groups need to be authorized to access the application. If using a file-based Oracle Fusion Middleware policy store (the default when you create a WebLogic domain) the Fusion Client installer takes care of this automatically. The users and groups specified in the installer properties are automatically provided with application access.
If you are using Oracle Internet Directory (OID) as your policy store, then the installer does not set up user and group authorization; you must follow these steps to complete this aspect of the installation.
For guidance on setting up an OID-based policy store, refer to the chapter ”Configuring the OPSS Security Store” in the Oracle® Fusion Middleware Application Security Guide 11g Release 1 (11.1.1) Configuring the OPSS Security Store. This document is available through My Oracle Support.
Upload Application Security Policies to OID-based Domain Policy Store using the following steps:
|
Note: Before you begin, ensure that the RPAS Fusion Client is installed and the OID policy store is already set up. |
Verify your RPAS Fusion Client application name and version. This can be found on the Deployments page in the WebLogic Application Console,
For example: RPAS Fusion Client application name is RPASFusionClient1 and version is 14.0.0.444.201309030533.256083.
Determine your application policy stripe. The application policy stripe is your RPAS Fusion Client application name plus # plus version.
For example: Application policy stripe is RPASFusionClient1#14.0.0.444.201309030533.256083
Extract META-INF/jazn-data.xml from rpas.ear (located under <cd-image-dir>/application) to a local directory..
Change directories to: cd <this local dir>/META-INF.
Copy <WLDOMAIN>/config/fmwconfig/jps-config.xml to your local directory.
Copy the domain bootstrap credential wallet to your local directory. cp <WLDOMAIN>/config/fmwconfig/bootstrap
Add a service instance definition to jps-config.xml:
<serviceInstance name="atlantis.policystore.xml" provider= "policystore.xml.provider"> <property name="location" value="./jazn-data.xml"/> </serviceInstance>
Add two jps contexts:
<jpsContext name="ldap-policy-store"> <serviceInstanceRef ref="policystore.ldap"/> </jpsContext> <jpsContext name="Atlantis"> <serviceInstanceRef ref="atlantis.policystore.xml"/> </jpsContext
Launch the WLST shell and run the migrateSecurityStore command using your Application policy stripe for <policystripe>:
$ORACLE_HOME/oracle_common/common/bin/wlst.sh migrateSecurityStore(type="appPolicies", configFile="./jps-config.xml", src="Atlantis", dst="ldap-policy-store", srcApp="Atlantis", dstApp="<policystripe>", overWrite="true", mode="lax")
Use the Enterprise Manager Fusion Middleware tool to locate the Fusion Client application security configuration, and add users and groups as members of the ”atlantis-users” role.
Restart your application server.
Delete the META-INF directory since it is no longer needed.
Enable Gzip compression to reduce network traffic.
Compressing the HTTP responses provides significant benefit to the Fusion Client. Using gzip compression compresses the HTTP response by a factor of 10 to 20 in most cases. This greatly reduces the available bandwidth consumed by each Fusion Client user, which leads to greater scalability in that a much larger number of concurrent users can be accommodated than would otherwise be possible.
The main reason for the large degree of compression is that the HTML content is inherently verbose, and in the case of the Workbook page there is a great deal of repetitive content in the HTML markup corresponding to the various worksheet cells.
Another benefit is faster end user response time, though this is rather unpredictable; sometimes the improvement can be very small. This is because the size of the HTTP response has its greatest effect on the latency, the time it takes for all the response bytes to completely arrive at the client browser; and latency is just one component of the overall response time. Other factors like server processing time, time to render the response on the browser, time for the request to reach the server, are also important, as well as, the need to account for the time taken to uncompress the response.
The decompression time can vary from browser to browser.
While there are many ways to achieve response compression, it has been tested using Oracle's web tier technologies. A basic web tier consists of an Oracle HTTP server instance furnished with a mod_wl_ohs module plug-in that tunnels user requests to WebLogic managed servers hosting Fusion Client application instances. Implement gzip compression using the mod_deflate module in the Oracle HTTP Server as shown in Figure 5-25.
The configuration of the mod_deflate module is to be done in the httpd.conf file corresponding to the Oracle HTTP Server instance, by adding the following lines:
LoadModule deflate_module "${ORACLE_HOME}/ohs/modules/mod_deflate.so"
AddOutputFilterByType DEFLATE text/plain
AddOutputFilterByType DEFLATE text/xml
AddOutputFilterByType DEFLATE application/xhtml+xml
AddOutputFilterByType DEFLATE text/css
AddOutputFilterByType DEFLATE application/xml
AddOutputFilterByType DEFLATE image/svg+xml
AddOutputFilterByType DEFLATE application/rss+xml
AddOutputFilterByType DEFLATE application/atom_xml
AddOutputFilterByType DEFLATE application/x-javascript
AddOutputFilterByType DEFLATE text/html

SetOutputFilter DEFLATE
You can verify that gzip compression is being applied by looking at the response headers using a tool such as Firebug (on Mozilla Firefox); you should see the following line in the headers.:
Content-Encoding gzip
|
Note: For further details, refer to the My Oracle Support guide, ”How to Add Compression on the Oracle HTTP Server to Reduce the Download Size of Webcenter Spaces Deployment ()” (Doc ID 1219013.1). |
This section lists possible solutions for some issues that may occur when using the application.
An error may occur when starting the WebLogic server if the limit for open files is set too low:
<Log Management> <BEA-170019> <The server log file /u01/Oracle/Middleware/user_projects/domains/domain1/servers/AdminServer/logs/AdminServer.log is opened. All server side log events will be written to this file.>
Unhandled exception
Type=Segmentation error vmState=0x00040000
J9Generic_Signal_Number=00000004 Signal_Number=0000000b Error_Value=00000000 Signal_Code=00000033
Handler1=09001000A049F450 Handler2=09001000A0495F70
R0=0000000000000001 R1=000000011757E200 R2=09001000A0340048 R3=09001000A0340178
R4=0000000000000234 R5=0000000000000000 R6=800000000000F032 R7=3000000000000000
R8=000000000012F7D0 R9=0000000000000000 R10=0000000000000000 R11=F0000000301D3600
R12=090000000154ABB0 R13=0000000117588800 R14=0000000116635CA0 R15=0000000116599D00
To avoid this issue, set the ulimit to a larger number, at least 8192, by issuing the following command:
ulimit -u 8192
If users attempt to access the application from a system that does not have a connected Display/Video card, they may encounter the following error message when they try using the charting feature for the first time:
Sun.awt.X11GraphicsEnvironment (initialization failure)
For more information, please see the server's error log for an entry beginning with: Server Exception during PPR, #
To avoid this issue, edit the WebLogic Startup script with the java.awt.headless parameter using the following steps:
Navigate to the following location on the system where the application server is installed:
<WEBLOGIC_DOMAIN_HOME>/bin/
In a text editor, open the startWebLogic.sh script for editing.
Append the following parameters to the set JAVA_OPTIONS = %SAVE_JAVA_OPTIONS% statement:
-Djava.awt.headless=true
After it is set up, the JAVA_OPTIONS statement appears as in the following example:
set JAVA_OPTIONS=%SAVE_JAVA_OPTIONS% -Djava.awt.headless=true
Save and close the file.
For the changes to take effect, restart the WebLogic Server.
If you attempt to export to Microsoft Excel in the Fusion Client, you may encounter the error message shown in Figure 5-26
This error message means that the Excel export file is corrupt due to a headless environment. In the server logs, the error message appears as follows:
ERROR view - java.lang.NullPointerException
java.lang.NullPointerException
        at javax.swing.MultiUIDefaults.getUIError(MultiUIDefaults.java:133)
        at javax.swing.UIDefaults.getUI(UIDefaults.java:741)
        at javax.swing.UIManager.getUI(UIManager.java:1002)
        at javax.swing.JPanel.updateUI(JPanel.java:109)
        at javax.swing.JPanel.<init>(JPanel.java:69)
        at javax.swing.JPanel.<init>(JPanel.java:92)
        at javax.swing.JPanel.<init>(JPanel.java:100)
To avoid this issue, edit the WebLogic Startup script with the java.awt.headless parameter using the following steps:
Navigate to the following location on the system where the application server is installed:
<WEBLOGIC_DOMAIN_HOME>/bin/
In a text editor, open the startWebLogic.sh script for editing.
Append the following parameters to the set JAVA_OPTIONS = %SAVE_JAVA_OPTIONS% statement:
-Djava.awt.headless=true
After it is set up, the JAVA_OPTIONS statement appears as the following example:
set JAVA_OPTIONS=%SAVE_JAVA_OPTIONS% -Djava.awt.headless=true
Save and close the file.
For the changes to take effect, restart the WebLogic Server.
If you attempt to access the application from a system that does not have a connected Display/Video card, you may encounter the following error message when you try using the charting feature for the first time:
StringIndexOutOfBoundsException in org.apache.myfaces.trinidadinternal.style.util.CSSGenerationUtils
To avoid this issue, you must set up the WebLogic Startup script with the JVM option
-XX:-UseSSE42Intrinsics parameter. To do this, perform the following steps:
Navigate to the following location on the system where the application server is installed:
<WEBLOGIC_DOMAIN_HOME>/bin/
In a Text Editor, open the startWebLogic.sh script for editing.
Append the following parameters to the set JAVA_OPTIONS = $SAVE_JAVA_OPTIONS statement:
-XX:-UseSSE42Intrinsics
After set up, the JAVA_OPTIONS statement appears like the following example:
set JAVA_OPTIONS=$SAVE_JAVA_OPTIONS -XX:-UseSSE42Intrinsics
Save and close the file.
Remove the cached CSS file, for example:
$APP_TMP_FOLDER/public/adf/styles/cache/blafplus-desktop-ezog8j-en-ltr-gecko-1.9.1.8-cmp.css
For the changes to take effect, restart the WebLogic Server.
Clear the browser cache.