| Oracle® Retail Predictive Application Server Installation Guide Release 14.1.2 E70811-01 |
|

 Previous |
 Next |
| Oracle® Retail Predictive Application Server Installation Guide Release 14.1.2 E70811-01 |
|
Previous |
Next |
The installation of the server-side RPAS components on UNIX or Linux operating systems is accomplished by using a Java-based installation program that is included with the installation package.
This program automates the following:
Installation of the RPAS Server
Installation of Configuration Tools on the server
Creation of sample domains
Definition of DomainDaemon port
The RPAS components included in this installation process are available inside the media pack of the solution downloaded from Oracle's E-Delivery Web site, http://edelivery.oracle.com/.
There are two RPAS archives inside the media pack: one RPAS archive for UNIX and Linux and one for Windows.
Ensure that Java Development Kit (JDK) has been installed on the machine where RPAS will run and that the JAVA_HOME environment variable is properly set.
|
Note: Avoid enabling AutoUpdate when installing Java because it may update the Java version without prompting. |
The following commands are examples based on common Java installation structures. These commands are automatically setup by the retaillogin.ksh script. After this script has run, compare your environment variables to the appropriate subsequent examples to ensure that it is correct. To ensure the path is correct, use the UNIX find command to locate libjvm.so (find $JAVA_HOME -name libjvm.so) and adjust the following paths as appropriate.
Example 3-2 shows a sample of common Java installation structures for AIX.
Example 3-2 AIX
export LIBPATH="$JAVA_HOME/lib/ppc64:$JAVA_HOME/bin/classic:$LIBPATH"
export PATH="$JAVA_HOME/bin:$PATH"
|
Note: Linux and AIX are compatible with only a 64-bit version of Java. |
Example 3-3 shows a sample of common Java installation structures for Solaris.
Example 3-3 Solaris
export LD_LIBRARY_PATH="$JAVA_HOME/lib:$JAVA_HOME/jre/lib/sparcv9/server:$JAVA_HOME/jre/lib/sparc: $LD_LIBRARY_PATH"
export RIDE_OPTIONS=-d64
|
Note: The PATH variable on Solaris operating systems must have /usr/xpg4/bin in the path, and there can be no other occurrence of /bin or /usr/bin to its left. Otherwise, the scripts use the incorrect versions of grep, sed, awk, tail, and so on. |
Example 3-4 shows a sample of common Java installation structures for HP-UX Itanium.
Example 3-4 HP-UX Itanium
export SHLIB_PATH="$JAVA_HOME/lib:$JAVA_HOME/jre/lib/IA64W/server:$JAVA_HOME/jre/lib/IA64W/:$SHLIB_PATH"
export PATH="$JAVA_HOME/bin:$PATH"
export RIDE_OPTIONS=-d64
|
Note: Solaris and HP Itanium do not release separate 32-bit and 64-bit versions of Java. Therefore, you must set the 64-bit Configuration Tools environment variable for Java as shown:
|
The RPAS_JAVA_CLASSPATH variable is used by RPAS applications that use the RPAS Java Special Expression functionality. This variable tells RPAS where to find the Java Special Expression implementations. It should contain a list of the locations of any Java code that is needed to run a Java Special Expression. The list must also include the oracleRpasUtils.jar located in the lib subdirectory of RPAS_HOME. For information about exporting RPAS_JAVA_CLASSPATH through Cygwin, refer to Cygwin Path Settings.
Example 3-5 RPAS_JAVA_CLASSPATH
In the following example, the absolute path to oracleRpasUtils.jar file name is listed as well as an example of a Java Special Expression implementation where customJavaExpression.jar contains the example expression.
export RPAS_JAVA_CLASSPATH="/Oracle/RPAS/lib/oracleRpasUtils.jar;/Oracle/RPAS/applib/customJavaExpression.jar"
|
Note: Certain RPAS applications may have additional uses for the RPAS_JAVA_CLASSPATH environment variable. To determine if you need to set this variable in a different way, refer to that application's Installation Guide. |
The RIDE_OPTIONS environmental variable has been defined to allow users to pass information into the rpasInstall process. Unlike the regular arguments passed on the command line to rpasInstall (such as -fullinstall and -updatestyles), arguments defined in RIDE_OPTIONS are passed to every rpasInstall instance that runs in the environment.
There are the three supported properties for use with RIDE_OPTIONS:
Xmx — used for Java
HP 64-bit mode Java (-d64) — used for HP Itanium and Solaris
Drpas.maxProcesses — used for RPAS
Xmx - By default, the Java Virtual Machine requests on the order of 268 MB of RAM from the OS to allocate for its heap. Large domains that are built from complex configurations can potentially exhaust this limited amount of memory. This is even more of an issue in patch installations than in builds since a patch installation requires two different versions of a configuration to be held in memory simultaneously.
By using the -Xmx option, you can instruct the Java Virtual Machine to request more memory from the OS to prevent situations when all allocated memory is exhausted. The syntax of the property is:
-Xmx###m, where ### is the amount, in megabytes, of memory the JVM is to request. Common values for this argument are -Xmx512m or -Xmx1024m.
HP 64-bit mode Java (-d64) - The HP and Solaris distribution of Java does not consist of separate executables for 32-bit and 64-bit operating systems. Instead, there is a single distribution of Java that can run in either 32-bit or 64-bit mode. By default, the HP Java runs in 32-bit mode. Because RPAS is built as a 64-bit executable on the Itanium OS, the RPAS libraries are unable to link with Java if it is running in 32-bit mode.
By adding the -d64 property to RIDE_OPTIONS, the HP Java distribution is 64-bit mode enabled and the RPAS libraries link successfully.
It is often the case that users may want to use other properties in conjunction with RIDE_OPTIONS. When this is the case, all desired properties should be included within the environmental variable definition separated by white space with the entire definition enclosed in double quotes. An example of this is shown as:
export RIDE_OPTIONS="-d64 -Xmx1024m -Drpas.maxProcesses=8"
Drpas.maxProcesses - Several RPAS server utilities are designed to take advantage of multi-processor hardware to improve their performance. These utilities attempt to perform operations in parallel, each process running on a distinct processor.
The -Drpas.maxProcesses argument is used to instruct RPAS how many processors it should attempt to run in parallel when running one of the server utilities that has multi-processor support when that utility is run as a part of the rpasInstall process.
Note that the -Drpas.maxProcesses argument only affects those calls to server utilities made from within the rpasInstall process and does not affect calls to server utilities made from the command line or as part of a batch job. The syntax of the property is:
-Drpas.maxProcesses=###, where ### is the number of sub-processes the RPAS server utility should attempt to run in parallel. The number of processes to use should be determined by the administrator of the hardware system based on the physical number of processors available and the amount of load that is acceptable for the rpasInstall process to place on the system.
Perform the following procedure to run the RPAS Installer.
Locate and extract RPAS-14.1.2-unix.zip into the current directory, which is referred to in this document as [RPAS_Installer].
|
Note: This product's installer includes Ant. If Ant is already installed on your system and is version 1.6.5 or earlier, then you must rununset ANT_HOME on the command line to ensure that the installer uses the included version. The unset ANT_HOME command must be run before running ./install.sh. |
Begin the Installer by changing to the [RPAS_Installer] directory and running the following command:
./install.sh
|
Note: The command must be run with the preceding period and slash (./). |
If this process is being run on an X-Windows emulator (such as Exceed), a graphical user interface (GUI) to the Installer opens. If you are running in console mode through a terminal emulator, a text interface to the Installer opens.
In both cases, the requested information is identical, but displayed differently. In the GUI, a checkbox may appear to indicate whether you want a component installed. In text mode, you are prompted for a response of either Yes or No.
|
Note: In text mode, the default value appears in square brackets. To use the default value and continue, press Enter. If you want to use a different value, enter the new value. When prompted to create a directory, respond with Yes and press Enter. |
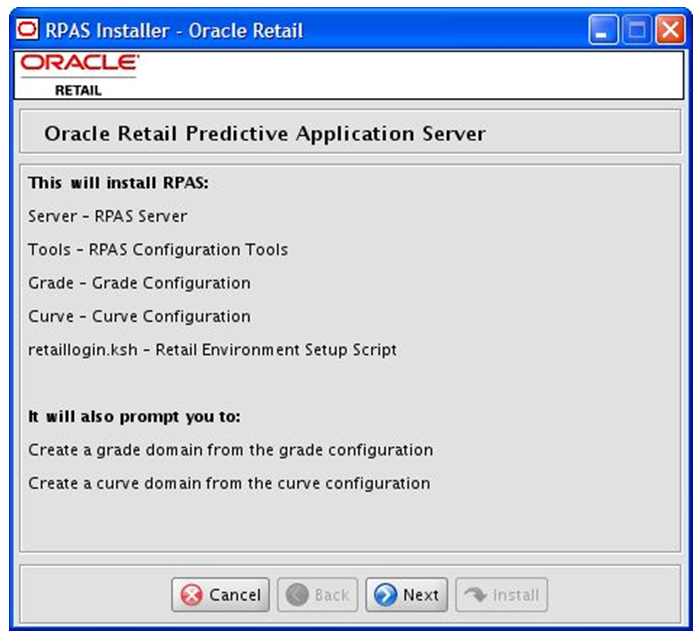
The RPAS Installer Window opens and displays the components that can be installed to your system. Click Next.
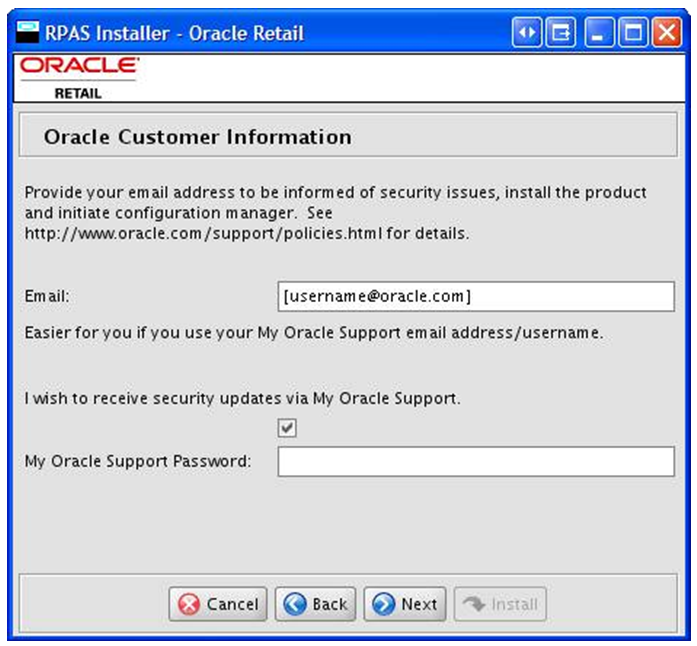
The Oracle Customer Information Window opens.
If you want to receive e-mails from My Oracle Support about security updates, enter your e-mail address and My Oracle Support password and ensure that the check box is selected. Click Next to continue.
The security updates are provided through Oracle Configuration Manager (OCM). The Oracle Retail OCM collector is included in the installer and is shown in Figure 3-2. The collector only needs to be installed once per ORACLE_HOME, WAS_HOME, or installation root directory. After the initial installation, the OCM collector automatically performs self-updates.
For more information about Oracle Retail OCM, refer to the following guide:
Oracle Configuration Manager Installer Guide (Note ID: 1071030.1)
This guide describes the procedures and interface of the Oracle Retail OCM collector that is a part of Oracle Retail full releases.
This document is available through My Oracle Support. Access My Oracle Support at the following URL:
The OCM documentation is located at the following URL:
http://www.oracle.com/technology/documentation/ocm.html
|
Note: If you select to receive security updates but do not provide e-mail and password information or lack an internet connection, additional windows appear. For more information about these windows, refer to the Oracle Configuration Manager Installer Guide. |
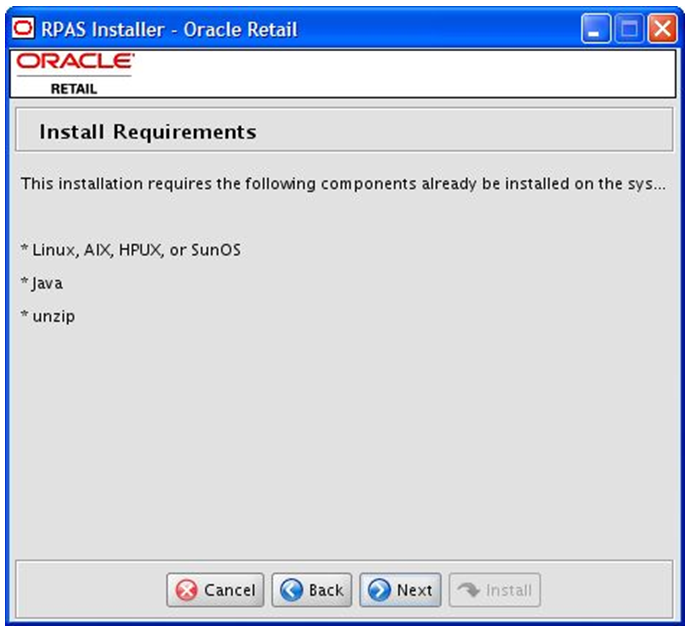
The Install Requirements Window opens.
This window displays the software required to complete this installation. You should already have installed this software on your system. If you have not installed these items, perform the necessary installations before continuing.
Click Next to continue.
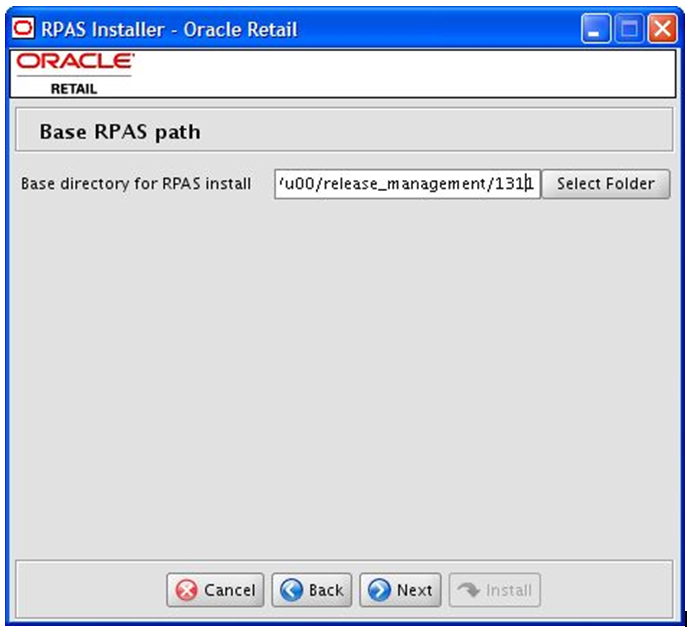
The Base RPAS Path Window opens.
Enter the path where the RPAS Server and components will be installed, and click Next. This path is used when creating your domains, should you choose to create them.
|
Note: Ensure that the installation path is located outside of the installer directory [RPAS_Installer].If this directory does not exist, the Installer prompts you to create it. |
The RPAS Installations Paths window opens.
Enter the following path information and click Next:
| Field | Description |
|---|---|
| RPAS Server path | Enter the target directory for your RPAS Server. |
| RPAS Tools path | Enter the target directory for your RPAS Configuration Tools. |
| Grade Config path | Enter the target directory for your Grade configuration. |
| Curve Config path | Enter the target directory for your Curve configuration. |
| Directory for Retail login script | Enter the target path where the retaillogin.ksh file will be created on your system. |
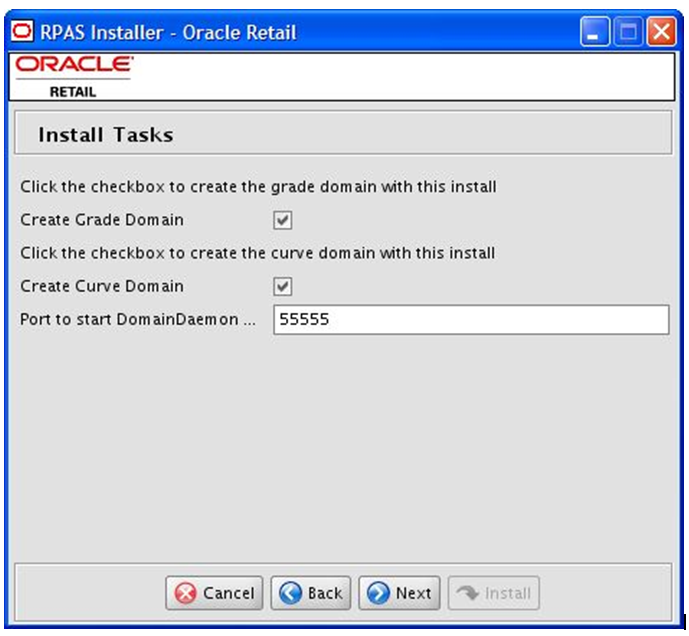
The Install Tasks Window opens.
Select the options to be performed by the RPAS Installer, enter the DomainDaemon port number, and click Next.
To create the domains for Grade and Curve, select the appropriate options on the Install tasks window. These options are selected by default, meaning that they will be created.
Enter the port where the RPAS DomainDaemon will run. This port needs to be configured for use with the RPAS Clients.
For the RPAS Classic Client, this is done with the EConfigure utility as documented in Chapter 6, "Installing and Configuring the RPAS Classic Client".
For the RPAS Fusion Client, this is done during the RPAS Fusion Client installation as documented in Chapter 5, "Installing the RPAS Fusion Client".
The Installer will validate that this port is not in use. The DomainDaemon will not be running at the end of this installation process, but can be started by using the startrpas alias created in the environment setup script.
|
Note: If you choose to create domains, they are created in a directory called domains under the Base directory path you defined on the Base RPAS path window. |
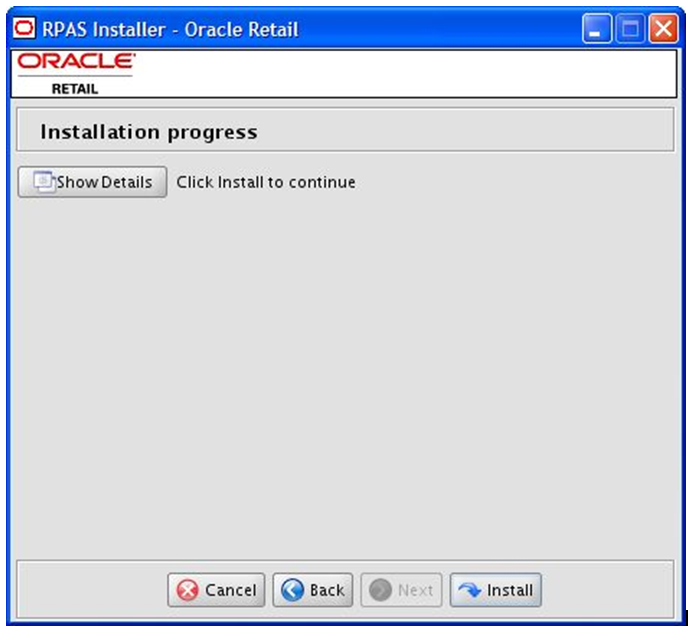
The Installation Progress Window opens. to start the installation, click Install.
To display the progress of the components and tasks being performed by the Installer, click Show Details. You can view the detailed mode at any time during or after the installation.
|
Note: The installation process can vary depending on your environment. If you chose to create the domains, installation time might take 10 to 30 minutes depending on server. |
When the installation process is complete, the Complete Window opens with a Finished Message dialog box.
Click OK to close the dialog box.
To view the installation details, click Show Details. The window displays two tabs: the Output tab and the Error tab. It is recommended that you review these tabs for any issues that may have occurred during the installation process.
If you want to view the log again at a later date, a text copy was saved in the directory [RPAS_Installer]. The log file will be named based on the product, platform, and a timestamp, followed by the.log extension.
Click Exit to close the Installer.
To begin using RPAS, run the retaillogin.ksh script. The script is located in the root of the base directory where RPAS was installed unless the default was overwritten when specifying directory paths.
Source the script from inside the directory where the script is located:
. ./retaillogin.ksh
Or, include the full path after the period and space ”.”:
. /<base_directory>/retaillogin.ksh
|
Note: The preceding period and space (”.”) must be included at the beginning of the command when running the script.Include this path and script in the |
This script will set up environment variables, such as RPAS_HOME and RIDE_HOME, which are required for RPAS to run properly.
After the RPAS Server has been installed and the RPAS_HOME environment variable has been set, the RPAS ODBC Server can be installed. The ODBC Server is required only if you have ODBC or JDBC applications that use the RPAS domain as data source, or if you want an SQL interface to the RPAS domain.
To install the ODBC Server, change directory to RPAS_HOME/odbc and run the shell script customInstall.sh. Although the installation script customInstall.sh works for non-root users, it is strongly suggested that the script be run by a root user so that the RPAS ODBC Agent can utilize the OS logon authentication method.
For information about the ODBC server configuration, refer to either the Classic Client or Fusion Client version of the Oracle Retail Predictive Application Server Administration Guide.
Both 32-bit and 64-bit ODBC Clients are available. They are delivered in zip files named odbcclient32.tar.zip and odbcclient64.tar.zip respectively. To install, copy the appropriate zip file to your preferred location. Unzip and untar the file. For more information about the ODBC Client configuration, refer to either the Classic Client or Fusion Client version of the Oracle Retail Predictive Application Server Administration Guide.
Perform the following procedure to install the JDBC client driver.
Unzip and untar the jdbcclient.tar.zip from the RPAS_HOME directory.For additional information on the JDBC Server, refer to either the Classic Client or Fusion Client version of the Oracle Retail Predictive Application Server Administration Guide.
Perform the following procedure to Determine the Path for the Domains.
Determine the locations of the domains to be installed.
|
Note: Domain paths cannot contain spaces. In addition, symbolic links cannot be used for domain paths. |
Create a directory at the root of the domain to be installed.
The RPAS DomainDaemon is the process that must be running on the server for a user to log into an RPAS domain. Before beginning the installation process, a port was specified where the DomainDaemon will run.
You can start the DomainDaemon manually. Instructions for the DomainDaemon are included in the Classic Client and Fusion Client versions of the Oracle Retail Predictive Application Server Administration Guide.