| Oracle® Retail Predictive Application Server Installation Guide Release 14.1.2 E70811-01 |
|

 Previous |
 Next |
| Oracle® Retail Predictive Application Server Installation Guide Release 14.1.2 E70811-01 |
|
Previous |
Next |
This chapter describes the full installation process of an Hybrid Storage Architecture (HSA) integration system on RPAS. This chapter includes these topics:
These prerequisites must be met before building the integrated environment, RPAS HSA:
Oracle Database Server
The Database server must have an Oracle Database 12c installed. The database connection details, that is, the server's IP address, port number, and SID or instance's service name should be provided to the RPAS installer. So the installer can use the connection information for the HSA installation.
Oracle Database Client
If the Oracle database server is not the same as the RPAS server, the Oracle Database 12c Client needs to be installed on the RPAS Server, including SQL Plus and SQL Loader. And ORACLE_HOME must also be set.
Participating Domains
Before registering each domain, it must:
Be upgraded to RPAS version 14.1.or later
Conform to the RPAS Data Mart (RDM) hierarchy structure
Be pre-built and loaded with hierarchy data
Have all informal positions formalized if removed before registration. DPM operations can resume after registration.
Be identified by the checkRDM utility as a valid domain.
The RPAS HSA Build process has three major steps:
Unlike any other traditional installer, database schemas are created as part of the RPAS HSA installation process.
The preinstallation process prepares the RDM repository, the Domains, Oracle wallet, and SQL script to create database schemas and roles. This SQL script must be manually run by a Database administrator.
Prepare the RDM Repository
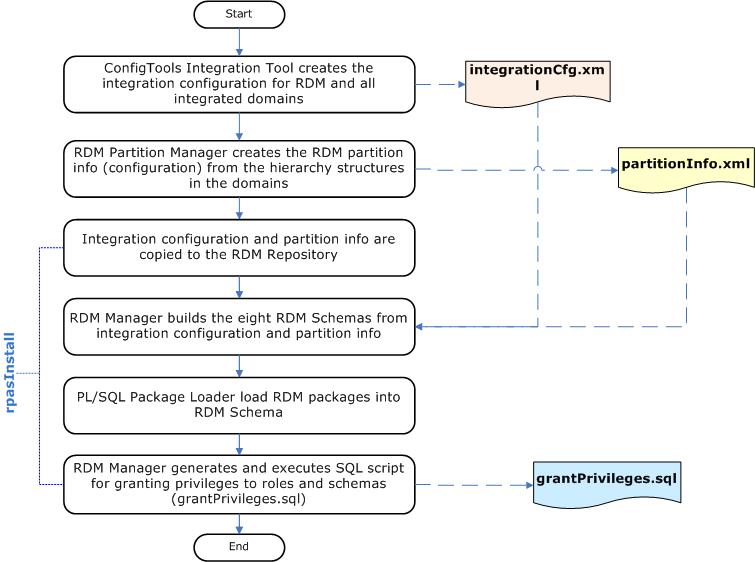
Figure 8-1 shows the preinstallation process flow and domain preparation. Since the HSA integration is a pluggable feature of RPAS, ensure that the existing processes of building and patching individual domains has not changed. All other schemas are granted additional required privileges during the installation
In order to integrate the domains, they must be upgraded and patched to RPAS version 14.1 or later.
The RDM Data Mart Schema should be granted the privileges using the provided script. All other schemas should be granted the corresponding role. At this point, the roles have privilege to create private synonyms only.
Prepare the Domains
Since the HSA integration is an optional feature of RPAS, existing processes of building and patching individual domains remain unchanged. Before a domain is registered with an HSA environment, it must be upgraded to the current RPAS version and patched with any Domain Configuration changes.
Informal positions created through DPM are unique to the individual domain and not shared by other domains or RDM. In order to prevent naming conflicts, all informal positions on the shared dimensions must be either formalized or removed before domain registration with the RDM. After a domain has been registered, DPM operations can continue as before since the RDM contains a mechanism to prevent naming conflicts.
The installation process builds schema objects in the database schemas and grants privileges to each role.
The RDM is built and populated from integration configuration and partition information by the rpasInstall utility. The access schemas which are created in the preinstallation step are populated by the schema objects and metadata.
Figure 8-2 shows the process of building the RDM schemas. The RDM manager invoked by rpasInstall can directly build the schemas in the database, or use an Alternative Installation Process.
During this build process:
All schema objects along with the PL/SQL packages are created in the data mart schema.
Private synonyms pointing to the data mart schema objects are created in each user schema.
All required privileges are granted to the roles.
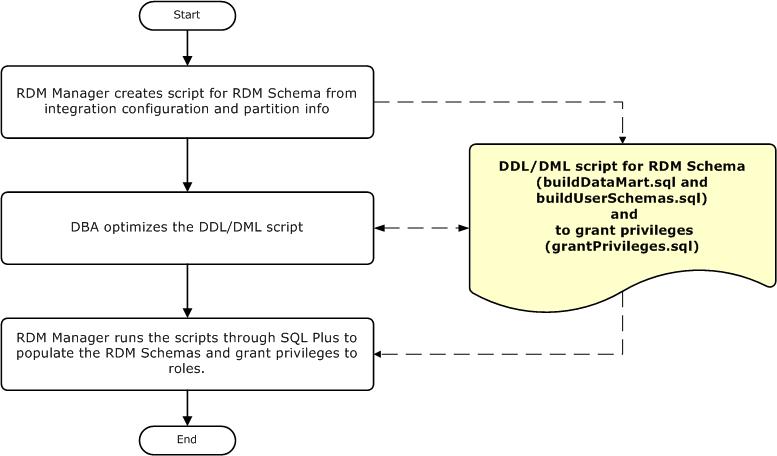
Alternative Installation Process
An alternative process of building the RDM schema is shown in Figure 8-3. Two DDL/DML SQL script can be generated first, one for the data mart schema and one for other access schemas. After optimization by the DBA or Database performance expert, it can then be used to populate the schema.
The postinstallation process initializes the data synchronization and registers compatible domains.
After the HSA system is built, the postinstallation process has three steps:
Figure 8-4 shows all of the post installation steps.
Load Dimension Data
The dimension data input files must first be copied to the input/dimdata directory in the RDM repository before running loadDimData. Perform this either manually or through a wrapper script.
Register Participating Domains
A domain can be registered anytime after the RDM has been built as long as it has been included in the integration configuration (domain name in the data flow set and shared measures in the shared fact set). This allows incremental integration of multiple domains.
If a domain has not been defined in the integration configuration, it requires a patching process to bring the domain into the HSA system.
Only a valid domain can be registered. The validity of a domain is checked by its conformity with the RDM at the partition, position and ITT level. These checks are performed by rdmMgr before registering. However, to check the complete validity of the domain, rollup conflicts must be verified. The checkRDM utility has the ability to verify a domain's validity.
Load Shared Fact Data
There are two ways to populate the shared data in RDM. The loadFactData utility can load fresh data from flat input files. The transferFactData utility can transfer existing data in the domains to RDM selectively according to user input.
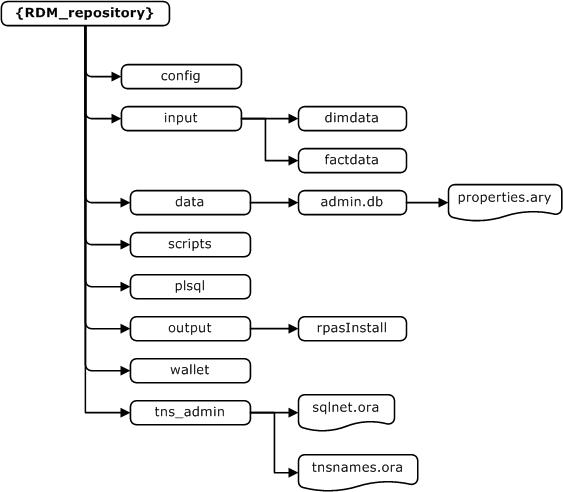
The RPAS Data Mart (RDM) repository is a directory on the file system to store RDM configuration, input files, log files, and metadata. Its directory structure is very similar to that of an RPAS domain except no dimension or measure data is stored there.The RDM repository is created by rdmMgr when the RDM is built and updated when the RDM is patched as part of the preinstallation process. It is a centralized location for RDM properties, Oracle database credential wallets and network configuration files.
The location to create the RDM repository is specified when running the prepareRDM script.
Figure 8-5 shows the directory structure of the RDM repository that is described in Table 8-1.
Table 8-1 RDM Repository Directory Structure Description
| Directory | Contents | Populated By | Processed By |
|---|---|---|---|
|
config |
Contains schema information file and Integration and partition configuration files. |
The The |
The |
|
input |
Contains shared hierarchies and measures data input files. |
The input dimension input files should be manually copied to the dimdata folder and the fact data files copied to the factdata folder. |
The |
|
data/admin.db |
Contains |
rpasInstall/rdmMgr |
Any operation connecting to the database. |
|
scripts |
Contains any script output of the RDM manager. |
RDM Manager |
DBA |
|
plsql |
Contains PL/SQL packages and procedures |
|
|
|
output |
RDM log files |
RDM utilities |
|
|
wallet |
Oracle database credential and SSL wallet |
|
Any operation connecting to the database. |
|
tns_admin |
Oracle database network configuration ( |
RDM Manager |
Any operation connecting to the database. |
In an integrated domain, all RDM related properties are encapsulated in the array, rdm_properties.ary. Figure 8-6 shows the RDM-related entities in a domain that is described in Table 8-2.
In order to implement RDM Schema Security, the DBA and the RPAS Administrator need to work together and set up a multi-schema environment. The schema names and connection parameters for the RDM are specified in a Schema Information file in xml format.
Table 8-3 lists all schemas and their corresponding roles. The Data Mart Schema is the home of all persistent data. Some of the Access Schemas require disk space for creating and populating staging tables during various RPAS operations. Tablespace quotas need to be granted accordingly.
|
Note: The recommended schema names can be changed, but the role names and database aliases are constants. The schema IDs must not be changed. |
Table 8-3 RDM Schemas and Roles
| Schema | Schema ID | Recommended Name | Role | DB Connect String (db_alias) | Notes |
|---|---|---|---|---|---|
|
RDM Data Mart Schema |
rpas_data_mart |
rpas_data_mart |
N/A |
rpas_data_mart_conn |
The main schema for all persistent data. |
|
RDM Patch User |
rpas_patch_user |
rpas_patch_user |
rpas_patch_role |
rpas_patch_conn |
|
|
RPAS Batch User |
rpas_batch_user |
rpas_batch_user |
rpas_batch_role |
rpas_batch_conn |
Requires space for fact staging tables. |
|
RDM Dim Loader |
rpas_dimload_user |
rpas_dimload_user |
rpas_dimload_role |
rpas_dimload_conn |
Requires space for dimension staging tables. |
|
RDM Fact Loader |
rpas_factload_user |
rpas_factload_user |
rpas_factload_role |
rpas_factload_conn |
Requires space for fact staging tables. |
|
RPAS Hier Manager |
rpas_hiermgr_user |
rpas_hiermgr_user |
rpas_hiermgr_role |
rpas_hiermgr_conn |
Requires space for DPM related staging tables. |
|
RPAS Workbook User |
rpas_wkbk_user |
rpas_wkbk_user |
rpas_wkbk_role |
rpas_wkbk_conn |
Requires space for staging tables for multiple users. |
|
RPAS ETL Schema |
rpas_etl_user |
rpas_etl_user |
rpas_etl_role |
rpas_etl_conn |
Requires space for fact staging tables |
The schema names and Oracle database network configuration can be configured in the schemaInfo.xml file which is passed to the RDM schemas preparation script.
The tablespace properties, name and space_quota, are optional. If no tablespace is provided, then the default tablespace of the database is used.
If no default tablespace is specified, then the schemas with unspecified tablespace are created in the system tablespace.
It is important to have proper tablespace management. If no space_quota is provided, then no table space quota is granted to the user.
The space quota can be decided based on the information in the Notes column from Table 8-3.
The space_quota must be accompanied by the tablespace name. However, the prepareSchemas.sql can be modified manually before running.
The <service_name> or <sid> must be present and only one can be present. This file has to be provided while creating the RDM repository as explained in RDM Repository.
Example 8-1 Format for schemaInfo xml
<?xml version="1.0" encoding="UTF-8" ?>
<rdm_configuration>
   <schema_set>
      <schema id="rpas_data_mart">
          <name>rpas_data_mart</name>
         <tablespace>
             <name></name>
             <space_quota></space_quota>
          </tablespace>
      </schema>
      <schema id="rpas_patch_user">
          <name>rpas_patch_user</name>
         <tablespace>
             <name></name>
             <space_quota></space_quota>
          </tablespace>
      </schema>
      <schema id="rpas_batch_user">
          <name>rpas_batch_user</name>
         <tablespace>
             <name></name>
             <space_quota></space_quota>
          </tablespace>
      </schema>
      <schema id="rpas_dimload_user">
          <name>rpas_dimload_user</name>
         <tablespace>
             <name></name>
             <space_quota></space_quota>
          </tablespace>
      </schema>
      <schema id="rpas_factload_user">
          <name>rpas_factload_user</name>
         <tablespace>
             <name></name>
             <space_quota></space_quota>
          </tablespace>
      </schema>
      <schema id="rpas_hiermgr_user">
          <name>rpas_hiermgr_user</name>
         <tablespace>
             <name></name>
             <space_quota></space_quota>
          </tablespace>
      </schema>
      <schema id="rpas_wkbk_user">
          <name>rpas_wkbk_user</name>
         <tablespace>
             <name></name>
             <space_quota></space_quota>
          </tablespace>
      </schema>
      <schema id="rpas_etl_user">
          <name>rpas_etl_user</name>
         <tablespace>
             <name></name>
             <space_quota></space_quota>
          </tablespace>
      </schema>
   </schema_set>
   <tns_parameters>
      <protocol>tcp</protocol>
      <host>burrg41002v.us.oracle.com</host>
      <port>1521</port>
      <server>dedicated</server>
      <service_name>rpasodb.us.oracle.com</service_name>
      <sid></sid>
   </tns_parameters>
</rdm_configuration>
The Integration Tool of RPAS ConfigTools creates the integration configuration from user inputs and one or more domain configurations. A name is specified for the integration configuration, which is saved as the name attribute of the highest level XML element. Example 8-2 shows an integration configuration with a name specified as RDM.
The language attribute specifies the language of all the labels in the integration configuration. It is used as the source language in the translation tables for those labels. It can be any of the 18 languages supported by RPAS.
These sections describe the integration configuration:
The shared hierarchy section defines the hierarchical structure of the RDM and it follows similar xml structure to the hierarchy.xml in a domain but has been simplified.
This section consists of multiple hierarchies, each forming a dimension graph. Each hierarchy has a name, a label and an order number which is used to define the order of multiple dimensions in an intersection. Each dimension has a name and a label, and the parent-child relationship of the xml structure defines the aggregation and spread relationship of the dimensions.
A fact in RDM is the corresponding data entity of a measure in a domain. The properties for a fact are name, label, base intersection, type, fact table, NA value, description, and purge age.
If a fact is shared by the RDM, a fact group name must be specified. Otherwise, the fact is shared by domains only.
Each entry defines the mapping between one domain measure and one database fact.
This section defines the domain and configuration map. Each domain is mapped to a domain configuration. The domain name is configured here which is by default the same as the configuration name. This section is used internally by the Integration tool of the ConfigTools.
Example 8-2 shows the format of the integration.xml file which contains all of the xml elements described in the previous sections.
Example 8-2 Format for integration.xml
RDM.xml
<?xml version="1.0" encoding="UTF-8" ?>
<rpas_hsa_configuration name="RDM" language=”English”>
<shared_hierarchy_set>
   <hierarchy name="CLND">
      <label>Calendar</label>
      <order>9990</order>
      <dimension name="day">
         <label>Day</label>
         <position_format>d%Y%m%d</position_format>
         <dimension name="week">
             <label>Week</label>
                <dimension name="mnth">
                    <label>Fiscal Month</label>
                       <dimension name="qrtr">
                        <label>Fiscal Quarter</label>
                           <dimension name="year">
                                <label>Fiscal Year</label>
                           </dimension>
                        </dimension>
             </dimension>
         </dimension>
      </dimension>
   </hierarchy>
   <hierarchy name="PROD">
      <label>Product</label>
      <order>9980</order>
      <dimension name="sku">
         <label>Sku</label>
         <dimension name="clss">
            <label>Class</label>
               <dimension name="dept">
                   <label>Department</label>
                </dimension>
            </dimension>
          </dimension>
   </hierarchy>
</shared_hierarchy_set>
<shared_fact_set>
   <fact name="P">
      <label>P Fact</label>
      <baseint>sku_week</baseint>
      <type>2</type>
      <fact_group>r_g_sku_week_ft</fact_group>
      <navalue>0</navalue>
      <description>PPP Fact</description>
      <purgeage>1000</purgeage>
   </fact>
   <fact name="Q">
      <label>Q Fact</label>
      <baseint>sku_week</baseint>
      <type>4</type>
      <fact_group>r_g_sku_week_ft</fact_group>
      <navalue>0</navalue>
      <description>QQQ Fact</description>
      <purgeage>1000</purgeage>
   </fact>
</shared_fact_set>
<integration_map>
   <entry>
      <domain>d1</domain>
      <measure>a</measure>
      <fact>P</fact>
   </entry>
   <entry>
      <domain>d2</domain>
      <measure>a</measure>
      <fact>P</fact>
   </entry>
   <entry>
      <domain>d1</domain>
      <measure>c</measure>
      <fact>Q</fact>
   </entry>
</integration_map>
<domain_set>
   <domain name="d1">
      <config_path>...</config_path>
   </domain>
   <domain name="d2">
      <config_path>...</config_path>
   </domain>
   <domain name="d3">
      <config_path>...</config_path>
   </domain>
</domain_set>
</rpas_hsa_configuration>
The RDM can be built to make use of database partitioning. This partitioning enables parallelization within the RDM in a manner similar to a RPAS domain. As with domain partitioning, information about the desired partitioning scheme is contained with a partition information document. The RDM partition information xml file is modeled after the global domain configuration. It contains the partition dimension name and multiple partition definitions, each with a partition name and its corresponding list of positions.
This xml file can be generated by the rdmPartitionMgr utility. for more information on the rdmPartitionMgr utility, refer to either the Oracle Retail Predictive Application Server Administration Guide for the Fusion Client or the Oracle Retail Predictive Application Server Administration Guide for the Classic Client.
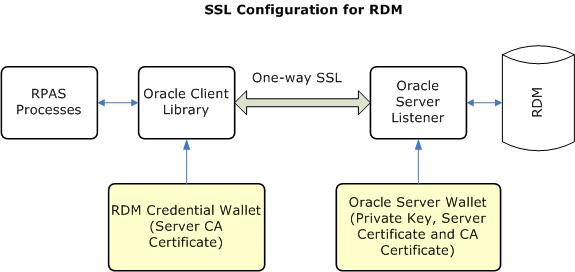
In an RPAS HSA environment, RPAS processes access shared data stored in the RDM through a network connection. Oracle database has built-in support for secure connection through Secure Socket Layer (SSL). RPAS HSA is taking advantage of this Oracle feature and provides support for network security through SSL. This section covers the configuration of SSL for RDM, including setting up SSL for both the Oracle database server and the Oracle client used by RPAS processes. Note that the SSL configuration of RDM connection is optional in HSA.
Figure 8-7 shows the components of the SSL configuration for RDM. The client/server connection is protected by one-way SSL, which only authenticates the server on the client side. As a result, only the Oracle Server Wallet is required to have a private key. The client wallet will only need to contain the server CA (Certificate Authority) certificate.
The CA certificate can be either self-signed or issued by a third-party CA. In the case of third-party CA, more than one certificate may need to be imported into the client wallet (usually called a CA certificate chain).
The server side configuration is mostly done manually by the DBA. A script is provided to create the wallet if a self-signed certificate is used.
The client side configuration is done through scripts by the RPAS admin.
These sections contain information on setting up SSL on the Oracle server side:
|
Note: Setting up SSL should be done by a DBA who has the permission to modify the configuration files of the Oracle server. |
The Oracle server wallet can be created the same way as is the RPAS server wallet for one-way SSL that is described in the SSL chapter of either the Oracle Retail Predictive Application Server Administration Guide for the Fusion Client or the Oracle Retail Predictive Application Server Administration Guide for the Classic Client.
On UNIX, the wallet must be created by the user account which starts the Oracle database processes. For security reason the wallet is only accessible by its creator.If a self-signed CA certificate is used, then the RPAS provided shell script, createSSLWallets.sh creates the root and server wallets, private keys, and all related certificates.When running the script createSSLWallets.sh, choose Option 3 to create wallets for Oracle database server, as shown in Figure 8-8.
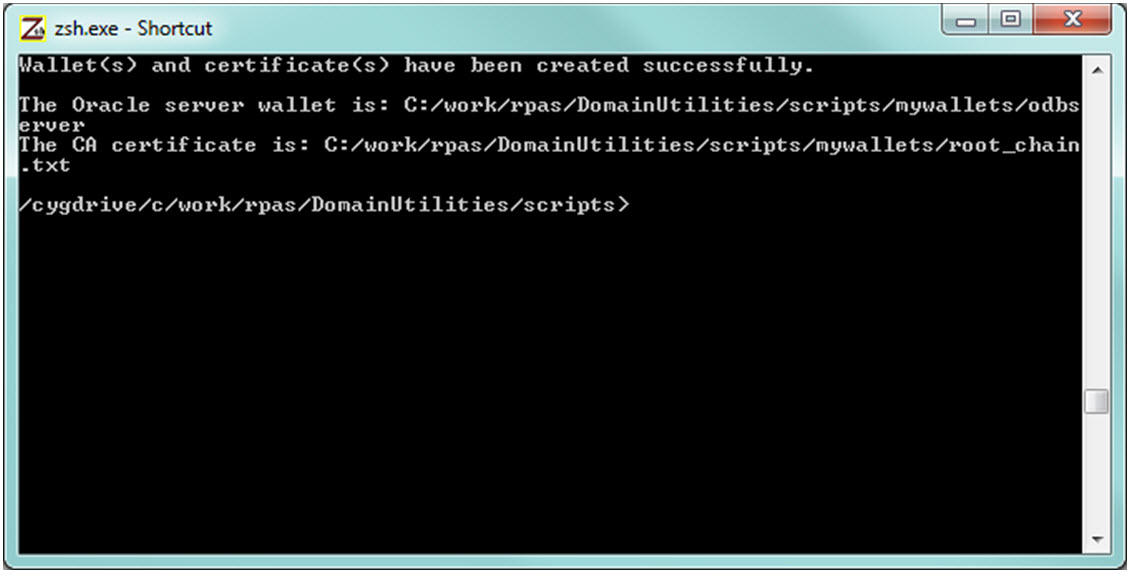
The script asks for the root directory where the wallets are to be created, your organization name, and passwords for the root and server wallets. At the end of a successful run, the wallet location and the path to the CA certificate file are displayed as shown in Figure 8-9.
The CA certificate file can be copied to a common location and then needs to be imported into the Oracle client wallet.
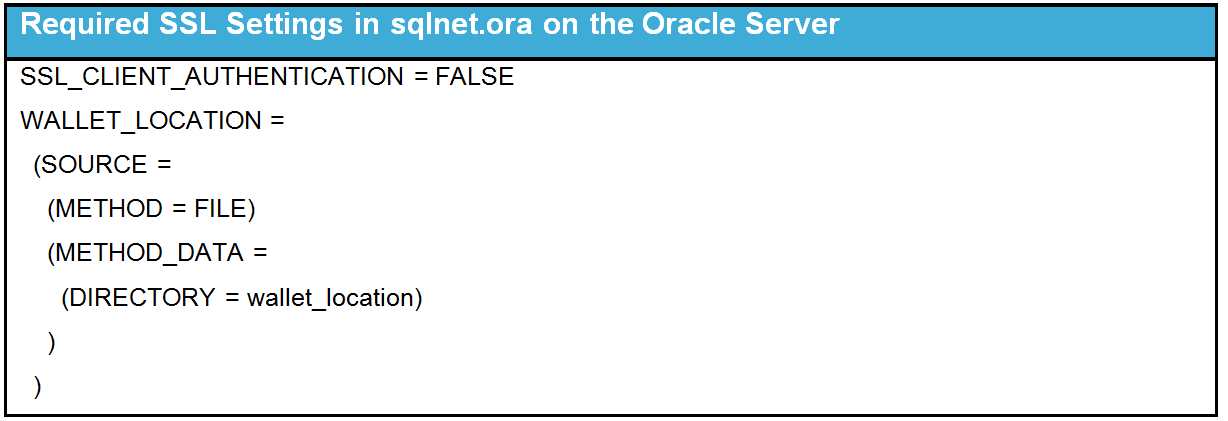
The network configuration file sqlnet.ora normally resides in the $ORACLE_HOME/network/admin directory.
The following table lists the required settings for SSL
|
Note: The SSL client authentication parameter must be set to FALSE for one-way SSL. Thewallet_location is the absolute path to the Oracle server wallet as described in Creating the Oracle Server Wallet. |
The following table lists the optional settings for SSL.By default, Oracle secure connection uses SSL version TLS 1.0 which can be overridden by the SSL_VERSION setting.
|
Note: For more information regarding these settings, refer to the Oracle Database Security Guide at: |
| Optional SSL Settings in sqlnet.ora on the Oracle server |
|---|
| SSL_CIPHER_SUITES= (SSL_cipher_suite1 [,SSL_cipher_suite2]) |
| SSL_VERSION=1.2 |
The listener configuration file listener.ora normally resides in $ORACLE_HOME/network/admin directory. After modification, the Oracle listener must be restarted for the changes to take effect.
|
Note: The wallet location and SSL settings are the same as that in the network configuration file (must be in both files). A new listener endpoint with protocol TCPS must be added to the LISTENER setting. Port number 2484 is the typical port for TCPS but other number can also be used, while the existing protocol listings of the LISTERNER setting can be kept as they are. |

These sections contain information on setting up SSL on the Oracle client side for use by RPAS or RDM processes:
|
Note: Only Updating Schema Information Configuration is performed by the user. The other three steps are processed by theprepareRDM.sh script. |
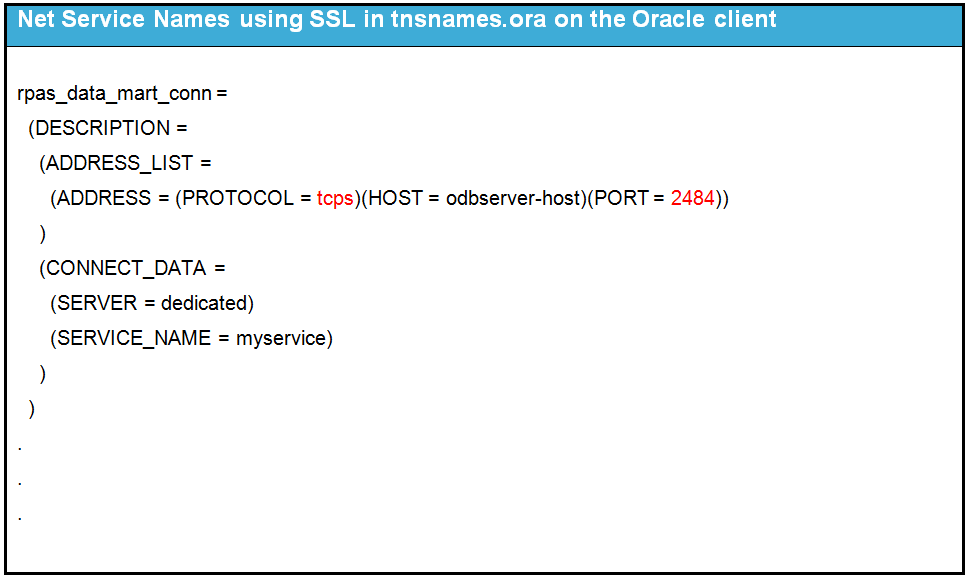
The schema information configuration must have matching endpoint parameters to the Oracle listener. The protocol must be tcps and the port number must be the same as specified in the listener configuration.
The following table lists the TNS parameters in schemaInfo.xml.

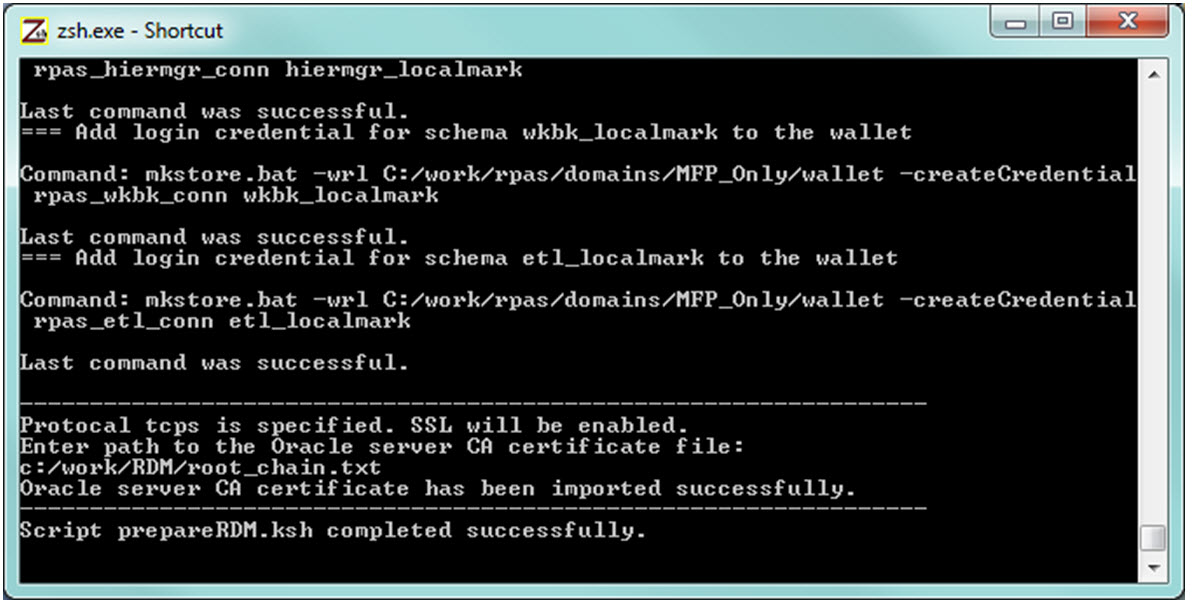
The prepareRDM.ksh script in the RDM build process already creates an Oracle wallet to hold the login credentials for RDM. The same wallet should be used to hold the Oracle server CA certificate. If protocol tcps is specified in the schema information, this same script asks for the path to the CA certificate file and imports it into the wallet automatically.
Figure 8-10 shows the importing of CA certificate by the prepareRDM.ksh script.
If a third-party CA is used and there is more than one file in the CA certificate chain, then you must specify the top certificate for the script to import and then manually import the rest in the order of the chain using the following command:
orapki wallet add -wallet {client_wallet_directory} -trusted_cert -cert {ca_cert_chain_file} -pwd {client_wallet_password}
|
Note: The client wallet location is the wallet subdirectory of the RDM repository. |
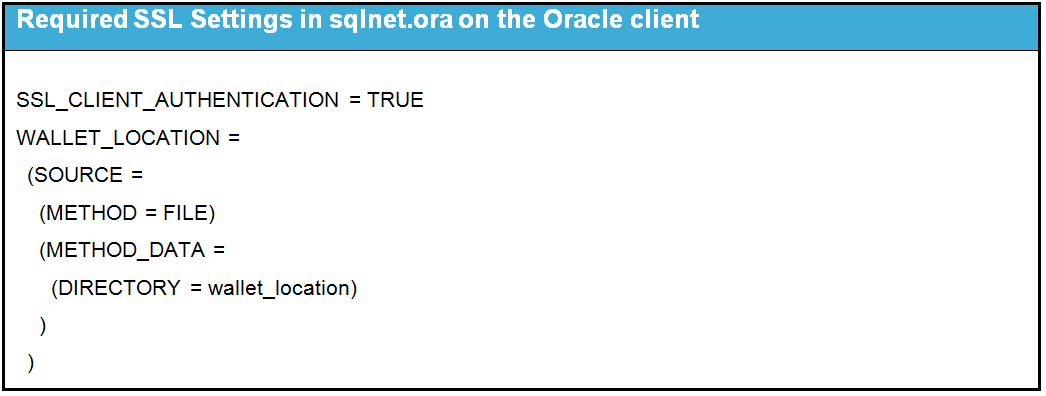
The network configuration file sqlnet.ora used by RPAS processes is created automatically by the RDM Manager during the RDM build process. This file resides in the tns_admin subdirectory of the RDM repository.
The following table lists the required SSL settings in sqlnet.ora on the Oracle client.
|
Note: The SSL client authentication parameter must be set to TRUE for one way SSL. Thewallet_location is the wallet subdirectory of the RDM repository. |
The Oracle Net Service Names configuration file tnsnames.ora is created automatically by the RDM Manager during the RDM build process in the tns_admin subdirectory of the RDM repository. All entries use the endpoint parameters specified by the schema information configuration.
After SSL configuration is complete on both the Oracle server and client and the Oracle listener has been restarted, then use RDM Manager to verify the connection using this command:
rdmMgr –rdm rdmPath –testConnection
|
Note: There is a small delay, sometimes a few minutes, after the listener is restarted and the SSL connection is up |
These sections describe the main RPAS installer and all helper utilities/scripts:
A shell script is created to configure the RDM before building the database schemas. The script is interactive but can be made silent if all parameters are specified by environment variables.
|
Note: If SSL is used for the RDM database connection, then it must first be configured prior to running this script. |
Script
prepareRDM.ksh [ rdmPath] [schemaInfoFile]
Functions
This script performs the following functions:
Creates the RDM file system repository.
Calls rdmMgr to create the RDM repository
Generates RDM pre-build scripts and network configuration files.
Calls rdmMgr –genPreBuildScript to create the preinstallation script and network configuration files.
The output files are placed in the RDM repository:
The file, prepareSchemas.sql is placed in the RDM repository subdirectory scripts. Passwords are prompted for while running this SQL file.
The files, tnsnames.ora and sqlnet.ora are placed in the RDM repository subdirectory tns_admin.
Creates an Oracle wallet for RDM.
Creates an Oracle wallet named rdmPath/wallet
Adds all RDM user credentials in the wallet.
Passwords are prompted for these schema logins.
|
Note: The password for each schema in the wallet must match to that of the corresponding schema created in the database. |
The existing rpasInstall program is enhanced to support building an HSA system.
The following example displays the command line syntax for rpasInstall.
Example 8-4 Command Line Syntax for rpasInstall
rpasInstall {command} {options}
rpasInstall
rpasInstall -buildRDM -genScript -integrationCfg <integration_config> {-partitionInfo <partitionInfo_file> | -noPartition} -log <log_file> -rdm <rdm_path>
rpasInstall -buildRDM -integrationCfg <integration_config> {-partitionInfo <partitionInfo_file> | -noPartition} -rdm <rdm_path> -log <log_file>
rpasInstall -buildRDM -fromScript -rdm <rdm_path> -log <log_file>
rpasInstall -rebuildRDM -integrationCfg <integration_config> {-partitionInfo <partitionInfo_file> | -noPartition} -rdm <rdm_path> -in <input_directory> -log <log_file>
rpasInstall -rebuildRDM -fromScript -rdm <rdm_path> -log <log_file>
rpasInstall {command} {options}
Table 8-4 describes the command and option values.
Table 8-4 Command and Option Values for rpasInstall
| Value | Description | Type |
|---|---|---|
|
-buildRDM |
Performs a build installation for integration deployment. |
Command |
|
-rebuildRDM |
Performs a rebuilt installation for integration deployment. |
Command |
|
-integrationCfg <config_file> |
Option for the integration configure file. |
Option |
|
-partitionInfo <partitionInfo_file> |
Option for the partition information input file. |
Option |
|
-noPartition |
Option if no partition information is provided. |
Option |
|
-rdm <path> |
Option for the RDM repository path. |
Option |
|
-genScript |
Only generates the SQL script with RDM schema definitions, does not deploy it. Two script files named |
Option |
|
-fromScript |
Builds or patches RDM using the scripts |
Option |
|
-log <log_file> |
For logging - all logging output from the sub-processes should be re-directed to this file. At the end of the |
Option |
|
-verbose |
Results in more detailed log information. |
Option |
The RDM Manager is a command line utility which manages operations on the RDM. It creates the RDM repository directory structure and the RDM database schema from integration configuration and optional partition information. It also manages domain registration and provides some other useful tools to support the RDM in an integrated environment.
These sections describe setting up the RDM Manager:
The command, rdmMgr, registers a domain at a time. Prerequisites to registering a domain include:
The partition level of the domain must be at or upper to the RDM partition level.
The domain to be registered with the RDM must have compatible hierarchies.
The domain's all informal positions must be formalized or removed.
Registering a domain does the following:
Validates the domain hierarchy's compatibility with the RDM.
Adds and assigns a new RDM property, domain_name, in the domain.
Registers the domain name with RDM in a domain table. An integer domain ID is created, which is used internally in the RDM.
Updates the ITT tables in the RDM with the domain's positions.
The command, rdmMgr, unregisters a domain at a time.
|
Note: Before unregistering the domain, it is recommended to transfer shared measure data belonging to the domain. It can be transferred to the domain using the transferFactdata utility. |
Unregistering a domain does the following:
Removes the domain name from the domain table in the RDM.
Removes all RDM properties created during registration from the departing domain.
Removes all entries in the ITT tables which belong to the departing domain.
Formalizes the informal positions of the departing domain to keep the measure data.
Preserves the departing domain data.
The integration configuration file and partition information file are not specified on the command lines. They should be pre-staged in the config directory of the RDM repository, usually by the rpasInstall process. The scripts and network configuration files generated by the RDM manager all have pre-defined output directories and names.
Integration configuration
Copy to rdmPath/config/integrationCfg.xml in advance.
Partition information
Copy to rdmPath/config/partitionInfo.xml in advance.
All output scripts to go to this directory: rdmPath/scripts/
These scripts have fixed names:
| Name | Type | Description |
|---|---|---|
| prepareSchemas.sql | Pre-build script | SQL script to create users and corresponding roles with few basic privileges. |
| buildDataMart.sql | Build script | SQL script to create private synonyms. |
| buildUserSchemas.sql | Build script | This script should be run for each access schema other than the data mart schema. |
| grantPrivileges.sql | Build script | SQL script to grant all required privileges to each access schemas. This should be re-executed only when the schema objects are created for the first time or when existing schema objects are re-created. |
The following files go to this directory: rdmPath/tns_admin:
tnsnames.ora
sqlnet.ora
|
Note: The environment variable TNS_ADMIN should be assigned the path to the tns_admin directory of the RDM repository, which is being done programmatically in the C++ code. |
The following example displays the command line syntax for the RDM Manager.
| Commands called by: | Command Line Syntax |
|---|---|
| prepareRDM.ksh script | rdmMgr -rdm rdmPath -create -schemaInfo f1 |
| rdmMgr -rdm rdmPath -genPreBuildScript | |
| RPAS Installer | rdmMgr -rdm rdmPath -clearSchema |
| rdmMgr -rdm rdmPath -buildSchema | |
| rdmMgr -rdm rdmPath -genBuildScript | |
| -buildFromScript | |
| Commands used by the: | Command Line Syntax |
| RPAS Administrator | rdmMgr -rdm rdmPath -listProperties |
| rdmMgr -rdm rdmPath -testConnection | |
| rdmMgr -rdm rdmPath -register -d domainPath -name domainName | |
| rdmMgr -rdm rdmPath -unregister -name domainName | |
| rdmMgr -rdm rdmPath -listDomains | |
| rdmMgr -rdm rdmPath -listHistory | |
| rdmMgr -rdm rdmPath -purgeDeletedData | |
| rdmMgr -rdm rdmPath -updateRegistration -d domainPath -name domainName | |
| rdmMgr -rdm rdmPath -move -dest destRdmPath |
Table 8-5 describes the command and parameter values.
Table 8-5 Command and Parameter Values for the RDM Manager
| Value | Description | Type |
|---|---|---|
|
-create |
Creates the RDM repository directory structure and copies the |
Command |
|
-listProperties |
Lists the RDM properties. |
Command |
|
-testConnection |
Tests all schema connections. |
Command |
|
-clearSchema |
Drops any existing RDM schema objects in all the schemas (without access). |
Command |
|
-buildSchema |
Builds the RDM schema objects in all schemas (without access) and grant privileges to the roles created initially. Assuming |
Command |
|
-genPreBuildScript |
Generates the SQL script that can be used to create schema user and roles. The generated script |
Command |
|
-genBuildScript |
Generates the SQL script that creates the schema objects, populates some metadata, and grants privileges to the roles created initially. Assuming |
Command |
|
-buildFromScript |
Builds the RDM schema objects and grants privileges using the SQL scripts |
Command |
|
-register |
Registers the RPAS domain with RDM. |
Command |
|
-unregister |
Unregisters the RPAS domain from RDM. |
Command |
|
-listDomains |
Lists the current domains and status. |
Command |
|
-listHistory |
Lists the RDM schema and RDM Repository history |
Command |
|
-purgeDeletedData |
Physically purges all dimension data that are marked for deletion, along with all associated fact data. |
Command |
|
-updateRegistration |
Updates existing registration of a domain. Depending on what has changed or become out of sync, it updates the domain path, RDM path, ITT tables, or all. |
Command |
|
-move |
Moves the RDM repository to a new location and updates all domains with the new RDM path. If any of the domains cannot be updated, a warning message displays. To update the RDM path in the domain separately, run the |
Command |
|
-d |
Path to the domain. |
Parameter |
|
-rdm |
Path to the RDM. |
Parameter |
|
-schemaInfo |
Path to the schema information file This file is copied to the config directory of the RDM repository. |
Parameter |
|
-name |
The domain name as defined in the integration configuration. |
Parameter |
|
-dest |
The destination path for moving RDM repository. |
Parameter |
This process results in the:
Creation of the RDM Repository directory structure
Saving the schema names in schemaInfo.xml as RDM properties
This process creates these RDM objects:
Dimension tables
Fact tables
Metadata Tables
Data flow table
Index Translation Tables (ITT)
Commit, logging and dimension staging tables
Other ODB objects (sequences, views, indexes, types, PL/SQL packages, and so on)
|
Note: Additionally, private synonyms for each schema user are also created. |
The connections to all ODB schemas are tested using this command: rdmMgr -testConnection
The command, rdmMgr, registers a domain at a time. Prerequisites to registering a domain include:
The partition level of the domain must be at or upper to the RDM partition level.
The domain to be registered with the RDM must have compatible hierarchies.
The domain's all informal positions must be formalized or removed.
Registering a domain does the following:
Validates the domain hierarchy's compatibility with the RDM.
Adds and assigns a new RDM property, domain_name, in the domain.
Registers the domain name with RDM in a domain table. An integer domain ID is created, which is used internally in the RDM.
Updates the ITT tables in the RDM with the domain's positions.
The command, rdmMgr, un-registers a domain at a time.
|
Note: Before unregistering the domain, it is recommended to transfer shared measure data belonging to the domain. It can be transferred to the domain using thetransferFactdata utility. |
Unregistering a domain does the following:
Removes the domain name from the domain table in the RDM.
Removes all RDM properties created during registration from the departing domain.
Removes all entries in the ITT tables which belong to the departing domain.
Formalizes the informal positions of the departing domain to keep the measure data.
Preserves the departing domain data.
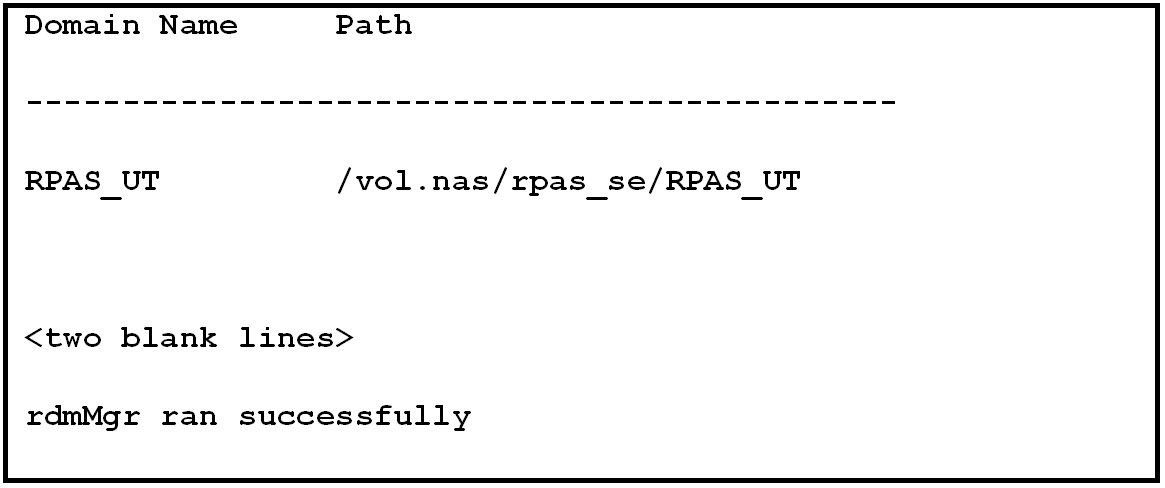
Figure 8-11 shows the output of rdmMgr -listDomains. Two blank lines indicate the end of output.
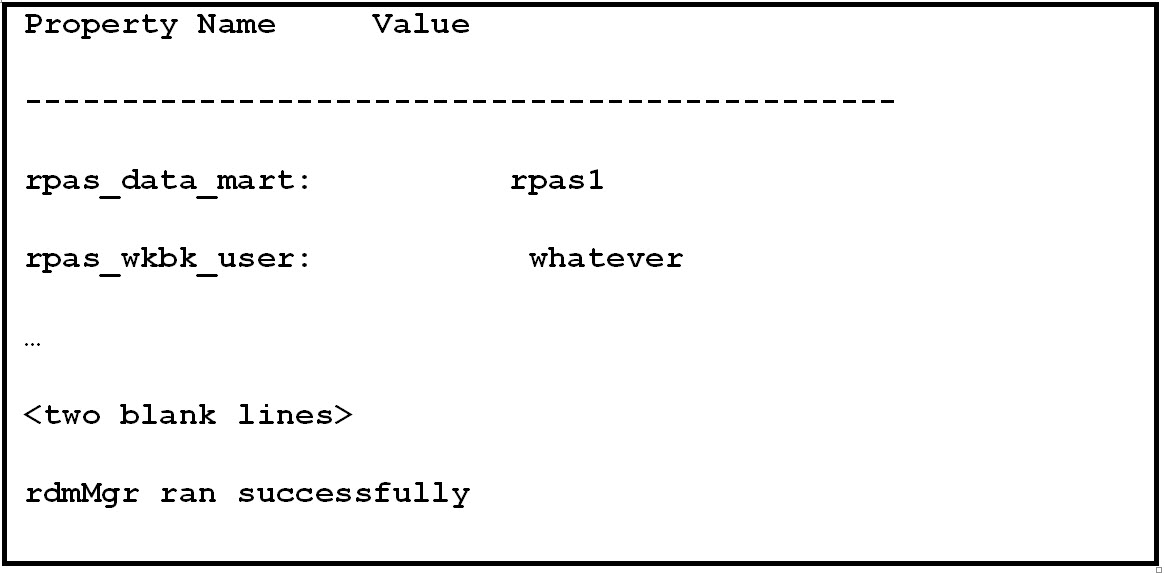
Figure 8-12 shows the output of rdmMgr -listProperties. Two blank lines indicate the end of output.