| Oracle® Retail Predictive Application Server User Guide for the Fusion Client Release 16.0 E81120-03 |
|


 Previous |
 Next |
| Oracle® Retail Predictive Application Server User Guide for the Fusion Client Release 16.0 E81120-03 |
|
Previous |
Next |
Dynamic attributes are attributes you can create in the RPAS Fusion Client. Dynamic attributes describe a particular dimension and level based on a measure's value at specified levels of other dimensions. The dynamic dimension attributes can be used for level splitting, sorting, and displaying in the workbook. For instance, you can create an attribute based on the weekly sales that describes stores in terms of their weekly sales rate: low, average, or high.
After you have created a dynamic attribute, it is saved to the domain. It is added to the workbook during workbook build process if the dimension is present and if the following conditions are met:
The attribute is accessible by the user.
The source measure exists in the workbook.
The other positions of this attribute fit into the workbook context.
The attribute data is only updated when the attribute is used.
This chapter describes the various tasks you can perform with dynamic attributes. It includes the following sections:
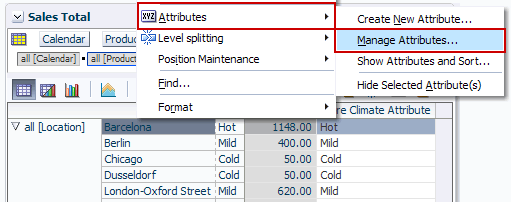
Dynamic attributes are created in the Define New Attribute dialog box. You can access this dialog box in three ways: with the attributes icon in the toolbar, from the right-click context menu, or from the dimension dialog box.
Attributes Icon in the Toolbar
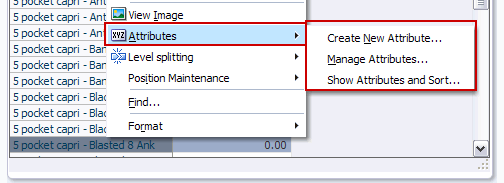
From the Right-Click Context Menu
Right-click a dimension level. The right-click context menu appears.
Select Create New Attribute.
From the Dimension Dialog Box
Click a dimension tile. The dimension dialog box appears.
Click the Show Attributes and Sort tab.
Click the New Attribute icon in the Available Attributes section.
To create a dynamic attribute, complete the following steps:
Access the Define New Attribute dialog box using the icon, right-click context menu, or the dimension dialog box, as described in the Accessing the Define New Attribute Dialog Box section.
Enter the following information:
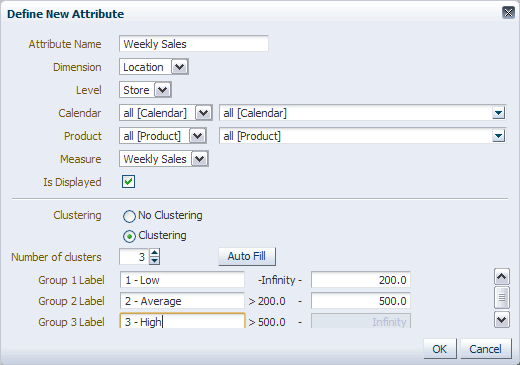
Attribute Name: Enter a name for the attribute. The name must be unique across a level for a selected dimension and fewer than 80 characters.
Dimension: Select the dimension that the attribute should apply to.
Level: Select the level of the dimension chosen in the Dimension field. This is the level that the attribute should apply to.
[Dimension1] and [Dimension2]: These fields display the dimensions that were not chosen in the Dimension field. Select the dimension levels and positions that the attribute should be applied to for each.
Measure: Select the measure that the attribute should be based on.
Is Displayed: Check the check box if you want the created attribute to be displayed in the view after it is created. If this was not selected, the attribute is created but not visible. To make the attribute visible at a later time, select it for display in the Dimension window as described in Select Attributes for Display.
Clustering: Select No Clustering if you want the data from the measure to be replicated in the attribute. Select Clustering if you want to group the dimension by the values of the measure data.
Number of clusters: Choose the number of groups that you want the attribute to create. This option is visible only if clustering is selected.
Group Label: Enter the label of the attribute that you want to apply to that cluster of data. Specify how the clusters should be defined by entering a range.
Auto Fill: Click this button to automatically create the range for each cluster.
|
Note: The cluster options are only available for real and integer measures. |
Click OK.
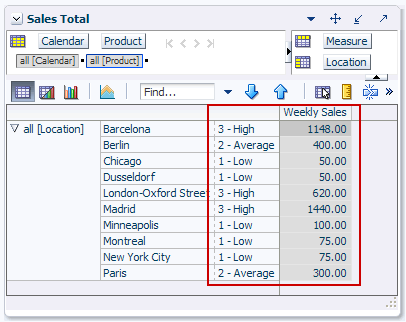
The attribute is added to the pivot table.
After you have created the attribute, you can sort the positions by attribute. For more about sorting, see Attribute Sorting.
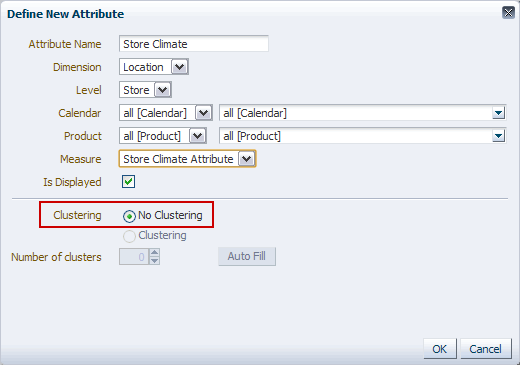
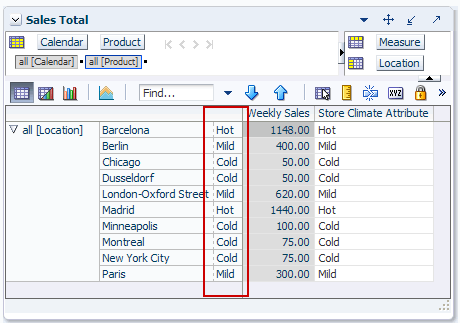
Another way to use dynamic attributes is to duplicate measure data in the attribute. For instance, if you had a Climate measure that describes the climate of a location, you could create an attribute based on that measure and select No Clustering, as shown in Figure 10-6 and Figure 10-7.
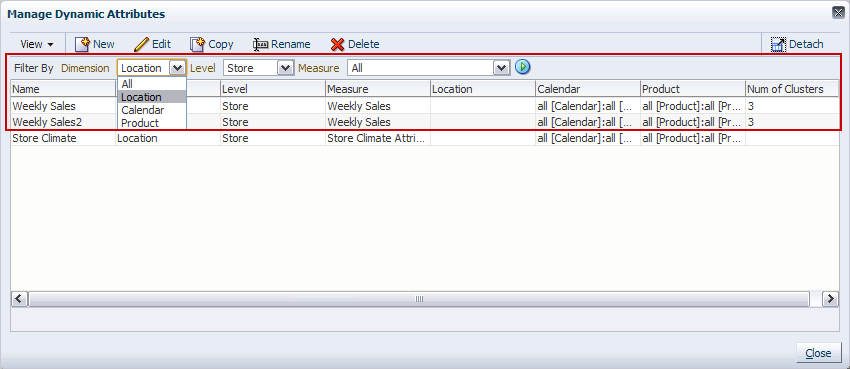
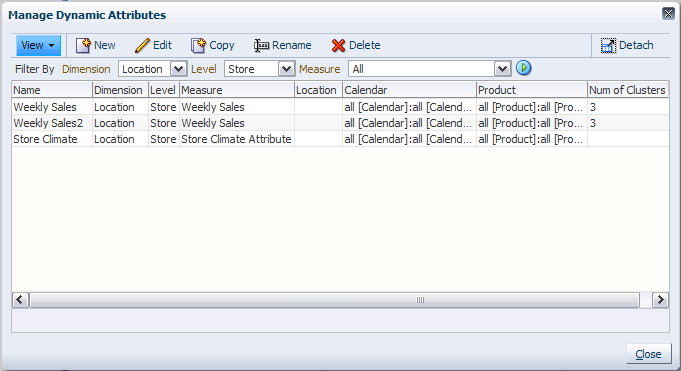
After you have created a dynamic dimension attribute, you can edit, copy, rename, or delete it using the Manage Dynamic Attributes dialog box.
The Manage Dynamic Attributes dialog box displays all attributes for the selected dimension and level. You can search for attributes by using the attribute filter. You can search all dimensions and levels by selecting All in the Dimension drop-down list. Or, you can search by a particular dimension, level, and measure.
By default, attributes for the innermost layer of the selection on the pivot table are listed. If there are no attributes for the selected level, attributes for all visible levels of the selected dimension are displayed.
If there are no attributes for the selection dimension, all attributes across all dimensions are shown. If there are no attributes across any dimension, a message states that there are none.
To access the Manage Dynamic Attributes dialog box, complete the following steps:
Right-click in the content area.
The right-click context menu appears. Select the Manage Dynamic Attributes option.
The Manage Dynamic Attributes dialog box appears.
From the Manage Dynamic Attributes dialog box, you can edit, copy, rename, delete, or create attributes.
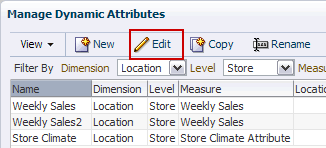
To edit a dynamic attribute, complete the following steps:
Access the Manage Dynamic Attributes dialog box as described in Accessing the Manage Dynamic Attributes Dialog Box.
Select the attribute you want to edit and click the Edit icon.
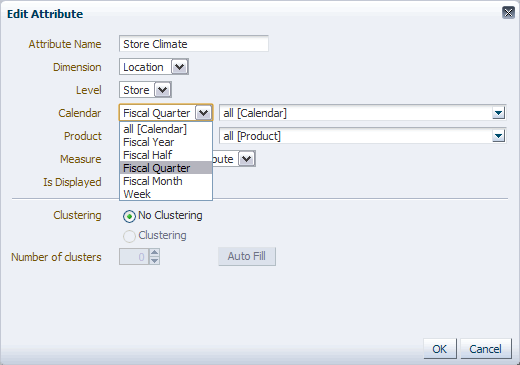
The Edit Attribute dialog box appears. Make changes to the attribute information. For details about the fields, see Step 2 of the Creating Dynamic Attributes section.
When finished, click OK.
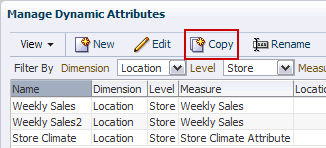
To copy a dynamic attribute, complete the following steps:
Access the Manage Dynamic Attributes dialog box as described in Accessing the Manage Dynamic Attributes Dialog Box.
Select the attribute you want to copy and click the Copy icon.
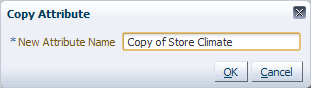
The Copy Attribute dialog box appears. Enter the name of the new attribute. The name must be unique across the level for a selected dimension and fewer than 80 characters.
Click OK.
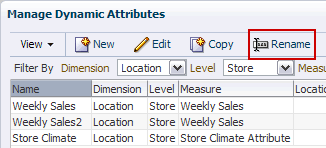
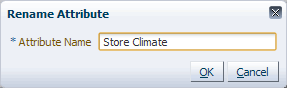
To rename a dynamic attribute, complete the following steps:
Access the Manage Dynamic Attributes dialog box as described in Accessing the Manage Dynamic Attributes Dialog Box.
Select the attribute you want to rename and click the Rename icon.
The Rename Attribute dialog box appears. Enter the new name. The name must be unique across the level for the selected dimension and fewer than 80 characters.
Click OK.
To delete a dynamic attribute, complete the following steps:
Access the Manage Dynamic Attributes dialog box as described in Accessing the Manage Dynamic Attributes Dialog Box.
Select the attribute you want to delete and click the Delete icon.
A warning message appears. Ensure that you have selected the correct attribute and click Delete.
The attribute is deleted from the list.
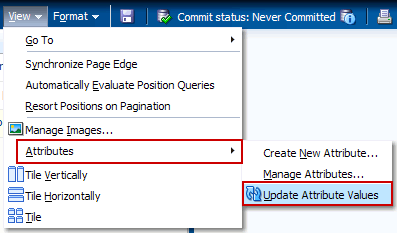
If data in the base measure of the attribute has changed, you may need to recalculate the attributes to see the updated data. To do this, use the Update Attribute Values option in the View menu or the Update Attribute Values and Level Splits icon in the toolbar.
The values of the user-defined attributes must be recalculated based on the user edits. The update icon and menu are enabled only when attributes are displayed that need to be recomputed based on user edits. Clicking the update option or icon recalculates all sort attributes and level splits displayed in the workbook based on the user edits since the attribute or dimension split was applied to the data.