| Oracle® WebCenter Framework Tutorial 10g (10.1.3.2.0) Part Number B31072-02 |
|
|
View PDF |
| Oracle® WebCenter Framework Tutorial 10g (10.1.3.2.0) Part Number B31072-02 |
|
|
View PDF |
In this lesson you'll add two portlets to a page and learn how to configure them so that one portlet drives the content of the other. To demonstrate inter-portlet communication, you'll use a Parameter Form Portlet (one of the sample WSRP 2.0 portlets) and an instance of OmniPortlet (an Oracle PDK portlet). Both portlets are available through the preconfigured OC4J you installed in Chapter 3, "Building and Testing Your First Portlet".
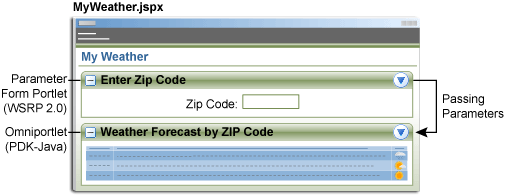
Figure 6-1 illustrates what the page (called MyWeather.jspx) will look like at the end of the lesson.
Figure 6-1 MyWeather.jspx at the End of Lesson 6
Both of the portlets we use in this lesson are available through the WebCenter Preconfigured OC4J (installed and initialized during Chapter 3 Step 2: Setting Up Your Connection). If this OC4J instance is no longer running, click the Start WebCenter Preconfigured OC4J icon at the far right of the JDeveloper toolbar before you begin this lesson.
Before you can add a portlet to a page, you must register its producer with the WebCenter application. For this lesson you'll need to register producers for the following portlets:
Parameter Form Portlet (WSRP portlet producer)
OmniPortlet (Oracle PDK portlet producer)
Let's start with the Parameter Form Portlet producer:
Check that the Parameter Form Portlet producer is up and running. In a browser, enter the following producer test page URL:
http://localhost:6688/portletapp/info
If the producer is up and running, you should see a WSRP Producer Test Page displaying two WSRP producer registration URLs (WSDL documents). You'll use the WSRP v2 WSDL URL in this WebCenter application:
http://localhost:6688/portletapp/portlets/wsrp2?WSDL
Now, let's register the producer with your application.
Right-click Portlet Producers in the Applications Navigator, and click New WSRP Producer.
When the WSRP Portlet Producer Registration Wizard displays, click Next to move beyond the Welcome page.
In the Name field, enter: SampleWSRPPortletsProducer
Click Next.
On the Connection page, enter the producer's URL Endpoint.
To produce the Parameter Form portlet through the WebCenter Preconfigured OC4J, enter the following URL:
http://localhost:6688/portletapp/portlets/wsrp2?WSDL
This tutorial assumes that localhost can be used in a URL to refer to the local computer on which your preconfigured OC4J installation resides. (If this is not the case, replace localhost with your computer's IP address.)
Proxy information isn't necessary as we're using a local preconfigured OC4J. Make sure that the Use proxy option is unchecked.
Click Next.
On the Registration Details page, accept the default timeout value of 30 seconds, and click Finish. For this tutorial, there is no need to set any of the advanced options.
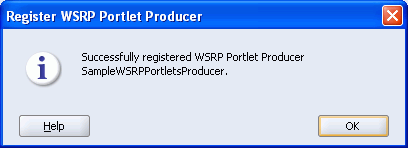
You should see the following message (Figure 6-2):
Figure 6-2 WSRP Portlet Producer Registration Successful
Click OK to close the message box.
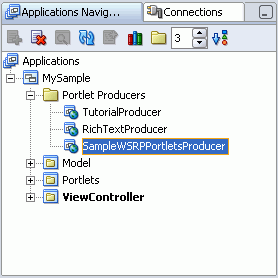
The new producer appears in the Applications Navigator, under the section Portlet Producers (Figure 6-3).
Figure 6-3 Successfully Registered Producer for the Sample WSRP Portlets
Open the Component Palette through the View menu, and expand its drop-down list. Locate and select SampleWSRPPortletsProducer from this list. Several portlets are available for selection. Among these, you will find the Parameter Form Portlet, which you will use in this lesson. (If you can't see anything in the Component Palette, try displaying a Java Server Faces page in Design view, such as MyPage.jspx. This should reveal all the portlets).
You'll come back to the Parameter Form Portlet later. First you must register the OmniPortlet producer.
First, check that the OmniPortlet producer is up and running. In a browser, enter the following producer test page URL:
http://localhost:6688/portalTools/omniPortlet/providers/omniPortlet
If the producer is available, you'll see the OmniPortlet's Producer Test Page.
Now, let's register the OmniPortlet producer. So far in this tutorial you've registered only WSRP producers. As OmniPortlet is an Oracle PDK portlet, you'll be using a different wizard to register this producer.
Right-click Portlet Producers in the Applications Navigator, and click New Oracle PDK Producer.
When the PDK Portlet Producer Registration Wizard appears, click Next.
In the Name field, enter: OmniPortletProducer
Click Next.
On the Connection page, enter the producer's URL Endpoint.
To produce OmniPortlet through the WebCenter Preconfigured OC4J, enter the following URL:
http://localhost:6688/portalTools/omniPortlet/providers/omniPortlet
This tutorial assumes that localhost can be used in a URL to refer to the local computer on which your preconfigured OC4J installation resides. (If this is not the case, replace localhost with your computer's IP address.)
Make sure that the Use proxy option is unchecked.
Click Finish.
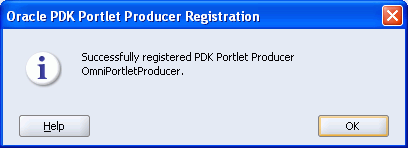
You should see the following message (Figure 6-4):
Figure 6-4 Oracle PDK Portlet Producer Registration Successful
Click OK to close the message box.
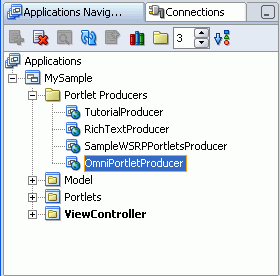
Both producers should now appear in the Applications Navigator, under the section Portlet Producers (Figure 6-5).
Figure 6-5 Successfully Registered Producer for OmniPortlet
Open the Component Palette again, and click the drop-down list to make sure that OmniPortletProducer is displayed. Select OmniPortletProducer from this list.
Several portlets are available for selection. Among these, you'll find OmniPortlet, which you will use in this lesson.
Now both producers are registered with the tutorial application you can drop their portlets onto a page.
In this step, you'll place a Parameter Form Portlet on a page and see how JDeveloper handles a portlet with public portlet parameters. Then you'll run the page and, through portlet customization, create a portlet that invites a user to enter a ZIP code. Later on in the lesson you'll learn how to pass the ZIP code as a parameter to an OmniPortlet, where it'll be used to drive the content of a weather portlet.
Let's start by creating a brand new page called MyWeather.jspx, which you'll use to learn about inter-portlet communication.
Create a new Java Server Faces page named MyWeather.jspx.
In the Applications Navigator, right-click ViewController, and select New.
In the Categories pane, under Web Tier, select JSF.
Under Items, select JSF JSP, and click OK.
Click Next to skip the Welcome page.
In the File Name field, enter: MyWeather
Under Type, click JSP Document, and then click Next.
Choose Automatically Expose UI Components in a New Managed Bean, and then click Next.
On the Tag Libraries page, make sure the following libraries appear in the Selected Libraries pane:
ADF Faces Components 10_1_3_2_0
ADF Faces HTML 10_1_3_2_0
ADF Portlet Components 10_1_3_2_0
Customizable Components Core 10_1_3_2
JSF Core 1.0
JSF HTML 1.0
There is no need to set any other options, so click Finish on this page.
MyWeather.jspx should open in the Visual Editor (Figure 6-6), ready for us to begin adding portlets.
Add a panelCustomizable component to your page. You'll use this component to house both of your portlets (Parameter Form Portlet and OmniPortlet) and to provide horizontal/vertical layout.
Open the Component Palette.
Scroll to the listing for Customizable Components Core (Figure 6-7).
Figure 6-7 Component Palette - Customizable Components Core
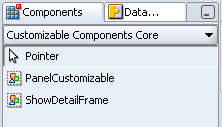
Select PanelCustomizable, and drag it over the h:form tag in the Structure window.
The panelCustomizable component should display at the top of the page (Figure 6-8).
Figure 6-8 MyWeather.jspx - PanelCustomizable Component
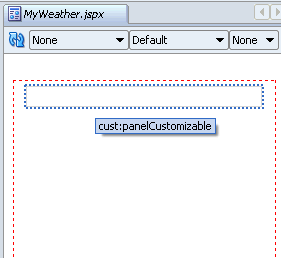
The panelCustomizable component must be placed inside the h:form for the page. Take a look in the Structure window to check that the frame is placed inside the form. Remember, you don't need add a showDetailFrame because portlets come automatically equipped with the customization capabilities; that is, the ability to maximize/minimize and to reposition the portlet on the page.
Now you're ready for the Parameter Form Portlet. From the Component Palette, select SampleWSRPPortletsProducer.
Select Parameter Form Portlet, then drag and drop it on top of the cust:panelCustomizable component in the Structure window.
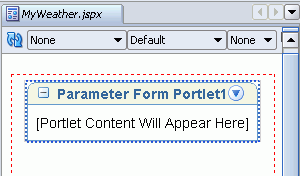
The Visual Editor should look like Figure 6-9.
Figure 6-9 MyWeather.jspx - Parameter Form Portlet Inside a panelCustomizable
Before you run the page, let's take a look at the underlying page definition to see how JDeveloper responds to a portlet with built-in parameters like this one.
Right-click MyWeather.jspx in the Applications Navigator, and choose Go to Page Definition. Click Yes if the Page Definition doesn't exist yet.
In the Structure window (Figure 6-10) you should see an entry for each of the Parameter Form's portlet parameters (ora_wsrp_navigparam_Parameter1, ora_wsrp_navigparam_Parameter2 and ora_wsrp_navigparam_Parameter3). You should also see three page variable entries with corresponding names and the prefix <portletname_n_> —in this case, ParameterFormPortlet1_1_).
Figure 6-10 MyWeatherPageDef.xml - Parameter Form Portlet Parameters
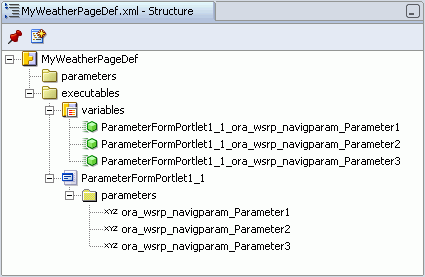
When a portlet is dropped on a page, JDeveloper checks to see if the portlet has public portlet parameters and, if it does, automatically adds the corresponding number of page variables and maps them to the portlet parameters.
Use the Property Inspector to examine one of the mappings. You should see that ora_wsrp_navigparam_Parameter1, for example, is mapped to the page variable named ParameterFormPortlet1_1_ora_wsrp_navigparam_Parameter1 (Figure 6-11).
Figure 6-11 Property Inspector - Portlet Parameter Mapped to Page Variable

Now let's run the page to see what a default Parameter Form Portlet looks like.
First, save all your changes. Click the Save All icon on the JDeveloper toolbar.
In the Applications Navigator, right-click MyWeather.jspx, and choose Run.
The default Parameter Form Portlet displays in your browser (Figure 6-12).
Figure 6-12 Default Parameter Form Portlet
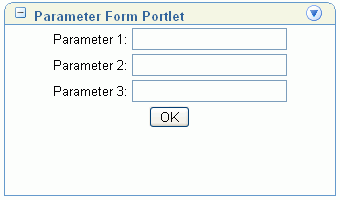
As you can see, the initial version of the portlet displays some default text. In the next step, you'll customize the portlet so that it invites users to enter a US ZIP code. Remember, the purpose of this lesson is to work with this portlet so it will accept a parameter value (such as a ZIP code) and pass it to another portlet.
In this step you'll customize the Parameter Form Portlet by changing its title and prompts. You'll also hide unwanted parameters. The Parameter Form Portlet provides three parameter but this tutorial requires only one to demonstrate parameter passing between portlets.
Display the portlet in a browser, then click the Actions icon in the portlet header.
Click the menu option Customize.
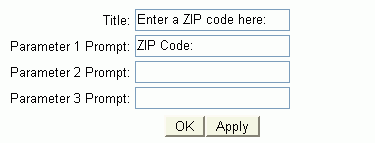
Change the Title to: Enter a ZIP code here:
For Parameter 1 Prompt, enter: ZIP Code:
You don't need the second and third parameters, so you can hide them. To do this, remove the default prompt text taking care not to leave behind any spaces.
The Customize options should now look something like Figure 6-13.
Figure 6-13 Parameter Form Portlet Customization Options
Click OK.
When displayed in the browser, the portlet should look like Figure 6-14.
Figure 6-14 Customized Parameter Form Portlet
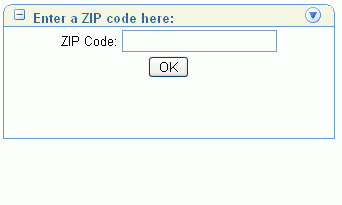
Before moving on to the next step, let's review what you've built so far. First, you created a page called MyWeather.jspx, and added a single Parameter Form Portlet. Then, through portlet customization, you set up one of its parameters, ora_wsrp_navigparam_Parameter1, to accept a US ZIP code. You may recall that JDeveloper automatically mapped this particular parameter to a page variable named ParameterFormPortlet1_1_ora_wsrp_navigparam_Parameter1. Later on, you'll use this variable to pass the ZIP code on to another portlet.
But first, let's add the second portlet—an OmniPortlet.
In this step you'll place an OmniPortlet under the Parameter Form Portlet.
Display MyWeather.jspx in JDeveloper. In the Applications Navigator, right-click MyWeather.jspx, and click Open.
Open the Component Palette, and locate OmniPortletProducer.
Select OmniPortletProducer.
Select OmniPortlet, and drag it over cust:PanelCustomizable in the Structure window.
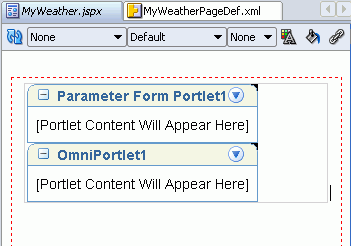
The Visual Editor should now look like Figure 6-15.
Figure 6-15 MyWeather.jspx - OmniPortlet Added To PanelCustomizable
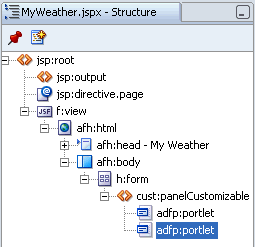
The Structure window should look like Figure 6-16.
Figure 6-16 Structure Window - Displays New OmniPortlet
Let's take another look at the underlying page definition. Right-click MyWeather.jspx in the Applications Navigator, and choose Go to Page Definition.
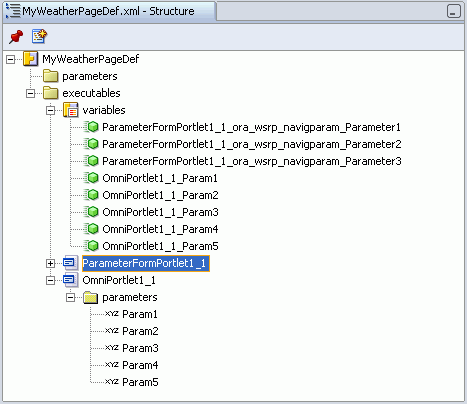
In the Structure window (Figure 6-17), you'll see a new entry for OmniPortlet. This portlet has five portlet parameters (Param1 - Param5), and they too have been automatically mapped to page variables OmniPortlet1_1_Param1 – OmniPortlet1_1_Param5.
Figure 6-17 MyWeatherPageDef.xml - OmniPortlet Portlet Parameters
In Step 6: Configuring the Portlets Together you'll use these portlet parameters to configure inter-portlet communication. But first, let's see what an OmniPortlet portlet looks like.
First, save all your changes. Click the Save All icon on the JDeveloper toolbar.
Before running the page again, stop the embedded OC4J Server. Choose Run, Terminate, Embedded OC4J Server from the main menu.
Alternatively, click the red square Terminate icon in the Embedded OC4J Server Log window.
In the Applications Navigator, right-click MyWeather.jspx, and choose Run.
OmniPortlet displays in the browser underneath the Parameter Form Portlet (Figure 6-18).
As you can see, the initial version of the portlet is blank. In the next step you'll use OmniPortlet to build a weather portlet based on a Web Service.
As one of the most versatile portlets, OmniPortlet can publish data from a variety of data sources using a variety of layouts. In this step you will build a weather portlet based on a Web Service.
Note:
If you are working behind a firewall, some additional configuration is required to access the Weather Web Service. Specifically, you will need to add HTTP proxy details to the<proxyInfo> tag in your Omniportlet producer's provider.xml file. This file is located at:
JDEV_HOME\jdev\extensions\oracle.adfp.seededoc4j.10.1.3.2.\j2ee\home\applications\portalTools\omniPortlet\WEB-INF\providers\omniPortlet
When making changes to the provider.xml file, the portlet producer must be refreshed on the WebCenter application side. To update the proxy details and refresh the portlet producer, perform the following steps:
Stop the WebCenter application (consumer).
Update the provider.xml file and save your changes.
In Oracle JDeveloper, refresh the portlet producer on the WebCenter application (consumer) side.
Redeploy the WebCenter application.
For more information, see topic titled "B.2.1 Configuring the OmniPortlet Producer to Access Data Outside a Firewall" in Oracle WebCenter Framework Developer's Guide.
Display MyWeather.jspx in a browser. In the Applications Navigator, right-click MyWeather.jspx, and choose Run.
In the browser, click the Define link to start the OmniPortlet wizard.
Choose Web Service, and click Next.
After you finish this tutorial, you'll probably want to learn how to use other data sources with OmniPortlet, such as spreadsheets (character-separated values), XML, and even application data from existing Web pages. All of these options are described in the Oracle WebCenter Framework Developer's Guide.
Enter the WSDL URL of a demonstration weather Web Service available through Oracle Technology Network at:
http://webservices.oracle.com/WeatherWS/WeatherWS?WSDL
This Web Service has one method (WeatherWS.giveMeSomeWeatherInfo) and accepts one parameter (param0). When you pass a valid US ZIP Code through param0, the Web Service returns weather information for the area specified.
Note: This Web Service does not return live weather information. It is useful for demonstration purposes only.
To access this method parameter, click Show Methods.
A parameter labeled param0 should display on the page.
Enter ##Param1## in the param0 parameter field.
This tells the Web Service to accept values from the Omniportlet parameter Param1. Later on, you'll map portlet parameter Param1 to a page variable named ParameterFormPortlet1_1_ora_wsrp_navigparam_Parameter1, see Step 6: Configuring the Portlets Together.
Under Portlet Parameters, set a Default Value for Param1. Enter: 94065
This tells the Web Service to return weather information for ZIP code 94065 (Redwood City, CA) by default.
Click Next, and then Next again as you don't need to set any filter options.
On the View Page, enter the values shown in Table 6-1.
Click Next, then specify the Column Label, Column, and Display As properties for the weather data as shown in Table 6-2.
Click Finish to display weather information for Redwood City. You should now see both portlets in your browser (Figure 6-19).
Figure 6-19 OmniPortlet Displaying a Weather Web Service
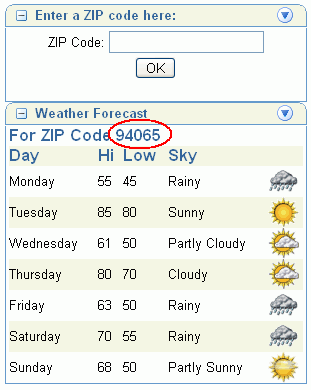
The Omniportlet displays a weather forecast for Redwood City, CA, which has the ZIP code 94065. The Web Service providing this data can return weather information for other areas if it is passed a valid US ZIP code. In the next step you'll learn how to link these two portlets and make the first portlet (Parameter Form Portlet) drive the content of the Omniportlet.
In this step you'll enable inter-portlet communication between two portlets.
In JDeveloper, display the page definition for MyWeather.jspx. In the Applications Navigator, right-click MyWeather.jspx, and select Go to Page Definition.
Examine MyWeatherPageDef.xml through the Structure window. In the executables section you'll find:
ParameterFormPortlet1_1 - with three portlet parameters ora_wsrp_navigparam_Parameter1, ora_wsrp_navigparam_Parameter2 and ora_wsrp_navigparam_Parameter3
OmniPortlet1_1 - with five portlet parameters Param1 - Param5
variables - eight page variables, each mapped to a different portlet parameter. JDeveloper creates these mappings automatically when portlets (with parameters) are placed on a page
Although each portlet supports several parameters you'll only use one from each portlet to demonstrate inter-portlet communication:
ora_wsrp_navigparam_Parameter1 - you configured the Parameter Form Portlet to accept a ZIP Code through this parameter (Step 3: Customizing the Parameter Form Portlet).
Param1 - you configured OmniPortlet to accept a ZIP code through this parameter (Step 5: Building an OmniPortlet That Uses a Web Service).
In the next step you'll map these two parameters to the same page variable and in doing so, facilitate parameter passing between two portlets. At the moment ora_wsrp_navigparam_Parameter1 is mapped to page variable ParameterFormPortlet1_1_ora_wsrp_navigparam_Parameter1, so let's map Param1 to this page variable too.
Use the Structure window to link OmniPortlet and the Parameter Form Portlet:
Right-click Param1, and select Properties.
Param1 is located under MyWeatherPageDef\executables\OmniPortlet1_1\parameters.
Click Advanced Properties.
From the pageVariable drop-down list, select ParameterFormPortlet1_1_ora_wsrp_navigparam_Parameter1 (Figure 6-20).
Figure 6-20 OmniPortlet Param1 Mapped to Same Page Variable as the Parameter Form Portlet

Click OK.
Click Save All in the JDeveloper toolbar.
Now, let's run the page to see the portlets working together.
Let's see the portlets on MyWeather.jspx working together.
Before running the page again, stop the embedded OC4J Server. Choose Run, Terminate, Embedded OC4J Server from the main menu.
In the Applications Navigator, right-click MyWeather.jspx, and select Run.
Assuming there aren't any compiler errors, the page opens in a new browser window and you should see a weather forecast for the Redwood City area (ZIP Code 94065).
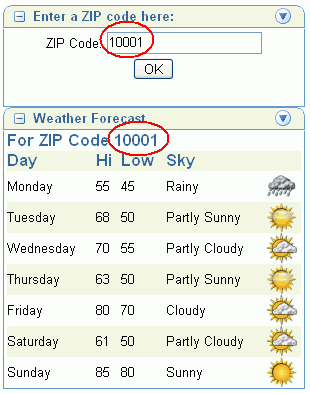
In the ZIP Code field, enter: 10001
This is the ZIP Code for New York.
Click OK.
The Weather Forecast portlet should change, showing weather information for New York (something like Figure 6-21).
Figure 6-21 Portlets Show Weather for New York
Congratulations! You've completed this lesson and made two portlets communicate with each other.
In the next lesson, you will learn how to publish file system content in your WebCenter application.