| Oracle® Retail Back Office Installation Guide Release 14.1 E54457-02 |
|

 Previous |
 Next |
Before proceeding, you must install the database and application server software. For a list of supported versions, see Chapter 1.
During installation, the Back Office database schema will be created and the Back Office application will be deployed to an Oracle WebLogic domain. When the domain was created, the JDK was selected. This is the JDK that is used to run the Back Office application. For the remainder of this chapter, the JDK installation directory is referred to as <JDK_INSTALL_DIR>.
Before installing Back Office, upgrade WebLogic with the latest version of the JPA jars that are tested with Back Office. The jars are shipped with the Back Office installer and are available in the ORBO-14.1.zip file. After extracting the zip file, the jars are available in the following folder:
<staging_directory>/backoffice/lib/thirdparty
For information on extracting the zip file, see "Expand the Back Office Distribution".
The following JPA jar files need to be upgraded:
eclipselink.jar
javax.persistence_2.1.0.v201304241213.jar
To upgrade the JPA jar files:
Copy the two jar files from <staging_directory>/backoffice/lib/thirdparty to the <WebLogic_HOME>/modules directory.
To set the CLASSPATH, edit commEnv.sh in the <WebLogic_HOME>/wlserver_10.3/common/bin directory:
PRE_CLASSPATH="${MODULES_DIR}/javax.persistence_2.1.0.v201304241213.jar:${MODULES_DIR}/eclipselink.jar"
After setting the variable, look on the console and make sure the jars are added to the CLASSPATH. If they are not added, shut down WebLogic and add the jars to the WEBLOGIC_CLASSPATH variable in the same file.
You can skip this section if you are manually redeploying to an existing domain.
The Back Office application must be deployed to its own dedicated domain. For information on how to perform the following steps, consult your Oracle WebLogic Server documentation.
Each server instance in your WebLogic environment must have a unique name, regardless of the domain in which it resides, or whether it is an Administration Server or a Managed Server. Within a domain, each server, machine, virtual host, and any other resource type must be named uniquely and must not use the same name as the domain.
|
Note: Back Office, Central Office, Returns Management, and the Mobile Point-of-Service server must have all unique domain names and server names in order to integrate successfully. |
The WebLogic Server enables you to establish global trust between two or more domains. You do this by specifying the same Domain Credential for each of the domains. By default, the Domain Credential is randomly generated and therefore, no two domains have the same Domain Credential. During installation, the WebLogic domain credential is configured to the value entered in the Domain Details installer window. For more information, see Figure A-23.
|
Note: All domains running Oracle Retail applications must have the same domain credentials. |
Back Office is accessed through a secure HTTP connection. Enable the Secure Sockets Layer (SSL) when creating the domain and set the listen port and SSL list port number so that the numbers are unique for each domain in your configuration.
Verify that the domain's administrative server is started and in running mode.
When a domain is created with a managed server using the Oracle JDK, the default WebLogic settings may leave the server without enough memory to configure and stop the running managed server. A careful inspection of the log files may indicate an out-of-memory exception.
To avoid the out-of-memory exceptions, increase the PermSize space:
In the WebLogic Administration console, click Lock & Edit. Under Environments, select Servers.
In Summary of Servers, select <managedServerName>.
In Settings, select the Server Start tab.
In the Arguments text box, add the following if it does not already exist:
-Xms512m -Xmx512m -XX:PermSize=512m -XX:MaxPermSize=512m
Click Release Configuration.
Before launching the Back Office installer, create a directory for the persistent store:
<WEBLOGIC_HOME>/user_projects/domains/<orbo-domain>/servers/<ManagedServerName>/data/store/orbo-persistent-store
In addition to specific steps previously described, you can use the following steps to create a new domain using the WebLogic Configuration Wizard:
Log on to the server, which is running your WebLogic installation, as the user who owns the WebLogic installation.
Launch the Weblogic Configuration Wizard.
Select Create a new WebLogic Domain. The domain can be a basic WebLogic server domain.
Choose a unique name for the new domain. In the remainder of this installation guide, <orbo-domain> is used for the name.
Configure the administrator user name and password.
Configure the server start mode and JDK.
Configure the Administration Server.
Before launching the Back Office installer:
If using a Managed Server, start the Managed Server.
Start the Administration Server.
Verify that all servers in the domain are started and in running mode.
WebLogic can be run in production mode or development mode.
When a domain is created in development mode using the Configuration Wizard, a boot identity file, named boot.properties, is created in the Administration Server's root directory. The boot identity file contains an encrypted version of the user name and password which lets you bypass the login prompt during instantiations of the server. In production mode, WebLogic prompts for credentials on the command line.
To install Back Office on a domain using production mode, you must first create a boot identity file so that the Administration Server can bypass the prompt for user name and password when the installer restarts the server.
Consult your WebLogic documentation for more information and options for creating boot identity files. Following is an example of one method, that can be used after domain creation, to create the boot identity file:
Start the Administration Server at least once and provide the user credentials on the command line.
Create the Administration Server's security directory, if it does not already exist.
<WEBLOGIC_HOME>/user_projects/domains/<orbo-domain>/servers/<AdminServerName>/security
Place the following two lines in a file named boot.properties in the security directory:
password=<password>
username=<username>
|
Note: There should be no spaces on either side of the equal sign. |
Stop and restart the Administration Server to verify that the credential prompts are bypassed.
If you are deploying Back Office to a managed server, note the following:
If any of the servers are remote from the admin server, copy the contents of the domain/lib directory to the corresponding directory on the remote systems. Also, a directory for the persistent store needs to be created on the remote systems. It should be located in the following location:
<WEBLOGIC_HOME>/user_projects/domains/<orbo-domain>/servers/<serverName>/data/store/orbo-persistent-store
To ensure that the SSL certificates match between WebLogic and Back Office:
Start the node manager.
Edit the nodemanager.properties file at the following location:
<WEBLOGIC_HOME>/wlserver_10.3/common/nodemanager/nodemanager.properties
Update the following values:
StartScriptEnabled=true
StartScriptName=startWebLogic.sh
KeyStores=CustomIdentityAndCustomTrust
CustomIdentityKeyStoreFileName=<KEYSTORE_PATH>/<Keystore_Name>
CustomIdentityKeyStorePassPhrase=<KeyStorePassPhrase>
CustomIdentityAlias=<PrivateKeyAlias>
CustomIdentityPrivateKeyPassPhrase=<PrivateKeyPassPhrase>
CustomTrustKeyStoreFileName=<TRUSTSTORE_PATH>/<Truststore_Name>
Restart the node manager.
The following recommendations should be considered for schema owners:
Database administrators should create an individual schema owner for each application, unless the applications share the same data. In the case of Oracle Retail Back Office and Point-of-Service, the database schema owner is the same because these applications share a database.
The schema owners should only have enough privileges to install the database.
For information on the best practices for passwords, see the Oracle Retail POS Suite Security Guide.
|
Note: Do not delete the database schema owner after installation. When using Data Import (DIMP), the schema owner privileges are needed for DIMP processing which includes creating and dropping tables. For information on DIMP, see "Enable Data Import". |
To create the database schema owner and data source connection users:
Log in using the database administrator user ID.
Create a role in the database to be used for the schema owner.
CREATE ROLE <schema_owner_role>;
Grant the privileges, shown in the following example, to the role.
GRANT CREATE TABLE, CREATE VIEW, CREATE SEQUENCE, CREATE PROCEDURE, ALTER SESSION, CONNECT TO <schema_owner_role>;
Create a role in the database to be used for the data source user.
CREATE ROLE <data_source_role>;
Grant the privileges, shown in the following example, to the role.
GRANT CONNECT, CREATE SYNONYM TO <data_source_role>;
|
Note: After the product is installed successfully, the CREATE SYNONYM privilege must be revoked from the data source role. Before the installer exits, it prompts for a database administrator to revoke the privilege. |
Create the schema owner user in the database.
CREATE USER <schema_username>
IDENTIFIED BY <schema_password>
DEFAULT TABLESPACE users
TEMPORARY TABLESPACE TEMP
QUOTA UNLIMITED ON users;
Grant the schema owner role to the user.
GRANT <schema_owner_role> TO <schema_username>;
Create the data source user.
CREATE USER <data_source_username>
IDENTIFIED BY <data_source_password>
DEFAULT TABLESPACE users
TEMPORARY TABLESPACE TEMP
QUOTA UNLIMITED ON users;
Grant the data source role to the user.
GRANT <data_source_role> TO <data_source_username>;
The installer grants the data source connection user access to the application database objects. If you choose No in the Manual Deployment Option window, you need to grant the access after the installer completes. For more information, see "Manual Deployment of the Back Office Application".
To extract the Back Office files:
Extract the Back Office 14.1 distribution zip file.
Create a new staging directory for the Back Office application distribution (ORBO-14.1.zip) file, for example, C:/tmp/j2ee/<orbo-domain>/orbo-staging.
|
Note: The staging area (<staging_directory>) can exist anywhere on the system. It does not need to be under tmp. |
Copy or upload ORBO-14.1.zip to <staging_directory> and extract its contents. The following files and directories should be created under <staging_directory>/ORBO-14.1:
ant/
ant-ext/
antinstall/
backoffice/
installer-resources/
retail-public-security-api/
.postinstall.cmd
.postinstall.sh
.preinstall.cmd
.preinstall.sh
antinstall-config.xml
build.xml
build-common.xml
build-common-backoffice.xml
build-common-esapi.xml
build-common-oas.xml
build-common-retailinv.xml
build-common-was.xml
build-common-webapps.xml
build-common-wl.xml
build-test.cmd
checkdeps.cmd
checkdeps.sh
install.cmd
install.sh
prepare.xml
revokesyn.sql
wallet.xml
For the remainder of this chapter, <staging_directory>/ORBO-14.1 is referred to as <INSTALL_DIR>.
The ojdbc6 jar file in the WebLogic installation must be replaced with the ojdbc6 jar included with Back Office.
To replace the ojdbc6 jar:
Stop the application server.
Change to the <INSTALL_DIR>/backoffice/db directory.
Expand the backofficeDBInstall.jar file.
jar -xvf backofficeDBInstall.jar
Copy the ojdbc6.jar file from the lib directory to the <WebLogic_HOME>/wlserver_10.3/server/lib directory.
Start the application server:
If Back Office is deployed to an admin server, start the application server for the admin server.
If Back Office is deployed to a managed server, start the application server for the managed server.
You select the applications that Oracle Retail Back Office is integrated with in the Integrate Applications window. See Figure A-7. If Central Office or Returns Management is selected in the window, that application must be running in order for the Back Office files to be installed correctly.
Data Import (DIMP) is used by external systems to send data bundles to Back Office for routine data loading of certain types of data. To use DIMP, you need to create a directory for the incoming bundles and a directory where the bundles are archived after being processed.
In the Enable DIMP installer window, you select whether DIMP will be used. See Figure A-11. If Yes is selected in the window, you then provide the paths to the directories in the DIMP Configuration installer window. See Figure A-12.
For detailed information on DIMP, see the Oracle Retail POS Suite/Merchandising Products Implementation Guide.
A retailer may want to use DIMP with Release 14.1 of the POS Suite applications but with an earlier release of the Oracle Retail Merchandising Operations Management products. Cross version support enables this integration.
In the Enable Cross Version for DIMP installer window, you select whether cross version support is enabled. See Figure A-13. If Yes is selected in the window, you then provide the information needed for cross version support in the Cross Version Compatibility Configuration installer windows. See Figure A-14 and Figure A-15.
For detailed information on cross version support, see the Oracle Retail POS Suite Implementation Guide, Volume 1 - Implementation Solutions.
During installation, there are options that enable you to select whether the installer completes parts of the installation or if you want to complete those parts manually. For information on the available options, see the following sections:
The database schema must be created and populated before configuring the application server. In the Install Database Option window, you select whether the installer creates and populates the database schema or if you want to do this manually. See Figure A-16.
If you choose Create schema with sample dataset, the installer creates and populates the database schema with sample data, such as item data. This is the default selection in the window. The sample dataset includes the minimum dataset and report configuration data. If you want data available to use for demonstrating Back Office functionality after installation, you can select this option.
To use this option, you must provide the location of the zip file containing the sample dataset in the Sample Dataset installer window. See Figure A-17. You can obtain the sample-dataset-14.1.zip file from the Oracle Software Delivery Cloud at the following web site:
https://edelivery.oracle.com/
If you choose Create schema with minimum dataset, the installer creates and populates the database schema with the minimum amount of data needed to launch and run Back Office. The minimum dataset includes report configuration data. If you want to load your own data after installation, you can select this option.
If you choose Skip schema creation and data loading, the installer does not create and populate the database schema. You choose this option if you want to create and populate the database schema manually. For information on manually creating and populating the database schema, see "Manually Create the Database Schema".
|
Note: If Back Office is being installed for the first time and a clean schema is being used, do not select the Skip schema creation and data loading option. The installer will fail at some point if there is no data available in the database. You must populate the database schema before running the installer by selecting one of the other options.If the schema is already populated and you want to manually restore or update the data, select the Skip schema creation and data loading option. |
To manually create and populate the database schema:
Change to the <INSTALL_DIR>/backoffice/db directory.
Set the JAVA_HOME and ANT_HOME environment variables.
JAVA_HOME=<JDK_INSTALL_DIR>/jre; ANT_HOME=<INSTALL_DIR>/ant; export JAVA_HOME ANT_HOME
Add $JAVA_HOME/bin and $ANT_HOME/bin to the front of the PATH environment variable.
PATH=$JAVA_HOME/bin:$ANT_HOME/bin:$PATH; export PATH
Expand the backofficeDBInstall.jar file.
jar -xvf backofficeDBInstall.jar
If you are using sample data, enter the path to the sample dataset file. Use forward slashes in the path:
# identifies the sample dataset file
dataset.sample.zip=FILE_DATASET_SAMPLE
Modify db.properties.
Uncomment the Oracle properties and comment out the properties for the other vendors.
In the Oracle properties, update the settings to the following:
db.product=jdbc
db.version=12.1.0.1.4
Set the following properties with your database settings. The values to be set are shown in bold in the examples.
Set the hash algorithm, for example, to SHA-256.
# Hash Algorithm
inst.hash.algorithm=HASH_ALGORITHM
Enter the values for the users shown in bold in the following example:
inst.app.admin.user=my-bo-admin-user
inst.app.admin.password-encrypted=

db.user=DB_USER_ID
db.password-encrypted=

db.owner.user=DB_OWNER_USER_ID
db.owner.password-encrypted=
Before running the ant target to encrypt the passwords, clear the encrypted password entries as shown in the preceding examples. The ant target prompts for the passwords. Run the following ant target to encrypt the passwords:
ant -f db.xml encrypt-webapp-passwords
Enter the values for the URL used by the Back Office application to access the database schema. See Appendix D for the expected syntax:
db.jdbc-url=jdbc:oracle:thin:@DB_HOST_NAME:1521:DB_NAME
If you are using a service name, the URL has the following format:
db.jdbc-url=jdbc:oracle:thin:@DB_HOST_NAME:1521/SERVICE_NAME
Enter the value for the store ID shown in the following example:
configured.store.id=04241
Enter the value for the supported locales shown in the following example:
gen.locales=fr,zh
Add a default locale as shown in bold in the following example:
mock.locales=none
default.locale=en_US
If VAT is used, set value to true:
tax.enableTaxInclusive=false
Add entries for tablespaces. If you are using the default tablespaces, leave the name blank:
db.table.space=pos_data_ts
db.index.table.space=pos_indx_ts
Set the host name and rmi port number for the parameters.apphost property to point to your Back Office installation.
parameters.apphost=t3://<hostname>:<port_number>
In the parameters.classpath property, replace the semicolons used as separators with colons. This is needed to run with Linux systems.
To enable VAT functionality, uncomment the tax.enableTaxInclusive property in the tax properties section.
If loading sample data, replace FILE_DATASET_SAMPLE with the full path and file name for the sample dataset zip file.
dataset.sample.zip=FILE_DATASET_SAMPLE
Run one of the available Ant targets to create the database schema and load data.
load_sample: creates the database schema containing the sample dataset. The sample dataset includes the minimum dataset and report configuration data.
To use this option, you must provide the location of the zip file containing the sample dataset. You can obtain the sample-dataset-14.1.zip file from the Oracle Software Delivery Cloud at the following web site:
https://edelivery.oracle.com/
load_minimum: creates the database schema containing the minimum dataset. The minimum dataset includes report configuration data.
load_reports: loads report configuration data.
For example: ant load_sample
To specifically load the report configuration data, use the following command:
ant -f db.xml load_reports
In the Enable Secure JDBC window, you select whether secure JDBC will be used for communication with the database. See Figure A-9.
If Yes is selected, the installer sets up the secure JDBC.
If No is selected and you want to manually set up the secure JDBC after the installer completes, see the Oracle Retail POS Suite Security Guide.
A WebLogic domain must be configured and started before you can run the Back Office application installer. This installer will configure and deploy the Back Office application.
Change to the <INSTALL_DIR> directory.
Set the JAVA_HOME environment variable. JAVA_HOME should point to <JDK_INSTALL_DIR>.
|
Note: The installer is not compatible with versions of Java earlier than Java 7. |
Run the installer.
Log into the Linux server as a user who is authorized to install software.
Change the mode of install.sh to executable.
Run the install.sh script. This will launch the installer.
|
Note: The usage details for install.sh are shown below. The typical usage for GUI mode does not use arguments.install.sh [text | silent weblogic] |
After installation is complete, a detailed installation log file is created: orbo-install-app.<timestamp>.log
The installer leaves behind the
ant.install.properties and cwallet.sso files for repeat installations.
After the installation is successfully completed, the CREATE SYNONYM privilege must be revoked. In the installer console window, it prompts for a database administrator to run the revokesyn SQL script to revoke the privilege. The script is found in the <INSTALL_DIR> directory.
For information on granting this privilege, see "Create the Database Schema Owner and Data Source Connection Users".
If the application installer encounters any errors, it will halt execution immediately. You can run the installer in silent mode so that you do not have to reenter the settings for your environment. For instructions on silent mode, see Appendix B.
For a list of common installation errors, see Appendix E.
Since the application installation is a full reinstall every time, any previous partial installs will be overwritten by the successful installation.
You can choose to disable the non-SSL port in the Turn Off the Application Server's Non-SSL Port window. See Figure A-42. If you select Yes in the window, you must delete the transaction log files.
To delete the files:
Stop the application server.
Delete the transaction log files:
<orbo-domain>/server/<serverName>/data/store/default/WLS*.dat<orbo-domain>/server/<serverName>/data/store/or*-persistent-store/*.dat
Start the application server:
If Back Office is deployed to an admin server, start the application server for the admin server.
If Back Office is deployed to a managed server, start the application server for the managed server.
For more information, see the following web site. Refer to the Moving a Server section.
http://download.oracle.com/docs/cd/E12839_01/web.1111/e13731/trxman.htm#i1053371
Skip this section if you chose the default option of allowing the installer to complete installation to the application server in the Manual Deployment Option window. See Figure A-38.
The installer includes the option to configure the application locally and skip deployment to the application server. If this option is chosen, the installer will make the configured application files available under
<INSTALL_DIR>/backoffice/configured-output/.
If you chose this installer option, you complete the installation by following these steps:
To deploy using the ant target:
|
Note: The application server's non-SSL listen port must be enabled before running the ant target described here. The non-SSL listen port can be enabled using the WebLogic Admin Console. After these steps are completed, the non-SSL listen port can be disabled so the server can only be reached on the SSL listen port. |
Set the JAVA_HOME environment variable. JAVA_HOME should point to <JDK_INSTALL_DIR>.
Update the following property in the ant.install.properties file.
input.install.to.appserver = true
Run the following ant target:
install.sh ant init app-ear-deploy -propertyfile ant.install.properties
To deploy from the application server console:
Set the JAVA_HOME environment variable. JAVA_HOME should point to <JDK_INSTALL_DIR>.
Run the following target:
install.sh ant init app-ear-deploy
Deploy the ear file from the following location:
<INSTALL_DIR>/backoffice/backoffice.ear
|
Note: When deploying the ear file, provide the same application name and context root you gave to the installer. These values were stored in the<INSTALL_DIR>/ant.install.properties file by the installer. |
|
Note: If the initial set of parameters has not been imported because deployment of the application was performed using the manual deployment option, see "Import Initial Parameters" for details on how to import the parameters. |
The application parameters must be installed before the Back Office application is fully operational. In the Install Parameters window, you select whether the installer completes installation of the parameters.
If you chose Yes, you do not need to perform any further steps to install the parameters. This is the default selection in the window.
If you chose No, the installer did not install the parameters. For information on installing the parameters, see "Import Initial Parameters".
|
Note: If you did not choose to have the installer set the initial parameters, you must import an initial set of parameters before you can use Oracle Retail Back Office. For more information on parameters, see the Oracle Retail POS Suite Configuration Guide. |
This section provides an overview of the procedures for importing an initial set of parameters. You can import the parameters through the Oracle Retail Back Office user interface or by using an ant target after the installation is complete. You only need to use one of the procedures. The procedure for importing parameters through the application user interface is described in more detail in the Oracle Retail Back Office User Guide.
To import the initial parameters through the user interface:
Open the Oracle Retail Back Office application in a web browser. The address is provided at the end of the installer output and in the log file.
https://<host name>:<port number>/<context root>
Log in to the application with a user ID that has full administrative rights.
Click the Admin tab and then the Job Manager subtab. Click the Available Imports left navigation link. The Available Imports window appears.
To import the master parameter set, click the File link in the Import Parameters for Distribution row. Follow the instructions to import parameterset.xml from the <INSTALL_DIR>/backoffice/configured-output/db folder.
To import the initial set of Oracle Retail Back Office application parameters, click the File link in the Import BackOffice Parameters row. Follow the instructions to import backoffice.xml from the <INSTALL_DIR>/backoffice/configured-output/db folder.
|
Note: The application server's non-SSL listen port must be enabled before running the ant target described here. The non-SSL listen port can be enabled using the WebLogic Admin Console. After these steps are completed, the non-SSL listen port can be disabled so the server can only be reached on the SSL listen port. |
To import parameters using an ant target:
Change to the <INSTALL_DIR>/backoffice/configured-output/db directory.
In db.properties, set the host name and port number for the parameters.apphost property to point to your Back Office installation.
parameters.apphost=t3://<host name>:<port number>
Set the JAVA_HOME and ANT_HOME environment variables.
JAVA_HOME=<JDK_INSTALL_HOME>; ANT_HOME=<INSTALL_DIR>/ant;
export JAVA_HOME ANT_HOME
Run the following command:
ant load_parameters
For information on the procedures provided for purging aged data, see the Oracle Retail POS Suite Operations Guide.
To load the purge procedures:
Run the available Ant target to load the procedures.
ant load_purge_procedures
Log in as the database schema owner, <schema_owner_user>.
Create a user for running the purge procedures. This user should only have the privileges required to run the purge procedures.
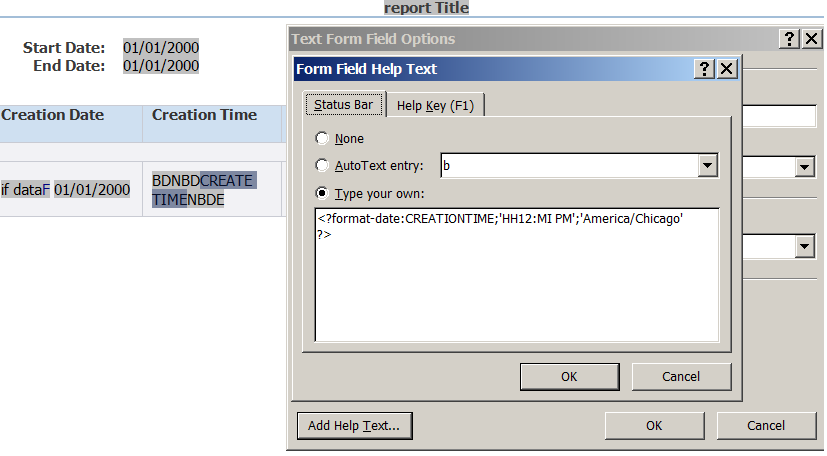
The default local time zone for the Bank Deposit Summary Report is America/Chicago. If this is not your local time zone for Back Office, the correct time zone needs to be set for the report. To change the local time zone:
In the <INSTALL_DIR>/backoffice/configured-output/db/reports/financial folder, open the BO_BankDepositSummaryReport.rtf file.
Update the create time in the file:
Double-click CREATE TIME under Creation Time. The Text Form Field Options window appears.
|
Note: Double-click only CREATE TIME and not the other two values which are also in the same area. The value is highlighted when selected. Figure 4-2 shows the CREATE TIME value selected. |
Click Add Help Text. The Form Field Help Text window appears.
Under the Status Bar tab, select Type your own. The date format appears.
Change America/Chicago to your local time zone. Figure 4-2 shows the America/Chicago value that you change.
Save the change.
Reload the reports:
Change to the <INSTALL_DIR>/backoffice/configured-output/db directory.
Run the following command:
ant -f db.xml load_reports
|
Note: When you are done installing Back Office, log out and close the browser window. This ensures that your session information is cleared and prevents another user from accessing Back Office with your login information. |
After the application installer completes and you have run the initial parameter load, you should have a working Back Office application installation. To launch the application, open a web browser and go to https://<servername>:<portnumber>/<context root>
For example, https://myhost:7002/backoffice