| Oracle® Retail Central Office User Guide Release 14.1 E54471-01 |
|


 Previous |
 Next |
The Customer feature enables you to manage individual and business customers for all stores in the enterprise. This feature provides the following functionality:
Add and remove individual and business customers
Change and save individual and business customer information
Handle duplicate customers
View and edit customer information
Search for customers based on different sets of criteria
See the following sections for information on the functions available for the Customer tab:
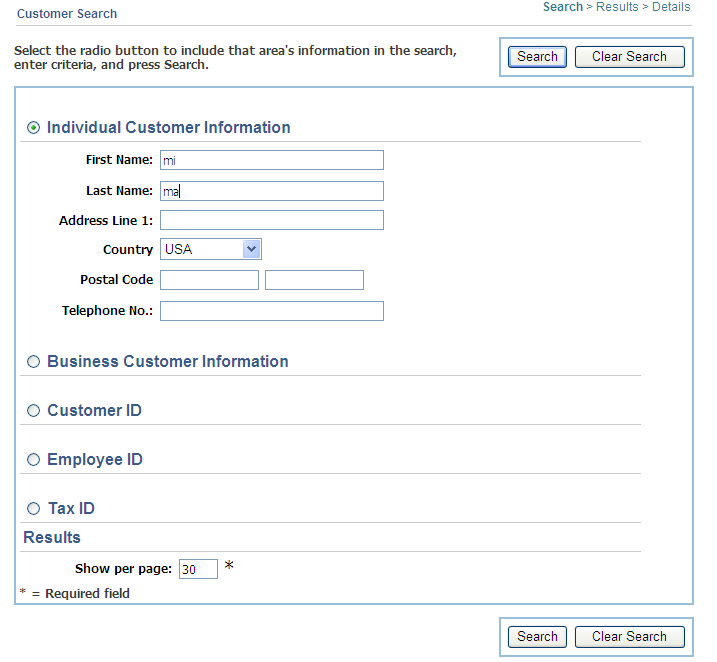
To search for customers, select the Customer tab and click Search. The Customer Search screen is displayed.
For each set of search criteria, you choose if that criteria should be used. When you select a set of search criteria, more fields appear on the screen. Enter the required information and any additional information you want to use for the search. If a set of search criteria is not selected, none of the fields are shown and that information is not used for the search.
Only one set of search criteria can be selected for a search. Only customers that meet all of the search criteria are displayed.
Table 5-1 describes the type of search criteria which is available.
Table 5-1 Search Information
| Type | Field | Description |
|---|---|---|
|
The following information can be specified: |
||
|
First Name |
First name is required. At least one character must be specified. |
|
|
Last Name |
Last name is required. At least one character must be specified. |
|
|
Address Line 1 |
Address is optional. To search by the first line of the mailing address, specify at least one character. |
|
|
Country |
Select a country from the menu. |
|
|
Postal Code |
Postal code is required. Five to seven characters must be specified. |
|
|
Telephone No. |
Telephone number is optional. To search by telephone number, specify at least one digit of the telephone number. The telephone number is automatically formatted as you enter the digits. |
|
|
The following information can be specified: |
||
|
Business Name |
Business name is required. At least one character must be specified. |
|
|
Address Line 1 |
Address is optional. To search by the first line of the mailing address, specify at least one character. |
|
|
Country |
Select a country from the menu. |
|
|
Postal Code |
Postal code is required. Five to seven characters must be specified. |
|
|
Telephone No. |
Telephone number is optional. To search by telephone number, specify at least one digit of the telephone number. The telephone number is automatically formatted as you enter the digits. |
|
|
Customer ID |
Enter the exact customer ID for the search. |
|
|
Employee ID |
Enter the exact employee ID for the search. |
|
|
Tax ID |
Enter the exact tax ID for the search. |
|
|
Results |
Enter the maximum number of customers displayed on a page. If the number of customers found is greater than this number, navigation is provided at the bottom of the results list to enable you to select the next, previous, or specific page of data. |
|
To search for customers:
Select the button to choose the criteria you want to use in the search. Enter the required information and any additional information you want to use for the search. If you want to reset all the fields to the default values, click Clear Search.
Click Search. The Customer Search Results screen is displayed. If only one customer is found that meets the criteria, the Customer Details screen is displayed instead.
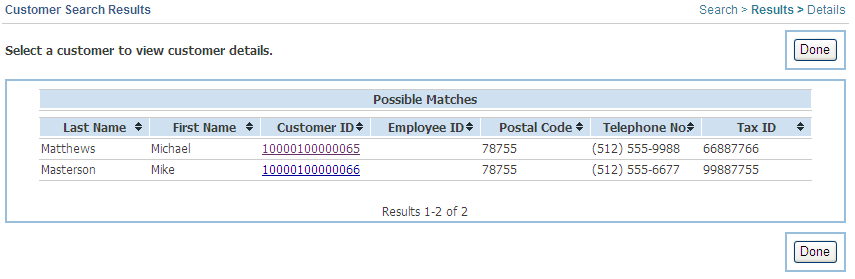
The Customer Search Results screen shows the list of customers that meet all of the selection criteria entered on the Customer Search screen.
The following information is shown for each customer:
Customer last and first name or business name
Customer ID
Employee ID
Postal code
Telephone number
Tax ID
To return to the Customer Search screen, click Done.
To view detailed information for the customer, click the customer ID. The Customer Details screen is displayed.
A details screen is displayed when you click a customer ID on the Customer Search Results or Duplicate Customer screen. For information on the two available details screens, see the following sections:
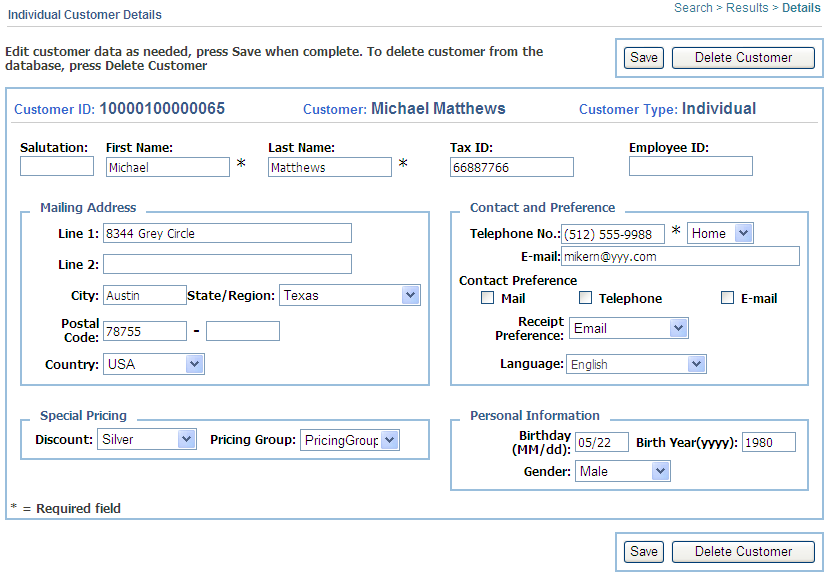
When a customer ID link for an individual is selected on the Customer Search Results or Duplicate Customer screen, the Individual Customer Details screen is displayed.
For a description of the fields on this screen, see Table 5-2.
To make changes to any of the information, change the fields and click Save. The updated information is saved.
To remove the customer, click Delete Customer. For more information, see "Removing a Customer".
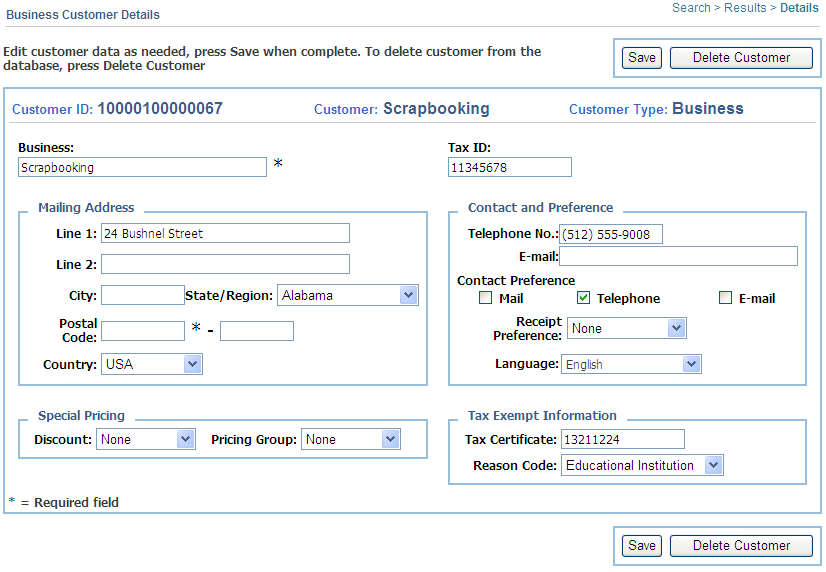
When a customer ID link for a business is selected on the Customer Search Results or Duplicate Customer screen, the Business Customer Details screen is displayed.
For a description of the fields on this screen, see Table 5-3.
To make changes to any of the information, change the fields and click Save. The updated information is saved.
To remove the customer, click Delete Customer. For more information, see "Removing a Customer".
You can remove the customer being displayed on the Customer Details screen. To remove the customer:
Click Delete Customer.
The Customer Delete Confirmation screen is displayed.
To remove the customer, click Yes.
If you do not want to remove the customer, click No. You are returned to the Customer Details screen.
If Yes is selected, the Customer Deleted Confirmation screen is displayed. Click Enter.
To add a customer, select the Customer tab and click Add. The New Customer screen is displayed.
To add an individual customer, select Individual from the Customer Type list. See "Adding an Individual Customer".
To add a business customer, select Business from the Customer Type list. See "Adding a Business Customer".
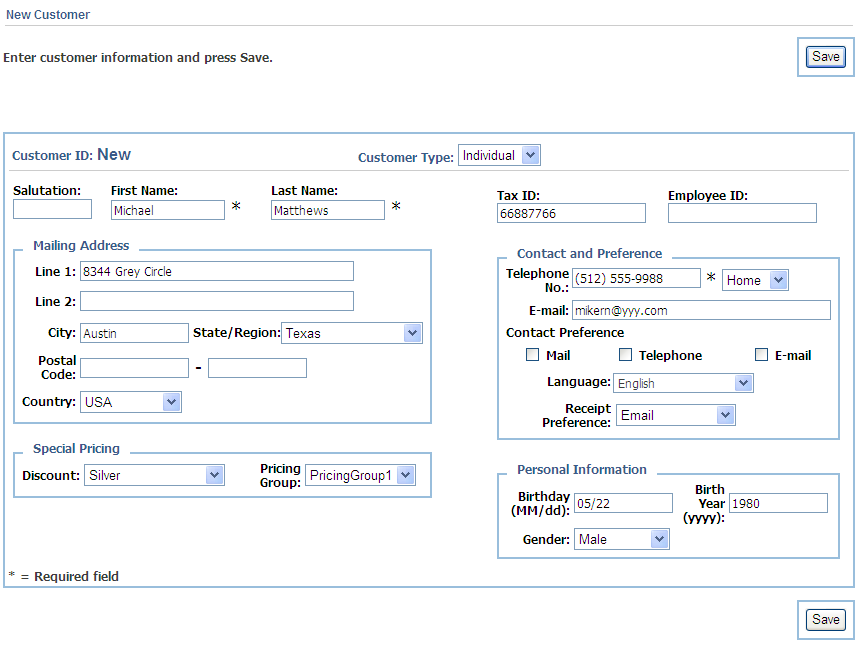
When Individual is selected for the Customer Type on the New Customer screen, the information for creating an individual customer is displayed.
Table 5-2 describes the type of information needed to create an individual customer. Only the customer name and postal code are required fields.
Table 5-2 New Customer Fields for an Individual Customer
| Field | Description |
|---|---|
|
Customer ID |
Unique number assigned to a customer by Oracle Retail Central Office. New is displayed for the customer ID on this screen. When the information is saved, the customer ID is assigned. |
|
Customer Type |
Type of customer. Individual is selected. |
|
Salutation |
Title prefixed to the customer name. |
|
First Name, Last Name |
Name of the customer. These fields are required. |
|
Mailing Address |
Address for receiving mail. The postal code is a required field. The second part of the postal code can only used when the selected country is USA. |
|
Special Pricing |
Discount type and pricing group assigned to this customer. These selections associate the customer to a specific type of discount or group of price promotions and discount rules. Both a discount and pricing group can be selected. For more information on discounts and pricing groups, see the Oracle Retail Back Office User Guide. |
|
Tax ID |
Tax identifier assigned by a government agency. For example, in the United States, the Internal Revenue Service assigns this number for tax reporting purposes. |
|
Employee ID |
Identifier of the employee. |
|
Contact and Preference |
Contact information and customer preferences for contact and language:
|
|
Personal Information |
Date of birth and gender. |
To add a new individual customer:
Enter the first and last name of the customer.
Enter the mailing address. Only the postal code is required.
Set any of the remaining information you want to include for the customer.
When you have entered all the information, click Save.
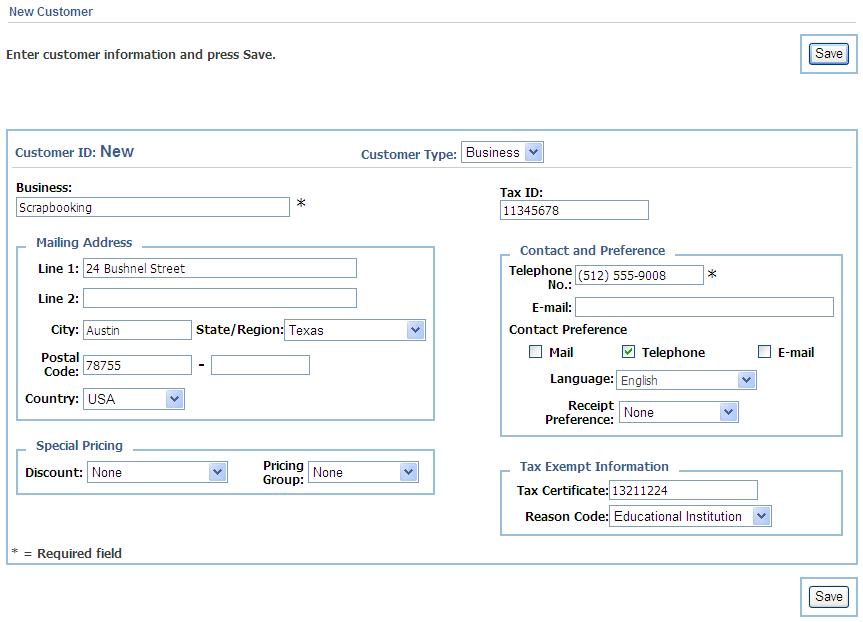
When Business is selected for the Customer Type on the New Customer screen, the information for creating a business customer is displayed.
Table 5-3 describes the type of information needed to create a business customer. Only the business name and postal code are required fields.
Table 5-3 New Customer Fields for a Business Customer
| Field | Description |
|---|---|
|
Customer ID |
Unique number assigned to a customer by Oracle Retail Central Office. New is displayed for the customer ID on this screen. When the information is saved, the customer ID is assigned. |
|
Customer Type |
Type of customer. Business is selected. |
|
Business |
Name of the business. This field is required. |
|
Mailing Address |
Address for receiving mail. The postal code is a required field. The second part of the postal code can only used when the selected country is USA. |
|
Special Pricing |
Discount type and pricing group assigned to this customer. These selections associate the customer to a specific type of discount or group of price promotions and discount rules. Both a discount and pricing group can be selected. For more information on discounts and pricing groups, see the Oracle Retail Back Office User Guide. |
|
Tax ID |
Tax identifier assigned by a government agency. For example, in the United States, the Internal Revenue Service assigns this number for tax reporting purposes. |
|
Contact and Preference |
Contact information and customer preferences for contact and language:
|
|
Personal Information |
Tax certificate number and reason for the tax exempt status. This information can be included if the customer is tax exempt. |
To add a new business customer:
Enter the name of the customer.
Enter the mailing address. Only the postal code is required.
Set any of the remaining information you want to include for the customer.
When you have entered all the information, click Save.
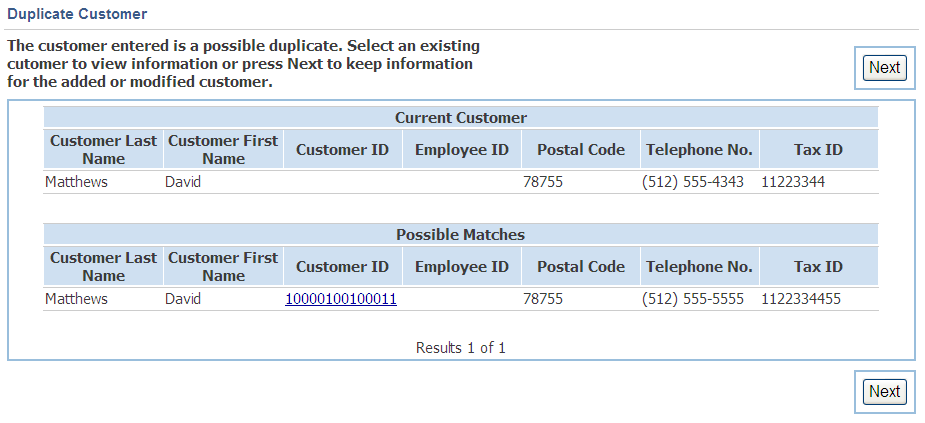
If the customer information on the New Customer or Customer Details screen matches an existing customer, the Duplicate Customer screen is displayed.
The following information is shown for each customer:
Customer last and first name or business name
Customer ID
Employee ID
Postal code
Telephone number
Tax ID
The Current Customer section lists the customer with the new or changed information. The same information for any possible duplicate customers is shown in the Possible Matches section.
You can choose to select one of the possible matching customers or save the new or changed customer information.
To save the information for the customer listed in the Current Customer section, click Next.
To view the information for a possible duplicate customer, click the Customer ID in the Possible Matches section. The Customer Details screen is displayed.
|
Note: The information that was entered for the customer listed in the Current Customer section is discarded when a possible duplicate customer is selected. |