| Oracle® Retail Central Office User Guide Release 14.1 E54471-01 |
|


 Previous |
 Next |
The Administration feature provides the administrative functions to manage user security and operations data for the enterprise. Administration provides the following benefits:
Utilization of the store hierarchy for data distribution and security
Create, read, update, and delete ad hoc groups of stores for data distributions
Manage user information including adding a new user and modifying an existing user
Definition of security roles and assignment of a specific role to each user ID
Management of all types of scheduled jobs
Maintenance of individual parameters for consistent implementation of Oracle Retail Central Office policies
Creation and management of user tasks
For information on each available function, see the following sections:
The store directory, or store hierarchy, defines where stores fit in the retailer's enterprise. The hierarchy levels can be ordered in a way that makes the most sense for security or data distribution purposes. For example, stores may be arranged by regions of the country and then the states within each region. Any number of hierarchy levels can exist, stores can exist at any level of the hierarchy, and one level of the hierarchy can contain both stores and lower levels, allowing flexibility in hierarchy definition.
The store hierarchy is defined in an XML file. Whenever any changes are made to the store hierarchy, the XML file is edited, and that file is then imported to Oracle Retail Central Office. The Data Import (DIMP) Subsystem enables the importing of the store hierarchy. For information on using DIMP, see the Oracle Retail POS Suite/Merchandising Products Implementation Guide.
|
Note: A store hierarchy level is assigned to each user ID. The import replaces the existing store hierarchy. If any users IDs were assigned to hierarchy levels now removed, those user IDs need to be reassigned to a different hierarchy level through the Users subtab. |
Individual stores can be chosen from any part of the store hierarchy and defined as a store group. A store group is an ad hoc collection of stores for use in the following group types:
Store Order Group
Grouping of stores from which customer pickup of an order is allowed. This group is used for Commerce Anywhere. For example, the retailer may have stores across a large metropolitan area. A store order group could be defined with all the stores within a 10 mile radius where customers can go to pick up their order.
Distribution Group
Grouping of stores used for parameter distributions. For example, all the stores that are in malls could be placed in one group and that group can be used for distributing parameters specific to mall stores.
Stores within one group do not have to be on the same arm of the store hierarchy. There is no limit to the number of groups in which a store can be included.
Click Store Directory to work with store groups.
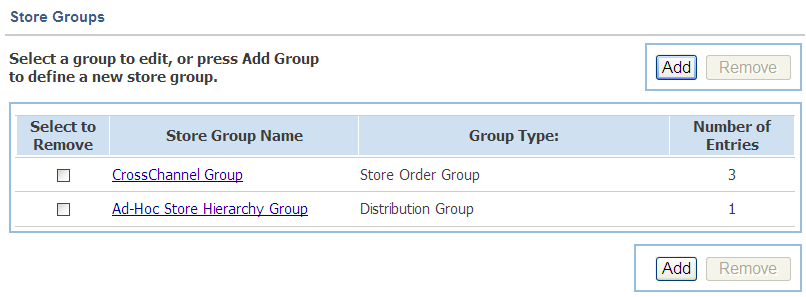
The Store Groups screen shows the list of defined store groups. To work with store groups, click Store Groups. The Store Groups screen is displayed.
Table 6-1 describes the information shown for each store group.
Table 6-1 Store Groups Column
| Column | Description |
|---|---|
|
Select to Remove |
A selected checked box indicates the group is selected to be removed |
|
Store Group Name |
Name of the group |
|
Group Type |
Type of group:
|
|
Number of Entries |
Number of stores in the group |
To change an existing store group, click the store group name. To add a new group, click Add. See "Adding or Changing a Store Group". To remove a store group, see "Removing a Store Group".
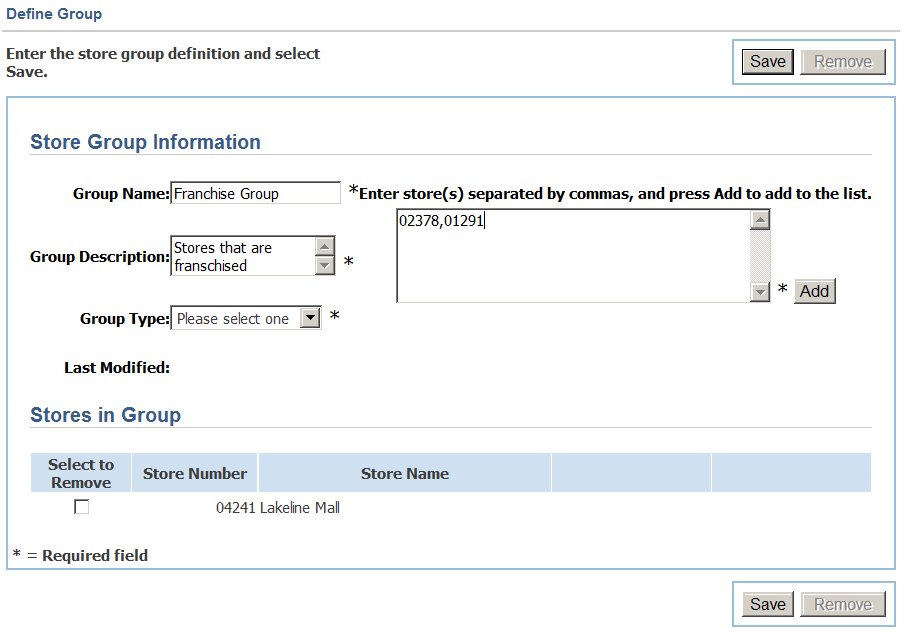
On the Define Group screen, you can define a new group or change an existing group.
To set the group definition:
Enter the group name.
Enter the group description.
Select the group type from the list.
Choose the stores for the group.
To add a store to the list, enter the store number from the store hierarchy. Click Add. The store is added to the Stores in Group list. Multiple stores can be added at the same time.
To remove a store already in the list, select the check box in the Select to Remove column. Click Remove. The store is removed from the group. More than one store can be removed at same time.
Click Save. The group definition is saved.
On the Store Groups screen, you can remove store groups. To remove a store group:
On the Store Groups screen, select the check box in the Remove column for the group you want to remove. More than one group can be removed at a time.
Click Remove. The Confirm Store Groups Removal screen is displayed. To delete the selected groups, click Yes. To not delete the groups, click No.
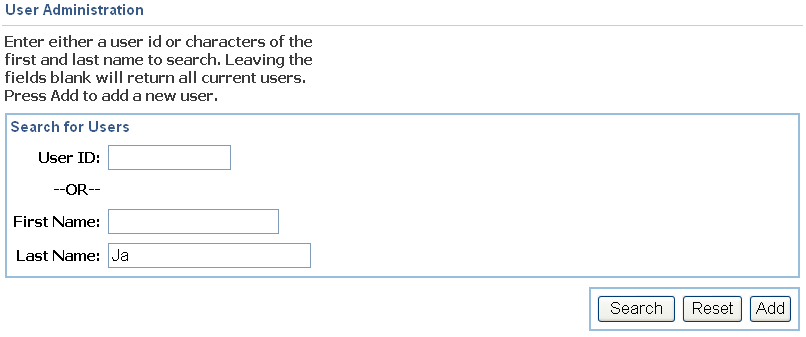
On the User Administration screen, you can search for users and add new users. Click the User tab. The User Administration screen is displayed.
To search for user IDs:
Enter a user ID or name.
If you want to search for a specific user ID, enter the entire user ID.
If you want to search by name, enter a full name or some of the characters in the name. All the user IDs that have those characters in the name are found.
To see all the user IDs, leave all the fields blank.
If you want to clear the entered criteria, click Reset.
Click Search. The User Search Results screen is displayed. See "Viewing User Search Results".
If only one user ID is found, the User Details screen is displayed instead. See "Adding or Changing a User ID".
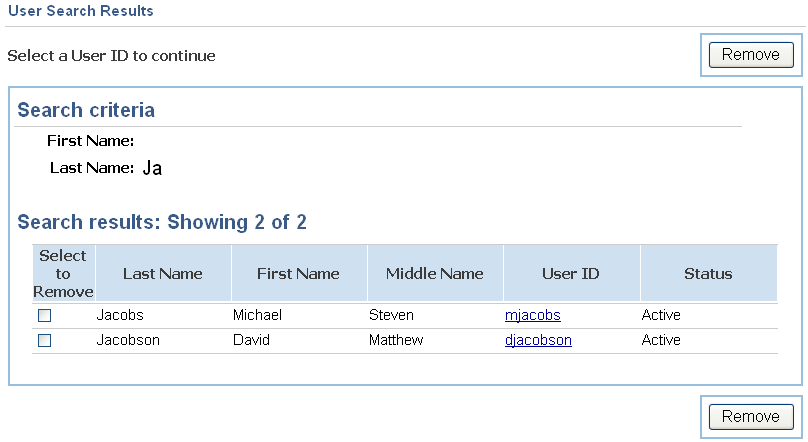
When more than one user is found when searching for users, the User Search Results screen shows all the users found who match the search criteria.
For each user, the following information is displayed:
A selected checked box in the Select to Remove column indicates the user is to be removed
First, middle, and last name of the user
User ID
Status of the user
To view the user details, click the user ID. The User Details screen is displayed.
To remove a user ID, see "Removing a User ID".
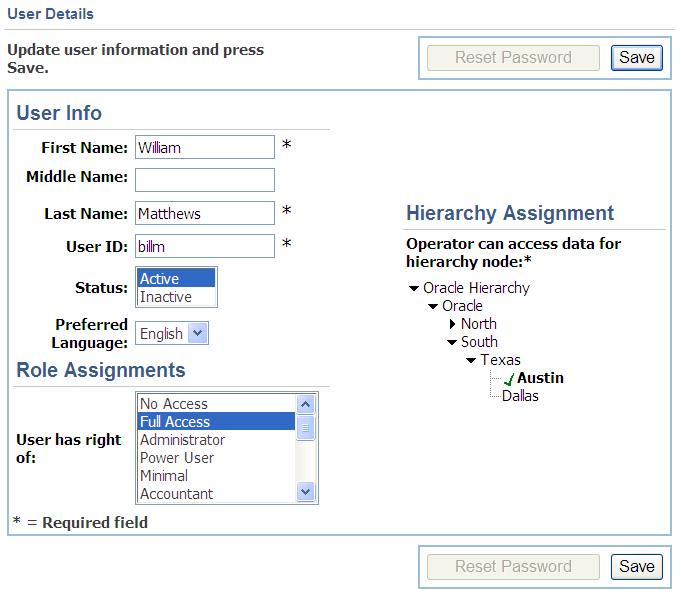
On the User Details screen, you can add a new user ID or change an existing user ID. For information on changing a user ID, see "Changing a User ID".
To add a new user ID:
Enter the name of the user and user ID. Select the status and preferred language.
|
Note: A user must have a status of Active in order to log in to Oracle Retail Central Office. |
Choose the role you want assigned to the user ID. See "Roles" for more information.
Set the hierarchy assignment.
The hierarchy assignment determines the hierarchy node the user can specify for searches through Transaction Tracker and for data and parameter distributions.
Click the node name in the store hierarchy. A check next to a node name indicates that node is selected. You can click a triangle next to any node name to display the child nodes or to hide the child nodes from view.
Click Save. The user ID is added. The temporary password is displayed. It should be written down and given to the user. This is the only time the password is displayed.
An Employee ID is assigned to the new user. The Employee ID is displayed on the User Details screen after the user has been added.
To change a user ID:
On the User Search Results screen, click the user ID. The User Details screen is displayed.
Change the user name, user ID, preferred language, or hierarchy assignment.
Change the status. The Confirm Status Change dialog is displayed.
To confirm the change, click Yes.
To not change the status, click No.
|
Note: There is a lag time on some application servers for the change in status to take effect. |
To change the password, click Reset Password. The Reset Password dialog is displayed.
To confirm the password reset, click Yes. The temporary password is displayed. It should be written down and given to the user. This is the only time the password is displayed.
To not reset the password, click No.
Click Save. The changes are saved.
To reduce the administrative time required to set up security for users, a role can be defined for each security level and the functions that role may and may not access can be specified. Each user ID is then assigned to one role and has access to all functions allowed for that role. Different roles may have identical function accessibility.
If a role is changed, any user IDs assigned to that role are not affected until the next time the user logs in.
|
Note: There is a lag time on some application servers for the security changes to become visible. Consult your system administrator if you do not see the changes take effect immediately. |
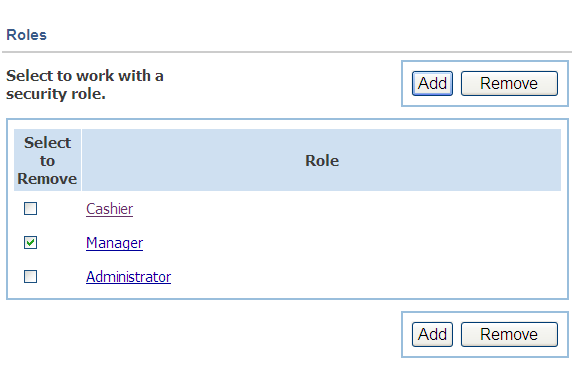
Click Roles. The Roles screen is displayed.
For each role, the following information is displayed:
A selected checked box in the Select to Remove column indicates the role is to be removed. See "Removing a Role".
Name of the role.
To view or change the settings for a role, click the name in the Role column. See "Selecting the Role Settings".
To add a new role, click Add. See "Adding a New Role".
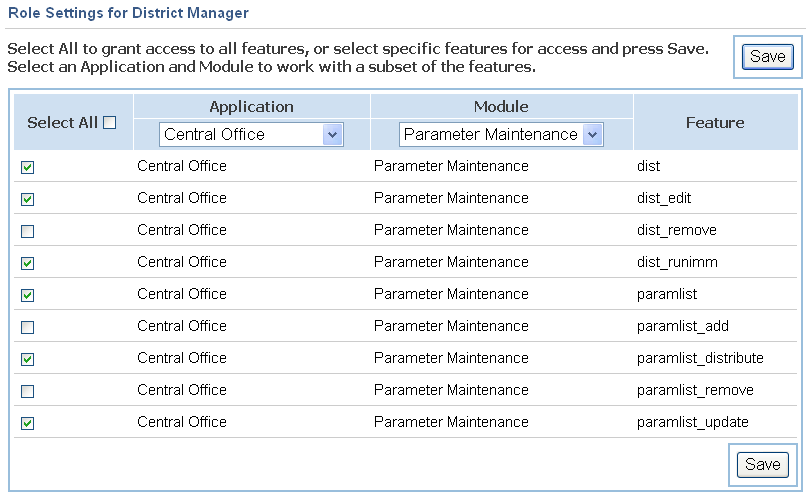
The Role Settings screen enables you to define the allowed access for a role.
Table 6-2 describes the information shown for each feature.
Table 6-2 Role Settings Column
| Column | Description |
|---|---|
|
Select All |
A selected checked box indicates that this role is granted access to the feature. If the check box is not selected, access to the feature is denied and a user ID assigned this role will not be able to use that feature. |
|
Application |
Available applications from which the functions can be selected. |
|
Module |
Sets of functions available for an application. For the Oracle Retail Central Office, this corresponds to the available subtabs. |
|
Feature |
Features available for the selected application and module. For the Oracle Retail Central Office, this corresponds to the left navigation links and action buttons available for each subtab. In some cases, additional fields can be secured such as the viewing of credit card numbers. |
To choose the role settings:
Choose the features that can be accessed:
Click Application. Click the application whose features you want to choose.
Click Module. Click the module whose features you want to choose. The features available for that function are shown.
To grant access to all the features, select the Select All check box. To grant access to a specific feature, select the check box in the Select All column.
To deny access to a feature already selected, deselect the check box in the Select All column.
When you have made choices for all the applications and modules that you want, click Save. The existing role is changed or the new role is added.
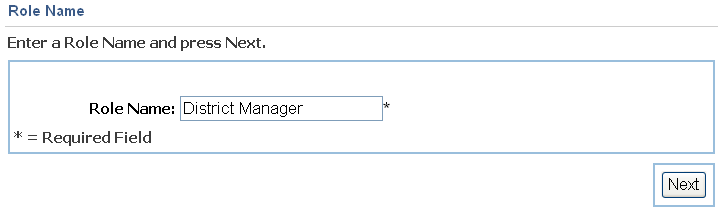
The Role Name screen is used to define the name for a new role. To add a new role, click Add on the Roles screen.
Enter the name for the role. click Next. The Role Settings screen is displayed. See "Selecting the Role Settings".
To remove a role:
On the Roles screen, select the check box in the Select to Remove column for the role you want to remove.
Click Remove. The Confirm Role(s) Removal screen is displayed.
If you want to remove all the selected groups, click Yes. The roles are removed.
If you do not want to remove all the selected groups, click No. The role is not removed and the Select to Remove box remains selected.
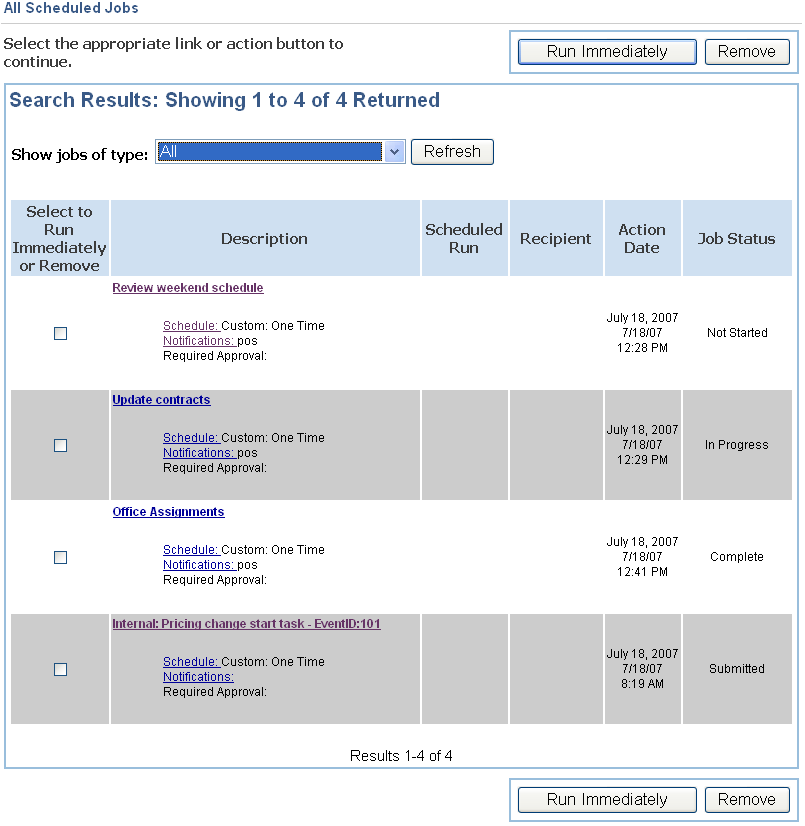
The Job Manager function provides the capability to work with scheduled jobs. The types of scheduled jobs are parameter distributions, file transfers, and data imports.
To work with scheduled jobs, click Job Manager. The All Scheduled Jobs screen is displayed.
For a description of each column, see Table 3-3.
To choose the jobs to be displayed:
Click Show jobs of type. Choose to display all jobs or just a certain type of job.
Click Refresh. The type of jobs selected are displayed.
The functions available on this screen are the same as the Scheduled Imports screen. See "Working with Scheduled Imports" in Chapter 3 for more information.
A parameter is a value that sets an individual characteristic. For example, a parameter called AcceptedTenderIssuers could list all the tenders that are accepted for payment.
A parameter group is a set of parameters that are grouped together by category. This makes it easier to find a specific parameter. A parameter is part of only one parameter group. For example, a group called Discount could contain all the parameters used for applying discounts. If you needed to change a parameter relating to discounts, you could easily find the parameter.
|
Note: For more information on specific parameters, see the Oracle Retail POS Suite Configuration Guide. |
Click Parameter Maintenance. The Select Parameters screen is displayed.
The Select Parameters screen displays all the available parameters in the selected parameter group.
The following information is displayed:
Name of the group
Parameters in the group
Value currently assigned to each parameter
To choose a different group of parameters:
Click Groups. The list of the available groups is displayed.
Click the group.
Click Refresh. The parameters in that group are displayed.
To edit a parameter value, see "Editing a Parameter".
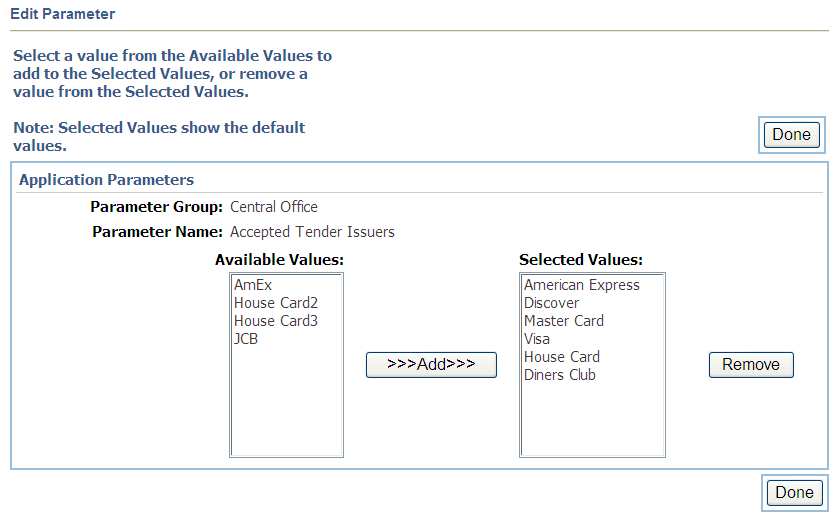
The Edit Parameter screen is used to change the value of a parameter. The type of edit screen displayed depends on the parameter:
If the parameter uses a value field, enter the new value. The minimum and maximum allowed values are displayed on the edit screen.
If the parameter uses one value chosen from a list of possible values, select the new value from the list.
If the parameter allows more than one value from a list, select a value from the list and click >>>Add>>>. Repeat this for each value you want to choose.
If the parameter uses a created list, enter the new values separated by commas.
If the parameter uses multiple lines of text, enter the new value for the text.
To change the value assigned to a parameter:
On the Select Parameters screen, click the name in the Parameter Name column. The Edit Parameter screen is displayed.
Enter or select the new value for the parameter.
In this example, to add a value for the parameter, click the value in the Available Values list and click >>>Add>>>. To remove a value, click the value in the Selected Values list and click Remove.
When you have made all your changes, click Done. The parameter value is changed.
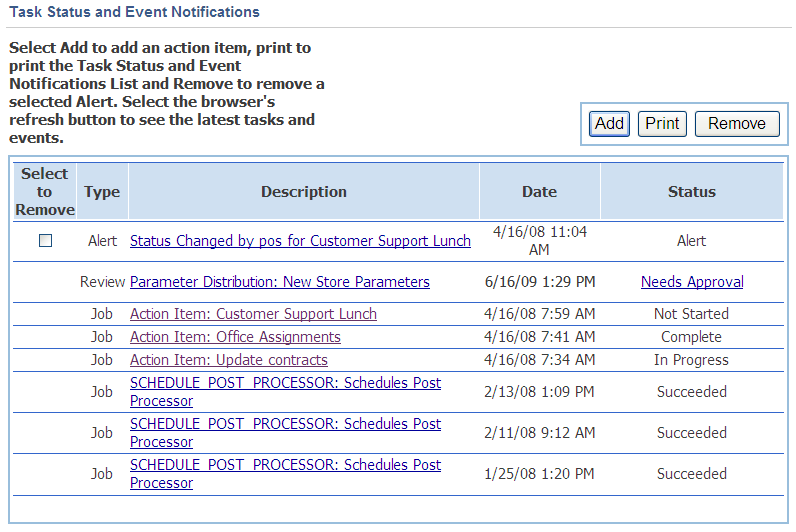
Current tasks and the status of each task, are displayed on the Task Status and Event Notification screen. The newest tasks are shown at the top of the list.
To work with tasks, click Tasks. The Task Status and Event Notifications screen is displayed.
Table 6-3 lists the information shown for each task in the list.
Table 6-3 Task Status and Notification Columns
| Column | Description |
|---|---|
|
Select to Remove |
A selected checked box indicates the alert type task may be removed. A check box is displayed only if you are allowed to remove the task. |
|
Type |
Alert indicates the status has changed for an action item task that you created. Job indicates either a notification from Oracle Retail Central Office about a job or an action item task that was assigned to you. Review indicates that you need to approve the data distribution job. |
|
Description |
Brief description of the task. |
|
Date |
The date and time is determined by the status of the task. |
|
Status |
See Table 6-4 for a description of the possible statuses. |
An easy way to keep track of tasks that you or another user need to get done is to create an action item task. You can then track the progress on the task using the Task Status and Event Notifications screen. To create an action item task, you provide the description, category, due date and time for completion, and list of assignees to complete the task. See "Adding or Changing a Task" for details on creating an action item task.
When you assign an action item task to a user, it is displayed in the assignee's Task Status and Event Notifications list. An action item task is not removed from an assignee's list until the status is Complete. The task cannot be removed by an assignee, but that user can choose other assignees for the task. That user is then the creator of the additional action item tasks and can then track the progress.
For an action item task assigned to you, you can edit the details. The information you change is only retained in the copy in your Task Status and Event Notifications list. Whenever you change the status of an action item task, an alert task is displayed in the Task Status and Event Notifications list of the user who created the action item task. See "Adding or Changing a Task" for more information. Table 6-4 describes the possible statuses.
Table 6-4 Possible Task Status
| Status | Description | Date and Time |
|---|---|---|
|
The following statuses are used for any type of task: |
||
|
Created |
Job was created |
When the job was created |
|
Denied |
Approval for the job was denied |
When the job approval was denied |
|
Executing |
Job is currently executing |
When the job started executing |
|
Failed |
Job failed and requires attention |
When the job failure occurred |
|
Needs Approval |
Approval is required before the job runs |
When the approval is needed |
|
Submitted |
Job has been submitted for scheduling |
When the job was submitted for scheduling |
|
Succeeded |
Job completed successfully |
When the job completed successfully |
|
The following statuses are only used for action item tasks: |
||
|
Complete |
Task has been completed by the assignee |
When the task was marked Complete |
|
Deferred |
Task has been deferred by the assignee |
When the task was marked Deferred |
|
In Progress |
Assignee is working on the task |
When the task was marked In Progress |
|
Not Started |
Task has been created |
When the task is due to be completed |
|
The following status is only used for Review type tasks: |
||
|
Needs Approval |
Your approval is required for a data distribution job |
When the approval is needed |
Additional information about each task in the list is displayed.
On the Task Status and Event Notifications screen, click the Description for the task details you want to see. The screen that is displayed depends on the task type. Table 6-5 lists the section that describes the screen for each task type.
Table 6-5 Task Details Screen Displayed for Each Task Type
| Task Type | Task Details |
|---|---|
|
Alert |
See "Viewing Details for an Action Item Task". The fields contain the current information for the alert or action item task. |
|
Job |
See "Viewing Details for a Task Type of Job". The fields contain information on job type tasks that are not action item tasks. |
|
Review |
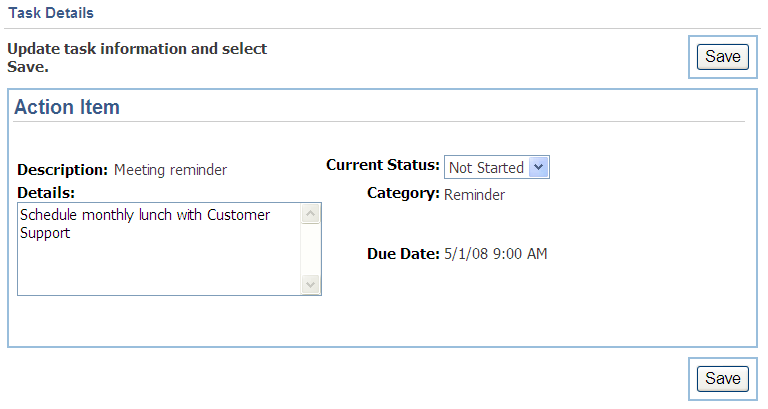
The Task Details screen shows detailed information about the action item task.
For a detailed description of each field, see Table 6-8.
The Scheduled Job Summary screen shows detailed information about the task.
Table 6-6 describes the information shown in the Scheduled Job Summary screen.
Table 6-6 Scheduled Job Summary Details
| Detail | Description |
|---|---|
|
Information |
Type of task performed. Name and description of the job. If the job is scheduled on a repeating basis, the next scheduled runtime is shown. Recipients of the data distribution or file transfer. Type of notification and the user IDs that receive notification of the job's progress. |
|
History |
Log of the status changes that occurred and the data and time of each change. |
|
Acknowledgements |
For a data distribution job, Oracle Retail Central Office can receive an acknowledgement back from each store that the data distribution was received. The acknowledgement includes a text field that can be completed by the store with any type of status information applicable to the job. The store ID number, status, and the date and time the status occurred are shown on this screen. Acknowledgements are only available for data distribution jobs. |
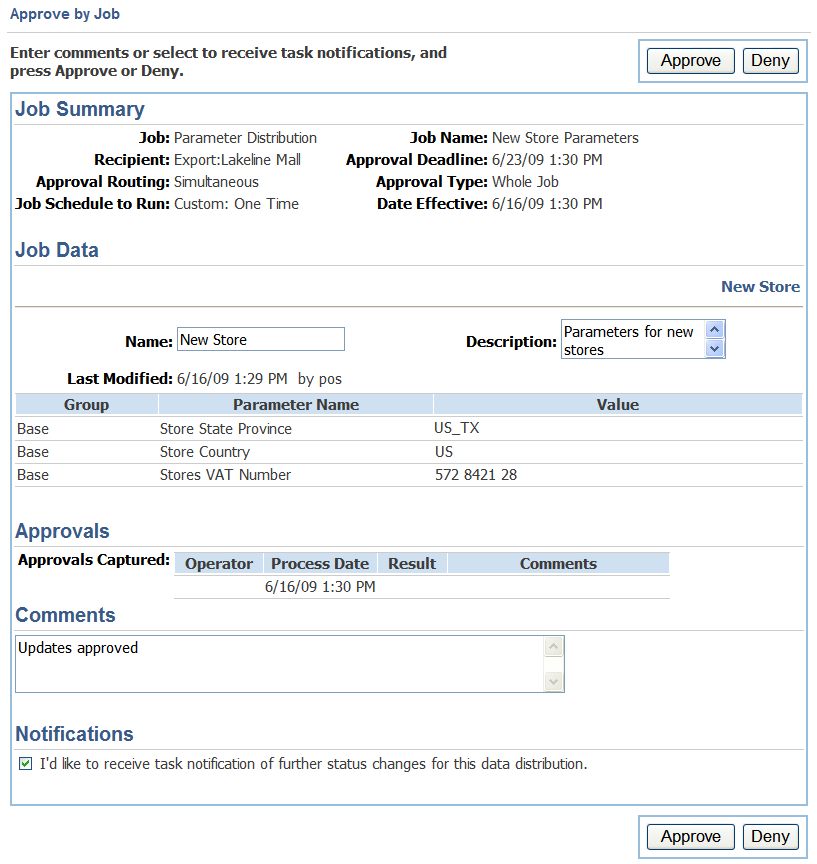
A task type of Review and a status of Needs Approval means that your approval, and possibly others, is needed to allow a data distribution job to run. To approve or deny the distribution, click the Needs Approval link in the Status column. The Approve by Job screen is displayed.
Table 6-7 describes the information shown for the job.
Table 6-7 Approve by Job Information
| Detail | Description |
|---|---|
|
Job Summary |
Type and name of the job. Intended recipient of the data distribution. Date and time when all approvals for the job must be captured in order to allow the data distribution to occur. Approval routing which is to all reviewers at the same time. Approval type which is to approve or deny all the parameter updates. If the job is scheduled on a repeating basis, the next scheduled runtime is shown. If the job is scheduled to run immediately, the date and time the job was submitted is shown. Date and time that the data update should take effect on the receiving system. |
|
Job Data |
Parameter list name. Date and time when the list was last modified. The parameter group, parameter name, and chosen value for each parameter in the list. |
|
Approvals |
Approvals that have already been captured:
|
|
Comments |
Any comments you want to include regarding your approval or denial. |
|
Notifications |
A selected checked box means you want to receive notification, in your Tasks list, of status changes for the job. |
To approve or deny the data distribution job:
Enter reviewer comments.
If you want to receive additional notices in your Tasks lists concerning the progress of the job, click Notifications at the bottom of the screen.
Approve or deny the job distribution:
To allow the distribution, click Approve. When all needed approvals have been done, the status is changed to Submitted.
To prevent the distribution, click Deny. The status for the task is changed to Denied. The job will not start.
On the Task Status and Event Notifications screen, you can add a new task or change an existing task:
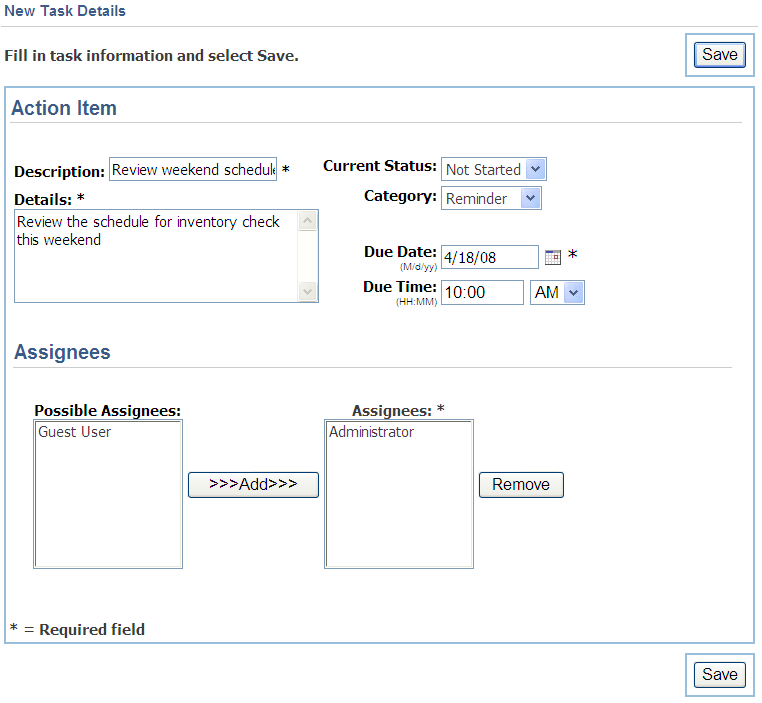
To add a task, click Add. The New Task Details screen is displayed.
To change an existing task, click the description of the action item task that you want to update. The Task Details screen is displayed with the current information about the task filled in. This screen has the same format as the New Task Details screen.
Table 6-8 describes the information shown for the task.
Table 6-8 Task Details Information
| Detail | Description |
|---|---|
|
Action Item |
Description of the action item task to be displayed on the Task Status and Event Notifications screen. Detailed description of the action item task. Current status of the action item task. For the list of possible statuses, see Table 6-4. Category of the action item task. The possible categories are Issue, Reminder, and Suggestion. The due date and time is dependent on the status assigned to the action item task. |
|
Assignees |
List of possible users that can be assigned to the action item task. List of users assigned to the action item task. |
To set the task details:
Enter the description for the action item task:
Enter the description. This description is displayed on the Task Status and Event Notifications screen.
Enter the details. This is more detailed information about the task.
Set the current status:
The default is Not Started.
Click Current Status. The list of possible statuses is displayed.
Click the status you want to use.
Set the category.
The default is Issue.
Click Category. The list of possible categories is displayed.
Click the category you want to use.
Set the due date and time.
These fields default to the current date and time.
Enter the date into the field or click the calendar button to bring up a calendar. You can search through the calendar and select the date that you want.
Enter the time between 00:00 a.m. and 11:59 p.m.
Set the list of assignees for the action item task. You must assign at least one user to the task.
To add an assignee, click the name in the list of Possible Assignees that you want to add. You can select multiple names at the same time. Click >>>Add>>>.
To remove an assignee, click the name in the list of Assignees that you want to remove. You can select multiple names at the same time. Click Remove.
To save the task details, click Save. If you changed the status of an existing action item task, an alert task is set to the Task Status and Event Notifications list of the user that assigned the action item task to you.
To print the list of tasks on the Task Status and Event Notifications screen, click Print. Printing is handled by the web browser you are using.
Only tasks that have a box displayed in the Select to Remove column on the Task Status and Event Notifications screen can be removed.
To remove a task:
If the task is not already selected to be removed, select the check box in the Select to Remove column.
Click Remove. All the tasks that have a selected checked box in the Select to Remove column are removed at the same time.