| Oracle® Retail Central Office User Guide Release 14.1 E54471-01 |
|


 Previous |
 Next |
Data Management provides the capability to manage and control the distribution of critical information updates between the corporate office and stores. This ensures timely updates and consistent store policies. Data Management provides the following benefits:
Flexibility in configuring what data needs to be sent where and when
Import and export of defined sets of data
Scheduling of data distribution jobs
Process for handling approval of data distribution
Notification of a job's status to your Tasks list or e-mail (Any hand-held device that is able to receive e-mail can be used)
Acknowledgement from stores of the receipt of data
For information on each available function, see the following sections:
Click Data Import/Export to work with the distribution of data. You can import defined sets of data into Oracle Retail Central Office. You can also export any type of file to the Oracle Retail Back Office application. Click a left navigation link to choose an import or export function. For information on each of these functions, see the following sections:
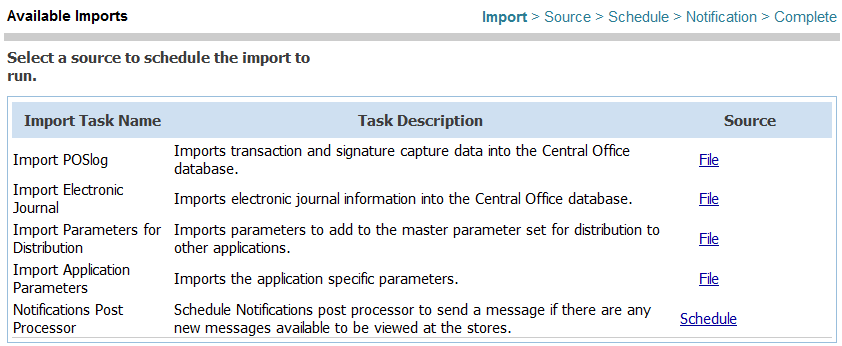
On the Available Imports screen, you select the import task to be performed.
Table 3-1 describes the available import tasks.
Table 3-1 Description of Import Tasks
| Task | Description |
|---|---|
|
|
|
|
|
|
|
|
|
Notifications Post Processor |
|
To import data, click Available Imports. The Available Imports screen is displayed.
Table 3-2 describes the information shown for each available import.
Table 3-2 Available Imports Columns
| Column | Description |
|---|---|
|
Import Task Name |
The task that is performed. |
|
Task Description |
The type of data that will be imported. |
|
Source |
File means you first choose the source file to be used for the import and then set the schedule for the distribution. Schedule means you do not choose a source file, you only need to set the schedule. |
An import task can be chosen and then scheduled.
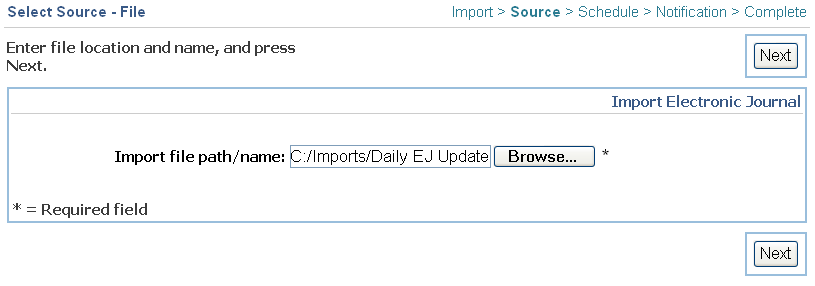
The Select Source - File screen is used to select the file for the import.
To choose a file to be imported:
Click File in the Source column for the data you want to import. The Select Source - File screen is displayed.
Enter the path name of the file or click Browse. Your web browser provides a window for searching for the file.
Click Next. The Job Schedule screen is displayed.
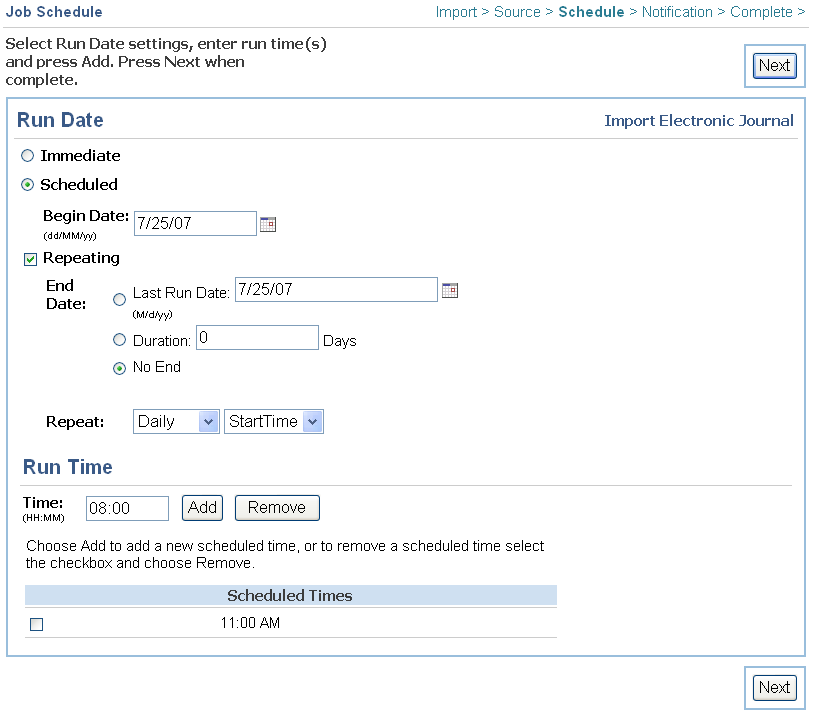
The Job Schedule screen enables you to set the job to run immediately or set up a schedule for the job. The default is Immediate.
If you want the job to run immediately, click Immediate and then click Next. The Notification screen is displayed. See "Setting the Notification".
To select the run date and time for the job:
Click Scheduled. Additional fields appear on the screen.
Set the Begin Date.
The default is the current date.
Enter the date into the field or click the calendar button to bring up a calendar. You can search through the calendar and select the date you want.
If you want the job to run on a repeating basis, click Repeating.
Additional fields appear on the screen.
Set the End date.
The default is No End.
Set when you want the job to repeat.
The default is to repeat Daily at a specific Start Time.
You can set the job to repeat Daily at a specific Start Time or Interval, Weekly on a specific day, or Monthly on a specific week and day.
Set the Run Time for the job.
Add or remove scheduled times from the list.
If you specified the job to run repeatedly on a daily interval, enter the interval and click Add. For example, if you want the job to run every five minutes, enter 5.
Otherwise, enter the time you want the job to run and click Add. You can specify multiple times.
If you want to remove a time from the list, select the check box by the time and click Remove.
Click Next. The Notification screen is displayed.
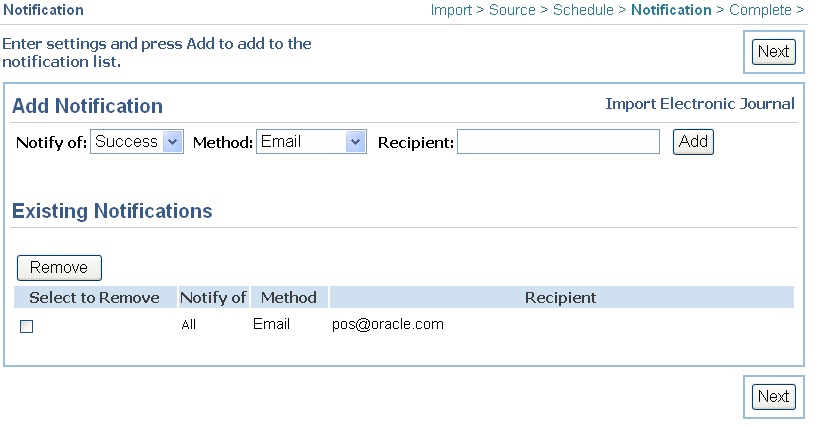
On the Notification screen, you can select users to be notified whether a scheduled job succeeds or fails. You set the method and recipient for the notification.
To set the notification:
Add or remove notifications.
To add a notification, choose whether to Notify of Success, Failure, or All. Choose the method. If you choose Tasks, the notification is displayed in your Tasks list. See "Tasks" in Chapter 6. If you choose e-mail, enter the full e-mail address of the recipient, for example, pos@oracle.com. Click Add. The notification is added to the list of Existing Notifications.
By default, notification of job success or failure is sent to the Tasks list of the user who scheduled the job.
To remove an existing notification, select the check box in the Select to Remove column. A selected checked box means the notification is set to be removed. Click Remove. All the entries that have a selected checked box in the Select to Remove column are removed at the same time.
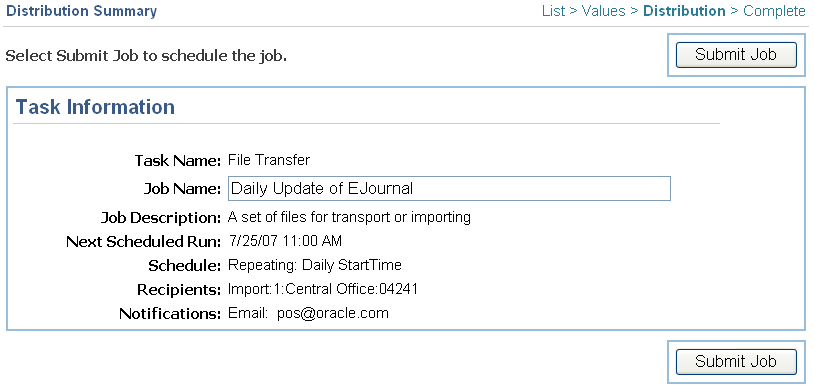
Click Next. The Distribution Summary screen is displayed.
The Distribution Summary screen provides a summary of information about the job to be scheduled and enables you to submit the job for scheduling.
To complete the job scheduling:
If you want to change the Job Name, enter a new name. It is easier to track the job progress if you enter a job name that specifically describes the purpose of the job.
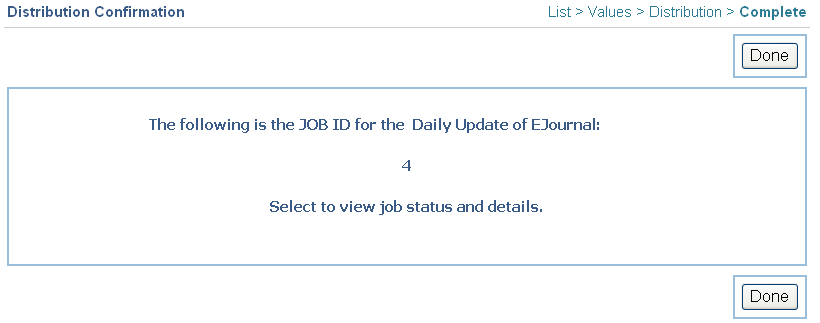
Click Submit Job to submit the job for scheduling. The Distribution Confirmation screen is displayed.
|
Note: If you do not select Submit Job, the job is given a status of Created. You then need to schedule the job through the Scheduled Imports screen. See "Working with Scheduled Imports" for more information. |
The job will run when all the required approvals are obtained.
Import jobs that have been scheduled to run are shown on the Schedule Imports screen. You can set a job to run immediately, remove a job from the schedule, and change the run date and notifications.
To work with scheduled imports, click Schedule Imports. The Scheduled Imports screen is displayed.
Table 3-3 describes the information shown for each available import.
Table 3-3 Scheduled Imports Columns
| Column | Description |
|---|---|
|
Select to |
A selected checked box indicates the import can be selected to run immediately or removed |
|
Description |
Description of the import, schedule, and method of notification of job success or failure |
|
Scheduled Run |
Date and time when the job will next run |
|
Recipient |
Recipient of the import |
|
Action Date |
Date and time is determined by the status |
|
Job Status |
See Table 6-4 for a description of the possible statuses |
|
Note: When you select Run Immediately or Remove, all jobs with a selected checked box are processed as you selected. |
You can view and change the description of the job.
To see a detailed description of the job, click the description. The Scheduled Job Summary screen is displayed. See Table 6-6 for an explanation of the screen.
To change the schedule, click Schedule. See "Setting the Schedule".
To change the notification, click Notifications. See "Setting the Notification".
To submit the job, click Run Immediately.
The job is submitted. It will run when the required approvals are obtained. See "Completing the Job Scheduling" to follow the steps to complete the job submission.
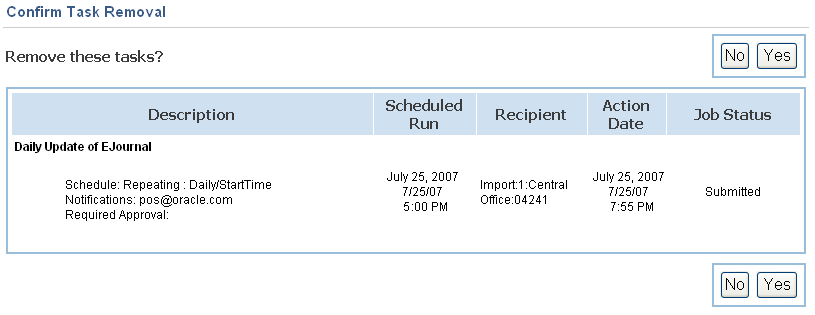
You can remove any schedule jobs. To remove a job, select the check box in the Select to Run Immediately or Remove column. Click Remove. Multiple jobs can be removed at the same time.
The Confirm Task Removal screen is displayed. A list of the jobs you selected to remove is shown.
If you do not want to remove all the tasks, click No. The selected checked boxes are deselected on the Scheduled Imports screen.
If you want to remove the tasks, click Yes. The tasks are removed.
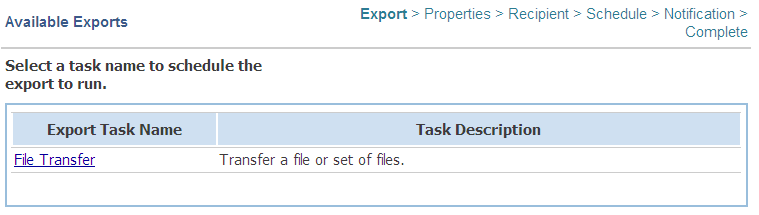
The Available Exports screen lists the available exports and a description of each export.
Table 3-4 describes the available export tasks.
Table 3-4 Description of Export Tasks
| Task | Description |
|---|---|
|
File Transfer |
|
To work with available exports, click Available Exports. The Available Exports screen is displayed.
Choose the files to export to Oracle Retail Central Office and schedule the distribution job.
On the File Selection screen, you select the files:
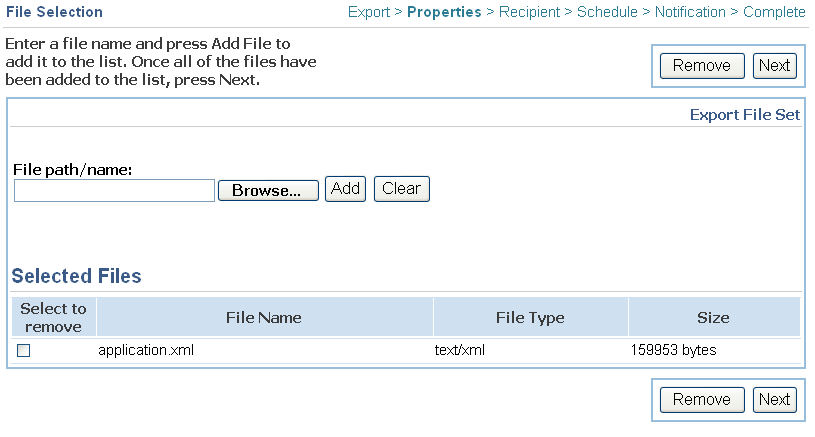
On the Available Exports screen, click the name in the Export Task Name column. The File Selection screen is displayed.
Choose the files to be exported.
To add a file, enter the path name of the file or click Browse. Your web browser provides a window for searching for the file. Click Add. The file is displayed in the Selected Files list.
If you want to remove any files from the Selected Files list, select the check box in the Select to Remove column. Click Remove.
The files are removed from the list.
When you have chosen all the files you want, click Next.
The Set Recipients screen is displayed.
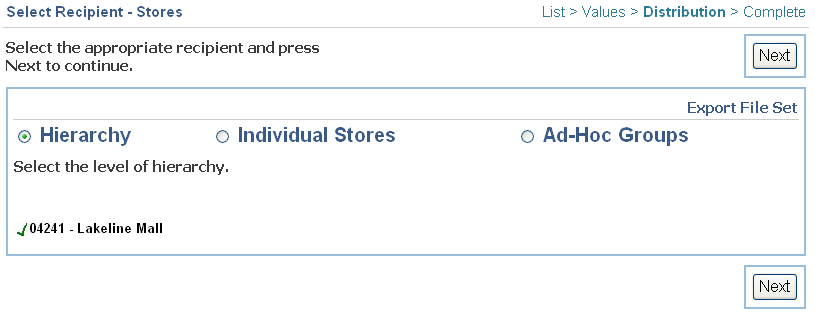
The Select Recipient - Stores screen is used to select the recipients of the export. The data can be distributed to any part of your store hierarchy, a list of individual stores, or an ad hoc group of stores. The default recipient is your store hierarchy.
To choose a part of your store hierarchy as the recipient:
Click Hierarchy. The screen is updated to enable you to select the hierarchy.
Click the part of the hierarchy to receive the export. A check next to a node name indicates that node is selected. You can click a triangle next to any node name to display the child nodes or to hide the child nodes from view.
Click Next. The Notification screen is displayed.
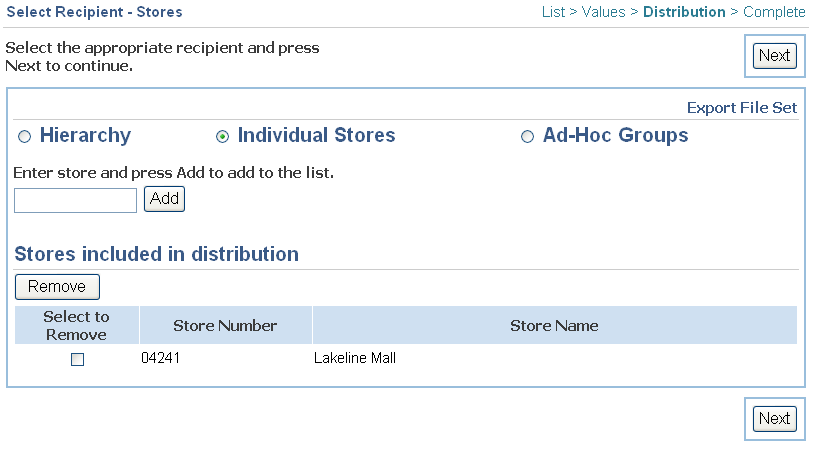
To choose a list of stores as the recipients:
Click Individual Stores. The screen is updated to enable you to select the stores.
Add or remove stores from the list:
To add a store to the list, enter the store number. Click Add. The store is added to the list.
To remove a store from the list, select the check box in the Select to Remove column. Click Remove. All the stores that have a selected checked box in the Select to Remove column are removed.
When you are done choosing stores, click Next. The Notification screen is displayed.
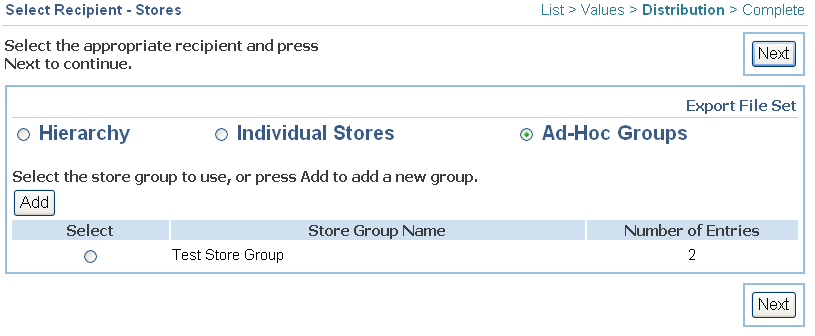
To choose a group of stores as the recipients:
Click Ad-Hoc Groups. The screen is updated to enable you to select store groups.
Select the store groups:
To select a store group from the list, select the check box in the Select column.
To add a new group to the list, click Add. The Define Group screen is displayed. See "Adding or Changing a Store Group" in Chapter 6 for information on adding a group.
Click Next. The Notification screen is displayed.
The remaining steps to complete the export are the same steps followed to complete an import. To follow the steps to complete the file export, see "Setting the Schedule".
Exports that have been scheduled to run are shown on the Scheduled Exports screen. From this screen, you can set a job to run immediately, remove a job from the schedule, and change the run date and notifications.
The Scheduled Exports function follows the same screens and steps as the Scheduled Imports function. See "Working with Scheduled Imports" for information on the screens and steps.
Parameter maintenance enables you to work with parameter lists. A parameter list is a set of parameters that are bundled together for distribution.
You can create, modify, and remove parameter lists. You can also distribute parameter lists to all stores or groups of stores to override the current values being used.
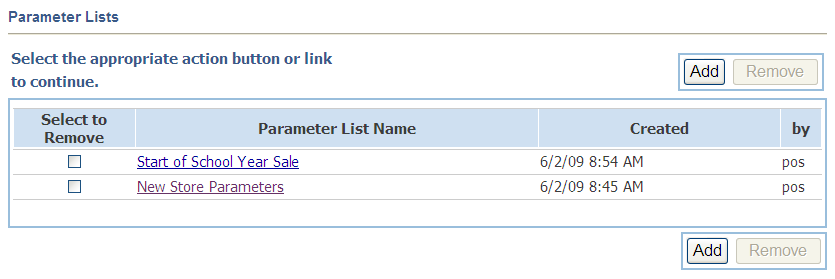
On the Parameter Lists screen, you can create a new parameter list, change the contents of an existing parameter list, or remove parameter lists.
To work with parameter lists, click Parameter Lists. The Parameter List screen is displayed.
For each parameter list, the following information is displayed:
A selected checked box in the Select to Remove column indicates the list is to be removed.
Name of the parameter list.
Date and time when the list was created.
User ID of the user who created the list.
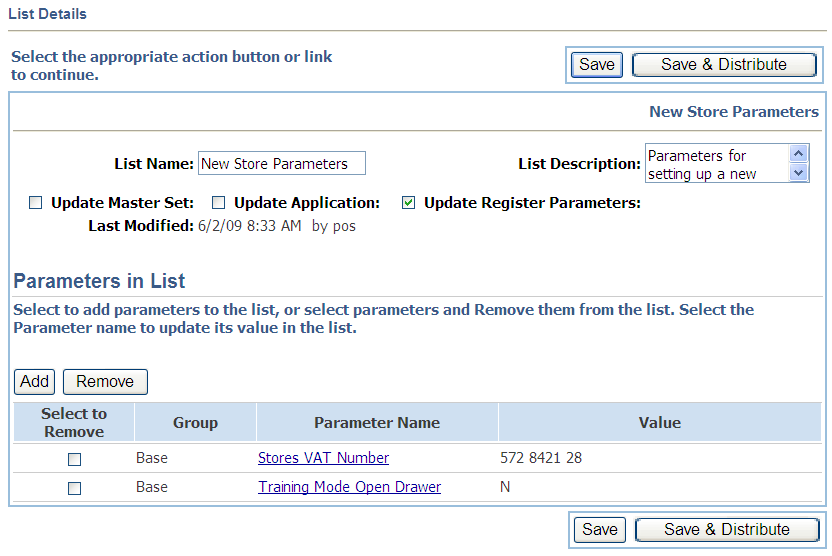
To add a new parameter list, click Add. To edit an existing list, click the name of the parameter list. The List Details screen is displayed.
The List Details screen is used to add a new parameter list or change an existing parameter list.
To define the parameter list:
Enter the name and a description of the list.
Select the check box to select where the parameters will be distributed.
Update Master Set updates the Oracle Retail Central Office master set of parameter lists.
Update Application updates the parameters to the Oracle Retail Back Office application.
Update Register Parameters updates the parameters to the Oracle Retail Point-of-Service application.
Choose the parameters for the list.
To add parameters to the list, click Add. See "Adding Parameters to a List".
To remove parameters from the list, see "Removing Parameters from the List".
Save the list you created or changes. You can also schedule a distribution of the parameter list.
To only save the list, click Save.
The list is displayed on the Parameters List screen.
To save and distribute the list, click Save & Distribute.
The list is saved and you then schedule the job to export the list. To follow the steps to export the list, see "Setting the Recipients".
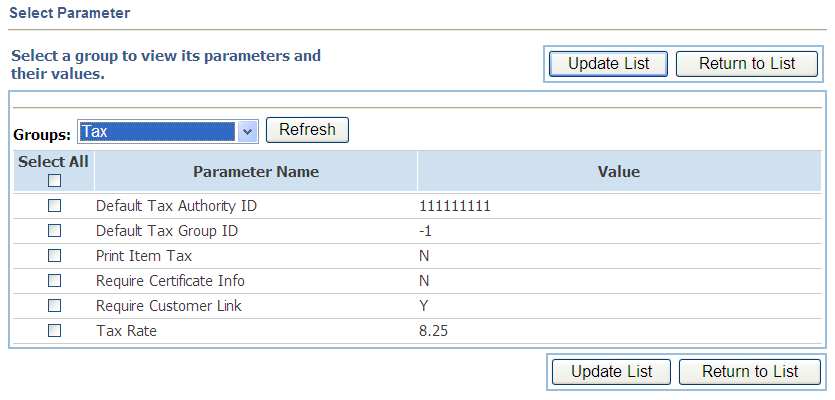
The Select Parameter screen is used to choose the parameters you want added to a parameter list.
To add parameters to a list:
Choose the parameters.
Click Groups to choose the group that contains the parameters you want to select.
The list of groups appears. Click the group you want. Click Refresh. The parameters for that group appear.
Choose parameters from the group.
If you want to choose all the parameters in the group, select the Select All check box.
If you want to choose only certain parameters, select the check box in the Select All column for each parameter that you want. If you do not want a parameter included in the list, deselect the check box.
Click Update List.
The parameters are added to the new parameter list. To add parameters from another group, repeat this step to choose the parameters until you have parameters from all the groups that you want.
When you have added all the parameters you want, click Return to List. The added parameters appear in the Parameters in List on the List Details screen.
On the List Details screen, you can remove parameter lists. To remove parameters from the parameter list:
If the parameter is not already selected to be removed, select the check box in the Select to Remove column.
Click Remove. All parameters that have a selected checked box in the Select to Remove column are removed.
|
Note: If you click Save before Remove, the parameters are also removed from the list. |
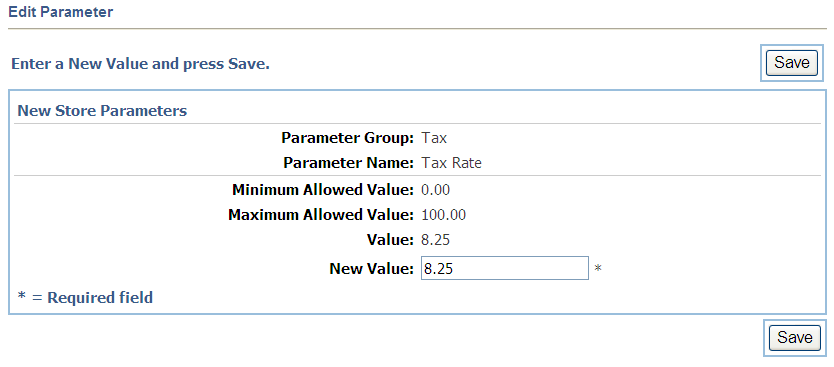
On the Edit Parameter screen, the value assigned to a parameter in a parameter list can be changed. The value of the parameter is only changed in the selected parameter list. The type of edit screen that is displayed depends on the parameter:
If the parameter uses a value field, you enter the new value. The minimum and maximum allowed values are displayed on the edit screen. Only new values within this range are accepted.
If the parameter uses one value chosen from a list of possible values, you select the new value from the list. To select a value, click the value in the New Value menu.
If the parameter allows more than one value from a list, you select the new values from the menu. To add a value, click the value in the Allowed Values menu and click Add. To remove a value, click the value in the Selected Values menu and click Remove.
If the parameter uses a created list, you enter the new values separated by commas.
To choose the new value for the parameter:
Click the Parameter List Name that you want to change. The List Details screen is displayed.
Click the Parameter Name in the Parameters in List section. The Edit Parameter screen is displayed.
Enter or select the new value for the parameter.
Click Save.
On the Parameter Lists screen, an existing parameter list can be removed. Multiple lists can be removed at the same time.
To remove a parameter list:
Choose the parameter list to be removed on the Parameter Lists screen. If the parameter list is not already selected to be removed, select the check box in the Select to Remove column.
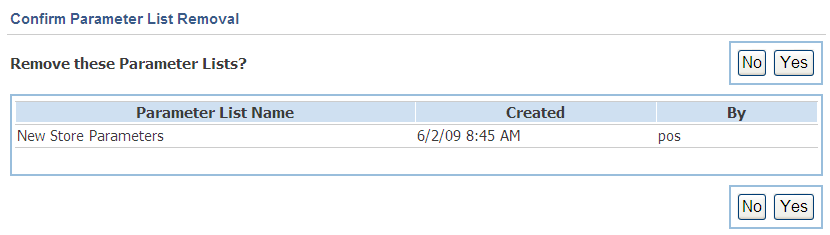
Click Remove. The Confirm Parameter List Removal screen is displayed. A list of the parameter lists you selected to remove is shown.
If you do not want to remove all the lists shown, click No. All the selected checked boxes are deselected on the Parameter Lists screen.
If you want to remove the lists, click Yes. All the selected parameter lists are removed.
The Distributions left navigation link enables you to work with the currently scheduled parameter distribution jobs.
|
Note: The parameter list that is distributed contains the parameters and their values that existed in the list on the date and time the distribution job was saved. If the data distribution includes any store groups, the stores included in a group are determined when the distribution job actually runs. |
Click Distributions. The Scheduled Exports screen is displayed. Only parameter distribution jobs that have been scheduled are shown. From this screen, you can set a job to run immediately, remove a job from the schedule, and change the run date and notifications. See "Working with Scheduled Exports" for more information.
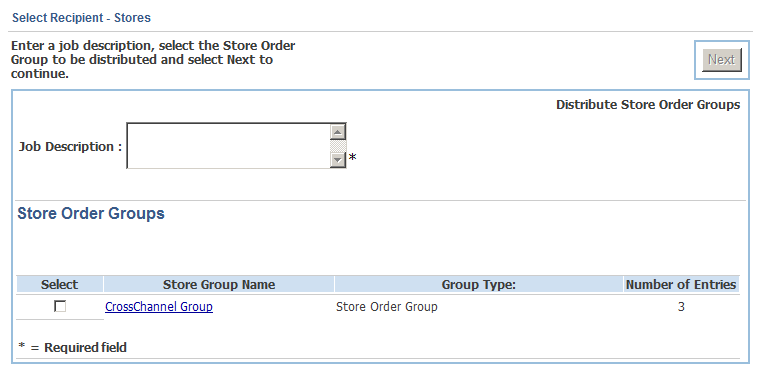
Click Store Order to create a job to distribute data to selected store order groups.
On the Select Recipient - Stores screen, you select the store order groups for the distribution. For information about store groups, see "Store Directory" in Chapter 6.
To select the recipients for the data distribution:
Enter a description for the data distribution job.
To select a store order group from the list, select the check box in the Select column.
When you have selected the store order groups you want, click Next. The Job Schedule screen is displayed. To follow the steps to complete the distribution job, see "Setting the Schedule".
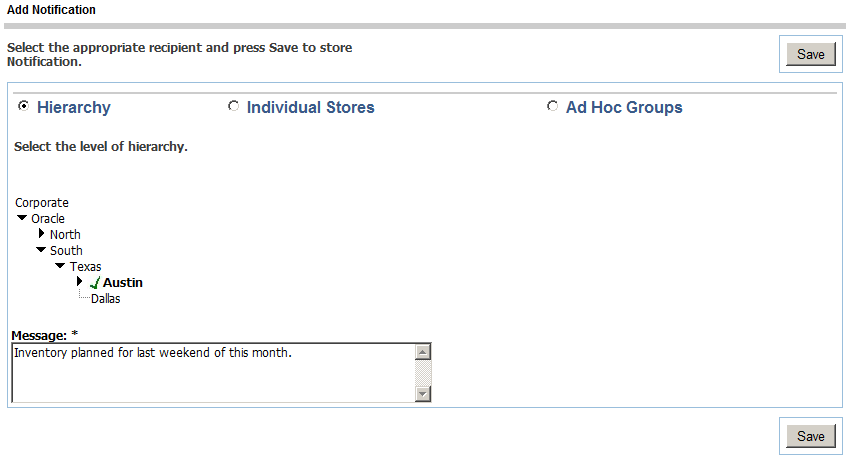
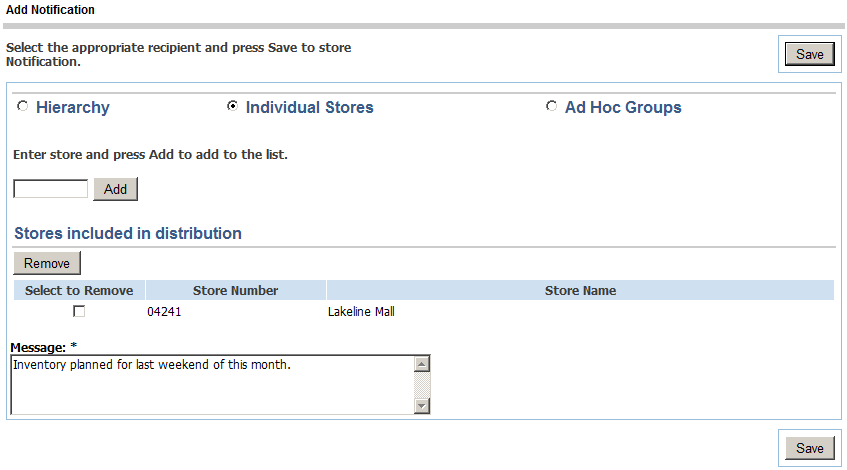
Click Notifications to create messages to be distributed to selected stores. The messages can be distributed to any part of your store hierarchy, a list of individual stores, or an ad hoc group of stores.
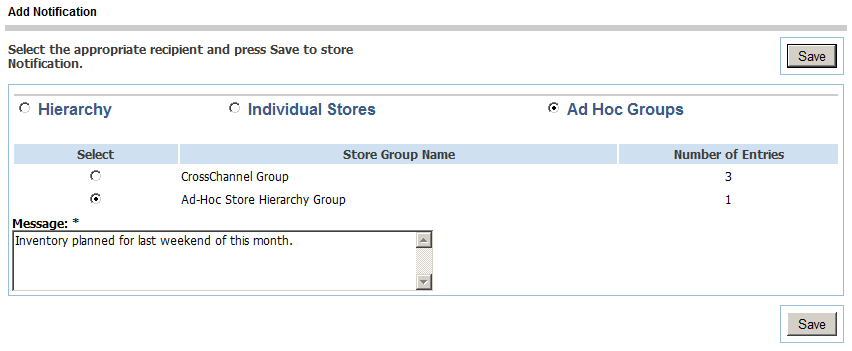
On the Add Notification screen, you enter the message and select the stores for the distribution.
To add a notification:
Select the recipients for the message:
To add recipients using the hierarchy, click Hierarchy. The screen is updated to enable you to select the part of the hierarchy to receive the notification. A check next to a node name indicates that node is selected. You can click a triangle next to any node to display the child nodes or to hide the child nodes from view.
To add recipients using individual stores, click Individual Stores. The screen is updated to enable you to select the stores:
To add a store to the list, enter the store number. Click Add. The store is added to the list.
To remove a store from the list, select the check box in the Select to Remove column. Click Remove. All the stores that have a selected checked box in the Select to Remove column are removed.
To add recipients using ad hoc groups, click Ad Hoc Groups. The screen is updated to enable you to select store groups. To select a store group from the list, select the check box in the Select column.
Enter the message to be distributed to the stores.
When you have selected the recipients and entered the message, click Save. The notification message is saved and then distributed when the Notification Post Processor runs.