| Oracle® WebCenter Framework Building a WebCenter Application Step by Step 10g (10.1.3.2.0) Part Number B31073-01 |
|
|
View PDF |
| Oracle® WebCenter Framework Building a WebCenter Application Step by Step 10g (10.1.3.2.0) Part Number B31073-01 |
|
|
View PDF |
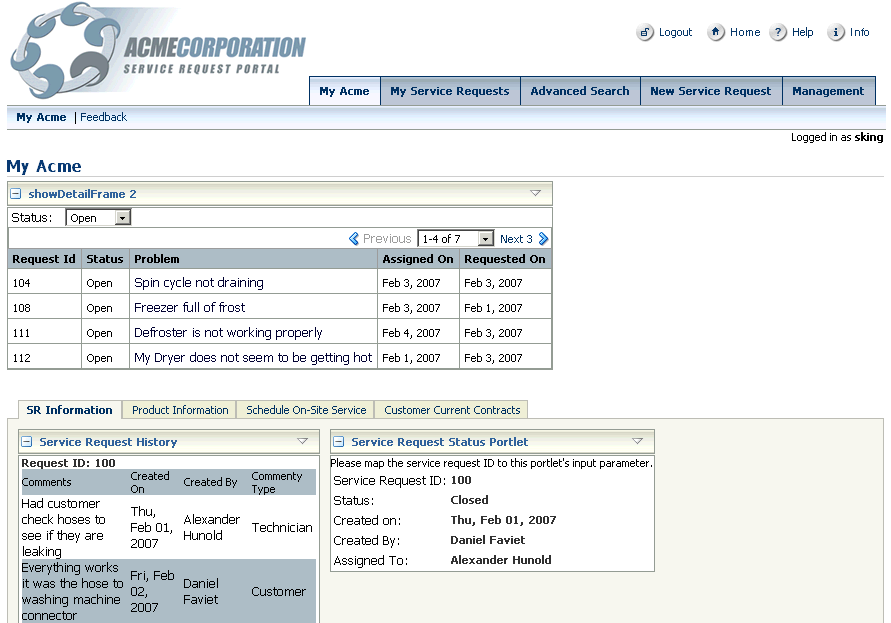
This chapter describes how to build a new page for your application that contains portlets, ADF Faces components, and interactivity between these items on the page, as shown in Figure 7-1.
Figure 7-1 My Acme Page Containing Portlets and ADF Components Wired Together
Note:
Before you can create the elements on this page, ensure you have registered the producers as described in Chapter 2, "Building Your Portlets" and set up your content repository, as described in Chapter 4, "Setting Up Your Content Repository".This chapter contains the following sections:
Let's begin by building a page where we will add the components. In this section, we will create the page and apply the template we have provided in the sample files.
In the Applications Navigator, under the UserInterface project, expand the Web Content folder if necessary.
Right-click the app folder and select New.
In the New Gallery, expand the Web Tier node.
Select JSF.
In the Items list, select JSF JSP.
Click OK to display the Create JSF JSP dialog box.
If you are on the Welcome page of the wizard, click Next to display the JSP File page.
In the File Name field, enter SRMyAcme.
Select JSP Document (*.jspx), as shown in Figure 7-2.
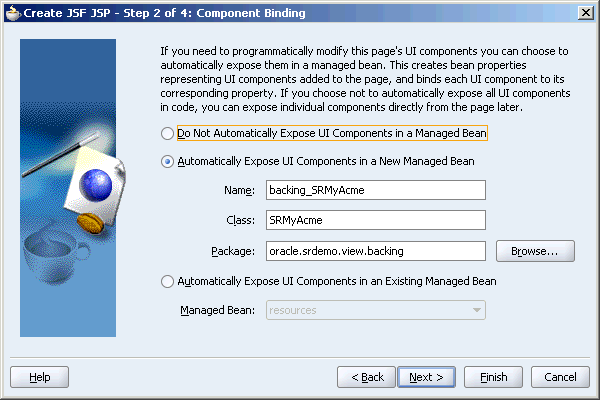
Click Next to display the Component Binding page.
On the Component Binding page, select the Automatically Expose UI Components in a New Managed Bean option, as shown in Figure 7-3.
Figure 7-3 Create JSF JSP Component Binding
Click Next to display the Tag Libraries page.
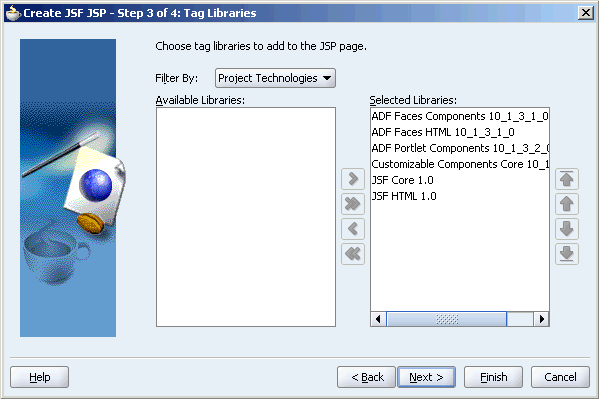
Filter by Portlet Technologies, then move all the Available Libraries to the Selected Libraries list, as shown in Figure 7-4.
Figure 7-4 Create JSF JSP Tag Libraries List
Click Finish to create the page.
Expand the WEB-INF/template folder.
Right-click SRDemoTemplate.jspx and select Open.
Select and copy the source code from the SRDemoTemplate.jspx file and replace the existing code of your new SRMyAcme.jspx page.
Search for the following line in the source of the SRMyAcme.jspx page:
<af:panelPage title="#{res['_PAGE_NAME_.pageTitle']}">
and replace it with:
<af:panelPage title="#{res['SRMyAcmePage.pageTitle']}">
Save the file.
Open the UIResources.properties file, located under UserInterface > Application Sources > oracle.srdemo.view > resources.
At the end of the file, add a new entry:
# ==============================================================================
# Resource Bundle Strings for new WebCenter version of SRDemo
# ==============================================================================

# WC_SRMyAcmePage
SRMyAcmePage.pageTitle=My Acme
Save the file.
In a later step in this chapter, you will create a Service Request History portlet to the My Acme page. You will use OmniPortlet to build this portlet; to do so, you must first register the OmniPortlet producer. You will add the PDK-Java portlet (SRStatus) you created in Chapter 2, "Building Your Portlets" to your page, as well, but if you followed the steps in that chapter, you've already deployed and registered the SRStatus portlet.
Note:
For information on registering producers, refer to Chapter 3, "Populating Pages" of the Oracle WebCenter Framework Developer's Guide.To register the OmniPortlet producer:
In the Applications Navigator, right-click UserInterface, then select New from the pop-up menu.
In New Gallery, under Categories, expand the Web Tier node and select Portlets.
Under Items, select Oracle PDK-Java Producer Registration, then click OK.
In the Oracle PDK Portlet Producer Registration wizard, on Step 1 of 3, enter the name: OmniPortlet Producer, then click Next.
In the URL Endpoint field, enter the URL of the OmniPortlet Producer, similar to Example 7-1.
Click Next.
Fill out the remaining options according to your preferences, then click Finish.
Before you include portlets and content on the SRMyAcme.jspx page, you must add certain customizable layout components that allow you to define how these portlets and content are displayed to users.
In the Structure pane of the SRMyAcme.jspx page, you will see an af:panelPage component as shown in Figure 7-5.
Add the following components within that PanelPage component:
Add a PanelCustomizable component within the PanelPage component to provide the ability to show or hide child components.
To do this, select PanelCustomizable from the Customizable Components Core library and drag it on to the af:panelPage component in the Structure pane. Set Layout to horizontal. Figure 7-6 shows the position of the cust:panelCustomizable component in the Structure pane.
Add a ShowDetailFrame component within the PanelCustomizable component to provide view-level customization of content. For example, options to move, minimize, or maximize the display of content.
To do this, select ShowDetailFrame from the Customizable Components Core library and drag it on to the cust:panelCustomizable component in the Structure pane and set Text to My Service Requests. Figure 7-7 shows the cust:showDetailFrame in the Structure pane.
Add a SelectOneChoice component within this ShowDetailFrame component, to select the status for service requests that must be displayed.
To do this, select SelectOneChoice from the ADF Faces Core library and drag it on to the cust:showDetailFrame component in the Structure pane. In the Insert SelectOneChoice dialog box displayed, click the appropriate tab and set values for few of the attributes as follows:
Label: Status
Value: Open
AutoSubmit: true
Binding: #{backing_app_SRMyAcme.statusPicker}
Id: statusPicker
Figure 7-8 shows the af:selectOneChoice component in the Structure pane.
Add three SelectItem components within the SelectOneChoice component, to include components that will be displayed as options under the SelectOneChoice component.
To add a SelectItem component, select SelectItem from the ADF Faces Core library and drag it on to the af:selectOneChoice component in the Structure pane.
For each of the new components, set values for few of the attributes as follows:
First SelectItem component:
Label: Open
Value: Open
Binding: #{backing_app_SRMyAcme.selectItem1}
Id: selectItem1
Second SelectItem component:
Label: Pending
Value: Pending
Binding: #{backing_app_SRMyAcme.selectItem2}
Id: selectItem2
Third SelectItem component:
Label: Closed
Value: Closed
Binding: #{backing_app_SRMyAcme.selectItem3}
Id: selectItem3
Figure 7-9 shows the SelectItem components in the Structure pane.
Add a PanelHorizontal component within the PanelPage component to arrange child elements horizontally.
To do this, select PanelHorizontal from the ADF Faces Core component library and drag it on to the af:panelPage component in the Structure pane. Ensure that is it located below the cust:panelCustomizable component in the Structure pane as shown in Figure 7-10.
Add an ObjectSpacer component (set height to 30 and width to 10) below the PanelHorizontal component to include a fixed amount of space between components in the layout.
To do this, select ObjectSpacer from the ADF Faces Core component library and drag it on to the af:panelPage component in the Structure pane. Ensure that it is located below the af:panelHorizontal component in the Structure pane as shown in Figure 7-11. Set the following attributes:
Height: 30
Width: 10
Add a ShowOneTab within the PanelPage component to include a series of items defined by ShowDetailItem components.
To do this, select ShowOneTab from the ADF Faces Core component library and drag it on to the af:panelPage component in the Structure pane. Ensure that it is located below the af:objectSpacer component in the Structure pane. Then, select the ShowOneTab and set the Position property to above.
Add four ShowDetailItem components within the ShowOneTab to include components that will be displayed as tabs in the ShowOneTab component.
Set the Text property for these ShowDetailItem components to SR Information, Product Information, Schedule On-Site Service, and My Current Contracts. Later, you will add four components within these ShowDetailItem components.
To add a ShowDetailItem, select ShowDetailItem from the ADF Faces Core component library and drag it on to the af:showOneTab component in the Structure pane. Figure 7-12 shows the af:showOneTab component with the four child af:showDetailItem components in the Structure pane.
Add a PanelHorizontal component within the ShowDetailItem component titled SR Information to arrange child elements horizontally.
To do this, select PanelHorizontal from the ADF Faces Core component library and drag it on to the cust:showDetailItem component - SR Information component in the Structure pane.
Later, you will add an OmniPortlet and an Oracle Java PDK portlet within this component to display the service request history and service request status respectively.
Add a PanelCustomizable component within the ShowDetailItem component titled Product Information by performing the steps described earlier in this section. Set Layout to horizontal. Figure 7-13 shows the new cust:panelCustomizable component in the Structure pane.
Figure 7-14 shows how these components appear in the Structure pane of SRMyAcme.jspx.
Figure 7-14 Structure Pane Showing Layout Components in the SRMyAcme.jspx Page
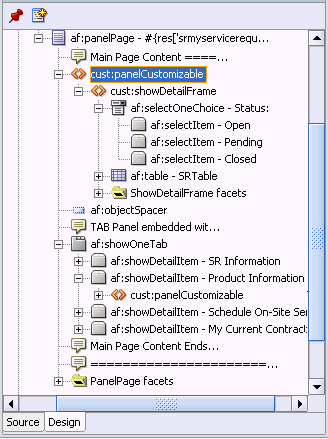
The following steps in this chapter provide details about adding portlets and content within these customization components.
To display a list of service requests with a particular status, you must add an ADF Read Only Table based on top of Toplink and EJB Session Beans. When a user clicks a service request number in this table, the history and status for that service request are displayed in portlets at the bottom of the page.
To add an ADF table that displays your service requests, perform the following steps:
In the Data Control Palette, locate and extract findServiceRequestByStatus.
Tip:
If you cannot see the Data Control Palette, select Data Control Palette from the View menu.In the Structure Pane, drag ServiceRequest on to the showDetailFrame component (that you added in the previous section).
From the context menu, select ADF Read Only Table. This displays the Action Binding Editor. If you see a note about client libraries being added, click OK.
In the Value field for the statusParam parameter, enter ${"Open"}.
This hard codes the status of the service request to Open. Later on, we will provide dynamic values.
Click OK.
This displays the Edit Table Columns dialog box.
Rearrange and delete the columns so that you have the following columns:
svrId
status
problemDescription
assignedDate
requestDate
Select Enable sorting.
Click OK.
Right-click SRMyAcme.jspx and select Run.
All open service requests are displayed in the table.
To reduce the number of rows displayed, go to the page definition and make the change indicated in bold:
Run the page again to see your changes.
In the previous section, we had hard coded the status to be Open. As a result, you could only view a list of open service requests. Now, we can add a component that allows end users to select the service request status from a list, rather than have this value hard coded. This section shows how to add a list that you can use to select a status and display all service requests with the selected status. To do this, perform the following steps:
In the Applications Navigator, expand the Application Sources folder.
Expand oracle.srdemo.view > pageDefs and select app_SRMyAcmePageDef.xml.
In the Structure Pane, expand the bindings node.
Expand the findServiceRequestByStatus node.
Double-click statusParam to display the NamedData Properties dialog box.
In the NDValue field, replace the existing value with the following:
${(backing_app_SRMyAcme.statusPicker.value == null) ? "Open" : backing_app_SRMyAcme.statusPicker.value}
To ensure the table always reflects the most recent selection of the statusPicker, set the table's partialTrigger property to statusPicker. To do so, select the table component on the page.
From the list, select statusPicker.
In the Property Inspector, locate the Partial Trigger property of the table.
Click the Edit button to display the Partial Trigger window.
Click New and select statusPicker from the list.
Run the page to view your changes.
Select a status from the list and see how the table changes.
The steps in this section show you how to use OmniPortlet to create a portlet that displays the service request history. To create a portlet that displays the service request history using OmniPortlet, perform the following steps:
Make sure you have registered the OmniPortlet producer as described in Step 2: Registering the OmniPortlet Producer.
In the Component Palette, select OmniPortlet Producer, and then select OmniPortlet. Drag this on to the panelHorizontal component in the Structure pane, located on the SR Information tab.
Run the page to view it in a browser.
In your browser, click Define in your OmniPortlet to change its definition:
On the Type page, choose SQL, then click Next.
On the Source tab, enter the query shown in Example 7-3.
Example 7-3 SQL Statement for the Service Request History Portlet
select svr_id, to_char(svh_date, 'Dy, Mon DD, YYYY') created_on, notes, svh_type, users.first_name || ' ' || users.last_name createdby
from service_histories, users
where svr_id = substr ('##Param1##', 1, 3)
and users.user_id = service_histories.created_by
order by line_no
Edit the Connection, and define the connection to your database.
Specify 104 as the default value of Param1, then click Next until the View tab is displayed.
On the View tab, make the following changes:
Title: Service Request History
Header Text: Request ID: ##Param1##
Layout Style: Tabular
On the Layout tab, set the Tabular Style to Alternating and specify the Column Layout as shown in Table 7-1.
Click Finish.
Note:
For more information on OmniPortlet, see Chapter 13, "Creating Portlets with OmniPortlet" in Oracle WebCenter Framework Developer's Guide, as well as the steps to building an OmniPortlet in Oracle WebCenter Framework Tutorial.In Chapter 2, "Building Your Portlets" you created a portlet that displays the current status of a specific service request, given its service request ID. In this section, you will add that portlet to the MyAcme page.
To add the Service Request Status portlet to a page:
Make sure that you have registered the PDK-Java producer as described in Chapter 2, "Building Your Portlets".
Tip:
The producer you registered in Chapter 2, "Building Your Portlets" is the SRStatusProducer, located athttp://host:port/SRStatusPortlet/providers.In the Component Palette, select SRStatusProducer from the list.
Drag the Service Request Status Portlet onto the panelHorizontal component, just below the Service Request History portlet you added earlier.
The Service Request Status portlet expects to receive a parameter containing a service request ID. For our page, we want the portlet to display the status of the service request selected in the table at the top of the page. Steps for passing the service request ID to the portlet are provided in Step 8: Wiring the Table to the Portlets.
Now that you have added all your components and portlets to your page, you can wire them together to create interactivity on the page. In this section, you will set up the page to enable the customer and/or technician to view the status and history of each service request they select from the table on the page. You will also wire the components together using partial page refresh so that the end users will be able to view this information without refreshing the entire page.
In this step, you will do the following:
While OmniPortlet can display the service request history based on the customization we performed in the previous steps, we now want the portlet to display the history based on a selection that the user makes in the table. The OmniPortlet can receive information from the table and use that information to display the history for a specific service request.
In the table you created in Step 4: Wiring the SelectOneChoice to the ADF Table, add a commandLink to the problemDescription column of the table.
In the Component Palette, under ADF Faces Core, choose commandLink and drag it onto the Structure pane within the third af column and above the outputText.
Delete the outputText.
Set the commandLink properties as follows:
Text: #{row.problemDescription}
Id: commandLink1
Action: #{backing_app_SRMyAcme.commandLink1_action}
Enter the code in Example 7-4 as the commandLink1_action() method. You can find this method in the backing.app.SRMyServiceRequests.java class, which is located under Application Source > oracle.srdemo.view > backing.app.SRMyAcme.java.
Example 7-4 commandLink_action () method
public String commandLink1_action() {
        FacesContext context = FacesContext.getCurrentInstance();
        context.getExternalContext().getSessionMap().put("serviceID", (Integer)outputText1.getValue());
        return "setCurrentRowWithKey";
    }
Note:
In caseoutputText1 is not recognized (it is underlined by Oracle JDeveloper), make sure that the svrId outputText column of the table has an ID, and that it is called outputText1. Then, ensure that the binding is defined as id="outputText1" binding="#{backing_app_SRMyAcme.outputText1.Expand the import section and add the following line to the top of the Java class:
import javax.faces.context.FacesContext;
In the Structure pane, navigate to the page definition and go to executables > variables, then click OmniPortlet1_1_Param1.
In the Property Inspector, set the DefaultValue property to
${sessionScope.serviceID}
Create a page parameter for OmniPortlet to receive the service ID. In beginning of the page definition, you will see the following:
<parameters/>
Replace this tag with the following code to set a page parameter called serviceID:
<parameters>
<parameter id="pageParam" value="${sessionScope.serviceID}"/>
</parameters>
Run the page to test the portlet wiring.
Click the hyperlinks in the Problem column of the table to test it. Your portlet should be updated every time you click a link.
The Service Request Status and Service Request History portlets both expect to receive a service request ID as a parameter. They then display the status or history of the specific service request identified by that ID. We will set the service request ID to be that of the service request selected in the table at the top of the page.
To wire the Service Request Portlet to the Service Request table:
Navigate to the page definition and in the structure pane expand executables > variables and click OmniPortlet1_1_Param1.
In the Property Inspector, set the DefaultValue property to ${sessionScope.serviceID}.
In the Structure pane, locate and select the variable ServiceRequestStatusPortlet1_1_ServiceReqID.
Tip:
You can find this by expanding the following nodes: executables > variables > ServiceRequestStatusPortlet1_1_ServiceReqID.In the Property Inspector, set the DefaultValue property to ${sessionScope.serviceID}.
Save the page, then run it to your browser. You can now test the portlet by clicking a service request in the table. The Service Request History and Service Request Status portlets update accordingly.
The steps in this section show you how to display a JSR 168 portlet on the page. Here, you will add the Product Details portlet you created in Chapter 2, "Building Your Portlets". On the Product Information tab, in the panelCustomizable component, add the following:
Make sure that you have registered the PDK-Java producer as described in Chapter 2, "Building Your Portlets".
Tip:
The producer you registered in Chapter 2, "Building Your Portlets" is the ProductDetailsPortlet, located athttp://host:port/ProductDetailsPortlet/portlets/wsrp1?WSDL.In the Component Palette, select ProductDetailPortlet from the list.
Drag the Product Details Portlet onto the panelHorizontal component.
Save the page, then run it to your browser to test the portlet on the Product Information tab.
The steps in this section show you how to display a folder's contents on a page. On the Product Information tab, in the panelCustomizable component, add the following:
In the Data Control Palette, expand SRContentRepository. You created this data control in Chapter 4, "Setting Up Your Content Repository".
Tip:
If you cannot see the Data Control Palette, select Data Control Palette from the View menu.Expand getItems(String, String).
Add a panelBox to the panelCustomizable.
Drag the Return node into the panelBox.
From the menu select Trees, then ADF Tree.
This displays the Action Binding Editor.
In the Value field for the path parameter, enter /manuals.
Leave the Value field for the type parameter empty.
Click OK.
This displays the Tree Binding Editor.
In the Tree binding Editor, select Name, URI, and Primary Type from the top right list.
In the Branch Rule Accessor list, select Items.
Click Add New Rule.
Click OK.
Click OK.
In the page source, find the code that looks something like:
<af:panelBox>
<af:tree value="#{bindings.getItems1.treeModel}" var="node">
<f:facet name="nodeStamp">
<af:outputText value="#{node}"/>
</f:facet>
</af:tree>
</af:panelBox>
In the Component Palette, select ADF Faces Core.
Drag the Switcher component inside the <f:facet> tag.
Set the facetName attribute to #{node.currentRow.dataProvider.primaryType}.
Create one facet named nt:file and one named nt:folder. To do so, right-click Switcher, then choose Insert Inside af:switcher > JSF Core > Facet.
For nt:folder, use the output text that was generated.
Note:
If the output text is not generated automatically, you may need to add an output text inside the facet, than set the value attribute.For nt:file, create a goLink and an objectImage.
The code for the switcher should look something like Example 7-5.
Example 7-5 Code for the Switcher
<af:switcher facetName="#{node.primaryType}">
<f:facet name="nt:file">
<h:panelGroup>
<af:objectImage source="/images/file.gif"/>
<af:goLink text="#{node.name}" destination="#{node.URI}" targetFrame="_blank"/>
</h:panelGroup>
</f:facet>
<f:facet name="nt:folder">
<af:outputText value="#{node.name}"/>
</f:facet>
</af:switcher>
Run index.html.
Click the Product Information tab.
Click one of the links in the table.
Expand one of the product categories to see the different models.
Expand one of the models to view a list of manuals for that model.
Select a manual to view.
The Schedule On-Site Services portlet enables you to schedule an on-site service for your product after you have created a service request in the application. By specifying the service ID for your request, and selecting a convenient date and time or a technician of your choice, you can schedule for a technician to come to the specified location and attend to the problem.
This section covers the following topics:
To register the Web Clipping producer:
In the Applications Navigator, right-click SRDemoSample_Starter under which to create the producer and select New from the context menu.
In New Gallery, under Categories, expand the Web Tier node and select Portlets.
In New Gallery, under Items, select Oracle PDK-Java Producer Registration.
Click OK.
On the Welcome page, click Next.
Optionally, before clicking Next, select Skip this Page Next Time to forego display of the Welcome page on subsequent uses of this wizard. The Welcome page may not display if the option to skip was selected on earlier use of the wizard.
In the Name field, enter WebClipping Producer as the name for the Web Clipping producer.
The name must be unique within this application. Use only letters, numbers, and the underscore character.
Click Next.
In the URL Endpoint field, enter the URL of the Web Clipping producer as shown in Example 7-6.
Click Finish to complete registration of the PDK-Java portlet producer.
To add the On-Site Web Clipping Service, perform the following steps:
If the SRMyAcme.jspx file is not already open, in the Applications Navigator, right-click the SRMyAcme.jspx file, and select Open from the context menu.
In the Component Palette, select WebClipping Producer.
Select WebClippingPortlet, and drag it on to the showDetailItem component called Schedule On-Site Service in the Structure pane.
Save your changes.
Right-click the SRMyAcme.jspx file and select Run from the context menu.
This will start the embedded OC4J server, launch your default browser, and display the Web Clipping Portlet. On the resulting page, you will select a Web page that you want to expose in your WebCenter application. You will then use Web Clipping Studio to select a section of the Web page for inclusion.
In this section, you will see how to display information from the ACME Technician Assignment System external application in your Web Clipping portlet. This external application is deployed to the OC4J instance available as part of the SRDemo application. Using this external application, you can request for an on-site service for your product.
Prior to performing the steps in this section, you must grant appropriate privileges on the page. See Step 13: Applying Security to the My Acme Page for the steps to grant privileges.
To display the ACME Technician Assignment System application in your Web Clipping portlet, perform the following steps:
Click the Actions icon on the header of the Web Clipping portlet, and select Customize, to select a Web page that can be used by all users.
This displays the Find a Web clipping page.
In the URL Location field, enter the following URL:
http://host:port/ExternalApp/preConfirmation.jsp?date=Tue,%2010:00am&technician=Peter
Specify the host name and port number of the system where you downloaded the SRDemo application.
Click Start.
The Web Clipping Studio displays the page you specified, as shown in Figure 7-15.
Figure 7-15 Web Clipping Portlet with Standalone Application to Be Clipped
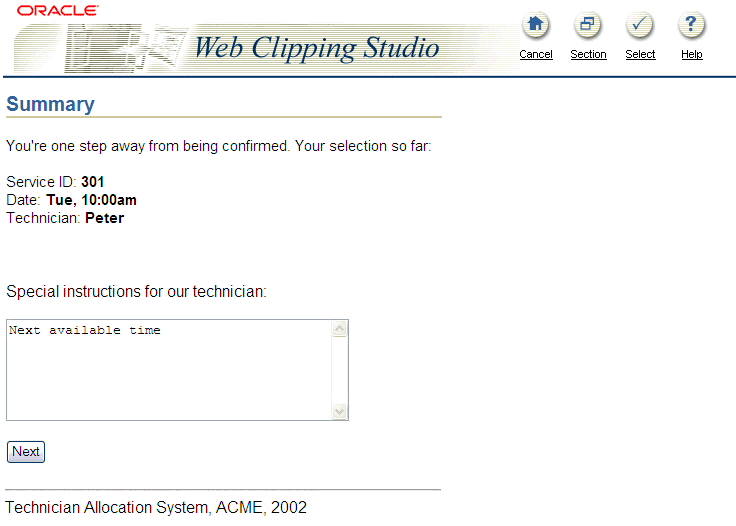
Specify Next Available Time as a comment and click Next.
Click Select in the Web Clipping Studio banner. The Web Clipping Studio displays the Find a Web clipping page, with the properties of the clipping.
In the Find a Web Clipping page shown in Figure 7-16, specify the following:
Title: Schedule On-Site Services
Description: Embed external scheduling application with the SR application
URL Rewriting: Inline
Note:
If you have integrated with an external application or are logged into the clipped site, and if you chooseInline for URL Rewriting, then the session to the clipped site is maintained while browsing.For the Parameterize Inputs section, specify the following values:
Parameter: ServiceID
Personalize: Param1
Display: ServiceID
Default Value: 104
Click OK to display the selected Web clipping in the Web Clipping portlet on your page.
Figure 7-17 shows the content added to the Web Clipping portlet.
Figure 7-17 Web Clipping Portlet with Clipped Content
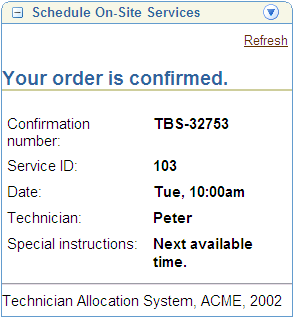
Using this portlet, users can schedule on-site services for products.
The steps in this section show you how to add a current contract component to your page.
Add a panelBox to the My Current Contracts tab.
In the Data Control Palette, expand SRContentRepository.
Tip:
If you cannot see the Data Control Palette, select Data Control Palette from the View menu.Expand getItems(String, String).
Drag the Return node into the panelBox.
From the menu, select Tables, then ADF Read-only Table.
This displays the Edit Table Columns dialog box.
Delete all the columns except for name.
Click OK.
In the page definition file (app_SRMyAcmePageDef.xml), under executables, duplicate the methodIterator tab with the ID "getItemster" and modify the code as shown in Example 7-7.
Under Bindings, duplicate <methodAction> with the ID "getItems" and modify the code as shown in Example 7-8
Example 7-8 Second Modified Code in the app_SRMyAcmePageDef.xml File
<methodAction id="getContracts" InstanceName="SRContentRepository"
 DataControl="SRContentRepository" MethodName="getItems" RequiresUpdateModel="true"
 Action="999" ReturnName="SRContentRepository.methodResults.SRContentRepository_
 getContracts_result">
  <NamedData NDName="path" NDValue="/contracts/${userInfo.userName}"
 NDType="java.lang.String"/>
    <NamedData NDName="type" NDType="java.lang.String"/>
</methodAction>
Look for <table id="getItems2"... and modify it to <table id="getItems2" IterBinding="getContractsIter">
View the source of the page.
Locate the table, then locate the inputText element.
In the Component Palette, select ADF Core.
Drag a GoLink component next to the outputText for name in the table cell on the page.
Copy the expression #{row.name}from outputText into the text attribute of GoLink.
Add destination attribute to GoLink with the value #{row.URI}.
Add a targetFrame attribute with the value _blank.
Delete the outputText element.
Set the access privileges:
Open the page definition.
Under bindings in the Structure Pane right-click getItems2.
From the context menu, select Edit authorization.
In the dialog box, check the Anyone box for SRContentRepository.getItems.name and all other values in the list.
Run index.html.
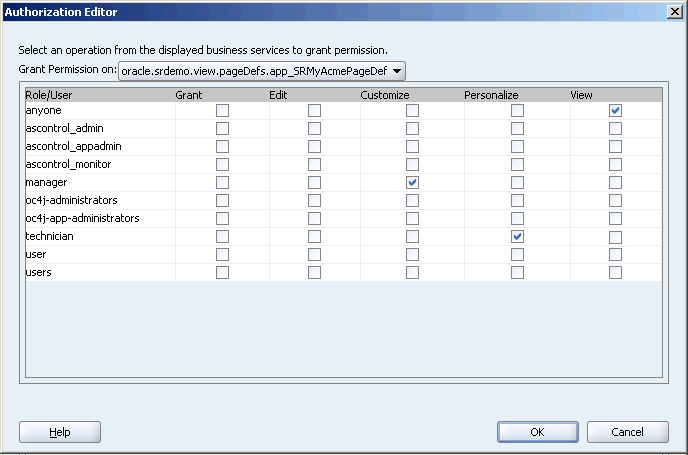
The page's authorization policies are defined against the Page Definition file. The Authorization Editor is used to read enterprise roles from the local System JAZN file. The editor lets you define the actions that can be set against a given resource, for example, page, method, iterator, and attribute. It writes the permission to the Policy Store and allows for declarative definition of granular JAAS permissions for different roles. Also, the Authorization Editor is used to define a Public page for which the permission is granted to the pseudo role anybody.
Perform the following steps to set up permissions for the SRMyAcme.jpsx page:
Right-click the SRMyAcme.jpsx page and select Go to Page Definition.
In the Structure window, right-click the page definition and select Edit Authorization. This displays the Authorization Editor.
Grant View privilege to anyone, Customize to manager, and Personalize to technician, as shown in Figure 7-18.
Figure 7-18 Authorization Editor to Set Privileges on the MyAcme Page
On the SRMyAcme.jspx page, we want only technicians and managers to be able to view the On-Site Service tab and the Product Details portlet. This section describes how to set these components to be rendered only when a user with the correct permissions is accessing the page.
To apply security to the On-Site Service tab and Product Details portlet, perform the following steps:
Open the SRMyAcme.jspx page.
Select the product details portlet.
In the Property Inspector set the Rendered property to the following:
#{authNLink.authenticated && bindings.permissionInfo['app_SRMyAcmePageDef'].allowsPersonalize}
Now select the On-Site Service tab on the SRMyAcme.jspx page.
In the Property Inspector for this tab set the Rendered property to the following:
#{authNLink.authenticated && bindings.permissionInfo['app_SRMyAcmePageDef'].allowsPersonalize}