| Oracle® WebCenter Framework Building a WebCenter Application Step by Step 10g (10.1.3.2.0) Part Number B31073-01 |
|
|
View PDF |
| Oracle® WebCenter Framework Building a WebCenter Application Step by Step 10g (10.1.3.2.0) Part Number B31073-01 |
|
|
View PDF |
In this chapter, you will build a dashboard page for your WebCenter application. A dashboard page is an easy-to-read user interface that organizes and presents metrics and key performance indicators related to business activity and business intelligence.
In this sample dashboard, your end user will be able to view site statistic information and search customer contacts and view volume distribution for each day. The end user can also view information about customers that are the most active, customer details, most productive customers, and products with the most requests, as shown in Figure 8-1.
Figure 8-1 Overview of the Dashboard Page
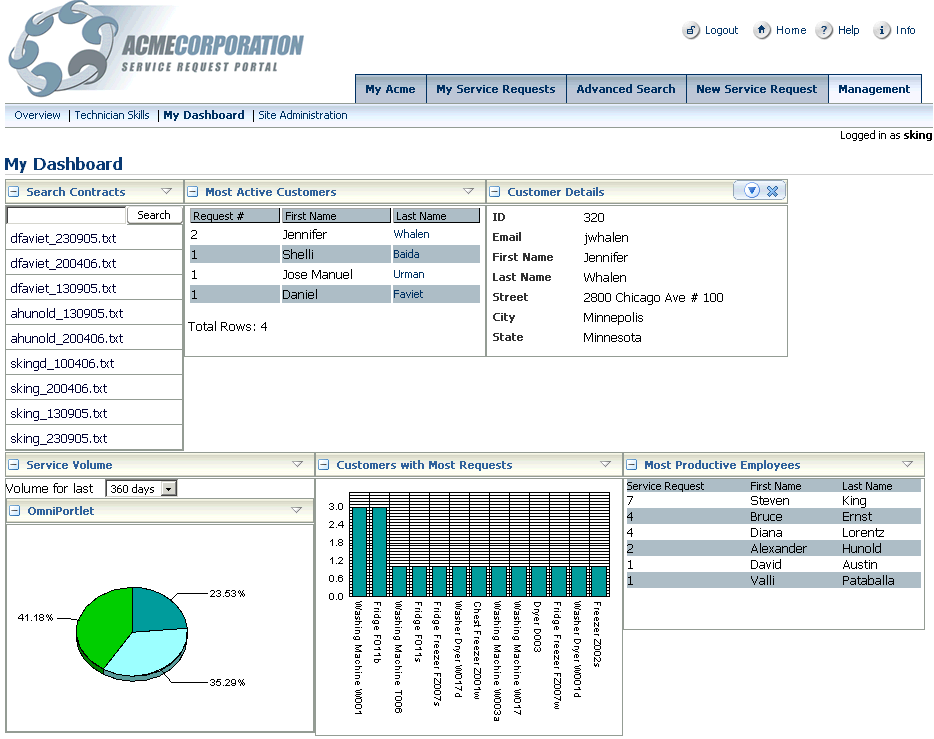
This chapter shows you how to build a page and use OmniPortlet to create the dashboard page shown in Figure 8-1 and includes the following sections:
This section shows you how to build the page on which you will place your portlets to create the dashboard page. Before you begin, ensure that you have the required sample files and initialized your preconfigured OC4J, as described in the install.html file located in the sample files.
Create a new JSF JSP page, ensuring that you select the following options in the Create JSF JSP Wizard:
Note:
To access the Create JSF JSP Wizard, from the File menu, choose New, and in the New Gallery dialog box, under Web Tier, choose JSF.Step 1 of 4: Name the page SRDashboard.jspx, point the directory path to UserInterface\public_html\app\management\, and select the JSP Document (*.jspx) type.
Step 2 of 4: Select the Automatically Expose UI Components in a New Managed Bean option and leave the remaining defaults on this page.
Note:
Make sure that the name of the New Managed bean isapp_management_SRDashboard.Step 3 of 4: Ensure that the following libraries are listed in Selected Libraries:
JSF Core
JSF HTML
ADF Faces Components
ADF Faces HTML
ADF Portlet Components
Customizable Components Core
Note:
For information on building and populating a page, refer to the Populating Pages chapter in the Oracle WebCenter Framework Developer's Guide.Once you have completed the wizard and created your page, expand SRDemoSample_Starter, UserInterface, and WEB-INF\template folders of your application.
Right-click SRDemoTemplate.jspx and choose Open.
Click the Source tab, then copy the source code from the SRDemoTemplate.jspx page and paste it into the source of your new SRDashboard.jspx page, replacing all the existing code in your new page.
Search for _PAGE_NAME_ and replace it with srdashboard so that the panelPage tag looks like:
<af:panelPage title="#{res['srdashboard.pageTitle']}">
To provide a translatable page title for the new page, expand SRDemoSample_Starter, UserInterface, Application Sources, oracle.srdemo.view, resources, and then open the UIResources.properties file.
In the UIResources.properties file, add the following lines to the end of file:
#WC_DashboardPage
srdashboard.pageTitle=Dashboard
In the WEB-INF folder of the UserInterface project, open faces-config.xml.
If necessary, click the Source tab.
At the end of the file, before the closing </faces-config> tag, add the managed bean shown in Example 8-1 to the existing code to instantiate the bean that manages the menu item for the Dashboard subtab.
Example 8-1 Managed Bean for the Dashboard Subtab
<managed-bean>
    <managed-bean-name>subMenuItem_Manage_Dashboard</managed-bean-name>
    <managed-bean-class>oracle.srdemo.view.menu.MenuItem</managed-bean-class>
    <managed-bean-scope>session</managed-bean-scope>
    <managed-property>
      <property-name>label</property-name>
      <value>#{resources['srdemo.menu.manage.dashboard']}</value>
    </managed-property>
    <managed-property>
      <property-name>shown</property-name>
      <value>#{userInfo.manager}</value>
    </managed-property>
    <managed-property>
      <property-name>viewId</property-name>
      <value>/app/management/SRDashboard.jspx</value>
    </managed-property>
    <managed-property>
      <property-name>outcome</property-name>
      <value>Dashboard</value>
    </managed-property>
<!-- ADF Authorization -->
    <managed-property>
      <property-name>targetPageDef</property-name>
      <value>app_management_SRDashboardPageDef</value>
    </managed-property>
<!-- End ADF Authorization -->
</managed-bean>
Save the file.
Add the following line to the end of the UIResources.properties file:
srdemo.menu.manage.dashboard=My Dashboard
Open the faces-config.xml file and search for <managed-bean-name>menuItem_Manage.
Now that you have created the subtab, you must add it as a menu item to the parent menu. You can do so by adding the following to the list-entries tag:
Link the new dashboard menu item to the JSPX page by adding the code shown in Example 8-3 to the navigation rule.
Example 8-3 Code for Linking the Dashboard Subtab to the Dashboard.jspx page
<navigation-rule>
   <from-view-id>/app/management/SRManage.jspx</from-view-id>
   <navigation-case>
      <from-outcome>Dashboard</from-outcome>
      <to-view-id>/app/management/SRDashboard.jspx</to-view-id>
   </navigation-case>
</navigation-rule>
Save the page.
This section shows you how to use customizable components, specifically the PanelCustomizable component, to design the layout of your page. For more information on using customizable components, refer to the Customizable Components section in Chapter 7, "Building a Page and Adding Components".
You can view the code of the completed page by opening the SRDashboard.jspx page in the completed demo and viewing its source.
To add the first row of the dashboard, first open the source of your SRDashboard.jspx file.
Search for the text "Please Insert Main Page Content Here!" and place your cursor below this line.
From the Component Palette, choose Customizable Components Core.
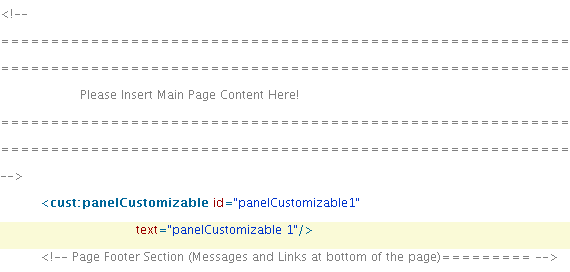
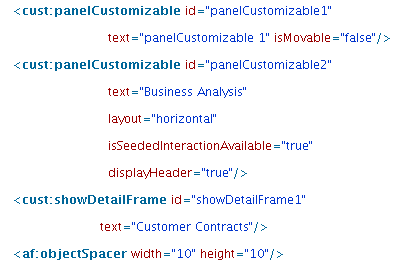
On the Customizable Components Core list, click PanelCustomizable to add a PanelCustomizable component to your page. The code displays as shown in Figure 8-2.
Figure 8-2 Placement of the First PanelCustomizable
In the Structure Pane, select the cust:panelCustomizable you just added, and set the IsMovable property in the Property Inspector to false.
Add a second PanelCustomizable below the one you just created.
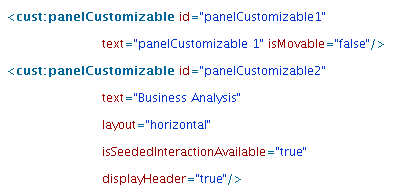
In the Structure Pane, select the cust:panelCustomizable you just added, and set the following properties in the Property Inspector:
DisplayHeader to true
Id to panelCustomizable2
Layout to horizontal
Text to Business Analysis
IsMovable to true
IsSeededInteraction to true
The source code of your page should now look like Figure 8-3.
Figure 8-3 PanelCustomizable in the Source Code
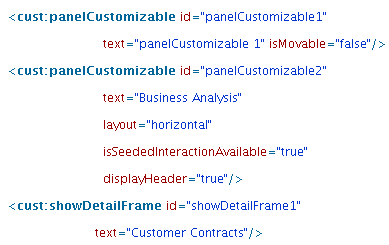
Create a ShowDetailFrame component below the PanelCustomizable you just created by choosing ShowDetailFrame from the Customizable Components Core Component Palette.
Set the Text property for the new ShowDetailFrame to Customer Contracts. The code displays as shown in Figure 8-4.
Figure 8-4 ShowDetailFrame in the Source Code
Insert a spacer after the ShowDetailFrame component you just created. To do so, choose ADF Faces Core from the Component Palette, then select ObjectSpacer. The code displays as shown in Figure 8-5.
Figure 8-5 ObjectSpacer in the Source Code
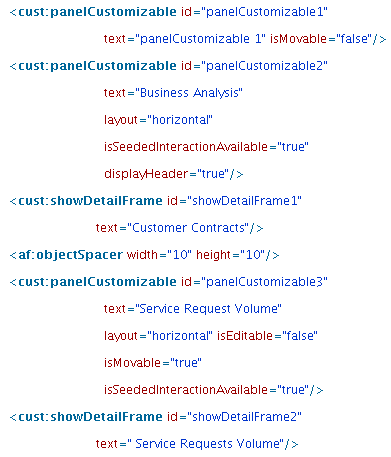
Add a second row to your page by creating a second PanelCustomizable component with the following properties:
| Property | Value |
|---|---|
| DisplayHeader | false |
| Layout | horizontal |
| Text | Service Requests Volume |
| IsMovable | true |
| IsSeededInteractionAvailable | true |
Add a ShowDetailFrame with the Text property set to Service Requests Volume.
The source code of your page should now look like Figure 8-6.
Figure 8-6 Source Code of Dashboard Page Containing Two Customizable Components
Next, you will add a horizontal panel inside the ShowDetailFrame called "Customer Contracts."
To do so, place your cursor on the line after the ShowDetailFrame. From the Component Palette, choose ADF Faces Core, then choose PanelHorizontal from the list.
Next, add an Input Text field inside the PanelHorizontal.
To do so, place your cursor on the line after the PanelHorizontal you just added, then choose InputText from the Component Palette.
Select the InputText component in your source.
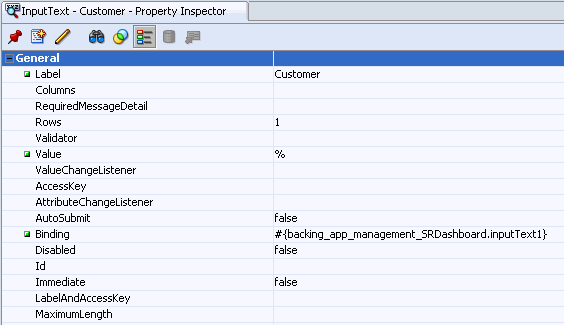
In the Property Inspector, set the Label property to Customer.
Set the Value property to: "%".
Set the Binding property to: #{backing_app_management_SRDashboard.inputText1}. Figure 8-7 shows the Property Inspector with the appropriate values.
Figure 8-7 Property Inspector for the Input Text Field
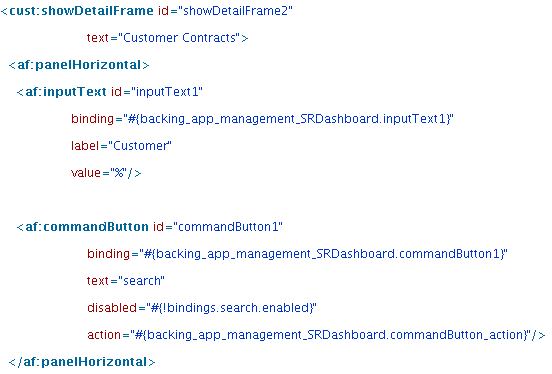
The resulting code should look like the source shown in Figure 8-8.
Next, add a command button that will enable users to search for customer contracts.
To do so, place your cursor below the InputText component, then choose CommandButton from the Component Palette.
Set the Text property to Search.
Set the Action property to: #{backing_app_management_SRDashboard.commandButton_action}.
In the Property Inspector, set the Binding property to: #{backing_app_management_SRDashboard.commandButton1}.
In the Source, add a Disabled property with the definition: #{!bindings.search.enabled}.
Your code should now look like Figure 8-9.
Figure 8-9 Source of the Input Text Field and Command Button
Add a table below the InputText and CommandButton, so that the various portlets display horizontally across the page.
In this section, you will add instances of OmniPortlet to the page layout. You will define the portlets in the later steps of this chapter, and, finally, wire the portlets together.
Now that you have created your layout, you can add the portlets to your page.
In the source of your page, place your cursor after the ShowDetailFrame called "Customer Contracts," and before the ObjectSpacer you created, then, place your cursor on the first PanelCustomizable in the Structure view.
From the Component Palette, choose OmniPortlet Producer, then click OmniPortlet. You should now see the source code of your page, as shown in Figure 8-10.
Figure 8-10 OmniPortlet in the Source Code of Your Page

Note:
If you do not see the OmniPortlet Producer listed in the drop-down list of the Component Palette, you may need to register the producers associated with this example.Select the OmniPortlet and, in the Property Inspector and set the ID to customerContracts.
In the source of your page, place your cursor after the OmniPortlet you just added, then add a second instance of OmniPortlet, and change the ID to mostProductiveEmployees.
In the Structure pane, below the third PanelCustomizable, select the ShowDetailFrame and add an OmniPortlet, then set the ID to serviceRequestVolume.
In the Structure pane, select the third PanelCustomizable and add another OmniPortlet, then set the ID to mostRequestedProducts.
Select the third PanelCustomizable again and add another OmniPortlet, then set the ID to customerDetails.
In this section, you will add a SelectOneChoice component for the Service Request Volume portlet.
In the Structure view, below the third PanelCustomizable, select the ShowDetailFrame, then add a SelectOneChoice component from the ADF Core Component palette.
Set the following properties for the SelectOneChoice component:
ID = dayPicker
label = Volume for last
default value = 360
items = 1,2,3,5,10,30,60,90,180 and 360 days
autoSubmit = true
The following code should appear in the JSPX:
<af:selectOneChoice label="Label 1" value="360" autoSubmit="true"
id="dayPicker">
<af:selectItem label="1 day" value="1"/>
<af:selectItem label="2 days" value="2"/>
<af:selectItem label="3 days" value="3"/>
<af:selectItem label="5 days" value="5"/>
<af:selectItem label="10 days" value="10"/>
<af:selectItem label="30 days" value="30"/>
<af:selectItem label="60 days" value="60"/>
<af:selectItem label="90 days" value="90"/>
<af:selectItem label="180 days" value="180"/>
<af:selectItem label="360 days" value="360"/>
</af:selectOneChoice>
In the Structure view, select the ShowDetailFrame from the second PanelCustomizable.
In the first tab, select Create list to fill the content of the drop-down list.
Click Add Item.
In the Item label field, type 1 day and in the Item Value field, type 1.
Repeat the previous step for the following days: 2, 3, 5, 10, 30, 60, 90, 180, and 360.
Click the Common Properties Tab.
In the Label field, type Volume for last.
In the Value field, enter 360.
In Advanced Properties tab, for the autoSubmit option, enter true.
Click OK to create the component.
In the Property view, for SelectOneChoice, update the id to dayPicker.
Within the ShowDetailFrame, drag and drop the dayPicker component above the OmniPortlet.
In the following steps, you will add a component that allows your users to search for existing customer contracts.
In the page source, locate the ShowDetailFrame called "Customer Contracts" and place your cursor under the PanelHorizontal that is located under the ShowDetailFrame.
In the Data Control palette, expand the ContentRepository data control, then expand Search.
Drag and drop the Search method as an ADF Command Button below the PanelHorizontal.
In the Structure Pane, select the Search method.
In the Action Binding Editor, specify "/contracts" as the path.
Set isRecursive to true, then click OK.
In the Data Control palette, under Search, expand Parameters.
Drag and drop the NamePattern method as an Input Text with Label component before the Search Button.
In the Structure Pane, select the InputText component you just added and set the Label property to Name (use % as wildcard).
In the Data Control palette, under Search, drag and drop the Return method as an ADF Read Only table below the PanelHorizontal.
Save the page.
In the following steps, you will define your OmniPortlets. Then, at the end of the chapter, you will wire them together to create interactivity.
In this section, you will define the portlet that displays the most productive employees in the organization. To define your OmniPortlet instances, you must first run your JSPX page to your browser, then use the OmniPortlet wizard to define the portlets.
Note:
For more information on using the OmniPortlet wizard, refer to the "Creating Portlets with OmniPortlet" chapter in the Oracle WebCenter Framework Developer's Guide.Run the SRDashboard.jspx page to your browser.
Click the Define link for the first portlet, and choose SQL as the data type, then click Next.
On the Source tab, enter the SQL statement shown in Example 8-4.
Example 8-4 SQL Statement for the Most Productive Employees Portlet
select count(SH.CREATED_BY) as NB_REQ, SH.CREATED_BY,U.FIRST_NAME, U.LAST_NAME
FROM SERVICE_HISTORIES SH INNER JOIN USERS U ON U.USER_ID = SH.CREATED_BY WHERE
SH.SVH_TYPE = 'Technician' OR SH.SVH_TYPE = 'Hidden' GROUP BY SH.CREATED
BY,U.FIRST_NAME,U.LAST_NAME ORDER BY NB_REQ DESC
Click Next, then click Next again.
On the View tab, select Tabular, then click Next.
On the Layout tab, update the following options:
Title: Most Productive Employees
Layout: Service Request (NB_REQ)
First Name (FIRST_NAME)
Last Name (LAST_NAME)
Click Finish.
The steps in this section will show you how to display information about the service requests in a pie chart.
In your browser, on the SRDashboard.jspx page, click the Define link for the second portlet.
On the Type tab, select SQL, then click Next.
On the Source tab, in the SQL Statement field, enter the following:
Set up a global connection to the database.
Under Connection, click Edit Connection.
In the Connection Name field, type SRDemo.
In the Username field, type hr.
In the Password field, type hr. These are the username and password for the SRDemo schema you installed when you downloaded the sample files.
In the Connection String field, type the path to your database, for example mydemo.mycompany.com:1522:XE, then click OK. You should now see the connection information in the Connection section of the Source tab.
Create a portlet parameter called Param1 with the default value of 360, then click Next.
On the Filter tab, click Next.
On the View tab, select Chart, then click Next.
On the Layout tab, select Pie, and enter 300 for the Width and 200 for the Height.
Set the Legend to Right and check the 3D effect checkbox.
From the Group list, choose None.
From the Category list, choose Status.
From the Value list, choose NB_REQ, then click Finish.
The steps in this section show you how to define the portlet that displays the most requested products using a SQL statement to access the data in a database.
In your browser, on the SRDashboard.jspx page, click the Define link for the third portlet.
On the Type tab, select SQL, then click Next.
On the Source tab, in the SQL statement field, enter the following:
Click Next.
On the Filter tab, click Next.
On the View tab, choose Chart, then click Next.
On the Layout tab, choose Bar, then set the following options:
Width: 300
Height: 250
Group: Name
Category: <none>
Value: NB_REQ
Click Finish.
The steps in this section will show how to define a portlet that displays the most active customers.
To create the two portlets in the Customer Information section of your page:
In your browser, on the SRDashboard.jspx page, click the Define link for the fourth portlet.
On the Type tab, choose SQL, then click Next.
On the Source tab, enter the following SQL statement, then click Next.
Example 8-7 SQL Statement for the Most Active Customers Portlet
select count(SH.CREATED_BY) as NB_REQ, SH.CREATED_BY , U.FIRST_NAME, U.LAST_NAME
FROM SERVICE_HISTORIES SH INNER JOIN USERS U ON U.USER_ID = SH.CREATED_BY WHERE
SH.SVH_TYPE = 'Customer' GROUP BY SH.CREATED_BY,U.FIRST_NAME,U.LAST_NAME ORDER BY
NB_REQ DESC
On the Filter tab, make no changes and click Next.
On the View tab, choose the HTML Layout and enter a title: Most Active Customers, then click Next.
On the Layout tab, choose the Sortable Template, then click Apply.
Leave the default code in the Heading Section.
In the Repeating Section, update the code so that it looks like the following:
<tr class="portlet-section-alternate opRowColorPI1146522302846_##OP_ROWNUM_MOD2##">
<td class=PortletText1>##NB_REQ##</td>
<td class=PortletText1>##CREATED_BY##</td>
<td class=PortletText1>##FIRST_NAME##</td>
<td class=PortletText1><a href="/SRDemo/faces/app/management/SRDashboard.jspx?
customerID=##CREATED_BY##" target="_top">##LAST_NAME##</a></td>
</tr>
In the Footer Section, update the code so that it looks like the following:
</tbody></table><font class=PortletText1>Total Rows: ##OP_ROWNUM##</font>
Click Finish.
In this section, you will define a portlet that displays details about a particular customer.
In your browser, on the SRDashboard.jspx page, click the Define link for the fifth portlet.
On the Type tab, choose SQL, then click Next.
On the Source tab, enter the following SQL statement:
Set Param1 to the default value 320, then click Next.
On the View tab, choose the HTML Layout and enter a title: Customer Details, then click Next.
On the Layout tab, clear the fields.
Choose Sortable Table from the Template drop-down list, and enter the following code in the Heading Section:
<TABLE BORDER='0' WIDTH="100%">
Replace the code in the Repeating Section with the following:
<TR CLASS='PortletText1'>
<TD CLASS='PortletHeading1'>ID</TD>
<TD>##USER_ID##</TD>
</TR>
<TR CLASS='PortletText1'>
<TD CLASS='PortletHeading1'>Email</TD>
<TD>##EMAIL##</TD>
</TR>
<TR CLASS='PortletText1'>
<TD CLASS='PortletHeading1'>First Name</TD>
<TD>##FIRST_NAME##</TD>
</TR>
<TR CLASS='PortletText1'>
<TD CLASS='PortletHeading1'>Last Name</TD>
<TD>##LAST_NAME##</TD>
</TR>
<TR CLASS='PortletText1'>
<TD CLASS='PortletHeading1'>Street</TD>
<TD>##STREET_ADDRESS##</TD>
</TR>
<TR CLASS='PortletText1'>
<TD CLASS='PortletHeading1'>City</TD>
<TD>##CITY##</TD>
</TR>
<TR CLASS='PortletText1'>
<TD CLASS='PortletHeading1'>State</TD>
<TD>##STATE_PROVINCE##</TD>
</TR>
Replace the code in the Footer Section with the following:
</tbody>
</table>
<font class=PortletText1>Total Rows: ##OP_ROWNUM##</font>
Click Finish.
The steps in this section show you how to add interactivity to the portlets you've just created. In this section, you will create a page parameter and portlet parameters, then wire the portlets together on the page.
To create the page parameter, return to Oracle JDeveloper and open the file SRDashboardPageDef.xml.
Create a page parameter called custID.
To do so, in the Structure Pane, right-click Parameters, then insert a new page parameter with the following:
<parameter id ="custID" value="$param.customerID)"/>
Open the source for the SRDashboard.jspx page you created.
Add a portlet parameter to the Customer Details portlet.
For Param1 set the value to the page parameter value from the bindings.custID (set the default value to 320 so that at least a customer shows up and the page is activated and no customers are selected):
<parameter name="Param1" value="${(bindings.custID == null || bindings.custID == '') ? 320 : bindings.custID }"/>
Add a parameter for the Service Request Volume portlet so that the portlet is refreshed when the value is selected from the SelectOneChoice.
In the Structure view, right-click parameters.
Select Insert Inside Parameters, then select parameter.
Set the value of Param1 to 360. By default we use 1 year or 360 days to show all the results.
Select OmniPortlet3_1_Param1 within executables/variables of the page defs.
In the Property Inspector, in the DefaultValue field, type the following:
${( app_management_SRDashboard.dayPicker.value == null) ? 360 : app_management_SRDashboard.dayPicker.value}
In the Structure pane, choose the fifth portlet, the Most Active Customers portlet.
In the Property Inspector, set the SubmitUrlParameters property to true. Doing so enables the portlet to submit the parameter through a URL to the page.
Save your page.
Run the SRDashboard.jspx page to your browser to view the portlets you just added.
The steps in this chapter showed you how to build a dashboard page for your WebCenter application. You learned how to create a page using customizable components and ADF Faces Core components to create the layout. You also learned how to create portlets that display related information and wire them together on a page, so that your end users can easily view information about their customers for a single entry point.