| Oracle® WebCenter Framework Building a WebCenter Application Step by Step 10g (10.1.3.2.0) Part Number B31073-01 |
|
|
View PDF |
| Oracle® WebCenter Framework Building a WebCenter Application Step by Step 10g (10.1.3.2.0) Part Number B31073-01 |
|
|
View PDF |
You have already created your WebCenter application. In this chapter, you will create a site administration page that can be used by the administrator to change the look and feel of the application and to customize the login page. This site administration page is then added as a subtab of the Management page.
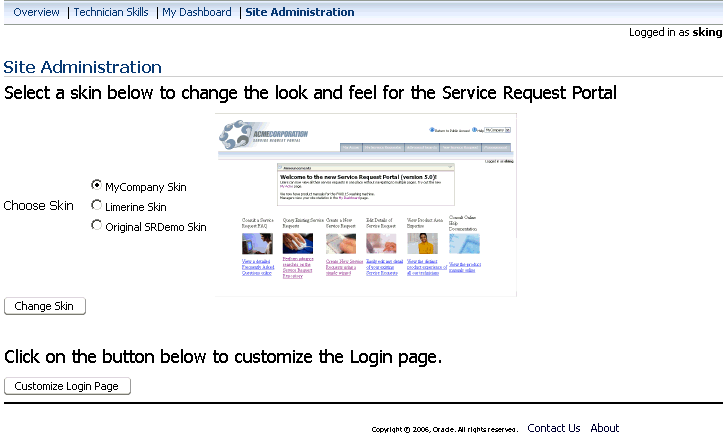
The SRDemo ZIP file contains three skins, myCompany, limerine, and original, and the corresponding image files you may require. Using the site administration page that you create in this chapter, end users will be able to change the skin of the application at run time by choosing from the three skins. In addition, they will be able to customize the login page of the application. At run time, the site administration page would look like Figure 9-1.
Figure 9-1 The Site Administration Page at Run Time
Before you can perform the tasks in this chapter, you must set up skins for your application by performing the steps in Chapter 3, "Setting Up Skins".
This chapter contains the following sections:
Step 4: Adding the Site Administration Page as a Subtab of the Management Page
Step 5: Using the Site Administration Page for Customization
The next step is to build the SRSiteAdmin.jspx page with controls that will let administrators change the look and feel of the application and customize the login page.
Note:
This page will set the value of the skin to be used in the skin bean we created earlier.To create the site administration page, perform the following steps:
In the Applications Navigator, expand the UserInterface node and the Web Content node, if necessary.
Under the app node, right-click the management folder and select New.
In the New Gallery, expand the Web Tier node.
Select JSF.
In the Items list, select JSF JSP.
Click OK to display the Create JSF JSP dialog box.
If you are on the Welcome page of the wizard, click Next to display the JSP File page.
In the File Name field, enter SRSiteAdmin.jspx.
Select JSP Document (*.jspx).
Click Next to display the Component Binding page.
Select Automatically Expose UI Components in a New Managed Bean and ensure that the Name field displays app_management_SRSiteAdmin.
Click Next to display the Tag Libraries page.
Make sure that the following libraries are listed under Selected Libraries:
JSF Core
JSF HTML
ADF Faces Components
ADF Faces HTML
ADF Portlet Components
Customizable Components Core
Click Finish to create the page.
Expand the WEB-INF node and the template node.
Right-click SRDemoTemplate.jspx and select Open.
Copy the source code from the SRDemoTemplate.jspx page and paste it into the source of your new SRSiteAdmin.jspx page, replacing all the existing code in your new page.
Search for the following line in the source of the SRSiteAdmin.jspx page:
<af:panelPage title="#{res['_PAGE_NAME_.pageTitle']}">
and replace it with:
<af:panelPage title="#{res['SRSiteAdmin.pageTitle']}">
Save the file.
Now we must provide the capability to select a specific skin for the application. We will do this by creating a radio group where the administrator can select a skin to use at run time. We will also provide a preview of what each skin looks like.
To add a skin selector to the page, perform the following steps:
In the Structure pane, expand the nodes, f:view, af:document, af:form, and af:panelPage, as shown in Figure 9-2.
In the Component Palette, select ADF Faces Core.
Drag a PanelHorizontal component into the Structure pane so that it appears between Page Content Start and Page Content End.
Add three more panelHorizontal components in the same way, making sure that they are all at the same level, and are child components of the panelPage component.
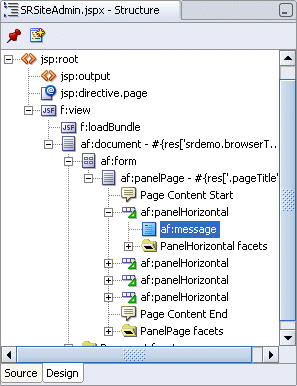
Drag a Message component from the Component Palette into the Structure pane so that it appears within the first panelHorizontal component, as shown in Figure 9-3.
Figure 9-3 Message Component in the Structure Pane of Your Page
In the Property Inspector, change the properties for the Message component as follows:
Message: Select a skin below to change the look and feel for the Service Request Portal
InlineStyle/font-size: large
Drag an ObjectSpacer component from the Component Palette into the Structure pane so that it appears between the first and second panelHorizontal component.
Drag a ShowOneRadio component into the second panelHorizontal component.
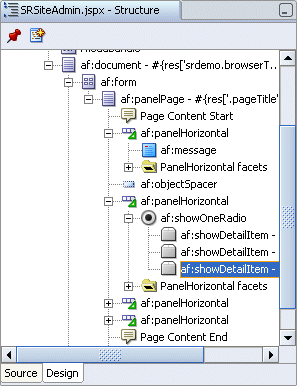
Add three showDetailItem components under the showOneRadio component as shown in Figure 9-4.
Figure 9-4 ShowOneRadio Component In the Structure Pane of Your Page
Drag an ObjectImage component into the first showDetailItem component. This displays the Insert ObjectImage dialog box.
Next to the Source field, click the Show Advanced Editor button.
Select srdemo_mycompany.gif from the list, and click OK.
Click OK.
Repeat the preceding four steps for the other two showDetailItem components to add the following images:
srdemo_limerine.gif
srdemo_original.gif
These components are displayed in the Structure pane as shown in Figure 9-5.
Select the first showDetailItem component and, in the Property Inspector, set the following properties:
Binding: #{backing_SRSiteAdmin.showDetailItem1}
DisclosureListener: #{skinBean.processDisclosure}
Text: My Company Skin
Select the second showDetailItem component and set the following properties:
Binding: #{backing_SRSiteAdmin.showDetailItem2}
DisclosureListener: #{skinBean.processDisclosure}
Text: Limerine Skin
Select the third showDetailItem component and set the following properties:
Binding: #{backing_SRSiteAdmin.showDetailItem3}
DisclosureListener: #{skinBean.processDisclosure}
Text: Original SRDemo Skin
Drag a CommandButton component between the second and third panelHorizontal components as shown in Figure 9-6.
Set the Text property of the commandButton to Change Skin.
Drag an ObjectSpacer component from the Component Palette into the Structure pane so that it appears between the first and second panelHorizontal components.
Save the file. The site administration page now looks like Figure 9-7.
You will now see how to customize the login page to include information that can be updated at run time, without redeploying the application. By performing the steps in this section, you can go back to the login page after you have logged in and customize the Rich Text Portlet that you added in "Step 3: Adding a Rich Text Portlet to the Login Page" in Chapter 6, "Creating a Login Page".
To enable customization of the login page, perform the following steps:
Create a navigation case to navigate from the site administration page to the login page. To do this, add the code in Example 9-1 to the faces-config.xml file:
Example 9-1 Navigation Rule to Navigate from Site Administration Page to Login Page
<navigation-rule>
  <from-view-id>/app/management/SRSiteAdmin.jspx</from-view-id>
  <navigation-case>
    <from-outcome>CustomizeLoginPage</from-outcome>
    <to-view-id>/infrastructure/SRLoginADF.jspx</to-view-id>
    <redirect/>
  </navigation-case>
</navigation-rule>
Create a navigation case to navigate from the login page to the site administration page. To do this, add the code in Example 9-2 to the faces-config.xml file:
Example 9-2 Navigation Rule to Navigate from Login Page to Site Administration Page
<navigation-rule>
  <from-view-id>/infrastructure/SRLoginADF.jspx</from-view-id>
  <navigation-case>
    <from-outcome>ReturnToSiteAdmin</from-outcome>
    <to-view-id>/app/management/SRSiteAdmin.jspx</to-view-id>
    <redirect/>
  </navigation-case>
</navigation-rule>
Drag an ObjectSpacer component between the commandButton and the third panelHorizontal.
Drag an OutputFormatted component into the third panelHorizontal and set the following properties in the Property Inspector:
Value: #{res['srsiteadmin.editLoginPagePrompt']}
This EL returns the appropriate string from the resource bundle.
InlineStyle/font-size: large
Drag a commandButton into the fourth panelHorizontal component and set the following properties:
Text: Customize Login Page
Action: CustomizeLoginPage
This button will use the previously defined ADF Faces navigation to take the user to the login page.
Note:
Unlike the case where a public user accesses the login page to authenticate, when accessing the page from the site administration page, the user's identity is already defined. Therefore, to prevent a subsequent login attempt while customizing the login page, the login component on the screen must be deactivated. This deactivation is handled by the backing bean code that was added in "Step 1: Creating a Login Page" in Chapter 6, "Creating a Login Page".To prevent all managers from being able to customize the login page, and to expose the button only to those who have customize privilege on the page, the Rendered property for the commandButton must be set as follows:
Render: #{bindings.permissionInfo['SRLoginADFPagePageDef'].allowsCustomize}
Save the file.
Open the SRLogin.jspx page and drag a commandButton on the page and set the following properties:
Text: Return
Action: ReturnToSiteAdmin
This button will use the previously defined ADF Faces navigation to take the user back to the site administration page after performing the required customizations.
Set the Rendered property for the commandButton as follows:
Render: #{authNLink.authenticated}
Save the file.
Finally, you must add the SRSiteAdmin.jspx page as a subtab of the main Management page. To do this, you must perform the following steps:
In the WEB-INF folder of the UserInterface project, right-click faces-config.xml and select Open.
If necessary, click the Source tab.
Add the managed bean shown in Example 9-3 to the existing code after the managed bean for the Dashboard subtab.
Example 9-3 Managed Bean for the Site Administration Subtab
<managed-bean>
    <managed-bean-name>subMenuItem_Manage_SiteAdmin</managed-bean-name>
    <managed-bean-class>oracle.srdemo.view.menu.MenuItem</managed-bean-class>
    <managed-bean-scope>session</managed-bean-scope>
    <managed-property>
      <property-name>label</property-name>
      <value>#{resources['srdemo.menu.manage.siteadmin']}</value>
    </managed-property>
    <managed-property>
      <property-name>shown</property-name>
      <value>#{userInfo.manager}</value>
    </managed-property>
    <managed-property>
      <property-name>viewId</property-name>
      <value>/app/management/SRSiteAdmin.jspx</value>
    </managed-property>
    <managed-property>
      <property-name>outcome</property-name>
      <value>SRSiteAdmin</value>
    </managed-property>
<!-- ADF Authorization -->
    <managed-property>
      <property-name>targetPageDef</property-name>
      <value>app_management_SRSiteAdminPageDef</value>
    </managed-property>
<!-- End ADF Authorization -->
</managed-bean>
Open the UIResources.properties file, located under UserInterface, Application Sources, oracle.srdemo.view, resources.
Locate the Admin page area and include the following:
srdemo.menu.manage.siteadmin=Administration
Search for <managed-bean-name>menuItem_Manage.
Add the code in Example 9-4 to the list-entries tag.
Search for <from-view-id>/app/management/SRManage.jspx.
Add the code in Example 9-5 to the navigation rule.
Make sure that the code in Example 9-6 is already included.
Save the file.
In the Applications Navigator, under the UserInterface project, right-click index.jspx and select Run.
Refer to Chapter 8, "Building a Dashboard Page" for more information about adding a page as a subtab on another page.
You will now see how you can customize your application by using the site administration page. You can perform the following tasks on this page:
To change the skin for your application, perform the following steps:
Log in to the Service Request portal as sking with a password of welcome.
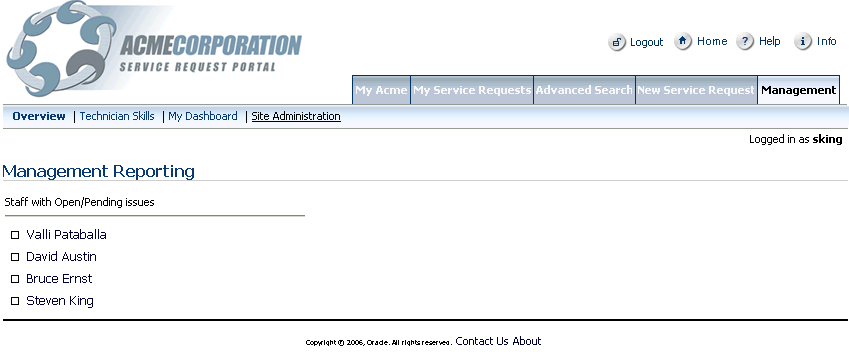
Click the Management tab. This page now includes a subtab for your site administration page as shown in Figure 9-8.
Figure 9-8 Management Tab on the Service Request Portal page
Click the Site Administration subtab. This page contains a radio group where the administrator can select the skin to use for the application, as shown in Figure 9-9. The default skin used by the application is MyCompany Skin.
Figure 9-9 Site Administration Tab with Customization Options
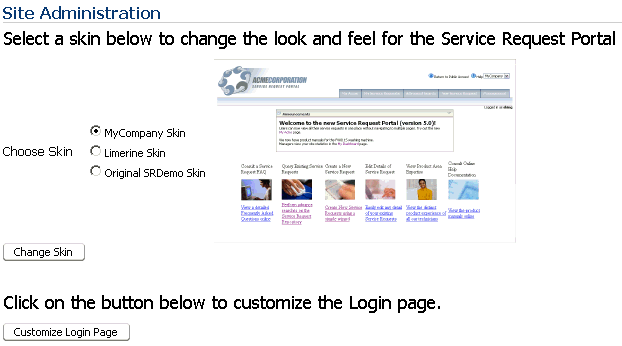
Select Limerine Skin. The image updates to give a preview of the skin selected.
Click Change Skin. The appearance of the page changes to use the Limerine skin. This change applies to the complete application.
If you are a manager, you can customize the login page and edit the text that is displayed to users on this page. To do this, use the Customize Login Page button on the site administration page.
Note:
The Customize Login Page button is displayed only to authenticated users who havecustomize privilege on the login page. As you had granted customize privilege to the manager role while performing the steps in "Step 4: Editing Authorization for the Login Page" in Chapter 6, "Creating a Login Page", only a manager can customize the login page.
The Customize Login Page button is not displayed to users who have only view privilege on the login page.
To customize the login page for your application, perform the following steps:
Log in to the Service Request portal as sking with a password of welcome.
Click the Management tab. This page now includes a subtab for your site administration page, as shown in Figure 9-8.
Click the Site Administration subtab. This page provides options to change the skin for your application and to customize the login page, as shown in Figure 9-9.
Click the Customize Login Page button.
On the login page, move your mouse over the text area and click the actions button that is displayed. Select Customize from the list displayed.
Add the text in Example 9-7 to the Rich Text portlet at the top of the page:
Example 9-7 First Rich Text Portlet on the Login Page
Please Log In to the Acme Service Request Application
This demonstration application has a number of predefined user accounts
which equate to different roles within the company.
For example:
   sking - a manager
   ahunold - a technician
   dfaviet - a user (customer)
All usernames should be in lowercase with a  password of  "welcome"
Note: If you copy and paste the user IDs from here, be sure to remove any trailing spaces to ensure that the ID is valid
Use the formatting features of the rich text editor and format this text to appear as shown in Figure 9-10.
Add the text in Example 9-8 to the second Rich Text portlet on the page.
Example 9-8 Second Rich Text Portlet on the Login Page
Acme's computer systems and networks are intended solely for use by authorized
Acme employees and contractors. Use of Acme computer systems and networks is
subject to the company policies, including the Employee Code of Conduct, Internal
Privacy Policy, the Acceptable Use Policy and the Information Protection Policy.
Unauthorized access or use may result in disciplinary action, up to and including
a really, really serious talking to and being sent into the corner! Further
information about Acme security and privacy policies is available at the GIS
Policy Portal.to ensure that the ID is valid
Decrease the font size for this text and set the color to a light grey so that the text appears as shown in Figure 9-10.
Click Return to get back to the site administration page.