| Oracle® WebCenter Framework Developer's Guide 10g (10.1.3.2.0) Part Number B31074-05 |
|
|
View PDF |
| Oracle® WebCenter Framework Developer's Guide 10g (10.1.3.2.0) Part Number B31074-05 |
|
|
View PDF |
This chapter provides a brief description of Web Clipping portlets and producers and explains how you can register a Web Clipping producer and use this producer to add Web Clipping portlets to a JSP document created through Oracle JDeveloper.
This chapter contains the following sections:
Section 17.3, "Integrating Authenticated Web Content Using Single Sign-On"
Section 17.4, "Adding a Web Clipping That Users Can Personalize"
See Appendix B, "Additional Portlet Configuration" for additional Web Clipping portlet configurations like configuring the repository, configuring proxy settings, and securing the Web Clipping producer.
Web Clipping is a browser-based declarative tool that enables you to integrate any Web application with your WebCenter application. It is designed to give you quick integration by leveraging the Web application's existing user interface. You can drag-and-drop Web Clipping portlets on to a *.jspx page. The Web Clipping producer and portlets are available when you install the WebCenter Preconfigured Oracle Containers for J2EE (OC4J), which is available by default as part of an Oracle WebCenter Framework installation. When this producer is registered, the portlets become available on the Oracle JDeveloper Component Palette. From here, you can drag-and-drop the portlets onto your *.jspx page.
Notes:
For more information about installing, initializing, and stopping the WebCenter Preconfigured OC4J and pointing Oracle JDeveloper to it, see Section 3.2, "Using the Preconfigured OC4J".
To learn more about registering a Web producer, see Section 4.3.1, "Registering Portlet Producers".
With Web Clipping, you can collect Web content into portlets in a single centralized Web page. You can use Web Clipping to consolidate content from Web sites scattered throughout a large organization.
Web Clipping enables clipping of an entire Web page or a portion of it and reusing it as a portlet. Basic and HTML-form-based sites may be clipped. Use Web Clipping when you want to copy content from an existing Web page and expose it in your WebCenter application as a portlet. Web Clipping portlets supports the following:
Navigation through various styles of login mechanisms, including form- and JavaScript-based submission and HTTP Basic and Digest Authentication with cookie-based session management.
Fuzzy matching of clippings, meaning that if a Web clipping gets reordered within the source page or if its character font, size, or style changes, then it will still be identified correctly by the Web Clipping engine and delivered as the portlet content.
Reuse of a wide range of Web content, including basic support of pages written with HTML 4.0.1, JavaScript, applets, and plug-in enabled content, retrieved through HTTP GET and POST (form submission).
Personalization, enabling page designers to expose input parameters that page viewers can modify when they personalize the portlet. These parameters can be exposed as public parameters that a page designer can map as page parameters. This feature enables end users to obtain personalized clippings.
Integrated authenticated Web content through Single Sign-On, including integration with external applications, which enables you to leverage Oracle Single Sign-On and to clip content from authenticated external Web sites.
Inline rendering, enabling you to set up Web Clipping portlets to display links within the context of the portlet. As a result, when a user clicks a link in the Web Clipping portlet, the results display within the same portlet. You can use this feature with internal and external Web sites.
Proxy authentication, including support for global proxy authentication and authentication for each user. You can specify proxy server authentication details including type (Basic or Digest) and realm in the provider.xml file. In addition, you can specify one of the following schemes for entering user credentials:
All users automatically log in using a user name and password you provide.
All users will need to log in using a user name and password they provide.
All public users (not authenticated into the WebCenter application) automatically log in using a user name and password you provide, while valid users (authenticated into the WebCenter application) will need to log in using a user name and password they provide.
See the Section B.3.2, "Configuring HTTP or HTTPS Proxy Settings" for more information.
Navigation and clipping of HTTPS-based external Web sites, if appropriate server certificates are acquired.
Clipping of page content from HTML 4.0.1 pages, including the following:
Clipping of <applet>, <body>, <div>, <embed>, <img>, <object>, <ol>, <span>, <table>, and <ul> tagged content
Preservation of <head> styles and fonts, and Cascading Style Sheets (CSS)
Navigation through hyperlinks (HTTP GET), form submissions (HTTP POST), frames, and URL redirection
Globalization Support in URLs and URL parameters. See Section 17.5, "Current Limitations for Web Clipping" for information about how Web Clipping determines the character set of clipped content.
You can select one of the following as the Web Clipping repository:
Oracle Metadata Services
Oracle Application Server infrastructure database
Other Oracle Database of version 9i or later
Oracle Metadata Services is the default option, which saves the Web Clipping definition in the file system. If you select Oracle Metadata Services as your Web clipping repository, then you can use Web Clipping even without a database. Web Clipping definitions can be stored persistently in the repository.
Any secure information, such as passwords, is stored in encrypted form, according to the Data Encryption Standard (DES), using Oracle encryption technology.
See Also:
Section B.3.1, "Configuring the Web Clipping Repository" for details about configuring a repository.To add Web page content to a page, follow the steps described in the following sections:
To add Web Clipping portlets to your page, you must first register the Web Clipping producer. Register your Web Clipping producer by referring to Section 4.3.1, "Registering Portlet Producers" for details.
To add a Web Clipping portlet to a *.jspx page, perform the following steps:
Start Oracle JDeveloper and the WebCenter Preconfigured OC4J (see Section 3.2.2, "Starting and Stopping the Preconfigured OC4J").
In the Applications Navigator, right-click the *.jspx file, and select Open from the context menu.
The *.jspx file is available in the following hierarchy:
Applications
 <ApplicationName>
  <ProjectName>
   Web Content
In the Component Palette, select the Web Clipping producer that you registered earlier.
Select a Web Clipping portlet, and drag it on top of the h:form component in the Structure pane in Oracle JDeveloper.
If you are using a PanelCustomizable or ShowDetailFrame component, then drag the portlet on top of that component instead of h:form. In the Structure pane, the Web Clipping portlet should display under the PanelCustomizable or ShowDetailFrame component. In the Page Editor, the portlet should display inside the PanelCustomizable or ShowDetailFrame component.
Note:
Ensure that the new Web Clipping portlet is selected in the Structure pane, and in the Property Inspector setAllModesSharedScreen to false.
If you do not set this property to false, when you personalize the Web Clipping portlet at run time, the text displayed on the page may be distorted.
Right-click the *.jspx file and select Run from the context menu.
This will start the embedded OC4J server, start your default browser, and display the Web Clipping Portlet. On the resulting page, you can select a Web page that you want to expose in your WebCenter application. You can then use Web Clipping Studio to select a section of the Web page for inclusion.
To select a section of a Web page to display in the Web Clipping portlet, you use the Web Clipping Studio. Using the Web Clipping Studio, you can do the following:
Section the chosen target page
Choose the exact portion of the Web content to clip
Preview the clipped content as a portlet
Save the clipped content as a portlet
Set portlet properties and save the updated portlet information
To select a section of a Web page to display in the Web Clipping portlet, perform the following steps:
Click the Actions icon on the header of the Web Clipping portlet, and select either of the following:
Customize, to select a Web page that can be used by all users.
Personalize, to enable end users to personalize their own view of the content in a Web Clipping portlet.
Note:
When running a portlet that has an Edit mode, the Personalize option in the portlet's menu only appears to authenticated users of the application. Anonymous or public users will not see the option to personalize the portlet through Edit mode. Therefore, you must have implemented some form of security for your application in order for users to personalize their portlets. If you are a developer creating portlets and pages, then you may want to quickly test the Edit mode of your portlet without creating a complete security model for your application. See Section 10.6, "Configuring Basic Authentication for Testing Portlet Personalization" for an explanation of how you can quickly add the necessary security for testing portlet personalization.The Find a Web clipping page is displayed.
In the URL Location field, enter the location of the starting Web page that links to the content you want to clip, as shown in Figure 17-2.
Click Start.
The Web Clipping Studio displays the page you specified, as shown in Figure 17-3.
Figure 17-3 Browsing to a Page Containing Content for a Web Clipping
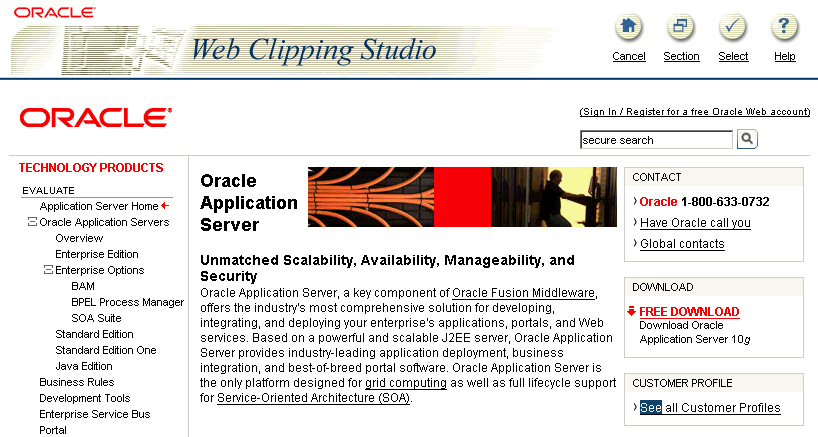
Browse to the page that contains the content you want to clip.
As you click hyperlinks in the Web page, your navigation links are recorded.
Note:
Any browsing operations that do not contribute to the eventual Web clipping will be discarded. Only the significant browsing operations are recorded for later playback during the show mode; any discarded links are not visited.For any Web sites that require HTTP Basic or Digest Authentication, a form is displayed that requests user name and password information. This encoded authentication information is recorded as part of the browsing information.
Once you display the page that contains the content you want to clip, in the Web Clipping Studio banner, click Section, as shown in Figure 17-4.
Figure 17-4 Sectioning the Target Web Page

Sectioning divides the target Web page into its clippable sections, as shown in Figure 17-5. After you click Section, you are no longer able to browse links in the displayed page. If you want to continue navigation, then click Unsection in the Web Clipping Studio banner.
At the top-left corner of the section of the Web content you want to clip, click Choose.
You can choose only one section as a clipping at a time.
Note:
To increase the number of sections available from which to choose, click Section Smaller in the Web Clipping Studio banner. For example, you would click Section Smaller to drill down one level of nested tables. To decrease the number of sections available from which to choose, click Section Larger.Web Clipping Studio displays a preview of your chosen section. If it is the section you want, then click Select in the Web Clipping Studio banner. The Web Clipping Studio displays the Find a Web clipping page, with the properties of the clipping.
If you do not want to use the section you clipped in your portlet, then click Unselect to return to the page containing the section. You can choose another section on the page, or click Unsection to navigate to another page.
Some sections may contain no data, only whitespace. For example, a Web page may contain an HTML <DIV> tag that contains no text or images. If you click Choose on a section that contains no data, then Web Clipping displays a preview, but the preview correctly shows only whitespace. In this case, click Unselect in the preview page to return to the sectioned page. Then, select a section containing data.
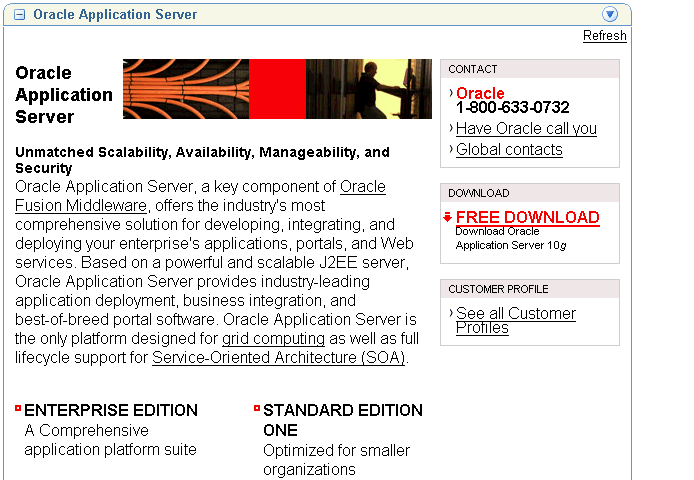
In the Find a Web clipping page, click OK to display the selected Web Clipping in the Web Clipping portlet on your page. (You can edit default properties in the page. See Section 17.2.4, "Setting Web Clipping Portlet Properties" for more information.)
Figure 17-6 shows the content added to the Web Clipping portlet.
Figure 17-6 Clipped Content Added to the Web Clipping Portlet on a WebCenter Application Page
Note:
The Refresh link in the Web Clipping Portlet retrieves fresh data from the originating Web site. This link reloads the portlet, but it may retrieve the data from the cache, depending upon the settings for expiration.You can edit various portlet settings to change the appearance of the Web Clipping portlet and to specify how end users can interact with the portlet.
To set Web Clipping portlet properties, perform the following steps:
Click the Actions icon on the header of the Web Clipping portlet, and select Customize. Web Clipping Studio displays the Find a Web clipping page with a Properties section, as shown in Figure 17-7.
Figure 17-7 Properties Section of Find a Web Clipping Page
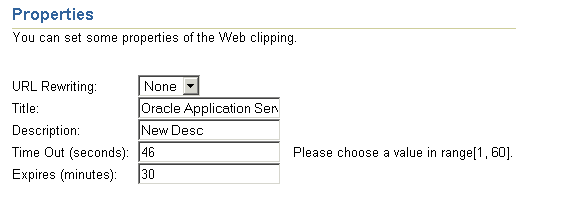
From the URL Rewriting list in the Properties section, choose Inline if you want link targets to be displayed inside the portlet, or choose None if you want link targets to replace the current page in the browser.
Note:
If you have integrated with an external application or are logged into the clipped site, and if you choose Inline for URL Rewriting, then the session is maintained to the clipped site while browsing.In the Title field, enter a title to display in the portlet banner.
In the Description field, enter a description of the portlet.
In the Time Out (seconds) field, enter the amount of time (in seconds) for the Web Clipping producer to attempt to contact the Web page from which the content was clipped.
In the Expires (minutes) field, enter the amount of time (in minutes) that cached content is valid. Any requests for portlet content that occur within the time period you specify will be satisfied from the cache.
Once the cache period is exceeded, requests for portlet content will be satisfied by retrieving content from the portlet's Web Clipping data source. The cache will also be refreshed with this content.
If you entered any information in a form while clipping content for the Web Clipping portlet, then the Parameterize Inputs section is available. Select the Click to start parameterizing check box to customize parameters associated with the Web Clipping portlet content. Then perform the following steps:
From the Parameters list, choose the parameters that you want to customize.
From the Personalizable list, select a parameter if you want to enable end users to provide their own values for the parameters when they personalize the portlet. Select None if you do not want to enable this.
In the Display Name field, enter a name to be displayed for the parameter.
In the Default Value field, enter a value to use by default for the parameter.
Section 17.4.2, "Personalizing a Web Clipping Portlet" provides an example of personalizing parameters.
Click OK.
This section walks you through an example that demonstrates how you can leverage Oracle Single Sign-On to integrate content from external Web sites that require authentication into a Web Clipping portlet.
The example incorporates a secured page from Oracle Metalink (an external application) into a Web Clipping portlet.
To integrate an external application, perform the following steps:
Register the external application in Oracle JDeveloper, specifying the authentication information by performing the following steps.
Start Oracle JDeveloper.
In the Applications Navigator, right-click your project and select New.
In the New Gallery dialog box, under the General category, select External Application.
From the list of items displayed, select External Application, and click OK.
In the Register External Application wizard, click Next on the welcome screen.
On step 1 of the wizard, enter a name for the application, for example, Metalink.
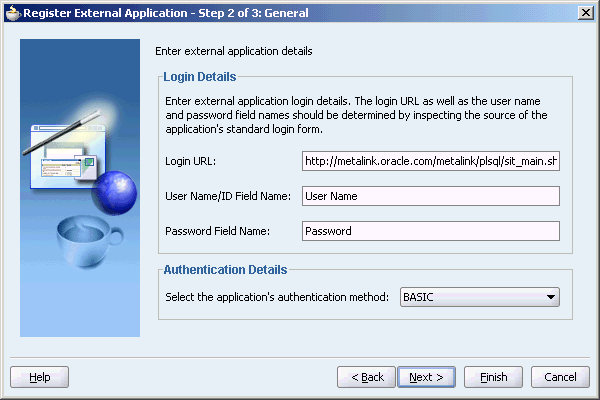
On step 2 of the wizard, enter the following details:
For Login URL, enter the URL to log in to the application, for example, http://metalink.oracle.com/metalink/plsql/sit_main.showSitemap?p_showTitle=0. To determine the URL, navigate to the desired application in a browser and note the URL.
For Form-based Authorization, view the source of the login page for the external application and note the URL to be accessed during the login action.
For User Name/ID FieldName, enter the field name that the external application uses for the user name. Determine the field name by viewing the source for the desired page. If the Authentication method uses Basic Authentication, then you do not need to enter a field name. For Metalink, you do not need to enter anything in this field
For Password FieldName, enter the field name that the external application uses for the password. Determine the field name by viewing the source for the desired page. If the Authentication method uses Basic Authentication, then you do not need to enter a field name. For Metalink, you do not need to enter anything in this field.
Select BASIC as the authentication method.
Figure 17-8 shows step 2 of the Register External Application wizard.
Figure 17-8 Registering an External Application
On step 3 of the wizard, you can enter names and values of any additional fields that are submitted with the login form of the external application. To specify a field name that is used to indicate a redirection URL, enter redirectFieldName for Field Name. For this example, you do not need to enter additional fields. Figure 17-9 shows step 3 of the Register External Application wizard.
Click Finish.
Create a credential provisioning page that will store the credentials for the external application. To do this, perform the following steps:
In the Applications Navigator, right-click your project and select New.
In the New Gallery dialog box, under the General category, select External Application.
From the list of items displayed, select Credential Provisioning Page, and click OK.
This creates the CredentialProvisioner.jspx page, which stores the external application login information. This information is used while implementing external application-related portlets.
For the Web Clipping portlet, create a new Web Clipping producer by performing the following steps:
In the Applications Navigator, right-click your project and select New.
In the New Gallery dialog box, under the Web Tier category, select Portlets.
From the list of items displayed, select Oracle PDK-Java Producer Registration.
On step 1 of the Register Oracle PDK Portlet Producer wizard, enter webClippingMetalink for the Name.
Click Next.
On step 2 of the wizard, do the following:
Specify the URL for the Web Clipping producer in the following format:
http://host:port/portalTools/webClipping/providers/webClipping
Note that host:port refers to the host and port where the producers are located.
If you use a proxy server to contact the Web producers from your application, then enter the proxy details.
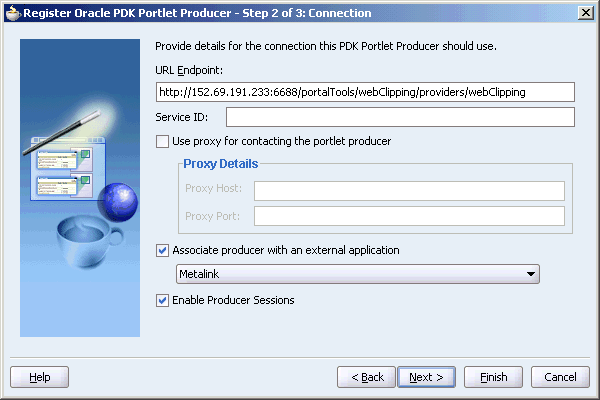
Click to select the Associate producer with an external application option, and from the list of values, select Metalink that you created earlier. The Enable Producer Sessions option also gets selected in this step.
Figure 17-10 shows step 2 of the Register Oracle PDK Portlet Producer wizard.
Figure 17-10 Specifying an External Application for a Web Clipping Producer
On step 3 of the wizard, specify the execution timeout, subscriber ID, and shared key values, if required.
Click Finish.
In the registration confirmation dialog box, click OK.
Add a portlet to a *.jspx page, using the webClippingMetalink producer that you just created. Section 17.2.2, "Adding a Web Clipping Portlet to a Page" describes in detail how to add a portlet.
Run the *.jspx page.
If you have not entered your credentials for the External Application representing Metalink, then the portlet will contain an Update login information link. Click the link and enter your credentials. Then, click OK.
Select a section of a page to display in the Web Clipping portlet, by performing the following steps:
Click the Actions icon on the header of the Web Clipping portlet, and select Customize.
The Find a Web Clipping page is displayed.
In the URL Location field, the default URL for the External Application is displayed.
Click Start. The Web Clipping Studio displays the page from the integrated external application.
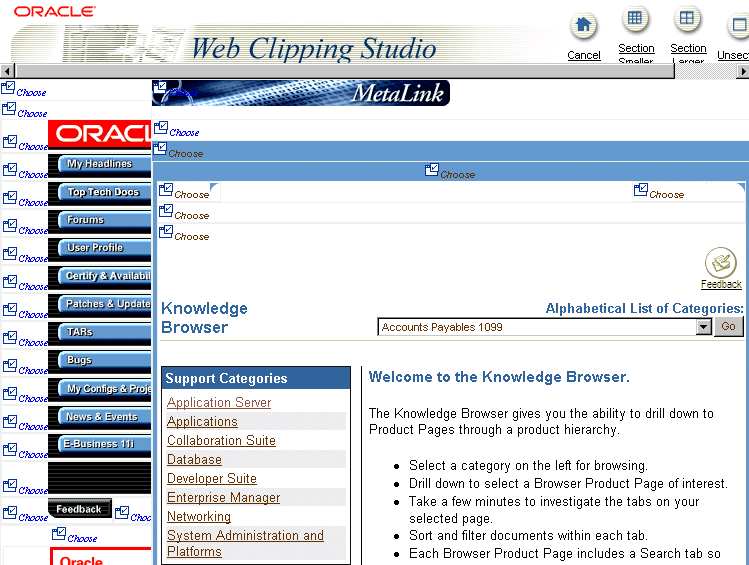
Browse to the page that contains the content you want to clip. After you display the page that contains the content you want to clip, click Section in the Web Clipping Studio banner. Figure 17-11 shows the external application displayed in Web Clipping Studio.
Figure 17-11 External Application in Web Clipping Studio
At the top-left corner of the section of the Web content you want to clip, click Choose.
Web Clipping Studio displays a preview of your chosen section. If it is the section you want, then click Select in the Web Clipping Studio banner.
The Web Clipping Studio displays the Find a Web Clipping page, with the properties of the clipping as shown in Figure 17-12.
Figure 17-12 Properties of the External Application

In the Find a Web Clipping page, from the URL Rewriting list, choose Inline to specify that you want link targets displayed inside the portlet, rather than in a new browser window. Click OK to display the selected Web clipping in the Web Clipping portlet on your page, as shown in Figure 17-13.
Figure 17-13 External Application Displayed in Portlet
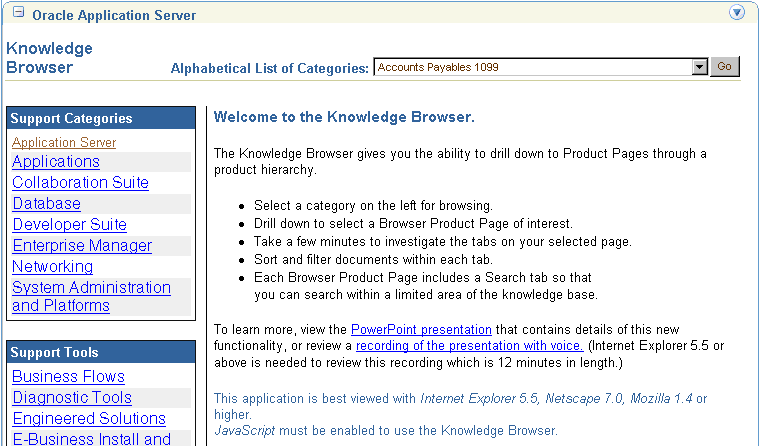
Now, the Web clipping, even though it is from a page requiring authentication, is available in your portlet.
Note that you can associate only one external application with a producer. For each external application, you must register a new producer. Each WebCenter application user accesses the authenticated content using their user name and password for that system, not the page designer's credentials.
Accessing External Application Images without Authentication
If you have integrated content from an external application that requires authentication into a Web Clipping portlet, and this content contains URLs that are links to images in the external application, then to ensure that the images are rendered without having to authenticate the browser with the external application, you must rewrite the URLs to use resource proxy. To do this, set the rewriteImageLink element in the Web Clipping producer's web.xml file to true as shown in the following example:
<!-- Rewrite the Image links to use Resource Proxy -->
<env-entry>
   <env-entry-name>oracle/webclipping/rewriteImageLink</env-entry-name>
   <env-entry-type>java.lang.Boolean</env-entry-type>
   <env-entry-value>true</env-entry-value>
</env-entry>
This section walks you through an example that demonstrates how you can enable end users to personalize their own view of the content in a Web Clipping portlet.
In the example, you perform the following tasks:
In this task, you navigate to the Oracle Technology Network (OTN) and search for specific information, then select the results as the clipping for your portlet. To do this, perform the following steps:
Click the Actions icon on the header of the Web Clipping portlet, and select Customize.
In the Web Clipping Studio's Find a Web clipping page, in the URL Location field, enter:
http://www.oracle.com/technology/products/ias/portal/index.html
Click Start. OTN displays the Portal Center page.
Enter a search string in the Search field at the top of the page. For this example, enter "web clipping portlet" (including the quotation marks), then click the Search icon.
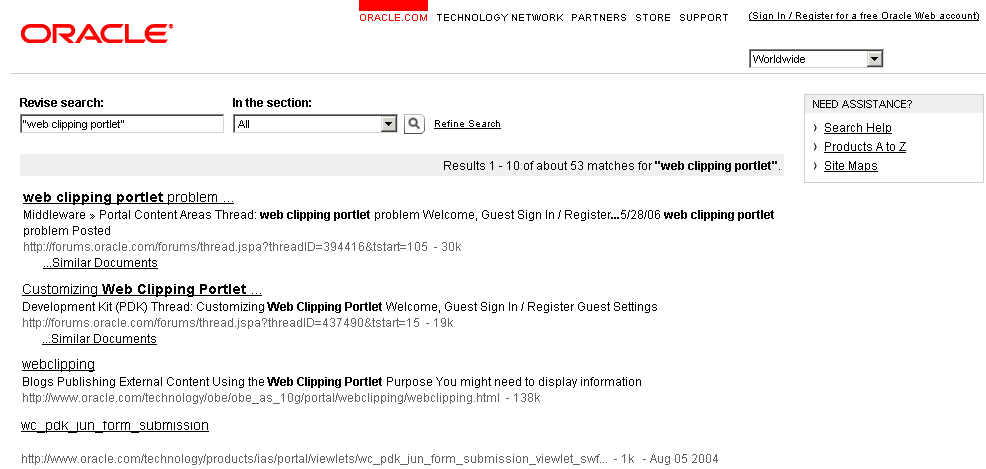
The Search result is displayed in the Web Clipping Studio, as shown in Figure 17-14.
Figure 17-14 Searching for information about OTN
Click Section. Web Clipping Studio divides the target Web page into its clippable sections, as shown in Figure 17-15.
Figure 17-15 Sectioning the Target Web Page
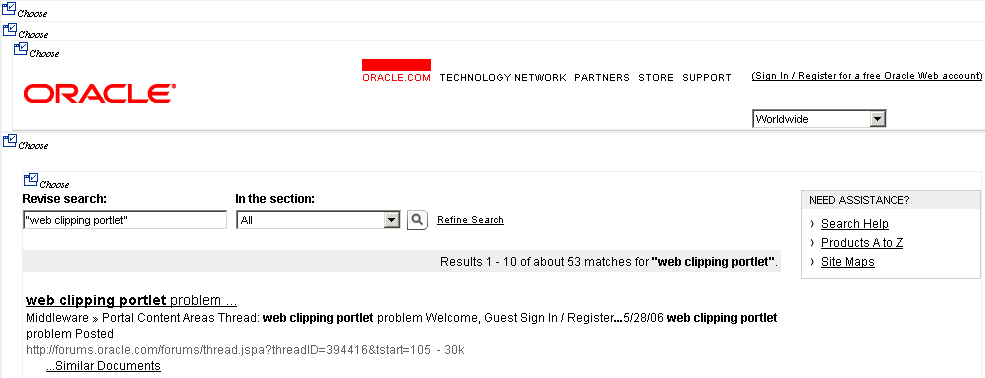
At the top-left corner of the search result, click Choose.
A preview of the search result section displays.
Some sections may contain no data, only whitespace. For example, a Web page may contain an HTML <DIV> tag that contains no text or images. If you click Choose on a section that contains no data, then Web Clipping displays a preview, but the preview correctly shows only whitespace. In this case, click Unselect in the preview page to return to the sectioned page. Then, select a section containing data.
Click Select to confirm that the search result section is the one you want to clip.
In the Find a Web Clipping page, click OK to display the selected Web Clipping in the Web Clipping portlet on your page. Figure 17-16 shows the Web Clipping displayed in the page.
Figure 17-16 Selected Web Clipping Displayed in Web Clipping Portlet
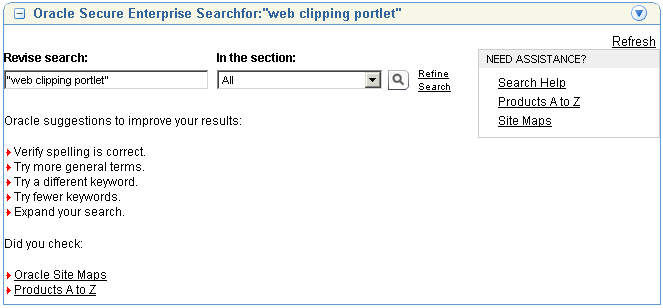
In this task, you edit the properties of the Web Clipping portlet to enable end users to display different search results in the portlet. To do this, perform the following tasks:
On the Web Clipping portlet you just added, click the Actions icon on the header of the Web Clipping portlet, and select Customize.
In the Find a Web Clipping page, modify the following items in the Properties section:
From the URL Rewriting list, choose Inline to specify that you want link targets displayed inside the portlet, rather than in a new browser window.
In the Title field, enter OTN Search. This title displays in the header of your Web Clipping portlet, as well as the pages where users can personalize parameters for the Web clipping.
Figure 17-17 shows the Properties and Parameterize Inputs sections of the Find a Web Clipping page.
Figure 17-17 Setting Properties for a Web Clipping
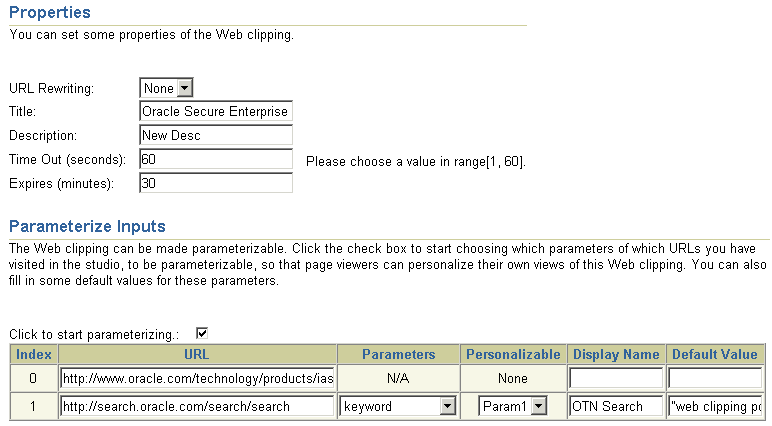
Because the content displayed in the portlet was reached by entering information in the Search field on OTN, you can customize the parameters used by the search to enable end users to specify their own search string.
Under the Parameterize Inputs section, select Click to start parameterizing, and make the following changes in the parameters table:
In the Parameters column, choose keyword from the list.
In the Personalizable column, choose Param1 from the list.
In the Display Name column, enter OTN Search.
Make sure that Default Value displays "web clipping portlet" to be sure you have selected the right parameter.
Click OK to display the default search results in the Web Clipping portlet on your page.
Click the Actions icon on the header of the Web Clipping portlet, and select Personalize.
Note:
When running a portlet that has an Edit mode, the Personalize option in the portlet's menu only appears to authenticated users of the application. Anonymous or public users will not see the option to personalize the portlet through Edit mode. Therefore, you must have implemented some form of security for your application in order for users to personalize their portlets. If you are a developer creating portlets and pages, then you may want to quickly test the Edit mode of your portlet without creating a complete security model for your application. See Section 10.6, "Configuring Basic Authentication for Testing Portlet Personalization" for an explanation of how you can quickly add the necessary security for testing portlet personalization.In the page that displays, scroll down to the Inputs section. Notice that the parameter field for the search string is labeled OTN Search, as you specified for the Display Name for this parameter. In the OTN Search field, enter a different search string. For example, enter OmniPortlet 2004, as shown in Figure 17-18.
Figure 17-18 Specifying Input for Parameters
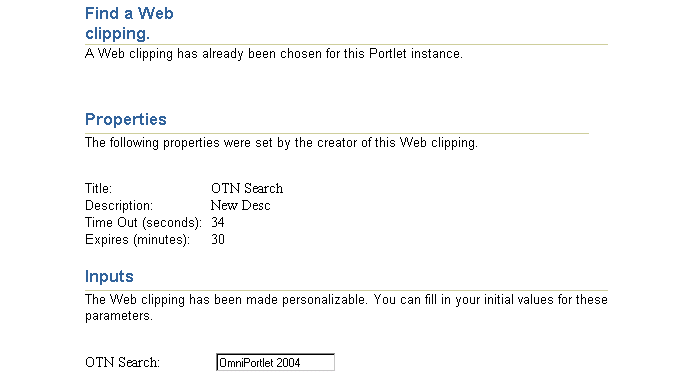
Click OK.
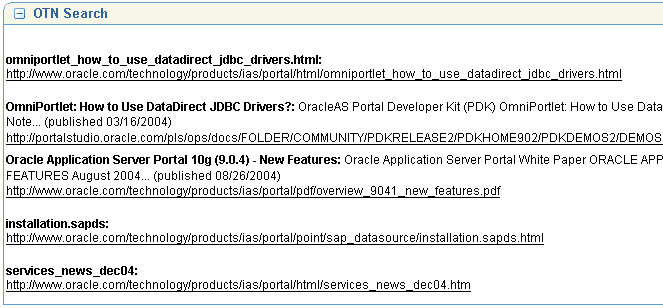
The Web Clipping portlet now displays the results of performing a search on OTN for OmniPortlet 2004 information, as shown in Figure 17-19.
Figure 17-19 New Web Clipping Result Based on Customer Input Parameter
This section describes current limitations for Web Clipping. For information about the latest limitations in this release, be sure to read the "Oracle Oracle WebCenter Framework" chapter in the Oracle Application Server Release Notes. Following are the limitations:
If the site to which you are connecting uses a large amount of JavaScript to manipulate cookies or uses the JavaScript method document.write to modify the HTML document being written, then you may not be able to clip content from the site.
When you integrate with partner applications (through the use of mod_osso), you cannot clip directly through those partner applications in an authenticated manner. However, you can use the partner applications through the external application framework.
You cannot use the Web Clipping portlet to clip Oracle Application Server Portal (OracleAS Portal) pages. As a workaround, reregister the same producer in the destination portal and edit the portal manually.
Note the following about Web Clipping and the use of cascading style sheets (CSS):
If a Web page contains more than one portlet that uses a CSS, then they should not conflict if the CSS uses distinct style names, such as OraRef, to specify a style within an HTML tag, rather than using an HTML tag name, such as <A>, as the name of the style.
If one portlet uses a CSS, and that CSS overwrites the behavior of HTML tags by using the name of the tag, such as <A>, as the name of the style, and a second portlet on the same page does not use a CSS, the second portlet will be affected by the style instructions of the CSS of the first portlet.
If two portlets on the same page use a different CSS and each CSS overwrites the behavior of HTML tags by using the name of an HTML tag, such as <A>, as the name of the style, then the style that will be displayed depends on the browser.
Web Clipping checks for Globalization Support settings in the following way:
Web Clipping checks the Content-Type in the HTTP header for the charset attribute. If this is present, then it assumes that this is the character encoding of the HTML page.
If the charset attribute is not present, then it checks the HTML META tag on the page to determine the character encoding.
If the HTML META tag is not found, then Web Clipping uses the charset in the previous browsed page. If this is the first page, then it defaults to the ISO-8859-1 character encoding.
If the value of the charset for Content-Type or META tag is not supported (for example, if the charset was specified as NONE), then Web clipping uses the default character set, ISO-8859-1, not the charset in the previously browsed page.
To use the Web Clipping portlet, you must use Netscape 7.0 or later, or Microsoft Internet Explorer 5.5 or later for Windows 2000, or Microsoft Internet Explorer 6.0 or later for Windows XP.
If you use browser versions older than these, then you may encounter JavaScript errors.
For troubleshooting information, see Appendix G, "Troubleshooting WebCenter Applications".