

|
The following sections describe how the P-Asserted-Identity and privacy headers affect forwarding to trusted and non-trusted hosts, and how to configure a WebLogic SIP Server P-Asserted-Identity Asserter provider:
The P-Asserted-Identity header is honored only within a trusted domain. In a WebLogic SIP Server system, trusted domains are purely configuration-based. To enable use of the header, you must configure one of two available P-Asserted Identity Assertion providers as described in Configuring a P-Asserted-Identity Assertion Provider. The P-Asserted-Identity assertion providers expose the trusted domain configuration for P-Asserted-Identity headers. If you do not configure a provider, the header considers no IP addresses as being "trusted."
When WebLogic SIP Server receives a message having the P-Asserted-Identity header from a trusted host configured with the provider, it logs in the user specified in the header to determine group membership and other privileges. The value contained in the P-Asserted-Identity header must be a SIP address (for example, sipuser@bea.com). By default, WebLogic SIP Server removes the domain portion of the address (@bea.com) and uses the remainder as the user name. If you must support overlapping usernames from different names (for example, sipuser@bea.com and sipuser@cea.com), you can create and use a custom user-name mapper to process the header contents into a unique username (for example, sipsuser_b and sipuser_c). Using a custom user name mapper also enables you to support WebLogic user names that contain an "@" character, such as @bea.com.
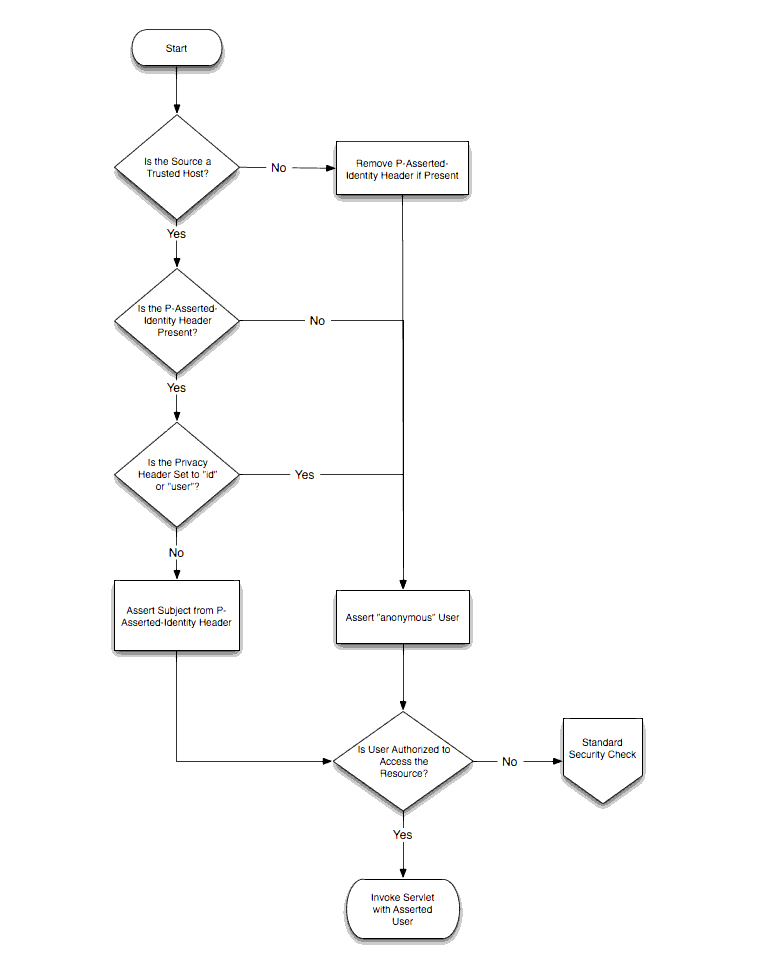
The presence of a P-Asserted-Identity header combined with the Privacy header also determines the way in which WebLogic SIP Server proxies incoming requests. Figure 4-1 describes how incoming SIP requests are managed in relation to the P-Asserted-Identity header.

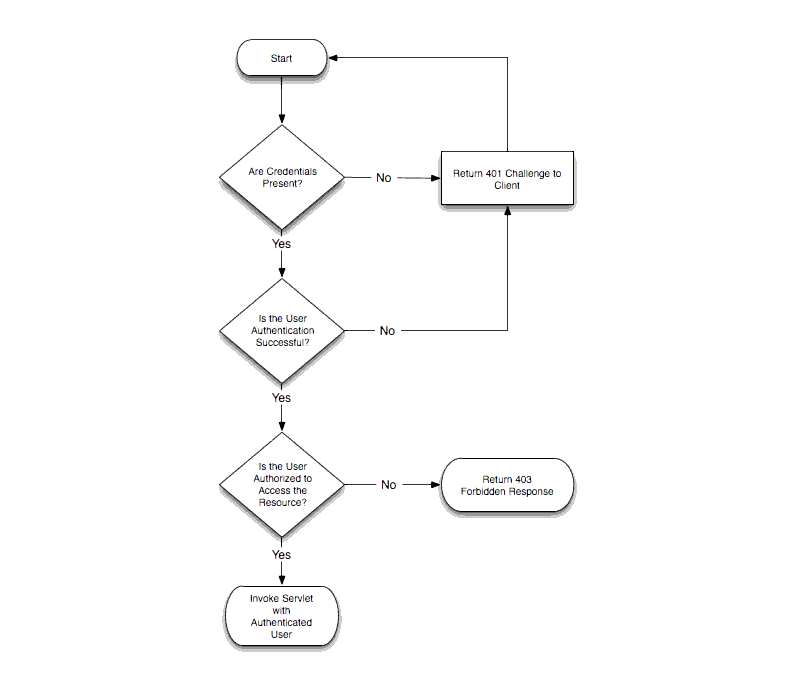
Figure 4-2 describes the standard security check procedure that WebLogic SIP Server uses when an asserted user name is not authorized to access a requested resource. The standard security check is performed according to the auth-method defined in the login-config element of the sip.xml descriptor for the current application.

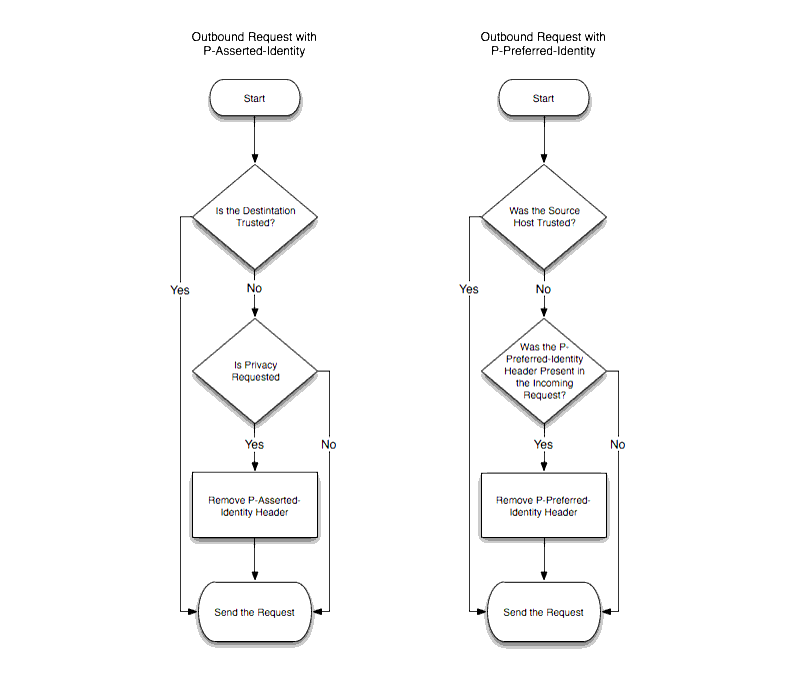
The presence of a P-Asserted-Identity header or a P-Preferred-Identity header also affects the processing of outbound SIP requests. Figure 4-3 describes the behavior.

If the contents of a P-Asserted-Identity header are invalid, or if the header is received from a non-trusted host, then the security provider returns an "anonymous" user to the SIP Servlet container. If you configured the PAsserted Identity Strict Asserter provider, an exception is also thrown so that you can audit the substitution of the anonymous user. (If you configured the basic PAsserted Identity Asserter provider, no exception is thrown.)
With either provider, if identity assertion fails and the requested resource is protected (the request matches a security-constraint defined in sip.xml), the SIP container uses the auth-method defined in the sip.xml deployment descriptor to challenge the end user. For example, digest authentication may be used if the Servlet specifies the digest authentication method.
If the requested resource is not protected, the anonymous user is simply passed to the SIP Servlet without authorization. Because the 3GPP TS 24.229 specification recommends forced authorization even when a resource is unrestricted (and privacy is not requested), you should use declarative security to protect all of a SIP Servlet's resources to remain compliant with the specification. See Securing SIP Servlet Resources in Developing Applications with WebLogic SIP Server for more information.
If authorization of the anonymous user fails, WebLogic SIP Server then forces authentication by challenging the user.
Follow these steps to configure a security provider used to support the P-Asserted-Identity header. Note that one of two providers can be selected, as described in Overview of Strict and Non-Strict P-Asserted-Identity Asserter Providers.
In addition to configuring one of the above providers, configure a secondary, "fallback" login method (for example, using DIGEST or CLIENT-CERT authentication).
To configure a P-Asserted-Identity provider:
P-Asserted-Identity header is invalid or is received from a non-trusted host and an anonymous user is substituted.P-Asserted-Identity header is invalid or is received from a non-trusted host and an anonymous user is substituted.See Overview of Strict and Non-Strict P-Asserted-Identity Asserter Providers for more information.
| Note: | The provider does not use trusted hosts configured in the sipserver.xml file (see
sip-security in Configuring and Managing WebLogic SIP Server.) |
P-Asserted-Identity header to user names in the default security realm. A custom user name mapper is generally used if user names are received from two or more different domains. In this case additional logic may be required to map usernames received from each domain. A custom user name mapper class is required if you want to map usernames in the P-Asserted-Identity header to WebLogic usernames. See
Configuring a Role Mapping Provider in the WebLogic Server 9.2 Documentation for more information.Alternately, leave this field blank to use the default user name mapper. The default mapper simply discards the domain name and takes the resulting user name without applying any additional logic.


|