6 Using workbooks and worksheets
This chapter explains how to use Discoverer Plus Relational workbooks and worksheets, and contains the following topics:
6.1 What are workbooks?
Workbooks are Discoverer files that contain worksheets displaying data retrieved from the database. If you are familiar with spreadsheet applications (for example, Microsoft Excel), think of a workbook as a spreadsheet file. Discoverer workbooks are stored in the database.
Workbooks typically contain data that is related in some way but organized to show different perspectives. For example, you might want to analyze different aspects of sales performance and create different worksheets for each aspect. For example (see figure below):
-
a worksheet called Rank of Sales to calculate a ranked list of cities based on sales performance
-
a worksheet called Top N/Bottom N to calculate the best sales performers and worst sales performers
-
a worksheet called Moving Average to calculate a rolling three-month average for sales figures
Note: For more information about maximizing Discoverer performance, see "About designing workbooks for maximum performance".
You use workbooks in the following ways:
-
You can create your own workbooks that you can subsequently share with other Discoverer users. Or, you can use workbooks created by other Discoverer users or by the Discoverer manager. For more information about sharing workbooks, see "Sharing workbooks".
-
You can include parameters to filter the workbook each time it is opened or refreshed. Including parameters enables workbook users to filter out data that they are not interested in and go directly to the data that they want to analyze. For more information about using parameters, see "Using parameters".
-
You can save workbooks to the database using Discoverer Plus Relational, and open workbooks from the database.
-
You can scheduled workbooks to processed at a particular time and frequency (for more information, see "Using scheduled workbooks").
6.2 What are worksheets?
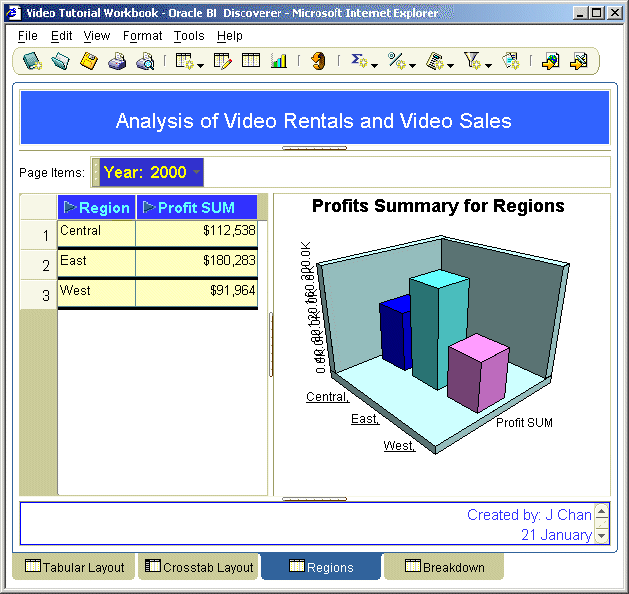
Worksheets contain the data you want to analyze and several features to help you analyze the data. For example, a worksheet can contain parameters, totals, percentages, exceptions, and calculations.
You create a worksheet in a workbook (for more information, see "What are workbooks?").
If you are familiar with spreadsheet applications (for example, Microsoft Excel), think of a workbook as a spreadsheet file and worksheets as different sheets in that spreadsheet file.
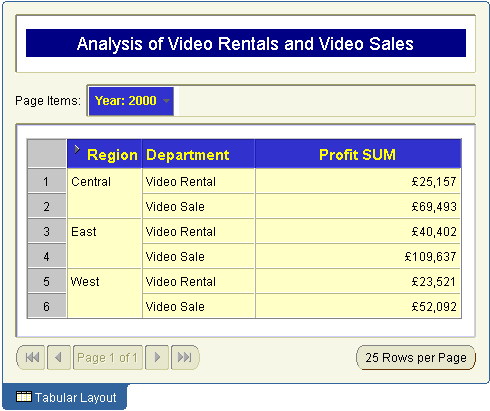
In the figure below, a Discoverer worksheet called Tabular Layout contains information about profits made by two departments across three regions in the year 2000.
You can develop worksheets in different ways:
-
you can create your own worksheets, which you can subsequently share with other Discoverer users.
-
you can use worksheets created by other Discoverer users or by the Discoverer manager
-
you can include parameters in a worksheet to filter the worksheet each time it is opened or refreshed
6.3 About Discoverer worksheet types
In Discoverer you can display data in two different ways:
-
in a table worksheet - see "About table worksheets"
-
in a crosstab (that is, cross-tabular) worksheet - see "About crosstab worksheets"
6.4 About table worksheets
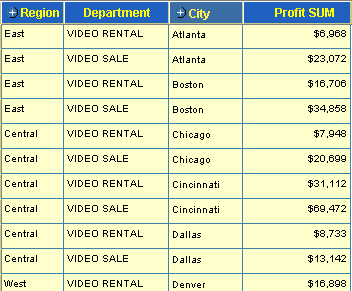
A table worksheet lists data in rows and columns. The figure below shows an example table worksheet analyzing profit values for cities within a region.
6.5 About crosstab worksheets
A crosstab worksheet (short for cross-tabulated worksheet) relates two different sets of data and summarizes their interrelationship in terms of a third set of data. The figure below shows an example crosstab analyzing profit values for regions by department.
Key to figure:
a. Top axis, containing the Region item.
b. Left axis, containing the Department item.
c. Data points, containing profit sum figures for each region in each department.
The region and department items are displayed as rows and columns on the crosstab. Each row and column intersection shows a data point, which in this case is the profit total for a particular region and a particular department.
6.6 About designing workbooks for maximum performance
Whether you are using Discoverer Plus Relational to perform ad hoc queries, or to create reports for other end users, you want to minimize the time it takes to run queries and reports. By following a few simple design guidelines, you can maximize Discoverer performance.
Where possible:
-
use tabular reports rather than cross-tabular reports
-
minimize the number of page items in reports
-
avoid wide cross tabular report
-
avoid creating reports that return tens of thousands of rows
-
provide parameters to reduce the amount of data produced
-
minimize the number of worksheets in workbooks
-
remove extraneous worksheets from workbooks (especially if end users frequently use Discoverer's export option, see Notes below)
-
When end users export data in Discoverer Plus Relational or Discoverer Viewer, they can export either the current worksheet or all the worksheets. In other words, they cannot selectively choose the worksheets to be exported. Remove extraneous worksheets so that extra data is not included when end users export all worksheets.
6.7 How to open workbooks
You open a workbook when you want to access Discoverer worksheets that you have saved previously or have been shared with you. For example, you might open a sales report that you saved previously. Or, you might open a large report that you scheduled to be processed overnight.
You can also open workbooks or scheduled workbook results that other users have shared with you.
To open a workbook:
-
Start Discoverer (for more information, see "About starting Discoverer").
When you start Discoverer, the "Workbook Wizard: Create/Open Workbook dialog" is displayed.
Hint: If you have started Discoverer, choose File | Open to display the "Open Workbook from Database dialog" and skip the next step.
-
Click the Open an existing workbook button to display the "Open Workbook from Database dialog".
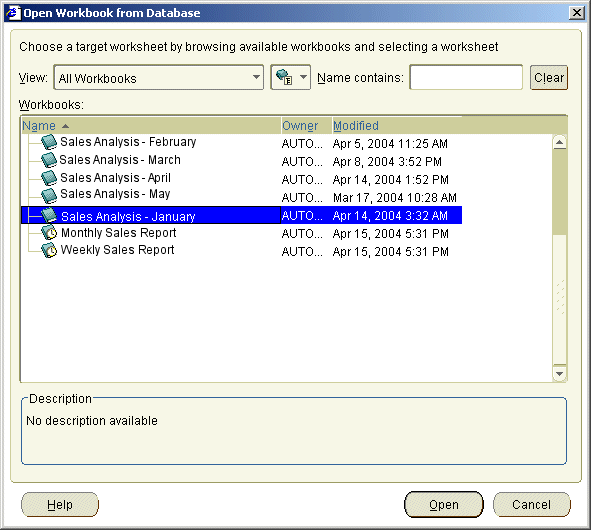
Workbooks are displayed with a book icon. Scheduled workbooks are displayed with a clock icon.
-
Select the workbook you want to analyze from the Workbooks list.
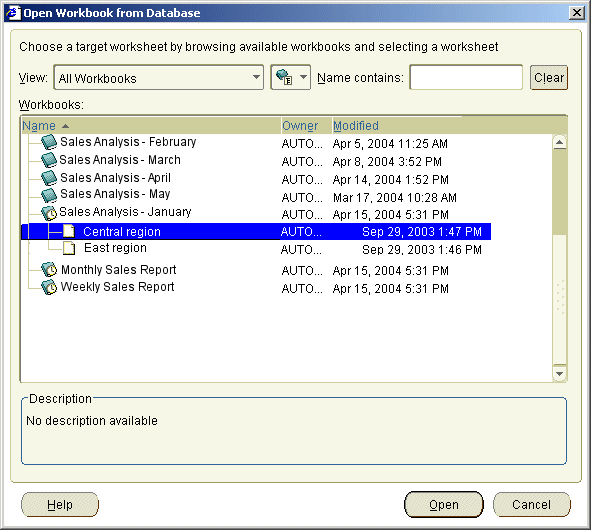
Hint: To open a scheduled workbook, click the + symbol next to the scheduled workbook to expand the list of scheduled workbook results and select a set of results.
-
Click Open to display the selected workbook or set of results.
Discoverer analyzes the workbook to determine how long it would take to open the first worksheet. Depending on how Discoverer is configured, a progress dialog shows you the estimated time for loading the first worksheet.
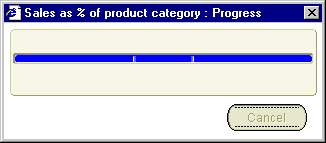
For more information about configuration settings, see "Changing default settings".
-
(optional) If the workbook or worksheet includes a parameter, Discoverer prompts you to enter a value with which to filter the data in the worksheet (for more information, see "How to set parameters").
Discoverer opens the workbook and displays the first worksheet. If the workbook contains multiple worksheets, the worksheets are displayed as tabs along the bottom of the Discoverer window.
Now you are ready to begin analyzing data using Discoverer!
-
If the time estimate for opening a workbook exceeds the value you set in the "Options dialog: Query Governor tab" (for more information, see "How to change default Discoverer settings"), Discoverer displays a dialog, which you use as follows:
-
Click Yes to open the workbook, regardless of the time estimate. If the query estimate is more than a few minutes, you can do other work while Discoverer gets the data for the worksheet.
-
Click No to open the workbook, but to show no data in the first worksheet. If you click No, you can always run the query for the first worksheet at a later time by choosing Tools | Refresh Sheet.
For example, you might click No if the data that you want is not in the first worksheet in the workbook. Click the other worksheet's tab at the bottom of the window. If you click No, you can always run the query for the first worksheet at a later time by choosing Tools | Refresh Sheet.
-
-
If you are connected to Discoverer, choose Tools | Scheduling to open scheduled workbooks from the "Scheduling Manager dialog".
6.8 About opening workbooks in a non-Oracle database
If your organization uses non-Oracle databases, the Discoverer manager can set up Discoverer to open workbooks in those databases. You can then use Discoverer to get the data you want. However, depending on the type of database, you might not be able to use all of the data access and analysis features available with Oracle databases. For more information, contact the Discoverer manager.
6.9 How to edit workbooks
You edit a workbook when you want to update the workbook's worksheets, or change the workbook's properties. For example, you might want to add or remove worksheets, or share the workbook with other Discoverer users.
To edit a workbook:
-
Open the workbook you want to edit from the database (for more information, "How to open workbooks").
-
Make changes to the workbook or the worksheets contained within the workbook.
-
Choose File | Save to save the workbook to the database (for more information, "About saving a workbook to the database").
Discoverer updates the workbook as you specified.
6.10 About saving a workbook to the database
You might want to save a workbook that you have created so that you can use the workbook again. When you save a workbook using Discoverer Plus Relational, you save the workbook in the database. Having saved the workbook in the database, you can open the workbook later using Discoverer Plus Relational, Discoverer Viewer, and Oracle BI Discoverer Desktop.
Before you can save a workbook to the database, the Discoverer manager must have given you permission to do so. The Discoverer manager gives you permission to save workbooks to the database by granting you a Discoverer privilege. Provided that you have this privilege, you can:
-
save changes to the workbooks that you have created
-
open a shared workbook and save the workbook as your own private copy of that workbook (for more information, see "About sharing workbooks")
Contact the Discoverer manager to find out whether you can save workbooks to the database.
6.11 How to save workbooks
You save a workbook when you want to store Discoverer worksheets in the database. When a workbook is saved to the database, it is available in Discoverer Plus Relational and Discoverer Viewer to all users with which it is shared (for more information, see "About sharing workbooks").
Hint: Before you can save it to the database, the Discoverer manager must have given you permission to do so. For more information, see "About saving a workbook to the database".
To save a workbook for the first time:
-
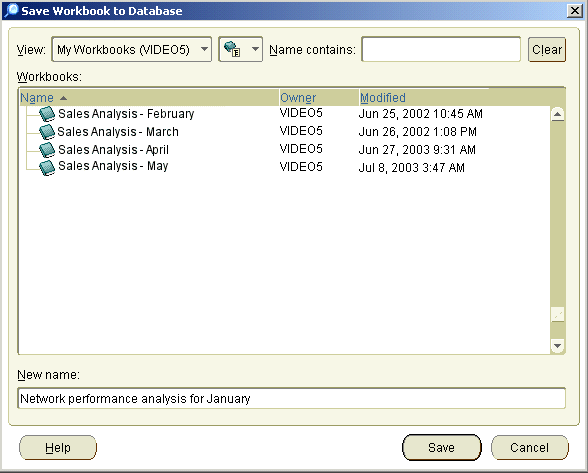
Choose File | Save to display the "Save Workbook to Database dialog".
-
Enter a new unique workbook name in the New name field.
Hint: You can enter a name that includes upper or lowercase characters, and spaces (for example Jchan Sales Analysis Workbook for March).
Note: To avoid export issues on some platforms, do not use the colon (:) in workbook names.
-
Click Save to save the workbook.
The workbook is saved to the database, and is now available in Discoverer Plus Relational and Discoverer Viewer to all users with which it is shared (for more information about sharing workbooks, see "About sharing workbooks").
To save changes to a workbook and keep the workbook open:
-
Choose File | Save.
The changes are saved and the workbook remains open.
To save changes to a workbook and close the workbook:
-
Choose File | Close.
If you have not made changes to any worksheet in the workbook, the workbook closes. If the workbook contains unsaved changes on any worksheet, a prompt reminds you to save the changes.
To make a copy of a workbook:
-
Open a workbook.
-
Choose File | Save As.
-
Enter a new name in the New name field.
-
You can only save changes to a shared workbook if you own that workbook. If you change a shared wookbook that you do not own and you want to keep the changes, you must save a copy of the shared workbook by selecting File | Save As. The copy of the shared workbook containing your changes becomes your own private copy of the workbook. The original shared wookbook remains unchanged. For more information about shared workbooks, see "About sharing workbooks".
6.12 How to copy workbooks
You copy a workbook when you want to save a previous version of a workbook. For example, you might want to make a backup copy of a sales workbook.
To copy a workbook:
-
Open a workbook.
-
Choose File | Save As to display the "Save Workbook to Database dialog".
-
Enter a new name in the New name field and click OK to save the copy of the workbook.
Discoverer saves the copy of the workbook using the name that you specified.
6.13 How to delete workbooks from the database
You delete a workbook when you no longer want to use the workbook, and want to remove it permanently from the database. Before deleting old workbooks, ensure that no other Discoverer users want to use the workbook in the future.
To delete a workbook from the database:
-
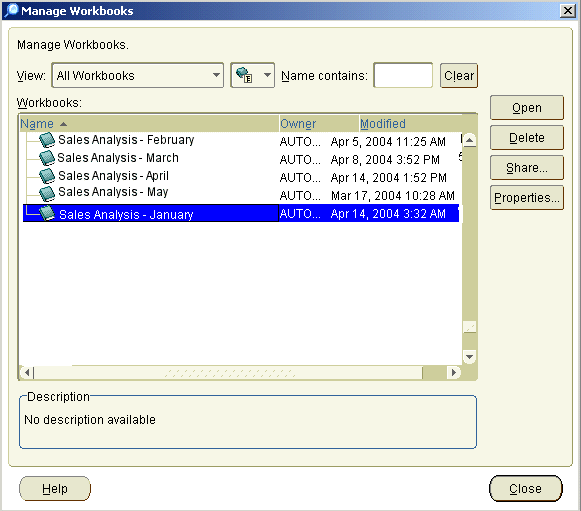
Choose Tools | Manage Workbooks to display the "Manage Workbooks dialog".
-
Select the workbook you want to delete from the Workbooks list.
-
Click Delete to delete the workbook and close the dialog.
Note: You can only delete workbooks that you own. The Delete button is only grayed out if you do not own the currently selected workbook (for more information, see "About sharing workbooks and security").
-
Click Yes at the confirmation dialog.
The selected workbook is permanently removed from the database.
6.14 About worksheet titles and text
A worksheet title is the text that you display in the title area at the top of a Discoverer worksheet. Worksheet text is the text that you display in the text area at the bottom of a Discoverer worksheet. For example, you might want to display the name of the workbook owner in the title area or text area when you print a worksheet. Or you might want to display custom help text for a worksheet in the worksheet text area.
Worksheet titles and text can contain static text (for example, text that you enter) and text variables (for example, date and time that are updated at run time).
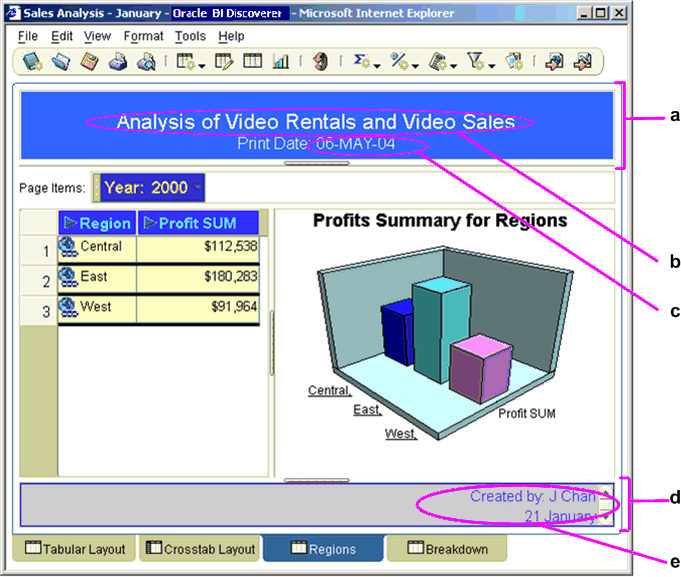
The figure below shows an example of a worksheet with a worksheet title area and worksheet text. The worksheet title contains the worksheet name and the print date. The worksheet text area contains the workbook name, worksheet name, a list of worksheet items, and the name of the worksheet creator.
Key to figure:
a. The worksheet title area.
b. Text added to the worksheet title area.
c. A text variable (that is, &Date), which displays the current date.
d. The worksheet text area.
e. Worksheet text.
-
If you print a worksheet that includes a worksheet title and text, Discoverer enables you to specify whether you print the worksheet title and text once or on every printed page. By default, the worksheet title is printed once at the top of a worksheet (regardless of how many pages are printed) and the worksheet text is printed once after the worksheet (regardless of how many pages are printed). For example, if a report is six pages long, the worksheet title is printed on page one and the worksheet text is printed on page six (by default).
-
To print a worksheet title and text, ensure that you display the worksheet title and text on screen before printing.
-
Text variables that you can display in worksheet titles and text include workbook name, worksheet name, date, time, page number, total pages.
-
If you use Discoverer Plus Relational to open a worksheet that was created using Discoverer Desktop Version 9.0.4 (or earlier), the size of the title area for that worksheet defaults to two lines in height. A title height of two lines might be a problem if a worksheet title requires more than or less than two lines. To change the size of the title area, you must manually resize the title area and save the worksheet.
To resize the title area for a worksheet, open the worksheet and drag the bar at the bottom of the title area pane up or down.
6.15 How to create or edit worksheet titles or text
You create or edit worksheet titles and text when you want to add text to the top or bottom of a worksheet. For example, you might want to display the current date at the top of a weekly report.
To create or edit a worksheet title or worksheet text:
-
Open the workbook containing the worksheet you want to edit (for more information, see "How to open workbooks").
-
Display the worksheet you want to edit.
-
To edit or create worksheet title text, choose Edit | Title to display the "Edit Title dialog" and use this dialog to specify a worksheet title, as follows:
-
Use the Font, Size, Color, and Background color buttons to format the worksheet title area.
-
Use the Title field to enter text you want to display in the title area of the worksheet.
-
Use the Insert drop down list to add text variables (for example, date and time that are updated at run time).
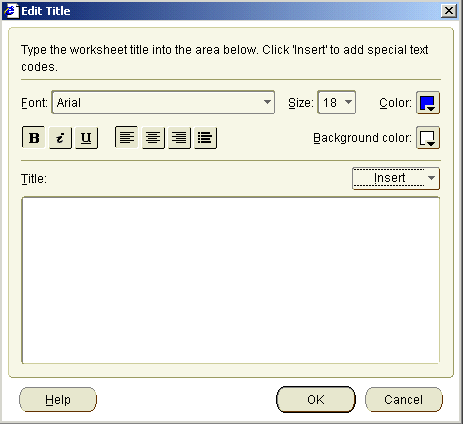
Hint: You can also double-click the worksheet title area (if displayed) to display the "Edit Title dialog". For more information, see "How to display or hide worksheet titles or text".
-
-
To edit or create worksheet text, choose Edit | Text Area to display the "Edit Text Area dialog" and use this dialog to specify worksheet text, as follows:
-
Use the Font, Size, Color, and Background color buttons to format text in the worksheet text area.
-
Use the Text field to enter text you want to display in the text area on the worksheet.
-
Use the Insert drop down list to add text variables (for example, date and time that are updated at run time).
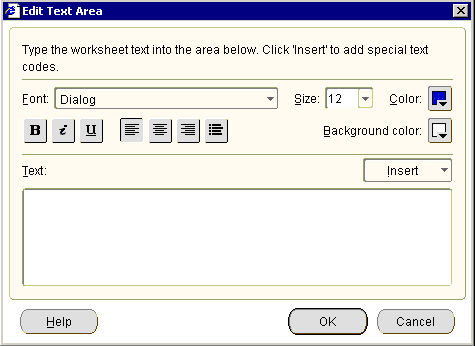
Hint: You can also double-click the worksheet text area (if displayed) to display the "Edit Text Area dialog". For more information, see "How to display or hide worksheet titles or text".
-
-
Click OK to save changes that you make.
The worksheet is updated with changes that you specified.
6.16 How to display or hide worksheet titles or text
You can display or hide a worksheet title or worksheet text when the worksheet is displayed, printed, or exported. For example, you might want to hide the current date and current time in the title when you are designing a worksheet but display the current date and current time in the title when a Discoverer end user prints the worksheet.
To display or hide a worksheet title or text area:
-
Open the workbook containing the worksheet you want to edit (for more information, see "How to open workbooks").
-
Display the worksheet you want to edit.
-
Choose the View menu to display a list of check boxes.
-
Use the Title check box to specify whether the worksheet title area is displayed at the top of the worksheet when the worksheet is displayed, printed, or exported, as follows:
-
Select the Title check box to display the worksheet title area.
-
Clear the Title check box to hide the worksheet title area.
-
-
Use the Text area check box to specify whether the worksheet text area is displayed at the bottom of the worksheet when the worksheet is displayed, printed, or exported, as follows:
-
Select the Text area check box to display the worksheet text area.
-
Clear the Text area check box to hide the worksheet text area.
-
The worksheet is updated with the changes that you specified.
-
To specify that Discoverer always displays the worksheet title area when you create a worksheet, choose Tools | Options and select the Show title check box on the "Options dialog: Sheet tab".
-
To specify that Discoverer always displays the worksheet text area when you create a worksheet, choose Tools | Options and select the Show text area check box on the "Options dialog: Sheet tab".
6.17 How to rename worksheets and workbooks
You rename a workbook to change its name used in Discoverer. For example, you might want to create a more meaningful workbook name by changing a workbook name from My Workbook to Sales Reports.
You rename a worksheet when you want to change the name displayed in the worksheet tab. For example, you might want to change the default worksheet name created by Discoverer (for example, Sheet 2) to something more meaningful (for example, Sales Report).
To rename a workbook:
-
If it is not open, open the workbook you want to rename (for more information, see "How to open workbooks").
-
Choose File | Save As to display the "Save Workbook to Database dialog" and enter a new name in the New Name field.
Note: Do not include a colon (:) character.
-
Click Save to save the workbook.
-
(optional) Delete the original workbook (for more information, see "How to delete workbooks from the database").
The workbook's new name is displayed at the top of the Discoverer work area.
To rename a worksheet:
-
If it is not open, open the workbook that contains the worksheet you want to rename and display the worksheet.
-
Choose Edit | Worksheet Properties to display the "Worksheet Properties dialog: General tab".
Note: You can also display the worksheet properties dialog by double-clicking the worksheet name tab at the bottom of the worksheet.
-
Enter the new name for the worksheet in the Name field.
-
Click OK to rename the worksheet.
The worksheet's new name is displayed at the bottom of the worksheet.
6.18 How to re-order worksheets within a workbook
You re-order worksheets within a workbook when you want to change the order that Discoverer displays worksheets in a workbook. For example, you might want to put the most commonly used worksheet at the front of a workbook to access information more easily.
To re-order a worksheet in a workbook:
-
Open the workbook that contains the worksheet you want to re-order.
-
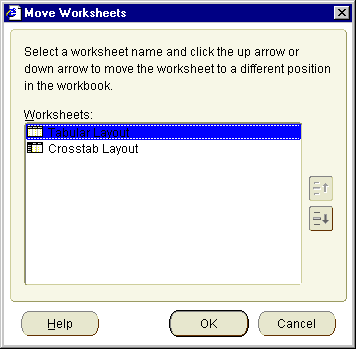
Choose Edit | Move Worksheet... to display the "Move Worksheets dialog".
-
To move the worksheet:
-
Click on the name of the worksheet you want to move.
-
Click the up arrow or down arrow as required to move the worksheet to a different position in the workbook.
-
-
Click OK to save the details.
The worksheets are now arranged in the order that you specified.
6.19 How to refresh worksheets
Data in a workbook appears as the result of querying the database at a particular time. If you have had a workbook open for a while, the data that is currently displayed in the workbook might be out-of-date. You refresh a worksheet when you want to ensure that you are accessing the most recent information. When you refresh a worksheet, Discoverer queries the database again.
-
Open the worksheet you want to refresh.
-
Choose Tools | Refresh Sheet.
Discoverer displays up-to-date data in the worksheet.
Note:
Do not use browser's refresh feature (F5 key) to refresh worksheets; doing so might result in an error.6.20 How to delete worksheets
You delete a worksheet when you no longer want to use the worksheet, and want to remove it permanently from the database. Before deleting worksheets, ensure that no other Discoverer users want to use the worksheet in the future.
To delete a worksheet
-
Open the workbook containing the worksheet.
-
Display the worksheet you want to delete.
-
Choose Edit | Delete Worksheet.
Discoverer removes the worksheet from the workbook.
6.21 How to find data in a worksheet
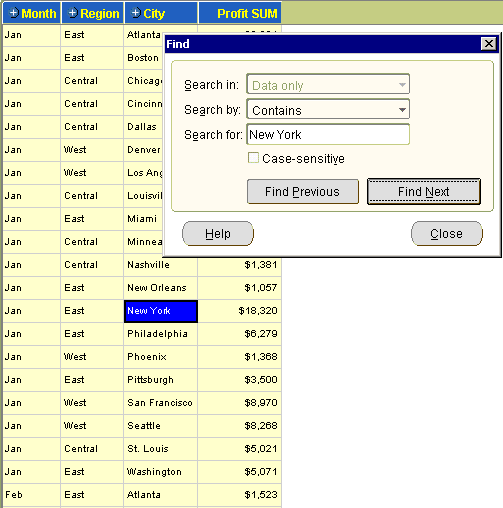
If you are working with a large worksheet, you can use Discoverer's search facility to find data that matches a search term you specify. For example, to find cell values that contain New York.
To find data in a worksheet:
-
Display the worksheet you want to search.
-
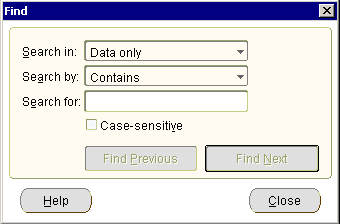
Choose Edit | Find to display the "Find dialog (in Worksheet)".
-
Use the Search in and Search by drop down lists to specify search.
-
In the Search for field, enter the search text you want to find.
-
Click Find Previous or Find Next.
Note: The search starts from the currently highlighted worksheet cell (if a worksheet cell is highlighted) or the start of the worksheet.
If the worksheet contains the search text that you specified, Discoverer highlights the first occurrence of this search term in the worksheet.
If the worksheet does not contain the search text that you specified, Discoverer displays a 'No match found' dialog.
-
(optional) Use the Find Previous and Find Next buttons to search for other occurrences of the search term.
When the search reaches the end of the worksheet, Discoverer goes back to the start of the worksheet and resumes the search.
-
Click Close to close the "Find dialog (in Worksheet)".
6.22 About creating new workbooks
In some organizations, the Discoverer manager or an experienced Discoverer user creates the workbooks required by Discoverer users. In other organizations, individual users create their own workbooks.
Typically, you create a workbook when you want to analyze data in a new way. For example, you might want to create a performance analysis workbook that you make available to all sales analysts in a marketing department.
Note: For more information about maximizing Discoverer performance, see "About designing workbooks for maximum performance".
Before you can create a workbook, the Discoverer manager must have given you permission to do so. The Discoverer manager gives you permission to create a workbook by granting you a Discoverer privilege.
6.23 How to create new workbooks
While working with Discoverer, you might want to create a workbook containing one or more worksheets. For example, you might want to distribute a new sales report to other Discoverer users.
When you create a workbook, Discoverer immediately prompts you to create a worksheet to go into the workbook.
To create a workbook:
-
Start Discoverer (for more information, see "About starting Discoverer").
When you start Discoverer, the "Workbook Wizard: Create/Open Workbook dialog" is displayed.
Hint: If you have started Discoverer, choose File | New to display the "Workbook Wizard: Create/Open Workbook dialog" and skip the next step.
-
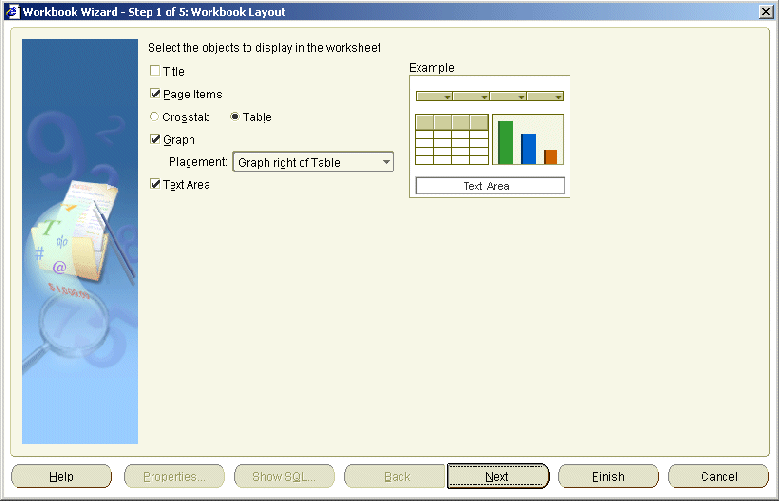
Click Create a workbook to display the "Edit Worksheet dialog: Worksheet Layout tab", which enables you to select the worksheet elements (for example, title area, graph) to display on the first worksheet.
-
Select the worksheet elements (for example, title area, graph) to display on the first worksheet.
-
Click Next to display the Select Items page of the Worksheet Wizard.
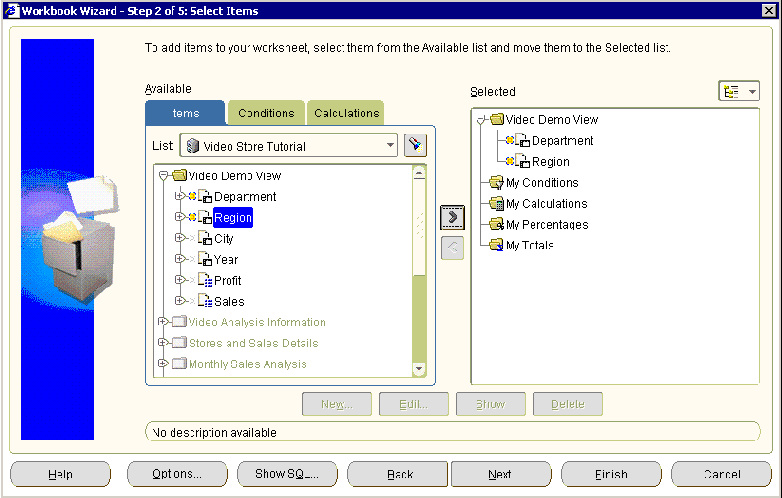
You use the Select Items page to select what data to display on the worksheet.
-
Select the business area you want to use from the drop down list at the top of the Available box.
The folders and items in the business area you selected appear beneath the business area name.
Hint: If you cannot see the business area you want to analyze, ensure that you selected the correct connection when you started Discoverer Plus Relational. If necessary, exit Discoverer Plus Relational and restart the Discoverer Plus Relational using a different connection that has access to the business area you want to analyze.
Note: Click the Find button to the right of the List field to display the "Find dialog (in Item Navigator)", where you search the business area for folders and items you want to add to the worksheet. Folders containing items available to the current worksheet are active. Items not available to the current worksheet are grayed out.
-
Move the folders and items you want to include in the new worksheet from the Available list to the Selected list.
Hints:
-
Click the plus (+) sign next to a folder to items within the folder.
-
You can select multiple folders or items at a time by pressing the Ctrl key and clicking another folder or item.
-
If you select a folder, you select all items in that folder.
-
Click the plus (+) sign next to items to expand items. For example, you might expand a Region to display the values North, East, and West. If you select North to display data for that region in the worksheet, you create a condition 'Region = North' (for more information about conditions, see "Using conditions").
-
Selecting a numeric item automatically includes its default aggregates (for example, Sum, Count, Max). You can also expand a numeric item list and select individual aggregates.
Having specified the folders and items to include in the worksheet, you can add other features to the worksheet or close the Worksheet Wizard to start analyzing the worksheet data.
-
-
Click Next to display the "Edit Worksheet dialog: Table Layout tab" or "Edit Worksheet dialog: Crosstab Layout tab", where you can change the default position of worksheet items.
-
Click Next to display the "Edit Worksheet dialog: Sort tab", where you can change the default sort order of worksheet items.
-
Click Next to display the "Edit Worksheet dialog: Parameters tab", where you can add parameters to the worksheet that prompt Discoverer end users to enter dynamic values to customize the worksheet.
-
Click Finish to save the layout and close the worksheet wizard.
Discoverer displays the new worksheet. Now you are ready to begin analyzing data using Discoverer!
-
(optional) You can add new items to the worksheet as required. For example:
-
parameters (for more information, see "Using parameters")
-
sorts (for more information, see "Sorting data")
-
totals (for more information, see "Using totals")
-
percentages (for more information, see " Using percentages")
-
conditions (for more information, see "Using conditions")
-
calculations (for more information, see "Using calculations")
Now that you have created a worksheet, you might want to do one or more of the following:
-
edit the worksheet using Oracle Portal (for more information, see Oracle Fusion Middleware Guide to Publishing Oracle Business Intelligence Discoverer Portlets
-
print the worksheet (for more information, see "Printing worksheets and graphs"
-
share the workbook with other Discoverer users (for more information, see "Sharing workbooks"
-
export the worksheet to a different format (for more information, see "Exporting data to other applications"
-
create a graph for the worksheet data (for more information, see "Creating graphs in Discoverer"
-
publish the worksheet using Oracle Portal (for more information, see Oracle Fusion Middleware Guide to Publishing Oracle Business Intelligence Discoverer Portlets
-
-
Before you publish a Discoverer workbook, ensure that the workbook is designed for maximum performance (for more information, see "About designing workbooks for maximum performance").
-
After creating a worksheet, you can always change default options later by choosing Edit | Worksheet... to display the "Edit Worksheet dialog". Here, you can change the worksheet layout and display formats, and add worksheet items (for example, parameters, conditions, calculations).
-
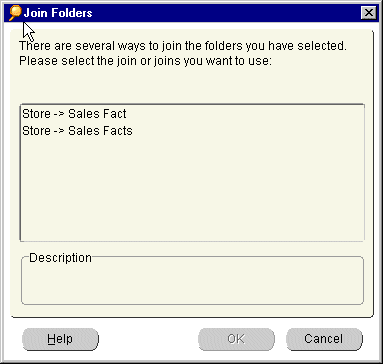
If you select items from different folders (or multiple folders), you might be prompted by the Join Folders dialog to specify how to join folders. This means that information in folders can be associated in multiple ways. For example, a product key item in a Products folder might be associated with a product key item in a Sales folder. The Products folder and Sales folder might also both contain an item called Location, which is an alternative item on which to associate the two folders.
Contact the Discoverer manager for more information about multiple join paths, or see "About multiple join paths".
In the figure below, the Join Folders dialog is displayed when Discoverer detects a multiple join path. In this instance, the Store item can be associated with the Sales Fact folder or the Sales Facts folder. The Please select the join or joins that you want to use list contains an entry for each of these options.
6.24 How to add worksheets to a workbook
You add a worksheet to a workbook when you want to analyze data in a new way. For example, you might have a sales workbook to which you want to add a new worksheet on sales for a particular region.
You can add a worksheet in two ways:
-
by creating a copy of an existing worksheet in the current workbook and modifying the copy to meet your needs (see "How to duplicate a worksheet")
-
by creating a completely new worksheet using the Discoverer Worksheet Wizard to guide you through the process (as described below)
To create a completely new worksheet:
-
Start Discoverer and open the workbook to which you want to add a worksheet (for more information, see "How to open workbooks").
-
Choose Edit | Add Worksheet... to display the Worksheet Wizard.
-
Follow the instructions on the Worksheet Wizard.
The new worksheet is added to the workbook.
6.25 How to view and update a workbook's properties
You update a workbook's properties to store additional information about the workbook. You can only update the properties of a workbook that you own and currently have open.
You might also want to view a workbook's properties to find out information about the workbook. For example, you might want to find out the name of the workbook owner or the date that the workbook was created.
To update a workbook's properties:
-
Open the workbook.
-
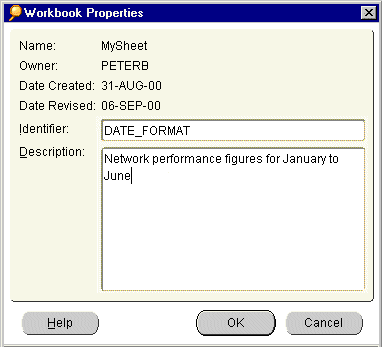
Choose File | Workbook Properties to display the "Workbook Properties dialog".
-
In the Description field, type additional information about the workbook.
The description that you type is displayed to Discoverer users when they open workbooks in Discoverer Plus Relational and Discoverer Viewer.
-
Click OK to save any changes and close the Workbook Properties dialog box.
To view the properties of a workbook:
-
Choose Tools | Manage Workbooks to display the "Manage Workbooks dialog".
-
Select a workbook in the Workbooks list.
-
Click Properties to display the "Workbook Properties dialog".
To view the properties of a workbook when you open a workbook:
-
Choose Tools | Open to display the "Open Workbook from Database dialog".
-
Right-click on a workbook in the Workbooks list to display a right-click menu.
-
Choose Properties in the right-click menu to display the "Workbook Properties dialog".
-
If you do not own the workbook, the Identifier and Description fields are grayed out.
-
Do not change the Identifier value unless asked to do so by the Discoverer manager.
6.26 About worksheet properties
Discoverer's worksheet properties determine the appearance and behavior of a worksheet. You can change worksheet properties to suit your requirements. For example, you might want a table worksheet to display headings and row numbers. Or you might want to specify how a null value is displayed.
When you change worksheet properties, the changes take effect immediately. For more information about editing worksheet properties, see "How to view and edit worksheet properties".
Note that when you change a worksheet's properties, you are only changing the properties of the current worksheet. For more information about the default properties that apply to new worksheets, see "Changing default settings".
Hint: In addition to opening the Worksheet Properties dialog from the Edit menu, you can also use the Properties button in the Edit Worksheet dialog tabs.
6.27 How to view and edit worksheet properties
You edit a worksheet's properties to change the appearance and behavior of the worksheet. For example, you might want to:
-
change the name and description of the worksheet
-
show vertical or horizontal gridlines
To view and edit worksheet properties:
-
If it is not open, open the workbook that contains the worksheet you want to view or edit and display the worksheet.
-
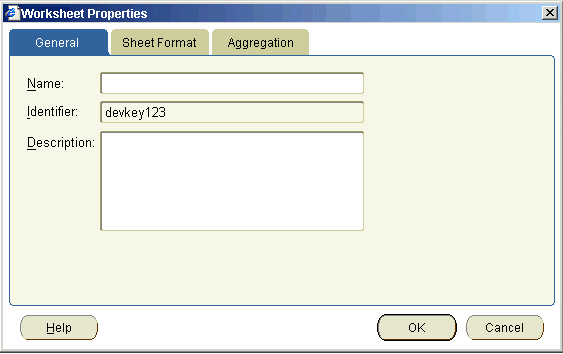
Choose Edit | Worksheet Properties to display the "Worksheet Properties dialog: General tab".
-
Display the appropriate tab for the properties you want to edit as shown below.
Tab Use to "Worksheet Properties dialog: General tab" Specify the worksheet name and description, and view the worksheet identifier. "Worksheet Properties dialog: Sheet/Crosstab Format tab" Specify how Discoverer displays the current worksheet (for example, with a text area, null values, grid lines, row numbers). "Worksheet Properties dialog: Aggregation tab" Specify how Discoverer displays aggregated values for the worksheet (for more information, see "What are aggregated values in Discoverer"). -
Click OK to save the changes that you have made and close the Worksheet Properties dialog.
The changes to worksheet properties that you have made take effect immediately.
